Eloquent Images by Gary Hart
Insight, information, and inspiration for the inquisitive nature photographer
Yosemite Reflections
Posted on October 28, 2017

Spring Sunset, Leidig Meadow, Yosemite
Sony a7R II
Sony/Zeiss 16-35
3.2 seconds
F/9
ISO 200
Rather than attempt the impossible task of choosing a favorite season in Yosemite, I find it easier to identify the things I like most about each season. From colorful fall to white winter to saturated spring, Yosemite becomes a completely different place with each season. (FYI, summer is for tourists.) But regardless of the season, I think it’s Yosemite’s reflections that make me happiest.
Yosemite’s reflection locations vary with the season. After a storm, small reflective pools form in Yosemite’s ubiquitous granite, then disappear almost as quickly as they appeared. The Merced River, is a continuous ribbon of reflection in the late summer and autumn low-water months, and a churning torrent in spring. But even in those high snowmelt months, reliable pockets of calm can be found along the riverbank, and there are a handful of spots where the river widens and smooths enough to reflect color and shape.
I think my favorite Yosemite reflections may be the ones I find in the flooded meadows during a wet spring, not necessarily because they’re any more beautiful than the other reflections, but mostly because they’re much more rare. Many years we don’t get these vernal pools at all, and even when they do form, their lifetime is measured in days or weeks.
Following years of drought, a record winter snowfall earlier this year translated to a record spring snowmelt, sending the Merced River well over its banks and into many of Yosemite’s normally high-and-dry meadows. This wasn’t “run for your life!” flooding, it was a gradual rise that seeped into and eventually submerged meadows, trails, and even some Yosemite Valley roads.
Leidig Meadow west of Yosemite Lodge is one of those spots that doesn’t usually flood, but flooding here is far from unprecedented. This year when I parked in my usual spot west of the meadow and attempted the normally relaxing 1/4 mile stroll along the river, I had to wade through eight inches of water to make it to the meadow. When I returned a few days later with my workshop group, even after choosing another somewhat less treacherous parking spot, we still had to pick our steps carefully or risk a shoe-full of water.
Meadows are always fragile, but never more-so than when they’re wet, so rather than venture further into the meadow, we set our sights on the numerous reflections among the trees near the (mostly submerged) trail. Even still, we ended up with a number of wet shoes and pant legs, some accidental and some by design (to get the shot, of course).
When it appeared the sunset show was over, the group started to pack up and head back to the cars. About the time I was ready to call it myself, I noticed a little bounce-back pink in the thin clouds overhead and warned everyone that they might be packing it in a little too soon. Many were anxious to get dry and escape the mosquito feast, but those of us who stayed were rewarded with about ten minutes of post-sunset color that went from pale pink to electric magenta, one of those moments in nature that you think just can’t get any better until somehow it does.
Reflecting a bit on reflections
A reflection can turn an ordinary pretty picture into something special. Of course they aren’t always possible, but when the opportunity exists I pursue reflections aggressively, scanning the scene for potentially reflective water and positioning myself accordingly. Too often I see people walk up to a reflection, plop down their tripod, and make a picture of whatever happens to be bouncing off the water at their feet. But maximizing reflection opportunities starts with understanding that, just like a billiard ball striking a cushion, a reflection always bounces off the reflective surface at exactly the same angle at which it arrived.
Armed with this knowledge, when I encounter a reflective surface, I scan the area for something worthy of reflecting. Sometimes that’s easy (Half Dome, for example), sometimes it’s a little tougher (like a rapidly moving sunlit cloud). Knowing that all I need to do is position myself in the path of the reflection of my target subject, I move left/right, forward/backward, up/down until my object appears. I’ve observed that many people are pretty good about the left/right thing, not quite so good with the forward/backward part, and downright miserable at the up/down. But I’ve found that once I get the left/right position nailed, it’s the up/down that makes the most difference.
For example, in the spring reflection of Half Dome at the top of this post, it’s not an accident that the Half Dome and North Dome reflections are centered and uncluttered by all the grass and leaves scattered throughout the water. The centering part was pretty easy, but finding a large enough clean surface to reflect the two domes required a lot of forward/backward maneuvering, combined with frequent up/down dipping—I’m sure to the uninformed observer it appeared that I was trying out a new dance routine.
Read more about reflections
A Gallery of Yosemite Reflections


Playing with my new toy
Posted on October 21, 2017

Tufa Pastel, South Tufa, Mono Lake
Sony a7R II
Sony 12-24 f4 G
1/20 second
F/10
ISO 160
Leading 15-20 photo workshops per year means coming to terms with photographing the same locations year in, year out. This is not a complaint—I only guide people to locations I love photographing—but it sometimes makes me long for the opportunity to capture something new. Which is why I’m loving visiting my familiar haunts with my newest lenses, the Sony 12-24 G and Sony 100-400 GM. (I’ve had the Tamron 150-600 for a couple of years, but find it too big to lug routinely.)
Back-to-back Eastern Sierra workshops earlier this month meant multiple visits to Mono Lake. My first group hit the jackpot on our South Tufa sunset shoot, finding a glassy reflection (usually reserved for sunrises here) beneath a striking formation of cirrocumulus clouds. Because I was with my group, and I’d guided them all to the spot where the majority wanted to be (justifiable so for first-time visitors), I couldn’t go out in search of something a little different. Instead I just whipped out my 12-24 lens, dropped my tripod to lake-level with one leg in the water, and started composing.
I’m still getting used to shooting at 12mm, which is not only considerably different from what my eyes see, it’s considerably different from what I’ve become used to seeing in my viewfinder (the difference between 16mm and 12mm is huge). The lesson here is the importance of a strong foreground in a wide composition—the wider the focal length, the more important the foreground becomes. Here the entire lakebed was so alive with color and shape, and the water was so still and clear, finding a foreground wasn’t really a problem. I just needed to make sure I organized all the scene’s visual elements into something coherent.
Anchoring my frame with a nearby quartet of small rocks (just a couple of feet away) and a larger protruding lump of tufa a little behind it (everything else in my foreground was submerged), I peered into my viewfinder and quickly decided to go for symmetry with the larger background elements. The clouds couldn’t have been more perfectly positioned—combined with their reflection, they seemed to point directly my composition’s centerpiece, the “Shipwreck” tufa formation (not really an official name, but widely used) that is probably Mono Lake’s most recognizable feature. At 12mm depth of field wasn’t a huge concern—I focused about three feet into the scene and was able to achieve sharpness throughout my frame.
Anyone who has ever been to Mono Lake’s South Tufa can appreciate, looking at this image, how 12mm on a full frame body shrinks distant subjects—the Shipwreck is a very prominent feature here, but the wide lens shrinks it to almost secondary status. On the other hand, dropping down and getting as close as possible to the shore at 12mm really emphasizes the beautiful submerged patterns.
A Mono Lake Gallery
Click an image for a closer look and slide show. Refresh the window to reorder the display.


Don’t believe your eyes
Posted on October 17, 2017

Sunstar, Horseshoe Bend, Arizona
Sony a7R II
Sony/Zeiss 16-35
1/4 second
F/18
ISO 100
One of the greatest benefits digital photography has over film is the ability it provides to check an image’s exposure at capture (when you can do something about it). But as photographers, we rely so much on our eyes that it’s sometimes difficult to accept that they’re not always right. We take a picture, look at it on the LCD, and decide whether or not it’s perfect without even considering that there might be a better way. But where exposure is concerned, there is indeed a better way.
That’s because every picture you click, whether raw or jpeg (but especially raw), contains more shadow and highlight information than the jpeg that appears on your camera’s LCD preview screen can reveal. Fortunately, our digital cameras give us a tool that tells us about that missing exposure info: the histogram.
Histogram explained

Simple Histogram: The shadows are on the left and the highlights are on the right; the far left (0) is absolute black, and the far right (255) absolute white.
A histogram is a graph of the tones in an image. While I imagine that any graph has the potential to evoke high school science trauma flashbacks, a histogram is really quite simple, simple enough to be read and interpreted in the blink of an eye. And not only is your histogram easy to read, it’s really the most reliable source of exposure feedback.
When an image is captured on a digital sensor, your camera’s “brain” samples each photosite (the individual pixels in the megapixel number used to measure sensor resolution), determining a brightness value that ranges from 0 (black) to 255 (white). Every brightness value from 1 to 254 is a shade of gray—the higher a photosite’s number, the brighter its tone.
Armed with the brightness values for each photosite in the image, the camera is ready to build the image’s histogram. The horizontal axis of the histogram has 256 discrete columns (0-255), one for each possible brightness value, with the 0/black column on the far left, and the 255/white column on the far right (they don’t display as individual columns because they’re crammed so close together).
Despite millions of photosites to sample, your camera builds a new histogram for each image instantly, quickly adding each photosite’s brightness value to its corresponding column on the histogram, like stacking poker chips—the more photosites of a particular brightness value, the higher its corresponding column will spike.
Reading a histogram
The version of a picture that displays on your camera’s LCD is great for checking the composition, but the range of tones you can see in your LCD preview image varies with many factors, such as the camera’s LCD brightness setting and the amount of ambient light striking the LCD. Most important, because there’s more information in captured than the LCD preview can show even in the best conditions, you’ll never know how much recoverable data exists in the extreme shadows and highlights by relying on the LCD preview.
It’s human nature to try to expose a scene so the camera’s LCD image looks good, but an extreme dynamic range image that looks good on the LCD will likely have unusable highlights or shadows. As counterintuitive as that feels, exposing an image enough to reveal detail in the darkest shadows brightens the entire scene (not just the shadows), likely pushing the image’s highlights to unrecoverable levels. And making an image dark enough on the LCD to salvage bright highlights darkens the entire scene, all but ensuring that the darkest shadows to be too black. In fact, a properly exposed extreme dynamic range scene (a scene with both bright highlights and dark shadows, such as a sunrise or sunset) will look awful on the LCD (dark shadows and bright highlights). The histogram provides the only reliable representation of the tones you captured (or, in your live-view LCD display or mirrorless electronic viewfinder, of the tones you’re about to capture).
There’s no such thing as a “perfect” histogram shape. Rather, the histogram’s shape is determined by the distribution of light in the scene, while the left/right distribution (whether the graph is skewed to the left or right) is a function of the amount of exposure you’ve chosen to give your image. The histogram graph’s height is irrelevant—information that appears cut off at the top of the histogram just means the graph isn’t tall enough to display all the photosites possessing that tone (or range of tones).
When checking an image’s histogram for exposure, your primary concern should be to ensure that the none of the tone data is cut off on the left (lost shadows) or right (lost highlights). If your histogram appears cut-off on the left side, shadow detail is so dark that it registers as black. Conversely, if your histogram appears cut off on the right side, highlight detail is so bright that it registers as white.
Managing a histogram
In a perfect world, when you see your histogram cut off on the left (everything cut off on the left is detail-less black), you simply increase the exposure until the histogram shifts right (brighter) far enough that no shadow data is cut off. And if you see your histogram is cut off on the right, you decrease the exposure until the histogram shifts left (darker) enough that no highlight detail is cut off. Problem solved.
But many scenes contain a broader range of light, from the darkest shadows to the brightest highlights, than the camera can handle. In these scenes you can blend multiple exposures that cover the entire range of tones, apply a graduated neutral density filter (to moderate the sky). When those options aren’t available or practical, I usually save the highlights and sacrifice the shadows.
While the general goal is to ensure that none of the tone data is cut off on the left or right side of the histogram, the exposure you choose for a scene is ultimately a creative choice that isn’t bound to the way the scene looks to your eye. Though I often expose my scenes to match the amount of light my eyes see, sometimes I decide to make the scene darker or brighter than what I see.
-

- Evenly distributed histogram
-

- Intentionally bright histogram
-
- Intentionally dark histogram
A picture is worth a thousand words
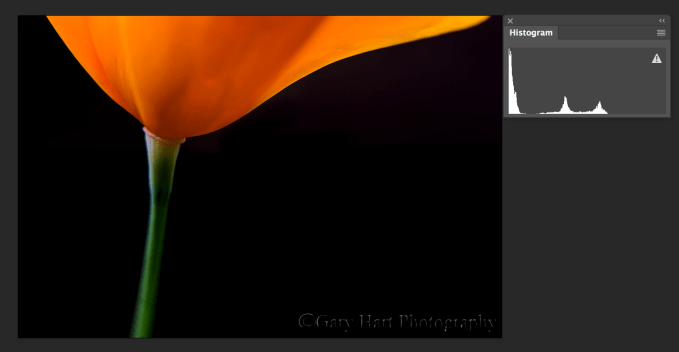
Trusting a histogram over a picture you can actually see requires a leap of faith. I can explain the concept until I’m blue in the face, but in my workshops the point doesn’t usually hit home without a demonstration. For example, the two Horseshoe Bend sunstar images below are from the same file—on the left is the way the picture looked when I captured it, along with its histogram; on the right is the same picture with just a few minutes of very basic processing in Lightroom and Photoshop (no plugins, blending, or any other elaborate processing).
If I’d have exposed this scene bright enough for the shadows to look good on my LCD (more like my eyes saw them), the highlights would have been hopelessly overexposed (white); if I’d have darkened my highlights enough to look good on my LCD, the shadows would have darkened to an unrecoverable black. I knew my best chance for capturing this high dynamic range scene with a single click was to ignore the LCD and trust the histogram.
Despite an image that didn’t look good at all on my LCD, the histogram on my Sony a7R II showed me that I’d captured virtually all of the scene’s shadows and most of its highlights. And because I captured this image in raw mode, I was confident that I had even more shadow and highlight information than my histogram indicated, a fact instantly confirmed with a rightward tug of Lightroom’s Shadows slider. With minimal processing effort, I was able to achieve final result you see here. (This is why landscape photographers are always begging for cameras with more dynamic range, and also why I use the Sony a7RII.)


Workshop Schedule || Purchase Prints
Trusting My Histogram


Photograph the Eastern Sierra
Posted on October 10, 2017
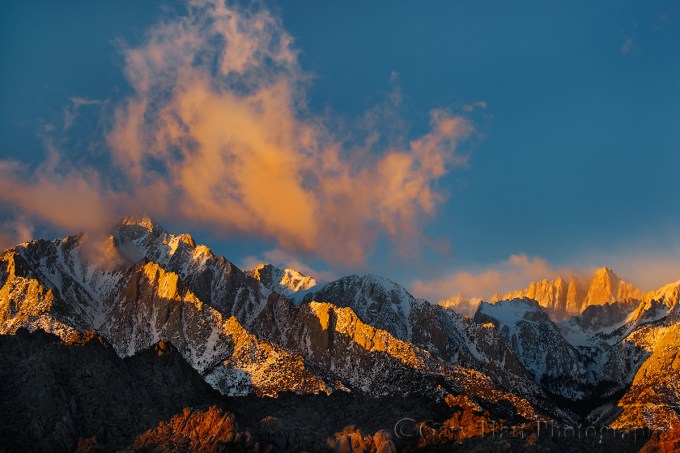
First Light, Lone Pine Peak and Mt. Whitney, Alabama Hills, Eastern Sierra (2006)
Canon EOS-1Ds Mark II
Canon 70-200 f/4L
1/20 second
F/8
ISO 200
This is an edited and updated version of my Eastern Sierra article that appeared in the September 2016 edition of “Outdoor Photographer” magazine
Eastern Sierra
Skirting the east side of the Sierra Nevada, US 395 enchants travelers with ever-changing views of California’s granite backbone. Unlike anything on the Sierra’s gently sloped west side, Highway 395 parallels the range’s precipitous east flank in the shadow of jagged peaks that soar up to 2 miles above the blacktop. More than just beautiful, these massive mountains form a natural barrier against incursion from the Golden State’s major metropolitan areas, keeping the Eastern Sierra region cleaner and quieter than its scenery might lead you to expect.
It would be difficult to find any place in the world with a more diverse selection of natural beauty than the 120-mile stretch of 395 between Lone Pine and Lee Vining: Mt. Whitney and the Alabama Hills, the ancient bristlecones of the White Mountains (across the Owens Valley, east of the Sierra), the granite columns of Devil’s Postpile, Mono Lake and its tufa towers, and too many lake-dotted, aspen-lined canyons to count. Long a favored escape for hikers, hunters, and fishermen, in recent years photographers have come to appreciate the rugged, solitary beauty possible only on the Sierra’s sunrise side.
I prefer photographing most Eastern Sierra locations at sunrise, when the day’s first rays paint the mountains with warm light, and the highest peaks are colored rose by alpenglow. (Without clouds, Eastern Sierra sunset light can be tricky, as you’ll be photographing the shady side of the mountains against the brightest part of the sky.) Devoid of large metropolitan areas, low light pollution also makes the Eastern Sierra one California’s finest night photography destinations. But regardless of the time of day, the key to photographing the Eastern Sierra is flexibility—if you don’t like the light in one direction, you usually don’t need to travel far to find something nice in another direction.
Lone Pine area
The southern stretch US 395 bisects the Owens Valley, a flat, arid plane separating the Sierra Nevada to the west from the Inyo ranges to the east. Just west of Lone Pine lies the Alabama Hills. Named for a Confederate Civil War warship, the Alabama Hills’ jumble of weathered granite boulders and proliferation of natural arches would be photogenic in any setting. Putting Mt. Whitney (the highest point in the 48 contiguous states), Lone Pine Peak (the subject of Mac OS X Sierra’s desktop image), and the rest of the serrated southern Sierra crest seems almost unfair.
The Alabama Hills are traversed by a network of unpaved but generally quite navigable roads. To get there, drive west on Whitney Portal Road (the only traffic signal in Lone Pine). After 3 miles, turn right onto Movie Road and start exploring. If you’re struck by a vague sense of familiarity here, it’s probably because for nearly a century the Alabama Hills has attracted thousands of movie, TV show, and commercial film crews.
Mobius Arch (also called Whitney Arch and Alabama Hills Arch) is the most popular photo spot in the Alabama Hills. It’s a good place to start, but settling for this frequently photographed subject risks missing numerous opportunities for truly unique images here. To get to Mobius Arch, drive about a mile-and-half on Movie Road to the dirt parking area at the trailhead. Following the marked trail down and back up the nearby ravine, the arch is an easy ¼ mile walk. There’s not a lot of room here, but if the photographers work together it’s possible to arrange four or five photographers on tripods with Mt. Whitney framed by the arch. And don’t make the mistake many make: the prominent peak on the left is Lone Pine Peak; Mt. Whitney is serrated peak at the back of the canyon.
Sunrise is primetime for Alabama Hills photography, but good stuff can be found here long before the sun arrives. I try to be set up 45 minutes before the sun (earlier if I want to ensure the best position for Whitney Arch) to avoid missing a second of the Sierra’s striking transition from night to day.
The grand finale from anywhere in the Alabama Hills is the rose alpenglow that colors the Sierra crest just before sunrise. Soon after the alpenglow appears, the light will turn amber and slowly slide down the peaks until it reaches your location, warming the nearby boulders and casting dramatic, long shadows. But unless there are clouds to soften the light, you’ll find that the harsh morning light will end your shoot pretty quickly once the sunlight arrives on the Alabama Hills.
Whitney Portal Road (closed in winter) ends about 11 miles beyond Movie Road, at Whitney Portal, the trailhead for the hike to Mt. Whitney and the John Muir Trail. On this paved but steep road, anyone not afraid of heights will enjoy great views looking east over the Alabama Hills and Owens Valley far below, and up-close views of Mt. Whitney looming in the west. At the back of the Whitney Portal parking lot is a nice waterfall that tumbles several hundred feet in multiple steps.
The Alabama Hills are one of my favorite moonlight locations. Because the full moon rises in the east right around sunset, on full moon nights the Alabama Hills and Sierra crest are bathed in moonlight as soon as darkness falls. Lit by the moon, the hills’ rounded boulders mingle with long, eerie shadows, and the snow-capped Sierra granite radiates as if lit from within.
If you find yourself with extra time, drive about 30 miles east of Lone Pine on Highway 136 until you ascend to a plain dotted with photogenic Joshua trees—after you’ve finished photographing the Joshua trees, turn around and retrace the drive back to Lone Pine on 136 to enjoy spectacular panoramic views of the Sierra crest. And just north of Lone Pine on 395 is Manzanar National Historic site, a restored WWII Japanese relocation camp. Camera or not, this historic location is definitely worth taking an hour or two to explore.
Bristlecone pine forest
Continuing north from Lone Pine on 395, on your left the Sierra stretch north as far as the eye can see, while the Inyo mountains on the right transition seamlessly to the White Mountains. Though geologically different from the Sierra, the White Mountains’ proximity and Sierra views make it an essential part of the Eastern Sierra experience.
Clinging to rocky slopes in the thin air above 10,000 feet, the bristlecone pines of the White Mountains are among the oldest living things on earth—many show no signs of giving up after 4,000 years; at least one bristlecone is estimated to be 5,000 years old.
Abused by centuries of frigid temperatures, relentless wind, oxygen deprivation, and persistent drought, the bristlecones display every year of their age. Their stunted, twisted, gnarled, polished wood makes the bristlecones suited for intimate macros and mid-range portraits, or as a striking foreground for a distant panorama.
The two primary destinations in the bristlecone pine forest are the Schulman and Patriarch Groves. Get to the bristlecone pine forest by driving east from Big Pine on Highway 168 and climbing about 13 car-sickness inducing miles. Turn left on White Mountain Road and continue climbing another 10 twisting miles to reach the Schulman Grove. Despite the incline and curves, the road is paved all the way to this point. Stop at the Sierra panorama after about 8 miles for a spectacular view that also makes a great excuse to pause and collect yourself.
Stop at the small visitor center in the Schulman Grove to pay the modest use fee, then choose between the 1-mile Discovery loop trail, and the 4 1/2 mile Methuselah loop trail. Both trails are in good shape, but the extreme up and down in very thin air will test your fitness. Most of the trees on the Methuselah Trail get more morning light, while the majority of the Discovery Trail trees get their light in the afternoon.
If you’re unsure of your fitness, or have limited time, the Discovery Trail is definitely the choice for you. Because the photogenic trees start with the very first steps, on this trail you can turn around at any point without feeling cheated of opportunities to photograph nice bristlecones. And along the way you’ll appreciate the handful of benches for enjoying the view and catching your breath. Hikers who can make it to the top of the switchbacks are rewarded great views of the snow-capped Sierra across the Owens Valley.
The Discovery Trail climbs for a couple hundred more yards beyond the switchbacks, but just as you’re beginning to wonder whether all the effort is worth it, the trail levels, turns, and drops. Soon you’ll round a 90-degree bend and be rewarded for your hard work with two of the most spectacular bristlecones in the entire forest. Spend as much time here as you have, because the rest of the loop back to the parking lot has nothing to compete with these two trees.
The pavement ends at the Schulman Grove, but the unpaved 12-mile drive to the Patriarch Grove is navigable by all vehicles in dry conditions. Home to the Patriarch Tree, the world’s largest bristlecone pine, the Patriarch Grove is more primitive and much less visited than the Schulman Grove. Unlike the Schulman Grove, where I rarely stray far from the trail, I often find the most photogenic bristlecones here by venturing cross-country, over several small ridges east of the Patriarch Tree. Even without a trail, the sparse vegetation and hilly terrain provides enough vantage points that make getting lost difficult.
Clean air, few clouds, and very little light pollution make the bristlecone groves a premier night photography location. On moonless summer and early autumn nights, the bright center of the Milky Way is clearly visible from the slopes of the bristlecone forest. For the best Milky Way images, look for trees that can be photographed against the southern sky. And no matter how warm it is on 395 below, pack a jacket.
The bristlecone forest closes in winter.
Bishop area
An hour north of Lone Pine on 395 is Bishop. Its central location, combined with ample lodging, restaurant, and shopping options make Bishop an excellent hub for an Eastern Sierra trip—if you want to anchor in one spot and venture out to the other Eastern Sierra locations, Bishop is probably your best bet.
West of Bishop are many small but scenic lakes nestled in steep, creek-carved canyons that are lined with aspen (and some cottonwood) that turn brilliant yellow each fall. Many of these canyons can be accessed on paved roads, others via unpaved roads of varying navigability, and a few solely by foot.
Of these canyons, Bishop Creek Canyon is the best combination of accessible and scenic. To get there, drive west on Highway 168 (Line Street in Bishop). After about 15 miles you can decide whether to turn left on the road to South Lake, or continue straight to reach North Lake and Lake Sabrina (pronounced with a long “i”).
One of the area’s most popular sunrise spots, North Lake is a 1-mile signed detour on a narrow, steep, unpaved road—easily navigated in good conditions by all vehicles, but the un-railed, near vertical drop is not for the faint of heart. A mile or so beyond the turn to North Lake the road ends at Lake Sabrina, a fairly large reservoir in the shadow of rugged peaks and surrounded by beautiful aspen (but its bathtub ring when less than full is not for me).
South Lake is another aspen-lined reservoir that shrinks in late summer and autumn. Highlights on South Lake Road are a manmade but photogenic waterfall leaping from the mountainside, clearly visible on the left as you ascend, and Weir Lake, just before South Lake.
Both Bishop Canyon roads are worth exploring, especially in autumn, when the fall color can be spectacular. Each features scenic tarns and dense aspen stands accented by views of nearby Sierra peaks. Rather than beeline to a fall color spot, in autumn I drive the Sabrina and South Lake roads and pick the best color.
Highway 395 north of Bishop features a few of my favorite fall color destinations, including Rock Creek Canyon and McGee Creek. About a half hour north of Bishop, detour west off the highway to postcard-perfect Convict Lake. And just beyond the road to Convict Lake is the upscale resort town of Mammoth Lakes, just a few miles west of 395. The drive on 203 through Mammoth Lakes takes you past the Mammoth Mountain Ski slopes to Minaret Vista. This panoramic view of the sawtooth Minaret Range, Mt. Ritter, and Mt. Banner captures the essence of high Sierra beauty. From here, follow the road down the other side to see the basalt columns of Devil’s Postpile, and to take the short hike to Rainbow Fall.
Lee Vining area
Leaving Bishop, Highway 395 climbs steeply, crests near Crowley Lake, skirts the communities of Mammoth Lakes and June Lake, finally dropping down into the Mono Basin and Lee Vining. Though this is an easy, one-hour drive, you’ll feel like you’ve landed on a different planet. In October, detour onto the June Lake Loop, another popular fall color drive.
By far the most popular Mono Lake location is South Tufa, a garden of limestone tufa towers that line the shore and rise from the lake. Tufa are calcium carbonate protrusions formed by submerged springs and revealed when the lake drops. In addition to the striking tufa towers, South Tufa is on a point that protrudes into the lake, allowing photographers to compose with both tufa and lake in the frame while facing west, north, or east.
To visit South Tufa, turn east on Highway 120 about 5 miles south of Lee Vining. Follow this road for another 5 miles and turn left at the sign for South Tufa. Drive about a mile on an unpaved, dusty but easily navigated road to the large dirt parking lot. From here it’s an easy ¼ mile walk to the lake, but wear your mud shoes if you want to get close to the water. And don’t climb on the tufa.
While South Tufa can be really nice at sunset, mirror reflections on the frequently calm lake surface, and warm light skimming over the low eastern horizon, make this one of California’s premier sunrise locations. To get the most out of a sunrise shoot here, it’s a good idea to photograph South Tufa at sunset to familiarize yourself with the many possibilities here (and who knows, maybe you’ll get lucky and catch one of the Eastern Sierra’s spectacular sunsets).
In the morning, arrive at the lake at least 45 minutes before sunrise to ensure a good spot at this popular location—you can start shooting as soon as you arriving, using long exposures to brighten the scene and smooth the water. I usually start with scenes to the east, capturing tufa silhouettes against indigo sky and water. As the dawn brightens, keep your head on a swivel and be prepared to shift positions with the changing light.
As the sun approaches and the dynamic range increases in the east, I often turn to face west. Soon the highest Sierra peaks are colored with pink alpenglow, followed quickly by the day’s first direct sunlight. With the sun rising beneath the horizon behind me, its light slowly descends the Sierra peaks stretching before me. When the sunlight finally reaches lake level, for a few minutes the tufa towers are awash with warm sidelight, creating wonderful opportunities facing north. As with the Alabama Hills, without clouds to soften the sunlight and make the sky more interesting, the sunrise show is terminated quickly by contrasty light.
Other options in and near Lee Vining are the excellent Mono Lake visitor center on the north side of town, the small but very informative Mono Committee headquarters in the middle of town, any meal at the Whoa Nellie Deli in the Mobil Station (trust me on this), and Bodie, an extremely photogenic ghost town maintained in a state of arrested decay, less than an hour’s drive north. And a sinuous 20-minute drive west, up 120 (closed in winter) lands you at Tioga Pass, Yosemite’s east entrance and the gateway to Tuolumne Meadows.
Fall color in the Eastern Sierra
Each fall the Eastern Sierra becomes a Mecca for photographers chasing the vivid gold coloring the area’s ubiquitous aspen groves. The show starts in late September at the highest elevations, and continues well into October in some of the lower elevations. Fall color timing and locations vary from year-to-year, but the general fall color rule to follow here is: If the trees are still green, just keep climbing.
The best way to photograph the Eastern Sierra’s fall color is to explore: Pick a road that heads west and start climbing until something stops you. To give you a head start, here are a few of my favorite spots, from south to north. (Rather than beeline to specific locations in these ever-changing canyons, I’ve found it’s best to drive slowly and stay alert for opportunities along the way.)
Bishop Creek Canyon: Nice any season it’s open, Bishop Creek Canyon (detailed earlier) comes alive with gold each autumn. Aspen surrounding the canyon’s many lakes make for spectacular reflections. Of these, North Lake is probably the most popular, but autumn mornings can be extremely crowded here. The color in Bishop Creek Canyon usually peaks in late September at the highest elevations (near North Lake, Lake Sabrina, and South Lake), but lasts until mid-October farther down the canyon.
Rock Creek Canyon: Near the crest of the climb out of Bishop on 395, turn left at the sign for Rock Creek Lake. Climb this road along Rock Creek all the way up to its terminus at Mosquito Flat trailhead. Over 10,000 feet, this is the highest paved road in the Sierra. As with Bishop Creek Canyon, the best photography in Rock Creek Canyon is usually found at random points along the road—drive slowly and keep your eyes peeled.
McGee Creek: When you see Crowley Lake on the right, look for the road to McGee Creek on the left. This 2-mile unpaved road is navigable by all vehicles, but take it slow. It ends at a paved parking lot that’s the launching point for a hike up McGee Creek, into the canyon, and the mountains beyond. Unlike most other Eastern Sierra canyons, the dominant tree here is cottonwood. While I’ve had good success photographing along the creek right beside the parking lot, you can find nice color as far up the canyon as your schedule (and fitness) permits.
Convict Lake: The road to Convict Lake is just south of Mammoth Lakes. It’s a 2-mile paved drive to a beautiful lake nestled at the base of towering mountains—definitely worth the short detour off of 395.
June Lake Loop: Between Mammoth Lakes and Lee Vining is a 15 mile loop that exits 395 near the small town of June Lake (look for a gas station on the left) and returns to 395 a few miles down. Along the route you’ll find several lakes, and a waterfall at the very back of the loop (visible from the road).
Lundy Canyon: About 5 miles north of Lee Vining, turn left onto the Lundy Canyon road to enjoy one of my favorite Eastern Sierra fall color spots. The lower half of this road, below Lundy Lake, is often a good place to find late season color, but my favorite photo spots aren’t until road turns bad, just beyond the lake.
Driving slowly and with great care, most vehicles can make the 2 unpaved miles along Mill Creek to the end of the road. In addition to beautiful creek scenes, you’ll find several small, reflective beaver ponds along the way. If you make it to the end of the road, park and follow the trail up the canyon, through an aspen grove, for about ¼ mile to reach a small, waterfall-fed lake. The overgrown lakeshore makes photography here difficult, but a short walk along the shoreline to the left, toward the lake outlet, will take you to a massive beaver dam. Roll up your pants and get your feet (and more) wet for the best views of the lake.
Dunderberg Peak and Virginia Lakes: Shortly after the turn to Lundy Canyon, 395 climbs steeply to Conway Summit, at 8143 feet, the highest point on the entire route. On the left, just past a spectacular view of the entire Mono basin (worth the stop), is the road to Virginia Lakes. Here you’ll find some of the area’s earliest aspen to turn. Just beyond the Virginia Lakes road are colorful views of Dunderberg Peak and its aspen-blanketed slopes.
There’s far too much to photograph in the Eastern Sierra to describe here. Join me in an Eastern Sierra photo workshop to explore all these locations, plus many more less known spots: Eastern Sierra Photo Workshops
Workshop Schedule || Purchase Prints
An Eastern Sierra Gallery


How a polarizer works
Posted on October 5, 2017

Autumn Reflection, North Lake, Eastern Sierra
Canon EOS-1Ds Mark III
Canon 17-40L
1/5 second
F/16
ISO 200
Some people couldn’t care less how a polarizer works—they’re satisfied knowing what a polarizer does, and how to make it happen. But if you’re like me, you also need to understand why things behave the way they do.
Put simply…
A polarizer cuts reflections. On the surface that not might seem so desirable for someone who likes photographing reflections as much as I do, but reflections are a much bigger part of our visual experience than most people realize. Virtually every object reflects at least a little, and many things reflect a lot more than we’re aware. Worse still, these reflections often hide the very surface features and color we most love to photograph.
When reflections hide an object’s underlying beauty, a polarizer can restore some of that beauty. I use a polarizer when I want to capture the submerged rocks or sand hidden by the reflection atop a river or lake, the rich color overwhelmed by glare reflecting from foliage, or the sky’s deep blue washed out by light scattered by atmospheric molecules.
Put a little less simply…
In reality, reflections are merely collateral damage to your polarizer. What a polarizer really does is eliminate light that’s already been polarized. To understand what’s really going on with a polarizer, read on….
Essential terminology
- Oscillation is motion relative to a fixed point. For example, when you snap a whip, the whip “oscillates” along its length. Without external interference (e.g., friction from the atmosphere or other objects), motion in one direction along the whip will have an identical motion in the opposite direction (e.g., up=down, left right, and so on), and that motion will move forward along the whip.
- A wave is oscillation along or through a medium (such as air, water, or space). The bulge that moves up and down (oscillates) along a cracked whip is a wave. For the liberal arts folks, (in this context) wave is a noun, oscillate is a verb. A wave is measured by its wavelength and frequency—the higher the frequency, the shorter the wavelength.
- Frequency is the number of times a wave peak passes a discrete point in a given unit of time (usually one second: “per second”).
- Wavelength is the distance from one wave peak to the next at any instant frozen in time.
- A transverse wave oscillates perpendicular (90°) to its direction of motion. To imagine the motion of a transverse wave, picture an ocean wave, which oscillates up and down as it advances through the water. Now think about a bottle floating in the open ocean—bobbing up and down with each wave, its up/down motion is perpendicular to the wave’s forward motion, but when that wave has passed, the bottle is in the same place it was before the wave arrived. (Waves don’t move bobbing bottles across the ocean, wind and currents do.)
- Visible light is electromagnetic radiation that reaches our eyes as a transverse wave somewhere in the wavelength range the human eye can register, about 380 to 740 nanometers (really small).
- Sunlight (or more accurately, solar energy) reaches earth as a transverse wave with a very broad and continuous spectrum of wavelengths that include, among others, the visible spectrum (lucky for photographers), infrared (lucky for everyone), and ultraviolet (lucky for sunscreen vendors). The oscillation of solar energy’s transverse wave is infinitely more complicated than an ocean wave because light oscillates in an infinite number of directions perpendicular to its direction of motion. Huh? Think about the blades of a propeller—each is perpendicular to the shaft upon which the propeller rotates, so in theory you can have an infinite number of propeller blades pointing in an infinite number of directions, each perpendicular to the shaft. So a light wave oscillates not just up/down, but also left/right, and every other (perpendicular) angle in between.
Polarization
While an unpolarized light wave oscillates on every plane perpendicular to the wave’s motion, polarized light only oscillates on one perpendicular plane (up/down or left/right or 45°/225° and so on).
Polarization can be induced many ways, but photographers are most interested in light that has already been polarized by reflection from a nonmetallic surface (such as water or foliage), or light that has been scattered by molecules in our atmosphere. Light scattered by a reflective surface is polarized parallel to the reflective surface; light scattered by molecules in the atmosphere is polarized perpendicular to the direction of the light.
Polarization can also be induced artificially with a polarizing filter (“polarizer”), a filter coated with a material whose molecular structure allows most light to pass, but blocks light waves oscillating in a specific direction. When unpolarized light (most of the light that illuminates our lives) passes through a polarizer, the light that enters the lens to which it’s attached has been stripped of the waves oscillating in a certain direction and we (through the viewfinder) see a uniform darkening of the entire scene (usually one to two stops).
But that uniform darkening is not usually what we use a polarizer for. (I say usually because sometimes we use a polarizer to reduce light and stretch the shutter speed in lieu of a neutral density filter.) Photographers are most interested in their polarizers’ ability to eliminate reflective glare and darken the sky, which occurs when their polarizer’s rotating glass element matches the oscillation direction of light that has already been polarized by reflection or scattering, cancelling that light. By watching the scene as we rotate the polarizing element on the filter, photographers know that we’ve achieved maximum polarization (reflection reduction) when we rotate the polarizer until maximum darkening is achieved—voila!
The exception that proves the rule
Most photographers know that a polarizer has its greatest effect on the sky when it’s at right angles (90°) to the sun, and least effective when pointed directly into or away from the sun (0º or 180°). We also know that a rainbow, which is always centered on the “anti-solar point” (a line drawn from the sun through the back of your head and out between your eyes points to the anti-solar point) exactly 180° from the sun, can be erased by a polarizer. But how can it be that a polarizer is most effective at 90° to the sun, and a rainbow is 180° from the sun? To test your understanding of polarization, try to reason out why a rainbow is eliminated by a polarizer.
Did you figure it out? I won’t keep you in suspense: light entering a raindrop is split into its component colors by refraction; that light is reflected off the back of the raindrop and back to your eyes (there’s a little more bouncing around going on inside the raindrop, but this is the end result). Because a rainbow is reflected light, it’s polarized, which means that it can be eliminated by a properly oriented polarizer.
About this image
Long before achieving international fame as the background scene for Apple OS X High Sierra, North Lake near the top of Bishop Canyon in the Eastern Sierra has been beloved by photographers. Each autumn this little gem of a lake teams with photographers longing for even one of the following conditions: peak gold and red in the aspen, a glassy reflection, or a dusting of snow.
I visit North Lake multiple times each autumn, sometimes with my workshop groups, sometimes by myself. I’ve found pretty much every possible combination of conditions: snow/no-snow; early, peak, or late fall color; and a lake surface ranging from mirror smooth to churning whitecaps.
One sunrise early October of 2010 I hit the North Lake trifecta. Crossing my freezing fingers that the reflection would hold until I was ready, I lowered my tripod on the rocky shore and framed the aspen-draped peak and its vivid reflection. I used a couple of protruding rocks to anchor my foreground, slowly dialed my polarizer until the entire lake surface became a reflection, and clicked. But rather than settle for that shot, I reoriented my polarizer until the reflection virtually disappeared and a world of submerged granite rocks appeared. I clicked another frame and stood back to study the image on my LCD.
As much as I liked the rocky lakebed version, I knew there was no way I could pass on the best reflection I’d ever seen at North Lake. So I returned my eye to my viewfinder and very slowly dialed the polarizer again, watching the reflection reappear across the lake and advance toward me until the entire mountain unfolded in reverse atop the lake. Stopping just at that midway polarization point, I had the best of both worlds: my pristine reflection and an assortment of submerge rocks.
I Use Breakthrough Filters
Dialing In My Polarizer
Click an image for a closer look and slide show. Refresh the window to reorder the display.


, California")


