Plot Twist
Posted on December 2, 2025

Afloat, Leaves on the Merced River, Yosemite
Canon EOS-1Ds Mark II
Canon 100-400 f/4 USM
1/5 second
F/9
ISO 400
One overcast autumn evening in Yosemite, I wandered an isolated trail on the bank of the Merced River with my 100-400 lens, searching for intimate scenes to isolate. Spotting an assortment of colorful leaves clinging to a beautifully textured log, an opportunity materialized in my mind. Though my eyes could see the log and leaves mingling with a reflection of overhanging branches and yellow trees lining the far riverbank, a simple twist of my polarizer erased the reflections and darkened the water. As my eyes adjusted to the change, submerged branches and rocks appeared where the reflection had been. Though more subtle than the reflection, I still found these new elements distracting, but also knew that slightly underexposing the scene would be enough to blacken the water, completely eliminating these distractions and make an image that was entirely about the log and clinging leaves.
As I evaluated the scene and tried a few compositions, a leaf floated by just beyond the log and I realized that by timing my exposure just right, I could separate the next drifting leaf from the log, making it appear suspended in an inky void. So, once I was satisfied with my composition, instead of clicking a nice little image of the scene moving on, I parked myself and waited for that perfectly shaped leaf to enhance my image. And waited. And waited….
During my workshops I enjoy observing my students in the field, the things that draw them and way each brings his or her own personality to the act of creating an image. I could go on and on about any of these differences, but this experience really underscores a particular aspect of my approach, so (since this is my blog) I thought I’d pause my story briefly to write about that. (Read to the end for a plot twist.)
Anyone who has ever photographed with me knows how deliberate I am in the field. It starts with a large measure of calculation, often starting long before I arrive, then scrutinizing the scene upon my arrival to determine the elements that draw the eye, what to include and exclude, and identifying the various ways to do that. When I finally get all those pieces assembled in my brain, I’ll wait as long as it takes (or at least for as long as I have) for the conditions to be perfect, evaluating and refining my composition as I wait. Many (charitably) label this “patience,” though it may include a significant component of stubbornness a well: “I’m not leaving here until I get exactly what I want.” Whatever you call it, this approach works for me because careful observation and measured response is the way I engage with the world. Once I think everything is right, I’ll work the composition to with in an inch of its life: repositioning to change relationships, zooming closer and farther, switching between horizontal and vertical, adjusting my polarizer for a variety of reflection effects, and so on.
But that’s me. More spontaneous photographers are far more energetic and restless in the field, constantly moving and exploring, exposing themselves to far more opportunities than I do. And while I may get more from my scenes than they do, they often capture things I never even laid eyes on.
Whatever your approach, there’s no “best” way for photographers to approach their craft. Leading workshops means being exposed daily to the product of other photographers’ efforts at the same locations I’m photographing. For each time I’m thrilled with an image I know I wouldn’t have found had I not waited patiently and worked it carefully, I can cite someone else’s image that caused me to kick myself because I spent all my time in one spot.
Plot twist
So anyway…
Even though this is a brand new post about a “brand new” (never processed or shared) image, all this happened 18 years ago. Despite the time that has elapsed between its capture and coming out, I still have very distinct memories of this image’s capture—the germination of the idea, the time I spent waiting for a perfect leaf to float into in the perfect location, the euphoria of eventual success, and the ultimate disappointment when I realized I’d messed up and would never be able to use the image….
Waiting nearly an hour for that perfect leaf in the perfect position, it occurred to me that the floating leave I’d seen earlier might have been a rogue one-off. But I never considered moving on, continuing to wait patiently (stubbornly) while a few tattered brown leaves drifted through my frame, and once or twice while a perfectly shaped yellow leaf floated by just out of my frame. About the time advancing darkness forced me to consider that it might be about time to give up, I spotted a promising leaf surrounded by an entourage of smaller leaves just upstream and heading directly into my frame.
My f-stop, ISO, and shutter speed had been dialed in much earlier, but a quick check of my meter told me instantly that I needed more light. With too much excitement and not enough time, instead of bumping my ISO to increase exposure while maintaining a shutter speed fast enough to freeze the moving leaves, I ignored my ISO and reflexively went with a longer shutter speed. Doh!
For 18 years I considered this image a failure because motion blur made the primary focal point too soft, but the memory of “the one that got away” has caused me to visit this very spot on each autumn visit to Yosemite since, hoping for similar opportunity. Eleven years ago I actually found something similar, albeit without a drifting leaf as a focal point. Good enough to process and share, but less than my original vision.
Then, a couple of weeks ago I upgraded my Topaz suite to the latest version so I could up-res and denoise the original files for several large prints ordered by a customer. In the past I’ve only used Topaz’s Denoise tool, but I was so pleased with my up-res results that I poked around to see what else I’d missed, and came across their Super focus tool. Realizing that, rather than the kind of pre-print sharpening I’ve been doing for years, this one actually promised to fix soft images, my mind immediately went to this “failure, and I started digging through my old image files until I found the raw file. And while the result still isn’t perfect, I was blown away by the improvement that I think is enough to actually give me a useable image. Eighteen years later.
Workshop Schedule || Purchase Prints || Instagram
Autumn Intimates


")


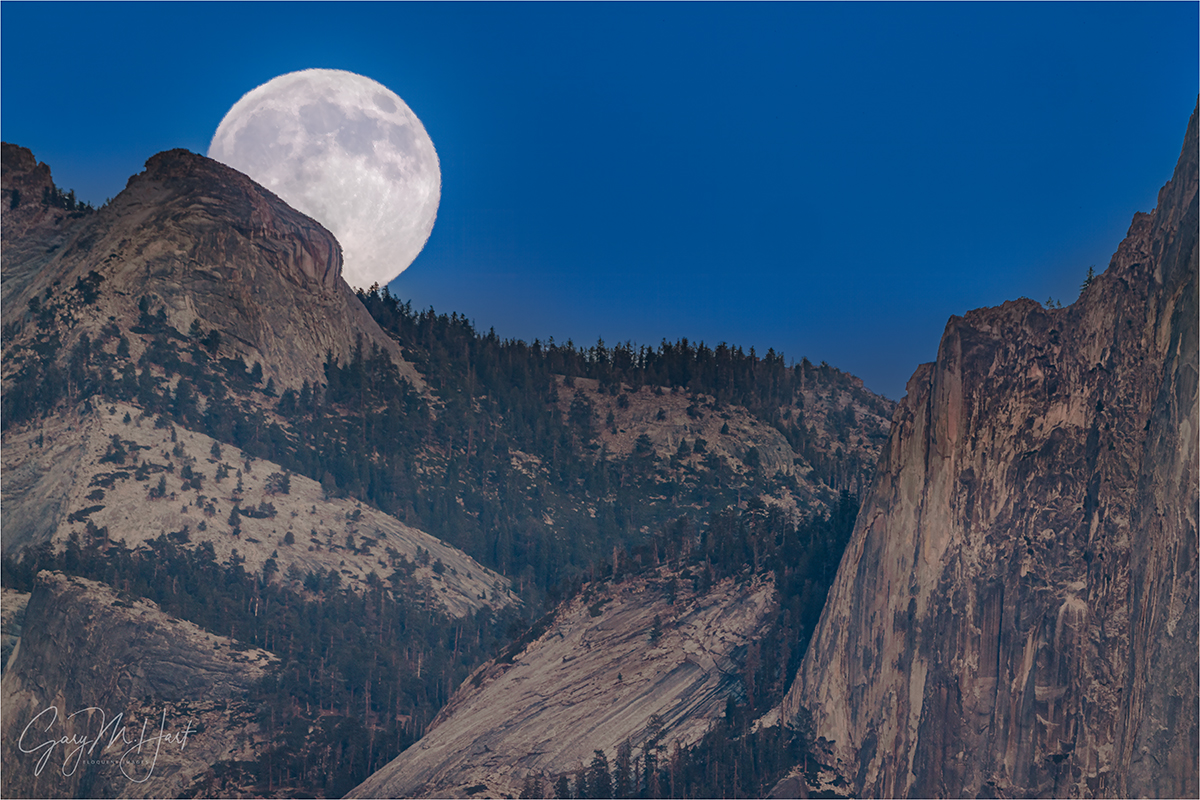
Moon Chasing
Posted on November 24, 2025

Half Dome Autumn Moonrise Reflection, Merced River, Yosemite
Sony a7R V
Sony 24-105 G
1/8 second
F/14
ISO 100
Many years ago I stood with a couple of other photographers on Sentinel Bridge in Yosemite. It was a few minutes before sunset and we were waiting, cameras poised, for the moon to ascend from behind Half Dome. As we chatted, a young woman approached and asked no one in particular what we were all waiting for. When I told her about the imminent moonrise, she laughed and advised us that we were too late, that the moon had already risen because she’d just come from watching the moonrise at Tunnel View. After several unsuccessful attempts to explain to her why the moon would in fact be arriving soon, and how the moon rises at different times depending on the viewer’s location, elevation, and nearby terrain, we finally gave up and she went on her way none the wiser.
Earlier this month my Yosemite Autumn Moon photo workshop group got the opportunity to apply this moon chasing approach firsthand, photographing a (nearly) full moon rising above Half Dome at sunset on three consecutive nights, from three different locations.
The challenge to photographing three consecutive moonrises is that, while sunset at any given location from one night to the next happens at more or less the same time, the moon rises nearly an hour later each night—in other words, if you stay put, the landscape feature that the moon rose behind last night will tonight obscure the moon until long after dark.
So, while the Sun/Moon/Earth choreography is fixed and predictable to ridiculous precision, my location for viewing this show is completely my call. Moon rising too late at one location? Just find another location that’s farther back, or higher. Or both. Of course that’s often easier said than done, but Yosemite, with its elongated east/west orientation and elevated vistas, is ideally set up for moon photography. (Not to mention its variety of world class subjects.)
(As you may have noticed) my favorite moonrise subject in Yosemite is Half Dome. And why not? Half Dome’s prominent shape stands out beautifully against open sky (rather than getting lost against a darker or more distracting terrestrial background), is viewable from countless different vantage points, and is wonderfully recognizable to the general public. But, since the moonrise location changes significantly from one month to the next, its ideal Half Dome alignment doesn’t happen most months. If I’ve learned nothing else in twenty-plus years of chasing moonrises in Yosemite, I do know that the full moon and Half Dome only align during one or two months on either side of the winter solstice—the rest of the year the moon rises either too far south (most months), which puts it behind Yosemite Valley’s towering south wall, or (maybe once or twice) too far north, putting it behind El Capitan.
Before attempting to photograph a moonrise, it’s important to understand that a location’s published sunrise/set or moonrise/set times always assumes a flat horizon. So unless you’re atop a mountain or on a ship at sea, you’ll probably see the sun disappear behind the terrain in the west before sunset, and you’ll probably need to wait until after moonrise for the moon to ascend above the terrain in the east.
In general, my goal for photographing any full moonrise is to get the moon near the horizon during the window that spans 15 minutes before to 15 minutes after the “official” (flat horizon) sunset. Earlier than that, there’s not enough contrast for the moon to stand out against still too-bright sky; later, there’s too much dynamic range to capture detail in the dark landscape and daylight-bright moon. Since the location for viewing the moon in that that sweet spot changes from night to night, so does my location.
With the sun at my back when viewing a rising full moon, I’m not too concerned about the precise timing of the sun’s disappearance—I know that once direct sunlight is off the landscape, the sky will still be bright enough to illuminate the foreground for 20 or 30 minutes. But I need to be pretty dead-on with the location and timing of the moon’s arrival.
Knowing the moon will rise about 40-60 minutes later each day, it’s easy to infer that the greater the number of days until the full moon, the earlier the moon will rise and the higher it will be at sunset. (Regrettably) I have no control over the timing of the absolute (flat horizon) sunset/moonrise, but I can control the elevation of my own personal horizon, and therefore the moon’s appearance on any given evening, by simply choosing my position relative to the point on the horizon above which the moon will rise.
To make this Yosemite workshop’s consecutive moonrises work, for our first evening I targeted a favorite riverside spot beneath Half Dome, on the east side of Yosemite Valley. For our second sunset, my original plan was to be at another spot on the Merced River near he middle of the valley, but we ended up photographing that evening’s moonrise from Glacier Point because I feared a forecast storm threatened to thwart the Glacier Point shoot I’d planned for our fourth and final night. The workshop’s main moonrise event was the Tunnel View moonrise on our third sunset, which I wrote about a couple of weeks ago. Only on that third evening was the moon the scene’s primary focal point—those first two evenings it was more of an accent to already beautiful scenes, but a wonderful accent it was.
Since this year’s autumn moon workshop started on the first day of standard time, the earlier than we’d all been accustomed to shorted our afternoon by an hour. That, combined with the fact that the spot I had in mind for that initial moonrise, while largely overlooked by tourists, is no secret to photographers. Wanting to get my group set-up before more people arrived, I passed on my usual workshop first shooting location and headed straight to my moonrise location.
Arriving an hour before sunset and finding it largely unoccupied, we had about 45 minutes to work before the moon appeared. The fall color and reflections were great, but clouds completely obscured the sky behind Half Dome to the point that it looked like the moon might be a no-show. But as we enjoyed the otherwise beautiful photography, the clouds parted just in time for the moon’s arrival.
I started with tighter telephoto shots, but quickly widened my composition as the moon separated from the ridge, trying both vertical and horizontal frames. Since I already have quite a few vertical moonrise images from here, I opted process this even wider horizontal frame and am extremely pleased with the way all the ingredients came together for an image I didn’t already have.
In defense of a small moon
Any time I share a wide angle image of the moon, I know I might hear from someone who tells me they’d prefer the image without the moon at all. And many years ago, when I proposed an article on photographing the moon to “Outdoor Photographer” magazine, the editor at the time (not the current OP editor) replied that moon photographs don’t work because the moon appears so much smaller in a photograph than people remember it.
They’re certainly entitled to their opinion, but I’ve never thought the moon needs to appear large to be an effective subject. I always look for ways to add something to an already beautiful scene that might make it stand out from the many other images of that scene, and the moon, with outsize emotional power that punches well above its weight, can dominate a disproportional segment of any frame.
And you don’t need to take my word for it. Ansel Adams certainly had this figured out long before I came on the scene, making a small moon the prime focal point of many compositions, including the image that’s arguably his most famous, “Moonrise, Hernandez, New Mexico.”
Join me in Yosemite
Workshop Schedule ||Purchase Prints || Instagram
Let’s Hear it for Small Moons
Click any image to scroll through the gallery LARGE


, Yosemite")


")


Let’s Get Vertical (Again)
Posted on November 16, 2025

New Day, Tunnel View, Yosemite
iPhone 17 Pro
(This seed of today’s blog is a post from many years ago—but the image and its story are brand new.)
What’s your orientation?
I’ve always questioned the reasoning behind labeling horizontally oriented images, “landscape,” and vertically oriented images, “portrait.” Despite my profession as a landscape (-only) photographer, nearly half of my images use “portrait” orientation. So it concerns me that this arbitrary naming bias might subconsciously encourage photographers to default to a horizontal orientation for their landscape images, even when a vertical orientation might be best.
The orientation of an image imparts implicit visual motion that’s independent of the eyes’ movement between an image’s visual elements. Photographers who understand that viewers’ eyes tend to move along the frame’s long side have an extra tool for guiding those eyes, and even to convey a mood.
For example, when orienting an image of a sunset on the coast, it’s easy to default without thinking to the same horizontal orientation that the distant horizon follows. And a waterfall image that’s oriented vertically certainly encourages the viewers’ eyes to move in the same direction as the water’s motion, so orienting the frame to match certainly seems reasonable. But, despite the natural instinct to match the frame’s orientation to the scene’s dominant flow, there is no absolute best way to orient an ocean, waterfall, or any other scene—there’s always a choice, and that choice matters. While matching the image’s orientation to the scene’s natural movement in this manner can instill a calmness to the image, a vertical ocean sunset, or horizontal waterfall, can create visual tension that can also be quite compelling.
Since I don’t need to convince most landscape photographers to take more horizontal pictures, I’m going to concentrate on the benefits of a vertical frame. One thing I especially like about orienting my landscape scenes vertically is the way it moves my viewer’s eyes through the scene from front to back, enhancing the illusion of depth that’s so important in a two-dimensional photo. And because of a vertical frame’s relative narrowness, a foreground element (that might get lost in a wider horizontal frame) instantly becomes the focal starting point that starts my viewer’s visual journey through the frame to whatever striking background I want to feature.
More than just guiding the eye through the frame, vertical orientation narrows the frame, enabling me to eliminate distractions or less compelling objects left and right of the scene’s prime subject(s). This makes vertical my preferred orientation when I want to emphasize an especially striking foreground from above (like Tunnel View), or a sky brimming with colorful clouds or a host of stars.
While a horizontally oriented scene is often the best way to convey the sweeping majesty of a broad landscape, I sometimes enjoy guiding my viewers’ eyes with vertical compositions of traditionally horizontal scenes. Tunnel View in Yosemite, where I think many photographers tend to compose too wide, is a great example. The scene to the left of El Capitan and the right of Cathedral Rocks just can’t compete with the El Capitan, Half Dome, Bridalveil Fall triumvirate, yet the world is full of Tunnel View images that shrink this trio to include (relatively) nondescript granite.
That’s why, when the foreground and sky aren’t particularly interesting, I often go for fairly tight horizontal compositions at Tunnel View. And while Tunnel View is among the most spectacular views on Earth, the foreground beneath the vista is usually quite bland, and overhead California’s chronic blue skies are frustratingly boring. So I’m afraid many of my Tunnel View images are horizontal, and rarely stray far left of El Capitan, or right of Cathedral Rocks.
Fortunately, there are exceptions. One of my favorite exceptions is those rare times when fresh snow smothers the evergreen valley floor. Another favorite is dramatic clouds, whether in the valley below or sky above. Faced with visual treats like this, vertical frames are wide enough to feature the foreground and/or sky without diluting the Tunnel View drama by including extraneous granite.
More specifically…
In Yosemite, one thing I never count on when there’s no weather in the forecast is a nice sunrise. That’s because Yosemite’s (default) blank skies, coupled with Tunnel View’s east-facing view, forces sunrise shooters to photograph fully shaded subjects (El Capitan, Half Dome, Cathedral Rocks, and Bridalveil Fall) against the brightest part of the sky. That’ why, without clouds, Tunnel View is much better late afternoon to sunset. For me, on a typical (empty sky) Yosemite morning, the real show is the first light on El Capitan, which arrives about 15 to 20 minutes after sunrise. On mornings with no clouds forecast, I usually start my groups with an El Capitan reflection of that first light—not only is this a reliably beautiful sight, everyone gets to sleep an hour longer (since going for the actual sunrise means being on location at least 30 minutes before sunrise instead of 20 minutes after).
But for whatever reason, and despite a promise of clear skies all morning (until a storm was forecast to start moving in that afternoon), I decided to hedge my bets on the final sunrise shoot of this month’s Yosemite Autumn Moon photo workshop. Normally we spend this final morning at Bridalveil Creek, arriving as soon as it’s light enough to start shooting in the dense shade there. Instead, I got everyone out about 30 minutes earlier and headed straight to Tunnel View. While this wouldn’t be early enough to shoot sunrise from start to finish, it would get us there in time for the best color in the remote chance the clouds arrived earlier than forecast. And that’s exactly what happened.
We were pulling in just as the cirrus precursors to the evening rain started lighting up. Since my group had already been up here twice, everyone was out of the cars and grabbing their gear before my seatbelt was off. Half the group beelined to the standard view with my brother (who was assisting me in this workshop), while the rest joined me on a granite ledge above the TV parking lot (a similar view, but with fewer people—also a little more physically challenging, and not the favorite spot of anyone bothered by heights).
As beautiful as the sky was, since I rarely photograph at Tunnel View anymore, my camera stayed in the car and I was content to just enjoy the show. Or so I believed. But as I stood there watching the color keep getting better and better, I started to second guess my decision to forego my camera. I knew I could be down to my car any back in less than 5 minutes, but the color was changing so rapidly, I also knew that would mean missing the best stuff. So I whipped out my iPhone 17 Pro, put it into RAW mode, and quickly framed up the scene.
With the great sky and bland foreground, I didn’t consider anything but vertical compositions. At first I went wide enough to include Bridalveil Fall, and though it was flowing nicely for autumn, it really wasn’t impressive enough to justify going that wide. So I quickly tightened my framing to include only El Capitan and Half Dome, putting in only the minimum amount of foreground so I could maximize the spectacular sky. I’d love to tell you what focal length, f-stop, and shutter speed I used, but my iPhone made all those decisions for me, and clearly did a pretty great job. What a time to be alive!
A few thoughts on iPhone image quality
Okay, seriously, as great as the iPhone (or any other current smartphone) camera is, let me remind you that smartphone image quality is nowhere near the quality of today’s full frame sensors and lenses. And I actually got a firsthand reminder of this fact while processing this image. Though I was truly blown away by the detail my iPhone captured, on the day I processed today’s image, I also prepared three large prints that had been ordered by an interior designer for the home of one of her customers. Though two of these images were captured more than 15 years ago with my Canon 1DS III (21 megapixels); the other was about 10 years old, from my Sony a7R II (42 megapixels), I was pretty confident the quality and detail this job required was all there.
-

- Stillness, South Tufa, Mono Lake
-

- First Light, Yosemite Valley
-

- Yosemite Sky, Tunnel View, Yosemite (2016)
And because maximizing this quality was the highest priority for her customer, she opted for custom prints rather than just going through my standard (much cheaper) SmugMug prints website (www.garyhartprints.com), where the images are pre-uploaded, medium resolution jpegs waiting for anyone to order (full disclosure: I’ve never had a single complaint about one of these prints). To prepare the images for printing, I returned to the original files and did extensive prep (using the latest processing technology) to ensure that the noise reduction, up-res, and sharpening got the most out of every single pixel.
I am absolutely certain I could print an iPhone image as large as these custom orders were (24×36) without apologizing. But getting up-close and personal with these three full-frame sensor prints at the same time I was processing an iPhone image, the detail captured left little doubt that, for anything much larger or more demanding than computer/web display, smartphone capture has a long way to go to catch “real” cameras. (But I’m still pretty thrilled to know that I can get useable quality any time Nature catches me without my real camera.)
Join me in Yosemite
Workshop Schedule || Purchase Prints || Instagram
Let’s Get Vertical
Click any image to scroll through the gallery LARGE
, Yosemite")


Super? Moon
Posted on November 8, 2025
November Moon, Half Dome from Tunnel View, Yosemite
Sony a7R V
Sony 200-600 G
Sony 1.4x teleconverter
ISO 200
f/9
1/80 second
This week’s full moon was a “supermoon”—or, as the media frequently proclaimed, “The biggest moon of 2025!” And while that is technically true, the size difference between a super and average moon is barely perceptible.
So, as a public service, I’ve dusted off and updated a prior article explaining the supermoon phenomenon (any hyperbole)—and what better time to share it than just days after photographing the November supermoon?
What’s the big deal?
So what exactly is so “super” about a “supermoon?” Answer: Not much. Or, maybe a better way to answer the question would be: When presented with a random series of full moon images, would you in fact be able to identify the supermoon? Doubtful. So why the media frenzy? And why do we see so many huge moon images every time there’s a supermoon? So many questions….
Celestial choreography: Supermoon explained
To understand what a supermoon is, you first have to understand that all orbiting celestial bodies travel in an ellipse, not a circle. That’s because, for two (or more) objects to have the gravitational relationship an orbit requires, each must have mass. And if they have mass, each has a gravitational influence on the other. Without getting too deep into the gravitational weeds, let’s just say that the mutual influence the earth and moon have on each other causes the moon’s orbit to deviate ever so slightly from the circle it seems to be (without precise measurement): an ellipse. And because its orbit isn’t round, as the moon circles Earth, its distance varies with the position in its orbit.
An orbiting object’s closest approach to the center of its ellipse (and the object it orbits) is at perigee; its greatest distance from the ellipse’s center is apogee. And the time it takes an object to complete one revolution of its orbit is its period. For example, earth’s orbital period around the sun is one year (365.25-ish days), while the period of our moon’s orbit is slightly more than 27 days.
But if the moon reaches perigee every 27 days, why don’t we have a supermoon every month? That’s because we’ve also added “syzygy” to the supermoon definition. In addition to being a great Scrabble word, syzygy (though it would cost you 2 blank tiles) is the alignment of celestial bodies—in this case it’s the alignment of the sun, moon, and earth (not necessarily in that order). Not only does a supermoon need to be at perigee, it must also be syzygy.
Syzygy happens twice each month, once when the moon is new (moon between the sun and Earth), and again when it’s full (Earth between the sun and moon). While technically a supermoon can also be a new moon, the full moon that gets all the press because a new moon is lost in the sun’s brightness and never visible, so no one cares. Since Earth circles the sun while the moon revolves around Earth, to achieve syzygy, with each orbit the moon has to travel a couple extra days to catch up. That’s why the moon reaches perigee evey 27 days, but syzygy comes every 29.5 days—the moon’s distance from earth is different with each syzygy because it comes at different points in the orbit.
The view from earth: Supermoon observed
While lunar perigee, apogee, and period are precise terms that can be measured to the microsecond, a supermoon is a non-scientific, media-fueled phenomenon loosely defined as a moon that happens to be at or near perigee when it’s full. To you, the viewer, a full moon at perigee (the largest possible supermoon) will appear about 14% larger and 30% brighter than a full moon at the average distance. The rather arbitrary consensus definition of the distance that qualifies a moon as a supermoon is a full moon that is within 90 percent of its closest approach to earth.
I really doubt that the average viewer could look up at even the largest possible supermoon and be certain that it’s larger than an average moon. And all those mega-moon photos that confuse people into expecting a spectacular sight when there’s a supermoon? They’re either composites—a picture of a large moon inserted into a different scene—or long telephoto images. (I don’t do composites, but they’re a creative choice that I’m fine with others doing as long as they’re clearly identified as composites.)
For an image that’s not a composite, the moon’s size in the frame is almost entirely a function of the focal length used. I have no idea whether most of the moons in the full moon gallery below were super, average, or small.
Can you identify the supermoon?
, Yosemite")

Well, if you said the big moon is a supermoon, you’d be right. But it’s kind of a trick question, because these are both images of Tuesday’s supermoon. The size difference is entirely a function of the focal length I used: around 100 mm for the small moon, more than 800 mm for the large one. What these images also make clear is that what I gain in moon size, I lose in field of view—you can’t have both. So when you see a wide angle scene with a huge moon, don’t think supermoon, think composite: a big moon dropped into a wide scene. Or worse still: AI. (Yuck.)
Every full moon is super
As far as I’m concerned, a rising or setting full moon is one of the most beautiful things in nature. But because a full moon rises around sunset and sets around sunrise, when most people are eating dinner or sleeping, seeing it is often an accident—maybe the moon catches your eye as you walk out of the store, or you spot it in near the horizon when your car rounds a bend. But viewing a moonrise or moonset doesn’t need to be an accident. There’s loads of information available online that will tell you which night to look for a full moon, and the general time and direction to look. And for people like me, who try to photograph moonrises and moonsets around an alignment with a terrestrial feature, there is also slightly more technical info that enables more precise planning.
About this image
Which brings me to this week’s image (images), captured Tuesday evening from my very favorite location to view a moonrise: Tunnel View in Yosemite. Why is Tunnel View my favorite moonrise location? Because I can’t think of a better combination beautiful subjects and distant view (nearly 9 miles to Half Dome), that allows me to photography the moon large with with a long telephoto lens and include a striking foreground subject. And if I just want to use the moon to accent a broader scene, the wide angle view at Tunnel View is not too shabby either.
As with most of my moonrise images, this one had been on my radar for over a year. And like many of my moonrise opportunities, I scheduled a workshop so I could share it with other enthusiastic nature photographers. But, since I don’t care about supermoons, I had no idea this November full moon would be a supermoon—and as I grew tired of hearing in the preceding weeks, the largest full moon of 2025! (Yawn.)
The way this month’s full moon set up, I was able to get my group a couple of practice moonrises from other Yosemite locations leading up the Tuesday moonrise—one with a reflection of Half Dome, and another from Glacier Point. Not only did they lear exposure and processing techniques that allow the capture of lunar and landscape detail with a single click, they got beautiful (albeit wider, with a small moon) moon images. I also demonstrated in a training session how I plot the moonrise (without using celestial plotting apps like Photographer’s Ephemeris and Photo Pills).
There’s often drama surrounding an impending moonrise as I stress about forecasts that promise clouds, or a sky filled with more clouds than forecast. This year, despite the threat of rain the following day, the Tuesday evening forecast was clear skies. And true to expectations, the entire afternoon was cloud free.
I got my group up to Tunnel View about a half hour before the moon’s expected arrival, so we all had plenty of time to get set up and settled in. About half of the group joined me on a granite slab above the Tunnel View parking lot, with the rest of the group setting up with my brother Jay and the hoards of other photographers at the wall in front of the parking lot (the standard Tunnel View vista).
I had two tripods set up: one with my (big and sturdy) RRS TVC-24L, with my Sony a7R V and 1.4X teleconverter; one with my Sony a1 and 100-400. My plan was to switch between the two bodies, and to switch out the 200-600 for my 24-105 once the moon separated from the landscape. In other words, I’d be using the a1 with the 100-400 for the entire shoot, and the a7R V with the 200-600 (first) and 24-105 (after a few minutes).
As we waited, I reminded my group that the moon would appear just a little left of Half Dome at around 4:45 (about 15 minutes before sunset), plus/minus 5 minutes. I also told my group that, depending on their camera and metering skills, we’d be able to continue photographing up to 15 minutes after sunset before the foreground became too dark to capture both lunar and landscape detail with one click. The moon arrived right on schedule, right around 4:44 and we were in business….
So maybe the best thing to come of the recent supermoon hype is that it’s gotten people, cameras or not, to appreciate the beauty of a full moon. If you like what you see, mark your calendar for every full moon and make it a regular part of your life—you won’t be sorry.
Join me in a Yosemite workshop
Workshop Schedule || Purchase Prints || Instagram
Tunnel View Moonrise Collection (Super and Otherwise)
Click any image to scroll through the gallery LARGE


, Yosemite")


Open Mind and Open Eyes
Posted on November 1, 2025

Splash of Rainbow, South Tufa, Mono Lake
Sony α1
Sony 16-35 GM II
6 seconds
F/11
ISO 100
As landscape photographers, it’s easy to arrive at a photo location with a preconceived idea of what we’re going to shoot. That’s often because there’s a single perspective that gets all the attention, dominating the images of the location shared online and skewing the perception of what its images should look like.

Stillness, South Tufa, Mono Lake
At Mono Lake, despite its sprawling layout with lake views that span 270 degrees, photographers (myself included) tend to gravitate the east-facing beach with a solitary tufa tower that resembles a battleship floating just a couple hundred feet offshore. I can’t deny that it’s a striking feature worthy of photographing, but certainly not to the exclusion of other opportunities at South Tufa.
Fortunately, since this spot is at the most distant corner of South Tufa, getting out there requires walking past most of the other views on the route. So each time I take a workshop group for its first visit to South Tufa, as I guide them out to this distant beach, I make a point of emphasizing all the possibilities along the way, encouraging them to stick with me all the way out to the battleship view, but to file away other scenes they might want to return to as they go.
But photography at South Tufa isn’t just about the views—equally important is the light. So another point I try to emphasize on that initial walk is understanding—given that there are photo-worthy views that include both lake and tufa facing east, north, and west—how much the scene will change with the direction of the sunlight. Since our first visit is usually a sunset shoot, I remind everyone how different the light will be when we return for sunrise the next morning. I point out where the sun will rise and encourage them to visualize the different light we’ll see that will opportunities in multiple directions, and to identify potential compositions that might work in that light.
Since we’d been there the prior evening, as soon as this year’s group arrived dark and early on this autumn morning, everyone scattered quickly. I brought up the rear, checking in with everyone on my walk out to the battleship tufa beach. As much as I like the scene at this east-facing beach, one challenge is that it’s in the midst of what might be best describes as a tufa garden—a collection of stubby shrubs and 10-15 foot high tufa towers—that makes it very difficult to see what’s happening in the other directions. But with a nice mix of clouds and sky this morning, I knew the potential existed for a nice sunrise and made a point of keeping my head on a swivel to avoid missing something in the other directions.
About 15 minutes before sunrise I noticed the clouds in the west start catching light, and shortly thereafter the Sierra peaks in the same direction lit up. I let the near me know that this might be a good time to wander over to the other side of the tufa garden and headed in that direction. The walk to the other side is probably less than 100 feet, but by the time I got there the light on the base of the clouds had intensified significantly. And much to my amazement—given that there was no sign of rain here, nor any rain at all forecast for the area that morning—realized that a splash of rainbow was perched atop the hills across the lake.
Not knowing how long the rainbow would last, I ran around hailing as many in my group as possible, and we all went straight to work trying to make a photo before it went away. I’m a strong proponent of finding compositions where all the elements work together, which is no small feat at South Tufa, given all the randomly situated tufa towers and rocks jutting from the water. Fortunately, as I moved around trying to organize all the visual elements in my scene, not only did the rainbow seem to be waiting for me to finish, it actually intensified as I did it.
It probably didn’t take more than a minute or two, but it felt like forever before I found a composition that satisfied me. As you can see, this rainbow was never destined to be the main subject—at its best it was simply a colorful accent to an already beautiful scene. But what an accent it was.
In addition to the distant rainbow and sunlit clouds, the other important elements I needed to organize were primarily in my foreground: the tufa peninsula jutting in from the left; the small tufa island at my feet, the submerged tufa stones; and (especially) the reflection.
To make all this work together, I started by centering the little island in my frame, and balancing the rainbow with the tallest spire of the peninsula. With the scene left/right balanced, I decided I need to get my boots muddy and set my tripod in shallow water to turn the foreground tufa into an actual island. Since the best clouds were fairly low, I only included enough sky to include them (by putting the top of my frame where I did, viewers can infer that the clouds stretch much farther than they did), and was careful not to put the little blip of tufa on the far right too close to the edge.
Now for the reflection. I didn’t really care for the empty water between the reflection and the little island, so I slowly dropped my tripod, keeping an eye on my LCD and stopping when the reflection filled almost all of that watery void. I put on my Breakthrough 6-stop dark polarizer to smooth the water, and it to reveal the interesting detail on the lakebed without erasing the colorful part of the reflection. Finally, I focused on the small rocks just beyond my foreground island, and clicked.
This is not a scene I’d have normally gravitated to, but I was drawn by the light (and stayed for the rainbow). Had I not seen the rainbow, I’m not even sure I’d have taken the time to build the composition I ended up with, but this is just one more reminder that if you open your mind and your eyes, things just have a way of working out.
Workshop Schedule || Purchase Prints || Instagram
Mono Views
Click any image to scroll through the gallery LARGE


Among the Aspen
Posted on October 25, 2025

Among the Aspen, Lundy Canyon, Eastern Sierra (California)
Sony a7R V
Sony 100-400 GM (with extension tubes)
ISO 200
f/5.6
1/30 second
I’m deviating (briefly) from grand landscapes to remind you (and myself) that even the most beautiful scene is abundant with smaller, simple beauty. Case in point: The Eastern Sierra, which is filled with expansive views beautiful enough to easily drown out Nature’s exquisite subtleties.
 Last week I shared an image from North Lake that featured many of the components nature photographers look for in a dramatic landscape scene: beautiful clouds and light, jagged peaks, a sparkling reflection, and vivid aspen throbbing with color. As spectacular as each of these things is, for me it’s the yellow and orange aspen that really make the North Lake scene special. When faced with a view like this, because it’s easy to overlook the underlying intricacies at play, each time I visit the Eastern Sierra I make a point of spending quality time among the aspen.
From a distance, especially in autumn, it’s the aspen’s color that first draws the eye. But move closer (or zoom tighter) and other qualities start to emerge, starting with the way the leaves dance and shimmer with the breeze. Closer still, and the parallel white trunks come into striking focus. But it’s not until you plunge into the depths of an aspen stand that you fully appreciate unique character of each individual aspen, the graceful curves of these knotted, textured trunks that seem to have paused mid-move while in the midst of an elegant dance.
I’ve explored many of the canyons up and down US 395 that are ideal for intimate aspen exploration. Unfortunately, the priorities and time restrictions of a workshop schedule generally limit my Eastern Sierra aspen opportunities to Bishop Creek Canyon (where North Lake is), and Lundy Canyon (a little north and west of Mono Lake). Though completely different, each offers opportunities to photograph aspen both far and near.
I found this little scene near the trailhead at the end of the Lundy Canyon road, during the final shoot of this year’s Eastern Sierra workshop. Instead of taking the popular approach to photographing within an aspen stand—some version of (usually) truncated trunks using front-to-back sharpness that emphasizes their parallel verticality receding into the distance—my preferred aspen stand approach is to minimize depth of field to isolate specific aspects of these beautiful trees. But the very quality that makes these close aspen scenes so enjoyable also provides a significant challenge: what my eye sees is absolutely nothing like what my camera sees.
That’s not a complaint, because the camera’s ability to “see” and share the world in ways that are completely foreign to human vision not only allows photographers to expand their viewers’ perspective, it may just be our most powerful opportunity for creativity. When I approach an aspen scene, I first decide what I want to emphasize. In last week’s image the aspen were across the lake, and just one (albeit significant) component of a grander scene. But when I wander among the aspen, I have to decide whether I want emphasize the parallel trunks of the entire stand, the yellow leaves (or leaf), the colorfully blanketed forest floor, the unique character of an individual trunk, or maybe some hybrid of multiple aspects.
In this instance, I decided to make it all about the trunks. I started with a tree that had a good assortment of knots, scars, and striations, then repositioned myself until the tree had a fair amount of separation from the trunks and leaves behind it. The position that worded best had a few green leaves dangling between me and my target trunk, but I was pretty sure my shallow depth of field plan would make the leaves a feature rather than a distraction.
I went to my 100-400 lens, adding 15mm of extension so I could focus closer, then set my aperture wide open (f/5.6). Now I was ready for the best part: putting my eye to the viewfinder, focusing on the trunk, and watching the scene to transform. As expected, the close green leaves created a soft green border. My subject trunk jumped into sharp focus, revealing all the intricate texture and definition I hoped to emphasize. while the background trunks softened into complementary vertical posts with enough definition to be recognizable, but not so much as to draw the eye from my subject. And the surrounding aspen leaves blurred into a golden canvas upon which my scene rested.
Following that initial view I tweaked my position and focal length a few times until everything felt balanced. But after few minutes the sun crested canyon wall, washing out the beautiful soft light, and the workshop was over.
An interesting (to me) aspen fact
Aspen reproduce largely by sprouting suckers and shoots from their roots. This makes a stand of aspen a single organism of genetically identical trees, all fed by the same root system. Though each individual aspen trees will only live up to 200 years, a mature aspen stand can be thousands of years old.
Aspen Near and Far
Click any image to scroll through the gallery LARGE


")


")
")


Hold My Gear (the Sequel)
Posted on October 18, 2025

Color and Clouds, North Lake Autumn Reflection, Eastern Sierra
Sony α1
Sony 16-35 GM II
1/100 seconds
F/9
ISO 100
After sharing in my prior post that I’ve been lugging a 30 pound camera bag through airports, it occurred to me that I haven’t updated you on the ever-changing contents of said camera bag lately. But before I continue, let me remind you that a photographer’s gear choice is no more relevant to his images than a writer’s pen is to her stories, or a chef’s cutlery is to her cuisine. Yes, these choices might make a difference on the fringe, but I imagine most would agree that a great chef will almost certainly get better results with Kirkland knives (with all due respect to Costco) than an average chef would get with top-of-the-line Zwilling.
But that doesn’t mean that I would voluntarily discard my current gear for some other brand. Far from it. I love the gear I use, and am always happy to share why. So what follows is a revised version of the first Hold My Gear post, from 2021—below that, you’ll find the story of today’s image.
I’ll start with my camera bag
Shimoda Action X50 with a Large Core Unit: This bag simply checks all the boxes for me: for starters, it’s large enough to carry everything I consider essential, with room to spare for a few things that are less than essential and that may change depending on the trip and my objective. In addition to 2 bodies and 5 lenses, it fits all the miscellany I always want with me (headlamp, rain and/or cold weather apparel, extra batteries and media cards, tools, among many things).
But more than capacity, my bag also needs to be comfortable on long hikes—whether across rugged High Sierra terrain, Iceland’s winter icescapes, or the endless concourses of Sydney International Airport—and (just as important) it must fit fully loaded into any overhead compartment I encounter. My Shimoda passes all these tests with flying colors.
Always in my bag
- Sony a7R V and Sony a1 bodies
- Sony 12-24 f/2.8 GM lens: Though I don’t use it as much as a couple of other lenses, having a lens as wide as 12mm allows me to photograph things I never could before, and I love that it’s still relatively compact.
- Sony 16-35 f/2.8 GM II lens (plus a Breakthrough polarizer), which is usually mounted on the a1: This focal range is covered by other lenses in my bag, but I love the lens too much to leave it behind—crazy sharp, and f/2.8 means it’s fast enough for night photography in a pinch. Plus, unlike the 12-24, I can use it with conventional polarizing and ND filters.
- Sony 24-105 G lens (plus a Breakthrough polarizer), which is usually mounted on the a7R V: Not only is this lens wonderfully sharp, its middle-of-the-road focal range fits so many situations—it’s no wonder this lens is my workhorse.
- Sony 100-400 GM lens (plus a Breakthrough polarizer): Replacing my 70-200 with this slightly bigger lens doubled my focal range, without adding tons of extra weight—and it’s a good match with the Sony 1.4X teleconverter.
- (Usually) Sony 14mm f/1.8 GM lens: This is my night lens, and though I only use it at night and don’t do night photography on every trip, since I have a slot for it and it’s not too heavy, my 14 GM usually just lives in my camera bag.
- Sony 1.4X teleconverter—I used to use the 2X, but found a noticeable sharpness improvement after switching to the 1.4X.
- Filters: Breakthrough 72mm and 77mm neutral polarizers (nearly fulltime on the 16-35, 24-105, and 100-400 lenses), Breakthrough 72mm and 77mm 6-Stop Dark polarizing filters (to switch out with my standard polarizers when I need a longer shutter speed).
- Memory cards: Each camera has two 128 GB Sony Tough cards, then I have a handful of other 128 GB and 64 GB SD cards rattling around in a pocket, just in case.
- Other stuff: Lens cloths, headlamp, insulated water bottle, extension tubes, memory cards, multiple spare batteries, Giotto Rocket Blower, and a couple of Luna Bars (because photography always trumps meals).
Specialty Equipment (lives in a second camera bag that gets tossed in the back of the car and stays there when I don’t need to fly to my destination)
- Sony 20mm f/1.8 G lens: For Milky Way and other moonless night photography—this one’s even more compact than the 24mm.
- Sony 24mm f/1.4 GM lens: For Milky Way and other moonless night photography—I can’t believe how compact this lens is.
- Sony 90mm Macro: I use this lens a lot with extension tubes to get super close for my creative selective focus work (wildflowers, fall color).
- Sony 200-600 G lens: When I want to go big on a moonrise/moonset—often pared with the 1.4x teleconverter. I also use this lens with extension tubes for selective focus fall color and wildflowers.
- 2 Stepping Stone LT-IV Lightning Triggers
Support
- Really Right Stuff Ascend-14L tripod with integrated head: Absolutely the best combination of light, tall, and sturdy I’ve ever found in a tripod. It’s so light and compact that I just attach it to my camera bag, even when flying, and just forget about it until it’s time to shoot (never a problem with TSA).
- Really Right Stuff 24L Tripod with a RRS BH-55 ball head: Sturdy enough for whatever I put on it, in pretty much whatever conditions I encounter. I also like that, even though it doesn’t have a centerpost, when fully extended (plus the head and camera), it’s several inches taller than I am. As much as love my Ascend, this is my tripod of choice in strong wind, or when I’m shooting extra long. As with my bag that carries my specialty lenses, this tripod usually lives in the back of my car and doesn’t usually fly with me (it would need to go in the suitcase), but is always available when I drive to a destination.
Color and Clouds, North Lake Autumn Reflection, Eastern Sierra
A few words about today’s image
Thanks to a great group and beautiful conditions, this year’s Eastern Sierra workshop was a great success. Though today’s image didn’t come during the workshop, you could call it ES workshop adjacent, because it came the day before the workshop, on my annual pre-workshop scouting visit to North Lake.
As familiar as I am with all my locations, I hate taking my groups to locations I haven’t been to in a year, because you just never know what might have changed. That’s especially important when the goal is fall color, which can vary significantly from year to year. It’s not always practical to pre-scout every location, but I do my best to make it happen when I can.
For my Eastern Sierra workshop, I always leave early the morning of the day before the workshop, which gives me time to hit all my spots on the way down. I can make it as far as Bishop, which makes for a long day, but from Bishop can finish my scouting the next morning by driving the final hour to Lone Pine, and leaving early enough to get eyes on my Lone Pine locations (Whitney Portal, Mt. Whitney, and the Alabama Hills) before the workshop starts that afternoon.
With the workshop always starting a Monday, Sunday is dedicated to scouting my locations. But this year’s Sunday scouting mission was a little problematic because I’d only just returned from Jackson Hole at 9 p.m. Saturday night, after assisting Don Smith’s Grand Teton National Park workshop (I’d get instant payback because Don would be assisting my Eastern Sierra workshop). After unpacking and repacking, the plan was to rise dark and early Sunday morning and be on the road by 7:00 a.m. This year, instead of bounding out the door at 7:00, I pretty much dragged myself out (with a shove from my wife) closer to 8:30. Still enough time, but not a lot of wiggle room.
I perked up pretty quickly once on the road, helped no doubt by an intermittent light-to-moderate rain that followed me down 395, and (especially) the beautiful clouds that came with it—a significant upgrade from the chronic blue skies that often plague this trip.
To ensure that I made it up to North Lake before dark, I didn’t take my usual swing through the June Lake Loop, and skipped the drives up to the McGee Creek and Mosquito Flat trailheads as well. Since these aren’t workshop stops (though I do recommend them as possible extra locations for anyone looking to photograph more color on the drive from Bishop to our Lee Vining hotel on Day 3), I felt okay about missing them in favor of North Lake.
On the steep ascent up Bishop Creek Canyon, I got a front row view of the peaks playing hide and seek with the clouds. By the time I climbed the last mile on the (mostly) unpaved, one-lane road to North Lake, a few sprinkles dotted my windshield. With so much workshop prep on my mind, I virtually never photograph at any point on this pre-workshop scouting trip, but for some reason (beautiful sky), this time I swung my camera bag onto my back for the 100-yard walk from the parking area to the lakeshore. I was beat, and hungry, and with darkness coming soon, I just wanted to get back to Bishop to check-in to my hotel to prepare (and rest up) for the workshop—but if the lake is real nice, maybe I’ll fire off a couple of frames before calling it a day.
The color couldn’t have been better, and the clouds were off the charts. A couple of other photographers were set up on the lakeshore where I usually like to shoot the reflection, but with a light breeze spreading small ripples across the water, I passed on the reflection in favor of the gold and green grass to fill my foreground.
After about five minutes I was pretty happy with what I had and was just about to pack up when I noticed that the water across the lake had flattened out, and a reflection had formed. It was a long way away and hardly visible, but looking closer, I could see the stillness expanding toward me. Soon—in no more than a minute—the entire lake surface a calmed to a reflection and all thoughts of leaving vanished.
With my usual reflection spot occupied, I moved about 30 feet closer to the road, to a tiny micro-cove sheltered by grass and a large rock. Here you can’t get as much reflection, but being so sheltered, it’s usually the last place the reflection leaves if a breeze picks up.
Given the narrowness of my foreground reflection here, combined with beautiful clouds and light high above, I opted for a vertical composition. Dropping lower, I positioned myself to include two small rocks as foreground anchors, then composed wide to include as much sky and reflection as possible.
Despite occasional sprinkles, the rain mostly held off and I ended up staying for nearly an hour, finally moving over to my usually spot when the other photographers moved on.
This was Sunday evening. I returned with my group for sunrise Wednesday morning. I was pretty confident the color would still be great, but crossed my fingers all the way up the canyon hoping we’d get a reflection. I was right about the color, and the reflection gods smiled on us as well, delivering an absolutely flawless mirror atop the water. We also had a couple of clouds, but nothing like my evening a couple of nights earlier, and as excited as my group was, I didn’t have the heart to tell them that I had it even better.
I Love Reflections (Perhaps You Noticed)
Click any image to scroll through the gallery LARGE


, Death Valley")


, Yosemite")


Things Always Work Out…
Posted on October 10, 2025

Setting Crescent Moon, Grand Teton, Grand Teton NP
Sony a7R V
Sony 24-105 G
.8 seconds
F/16
ISO 100
I’m a naturally positive person who doesn’t have to work too hard to stay optimistic about pretty much everything. And while this “things always work out” philosophy generally serves me quite well, it can sometimes cause problems. Case in point…
A couple of weeks ago I was in Jackson Hole to help out Don Smith with his Grand Teton workshop. Back in the pre-Covid days, when Don and I would trade off assisting several of each other’s workshops every year, my annual Jackson Hole trip was one I especially looked forward to. Since I hadn’t been there since 2018, returning this year was a particular treat.
In addition to the incomparable beauty of the Tetons, Jackson itself is has a great little downtown that I make a point of walking daily when I’m there. With so many shops, galleries, and restaurants, it’s hard to spend quality time at each, but the one place I always make sure I get to is Tom Mangelsen’s gallery on Cache Street.
This year I had so much other stuff on my plate, by the time our final day arrived, I still hadn’t made it there. So I got a late checkout and carved out a couple of morning hours to walk down there, browse, and return before heading to the airport.
While enjoying the beautiful gallery, I couldn’t help patting myself on the back for allowing enough time to feast on every print displayed without feeling rushed. Even though I’d estimate that at least 80% of Mangelsen’s images are of wildlife, and I don’t photograph wildlife, I couldn’t help but feel the inexplicable kindred connection that draws me to a very small cadre of nature photographers whose motivation seems, rather than to dazzle or impress, simply to share their own very personal relationship with natural beauty as it touches them. And while I won’t pretend to have tapped those instincts to the extent Mangelsen and those few others have, their images have a profound influence on me.
As much as I’d have loved to leave with a Mangelsen print, I knew that would be far beyond my ability to transport home (not to mention my budget). But during my meanderings I couldn’t help notice the variety of beautiful Tom Mangelsen coffee table books displayed throughout the gallery. Last year I wrote a post about, among other things, my relationship with coffee table books, and how it saddens me that the coffee table photo book appears to be a declining medium., so it always thrills me to encounter signs of CTB life. On a whim I asked if any of the books were signed (I’d looked but found none) to my delight she not only did she point me to some, she said there was no price premium for the signed books.
For context, I’m of the pre-selfie generation, coming of age way back in the time autographs, not selfies, were the ultimate commemoration of a transient connection to greatness. (Another nice thing about autographs is that they can be acquired without bothering a person who is most likely quite tired of accommodating intrusive strangers.) Though I’m not a collector, over the years I’ve assembled an eclectic inventory of signed memorabilia from people I admire.
How eclectic? Well, I have a baseball signed by Ted Williams; a bottle of wine signed by Mick Fleetwood; “August and Everything After,” in vinyl, signed by all of Counting Crows; CDs signed by Michael Franks and Pat Metheny; two signed Galen Rowell prints; and a personal postcard from Wallace Stegner. (And the person who scores me a cartoon personally signed by Gary Larson would be a friend for life.) So anyway, getting a signed Tom Mangelsen book just seemed like the thing to do.
I’d be lying if I said I’d forgotten that, on my flight out, my suitcase weighed in at 51 pounds, one pound above the checked bag limit, forcing me to transfer a pound worth of miscellany to my already 30-pound camera bag. (My computer bag, which must fit under the seat to qualify as a personal item, weighs about 10 pounds and was already stuffed to the brim.) Nevertheless, I of course chose the largest, heaviest Mangelsen book: “The Last Great Wild Places”— a whopping 12×18 inches and (including the lovely protective carryall) about ten pounds. My plan for how I was going to travel with an additional 10 pounds? It’ll work out.
Unfortunately, somehow the woman at the Jackson Hole United Airlines counter didn’t get that memo. While packing, after adding my new book, I’d made a token effort to transfer a few more things to my camera bag (oh yeah, I’d also purchased some T-shirts for me, a sweatshirt for my wife, plus a pound of coffee, so my suitcase was starting out even heavier than before), and strategically positioned a few other heavy-ish items near the top of the suitcase for easy access in case more transferring was required. At the airport, I held my breath as I hefted my suitcase onto the scale, flashing my best, “Hey, I’m nice guy—work with me here” smile. The counter person looked at the scale, then back at me, and issued her best, “You’ve got to be kidding me” stare. When I feigned ignorance, she simply said, “You’re ten pounds over.” Sigh.
After shifting my pre-staged heavier items and discovering that I was still seven pounds overweight, a small amount of panic started to leak in. Fortunately, we’d arrived at the airport more than 3 hours early. After 45 minutes of shifting, repacking, and reweighing (at least four times) I passed the weigh-in and queued up for TSA. (My new United airlines “friend” wouldn’t even reward me for getting down to just 1/2 pound over.)
I won’t bore you with the details, but suffice to say, if the plane had gone down and they sent my recovered belongings to my wife, she’d no doubt be scratching her head trying to figure out why my camera bag included a one pound bag of ground coffee, my toiletry kit, a Bluetooth speaker, and a pair of hiking boots—and why my computer bag also included a coffee mug, umbrella, and several pairs of socks.
But the bottom line is, after countless failed weigh-ins, then lugging (not to mention babysitting) over 50 pounds of bulky carryon through the Jackson Hole, (incomprehensibly large) Denver, and Sacramento airports, I did indeed make it home with the signed Tom Mangelsen book that’s now on display in my office. So I guess things really do work out.
Speaking of things working out
The workshop shoot that resulted in today’s image was not part of Don’s Grand Teton workshop master plan. It was an opportunistic response to a fortuitous confluence of blank skies and a crescent moon that just happened to come at the right time this year.
When scheduling a photo workshop, we have no idea of the conditions we’ll encounter. While I schedule many workshops using the moon as a hedge against blank skies, other factors can and do take priority—like fall color in a fall color workshop. Since this was Don’s workshop, I had nothing to do with the schedule, but I knew this one had to be scheduled for the best chance of peak fall color, moon be damned. (And to say Don nailed the fall color timing this year would be an understatement.)
Having just returned from my Hawaii Big Island workshop, and knowing I was departing for my Eastern Sierra workshop the day after returning from Jackson Hole, the moon had been the last thing on my mind until just a day or two before the workshop started. That we’d have a crescent moon in the west shortly after sunset had been on Don’s radar long before that, but we both agreed that it would probably be too far south to align with any of our prime sunset locations. But when mostly clear skies were forecast for the workshop, Don and I revisited the moon as a potential blank sky antidote to follow one of the workshop’s sunsets, and decide that we could indeed make it work.
After pulling up some topo maps and solar/lunar data, I plotted the waxing crescent’s altitude and azimuth for each evening of the workshop and determined that Thursday night would be the time to go for it. Then Don and I scouted the potential locations, both on maps and in person, and found a spot on the road between Jackson Lake and Oxbow Bend that would align the moon perfectly with Teton Peak on Thursday evening.
When the day arrived, we followed a nice sunset at Jackson Lake with a short drive to our predetermined spot, arriving in the warm glow of early twilight. To my eye the view here was the spectacular peaks to our south and west, but I couldn’t help notice that just across the the road and facing north (backs to the mountains), a dozen or so photographers were pointing very long glass at something far across the meadow. I looked more closely and barely made out a pair of elk doing whatever elk do (no, not that). Whatever. (Okay, seriously, I understand the appeal of wildlife photography, it’s just not for me.)
We landscape shooters pointed in the complete opposite direction, toward the brightening crescent hanging above Grand Teton, arguably America’s most striking mountain. To align the moon and peak with the foreground I wanted, I jogged about 5o yards down the road, staying only long enough to get a few frames. But being down there also gave me a great perspective of the conflicting priorities on display: wildlife shooters on one side of the road pointing north, landscape shooters on the other pointing south (it was actually a pretty amusing sight I wish I’d thought to take a picture of). I imagine they were just as baffled by our choices as I was about theirs.
Even though this moonset wasn’t a “featured” shoot of the workshop (people were there for fall color and the many views of the Tetons), it’s a great example of how things really do work out. Don and I used to stress about the conditions in a workshop and whether people might be disappointed, but we learned a long time ago that if you stay prepared and flexible, there will always be great stuff to photograph—and things really do work out.
Workshop Schedule || Purchase Prints || Instagram
A Peek at Peaks
Click any image to scroll through the gallery LARGE


")


Kilauea Eruption Episode 33, Part 2: Grand Finale
Posted on September 29, 2025

Fountain of Fire, Kilauea Eruption, Hawaii
Sony a7R V
Sony 100-400 GM
ISO 400
f/5.6
1/125 second
For the full context of my experience with Kilauea eruptions in general, and the events leading up to the fountaining portion of this episode (33), check out my prior blog post: Kilauea Eruption Episode 33, Part 1: So You’re Telling Me There’s a Chance…
The euphoria of our (very) early Thursday morning Kilauea eruption shoot powered my workshop group through the day and into Thursday night. Since we hadn’t made it back to the hotel until 4:00 a.m., I pulled the plug on our sunrise shoot (with zero objections), and the group didn’t gather again until our 1:00 p.m. image review session. It turns out many were so excited by the eruption experience, they opted for downloading and processing over sleep, but the few eruption images we did see definitely turbocharged the eruption enthusiasm.
The discussion during the afternoon meeting centered around whether the fountaining we saw was Kilauea’s new normal, or whether there might be more to come. My inherent optimism went straight to the fact that the prior episode (episode 32, in early September) had delivered the second greatest volume of lava to the caldera floor of all the episodes —the most of 2025 so far. And the latest USGS report said that continuing inflation at the summit meant more was coming. Yay.
The pessimist in me, that annoying little voice that keeps reminding me of the times Mother Nature has thrown cold water on high hopes, kept reminding me of the signs that the reliable eruption sequence that started in December 2024 might be flagging: the fountain height of recent eruptions had decreased significantly from its 1000+ foot peak; the gap separating each fountaining phase was increasing; and most significantly (in my mind), live webcams focused on the eruption’s vents showed that the activity we’d photographed the prior night had completely died—only smoke was visible where we had once seen bubbling, flowing lava.
Shortly after the image review session, we departed for the workshop’s sunset shoot at my favorite beach on the Puna Coast. That evening’s spectacular sunset pushed the eruption buzz to the background, and in a way felt like a fitting wrap-up to a fantastic workshop. We did have one more sunrise shoot planned, but I think everyone felt like it would be anticlimactic following all we’d photographed in the workshop so far. In fact, with flights to catch and coming off a night with very little sleep, when I suggested that we stay in Hilo and stick to the sunrise plan even if the eruption resumed during the night, the agreement was unanimous—we’d already had a great volcano shoot that would be tough to beat. (We’d already been up to Kilauea twice, so I also suggested that anyone who changed their mind should feel free to go up on their own if the eruption started.)
That plan lasted until 3:30 a.m. One of the workshop participants (who had his office manager in Ohio, where midnight in Hawaii is 6 a.m., monitoring the Kilauea webcams and reporting any changes) messaged the group, “It’s fountaining!” I was sound asleep, but the messaging frenzy that followed quickly roused me enough to grab my phone and check the webcam. I instantly knew the sunrise plan was out the window and we were going back to Kilauea, sleep be damned. When he said fountaining, he meant FOUNTAINING!!!
This fountaining was on an entirely different scale from what we’d seen the prior night, or even from anything I’d ever seen—like someone had kicked a giant sprinkler head on the caldera floor. (I learned later that it was the highest fountaining since early July.) Almost all of the group was wide awake and on the road in 20 minutes.
Even though we arrived before 5:00 a.m., a little more than an hour after the fountaining began, the park was much more crowded than we’d seen the previous night. We found parking, but just barely, and I knew the way cars were streaming into the park the open spaces wouldn’t last long.
Because of the crowds, we’d implemented an “every car for itself plan,” each doing its own thing while staying in contact. My car started at Kilauea Overlook, but found the view, while very close, was partially obscured behind the caldera rim. So we quickly doubled back to the Wahinekapu Steaming Bluff (steam vents), for the best combination of direct view to the fountaining vents, and fast access. There we reconnected with most of the rest of the group.
The view to the fountaining vents from the Wahinekapu is about 2 miles—our other option was the closer vantage point at Keanakako’i Overlook, on the other side of the caldera (where I shot the 2023 eruption). This is about 1.25 miles from the fountains, but also required a 15 minute drive followed by a 1 mile walk, and I knew that even if we found parking there (far from a sure thing), it would probably be starting to get light by the time we got our eyes on the eruption. Plus, having shot the eruption from Wahinekapu already, I knew we’d be close enough that 400mm would be plenty long enough.
I’m so glad we took the path of least resistance and stayed at Wahinekapu. Even though my brother Jay (who was assisting me in this workshop) and I had a very small window to shoot before we needed to head back to Hilo to catch our flight home, the timing of the eruption and our arrival couldn’t have been better. We started with nearly an hour of complete darkness, allowing exposures that froze the fountains without blowing out the highlights (overexposing the lava) to create the virtually black background that I think makes the most dramatic lava images. Following the complete darkness, we photographed through the slow transition into a beautiful sunrise. Finally, as the day brightened, we enjoyed about a half hour of the eruption’s towering plume warmed by lava-light from below, and low sunlight from above. Absolutely spectacular.
When I first photographed lava in 2016, I was learning on the fly. At night, standard histogram rules don’t apply to lava because a properly exposed frame will be almost completely smashed agains the left side (with much cut off), and often, especially on wider shots, with just few small highlight blips on the far right. Basically, job-one is to make the lava as bright as possible without blowing it out. And job 1a is to do that using a shutter speed that freezes the lava’s motion (unless motion blur is your objective). And finally, you really should do this using the best (lowest) possible ISO.
The mistake people make for any kind of motion blur, and I’ve heard a lot of “best shutter speed for Kilauea’s lava fountains” advice, is to assume that there’s one ideal shutter speed for freezing the lava fountains. There isn’t. Just as with flowing water, the shutter speed that freezes a lava fountain is a function of several factors: the speed at which the lava is moving—the higher the fountain, the faster the lava will be moving when it reaches the ground, the distance to the fountain, and the focal length.
Back in 2016 I started with extremely high ISOs to maximize my shutter speed, but have gradually, through trial and error, dropped both my ISO and decreased my shutter speeds for my lava images. At night, since depth of field is usually no concern, for most of my long telephoto shots using my 100-400, I now just shoot wide open, at f/5.6 for that lens. My exposure trial and error process involves taking a shot at a certain focal length, verifying that the lava is close to maximum brightness without blowing out, then magnifying the image in my viewfinder (or LCD) to confirm that there’s no motion blur in the lava fountain (make sure you check the lowest lava blobs, as they’ll be moving fastest). If that works, I lower my ISO and increase my shutter speed further, until I find the threshold where blur is discernible. Then, for a just-to-be-safe cushion, I bump my ISO and shutter speed back up to just slightly more than the prior settings (that I thought froze the lava).
I had to do this for every significant change in focal length, but it wasn’t long before I became pretty comfortable with my settings. And by the time this Friday morning lava fountaining started—having done it in 2016, 2022, 2023, and earlier that week—I was feeling so comfortable with my exposure settings that it was no longer a distraction. In fact, I was varying my focal length so frequently and clicking so fast, to simplify the process I just kept my exposure settings in the range I knew would work all the way out to 400mm. I was fine with this because a very satisfactory ISO 400 gave me a shutter speed in the 1/100 to 1/200 second range that I knew worked.
So bottom line? In total darkness, standing 2 miles away, at 400mm I was perfectly comfortable with f/5.6, ISO 400, and 1/100. But I hope you can see that my exposure settings probably won’t work for you if you’re much closer than 2 miles, and might be overkill if you’re farther away. In other words, I strongly encourage anyone who wants to photograph fountaining lava to apply my process, not my settings. (And there are many people with far more experience photographing lava than I have, so feel free to defer to them if their results confirm that they know what they’re talking about.)
This experience, the final shoot of my 2025 Hawaii Big Island workshop, wasn’t just the grand finale for this workshop, it was the grand finale of 15 years of Hawaii workshops. As I pare down my workshop schedule and ease (slowly) toward retirement, I decided a few months ago that this would be my final Hawaii workshop. Not because I don’t enjoy it (I do!), or because it no longer fills (it does!), but simply because I had better reasons to keep other workshops. Just as my final Grand Canyon raft trip was gifted with a beautiful, albeit less dramatic, crescent moon for our final sunrise, I can’t imagine a better Hawaii memory to go out on.
Workshop Schedule || Purchase Prints || Instagram
Kilauea Memories (2010-2025)
Click any image to scroll through the gallery LARGE


")


Kilauea Eruption Episode 33, Part 1: So You’re Telling Me There’s a Chance…
Posted on September 24, 2025

River of Light, Kilauea Eruption, Hawaii
Sony a7R V
Sony 100-400 GM
ISO 400
f/5.6
1/250 second
One out of a million…
One of the great motivators for a nature photographer is the potential for the unexpected. As much as I love planning my photo shoots, especially when things come together exactly as hoped, the euphoria of the unexpected feels like photography’s greatest reward.
Some natural phenomena can be predicted with surgical precision—events like a rising or setting sun or moon, a total solar eclipse, the moonbow that materializes every spring full moon at the base of Yosemite Falls, and the sunset light that colors Horsetail Fall in late February—with the only variable being whether or not the clouds will cooperate enough to allow us to view the show.
I love those reliable phenomena and have made my living scheduling photo workshops to share them with others. But I also have a few workshops scheduled around the hope of something spectacular—a high risk, high reward roll of the dice that can only be timed to provide the best chance of success. In this category I include the Iceland aurora workshops Don Smith and I do each year, my Grand Canyon monsoon workshops where we cross our fingers for lightning and rainbows, and my latest obsession, chasing supercells and tornadoes across the US and Canadian plains.
But let me submit a third category: those phenomena where there’s absolutely nothing strategic about the timing, and when it occurs, it feels like a gift from Heaven. I guess that could describe any random sunset, rainbow, or unexpected snowfall, but I’m thinking more about those one-out-of-a million phenomena that are so spectacular and rare, for many they’re a once in a lifetime event. Like an erupting volcano.
My personal volcano history
I’ve been visiting Hawaii’s Big Island every (non-Covid) September since 2010. Through 2017, the lava lake in Halemaʻumaʻu on Kilauea’s summit bubbled away 24/7, allowing each of my workshop groups to view and photograph beneath the Milky Way. This was so reliable, I simply took lava’s nightly glow for granted. Until 2016 I never saw actually the lava itself, just its rising smoke and vapor plume during the day, and the lava’s orange radiance illuminating the caldera walls after dark. But in 2016 the lava lake rose to the top of Halemaʻumaʻu and overflowed onto the caldera floor, and my group and I were gifted with the rare opportunity to view bubbling, exploding lava. Then in 2017 everything was back to normal, and my group returned to photographing the glow (and me to taking the eruption for granted).
But in a frustrating exhibition of Mother Nature’s fickle whims, in 2018 she reminded me to never take her for granted, and completely shut off the summit eruption the week before my workshop. Of course there’s lots of other stuff to photograph on the Big Island (my favorite Hawaiian island), but it’s pretty hard to top a volcanic eruption.
Since 2018, Kilauea has been mostly quiet, with a handful of relatively minor eruptions each year, most measured in hours or days, arriving with very short notice, and vanishing just as suddenly. In other words, impossible to plan a workshop around, and rare enough to never be expected.
My groups got nothing from the volcano in 2018, 2019, and 2021 (2020 was lost to Covid). Then in 2022, my workshop group and I were fortunate enough to get a long distance view of an eruption and the Milky Way from a brand new location. And in 2023 we hit the jackpot when a very active eruption started the day before my workshop, and ended the day after. For that one, I got to photograph numerous small fountains and lava rivers across a wide area of the caldera floor three different times, and my group enjoyed the same show twice. Then in 2024, Kilauea was quiet again.
I knew that Kilauea’s eruption history meant that the next one could be tomorrow, or years away. Or never. But in December of 2024, a whole new kind of eruption started on Kilauea. Instead of smaller fountains spreading across the caldera as we’d seen in 2023, this one was limited to one or two massive fountains. And instead of the recent one-and-done eruptions that would last for days or (occasionally) weeks, this new eruption came in short and sweet bursts separated by days. The first few lasted longer, up to 8 days, but after a while this latest eruption established a fairly regular routine, coming every week or so and lasting less than a day.
The fountaining in some of these episodes exceeded 1000 feet (a height I struggled to imagine, despite the many pictures and videos shared online), with most reaching at least 300 feet—far higher than anything I’d seen before, including in 2023.
Finally, we get to this image
(That’s a lot of context for just one image, so thanks for sticking with me.)
Since I scheduled the 2025 Hawaii workshop in the summer of 2024, I added it with no expectations of photographing an eruption. I simply knew any eruption, while always possible, was quite unlikely. Of course Hawaii has plenty to photograph without an erupting volcano, but a person can dream….
When the current eruption started late last year, nothing in recent history gave hope that it would last long enough to still be going by the time my workshop came around. With 10 months to go, my hope meter stayed pegged on zero. But as the volcano settled into its once-a-week routine and the months clicked past with little change in that pattern, I started to notice a slight quiver in the meter’s needle.
But as we all know, Mother Nature toys with hope. No sooner had my meter shown signs of life, the reliable one-week span between eruptions started stretching out to 10-14 days, the episode duration dropped to less than 12 hours, and the fountain heights dropped well below 500 feet. By the time episode 32 came and went in early September, I was down to hoping my workshop group would be lucky enough that the 12-hour or less span of the next episode (if there was a next episode), would fall sometime in the workshop’s 4 1/2 days. Not great odds, but to be safe, a few weeks before the workshop I e-mailed my group explaining our poor odds, but also reassuring them that if any eruption did happen during the workshop, we’d drop all other plans and I’d do everything in my power get us up to Kilauea to view it, regardless of the hour.
But in the secret recesses of my mind, despite my overwhelming desire to see and share this unprecedented sight, the possibility (no matter how small) that I might be responsible for navigating a dozen photographers and 3 vehicles through the mayhem reported to accompany every prior episode—gridlock and hours just getting into the park, no parking once we get in, and limited viewing space—was daunting at best. Combine that with the fact that I obsess about getting my eyes on a scene before guiding a group to it—not only did I not have any experience with the best viewing locations for this eruption (each eruption happens at a different location in or near the crater), if it did happen during the workshop, I’d be learning on the fly, with my group depending on me.
I did as much research and preparation as possible from 2600 miles away, scouring the internet, reaching out to others I knew who had viewed prior episodes, and practically memorizing the viewing instructions on the NPS Hawaii Volcanoes website. But I knew all this planning would be of little use if we made the 45 minute drive from our Hilo hotel to the park and found it teeming with double-parked photographers and gawking tourists.
Then, just a few days before the workshop, the USGS posted an eruption forecast stating that the earliest the next episode would start would be September 19, and possibly later if summit inflation (the amount of magma in the subterranean chamber) decreases. Since my workshop wraps up following the sunrise shoot on September 19, I knew we’d almost certainly miss it. A disappointment for sure, but also a significant stress reliever.
On my pre-workshop scouting visit, I learned that the vent of the eruption had been glowing the last couple of nights, a sign that the magma chamber was filling. With that information I realized there might be an opportunity to give my group a caldera night shoot for the first time since 2017. Not only that, as I scouted the views to the current eruption vents, I realized that I’d be able to align the caldera’s glow with the Milky Way, just like the olden days. Even without an eruption, things were looking up.
On Tuesday, our second night, I took the group to the caldera for sunset, and we stayed for a magnificent Milky Way shoot beneath a spectacularly (and unusually) clear sky. In fact, unlike all the prior Kilauea Milky Way shoots, where we just photographed a glowing hole at the bottom of a featureless caldera floor, subsequent eruptions (and especially the current one) had raised the caldera floor from 100 to 300+ feet, and replaced the dull rocks and shrubs with brand new beautifully textured lava. And the glow now emanated from a discernible volcanic cone that at times during our shoot emitted visible splashes of lava.
I went to bed that night overjoyed to have given my group an actual active volcano experience. And then I woke Wednesday morning. Checking the USGS Kilauea status update, I did a double-take. The earlier September 19 – 23 episode 33 forecast had been revised to indicate that an eruption was imminent, and could start any time from September 17 (today!) to 19. Whoa.
Along with the euphoria that we might indeed get to witness an actual fountaining eruption came the prior anxiety of not knowing exactly how I’d navigate it. So I devised a plan. Knowing that we’d all been up to the volcano the prior day, I decided that if the eruption does start, we’d drop everything and immediately beeline to Kilauea as a group, in no more than 3 vehicles (there were 14 of us, including me and my brother Jay). Once there, we’d do our best to stay together, but if it was too crowded and unmanageable, each car would have full autonomy to go where its occupants wanted to go, and to stay as long as they wanted. If that happened, we’d still keep in constant contact via our workshop WhatsApp group (which we’d already been using all week), and share any insights we learned about parking or vantage points. With a plan in place, we went about the day’s workshop plans (Akaka Falls and Hawaii Tropical Botanical Garden), keeping a constant eye on the USGS eruption webcams and status updates.
Nothing had happened by the end of the day, so before sending everyone off for the evening, I checked to see who wanted to be awakened if the eruption started overnight, and found that all but three were up for an overnight adventure.
At 11:30 p.m. I’d already been asleep for a couple of hours when my phone started lighting up with notifications that the eruption had started. We were awake, dressed, and on the road in 15 minutes. By 12:15 a.m. (Thursday morning) we in place at the caldera and clicking madly.
What we saw this evening was not the promised fountaining, but no one was disappointed by the bubbling vent, lava falls, and lava river we did see. The splashes this night reached up to 50 feet, and our vantage point at the Steam Vents gave us a perfect view straight to all the action. We stayed to photograph it until 3:00 a.m., and drove back to the hotel completely euphoric. Needless to say, we passed on the sunrise shoot.
Stay tuned for Part Two…
Unplanned Beauty
Click any image to scroll through the gallery LARGE


