Eloquent Images by Gary Hart
Insight, information, and inspiration for the inquisitive nature photographer
(Really) Big Moon
Posted on September 20, 2020

Lunar Arrival, El Capitan and Clouds Rest, Yosemite
Sony a7RIV
Sony 200-600 G (APS-C crop)
Sony 2x teleconverter
1800mm focal length equivalent
ISO 200
f/13
1/20 second
This is an updated version of the “Big Moon” article from my Photo Tips section,
plus the story of this image (below)
Nothing draws the eye quite like a large moon, bright and bold, above a striking foreground. But something happens when you try to photograph the moon—somehow, a moon that looks to the eye like you could reach out and pluck it from the sky shrinks to a small white speck in a photo. While a delicate accent of moon is great when properly framed above a nice landscape, most photographers like their moons BIG.
Some photographers resort to cheating, plopping a telephoto moon into a wide angle landscape. But armed with basic knowledge bolstered by a little planning, capturing a large moon isn’t hard.
Focal length
Every time there’s a “supermoon,” we’re bombarded with news stories implying that the moon will suddenly double or triple in size, followed by faked images intended to confirm the impossible. But crescent or full, super or not, the moon’s size in an image is almost entirely a function of the focal length the photographer used—photograph it at 16mm and the moon registers as a tiny dot; photograph it at 600mm and your moon dominates the frame.
But a landscape image with a large moon requires more than just a long focal length. If big was all that mattered, you could attach your camera to a telescope, point skyward, and capture a huge moon (not that there’s anything wrong with that). But without a landscape to go with your huge moon, no one would know whether you took the picture on a mountainside in Yosemite, atop a glacier in New Zealand, or beside the garbage cans in your driveway.
Equipment
“Big moon” is a subjective label, but I don’t usually use it unless my focal length was 200mm or longer. And while a 200mm lens is okay for the moon, for me the moon doesn’t really start to jump out of the frame until I approach 400mm.
Prime zooms are super sharp and fast, but for my moon photography I prefer a telephoto zoom for focal length flexibility that enables me to adjust my composition to include or exclude foreground elements. As a Sony Alpha shooter, my default big moon lens that’s almost always in my bag is my Sony 100-400 GM. The Sony 200-600 is sometimes too long, and it’s too big to live in my bag fulltime, but when I know I’ll be photographing the moon rising (or setting) above a location that’s several miles from my foreground subjects, I’ll replace the 100-400 in my bag with the 200-600. And when I want to go nuclear on the moon with either lens, I add the Sony 2X Teleconverter.
Not a Sony shooter? No problem, all the major camera manufacturers offer similar options.
The camera you use makes a difference too. The more resolution you have, the more you can crop (increase the size of the moon) without noticeable quality loss. And since an APS-C sensor has a 50% (-ish) crop built in, until I got my Sony a7RIV, I’d often use my APS-C Sony a6300 to maximize the size of the moon in my images. But now that I have the full frame Sony a7RIV, with 61 megapixels I actually have more resolution in APS-C mode than I had with my a6300.
My own rule for full moon photography is that I must capture both lunar and landscape detail. But a full moon rises at sunset and sets at sunrise, and a crescent moon is only visible shortly before sunrise or after sunset. So your camera’s dynamic range a very important consideration. The darker the sky, the better the moon looks, but the darker the sky, the darker the foreground too. For me it’s time to go home when the foreground becomes so dark that making it bright enough to capture usable detail means blowing out the moon. So the more dynamic range I have, the darker the sky can be. While I don’t know of a camera with as much dynamic range as my a7RIV, all of today’s cameras have pretty decent dynamic range.
And finally, given the extreme focal lengths you’ll be dealing with, don’t even think about trying to shoot a big moon without a sturdy tripod.
Distance yourself
Often the most difficult part of including a large moon with a specific landscape subject is finding a vantage point far enough back to fit the subject and the moon. But the farther back from your foreground subject you can position yourself, the longer the focal length you can use, and the bigger the moon will be.
For example, I love photographing a big moon rising behind Half Dome in Yosemite. But at Yosemite’s popular east-side locations, even 200mm is too close to get the moon and all of Half Dome in my frame. And while Yosemite’s most distant east-facing Half Dome vistas are up to 10 miles away, Half Dome is large so that even at that distance the longest focal length that will include the moon and all of Half Dome isn’t much more than 400mm.
A little easier for me is including a big moon with smaller foreground objects like a prominent tree. Near my home in Northern California are rolling hills topped by solitary oaks that make perfect moon foregrounds when I can shoot up so they’re against the sky. And since these trees are much smaller than Half Dome, even vantage points that are less than a mile away are doable.
Location, location, location
As your focal length increases, your compositional margin for error shrinks. You can’t expect to go out on the evening of a full or crescent moon, look to the horizon, and automatically put the moon in the frame with your planned foreground subject.
Even when the moon and your foreground do align, once the moon appears, you’ll only have a few minutes before it rises out of your telephoto frame. This means extreme telephoto images that include both the moon and a foreground subject are only possible when the moon is right on the horizon, making proper timing essential.
Like the sun, the moon traces a different path across the sky each day. This path changes with each lunar cycle (from full, to new, back to full)—whether the moon is full or crescent, a location that perfectly aligns the moon and foreground one month, will probably be nowhere close the next.
Coordinating all the moving parts (moon phase and position, foreground subject alignment, subject distance, and rise/set timing) requires some planning and plotting. When I started photographing the moon, in the days before smart phones and apps that do the heavy lifting, I had to refer to tables to get the moon’s phase and position in the sky, manually plot the alignment, then apply the Pythagorean theorem to figure the timing of the moon’s arrival above (or disappearance behind) the terrain.
Today there are countless apps that will do this for you. Apps like The Photographer’s Ephemeris and Photo Pills (to name just two of many) are fantastic tools that give photographers access to moonrise/set data for any location on Earth. There is a bit of a learning curve (so don’t wait until the last minute to plan your shoot), but they’re infinitely easier than the old fashioned way.
Depth of field
With subjects so far away, it’s easy to forget about depth of field. But extreme focal lengths mean extremely limited depth of field. Depth of field isn’t a concern when Half Dome is your closest subject and it’s ten miles distant, but when your foreground is an oak tree on a hill that’s a mile away, you absolutely need to consider the hyperfocal distance.
For example, at 800mm and f/11 (with a full frame sensor), the hyperfocal distance is about a mile-and-a-quarter (look it up)—focus on the tree and the moon will be soft; focus on the moon and the tree is soft. But if you can focus on something that’s a little beyond the tree, at maybe one-and-a-half miles away, the image will be sharp from front to back.
When I’m not sure of my subject distance, I estimate as best I can, focus on a point beyond my foreground subject, then review my image magnified to check sharpness. If my focus point is in my frame, great, but I won’t hesitate to remove my camera from the tripod to focus on something in another direction that’s the right distance (if you do this, to prevent refocusing, be sure you use back-button focus or are in manual focus mode when you click your shutter). It’s always best to get the focus sorted out before the moon arrives, a good reason to arrive at a new location well in advance of the moon’s arrival.
Plan ahead
When the moon is a small accent to a wide scene, it’s often enough to just show up on its full or crescent day and shoot it somewhere above your subject. But because the margin of error is so small, planning for a big moon image is best done months in advance.
I identify big-moon candidate locations near home and on the road, and am always on the lookout for more. My criteria are a prominent subject that stands out against the sky, with a distant east or west facing vantage point. Over the years I’ve assembled a mental database ranging from hilltop trees near home, to landscape icons like Half Dome, Mt. Whitney, and Zabriskie Point (Death Valley).
With my subjects identified, I do my plotting (I still do it the old fashioned way) and mark my calendar for the day I want to be there. That often means waiting close to a year for the alignment I want. And if the weather or schedule doesn’t cooperate, my wait can be longer than that.
About this image
On the penultimate evening of last February’s Yosemite Winter Moon photo workshop, I assembled my Yosemite Winter Moon photo workshop group on the granite above Tunnel View to wait for the moonrise we’d been thinking about all workshop. Sunset was 5:30, and I expected the moon to appear behind Cloud’s Rest between a little before 5:35, which meant the sky and landscape would already be starting to darken. The exposure for a post-sunset full moon is trickier than many people realize because capturing detail in both the daylight-bright moon and the rapidly fading landscape requires vigilant scrutiny of the camera’s histogram and highlight alert (blinking highlights). To get everyone up to speed, I used nearly full rising moons on the workshop’s first two nights to teach them to trust their camera’s exposure aids and ignore the image on the LCD (kind of like flying a plane on instruments). With two moonrises under their belts, by this evening I was confident everyone was ready.
I was ready too. In my never-ending quest to photograph the moon as large as possible, I went all-in—none of that wimpy-ass 200mm glass for me, for this moonrise I used every resource in my bag. I set up two tripods: mounted on one was my Sony a7RIII and 100-400 GM lens; on the other tripod was my Sony a7RIV and 200-600, doubled by the 2X teleconverter: 1200mm. But I wasn’t done. Normally I shoot full frame and crop later (for more compositional flexibility), but just for fun, on this night I decided to put my camera in APS-C mode so I could compose the scene at a truly ridiculous 1800mm—I just couldn’t resist seeing what 1800mm looked like in my viewfinder.
While waiting for the moon the group enjoyed experimenting with different compositions using the warm sunset light illuminating Half Dome and El Capitan. I used the time to test the focus at this unprecedented focal length. Waiting for an event like this with a group is one of my favorite things about photo workshops, and this evening was no exception. Between questions and clicks, we traded stories, laughed, and just enjoyed the spectacular view.
The brilliant sliver of the moon’s leading edge peaked above Cloud’s Rest at 5:33. It is truly startling to realize how quickly the moon moves through the frame at 1800mm, so everything after that was kind of a blur. Adjusting compositions and tweaking exposure and focus on two bodies, I felt like the percussionist in a jazz band, but I somehow managed to track the moon well enough to keep it framed in both cameras.
Though I just processed this image yesterday, it’s the earlier of the two big moon images I’ve processed from that shoot. Which one do you like best?
Big Moon


")


You’re Gonna Need a Bigger Moon
Posted on February 13, 2020
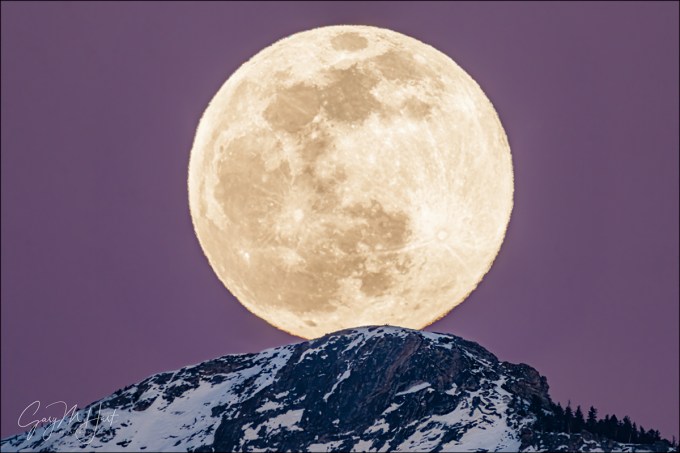
Moon’s Rest, Cloud’s Rest, Yosemite
Sony a7RIV
Sony 200-600 G (APS-C crop)
Sony 2x teleconverter
1800mm focal length equivalent
ISO 200
f/13
1/20 second
Size matters
About 15 years ago I pitched a moon photography article to a national photography magazine. I was declined because, according to the editor, “No one likes to photograph the moon because it looks too small in a picture.” While I respectfully disagree and in fact love using a small moon as an accent to my landscape scenes, that felt like a challenge to prove that it is possible to capture the moon BIG.
Then…
When I started plotting and photographing moonrises (long before The Photographer’s Ephemeris and PhotoPills), my longest lens was 200mm—adding a 100-400 to my bag was just a dream. When I finally got a good deal on a slightly used Canon 100-400 lens, I thought I was set for big-moon photography for life—until my friend Don Smith’s 150-600 lens gave me feelings of inadequacy. Soon I was packing a Tamron 150-600 lens. I liked the extra size my Tamron 150-600 gave my moons, and while found the images sharp enough to continue using the lens with an adapter after switching to Sony, when got my hands on the Sony 100-400 GM lens, I was so excited about that len’s sharpness with the Sony 2X Teleconverter, that I jettisoned the Tamron for good.
For a couple of years my standard big-moon setup was a Sony a7RIII and Sony 100-400 with the 2X Teleconverter, giving me 42 megapixel images and 800mm for the biggest, sharpest moon I’d ever photographed. Better still, putting the Sony 100-400 and 2X Teleconverter on my 1.5-crop Sony a6300, I was able to capture 24 megapixel files at a 1200mm equivalent. Wow, 1200 megapixels: Surely I’d achieved the zenith of my lunar supersizing aspirations. Nope.
… and now
Last year Sony released its 200-600 lens and the 61 megapixel a7RIV body. Since the APS-C (1.5x) crop on the a7RIV is 26 megapixels (2 megapixels more than the a6300), I dropped the a6300 from my moon shooting arsenal. In October I played with my new setup a little using a crescent moon in the Eastern Sierra, but I couldn’t wait to try it out on my favorite moon shoot of all: the Yosemite Tunnel View full moon.
Last Saturday night I assembled my Yosemite Winter Moon photo workshop group on the granite above Tunnel View to wait for the moonrise I’d timed the workshop for. Sunset was 5:30, and I expected the moon to appear directly behind Cloud’s Rest between a little before 5:35, which meant the sky and landscape would already be starting to darken. The exposure for a post-sunset full moon is trickier than many people realize because capturing detail in both the daylight-bright moon and the rapidly fading landscape requires vigilant scrutiny of the camera’s histogram and highlight alert (blinking highlights). To get everyone up to speed, I used nearly full rising moons on the workshop’s first two nights to teach them to trust their camera’s exposure aids and ignore the image on the LCD (kind of like flying a plane on instruments). With two moonrises under their belts, by Saturday evening I was confident everyone was ready.
I was ready too. In my never-ending quest to photograph the moon as large as possible, I went nuclear—none of that wimpy-ass 200mm glass for me, for this moonrise I used every resource in my bag. I set up two tripods: mounted on one was my Sony a7RIII and 100-400 GM lens; on the other tripod was my Sony a7RIV and 200-600, doubled by the 2X teleconverter: 1200mm. But I wasn’t done. Normally I shoot full frame and crop later (for more compositional flexibility), but just for fun, on this night I decided to put my camera in APS-C mode so I could compose the scene at a truly ridiculous 1800mm—I just couldn’t resist seeing what 1800mm looked like in my viewfinder.
While waiting for the moon the group enjoyed experimenting with different compositions using the warm sunset light illuminating Half Dome and El Capitan. I used the time to test the focus at this unprecedented focal length. Waiting for an event like this with a group is one of my favorite things about photo workshops, and this evening was no exception. Between questions and clicks, we traded stories, laughed, and just enjoyed the spectacular view.
The brilliant sliver of the moon’s leading edge peaked above Cloud’s Rest at 5:33. It is truly startling to realize how quickly the moon moves through the frame at 1800mm, so everything after that was kind of a blur. Adjusting compositions and tweaking exposure and focus on two bodies, I felt like the percussionist in a jazz band, but I somehow managed to track the moon well enough to keep it framed in both cameras.
By the time the moon was about to clear Cloud’s Rest, the darkening sky had started to pink-up nicely—underexposing slightly to avoid blowing out the moon’s highlights enriched the color further. The image you see here is exactly what I saw in my viewfinder (not cropped in post-processing), a full 1800mm equivalent that nearly fills the frame top-to-bottom. After years of thinking I’ll never need a bigger lens, I know enough now not make that claim again, but I’m definitely satisfied (for now).
Learn how to photograph a big moon
Workshop Schedule || Purchase Prints
Fifteen Years of Supersized Moons
Click an image for a closer look and to view a slide show.

")


")


