Eloquent Images by Gary Hart
Insight, information, and inspiration for the inquisitive nature photographer
Super? Moon
Posted on November 8, 2025
November Moon, Half Dome from Tunnel View, Yosemite
Sony a7R V
Sony 200-600 G
Sony 1.4x teleconverter
ISO 200
f/9
1/80 second
This week’s full moon was a “supermoon”—or, as the media frequently proclaimed, “The biggest moon of 2025!” And while that is technically true, the size difference between a super and average moon is barely perceptible.
So, as a public service, I’ve dusted off and updated a prior article explaining the supermoon phenomenon (any hyperbole)—and what better time to share it than just days after photographing the November supermoon?
What’s the big deal?
So what exactly is so “super” about a “supermoon?” Answer: Not much. Or, maybe a better way to answer the question would be: When presented with a random series of full moon images, would you in fact be able to identify the supermoon? Doubtful. So why the media frenzy? And why do we see so many huge moon images every time there’s a supermoon? So many questions….
Celestial choreography: Supermoon explained
To understand what a supermoon is, you first have to understand that all orbiting celestial bodies travel in an ellipse, not a circle. That’s because, for two (or more) objects to have the gravitational relationship an orbit requires, each must have mass. And if they have mass, each has a gravitational influence on the other. Without getting too deep into the gravitational weeds, let’s just say that the mutual influence the earth and moon have on each other causes the moon’s orbit to deviate ever so slightly from the circle it seems to be (without precise measurement): an ellipse. And because its orbit isn’t round, as the moon circles Earth, its distance varies with the position in its orbit.
An orbiting object’s closest approach to the center of its ellipse (and the object it orbits) is at perigee; its greatest distance from the ellipse’s center is apogee. And the time it takes an object to complete one revolution of its orbit is its period. For example, earth’s orbital period around the sun is one year (365.25-ish days), while the period of our moon’s orbit is slightly more than 27 days.
But if the moon reaches perigee every 27 days, why don’t we have a supermoon every month? That’s because we’ve also added “syzygy” to the supermoon definition. In addition to being a great Scrabble word, syzygy (though it would cost you 2 blank tiles) is the alignment of celestial bodies—in this case it’s the alignment of the sun, moon, and earth (not necessarily in that order). Not only does a supermoon need to be at perigee, it must also be syzygy.
Syzygy happens twice each month, once when the moon is new (moon between the sun and Earth), and again when it’s full (Earth between the sun and moon). While technically a supermoon can also be a new moon, the full moon that gets all the press because a new moon is lost in the sun’s brightness and never visible, so no one cares. Since Earth circles the sun while the moon revolves around Earth, to achieve syzygy, with each orbit the moon has to travel a couple extra days to catch up. That’s why the moon reaches perigee evey 27 days, but syzygy comes every 29.5 days—the moon’s distance from earth is different with each syzygy because it comes at different points in the orbit.
The view from earth: Supermoon observed
While lunar perigee, apogee, and period are precise terms that can be measured to the microsecond, a supermoon is a non-scientific, media-fueled phenomenon loosely defined as a moon that happens to be at or near perigee when it’s full. To you, the viewer, a full moon at perigee (the largest possible supermoon) will appear about 14% larger and 30% brighter than a full moon at the average distance. The rather arbitrary consensus definition of the distance that qualifies a moon as a supermoon is a full moon that is within 90 percent of its closest approach to earth.
I really doubt that the average viewer could look up at even the largest possible supermoon and be certain that it’s larger than an average moon. And all those mega-moon photos that confuse people into expecting a spectacular sight when there’s a supermoon? They’re either composites—a picture of a large moon inserted into a different scene—or long telephoto images. (I don’t do composites, but they’re a creative choice that I’m fine with others doing as long as they’re clearly identified as composites.)
For an image that’s not a composite, the moon’s size in the frame is almost entirely a function of the focal length used. I have no idea whether most of the moons in the full moon gallery below were super, average, or small.
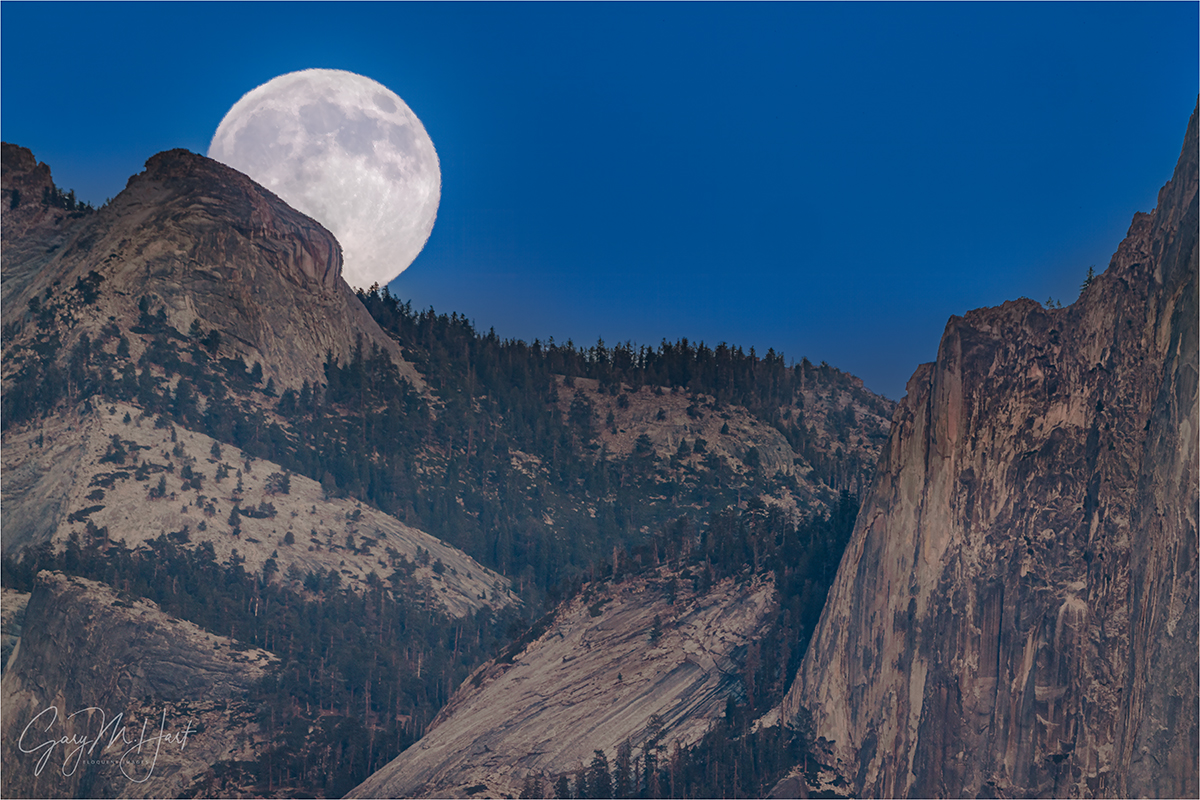
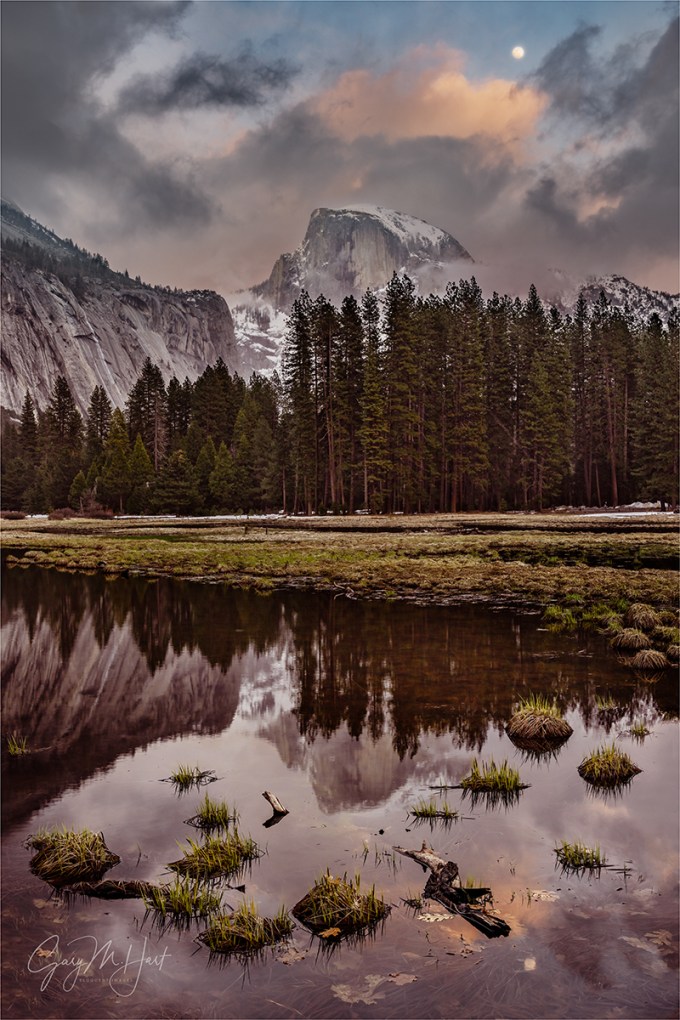
Can you identify the supermoon?
, Yosemite")

Well, if you said the big moon is a supermoon, you’d be right. But it’s kind of a trick question, because these are both images of Tuesday’s supermoon. The size difference is entirely a function of the focal length I used: around 100 mm for the small moon, more than 800 mm for the large one. What these images also make clear is that what I gain in moon size, I lose in field of view—you can’t have both. So when you see a wide angle scene with a huge moon, don’t think supermoon, think composite: a big moon dropped into a wide scene. Or worse still: AI. (Yuck.)
Every full moon is super
As far as I’m concerned, a rising or setting full moon is one of the most beautiful things in nature. But because a full moon rises around sunset and sets around sunrise, when most people are eating dinner or sleeping, seeing it is often an accident—maybe the moon catches your eye as you walk out of the store, or you spot it in near the horizon when your car rounds a bend. But viewing a moonrise or moonset doesn’t need to be an accident. There’s loads of information available online that will tell you which night to look for a full moon, and the general time and direction to look. And for people like me, who try to photograph moonrises and moonsets around an alignment with a terrestrial feature, there is also slightly more technical info that enables more precise planning.
About this image
Which brings me to this week’s image (images), captured Tuesday evening from my very favorite location to view a moonrise: Tunnel View in Yosemite. Why is Tunnel View my favorite moonrise location? Because I can’t think of a better combination beautiful subjects and distant view (nearly 9 miles to Half Dome), that allows me to photography the moon large with with a long telephoto lens and include a striking foreground subject. And if I just want to use the moon to accent a broader scene, the wide angle view at Tunnel View is not too shabby either.
As with most of my moonrise images, this one had been on my radar for over a year. And like many of my moonrise opportunities, I scheduled a workshop so I could share it with other enthusiastic nature photographers. But, since I don’t care about supermoons, I had no idea this November full moon would be a supermoon—and as I grew tired of hearing in the preceding weeks, the largest full moon of 2025! (Yawn.)
The way this month’s full moon set up, I was able to get my group a couple of practice moonrises from other Yosemite locations leading up the Tuesday moonrise—one with a reflection of Half Dome, and another from Glacier Point. Not only did they lear exposure and processing techniques that allow the capture of lunar and landscape detail with a single click, they got beautiful (albeit wider, with a small moon) moon images. I also demonstrated in a training session how I plot the moonrise (without using celestial plotting apps like Photographer’s Ephemeris and Photo Pills).
There’s often drama surrounding an impending moonrise as I stress about forecasts that promise clouds, or a sky filled with more clouds than forecast. This year, despite the threat of rain the following day, the Tuesday evening forecast was clear skies. And true to expectations, the entire afternoon was cloud free.
I got my group up to Tunnel View about a half hour before the moon’s expected arrival, so we all had plenty of time to get set up and settled in. About half of the group joined me on a granite slab above the Tunnel View parking lot, with the rest of the group setting up with my brother Jay and the hoards of other photographers at the wall in front of the parking lot (the standard Tunnel View vista).
I had two tripods set up: one with my (big and sturdy) RRS TVC-24L, with my Sony a7R V and 1.4X teleconverter; one with my Sony a1 and 100-400. My plan was to switch between the two bodies, and to switch out the 200-600 for my 24-105 once the moon separated from the landscape. In other words, I’d be using the a1 with the 100-400 for the entire shoot, and the a7R V with the 200-600 (first) and 24-105 (after a few minutes).
As we waited, I reminded my group that the moon would appear just a little left of Half Dome at around 4:45 (about 15 minutes before sunset), plus/minus 5 minutes. I also told my group that, depending on their camera and metering skills, we’d be able to continue photographing up to 15 minutes after sunset before the foreground became too dark to capture both lunar and landscape detail with one click. The moon arrived right on schedule, right around 4:44 and we were in business….
So maybe the best thing to come of the recent supermoon hype is that it’s gotten people, cameras or not, to appreciate the beauty of a full moon. If you like what you see, mark your calendar for every full moon and make it a regular part of your life—you won’t be sorry.
Join me in a Yosemite workshop
Workshop Schedule || Purchase Prints || Instagram
Tunnel View Moonrise Collection (Super and Otherwise)
Click any image to scroll through the gallery LARGE


, Yosemite")


Grand Finale
Posted on February 6, 2025

Lunar Lift Off, El Capitan, Yosemite
Sony α1
Sony 200-600 G
Sony 1.4x teleconverter
ISO 800
f/13
1/25 second
For most of my full moon workshops, I try to schedule the moonrise main event for the workshop’s final sunset. Sometimes other factors prevent this (for example, in Yosemite I try to avoid weekends), but when the schedule works, a nice moonrise gives the group something exciting to anticipate throughout the workshop. This becomes especially important when some or all of the workshop’s hoped-for conditions fail to materialize.
Last month’s Yosemite Winter Moon workshop lacked to winter snow and cloudy skies we hope for in a Yosemite winter workshop, but the moon (among other things) saved the day for us by not only giving us something to look forward to, but also by photobombing an earlier sunset. The true star of that prior sunset was the clouds and color, and as nice as it was to accent the scene with the moon, it was the final night moonrise that I most looked forward to.
As I’ve written before, despite all the unjustified “supermoon” hype, the key to photographing a big moon is focal length—the longer the better. Period. If you don’t care about what’s in the foreground, or for that matter choose not to include any foreground at all, any location where the moon is visible will do. But if you want to complement your legitimate big moon (a moon image that happens in one click) with a striking landscape feature, the farther you position yourself from your landscape subject, the longer the focal length you can use, and the bigger the moon will be. Of course if you make the moon bigger with a longer focal length, the less of your foreground you can include, and the more precise the moon/foreground alignment must be.
In Yosemite, the best place to set up for a telephoto moonrise that also includes photo-worthy foreground features, is Tunnel View. At Tunnel View, the prime moonrise subjects are El Capitan and Half Dome, three and eight miles distant. From there, I can include all of Half Dome with a focal length up to 400mm; with a longer lens, I can enlarge the moon further, while still including some of Half Dome—if the alignment is right.
The most important part of photographing a moonrise from Tunnel View is to align it with a desirable foreground subject. Most of the year, the moon rises much too far south to include in a Tunnel View scene, but for 2 or 3 months each winter, the full moon rises far enough north to align beautifully with Tunnel View’s magnificent monoliths.
But success is not simply a matter of showing up at Tunnel View the night of the full moon. Each winter the solar/lunar choreography is different, which is why the moon is all over the place in my many Tunnel View moonrise images in the gallery below: left of Half Dome, right of Half Dome, directly aligned with Half Dome, and occasionally closer to El Capitan than Half Dome.
This winter’s geometry was especially exciting to me when I realized the January moon would rise farther north, and therefore closer to El Capitan, than I’d ever photographed it. I have photographed the moon arriving from behind El Capitan’s vertical face, but I’d never seen it come up from behind the top of El Capitan. Always up for photographing something new (especially in Yosemite), I scheduled a workshop for it.
Which is how my workshop group and I ended up at my favorite Tunnel View vantage point on a Sunday evening last month. Sunset that evening was 5:05, and my calculations said the moon would at just about the same time—pretty much perfect timing for a moonrise, because you want the sky dark enough for the moon to stand out in contrast, while still bright enough that the landscape has enough light to reveal detail without blowing out the moon.
I’d set up with two tripods and cameras, one with my 200-600 lens, the other my 24-205 lens. The long telephoto was for the moon’s arrival; the wider lens was for when the moon elevated enough to separate from El Capitan. I’d planned to increase the magnification of the telephoto with my 2x teleconverter, but trying to attach the teleconverter to the lens, I fumbled it and helplessly watched it roll down the steep granite toward a vertical drop of several hundred feet. Fortunately, it lodged in small crack just before taking the plunge, but when I put it on the view was completely blurred, so I switched to my 1.4X teleconverter, giving me a focal range of 280-840.
As the sun dropped and the time approached, I became aware that a thin film of clouds had drifted across the eastern horizon above El Capitan—so thin that they weren’t visible at all in daylight brightness, but just substantial enough to reflect some color as sunset approached.
The moon arrived right on schedule, and we immediately started clicking. My earliest shots were almost entirely long telephotos, like this one at 840mm. It’s always shocking to see how fast the moon moves across a long telephoto frame, but I soon started mixing in a few wider frames (that required less frequent adjustments) as the moon started separating from El Capitan. By this time sky had pinked up beautifully, adding an element of color I hadn’t expected.
We all come to a workshop with expectations, students and leaders alike, but rarely are all of them met. And while the January group’s hopes for snowy winter scenes were dashed, I think that loss was more than made up for by other things we witnessed, some complete surprises, and some just a little better than our already high expectations—like this sunset moonrise to finish the workshop.
Join me in a Yosemite photo workshop
Workshop Schedule || Purchase Prints || Instagram
Yosemite Moonrise Collection
Click any image to scroll through the gallery LARGE


One Night, Two Moons
Posted on November 27, 2024

Through the Clouds, Tunnel View Moonrise, Yosemite
Sony a7R V
Sony 24-105 f/4 G
ISO 100
f/10
1/3 second
I wrapped up this year’s workshop schedule at the beginning of this month and am now enjoying a much anticipated Holiday breather before my schedule ramps up again in January. This isn’t exactly a vacation, because the end of the year is when all my permit reporting and next year’s permit applications are due, and my 2025 workshop prep starts to ramp up, but my schedule does get a bit less frenetic when the travel (and all its prep and recovery) is over.
As I often do when my travel schedule eases around the Holidays, I prioritize family over photography. That doesn’t mean no new pictures, but it does mean that most (all?) of the new pictures I share over the next couple of months will probably be pictures captured months, or even years, ago, but never got around to processing.
Going through my vast repository of unprocessed images is something I started doing while isolated during the early months of the pandemic (has it really been 4 1/2 years?!). I’d always been aware that I had lots of untapped gems languishing on my hard drive(s), but was nevertheless surprised by how much I enjoyed searching them out. Sometimes I’ll start by randomly picking a photo trip and scanning the Lightroom thumbnails for something that stops me, but the most productive approach has been going through my collection of already processed favorites to identify particularly special shoots, reasoning that there must certainly be more there. (I write more about this in my Back to the Future blog post.)
It always surprises me how much I enjoy revisiting past photo trips and workshops. Not only does the experience revive memories of special moments in Nature, lots of the best memories are of the people I was with. Sometimes that’s been other photo buddies, but since so much of my photography is centered around my workshops, the majority of those memories are actually my workshop groups.

Moonrise, Half Dome, Yosemite
Case in point: The seed for this “new” image was my “Moonrise, Half Dome, Yosemite” image from my February 2024 Yosemite Winter Moon workshop. Going through this workshop’s image folder, all the cloud-induced stress surrounding this particular moonrise came flooding back. And with it also came memories of the euphoria we all felt when the clouds opened just enough, at exactly the right time, to reveal the Half-Dome/moon/sunset alignment I’d been thinking about for more than a year. (Read the details here: Moon Swoon.)
Within minutes, the moon had climbed into the rapidly thickening clouds, and it looked like the show might be over—until, shortly before darkness was complete (or at least too dark to photograph the moon and foreground in one frame), it rose into a patch of slightly thinner clouds and briefly reappeared.
My strategy for moonrises is to go long until the moon separates from the landscape, then go progressively wider as it rises. This evening I’d set up two tripods, one with my Sony α1 and 200-600 lens, the other with my a7RV and 24-105 lens. So when the moon made its brief return, I was instantly ready to start clicking.
I chose a vertical composition to emphasize the foreground and minimize the lateral aspects of the scene. I also tried a few that were wide enough to include more of El Capitan, but ultimately decided to process this one to avoid shrinking the moon too much with a wider focal length.
Viewing these two images together provides a fantastic opportunity to make a point I’ve tried to make many times before: how to photograph a large moon. Thanks to the continued emphasis (and hype) focused on the largely irrelevant “supermoon” phenomenon, many people seem to believe the size of the moon in the sky is the most import part of a large moon image. It’s not.
The size of the moon in any image is almost entirely a function of the focal length used, not the relatively small difference between a “regular” size moon and a supermoon. Compare the size of the moon in these two images, noting that they were captured from the same location, on the same night, less than 10 minutes apart. For the big moon image, I used a 450mm focal length that magnified both Half Dome and the moon and eliminated everything else. For today’s smaller moon image, I chose a 50mm focal length that enabled me to fit far more of the surrounding beauty, but also shrunk the moon.
I should add that as far as I’m concerned, the absolutely best light for photography is the shadowless light that starts 10-15 minutes after sunset. I captured my (wide) image about 15 minutes after sunset. To my eyes, the scene appeared much darker than what you see in the image. I had to be careful with the exposure to avoid blowing out the moon, making the foreground in my raw original nearly black, but by monitoring my histogram and knowing my camera, I knew that the shadows would be recoverable. And I think the thin clouds helped subdue some of the lunar highlights, enabling to give the scene a little more exposure.
I still have a few openings in my 2025 Yosemite photo workshops
The Moon Large and Small, from Full to Crescent
Click any image to scroll through the gallery LARGE


")

")


Moon Swoon
Posted on March 6, 2024

Moonrise, Half Dome, Yosemite
Sony α1
Sony 200-600 G
ISO 200
f/8
1/50 second
Given an especially intense workshop schedule to start my year, the only Yosemite workshop I originally planned for February was my annual Horsetail Fall workshop. But in early 2023 I plotted the 2024 February full moon and saw that it would appear above Yosemite Valley, directly behind Half Dome (viewed from Tunnel View), at exactly sunset on Friday, February 23. Hmmm…
Checking my 2024 schedule, I noted that the year’s workshop fun started on January 22 with five days in Death Valley, followed by just a two-day break before I flew to Iceland for eleven days. After returning from Iceland, I had only two days to catch my breath before my four-day Horsetail Fall workshop. Avoiding Yosemite’s weekend crowds (always a problem, but magnified significantly by Horsetail Fall) while including the moonrise, meant the February moon workshop could only start on February 20. That would give me just three days between Yosemite workshops to recharge and recover from jet lag. But that moonrise…
(All this probably isn’t terribly interesting, but surely there’s someone out there interested in the calculus that goes into scheduling photo workshops.) In general, any photo shoot should be timed to pair the static landscape feature (one we know exactly where it is, and that it’s not going anywhere) of your choice with some dynamic natural element (great light, dramatic weather, seasonal features, celestial elements, and so on) that will take the scene (cliché alert) “to the next level.” And while I can’t speak for other workshop leaders, my own scheduling process follows the same rule: start with a beautiful location I’m extremely familiar with, then identify those special external phenomena that I’d travel to photograph even without a workshop.
While personal trips can happen at the last minute, workshops need to be scheduled at least a year in advance, which of course adds an element of uncertainty because I can’t actually promise the event I scheduled the workshop for. And that doesn’t even take into account the other unforeseen events that can shut down a location with little notice. Case(s) in point: since 2020 I’ve lost workshops to a global pandemic (perhaps you remember that), extreme wildfire potential, and a flood threat. And just this week a forecast of extreme snow closed Yosemite for the weekend with very short notice—a bullet narrowly dodged by my February workshops. But none of that stress can trump the potential for a perfectly timed and placed Tunnel View moonrise that I wouldn’t dream of missing myself—so why not share it?
Worst case, I rationalized, I’d be delaying my post-workshop recovery for a week to get four more winter days of Yosemite beauty without having to battle any crowds (who’d be camped out beneath Horsetail Fall) at all my sunset spots. And best case, in addition to all of the above, we’d enjoy two beautiful moonrises, capped by the Tunnel View grand finale on our last shoot.
So schedule it I did. After an inauspicious beginning to the 2024 workshops—forgotten computer in Death Valley, traumatic reindeer encounter in Iceland, and a last-day power outage in the Horsetail workshop—I figured I’d gotten all the bad stuff out of the way just in time for the moon workshop. And despite the inconveniences, the photography in those first three workshops was off the charts—could I keep that photography streak alive in workshop number four?
That question was answered early. On the workshop’s first morning we drove into the park for sunrise and discovered that an unforecast overnight snowfall had decorated Yosemite Valley with a couple of inches of fresh snow. Better still, that storm was just departing as we set up for sunrise at Tunnel View, so my group got to enjoy a truly classic Yosemite clearing storm, followed by an intense dash to capture as much of Yosemite Valley as possible before the snow melted. After that morning, it felt like I was playing with house money. But I still wanted that moon…
One of the unfortunate side-effects of dependence on fickle, ephemeral natural phenomena is the urge to compulsively check their status as the target time approaches. In this case, since I knew exactly when and where the moon would rise (which of course didn’t prevent me from compulsively plotting and replotting, just to be sure), I was wholly dependent on the clouds to cooperate and couldn’t keep my eyes off the weather forecast (as if that would do any good).
On Monday of that week the forecast for Friday was clear. Excellent! By Tuesday, it changed to mostly clear—uh-oh (I always hate to see my weather forecasts trending in the wrong direction.) Sure enough, on Wednesday, Friday was forecast to be partly cloudy. And by the time I went to bed Thursday night, the NWS was calling for mostly cloudy on Friday. Sweet dreams…
We still had a nice moonrise shoot on the valley floor Thursday evening, so technically I’d delivered the “Yosemite Winter Moon” the workshop name promised. Not only was that moonrise a visual treat, it provided an opportunity for everyone to practice the surprisingly tricky exposure techniques a sunset moonrise requires. The tendency is to expose the scene so the darkening foreground looks good on the camera’s LCD, which pretty much guarantees the moon will be an overexposed white blob. The solution is to base the exposure on the moon, making the moon as bright as possible without blowing it out, and trusting that the foreground that looks much too dark on the camera’s LCD can be fixed in Lightroom/Photoshop. (Or you could just take one picture for the moon and one for the foreground, then combine them later in the image processor—but what fun is that?)
After building up the Friday moonrise promised in the workshop’s name, preparation material, and orientation, there was no turning back. And while everyone in the group knew I had no control over the weather, and the Wednesday morning snow and clearing storm guaranteed the workshop was already a huge photographic success, that was old news, and I couldn’t help stressing about the moonrise I’d built this workshop around.
The clouds arrived and lingered on Friday as promised. Throughout the day we got a few glimpses of blue overhead, but nothing that gave me a lot of optimism. Nevertheless, after a nice day of photography, with sunset and the moonrise both at 5:45, I got my people up to Tunnel View a little after 5:00 so they’d have plenty of time to stake out a good spot and get comfortable with the conditions. But there were those clouds…
About half the group followed me to a sloping granite slab behind Tunnel View, while the other half chose to stay with my brother Jay at the more accessible, less vertically exposed regular view in front of the parking lot. Before setting up, I bounced back and forth between the two spots a couple times to be sure everyone was settled in and knew exactly when and where the moon would appear (if the sky were clear).
Ever the optimist, I settled down on my little patch of granite with two tripods, cameras, and lenses. On my (large) Really Right Stuff 24L tripod (with the BH-55 head) was my Sony a1 and 200-600 lens; on my (compact) RRS Ascend 14L was my Sony a7R V and 24-105 lens. I pointed the 200-600 at Half Dome and zoomed to around 450mm to fill the frame with the snow-capped monolith; with the 24-105 I composed a wider scene that included El Capitan, Half Dome, and Bridalveil Fall. The plan, should the moon actually appear, was to start with tight telephotos of just Half Dome, then, as the moon separates from Half Dome, switch to wider frames of the entire scene. But those clouds…
Thinner clouds covered most of Yosemite Valley, but my primary concern was a large stratus blob above and a little west of Half Dome, with the thickest clouds approaching the rock from the west. Not a good setup. A lifetime of photographing Yosemite has taught me that the clouds above Yosemite Valley arrive from the west and exit in the east, which meant the heavier cloud cover was bearing down on the very area of the sky where the moon would appear. But a lifetime of photographing Yosemite has also taught me that as soon as you think you have the weather there figured out, it will prove you wrong.
Around 5:30 I noticed a small patch of blue behind Half Dome, low on the right side where it intersects the tree-lined ridge. This is the area the thicker clouds should be filling, but as I watched, rather than advancing, those clouds seemed to be lifting. Soon it became apparent that the blue behind Half Dome was expanding. With a couple of minutes to go, not only was all the sky directly behind and above Half Dome clear, even the clouds above that appeared to be thinning.
This is probably a good time to say that few sights thrill me more than the first appearance of the moon above any landscape. As the time for the moonrise approaches, I lock my eyes on the spot and don’t move them, even when talking to others—I don’t want to miss a single photon of the moon’s arrival.
And I didn’t. The instant I saw the first molecule of moon nudge above Half Dome I called out to everyone with me and the clicking commenced. I waited about 30 seconds just to enjoy the view a bit, then went to work with my 200-600. As soon as the moon separated from Half Dome, I switched to my a7R V 24-105 as planned and spent the next 15 or so minutes with wider views of the scene. The rising moon soon encountered some clouds, but most weren’t thick enough to completely obscured it, and most actually enhanced the view.
I realize this zoomed image isn’t a compositional masterpiece—I just wanted to get the tightest zoom possible (to make the moon as large as possible), without cutting off any of Half Dome (easy to do if you’re not paying attention). Mission accomplished.
Epilogue
Just when I thought I’d put the inauspicious behind me, I was notified by one of the people in the Yosemite moon group that he’d tested positive for COVID. The next day, I too tested positive for COVID, as did three others in the group. Fortunately, we were all sufficiently vaccinated and no one got terribly sick. For three days I felt pretty miserable (bad cold miserable, nothing that sent me to bed), but was back to my regular morning workout after four days.
Join me in a Yosemite photo workshop
Workshop Schedule || Purchase Prints || Instagram
Yosemite Moonrise
Click any image to scroll through the gallery LARGE


Searching for Serendipity
Posted on February 8, 2024
 Dante’s Moon, Badwater, Death Valley
Sony a7R V
Sony 24-105 f/4 G
ISO 100
f/11
1/30 second
Miriam-Webster defines serendipity as, “Finding valuable or agreeable things not sought for.” Wikipedia calls it, “An unplanned fortunate discovery.” Though I can’t quibble with these definitions, I think photographers can create their own serendipity by keeping their eyes and mind open to unexpected opportunities.
Sometimes Mother Nature bludgeons us with serendipitous events that are too obvious to ignore—for example, a double rainbow suddenly coloring a gray downpour, a sunset that ramps up just as you’re about to pack up your gear, or maybe a rocket streaking through your Milky Way scene. But Nature’s more subtle gifts usually require our internal serendipity receivers to be tuned a little more sensitively—the unexpected is there if we keep an open mind.
Unexpected gifts from Nature are probably the single greatest joy I get from photography. But given the importance of planning and execution nature photography requires, it’s easy to understand how we might become so fixated on a specific plan that serendipity slips by undetected. The intense focus on a subject that shrinks the world and enables photographers to extract the best from one scene, also leads to overlooked scenes.
Over my many years photographing Nature, I’ve learned that rather than being mutually exclusive, laser focus and openminded awareness not only can coexist, they can actually collaborate to create photographic synergy.
Toward this goal, I’ve established a few techniques that nudge me into examining my surroundings more closely. These simple steps have become so ingrained in my photographic process that they no longer require conscious thought—in other words, the mere act of concentrating on my primary subject doesn’t mean my surroundings are denied the attention they deserve as well.
The first, and simplest, of these techniques is to periodically stop and do a slow 360, keeping a few questions in mind: What’s going on with the light, sky, shadows? What in the surrounding landscape draws my eye? Is anything moving? Then, to force myself to consider these observations even more closely, I try to anticipate what each of these factors will be doing over the next few minutes.
Another way to shake my single-minded focus while working any given scene is making sure I don’t move on without checking in on different perspectives: switch my camera’s orientation, zoom tighter and wider, reframe and/or adjust focus to emphasize different elements in my composition, and reposition my camera to change foreground/background relationships. I can’t tell you the number of times something unexpected and even better has magically appeared just because I adjusted some aspect of my perspective.
Despite these tools, extended periods away from my camera can make my serendipity generator a little creaky. So, following my recent two-and-a-half month workshop break, last month’s Death Valley / Alabama Hills workshop proved to be just what I needed.
Both locations, with their unique and diverse features, are great places to oil up the works and get my vision humming. And this workshop group in particular showed strong and varied vision that inspired everyone (myself included) during our daily image reviews.
I time this workshop to coincide with the full moon. Because the best full moon views in both Death Valley and the Alabama Hills face west, our moonsets come at sunrise. But that doesn’t mean we never see a sunset moonrise too. Even though the view isn’t great, and I never actually plot and plan a Death Valley moonrise, wherever I photograph a Death Valley sunset, I try to keep an eye on the east horizon for the moon’s arrival.
On our second evening, I took the group out to Badwater for sunset and the rare opportunity to photograph Lake Manly. Badwater Basin is almost always dry, but every once in a while extreme runoff will briefly restore it, adding a few inches of water that can stretch for miles, and for a few weeks or months transform the arid basin into a vast mirror. This version of Lake Manly is the vestigial runoff of Tropical Storm (and former hurricane) Hilary that laid waste to Death Valley last August.
The photography this evening was everything we’d hoped for—calm winds for a pristine reflection, and just enough nice clouds to catch the sunset color. The best Badwater views face west, toward 11,000 foot Telescope Peak, and north, up the valley. So while I knew the nearly full moon would be rising above the valley’s east wall this evening, lacking any kind of a view in that direction, the moon’s arrival wasn’t really a priority. Nevertheless, I occasionally glanced that way, and doubled-down when a cohort of clouds scooted across the eastern horizon and started catching sunset light.
And suddenly there it was, edging above the shear valley wall a little north of Dante’s View. With nothing beneath the moon but nondescript brown cliffs, at first I was content to simply watch it climb, but as the clouds closed in on the moon and their pink continued to intensify, I couldn’t help repositioning my camera.
With the clouds, moon, and color moving fast, the composition I ended up with was as simple as the scene was serendipitous. Since the scene really was all about the pink clouds and rising moon, I zoomed my 24-105 lens until my frame included as little of the surrounding (less appealing) elements as possible, and underexposed slightly to ensure lunar detail, emphasize the color, and darken (deemphasize) the barren mountain ridges.
The Badwater view and reflection this evening was so spectacular, especially when sunset started to color the sky, it would have been easy for this convergence of moon, clouds, and color to have unfolded behind my back, completely unseen. Instead, on an evening filled with the beautiful conditions I’d hoped for, I also got to enjoy one of those serendipity moments I love so much.
Workshop Schedule || Purchase Prints || Instagram
A Gallery of Serendipity Scenes (That I Didn’t Come Looking For)
Click any image to scroll through the gallery LARGE


, Yosemite")


Relationship Building
Posted on April 17, 2023
Lunar Reflection, Half Dome and Cook’s Meadow, Yosemite
Sony a7R V
Sony 24-105 f/4 G
ISO 100
f/10
1/8 second
It’s all about relationships
I write a lot about relationships in photography. Often I’m referring relationships with my subjects, which could mean gaining better understanding of a location—not just the where and when of its photo opportunities, but its weather and geology (especially), as well as its flora, fauna, and history. (Of course I love visiting new places too, but I’ve never felt particularly driven to expand my portfolio through relentless pursuit of new locations.)
As important as location relationships are my relationships with the natural phenomena that inspire me understand the science behind the ephemeral phenomena that fascinate me enough to photograph them. Things like lightning, rainbows, reflections, sunrise/sunset color, fall color, and anything celestial simply fascinate me and it never feels like work to study them.
But there’s another side to photography’s relationship coin that takes place within the frame of an image. I’m talking about the visual relationships between disparate subjects—juxtaposing one subject with another physical subject (nearby or distant), or elevating a favorite location by photographing it under the spell of a favorite natural phenomenon.
However these relationships happen, it’s only logical that the best photography takes place when intimate knowledge of location and natural phenomena are combined to create the intra-image relationships that make an image sing.
Sometimes this seems so obvious the we make these connections without realizing we’re doing it. when we visit a vista that includes multiple features, or travel to a favorite location to photograph it with sunset light or fall color. Other times we’re beneficiaries of happy accidents, when something unexpected just happens to manifest while we’re there. And while I love happy accidents as much as anyone, we should never count on them.
In general, the more deliberate we can be about consciously combining the things we love in our photography, the better our images will be. Of course some of my favorite images are happy accidents—something unexpected that just happened to take place while I was there to witness it—but the vast majority were more strategic.
So I guess in a way that would make me a photographic matchmaker, aggressively seeking to create relationships, not just with, but for the things I love most. Whether it’s fresh snow in Yosemite, lightning at Grand Canyon, the northern lights in Iceland, or the Milky Way in New Zealand, it’s usually not an accident that I was there. Of course there are no guarantee any of these things will happen as planned, but I always do my best to maximize my odds.
As much as I’d love to claim that creating these matches makes me some kind of photographic savant, I’m afraid it’s far simpler than that. (Like most people) I can read a weather report and get a few days advance notice of snow in Yosemite Valley; I know that the ingredients for a rainbow are sunlight and airborne water droplets (like rain and waterfall mist), and that my shadow always points in the direction of the rainbow’s center; the time window for any location’s fall color peak is generally common knowledge; and the moon and Milky Way follow precise schedules, and there are plenty of resources that reveal their position in the sky at any time, from any location. All I need to do is act on this information.
Tying it all together
Usually all you need to do to understand the relationships I’m seeking in a workshop is to look at the workshop’s name. The image I’m sharing in this blog post was captured during my Yosemite Moonbow and Wildflowers photo workshop earlier this month—but, as you can see, there is in fact (and fortunately) more to Yosemite in spring than moonbows and wildflowers.
When I scheduled this workshop more than a year ago, I knew for a fact that it would take place during the full moon that’s necessary for the Lower Yosemite Fall moonbow, and that the angle of the rising moon relative to the fall would be just right. And I knew from experience that the odds of wildflowers in April were extremely high. What I didn’t know was whether we’d have clear or cloudy skies, nor could I have anticipated California’s unprecedented wet and cold winter and how it might threaten to throw a wrench in my plans.
This is where the location familiarity part of relationship building comes in handy, as I was able to adjust enough that we ended up with some wonderful photography, albeit something that was much closer to a winter workshop than a spring workshop. This group had chilly temperatures, clouds, a little rain, and lots of snow (mostly on the ground, but a few flakes as well). Nevertheless, as you no doubt know if you read my previous blog post, we were able to catch the very beginning of what has turned out to be a very late (but potentially spectacular) wildflower bloom, so I was able to deliver something as advertised.
The moonbow part of my plan was a little more problematic. While Yosemite Falls is fed entirely by snowmelt, and the Sierra received record snowfall this winter boded well for our chances, the temperatures hadn’t warmed enough yet for the fall to deliver the explosion of mist at its base necessary for the moonbow. (There was nice flow in the fall, just not enough for the moonbow.) We tried, but ended up with a moonlight shoot sans moonbow.
On to Plan B
From the moon to the Milky Way, regular readers of my blog know of my fascination with all things celestial. Orbital geometry aligns Yosemite’s moon with different features as the seasons change, and I try to be there for as many moonrises as possible. Since the full moon happens during this workshop, photographing it is always part of my plan. On the other hand, because the moon doesn’t align as perfectly with Half Dome or El Capitan as it does in winter, it’s more of a bonus than it is something I advertise.
The first night clouds that threatened my moonrise made for great photography, and we kicked off with a nice Tunnel View shoot. Since the wet winter also meant reflective vernal pools in Yosemite Valley’s meadows, to create a sunset match for my workshop students on that cloudy first evening, I opted for the vernal pool in Cook’s Meadow. (For good reason, Cook’s Meadow itself is closed to visitors to allow the meadow to recover from years of pedestrian abuse—we approached the pool from behind, via the trail from the Sentinel Bridge parking lot, and never actually entered the meadow.)
I was actually thinking about multiple matches this evening: not only does this location have a great view of Half Dome, the vernal pool is ideally positioned for a Half Dome reflection. And I knew (but kept to myself for fear of jinxing us) that in the off-chance that the clouds parted, this would be the best location to add the moon to our Half Dome reflection scene.
Between Half Dome, the reflection, and clouds kissed by warm light, I almost forgot about the moon. But about 20 minutes before sunset the clouds opened and there it was. I’d already been strategically moving about to manage the reflection’s relationship to the various features dotting the water’s surface, taking care to frame Half Dome rather than obscure it. So the biggest obstacle I had to overcome was making sure that everyone else had their shot before I got mine.
Since most of us were set up within a few feet of each other, I was able to provide impromptu coaching on how to expose bright enough to capture the shadows without blowing out the moon (read more here). Another (counterintuitive) learning point was to point out that the focus point for a reflection is the same as the focus point for the reflective subject, not the reflective surface (read more here).
One more thing
People ask me if I ever tire of Yosemite, and I can honestly answer, no. Part of keeping Yosemite fresh for me is the infectious excitement that happens when the people I’m with witness something like what we saw this evening. Even without the moon, this Half Dome scene provided a great Yosemite introduction for everyone. But when the clouds lit up and the moon popped out, it elevated to one of those truly special Yosemite moments that I’ll never tire of sharing.
Photographic Matchmaking
Click any image to scroll through the gallery LARGE


Upping Your Vertical Game
Posted on January 16, 2023

Moonrise and Clouds, El Capitan, Yosemite
Sony a7R IV
Sony 24-105 G
1 second
F/11
ISO 100
Greetings from Iceland. Perhaps you noticed that this picture is in fact not Iceland, but that’s only because I simply haven’t had a chance to process my images from the past week. There are many reasons to visit Iceland in winter, and I will very enthusiastically share examples in future posts (northern lights, anyone?), but today I’m sharing one more image from last month’s Yosemite workshop. And because I’m fully immersed in a workshop that occupies me day and night (chasing the low light by day, and the aurora by night), I’m dusting off (and polishing up) a post on a topic that is as important to me today as it was when I wrote it 12 years ago.
Let’s Get Vertical
Who had the bright idea to label horizontal images “landscape,” and vertical images “portrait”? To that person let me just say, “Huh?” As a landscape-only photographer, about half of my images use “portrait” orientation. I wonder if this naming bias subconsciously encourages photographers to default to a horizontal orientation for their landscape images, even when a vertical orientation might be best.
Every image possesses an implicit visual flow that’s independent of the eyes’ movement between the scene’s elements. Understanding that the long side of an image subtly encourages the visual motion through the frame—left/right in a horizontal image, up/down in a vertical image—photographers can choose visual symmetry or tension with the visual movement between the scene’s visible elements.
For example, because a waterfall flows down, orienting a waterfall image vertically complements the water’s motion, instilling a feeling of calm. Conversely, a waterfall image that’s oriented horizontally can possess more visual tension because of the natural inclination for the eye to move laterally in a horizontally oriented image. While there’s no absolute best way to orient a waterfall image (or any other scene), you need to understand that there is a choice, and that choice matters.
By moving the eye from front to back, vertical images can enhance the illusion of depth so important in a two-dimensional photo. Even though a still image lacks the depth dimension, there’s a sense that distance increases from the bottom up in its 2-dimensional world. The viewer’s eye is drawn first to a strong visual element in the foreground, then naturally flows up, and away, from there. The left/right tug of a horizontal image conflicts with this. (Many factors go into creating the illusion of depth, so I’m not saying that horizontal images inherently lack depth.)
More than just guiding the eye through the frame, vertical orientation narrows the frame, enabling us to eliminate distractions or less compelling objects left and right of the prime subject(s). Vertical is also my preferred orientation when I want to emphasize a sky full of stars, dramatic clouds and color, or (as I was reminded earlier this week) an aurora that rockets skyward.
In these scenes with especially dramatic skies, not only do I orient them vertically, I put the horizon near the bottom of the frame to further underscore the drama. When the sky is dull and all the visual action is in the landscape, I’ll put the horizon at the top of my frame. And when the landscape and sky are equally compelling, I have no problem splitting the frame in the middle (regardless of what the photo club rule “experts” might proclaim).
While a horizontally oriented scene is often the best way to convey the sweeping majesty of a broad landscape, I particularly enjoy guiding and focusing the eye with vertical compositions of traditionally horizontal scenes. Tunnel View in Yosemite, where I think photographers tend to compose too wide, is a great example. The scene left of El Capitan and right of Cathedral Rocks can’t compete with the El Capitan, Half Dome, Bridalveil Fall triumvirate, yet the world is full of too-wide Tunnel View images that shrink this trio to include (relatively) nondescript granite that can’t hold a candle to the main scene.
When the foreground and sky aren’t particularly interesting, I tend to shoot fairly tight horizontal compositions at Tunnel View. But when a spectacular Yosemite sky, snow-laden trees, or cloud-filled valley below demand attention, vertical is my go-to orientation because it frees me to celebrate the scene’s drama without diluting it.
When I composed the scene in this image, the moon had just popped out of the clouds. Knowing when and where it was supposed to arrive, I’d been set up with my Sony a7R IV mounted with my Sony 200-600 lens and 2X Teleconverter, hoping to capture the moon BIG as it edged up from behind El Capitan. When the clouds threatened to completely wipe out the moonrise, I’d have been thrilled with any lunar appearance. By the time this wish was fulfilled, I’d long since abandoned my big moon plan and switched to my Sony 24-105 lens.
Because the clouds and color stretched across the sky, and Bridalveil Fall was flowing nicely, I naturally did a horizontal composition of this scene wide enough to include all the good stuff. But that composition shrunk the moon to more of a strong accent, and I wanted something with the moon more front-and-center.

Moonrise and Clouds, Tunnel View, Yosemite
Flipping my camera to vertical, I increased my focal length to limit my terrestrial subjects the business end of El Capitan, with an incognito Half Dome lurking in the background. The longer focal length enlarged the moon enough that, while not the BIG moon I’d once imagined, it stands out far more prominently than it does in my horizontal version.
Breaking News
The night before last, my Iceland workshop group was treated to what may have been the most spectacular northern lights display I’ve ever witnessed. Until last night, when we topped it. Stay tuned to this channel for images (as soon as I get a chance to process them and write some—by my next blog, I hope).
Let’s Get Vertical
Click any image to scroll through the gallery LARGE


, Yosemite")


, California")


The Third Time’s the Charm
Posted on December 12, 2022

Moonrise and Clouds, Tunnel View, Yosemite
Sony a7R IV
Sony 24-105 G
1/4 second
F/11
ISO 100
Large or small, crescent or full, I love photographing the moon rising above Yosemite. I truly believe it’s one of the most beautiful sights on Earth. The moon’s alignment with Yosemite Valley changes from month-to-month, with my favorite full moon alignment coming in the short-day months near the winter solstice when it rises between El Capitan and Half Dome (from Tunnel View), but I have a plan for each season. Some years the position and timing are better than others, but when everything clicks, I do my best to be there. And if I’m going to be there anyway, why not schedule a workshop? (He asked rhetorically.)
Strike one, strike two
For last week’s Yosemite Winter Moon photo workshop, I’d planned three moonrises, from three increasingly distant vantage points. On our first night, despite the cloudy vestiges of a departing storm, I got the group in position for a moonrise at a favorite Merced River sunset spot, hoping the promised clearing would arrive before the moon. The main feature here is Half Dome, but the clouds had other ideas. Though they eventually relented just enough to reveal Half Dome’s ethereal outline and prevent the shoot from being a complete loss, the moon never appeared. Strike one.
With a better forecast for the second evening, we headed into the park that afternoon with high hopes. But as the sun dropped, the clouds thickened to the point where not only did I fear we’d miss the moon again, I was pretty sure Half Dome would be a no-show as well. So I completely aborted the moonrise shoot and opted for sunset at Valley View, where El Capitan and freshly recharged Bridalveil Fall were on their best behavior. The result was a spectacular sunset that made me look like a genius (phew), but still no moon. Strike two.
Revisiting nature photography’s 3 P’s
Because the right mindset is such an important part of successful photography, many years ago I identified three essential qualities that I call the 3 P’s of Nature Photography:
- Preparation is (among many things) your foundation; it’s the research you do that gets you in the right place at the right time, the mastery of your camera and exposure variables that allow you to wring the most from the moment, and the creative vision, refined by years of experience, and conscious out-side-the-box thinking.
- Persistence is patience with a dash of stubbornness. It’s what keeps you going back when the first, second, or hundredth attempt has been thwarted by unexpected light, weather, or a host of other frustrations, and keeps you out there long after any sane person would have given up.
- Pain is the willingness to suffer for your craft. I’m not suggesting that you risk your life for the sake of a coveted capture, but you do need to be able to ignore the tug of a warm fire, full stomach, sound sleep, and dry clothes, because the unfortunate truth is that the best photographs almost always seem to happen when most of the world would rather be inside.
Most successful images require one or more of these three essential elements. Chasing the moon last week in frigid, sometimes wet, Yosemite got me thinking about the 3 P’s again, and how their application led to a (spoiler alert) success on our third and final moonrise opportunity.
Meanwhile…
As we drove into the Tunnel View parking lot, about 45 minutes before sunset, our chances for the moon looked excellent. There were a few clouds overhead, with more hanging low on the eastern horizon behind Half Dome, but nothing too ominous. My preparation (there’s one) had told me that the moon this evening would appear from behind El Capitan’s diagonal shoulder, about halfway up the face, and that area of the sky was perfectly clear. So far so good.
Organizing my group along the Tunnel View wall, I pointed out where the moon would appear, and reminded them of the previously covered exposure technique for capturing a daylight-bright moon above a darkening landscape. Eventually I set up my own tripod and Sony a7R IV, with my Sony 200 – 600 G lens with the 2X Teleconverter pointed at ground 0. In my pocket was my Sony 24 – 105 G lens, which I planned to switch to as soon as the moon separated from El Capitan. Then we all just bundled up against the elements and enjoyed the view, waiting for the real show…
But, as if summoned by some sinister force determined to frustrate me, the seemingly benign clouds hailed reinforcements that expanded and thickened right before our eyes. Their first victim was Half Dome, and it looked like they’d set their sights on El Capitan next. By the time sunset rolled around, my optimism had dropped from a solid 9 to a wavering 2. I knew the moon was up somewhere behind the curtain and tried to stay positive, but let everyone know that our chances for actually seeing it were no longer very good. I reminded them not to get so locked in on waiting for the moon that they miss out on the beauty happening right now. Ever the optimist, I switched to my 24-105, privately rationalizing that even without the moon, we’d had so much spectacular non-moon photography already, nobody could be unhappy. But still…
At that point it would have been easy to cut our losses, come in out of the cold (pain), and head to dinner. But I have enough experience with Yosemite to know that it’s full of surprises, and never to go all-in on it’s next move. So we stayed. And our persistence (we’ve checked all three now) was rewarded when, seemingly out of nowhere, a hole opened in the clouds and there was the moon. The next 10 minutes were a blur of frantic clicking and excited exclamation as my group enjoyed this gift we’d all just about given up on.
A few full moon photography tips
- Sun and moon rise/set times always assume a flat horizon, which means the sun usually disappears behind the local terrain before the “official” sunset, while the moon appears after moonrise. When that happens, there’s usually not enough light to capture landscape detail in the moon and landscape, always my goal. To capture the entire scene with a single click (no image blending), I usually try to photograph the rising full moon on the day before it’s full, when the nearly full (99% or so illuminated) moon rises before the landscape has darkened significantly.
- The moon’s size in an image is determined by the focal length—the longer the lens, the larger the moon appears. Photographing a large moon above a particular subject requires not only the correct alignment, it also requires distance from the subject—the farther back your position, the longer the lens you can use without cutting your landscape subject.
- To capture detail in a rising full moon and the landscape (in a single click), increase the exposure until the highlight alert appears on your LCD (any more exposure blows out the moon). At that point, you can’t increase the exposure any more, even though the landscape is darkening. You’ll be amazed by how much useable data you’ll be able to pull from the in nearly black shadows in Lightroom/Photoshop (or whatever your processing software). In the image I share above, my LCD looked nearly black except for the single white dot of moon. Eventually the scene will become too dark—exactly when that happens depends on your camera, but if you’re careful, you can keep shooting until at least 15 minutes after sunset.
Learn More
Moon Over Yosemite


Ready or Not…
Posted on October 30, 2022

Moonrise Through the Trees, Olmsted Point, Yosemite
Sony α1
Sony 100-400 GM
ISO 800
f/16
1/500 second
Let’s review
Consistently finding great photo opportunities isn’t just luck, but neither is it a divine gift. With that in mind, I sometimes refer to “The 3 P’s of nature photography,” describing the effort and sacrifice necessary to consistently create successful landscape images: Preparation, Persistence, and Pain.
- Preparation is your foundation, the research you do that puts you in the right place at the right time, the mastery of your equipment that allows you to wring the most from the moment, and the creative vision honed from prior experience.
- Persistence is patience with a dash of stubbornness. It’s what keeps you going back when the first, second, or hundredth attempt has been thwarted by unexpected light, weather, or a host of other frustrations. Persistence keeps you out there long after any sane person would have given up.
- Pain is the willingness to suffer for your craft. I’m not suggesting that you risk your life for the sake of a coveted capture, but you do need to be able to ignore the lure of sound sleep, a full stomach, dry clothes, and a warm fire, because the unfortunate truth is that the best photographs almost always seem to happen when most of the world would rather be inside.
Of course every once in a while you might come across an image that simply fell into your lap and all you had to do was whip out your smartphone and click. But those images are few and far between, and I daresay are rarely as rewarding as the images you worked for.
Picking a favorite image and trying to assign one or more of the 3 P’s to it is a fun little exercise I sometimes use to remind myself to keep doing the extra work. Take a few minutes to scan your portfolio; ask yourself how many didn’t require at least one of the 3 P’s. (I’ll wait.) …….. See what I mean?
Ready or not, here it comes

Moonrise Through the Trees, Olmsted Point, Yosemite
For this image, I will thank preparation. But, if you know how obsessively I plan my moonrises, not the kind of preparation you might think. Since I started photographing the moon long before The Photographer’s Ephemeris and other moon-plotting apps were available (long before smartphones, in fact), my moonrise/set workflow has always been to just plot everything manually using location-specific moon altitude and azimuth data, combined with topo map software (pretty much the same thing TPE does behind the curtain). But I didn’t do that for this moonrise because the moon wasn’t on my radar this evening.
Guiding my Eastern Sierra workshop group to Olmsted point for the workshop’s final sunset, I hadn’t plotted the moon because this workshop didn’t coincide with the full moon (I’d scheduled it for peak fall color, not the moon), and because the moonrise doesn’t align with any feature of particular interest at Olmsted Point.
But even when the moon isn’t part of my plan, it’s never far from my mind. (This is where the preparation part kicks in.) I always make it a point to know what the moon is doing, both its phase and general rise/set time and direction, whenever I’m out with my camera. Once I got my group situated on the granite at Olmsted Point, I mentally checked on the moon. Knowing that a 90% waxing gibbous moon would be rising in the southeast a couple of hours before sunset, I wondered how long it would take it to crest the ridge above us.
On my iPhone is an app called Theodolite that I can point at any feature to learn its altitude and azimuth in degrees of whatever I point it at. I wouldn’t trust this data enough to engineer a bridge, but since it works without connectivity, it’s perfect for exactly what I wanted to do—get a general idea of when and where the moon would appear. I pointed Theodolite at the ridge (using my phone’s camera, it computes and transposes the various angles on the display), and learned that the ridge rose 8 degrees above my location.
Next I switched to my Focalware app (which also doesn’t require connectivity) and learned that the moon should appear (rise to 8 degrees) a little less than 30 minutes before sunset. Focalware also gives me the moon’s azimuth at any given time, an angle I was able to find on the ridge using Theodolite (by pointing it at the ridge and shifting the view until the crosshairs aligned with the desired azimuth), giving me a general idea of the location on the ridge where the moon would rise.
Not only was I able to alert my group to this bonus moonrise, I was able to tell them when and where to look. The light on Half Dome was so good that some decided to pass on the moon, but those who wanted to photograph it had plenty of time to set up with their desired lens and composition.
For the moon’s appearance, especially when there isn’t an iconic landscape feature to pair it with, I like going long, the longer the better. Even though I had no expectation of using it, I’d still carried my Sony 100-400 GM lens on the short hike out to Olmsted—because, well, you never know. That, combined with my Sony 2X Teleconverter (which I also always carry), gave me 800mm.
There was nothing special about the ridge, so I tried to find a tree (or trees) to juxtapose with the rising moon. Though I knew about where the moon would appear, I wouldn’t know exactly where to point until I actually saw it. So I identified a few potential target trees, then pasted my eyes on the ridge.
By the time the moon rose, the warm light from the setting sun was just about to leave the granite. I raced to the spot that aligned with the first tree I’d identified and went to work. As soon as the moon separated from the ridge, I sprinted along the granite until I could frame it with a pair of trees, shifting slightly after every two or three clicks.
To summarize…
The preparation I credit for this image starts with my general sense of the moon’s phase at rise time. I was also there with all the tools I needed, from my long lens and teleconverter, to a couple of apps that allowed me to get the information I needed on the fly. And finally, because the moon ascends surprisingly fast, it helped a lot to have pre-identified my foreground targets.
Moon Over Yosemite


Big Moon Rising
Posted on May 1, 2022

Big Moon Rising, Tunnel View, Yosemite
Sony a7RIV
Sony 200-600 G
Sony 2x teleconverter
ISO 100
f/13
1/10 second
It doesn’t take much time with my images to figure out that I love photographing the moon. Large or small, full or crescent, it doesn’t really matter. Almost every one of my moon images is the product of plotting the time of its arrival (or departure), then making sure I’m there to photograph it. Using astronomical tables and topo map software, I’ve been doing this for more than 15 years—long before the availability of the astronomy apps that tremendously simplify the process with pretty decent accuracy. And while I recommend these (new fangled) apps to everyone who wants to photograph anything celestial above a particular terrestrial scene, I still do it the old fashioned way for no other reason than it’s more fun. But, as much as I’d love to tell you that I plotted this moonrise from last Wednesday morning in Yosemite, I have to admit that this one was largely a matter of just happening to be in the right place at the right time (aided by just a dash of advance knowledge).
Yosemite Valley is not a great sunrise location because nearly all of its vistas face east, which means photographing towering monoliths in full shade (the sun’s behind them), against the brightest part of the sky. We always hope for clouds to add color to the sky and subdue some of the sun’s brightness, but too frequently end up with blank skies.
Nevertheless, in most of my Yosemite photo workshops I take my group to Tunnel View for our first sunrise. I choose Tunnel View for that first sunrise because when clouds aren’t present, we can still turn the distinctive outlines of El Capitan, Half Dome, and Cathedral Rocks into silhouettes. Not only does this give my students the opportunity to create something a little different than the standard Yosemite image, it’s also a good way to get them thinking about photographing the way their camera sees rather than the way their eyes see (a real point of emphasis in my workshops).
My Yosemite Waterfalls and Dogwood workshop was scheduled to (fingers crossed) coincide with the park’s peak spring runoff and dogwood bloom, which usually happens around May 1 (+/- a week or two). This year I chose the last week of April because I’d rather be a little early for the dogwood than a little late, and to avoid the weekend crowds. Though I hadn’t considered the crescent moon when I scheduled it, as the workshop approached I checked and saw that on our first morning an 11% crescent would rise nearly 90 minutes before sunrise. Unfortunately, this moon aligned poorly with all of Yosemite’s icons, and to be visible at all would need to climb above the much higher walls southeast of Tunnel View. On the other hand, I saw that the crescent would be trailing a nice planetary alignment that included Mars, Venus, and Jupiter—maybe not great to photograph, but pretty nice to see.
When we arrived the sky was dark enough to enjoy the planets, but there was no sign of the moon. As feared, there were no clouds, so after getting my group going with their silhouettes, I started thinking about the moon again. Knowing that it was almost directly beneath Jupiter, about 1 1/2 times the distance separating Venus and Jupiter, I was able to pretty closely approximate where the moon would rise. And I realized that when it did rise, the sky would still be plenty dark enough.
I let my group know what would be happening and quickly ran to my car to grab my tripod, Sony a7RIV, Sony 200-600 G lens, and Sony 2X Teleconverter. Zooming my lens all the way out to 1200mm (go big or go home), I trained it on the small tree on the far left of this image and waited. The moon actually appeared just slightly left of the target tree, close enough that I didn’t need to recompose. The ridge here was so steep that it took more than 10 minutes for the moon to completely separate, creating the illusion that it was sliding uphill. merge
The most exciting part of this otherwise serene morning came when a commercial jet zipped into the scene, contrail trailing, and someone realized it was on a collision course with the moon. What ensued was a brief scramble to photograph the collision. Thwarted by my 2-second timer (a further reminder why I don’t photograph anything that moves), I got nothing but contrail, but at least two in the group got the moon/jet convergence.
Here’s a link to my Crescent Moon article in the Photo Tips section of my blog
Workshop Schedule || Purchase Prints || Instagram
A Crescent Moon Gallery


")


")


