Eloquent Images by Gary Hart
Insight, information, and inspiration for the inquisitive nature photographer
I Can Relate (You Can Too)
Posted on April 24, 2022

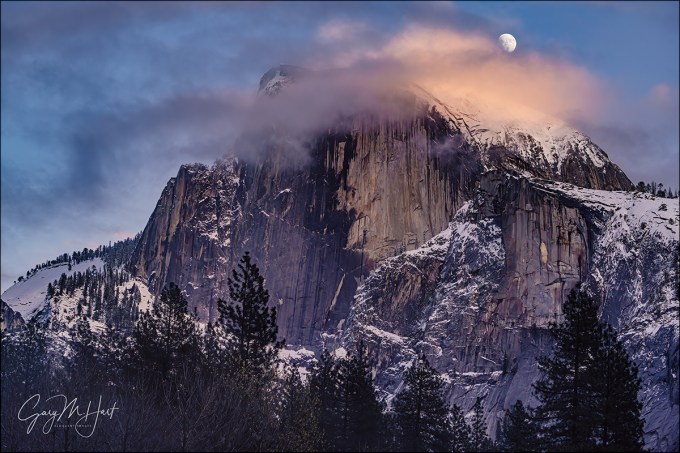
Peek-a-Boo Moon, Merced River Canyon and Bridalveil Fall, Yosemite
Sony a7RIV
Sony 24-105 G
1/4 second
F/10
ISO 100
Our lives revolve around relationships: romance, family, friends, work, pets…. Even that clown who cut you off on the freeway, for a few brief (I hope) seconds, might just be the most powerful influence in your life.
Like most words in the English language, “relationship” can mean more than one thing. On the macro scale are the specific personal connections that matter to us—not just people, but also places, things (I actually love my new dishwasher), music, sports teams, and so on. On a micro scale, we have spacial juxtapositions that can be either planned or random, and the realization that it’s possible to draw a straight line relating any two objects on Earth (or in the Universe, for that matter).
I know this isn’t first time I’ve written about relationships (it won’t be the last), but they’re very important to photography because they play a significant role in literally every image we capture. My image choices are very much determined my relationship with my subjects, while my images’ ability to connect with others is a function of the relationships, both conscious and unconscious, they tap in the minds of my viewers.
In addition to finding those personal connections, as I wrote in last week’s post, spacial relationships that connect visual elements and guide the eye have the power to move viewers’ through the frame (good), pull them out of the frame (bad), and to signal viewers what it is they’re supposed to see and do in the image (good).
Laying the foundation
In this image from the final shoot of last week’s Yosemite workshop, it’s easy to see how all those relationship factors combine to create an image. It all starts with a life-long relationship with Yosemite that predates my oldest memories. Campfires, hiking, the Firefall, bear watching, transient friendships with kids in nearby campsites, fishing with my dad, are all among the many vivid contributors to my Yosemite memory mosaic.
My love of the night sky is related (there’s that word again) to this Yosemite connection, and started just a few years later. Its seeds, sown on summer nights falling asleep beneath a sky full of stars on family camping trips, germinated with my first telescope when I was 9 or 10, and flourished under the dark skies of the High Sierra backcountry.
Putting it all together
When I started getting serious about photography, my love for (and proximity to) Yosemite made it the ideal place to start. It’s hard to take a bad picture in Yosemite, so at first I was content with my own version of the more conventional scenes seen in postcards, calendars, and travel brochures.
Soon I grew to appreciate the importance of light, and started timing my Yosemite visits around the best opportunities for sunrise/sunset color, warm light, and waterfall rainbows—my first conscious attempts to create relationships between fixed terrestrial subjects and ephemeral natural conditions. This epiphany led to the realization that instead of being satisfied with great light on Half Dome, a tumbling cascade, or mirror reflection, why not accent the scene with fall color or elegant dogwood? Whether not I was conscious of it at the time, I’d gone all-in on creating my own visual relationships: disparate elements connected in a shared moment.
Incorporating the night sky came later, but at some point I realized that, while a Yosemite sunset is nice, a Yosemite sunset that includes the moon might be especially nice. Suddenly I found myself obsessively calculating and logging the horizontal and vertical angles at every conceivable Yosemite vista, and plotting the moon’s altitude and azimuth to determine when and where it would appear above Yosemite Valley. (This was long before the days of the Photographer’s Ephemeris, Photo Pills, and other tools of that ilk.)
Back to the present
Somehow, that long and continuous thread lead me and my workshop group to the Bridalveil Fall vista on Big Oak Flat Road in Yosemite last Friday evening. More than a year earlier, I’d plotted this moonrise and scheduled a workshop to photograph it—among other things, like the moonbow beneath Lower Yosemite Fall and the poppy bloom in the Merced River Canyon.
But simply planning for a relationship doesn’t make it so. This year’s poppy bloom was a complete swing-and-miss, and clouds dogged our entire workshop, wiping out our moonbow.
But all was not lost. The clouds made for spectacular skies, while the sun came out enough for the group to capture a variety of waterfall rainbows on Bridalveil and Yosemite Falls. And there was enough water in Tenaya Creek to justify the 1 1/2 mile hike up to Mirror Lake for the Half Dome Reflection. We even got to photograph the earliest dogwood that had just started to pop out near Valley View, an unexpected treat.
And I still had one relationship ace up my sleeve: the moonrise on our final night. As often happens in Yosemite, the Friday forecast was frustratingly noncommittal: partly sunny. So it’s no wonder my moonrise optimism waxed and waned all day as the sky wavered between blue (yay!) and gray (boo!).
I’d figured that the moon would appear above Leaning Tower (above and just right of Bridalveil Fall) at around 7:15 p.m., so I got the group in place about 7:00. Even though we had more clouds than sky, a small gap on the western horizon let just enough sun through to spotlight Bridalveil Fall. There was even enough of an opening above the fall to give me hope that we’d see the moonrise right on schedule, and I set up my (brand new!) Sony a1 with the Sony 200-600 lens and 2X Teleconverter in anticipation. But by the time 7:15 arrived, that window had slammed shut.
The next opportunity was another opening in the clouds about 2 degrees higher, and I kept my eyes on it knowing the moon would probably rise into it around 7:25—about 10 minutes before sunset. With the moon higher, I set aside the a1 and 200-600 in favor of (one of) my Sony a7RIVs and my Sony 24-105. As I watched the small patch of blue sky, I realized it was shrinking, further delaying (and threatening to completely wipe out) the moon’s appearance.
We experienced brief euphoria when the moon finally peeked above the clouds at around 7:30, just long enough to capture 2 frames that had it more than 1/2 visible. Then it was gone.
I still faced a 4-hour drive home, but since the clouds were changing so fast and we were already there, I decided not to call the workshop quite yet. About 20 minutes later, right at the tail end of the window when there’s still enough light to capture detail in the moon and foreground (with one click), I was starting to consider pulling the plug for good when a small bright patch got my attention. Suddenly the clouds parted just long enough for me to grab 2 more frames that included most of the moon, before snapping shut for good.
Yosemite Relationships
Click an image for a closer look, and to view a slide show.


Yosemite Moonrise
Posted on February 27, 2022

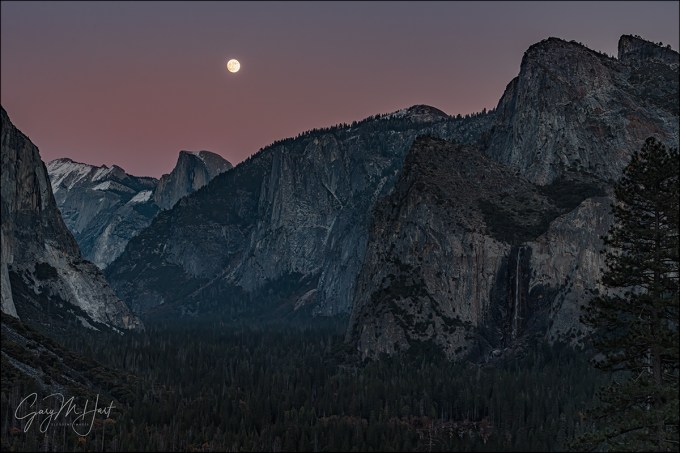
Twilight Moon, Tunnel View, Yosemite
Sony a7RIV
Sony 24-105 f/4 G
1/3 second
F/11
ISO 100
Though last week’s harrowing story of a sneaker wave that drenched members of the Iceland photo workshop group had a (relatively) happy ending (R.I.P., 3 cameras and lenses), it generated more responses than any blog post in recent memory. Exactly one week later, that sobering reminder of Nature’s power and ability to surprise was still on my mind when I was gifted a reminder of Nature’s ability to also soothe and inspire.
This epiphany struck me as I reclined on a granite slab above Tunnel View, waiting for the full moon to grace the most beautiful view on Earth. Just as in Iceland, I was with a workshop group. Unseen in Yosemite Valley below us, I knew thousands of photographers were assembled with eyes glued to a section of granite stained by Horsetail Fall’s trickle, praying to avoid a reminder of Nature’s ability to disappoint. If all went as hoped, the moon would appear at about the same time light from the setting sun colored the waterfall some shade of orange or (fingers crossed) red.
While clouds were a factor for both events, I wasn’t concerned about the moonrise because I could see there was only one cloud that might delay the moon’s appearance, but certainly wouldn’t wipe it out. On the other hand, I knew from experience that the people on the ground beneath Horsetail Fall would have no idea of the clouds poised to block the sun, and ultimate fate that evening’s light, until it actually happened (or didn’t). For me and my group, the light on Horsetail Fall would be tomorrow night’s anxiety; tonight was our opportunity to bask and marvel.
My general moonrise approach is to start with max telephoto until the moon gets some separation from the landscape, then go wider as the moon climbs. This evening my tripod was mounted with my Sony a7RIV and Sony 200-600 composed at full magnification on Cloud’s Rest, the peak between El Capitan and Half Dome, behind which the moon should appear about 25 minutes before sunset. Within arm’s reach was my other a7RIV with my Sony 24-105.
Once everyone was set up with lenses trained, we had time to sit and appreciate the view. From our perch not only could we see the spot behind which the moon would appear, we also could see the part of El Capitan where Horsetail flowed (though there wasn’t enough water to actually see the fall from this distance). As we waited for the moon, we watched the shadow cast by the setting sun move across the face of El Capitan, gradually warming the granite as it advanced.
My eyes were trained more on the cloud taking a breather atop Cloud’s Rest—more specifically, trying to figure out if the cloud was dense enough to completely block the moon. I got my answer when the time for moonrise came and passed, and adjusted my composition by widening my composition somewhat.
The moon came out from behind the cloud about 10 minutes before sunset, still close enough to Horsetail Fall to include both at 400mm. Meanwhile, the light on Horsetail Fall faded as the sun dropped into thin clouds near the horizon—faded just enough to subdue the color and disappoint the massed throngs below.
From our vantage point the light on El Capitan was good, but I could tell that the color wasn’t what people came for. As pretty as our scene was was, my favorite time to photograph a full moon isn’t until after the sun has set and the blue and pink pastels of Earth’s shadow starts to paint the sky. By this time the daylight-bright moon stands out strikingly against the darkening sky. Waiting for this to happen, I switched to my 24-105 and started playing with a variety of compositions that included some combination of El Capitan, Half Dome, and Bridalveil Fall.
Since I need to capture detail in both the moon and the foreground, and I never blend images (combine exposures to make a single image), the exposure margin for error shrinks significantly as the sky darkens around the moon. I captured this image more than 15 minutes after sunset, when the scene looked much better to my eyes than it did on my LCD. This is where I especially appreciate the dynamic range of my Sony sensors—I just monitor the moon, making it as bright possible without blowing it out, then rely on Lightroom and Photoshop to reveal the unbelievable amount of usable detail hidden in the shadows and highlights.
Large or small, crescent or full, I love photographing the moon rising above Yosemite as much as ever. I’m fully aware that I have far more than my share of these images, but it just makes me so happy, I have no plans to stop.
Workshop Schedule || Purchase Prints || Instagram
Yosemite Moonrise


2021 In Review: Pedal to the Metal, While Tapping the Brakes…
Posted on December 26, 2021

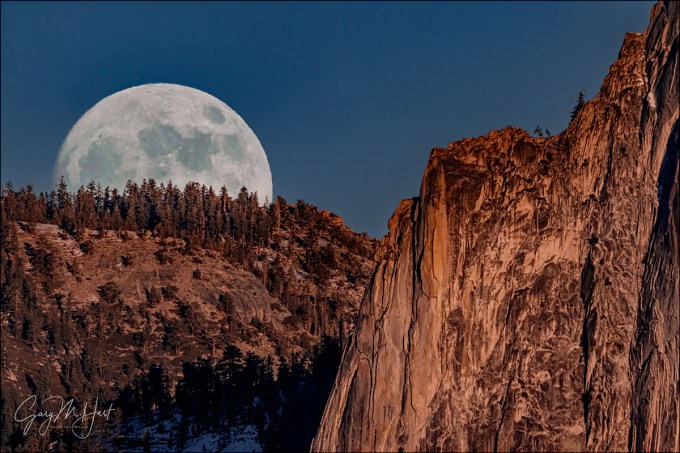
Massive Moonrise, El Capitan, Yosemite
Sony a7RIV
Sony 200-600 G
Sony 2x teleconverter
ISO 400
f/16
1/80 second
As COVID started ravaging my workshop schedule way back in March 2020, my private mantra was, “Just hang on until August.” As we approach our third pandemic year with the Omicron variant raging, how misguided that dream feels today. While 2020 was pretty much lost to COVID, 2021 was the year things seemed poised to return to normal. And while not the Disney happy ending I’d envisioned, in many ways that proved true.
Even though I had to postpone my 2021 January workshops—one in Death Valley, as well as the Iceland workshop I do with Don Smith—it seemed things were improving. And improve they did: In quick succession I did two Yosemite workshops in February, followed by three more Yosemite workshops, one each in March, April, and May. Another 2021 spring highlight came in May, when I returned to the Grand Canyon for my beloved raft trip. Amidst all this, Don Smith and I managed to get in our April Oregon Coast and Columbia River Gorge workshops. So far, so good.
Despite missing most of 2020 and a few COVID-related inconveniences, these resurrected workshops felt surprisingly normal—not only was I thrilled to get back to my locations, spending time with the groups reminded me how much I missed having people to share the beauty with. And it seemed the people in my groups were just as happy to return to nature, and to interact with others in the relative safety of the great outdoors, as I was.
Approaching mid-year, Don and I did lose our spectacular New Zealand workshop for the second year in a row, but we’d been resigned to that for many months and had a solid plan in place. I was actually philosophical about the New Zealand loss, rationalizing that I was ready for a breather following my brutal spring schedule, and the similarly ambitious schedule coming in the second half of the year (trying to make up for my 2020 losses).
The second half of the summer was back to pedal-to-the-metal mode, with three Grand Canyon workshops (back-to-back-to-back) in July and August, followed by a return to the Big Island of Hawaii in September. Autumn didn’t get any easier, with back-to-back Eastern Sierra workshops in September and October, and another Yosemite workshop in November.
If all this seems like a lot, let me assure you, it was. But, in the midst of this breakneck pace, October brought a real tap-the-brakes moment: Despite COVID precautions and all 11 participants/leaders fully vaccinated, following my second Eastern Sierra workshop, 7 people (including me) tested positive for COVID. Fortunately, no one became seriously ill (I felt like I had a moderate cold for less than a week—no fever, headache, or fatigue, but 4 days with absolutely no sense of smell). I know it would have been far worse had we not been vaccinated—a blessing for which I’ll be eternally grateful—but it was a reminder to stay vigilant.
The grand finale
Fully recovered, I wrapped up my busy year in December with a spectacular Yosemite workshop. This “Winter Moon” workshop delivered ample portions of both winter and moon—lots of snowfall that gave way to clear sky just in time for the full moon on our final shoot.
Fellow Yosemite (among other places) photographer Michael Frye was doing a workshop at the same time, but we communicated regularly and adjusted our plans to prevent our groups from ending up at the same spots at the same time. After learning that we both planned to be at Tunnel View for Friday’s sunset moonrise (we agreed there’d be enough room to make it work), an event that was no secret to the photography community in general, I knew it would be crowded.
While there’s quite a bit of room at Tunnel View, it’s not infinite, and parking can sometimes be a problem, so I got my group up there about 90 minutes before sunset (and about 75 minutes before the moon would appear). While we waited, I made sure everyone knew when and where the moon would appear, and encouraged them to work on compositions before the moon appeared.
Though I had two tripods with me, I didn’t think it would be fair for one person to take two spots and instead just set up one tripod and readied two bodies and lenses: a Sony a7RIV with my Sony 200-600 G and Sony 2X Teleconverter (1200mm), and a Sony a7RIV with my Sony 24-105 G. My plan was to start with the telephoto body as the moon appeared, then switch to the wider body as the moon climbed and moved away from El Capitan.
As you can see, the workshop grand finale was a spectacular success. The moon appeared near the (barely visible) frozen trickle that will become Horsetail Fall just a few minutes before sunset, just as the day’s last light kissed El Capitan. I shared one of the wider images in last week’s post; this week I’m sharing a 1200mm image from shortly after the moon’s arrival.


Note the size of the moon in these two images that were taken on the same night, from the same location. While it would be spectacular to have the large moon in the scene with both El Capitan and Half Dome, that would be impossible from any earthbound vantage point. From Tunnel View, magnifying the moon with a 1200mm focal length only gives me a small fraction of El Capitan, while widening the scene enough to include both of Yosemite’s granite icons shrinks the moon to small disk. The results are so different, I won’t even try to suggest that one is “better” than the other.
Epilogue
So, in case you weren’t keeping score, in 2021 I had 3 workshops rescheduled, while adding 16 workshops notches to my belt—a personal record. Yet despite this very productive year, 2021 didn’t usher in the Disney happy ending I’d hoped for. It seems very possible that Don and I will lose New Zealand again in 2022, and Omicron has forces to reschedule one of the two Iceland workshops scheduled for January.
My other 2022 workshops are still on schedule, but I’m monitoring Omicron closely and hoping it fades as quickly as it started (monitoring positive signs from South Africa and other countries ahead of us—with fingers crossed).
Workshop Schedule || Purchase Prints || Instagram
2021 Highlights


These Are Two of My Favorite Things
Posted on December 19, 2021

Winter Twilight Moonrise, El Capitan and Half Dome, Yosemite
Sony a7RIV
Sony 24-105 G
1/25 second
F/8
ISO 100
Camera or not, two of my very favorite things in nature are a rising moon, and the rich pink and blue twilight sky opposite the sun after sunset*. Once a month, in the days around the full moon, these phenomena converge, and I get an opportunity to photograph the moon actually in the best part of the sky. I spend a lot of time trying to identify the scenes above which to photograph these celestial displays, and the best time to be there.
As a one-click photographer, for years the primary obstacle to photographing these scenes has been capturing (in a single frame) detail in the daylight-bright moon and a rapidly darkening landscape. In my early digital years, I found that the window of exposure opportunity—the time from sunset until the foreground became too dark to capture with one click—ended about 5-10 minutes after sunset (this can vary somewhat with several factors, such as longitude and terrain), just as the best color was ramping up. I could extend that window by 5 minutes or so by using a graduated neutral density filter to subdue the moon’s brightness by 2 or 3 stops, but GNDs come with their own set of problems—especially when the scene doesn’t have a homogenous, horizontal space near the horizon to disguise the GND boundary.
Technology to the rescue
One of the main reasons I switched to Sony in 2014 was the dynamic range of the Sony Alpha sensors, and few situations underscore that advantage better than these twilight moonrises. With my new cameras, suddenly my post-sunset threshold jumped by at least 50%—an advantage that continued progressing with each Sony sensor iteration.
Along with improved sensor technology, advances in processing software enabled me to get even more out of each image. Probably biggest processing improvement is in the noise reduction software that reduces blotchy, image softening, detail robbing noise that’s the prime limiting factor when you pull up the shadows of a twilight moonrise. Noise reduction software doesn’t restore lost image data, but it can bring out the best of what you did capture, allowing you to push back the twilight moonrise window just a little more. (I use and recommend Topaz DeNoise AI.)
Time for an Ansel Adams quote
Ansel Adams famously said, “The single most important component of a camera is the twelve inches behind it.” Put in today’s terms (and far more prosaically), all the technology in the world doesn’t do much good if you don’t know how to use it. For example, me: I know now that I probably packed up too early, mistakenly thinking the twilight moonrise photography window had closed—simply because I didn’t know how to get the most from my camera.
In fact, proper exposure is probably the single biggest struggle most photographers have when photographing a twilight moon. The most frequent mistake is trying to make the picture look good on their LCD, which invariably results in a preview image with gorgeous foreground beneath a brilliant white lunar disk—a disk that, on closer scrutiny, is hopelessly stripped of detail.
Photographing both a full moon and the landscape, with detail, starts by understanding that, in a high dynamic range scene, an ideal exposure rarely looks good on the LCD. I repeat: In a high dynamic range scene, an ideal exposure rarely looks good on the LCD. The key is making the image as bright as possible without blowing the highlights, providing the best opportunity to restore the highlights and shadows in post-processing.
While it’s usually best to trust the image’s histogram in extreme dynamic range situations, since the moon is such a small part of most images, it rarely registers on the histogram. This small but important detail makes it possible to capture a histogram that looks great, while ending up with a moon that’s hopelessly blown (detail-less white).
So if you can’t trust the image or the histogram, what can you trust? I thought you’d never ask. While the histogram is helpful for the landscape part of the scene, when I photograph a full moon, I monitor the moon’s exposure with my camera’s highlight alert feature—on my Sony Alpha mirrorless bodies that the “zebras” (pre-capture highlight warning stripes on all mirrorless and some DSLR cameras), but DSLR shooters can use the post-capture blinking highlights.
My twilight moonrise recipe
My process for a post-sunset moon starts with metering in manual mode (because I want complete control of my exposure). I set the ISO to 100 (my Sony a7RIV’s native/best ISO), and the f-stop to whatever I think will give me the sharpest image. The exposure is controlled with the shutter speed.
While the moon’s brightness doesn’t change, with a rising full moon, the landscape will continue to darken, making a foreground exposure that was perfect a minute or two ago not quite so perfect now. As the scene darkens, I add light by deliberately increasing my shutter speed in 1/3 stop increments (that is, one click at a time), with my eye on the moon.
When the zebras appear, I use my knowledge of my a7RIV to squeeze the most possible light from the scene. Raw shooters almost always have more detail than their histogram or highlight alerts indicate (different cameras’ highlight alerts engage at different points). This means you can add still light after the first alerts appear in the moon. When I first detect the zebras on my a7RIV, I know I can push my highlights 2/3 to 1 full stop brighter and still recover detail later.
If you’re shooting with a DSLR that doesn’t offer pre-capture zebras in your viewfinder, you may still be able to get them on the live-view LCD (some DSLRs offer them, some don’t). If not, you’ll need to check the post-capture blinking highlights after you click. Camera familiarity is no less essential when reading the blinking highlights of post-capture DSLR image preview highlight alerts than it is with the pre-capture zebras on a mirrorless camera.
Another thing I’ve started doing to get the most light out of the scene is pushing my highlights beyond the point where I’m certain I haven’t blown them out, then magnifying the moon in the preview image—if I see detail, I know not only am I still good to go, I may even be able to squeeze another 1/ or 2/3 of a stop more light out.
Still learning

Straight from the camera, the shadows in this image were nearly black. But I’m constantly amazed by the amount of usable data I can pull from the darkest shadows of my Sony a7RIV.

Winter Twilight Moonrise, El Capitan and Half Dome, Yosemite
What I’m starting to realize now is how much usable detail I have in the shadows of my a7RIV. This image was captured just Friday night, on the final night of my Yosemite Winter Moon workshop. It was more than 20 minutes after sunset and my foreground looked so black on the LCD that I figured it was unusable. But the scene was so beautiful, I just couldn’t make myself stop shooting. (A friend who happened to be standing next to me for most of the evening had left about 10 minutes earlier, despite my protests that he was leaving too soon.)
So imagine my surprise when I opened it in Lightroom, pulled up the Blacks (to about 30), Shadows (all the way), and Exposure (about two stops) sliders and saw plenty of detail and very fixable noise. A quick treatment from Topaz DeNoise AI confirmed what what I’d just seen—my twilight moon window is now open until at 20 minutes after sunset. Amazing.
(I’ll have more on this fantastic finale to a fantastic workshop in a future post. Spoiler alert: This isn’t the only image from this shoot.)
* When I say sunset, you can infer that I mean sunrise as well, with everything happening in reverse, on the other side of the sky.
Workshop Schedule || Purchase Prints || Instagram
Twilight Moon
Click an image for a closer look, and to view a slide show.


Making Your Own Luck
Posted on April 4, 2021
Moonrise Through the Clouds, Half Dome, Yosemite
Sony a7RIV
Sony 100-400 GM
1/30 second
F/10
ISO 200
“Chance favors only the prepared mind.” ~ Louis Pasteur
Successful nature photography requires the convergence of physical objects, position (relative to those objects), light, weather conditions, the right equipment, and mastery of craft (did I miss anything?). Though we can control many of these factors, the overriding element that trumps everything else is plain old luck. But despite the undeniable luck factor in photography, most photographers bristle at the suggestion that a particular capture was “lucky.” For good reason.
No one denies that photography involves a great deal of luck, but each of us chooses our relationship with the fickle whims of chance, and we have more control than you might imagine. Which is why, like Ansel Adams, Galen Rowell, and a host of other photographers, I embrace Louis Pasteur’s belief that chance does indeed favor the prepared mind. In other words, the more prepared we are, the less luck will effect our outcomes.
As photographers, job-1 is subtracting as much luck as possible from the image capture equation: we hone our craft, get the best gear our budget allows (including backups), painstakingly research our locations, study the science behind the conditions we want to photograph, then sacrifice comfort and convenience (and sleep!) to be in the right place at the right time. Though we definitely appreciate our good fortune when the magic does happen, much of photography’s joy comes from the special effort it took to be there. Yes, it was fortunate that a lightning bolt struck right there, or the clouds parted just as the moon appeared, but it was no accident that we were there when it happened, fully prepared to capture the moment.
All photographers, in one way or another, work to manufacture their own luck. Because I’m particularly drawn to capturing nature’s ephemeral phenomena above its terrestrial wonders, that’s where my efforts are spent. Whether it’s lightning at the Grand Canyon, the Milky Way over Tasman Lake in New Zealand, or a moonrise above Half Dome in Yosemite, I schedule most of my photo trips (both personal and workshops) to maximize my chances for something special. While there’s never a guarantee that it will actually happen, and I’ve been disappointed more times than I can count, that doesn’t stop me from planning and getting out there just in case.
Which is how I happened to be in Yosemite in December 2019 for this moonrise. I’d plotted this alignment more than a year in advance. When I scheduled a workshop to capture it (fingers crossed), I knew full well that December is the wet season in Yosemite, making it entirely possible, maybe even likely, that my much anticipated moonrise could happen entirely behind a curtain of clouds.
Since this was a workshop, my first job is to reduce the luck factor for my entire group. That started with letting everyone know what gear they needed (nothing special: camera, lenses covering 24mm to 200mm, and a tripod), and (more important) getting them up to speed on the surprisingly tricky exposure idiosyncrasies of sunset moonrises. Meanwhile, behind the scenes I obsessively refreshed the NWS Yosemite forecast page every five minutes, trying will the forecast into promising something more definitive than the annoyingly ambiguous “partly cloudy.” No such luck.
The day of the event proceeded as advertised, teasing us with skies that alternated between mostly clear to mostly cloudy. Fickle skies notwithstanding, there was no thought of abandoning Plan A—I’ve been surprised enough by Nature (especially in Yosemite) to know that, no matter what the forecast promised, I’d have my group out there. Another thing I try to do to improve my group’s odds of success is get them on location early enough to familiarize themselves with the scene and its variety of composition options. Even though I’ve photographed this spot countless times, experience has taught me that first time need time to get comfortable with a scene.
Even without the moon, this location is very photo-worthy. So by the time moonrise approached, they’d all had plenty of photos under their belt and were pretty comfortable with the possibilities here. Clouds came and went as we waited, but the moon’s appearance coincided with one of the more clear moments. We started clicking wildly when the moon peeked out from behind Half Dome, then held our collective breaths as Half Dome’s cloud-making machine churned into action, completely erasing the moon within minutes of its arrival. But instead of getting discouraged, we just hung tight and hoped the moon would punch through. Punch through it did, delighting us with a moon/cloud dance that lasted until it became too dark to photograph.
We all felt very lucky walking back to the cars that evening, but we felt so much more than that. Exiting Safeway to see a rainbow arcing over the parking lot is lucky. Period. But when you see an image of one of nature’s ephemeral gifts matched with a beautiful landscape, try to appreciate that its creation, as lucky as the moment might have felt to the photographer, was probably much more than simple good luck.
Fortunately, anticipating these special moments in nature doesn’t require any real gifts—just a basic understanding of the natural phenomena you’d like to photograph, and a little effort to match your anticipated natural event (a rainbow, lightning, a moonrise, or whatever) with your location of choice. Mix in the right gear, the resolve to get out there, and the perseverance not to give up when nature appears to have other ideas, and voila: You’re a photographer! And that’s about as lucky as you can be.
Workshop Schedule || Purchase Prints || Instagram
More Self-Made “Luck”
Click an image for a closer look, and to view a slide show.


")


Good Things Come to Those Who Wait
Posted on February 28, 2021

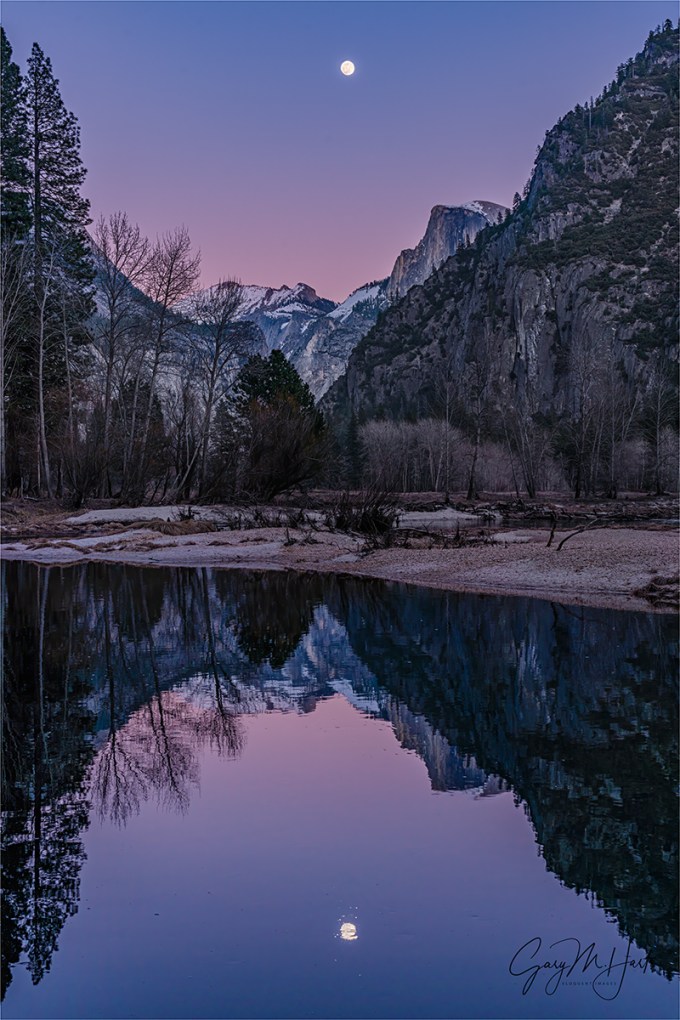
Nightfall, Yosemite Valley Moonrise
Sony a7RIV
Sony 24-105 G
.8 second
F/10
ISO 400
So much to do after two workshops in the last two weeks (and all the planning and recovery that goes with them). I had ambitious plans to return home late Friday night and hit the ground running first thing Saturday morning, so imagine my frustration to walk into my chilly house (I’d turned off the heat before I left), equal parts hungry and tired, at about 11 p.m. to find my internet down. When I discovered no dial tone on my landline (yes, I still have a landline), I realized this was a Comcast problem. Uh-oh. Having dealt with Comcast problems in the past (don’t get me started on their automated phone support system), I set aside food, warmth, and sleep to immediately call Comcast tech support. (Cold, hungry, tired, and no internet—suddenly I knew how the Donner Party must have felt.)
After about two hours on the phone (no, I do not want to reset my modem for the eighth time!), the best I could do was arrange for a Sunday house call—not bad for Comcast, but certainly not great for someone with a business to run, especially given all I had to do. I went to bed strategizing my Saturday, figuring I could at least load and process my images, and handle my basic internet needs by turning my phone into a wifi hot spot. But Saturday morning when I tried to connect my computer to my phone and load a page, my computer just stared back dumbly. I checked my reception and saw it bouncing between one and zero bars. I found a corner by the window that at least seemed to stay at one bar and called T-Mobile. Turns out a tower was down, but at least they were sorry. (I actually think T-Mobile’s tech support is very good, especially after dealing with Comcast.) And for some reason my Adobe Creative Suite wouldn’t load either (usually it works fine without connectivity, but I didn’t have the bandwidth to debug the problem without internet).
The additional technical frustration between then and now included multiple support calls with Comcast and T-Mobile and a trip to the Comcast store to swap out my modem, all culminating with a visit from a very nice Comcast technician who fixed the problem and told me the support rep I talked to yesterday could have fixed it over the phone. Sigh.
So here I am, it’s Sunday night and have a blog to write. I loaded my images, grabbed one from Friday night, processed it, and here you go. Now for something to say….
I’d scheduled my Yosemite Winter Moon workshop around this grand finale, a full moon rising from directly behind Half Dome right at sunset on Friday evening. The rest of the workshop had already been really nice—multiple rainbows on Yosemite Falls (Upper and Lower), a warmup moonrise on Thursday night, and even a bonus Horsetail Fall shoot (I’d made it clear that the moon, not Horsetail Fall, was the priority for this workshop) when it became clear the conditions would be perfect, and I had cracked this year’s NPS Horsetail Fall restrictions code—but this moonrise is what we’d all been looking forward to.
Because of the crowds in the park and the fact that the moonrise was apparently not a secret (how I long for the good old days), we got to our moonrise spot above the Tunnel View vista about two hours early. After not seeing a single cloud for the entire workshop, the first thing we saw as we unpacked and set up our gear was a bank of thin clouds that had set up camp low on the horizon, directly behind Half Dome. At first they appeared to be moving on and I was pretty optimistic about our moonrise, but as the appointed hour approached I grew increasingly pessimistic—not only were clouds thickening, they were expanding.
Sure enough, zero hour arrived with no sign of the moon, but we did get some nice color in the clouds and the group, while disappointed, seemed happy enough with what did get. The scene was so nice in fact that we were in no rush to leave despite the darkening landscape. Which is why we were still primed and ready for action when I noticed a faint glow in the clouds above Sentinel Rock. Could it be?
Yes it could. What started as a glow quickly revealed itself to be the lunar disk we’d been waiting for. And though it wasn’t apparent to our eyes, it was clear that the moon had edged into a patch of thinner clouds, because as we frantically clicked, actual lunar detail started to emerge. In fact, the clouds that originally thwarted our moonrise turned out to be a benefit when they moderated the moon’s brightness enough to allow us to photograph long after it have been too bright.
In my prior blog post I wrote about the joy of unexpected gifts from nature, events that seem to come out of nowhere, just when you’ve about given up hope. Now it had happened in consecutive workshops. I realize that moments like this are the exception, but they really do more than make up for all the disappointment nature likes to deal.
Workshop Schedule || Purchase Prints || Instagram
Worth Waiting For


Photography With Friends
Posted on December 6, 2020
Twilight Moonrise, Half Dome and Bridalveil Fall, Yosemite
Sony a7RIV
Sony 70-200 f/4 G
ISO 200
f/10
1/8 second
One of my favorite things about landscape photography is the opportunity to experience nature in complete solitude. But since COVID has forced us all to socially distance, I’ve realized that another one of my favorite things about landscape photography is the opportunity to experience nature in the company of others.
There’s a lot of waiting in landscape photography: for the light to be right, the lightning to fire, the sky to darken, the clouds to part, or the moon moon to arrive. But it wasn’t until I started leading photo workshops that I fully appreciated how much I miss sharing that waiting with people who appreciate nature’s beauty as much as I do. Whether it’s actively engaging in conversation, or just watching my workshop students enjoy the company of friends new and old. And then there are the many lasting friendships that formed in workshops.
So about a week before the late November full moon (that I’d circled on my calendar over a year ago), I got the bright idea to invite a half-dozen or so of my favorite photography friends to join me for one of my favorite things in nature: a full moon rising above Yosemite Valley. I sent an e-mail invitation detailing what was going to happen, where I was going to photograph it, and when I’d be there.
My brother Jay and I left for Yosemite late that morning, arriving at Tunnel View about four hours later. After about ten minutes circling and waiting for a place to park (I’ve never seen Yosemite more crowded in November), we made it up to the designated spot right around 4 p.m. I was thrilled to see nearly everyone I’d invited, some who had driven as long as six hours to get there. A couple of them had brought their wives, and one brought a friend.
The standard Tunnel View vista was crowded enough to qualify as a super-spreader event, but since I’d chosen a broad, unmarked slab of granite above the parking lot, we were able to socialize while remaining safely socially distant. The moon would arrive at 4:25, so after enthusiastic greetings and a few elbow-bumps, I opened my bag and went to work.
For this event I set up two tripods: one with a Sony a7RIV and Sony 200-600 with a Sony 2X Teleconverter; one with my other a7RIV and Sony 70-200 f/4. (Normally I’d have used my Sony 24-105 f/4 G, but I’ve shot this moonrise wide so many times that I decided before leaving that I was going to go all telephoto.)
Equipment ready and compositions set, I checked my watch and saw that we still had 15 minutes until the moon arrived. Perfect. Because this shoot was as much about reconnecting with friends as it was about photography, before leaving I’d filled two large thermoses with boiling water, and brought enough cocoa mix for each of us to warm our insides with two steaming cups of chocolate goodness. Sipping cocoa, we enjoyed the view and waited for the moon, chatting, laughing, and simply catching up—just like the good old days.
The moon arrived just as the last sunlight bathed Half Dome in warm hues that started amber and transitioned to soft pink before finally fading. As the moon rose through the darkening sky, the conversation was replaced by clicking shutters.
The image below is one of my first clicks; at the top of the post is one of my final images, captured shortly before the foreground became too dark to capture (with one click) without overexposing the moon.
Lunar Arrival, Half Dome, Yosemite
Sony a7RIV
Sony 200-600 G
Sony 2x teleconverter
ISO 800
f/18
1/60 second
Down in the parking lot we chatted more in the darkness, reluctant to acknowledge that our gathering was over so fast. I’ve always thought that there are few experiences in nature better than watching the moon rise above Yosemite Valley, but as far as I’m concerned, the highlight of this evening was reconnecting with friends.
Read how I plan my moon shoots
Workshop Schedule || Purchase Prints || Instagram
A Tunnel View Moonrise Gallery


(Really) Big Moon
Posted on September 20, 2020

Lunar Arrival, El Capitan and Clouds Rest, Yosemite
Sony a7RIV
Sony 200-600 G (APS-C crop)
Sony 2x teleconverter
1800mm focal length equivalent
ISO 200
f/13
1/20 second
This is an updated version of the “Big Moon” article from my Photo Tips section,
plus the story of this image (below)
Nothing draws the eye quite like a large moon, bright and bold, above a striking foreground. But something happens when you try to photograph the moon—somehow, a moon that looks to the eye like you could reach out and pluck it from the sky shrinks to a small white speck in a photo. While a delicate accent of moon is great when properly framed above a nice landscape, most photographers like their moons BIG.
Some photographers resort to cheating, plopping a telephoto moon into a wide angle landscape. But armed with basic knowledge bolstered by a little planning, capturing a large moon isn’t hard.
Focal length
Every time there’s a “supermoon,” we’re bombarded with news stories implying that the moon will suddenly double or triple in size, followed by faked images intended to confirm the impossible. But crescent or full, super or not, the moon’s size in an image is almost entirely a function of the focal length the photographer used—photograph it at 16mm and the moon registers as a tiny dot; photograph it at 600mm and your moon dominates the frame.
But a landscape image with a large moon requires more than just a long focal length. If big was all that mattered, you could attach your camera to a telescope, point skyward, and capture a huge moon (not that there’s anything wrong with that). But without a landscape to go with your huge moon, no one would know whether you took the picture on a mountainside in Yosemite, atop a glacier in New Zealand, or beside the garbage cans in your driveway.
Equipment
“Big moon” is a subjective label, but I don’t usually use it unless my focal length was 200mm or longer. And while a 200mm lens is okay for the moon, for me the moon doesn’t really start to jump out of the frame until I approach 400mm.
Prime zooms are super sharp and fast, but for my moon photography I prefer a telephoto zoom for focal length flexibility that enables me to adjust my composition to include or exclude foreground elements. As a Sony Alpha shooter, my default big moon lens that’s almost always in my bag is my Sony 100-400 GM. The Sony 200-600 is sometimes too long, and it’s too big to live in my bag fulltime, but when I know I’ll be photographing the moon rising (or setting) above a location that’s several miles from my foreground subjects, I’ll replace the 100-400 in my bag with the 200-600. And when I want to go nuclear on the moon with either lens, I add the Sony 2X Teleconverter.
Not a Sony shooter? No problem, all the major camera manufacturers offer similar options.
The camera you use makes a difference too. The more resolution you have, the more you can crop (increase the size of the moon) without noticeable quality loss. And since an APS-C sensor has a 50% (-ish) crop built in, until I got my Sony a7RIV, I’d often use my APS-C Sony a6300 to maximize the size of the moon in my images. But now that I have the full frame Sony a7RIV, with 61 megapixels I actually have more resolution in APS-C mode than I had with my a6300.
My own rule for full moon photography is that I must capture both lunar and landscape detail. But a full moon rises at sunset and sets at sunrise, and a crescent moon is only visible shortly before sunrise or after sunset. So your camera’s dynamic range a very important consideration. The darker the sky, the better the moon looks, but the darker the sky, the darker the foreground too. For me it’s time to go home when the foreground becomes so dark that making it bright enough to capture usable detail means blowing out the moon. So the more dynamic range I have, the darker the sky can be. While I don’t know of a camera with as much dynamic range as my a7RIV, all of today’s cameras have pretty decent dynamic range.
And finally, given the extreme focal lengths you’ll be dealing with, don’t even think about trying to shoot a big moon without a sturdy tripod.
Distance yourself
Often the most difficult part of including a large moon with a specific landscape subject is finding a vantage point far enough back to fit the subject and the moon. But the farther back from your foreground subject you can position yourself, the longer the focal length you can use, and the bigger the moon will be.
For example, I love photographing a big moon rising behind Half Dome in Yosemite. But at Yosemite’s popular east-side locations, even 200mm is too close to get the moon and all of Half Dome in my frame. And while Yosemite’s most distant east-facing Half Dome vistas are up to 10 miles away, Half Dome is large so that even at that distance the longest focal length that will include the moon and all of Half Dome isn’t much more than 400mm.
A little easier for me is including a big moon with smaller foreground objects like a prominent tree. Near my home in Northern California are rolling hills topped by solitary oaks that make perfect moon foregrounds when I can shoot up so they’re against the sky. And since these trees are much smaller than Half Dome, even vantage points that are less than a mile away are doable.
Location, location, location
As your focal length increases, your compositional margin for error shrinks. You can’t expect to go out on the evening of a full or crescent moon, look to the horizon, and automatically put the moon in the frame with your planned foreground subject.
Even when the moon and your foreground do align, once the moon appears, you’ll only have a few minutes before it rises out of your telephoto frame. This means extreme telephoto images that include both the moon and a foreground subject are only possible when the moon is right on the horizon, making proper timing essential.
Like the sun, the moon traces a different path across the sky each day. This path changes with each lunar cycle (from full, to new, back to full)—whether the moon is full or crescent, a location that perfectly aligns the moon and foreground one month, will probably be nowhere close the next.
Coordinating all the moving parts (moon phase and position, foreground subject alignment, subject distance, and rise/set timing) requires some planning and plotting. When I started photographing the moon, in the days before smart phones and apps that do the heavy lifting, I had to refer to tables to get the moon’s phase and position in the sky, manually plot the alignment, then apply the Pythagorean theorem to figure the timing of the moon’s arrival above (or disappearance behind) the terrain.
Today there are countless apps that will do this for you. Apps like The Photographer’s Ephemeris and Photo Pills (to name just two of many) are fantastic tools that give photographers access to moonrise/set data for any location on Earth. There is a bit of a learning curve (so don’t wait until the last minute to plan your shoot), but they’re infinitely easier than the old fashioned way.
Depth of field
With subjects so far away, it’s easy to forget about depth of field. But extreme focal lengths mean extremely limited depth of field. Depth of field isn’t a concern when Half Dome is your closest subject and it’s ten miles distant, but when your foreground is an oak tree on a hill that’s a mile away, you absolutely need to consider the hyperfocal distance.
For example, at 800mm and f/11 (with a full frame sensor), the hyperfocal distance is about a mile-and-a-quarter (look it up)—focus on the tree and the moon will be soft; focus on the moon and the tree is soft. But if you can focus on something that’s a little beyond the tree, at maybe one-and-a-half miles away, the image will be sharp from front to back.
When I’m not sure of my subject distance, I estimate as best I can, focus on a point beyond my foreground subject, then review my image magnified to check sharpness. If my focus point is in my frame, great, but I won’t hesitate to remove my camera from the tripod to focus on something in another direction that’s the right distance (if you do this, to prevent refocusing, be sure you use back-button focus or are in manual focus mode when you click your shutter). It’s always best to get the focus sorted out before the moon arrives, a good reason to arrive at a new location well in advance of the moon’s arrival.
Plan ahead
When the moon is a small accent to a wide scene, it’s often enough to just show up on its full or crescent day and shoot it somewhere above your subject. But because the margin of error is so small, planning for a big moon image is best done months in advance.
I identify big-moon candidate locations near home and on the road, and am always on the lookout for more. My criteria are a prominent subject that stands out against the sky, with a distant east or west facing vantage point. Over the years I’ve assembled a mental database ranging from hilltop trees near home, to landscape icons like Half Dome, Mt. Whitney, and Zabriskie Point (Death Valley).
With my subjects identified, I do my plotting (I still do it the old fashioned way) and mark my calendar for the day I want to be there. That often means waiting close to a year for the alignment I want. And if the weather or schedule doesn’t cooperate, my wait can be longer than that.
About this image
On the penultimate evening of last February’s Yosemite Winter Moon photo workshop, I assembled my Yosemite Winter Moon photo workshop group on the granite above Tunnel View to wait for the moonrise we’d been thinking about all workshop. Sunset was 5:30, and I expected the moon to appear behind Cloud’s Rest between a little before 5:35, which meant the sky and landscape would already be starting to darken. The exposure for a post-sunset full moon is trickier than many people realize because capturing detail in both the daylight-bright moon and the rapidly fading landscape requires vigilant scrutiny of the camera’s histogram and highlight alert (blinking highlights). To get everyone up to speed, I used nearly full rising moons on the workshop’s first two nights to teach them to trust their camera’s exposure aids and ignore the image on the LCD (kind of like flying a plane on instruments). With two moonrises under their belts, by this evening I was confident everyone was ready.
I was ready too. In my never-ending quest to photograph the moon as large as possible, I went all-in—none of that wimpy-ass 200mm glass for me, for this moonrise I used every resource in my bag. I set up two tripods: mounted on one was my Sony a7RIII and 100-400 GM lens; on the other tripod was my Sony a7RIV and 200-600, doubled by the 2X teleconverter: 1200mm. But I wasn’t done. Normally I shoot full frame and crop later (for more compositional flexibility), but just for fun, on this night I decided to put my camera in APS-C mode so I could compose the scene at a truly ridiculous 1800mm—I just couldn’t resist seeing what 1800mm looked like in my viewfinder.
While waiting for the moon the group enjoyed experimenting with different compositions using the warm sunset light illuminating Half Dome and El Capitan. I used the time to test the focus at this unprecedented focal length. Waiting for an event like this with a group is one of my favorite things about photo workshops, and this evening was no exception. Between questions and clicks, we traded stories, laughed, and just enjoyed the spectacular view.
The brilliant sliver of the moon’s leading edge peaked above Cloud’s Rest at 5:33. It is truly startling to realize how quickly the moon moves through the frame at 1800mm, so everything after that was kind of a blur. Adjusting compositions and tweaking exposure and focus on two bodies, I felt like the percussionist in a jazz band, but I somehow managed to track the moon well enough to keep it framed in both cameras.
Though I just processed this image yesterday, it’s the earlier of the two big moon images I’ve processed from that shoot. Which one do you like best?
Big Moon


")


The Bright Side
Posted on May 4, 2020

Moon Over East Mitten, Monument Valley
Canon EOS-5D Mark III
Canon 24-105L
1.6 seconds
F/11
ISO 100
Some of the best things that have happened in my life would not have happened had something bad not happened first. Not only does this apply to life’s important things, like relationships and careers, I can also say the same thing about my photography.
In 2013, the politicians we Americans elected to serve us got in a pissing match about the budget and the public suffered. When they shut down the government, the workers who could least afford it lost their income, and people who had been planning vacations to our national parks had to cancel or find alternatives. I make my living conducting photo workshops in the national parks, so to say I was anxious about the government shutdown would be an understatement.
Because of the timing, the shutdown affected my friend Don Smith’s workshops even more that it affected mine—I lost one sunset shoot in my Eastern Sierra workshop (and simply replaced it with an alternate location), but Don lost the Grand Tetons the day before the start of his workshop there (and still managed to make it work with alternate locations just outside the park), and it looked he was going to lose his Arches/Canyonlands workshop too.
As many of you may know, Don and I sometimes trade off assisting each other’s workshops, and I was scheduled to help him in Arches/Canyonlands. Don wanted to find alternate locations for his Arches/Canyonlands group as he’d done in the Tetons, but a schedule conflict prevented him from traveling to Moab early to scout. With an opening in my schedule, I volunteered to do the advance scouting instead. I flew out a few days early and spent that extra time identifying options in areas surrounding the parks’ boundaries.
It turned out that while I was out there, the state of Utah paid the federal government to reopen their parks, so by the time the workshop started everything was back to business as usual. But because of that advance scouting trip, that only happened because of the government shutdown, Don was able to give his participants several really nice spots that would never have happened without the shutdown.
The highlight of the entire workshop was a trip to Monument Valley to photograph the full moon rising above The Mittens that would never had happened without the shutdown. I knew we’d have a full moon during this workshop and was looking for places to photograph it outside Arches and Canyonlands NPs. My first evening in Moab, on a whim I checked the sunset moonrise above The Mittens and realized it would align perfectly. Even though the drive from Moab to Monument Valley was 2 1/2 hours, Don and I thought this opportunity was too good to pass up. When we shared the opportunity with the rest of the group at the orientation, even though we now had access to Arches and Canyonlands and didn’t need to drive to Monument Valley, everyone was excited to do it.
We left early enough to allow the group to explore some of the beauty along the route, enjoy the loop drive through Monument Valley, and even have dinner at the spectacular (and aptly named) The View restaurant. And as you can see, the moonrise itself was a rousing success. All because our original plans were blown up by the national parks closure.
The moral of the story
I’m not saying that a global pandemic is a good thing, and certainly am not trivializing the true tragedies COVID-19 has brought. But I do believe that those of us not affected by extreme COVID loss can find comfort in the positives that come from an experience we can all agree feels quite negative. Here’s my list of things that have happened thanks to COVID that would not have happened with business as usual (in no particular order):
- I’m learning video!
- I emptied a storage unit I hadn’t visited in four years and that was sucking $170/month from my checking account
- My garage is cleaner that it has been in years, in spite of (in fact because of) the infusion of mostly useless junk from my storage unit
- I’m refinancing my house and saving $$$
- I’ve learned that I can go (at least) 6 weeks without a haircut
- I’m walking 7-10 miles per day and have started running again
- I’ve processed tons of images that I had completely forgotten about (and even sold some)
- I’ve learned (or at least been reminded) that “success” isn’t as money-centric as we tend to believe
I can’t wait to return to “normal” (whatever that may be), to get out and photograph the nature I love so much and reconnect in person with my workshop students. But in the meantime I find comfort in the knowledge that in many ways I’ll be better for this experience. I hope you can say the same thing.
Workshop Schedule || Purchase Prints
Change of Plans: Images That Happened Because Something Went Wrong
Click an image for a closer look, and to view a slide show.


")


")


Garbage in, garbage out
Posted on April 29, 2020
Magenta Moonrise, Half Dome and the Merced River, Yosemite
Sony a7RIV
Sony 24-105 G
1/13 second
F/11
ISO 100
True story: I once saw a guy taking 10-second exposures of the moonbow at the base of Yosemite Falls, hand-held. When I gently suggested that his image might be a little soft, he assured me that he would just sharpen it in Photoshop.
I won’t deny that digital capture and processing has given photographers more flexibility and control than ever, and processing can indeed correct a number of problems, but processing is not a panacea—if the image was garbage going in, it’ll be garbage going out. Processing software and skills are an essential part of good photography, but the best images are still created in the camera.
Just as Ansel Adams visualized the finished print before clicking the shutter, success in digital photography still starts with understanding how the camera’s vision differs from your own, and taking the steps necessary to leverage those differences at capture. While Adams was indeed a master in the darkroom, that skill would have been wasted without his intimate knowledge of his camera and film, combined with his understanding of exposure, that ensured the best possible negative and print once he got into the darkroom.
Of course (spoiler alert) photography has come a long way since Ansel Adams’ roamed the earth. Digital photographers now have more control than ever, and incredible capture tools that allow us to correct problems instantly. But I fear all this power has intimidated some photographers, and made others lazy. Fortunately, like many things that seem scary-complex going in, just scratching the surface a little starts to reveal a foundation of very simple principles.
One of the simplest things you can do is learn how to read a histogram, then train yourself to rely on it. It’s the relying on the histogram part where most photographers fall short. One of the most frequent mistakes I see inexperienced photographers make is basing their exposure decision on the way the picture looks on the back of their camera. The LCD is great for composition, but trusting it for exposure is a huge mistake.
Additionally, and here’s another thing that’s often overlooked: take the time to learn how your camera’s actual capture differs from what its histogram tells you. The histogram is based on a jpeg preview, but if you’re shooting raw, you almost always have more information than the histogram shows you. Each camera model is different, so you need to do a little observing or testing to determine how far you can push your camera’s histogram beyond its boundaries and still get usable data. Shooting this way, the jpeg that comes out of the camera may indeed show blown highlights or unrecoverable shadows, but they’ll come back like magic in Lightroom/Photoshop (or whatever your processing paradigm).
When I photographed this moon rising above Yosemite Valley last February, even though the color and exposure of the finished image you see here is pretty close to what my eyes saw, the image that appeared on my camera’s LCD screen looked nothing like this. The sky was washed out, and the reflection was lost in the shadows. But a quick check of my luminosity histogram told me that I’d captured all the scene’s detail, and verifying with the RGB histogram confirmed that I’d gotten all the color as well.
Usually a perfect histogram is all you need to get the exposure right, but in this case I also had make sure I had detail in the moon, which was by far the brightest thing in the scene. Normally I only use my camera’s highlight alert features (“zebras” pre-capture, blinking highlights post-capture) as a reminder to check my (nearly always more reliable) histogram, but here the moon was too small to register on the histogram. So as I added light, I closely monitored my highlight alert, bumping the exposure in 1/3-stop increments until the flashing appeared. But wait, there’s more! Just seeing the highlight alert wasn’t enough to tell me the moon was blown out. I know my Sony a7RIV well enough to know that I can push my exposure at least a stop beyond where the moon starts blinking and still recover the lunar details in post. This little piece of knowledge enables me to give my moon images the most light possible, ensuring less noise when I pull up the shadows.
In Lightroom I pulled down the highlights, pulled up the shadows, tweaked a few other things (color temperature, vibrance, clarity), then moved the image to Photoshop, where I did some noise reduction (Topaz DeNoise AI), dodging and burning, and (finally) sharpening. Voilà.
More Twilight Magic
Click an image for a closer look, and to view a slide show.


