Eloquent Images by Gary Hart
Insight, information, and inspiration for the inquisitive nature photographer
Watch Your Backup
Posted on March 12, 2024

Sunrise Gem, Diamond Beach, Iceland
Sony a7R V
Sony 12-24 GM
1/13 second
F/22
ISO 50
A funny thing happened to me on the way to this image. And when I say “on the way,” I don’t mean taking the picture, I mean after it was safely loaded onto my computer and fully processed, it seems that someone (who wishes to remain anonymous), accidentally overwrote it with a completely different image. Oops.
Establishing a backup mindset
Overwriting an image is an easy thing to do; without a backup, it’s lost forever. In this case, I still had the raw file, but I’d have lost all the time and effort I’d put into processing the image, with no guarantee that I’d ever perfectly duplicate my original processing. Not the end of the world, but a real pain. Instead, since I did have a backup, I was simply able to restore the image and go about my business.
Though whole experience was just a blip in my day, it made me think about the data management practices that made it a non-event. These data practices I acquired in my previous life in the tech industry (way back when megabytes were big), but practices that might not be quite so second nature to others (especially those who don’t yet know the devastation of lost irreplaceable data). Which led me to thinking that perhaps some would be interested knowing how I keep my data safe. So I’ll share my own image (and data) workflow as an example of good data practices—not to advocate for my specific approach, but simply as an example.
However you choose to implement your own backup scheme, you should be fine long as you follow a few basic principles:
- Backup everything that’s important: Duh.
- Backup regularly—Ideally that will be automatically and as instantly as possible: Your data is only as good as your most recent backup.
- Redundant backups: Relying on a single backup of important data is playing with fire, and I daresay even two backups might not be not enough.
- At least one offsite backup: You never know what catastrophe might befall your abode.
- Multiple storage types: There is no “perfect” storage technology, so whatever your preference—spinning drives (cheaper but prone to crashing without warning); SSD drives (faster, relatively crash-resistant, and extremely compact, but expensive and not forever); CDs/DVDs (cheap, but also not forever); or the cloud (convenient but slow to populate, and even slower to restore—especially if you need to restore a lot of data at once)—never put all your backup eggs in one basket.
I’m going to concentrate on my image storage and backup, but since photography is my livelihood, there’s lots of non-image data that’s just as important and treated with the same care.
To the extent that it’s possible, for me a regular backup means an immediate backup. Because all of my cameras have two card slots and I write each image I capture to both cards, my image backups start the second I click my shutter. Card failures are rare, and usually survivable with the help of recovery software, but usually isn’t good enough. Not only that, media failure isn’t the only threat to my images. Don’t forget user error. For example, I know a photographer (the same one who overwrote the image above) who one time pulled a card out of his camera intending to upload the images from a recent weekend in Yosemite, stuck it in a pocket for the short walk down to his nearby Starbucks, and somehow lost the card. Instead of freaking out about a lost weekend, he simply pulled the other card from his camera and used it to import the weekend’s images. The stray card never did turn up, so he was out the cost of its replacement—a temporary bummer, but far from the crushing letdown losing a weekend’s worth of irreplaceable photography would have been.
As much as I’d like to automate the step of importing my images from my camera to my computer, my own import workflow does require some intervention because I use Lightroom’s Import program to name and organize my images. Without getting too deep into the weeds, I let Lightroom rename each image—retaining the camera-assigned image number and adding descriptive info—before copying them into a trip-specific folder on a 4TB SSD drive that always travels with me. And because I use two computers, my Lightroom catalog also lives on this drive—I just plug the drive into whichever computer I’m working on and away I go.
Once this Lightroom upload is complete, I immediately copy that trip’s newly populated folder onto a 10TB spinning hard drive that lives on my desk, and also to a RAID 6 configured NAS array (a possibly overkill but much appreciated backup set-up by my IT professional son-in-law). Only when all this is done do I format the camera’s media cards.
That sounds pretty good—3 copies (computer, hard drive, NAS array)—but it’s not enough. Consider the plight of Francis Ford Coppola, who lost 15 years worth of writing and images when his computer and its backup were stolen. Then think about the unthinkable things that could happen to your home—theft, fire, flood, nuclear missile, etc.—that might jeopardize everything inside. You need an offsite backup.
Places to host an offsite backup(s) include the home of a friend or relative, a safe deposit box, a storage facility, the office, to name a few. All those options are better than nothing, but not only are these manually generated backups only as good as the most recent update, updating them frequently enough to be worthwhile requires more discipline than I can take credit for.
Which is why my offsite backup uses a cloud service: Backblaze. There are many cloud backup options, but I chose Backblaze because it’s computer-based (it backs up every hard drive attached to my computer for the same price), not size limited (they’ll backup as much data as I connect to my computer), and not expensive (around $100/year). Almost the instant I add images to the 10TB drive on my desk, Backblaze recognizes the new data and starts backing it up—I never have to think about it again. With so much redundancy in my local backups, I consider this Backblaze backup to be my backup of last resort—I’ll probably (fingers crossed) never use it, but the peace of mind I get from the knowledge of its existence is worth far more than the service’s relatively small cost.
A de facto backup (it does backup my data, but that’s not why use it) is Dropbox, which holds every piece of data I might want to access regularly—processed images (but not raw files), documents, presentations, etc.—and syncs it all between my various devices. This allows me to work on something at home, then relocate to my remote “office” (Starbucks) without skipping a beat. I can also access all this essential data on my iPhone and iPad if when I find myself separated from my computers. I actually sync all of my Dropbox data to each of my computers, so once its synced I can still access it when I’m off the grid (I’m looking at you, Grand Canyon North Rim); on my iPhone and iPad, I pull most of my Dropbox data from the cloud when I need it, but do have a few important folders and files permanently downloaded for offline access.
The final piece of my backup paradigm is Mac OS Time Machine, which comes installed on every Mac, stores history for each file (I can go back to any date and recover a copy of any given file on that date), and is so easy to set up and use, I don’t understand why any Mac user wouldn’t use it. My primary Time Machine backup is a dedicated (not used for anything else) 5TB spinning hard disk that lives on my desk and is always connected. Because spinning hard drives can fail without warning, I also have a duplicate Time Machine backup on my NAS array.
In this case, when I someone overwrote a this fully processed image file, I didn’t panic, I just went to my backup. I had multiple options, but my Time Machine backup was right there on my desktop, so in less than a minute I was back in business with a fully restored image file.
One more very specific case
No example illustrates how backup obsessed I am than my workflow on a trip that requires flying. Since I’ll be so far from my whole home office backup paradigm, when I fly I carry a second 4TB SSD drive. After uploading the images onto my regular image drive and into the Lightroom catalog, I copy that folder onto that second drive, and hide it deep in my suitcase. If, God forbid, someone breaks into my room and steals my (insured) camera and computer bags, it’s unlikely they’ll find the second backup drive.
When I fly home, I make sure my images are in three different places: the primary image drive is in my computer bag over my shoulder and then under the seat in front of me; the backup drive is safely tucked into my checked suitcase; the SD cards containing the original raw files are in my cameras, which are in my camera bag on my back, and then in the overhead bin. The only way I’ll lose all three is if the plane goes down, in which case I likely have bigger problems.
About this image

Sunrise Gem, Diamond Beach, Iceland
The day after our aborted visit to Diamond Beach, this year’s Iceland workshop group enjoyed a far more successful return visit. It seems every time Don Smith and I bring a group here, it’s a little different. Last year there was much less ice; the year before the surf was so rough that we didn’t dare get close to the water—and still ended up being too close. Some years the advancing and receding surf gently wraps each ice chunk, and other years most of the ice is high and dry.
This year the tide was out, so most (but not all) of the ice was up the beach and rarely touched by the surf. I started here trying to get the standard Diamond Beach motion blur shots on the few ice cubes the waves reached, but when the sun arrived turned my attention to the much larger ice slightly (20 feet) inland from the waves’ farthest approach.
I love the way the ice lights up with the warm hues of the sun’s first rays, so to fill the screen with this beautiful translucent natural ice sculpture, I went with my 12-24 lens, dropped low, and positioned my tripod no more than two feet away. Because I was going for a sunstar, I dialed to f/22, then spent the time waiting for the sun micro-positioning myself to get all the elements in place. I liked the smooth rocks embedded in the black sand, and though that distant block of ice in the upper left was quite tiny at 12mm, I knew as soon as the sun hit it, it would stand out enough to create a little visual interest in that corner of the frame. I put the top of my frame just above the clouds to minimize the amount of blank sky.
As soon as the sun popped out, I started shooting. On my camera’s LCD the foreground looked nearly black—not just the sand, but the shaded part of the ice as well. But I didn’t want to blow out the sky, and knew my Sony a7RV well enough to be confident I could pull up the shadows in Lightroom/Photoshop. I’d love to say that the feathery sun-kissed waves were intentional, but I didn’t even notice them until I started working on the image.
Don Smith and I return to Iceland in 2025
Here Comes the Sunstar
Click any image to scroll through the gallery LARGE


Moon Swoon
Posted on March 6, 2024

Moonrise, Half Dome, Yosemite
Sony α1
Sony 200-600 G
ISO 200
f/8
1/50 second
Given an especially intense workshop schedule to start my year, the only Yosemite workshop I originally planned for February was my annual Horsetail Fall workshop. But in early 2023 I plotted the 2024 February full moon and saw that it would appear above Yosemite Valley, directly behind Half Dome (viewed from Tunnel View), at exactly sunset on Friday, February 23. Hmmm…
Checking my 2024 schedule, I noted that the year’s workshop fun started on January 22 with five days in Death Valley, followed by just a two-day break before I flew to Iceland for eleven days. After returning from Iceland, I had only two days to catch my breath before my four-day Horsetail Fall workshop. Avoiding Yosemite’s weekend crowds (always a problem, but magnified significantly by Horsetail Fall) while including the moonrise, meant the February moon workshop could only start on February 20. That would give me just three days between Yosemite workshops to recharge and recover from jet lag. But that moonrise…
(All this probably isn’t terribly interesting, but surely there’s someone out there interested in the calculus that goes into scheduling photo workshops.) In general, any photo shoot should be timed to pair the static landscape feature (one we know exactly where it is, and that it’s not going anywhere) of your choice with some dynamic natural element (great light, dramatic weather, seasonal features, celestial elements, and so on) that will take the scene (cliché alert) “to the next level.” And while I can’t speak for other workshop leaders, my own scheduling process follows the same rule: start with a beautiful location I’m extremely familiar with, then identify those special external phenomena that I’d travel to photograph even without a workshop.
While personal trips can happen at the last minute, workshops need to be scheduled at least a year in advance, which of course adds an element of uncertainty because I can’t actually promise the event I scheduled the workshop for. And that doesn’t even take into account the other unforeseen events that can shut down a location with little notice. Case(s) in point: since 2020 I’ve lost workshops to a global pandemic (perhaps you remember that), extreme wildfire potential, and a flood threat. And just this week a forecast of extreme snow closed Yosemite for the weekend with very short notice—a bullet narrowly dodged by my February workshops. But none of that stress can trump the potential for a perfectly timed and placed Tunnel View moonrise that I wouldn’t dream of missing myself—so why not share it?
Worst case, I rationalized, I’d be delaying my post-workshop recovery for a week to get four more winter days of Yosemite beauty without having to battle any crowds (who’d be camped out beneath Horsetail Fall) at all my sunset spots. And best case, in addition to all of the above, we’d enjoy two beautiful moonrises, capped by the Tunnel View grand finale on our last shoot.
So schedule it I did. After an inauspicious beginning to the 2024 workshops—forgotten computer in Death Valley, traumatic reindeer encounter in Iceland, and a last-day power outage in the Horsetail workshop—I figured I’d gotten all the bad stuff out of the way just in time for the moon workshop. And despite the inconveniences, the photography in those first three workshops was off the charts—could I keep that photography streak alive in workshop number four?
That question was answered early. On the workshop’s first morning we drove into the park for sunrise and discovered that an unforecast overnight snowfall had decorated Yosemite Valley with a couple of inches of fresh snow. Better still, that storm was just departing as we set up for sunrise at Tunnel View, so my group got to enjoy a truly classic Yosemite clearing storm, followed by an intense dash to capture as much of Yosemite Valley as possible before the snow melted. After that morning, it felt like I was playing with house money. But I still wanted that moon…
One of the unfortunate side-effects of dependence on fickle, ephemeral natural phenomena is the urge to compulsively check their status as the target time approaches. In this case, since I knew exactly when and where the moon would rise (which of course didn’t prevent me from compulsively plotting and replotting, just to be sure), I was wholly dependent on the clouds to cooperate and couldn’t keep my eyes off the weather forecast (as if that would do any good).
On Monday of that week the forecast for Friday was clear. Excellent! By Tuesday, it changed to mostly clear—uh-oh (I always hate to see my weather forecasts trending in the wrong direction.) Sure enough, on Wednesday, Friday was forecast to be partly cloudy. And by the time I went to bed Thursday night, the NWS was calling for mostly cloudy on Friday. Sweet dreams…
We still had a nice moonrise shoot on the valley floor Thursday evening, so technically I’d delivered the “Yosemite Winter Moon” the workshop name promised. Not only was that moonrise a visual treat, it provided an opportunity for everyone to practice the surprisingly tricky exposure techniques a sunset moonrise requires. The tendency is to expose the scene so the darkening foreground looks good on the camera’s LCD, which pretty much guarantees the moon will be an overexposed white blob. The solution is to base the exposure on the moon, making the moon as bright as possible without blowing it out, and trusting that the foreground that looks much too dark on the camera’s LCD can be fixed in Lightroom/Photoshop. (Or you could just take one picture for the moon and one for the foreground, then combine them later in the image processor—but what fun is that?)
After building up the Friday moonrise promised in the workshop’s name, preparation material, and orientation, there was no turning back. And while everyone in the group knew I had no control over the weather, and the Wednesday morning snow and clearing storm guaranteed the workshop was already a huge photographic success, that was old news, and I couldn’t help stressing about the moonrise I’d built this workshop around.
The clouds arrived and lingered on Friday as promised. Throughout the day we got a few glimpses of blue overhead, but nothing that gave me a lot of optimism. Nevertheless, after a nice day of photography, with sunset and the moonrise both at 5:45, I got my people up to Tunnel View a little after 5:00 so they’d have plenty of time to stake out a good spot and get comfortable with the conditions. But there were those clouds…
About half the group followed me to a sloping granite slab behind Tunnel View, while the other half chose to stay with my brother Jay at the more accessible, less vertically exposed regular view in front of the parking lot. Before setting up, I bounced back and forth between the two spots a couple times to be sure everyone was settled in and knew exactly when and where the moon would appear (if the sky were clear).
Ever the optimist, I settled down on my little patch of granite with two tripods, cameras, and lenses. On my (large) Really Right Stuff 24L tripod (with the BH-55 head) was my Sony a1 and 200-600 lens; on my (compact) RRS Ascend 14L was my Sony a7R V and 24-105 lens. I pointed the 200-600 at Half Dome and zoomed to around 450mm to fill the frame with the snow-capped monolith; with the 24-105 I composed a wider scene that included El Capitan, Half Dome, and Bridalveil Fall. The plan, should the moon actually appear, was to start with tight telephotos of just Half Dome, then, as the moon separates from Half Dome, switch to wider frames of the entire scene. But those clouds…
Thinner clouds covered most of Yosemite Valley, but my primary concern was a large stratus blob above and a little west of Half Dome, with the thickest clouds approaching the rock from the west. Not a good setup. A lifetime of photographing Yosemite has taught me that the clouds above Yosemite Valley arrive from the west and exit in the east, which meant the heavier cloud cover was bearing down on the very area of the sky where the moon would appear. But a lifetime of photographing Yosemite has also taught me that as soon as you think you have the weather there figured out, it will prove you wrong.
Around 5:30 I noticed a small patch of blue behind Half Dome, low on the right side where it intersects the tree-lined ridge. This is the area the thicker clouds should be filling, but as I watched, rather than advancing, those clouds seemed to be lifting. Soon it became apparent that the blue behind Half Dome was expanding. With a couple of minutes to go, not only was all the sky directly behind and above Half Dome clear, even the clouds above that appeared to be thinning.
This is probably a good time to say that few sights thrill me more than the first appearance of the moon above any landscape. As the time for the moonrise approaches, I lock my eyes on the spot and don’t move them, even when talking to others—I don’t want to miss a single photon of the moon’s arrival.
And I didn’t. The instant I saw the first molecule of moon nudge above Half Dome I called out to everyone with me and the clicking commenced. I waited about 30 seconds just to enjoy the view a bit, then went to work with my 200-600. As soon as the moon separated from Half Dome, I switched to my a7R V 24-105 as planned and spent the next 15 or so minutes with wider views of the scene. The rising moon soon encountered some clouds, but most weren’t thick enough to completely obscured it, and most actually enhanced the view.
I realize this zoomed image isn’t a compositional masterpiece—I just wanted to get the tightest zoom possible (to make the moon as large as possible), without cutting off any of Half Dome (easy to do if you’re not paying attention). Mission accomplished.
Epilogue
Just when I thought I’d put the inauspicious behind me, I was notified by one of the people in the Yosemite moon group that he’d tested positive for COVID. The next day, I too tested positive for COVID, as did three others in the group. Fortunately, we were all sufficiently vaccinated and no one got terribly sick. For three days I felt pretty miserable (bad cold miserable, nothing that sent me to bed), but was back to my regular morning workout after four days.
Join me in a Yosemite photo workshop
Workshop Schedule || Purchase Prints || Instagram
Yosemite Moonrise
Click any image to scroll through the gallery LARGE


Get Centered
Posted on February 27, 2024
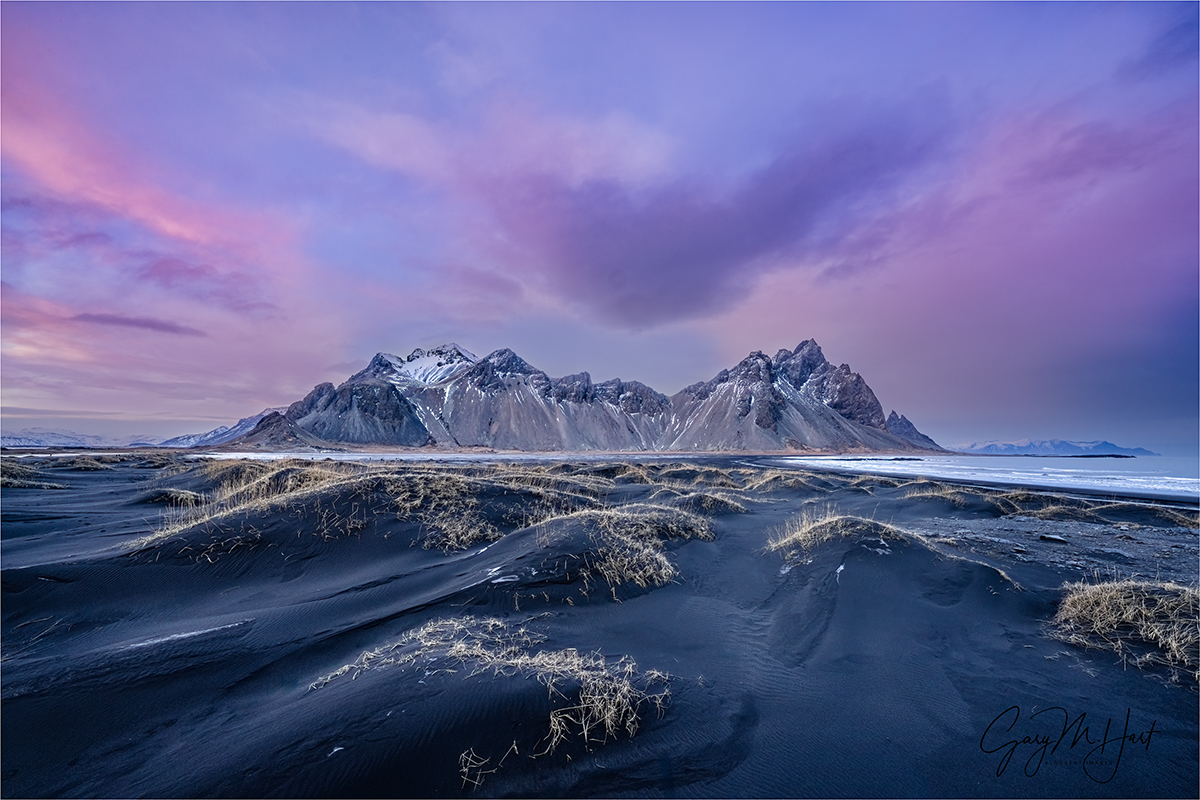
Winter Twilight, Vestrahorn, Iceland
Sony a7R V
Sony 12-24 GM
1/8 second
F/11
ISO 200
This day started with one of the most disturbing experiences of my photo workshop life, so finishing with a sunset like this was comforting relief for the entire group.
But before I get to the sunset, let me wind the clock all the way back to our short drive to Diamond Beach for this morning’s sunrise. In February Iceland’s sunrise arrives at around 10 a.m., but with the high latitude also comes extremely long twilight hours, so we were on the road for the 10-minute drive to the beach at 8:30, stomachs full of breakfast. The sky was still quite dark, but hints of a beautiful sunrise were already creeping up along the eastern horizon as we drove. In a workshop filled with special, Diamond Beach is extra special, so despite the darkness outside, everyone was pretty energized as we bounced along the highway.
Gazing through the windshield from my seat near the front of our (small—26 passengers) bus, I caught sight of a dark shadow approaching from the left. Simultaneously, someone in the back yelled, “Look out!”, and our driver Vincenzo braked hard. The shadow was just ambling, showing no sign of awareness of its immediate peril, neither slowing or speeding as it moved About the time my brain identified the shadow as a reindeer, it was directly in front of us and smack! From the first instant of the reindeer’s appearance to our bus’s direct hit, I’d guess less than a second elapsed.
We were traveling around 45 miles per hour, a pretty reasonable and safe speed in Iceland’s icy darkness. We’ve all been in accidents (right?)—almost without exception the situation changes from perfectly normal to dire before your brain has time to register what’s happening. Given that, I have to say that Vincenzo did an amazing job: Instead of following the normal human reflex to swerve (as I’m afraid I might have done), he simply braked quickly and continued forward into the reindeer. Textbook. While not the best result for the reindeer, Vincenzo’s response on that frozen highway almost certainly spared us a rollover and many injuries, perhaps worse.
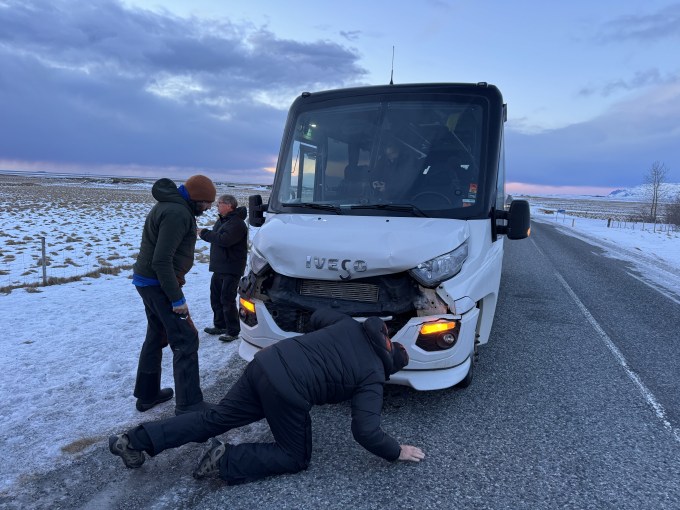
Bus reindeer damage. I took this picture quite a while after the accident, shortly before we tried to limp home.
We immediately pulled over, all pretty shaken, but no one more-so than Vincenzo. After a minute or two to recenter, the four group leaders (Iceland guide Albert Dros, driver and photographer Vincenzo Mazza, Don Smith, and me), exited to assess the damage. There was no doubt that the reindeer was down for the count on impact, a small comfort to know that it didn’t suffer. But when I saw our headlights still shining bright before exiting, I’d held out slight hope that damage to the bus would be cosmetic and not impact our trip. No such luck.
In addition to the obvious damage to the grill (which doesn’t really show up well in the picture), we were losing coolant. Only a few minutes from Diamond Beach, we briefly toyed with the thought of continuing on to sunrise and letting Vincenzo deal with the damage while we photographed, but ended up making the incredibly wise decision to cut our losses and turn around to attempt the 3 mile drive back to our hotel where we could regroup.
Even poking along at around 5 MPH, and despite the frigid outside temperature, the bus’s thermostat needle immediately started creeping northward, toward the red. I know Vincenzo was watching its climb as closely as he watched the road, and after about 10 minutes he pulled us to a stop to let the engine cool. After about a 15-minute respite, we (fingers crossed) fired up the engine and limped the rest of the way back—3 miles in 45 minutes.
Back at the hotel, immediate problem solved, we still needed to figure out how we were going to complete the second half of our workshop minus our trusty chariot. But within a couple of hours, Don and I got word that our tour company had pulled some strings and our replacement “bus” would be delivered by 1 p.m. We were back in business.
The arrival of this replacement van might be a good time to remind you that beggars can’t be choosers. Normally Don and I cap the Iceland workshop at 12 participants, but since this group would be led by 4 qualified photographers, and we knew our bus would be more than big enough for everyone, we went to 14 participants. With the 4 leaders, that meant 18 people in our 26-passenger bus—no problem, especially since the bus had ample storage. Sadly, that calculus didn’t account for an encounter with a reindeer, and the reality that our replacement vehicle would turn out to be more of a large van, with seats only for 21, and very limited storage space—more designed for day excursions than multi-day trips.
Having missed just the morning’s sunrise shoot, that afternoon we motored off to Vestrahorn in our new wheels, certainly cozy, but (more or less) comfortable. Since we were already using virtually every inch of available space for our bodies and camera bags, we all scratched our heads at how, when we checked out in a couple of days, we were going to squeeze all of our luggage in to our new ride. When questioned, Albert simply answered that we’d do it because we had no choice, and I chose not to stress about it. (Much.) And there was still photography to be done!
Vestrahorn is rivaled only by Kirkjufell on the list of recognizable Iceland peaks. Towering about 1500 feet above the North Atlantic, Vestrahorn’s intrusive origins distinguish it from many of its mostly extrusive Icelandic neighbors. The mountain’s rock formed about 10 million years ago, when subterranean volcanism injected iron- and magnesium-rich magma from Earth’s mantle into the crust above. Protected by this crust from exposure to the much cooler atmosphere on the surface, this magma cooled slowly to form Vestrahorn’s hard, crystal-infused core. Over time this hardened core was pushed upward by the region’s relentless geological forces. With this increasing elevation, the much softer crust entombing the mountain gradually eroded away, leaving only the peak we see today.

Vestrahorn Reflection, Stokksnes Beach, Iceland (2021)
On any day, Vestrahorn is a photographer’s delight. Though visually quite different, I liken the photography experience here to the Alabama Hills beneath California’s Sierra Crest, where an infinite variety of foreground composition possibilities stretch beneath the dramatic mountain peaks. At Vestrahorn, the foreground variety comes courtesy of black sand dunes, icy ponds, faceted ice patterns, and the mirror reflections left behind each time the surf retreats from gently sloping Stokksnes Beach.
I like to get around to everyone in the group before starting my own photography, but more than any other location in Iceland, here people seem to scatter like shotgun pellets. After about a half hour of wandering I finally gave up on finding everyone and started looking for my own foreground to put with the mountain. A sucker for reflections, I normally beeline to the beach, but with the tide out I decided this might be a good day to try the dunes. I’m so glad I did.
I poked around the dunes, searching for a grouping I could compose into something coherent and complementary, and that hadn’t been soiled by footprints. After about 20 minutes I landed at the spot you see in my image at the top of the post and didn’t move more than 20 feet for the rest of the evening.
As you can see from the image above, Vestrahorn this evening was a particular treat. One of the many reasons I like Iceland so much in winter is the snow decorating the peaks. And though I’ve seen Vestrahorn with much more snow, I found the peak’s snowy accents this evening especially appealing (compared to the barren slopes that dominate in Iceland’s warmer months). But the evening’s real show came courtesy of the interplay of clouds and light above the peak as the sun dropped.
Because the sun ascends and descends the sky at such a shallow angle at this high latitude, sunrise and sunset seem to unfold in slow motion. When the reds fired up this evening, much of the color above the mountain was obscured by clouds. But because the really nice color hung-in for at least 30 minutes, the clouds had more than enough time to thin and spread enough to allow the late light through, eventually blanketing much of the sky with persistent pink. By the time it reached this stage, I’d become so familiar with all the compositional opportunities in my little corner of the island that I had a pretty good idea of how I wanted to handle it.
I fell in love with the foreground dunes early on, and after it became pretty clear that the color would stretch far overhead, switched to my 12-24 lens to include as much of the entire scene as possible: dunes, mountain, sky. But how to handle a sky that rivals a classically beautiful landscape? There are very few absolutes in photography, but one of the most damaging “absolutes” is the admonition to never center the horizon, or your subject on the frame’s horizontal or vertical axes. This usually well-intended edict might have value to the raw novice who automatically centers every horizon and subject, but can actually be damaging to insecure neophytes not confident enough to trust their own creative vision. If centering feels right, go for it!
My own “rule” is to decide where most of the scene’s visual interest resides, foreground or background, and allocate a proportional percentage when I set my horizon. Sky better than the foreground? The sky gets most of my frame. Foreground better than the sky? The foreground gets most of my frame. Both sky and foreground too beautiful to decide? I have no problem splitting my scene right down the middle.
Reflections are probably the most frequent example of scenes that can be split down the middle, but this choice isn’t limited to reflections. And as far as centering a subject is concerned, I don’t hesitate when I want it to dominate my scene, or when there’s nothing else in the frame to balance a dominant subject. If you’re not sure, or simply don’t trust your own instincts, just do it both ways and decide later.
Epilogue
Striking an animal leaves a persistent knot in the pit of your stomach. We all felt it, but no one more than Vincenzo, who told us later that he’s never struck anything with a vehicle—person, animal, or other vehicle. He was pretty shaken, but I think having a job to do, plus the interaction with, and support of, the rest of the group distracted him enough to make it through the trip. For the rest of us, knowing we’re all dealing with this shared trauma helped a lot, as of course did being the distraction of wonderful photography.
Another unexpected bonding opportunity came from the impossible solution Albert and Vincenzo devised to get us back to Reykjavik with all of our stuff. Without going into great detail (lest we get them into trouble for violating some kind of Iceland vehicular safety code), no person or gear was left behind or strapped to the outside of the vehicle, and we each had our own seat (and seatbelt). Hardly a square-inch of space, horizontal or vertical, went unused, and even after getting the group choreography polished, entering exiting the van still took at least five minutes. But we made it, and I think everyone would agree that the tight quarters became a catalyst for much fun and laughter that proved just the necessary medicine.
Join Don Smith and Me in Iceland Next Year
Sublimely Centered Subjects
Click any image to scroll through the gallery LARGE


, Yosemite")


This is Why We Can’t Have Nice Things
Posted on February 20, 2024

Golden Touch, El Capitan and Horsetail Fall, Yosemite
Sony a7R V
Sony 24-105 f/4 G
ISO 64
f/10
1/10 second
I was planning to just write a brief Horsetail Fall update following last week’s workshop, but before I get into that, a couple of recent experiences have me wanting to say a few words about the bad photographer behavior I witness in my many travels.
The first occurred in Iceland, where Don Smith and I, along with our tour guides Albert Dros and Vincenzo Mazza (look them up!), guided our group on a short hike to a beautiful, and slightly off the beaten path, waterfall. Thrilled to find the scene blanketed with pristine snow, and to be the only ones there, we quickly set up on the footbridge spanning the river (the only place to photograph legally).
Everyone was quite content until a couple of other photographers wandered up the trail and joined us. Despite the fact that there was more than enough room for all of us on the bridge, these two newcomers ignored the “Keep Out” signs and hopped the barricade, trampling our perfect snow to set up shop in everyone’s frame as if we were all invisible. We tried in vain to get their attention (they clearly heard us but refused to acknowledge). Soon one of them whipped out a drone (also a violation of posted rules), launching it directly in front of the fall, while the other guy walked straight up to the base of the fall and planted himself directly in the middle of the scene (where it was impossible to compose him out).
I try not to stress too much about photographers who are simply unaware that they’re in my frame because it’s usually not too hard to remove them later, in Photoshop. But this kind of willful disregard for others transcends photography, damaging the experience for all visitors and reflecting poorly on all photographers.

Horsetail Fall Southside Drive crowd (2017): This is why we can’t have nice things (picture from the Yosemite Exploration Center)
The other instance of selfish photography is the “My shot is more important than the wellbeing of the natural beauty I’ve come to photograph” attitude that I witness every time I try to photograph Horsetail Fall. (This isn’t unique to Horsetail Fall.)
The general consensus among Yosemite photographer, with which I agree, is that the best Horsetail Fall photography spot on the valley floor is a raised riverbank on the Southside Drive side of the Merced River. Believe it or not, I used to be able to show up with a group to this location about 45 minutes before sunset, confident that all in my care would be able to find an unobstructed view.
But when the crowds took over (some photographers even claiming the prime spots for this sunset shot before breakfast) and the number of photographers far exceed the number of available places to set up, I started opting for the relative peace of the Northside Drive locations. I wasn’t terribly surprised to witness cars actually driving off-road and into the forest to park, and by the reports of Southside Drive fisticuffs that started to appear. All this Southside mayhem culminated with the riverbank’s collapse under the weight of the assembled masses, leading to the complete shutdown of Merced River south bank Horsetail Fall photography. Problem solved—or so I believed.
Put me in the camp of those who think that the NPS does an amazing job managing the virtually unmanageable crowds that swarm Yosemite Valley to photograph Horsetail Fall each February. The whole experience has gotten better (more enjoyable) with the Southside Drive ban, relatively liberal reservation system (it’s not that hard to view the Horsetail phenomenon with only a little planning and effort) to curtail crowds, and Northside Drive pedestrian accommodations.
Nevertheless, each year I still see photographers attempting to sneak into the prime Southside Drive view as if the rules don’t apply to them. Some simply park in the Southside Drive turnouts clearly marked “No Parking,” apparently oblivious to the $280 that will await their return.
More egregious (because it can’t be written off to ignorance) in my mind are the photographers who park legally, then sneak along the south river, shielded from view from the road by the elevated riverbank. This year, while waiting with the joyful crowd on Northside Drive, I actually saw several of these scofflaws (such a great word) skulking about across the river, apparently completely oblivious to the fact that they are quite visible to everyone on Northside Drive, including the numerous rangers (with 2-way radios), or to the fact that the rangers actually patrol the south riverbank each February afternoon and evening.
Maybe I’m just getting old, but it both angers and saddens me that there are photographers whose selfish desire exceeds their respect for their subjects, because it’s attitudes like these that lead to even further restrictions for everyone. A photograph should never be more important than its subject.
Now I need to go chase some kids off my lawn…
So anyway…
Some years Horsetail Fall is completely dry in February, other years it’s there but you really have to look closely to locate the Horsetail wet spot on El Capitan. This year I’d say the baseline flow in Horsetail Fall is good but not great, clearly visible as a thin white stripe descending from the top of El Capitan’s sloped east shoulder. By “baseline flow” I mean the minimum you can expect on any given day—a decent flow with the potential to ramp up nicely with a warm storm that drops heavy rain on the Horsetail watershed (above 7000 feet). Also this year, thanks to recent high country snowfall, there’s enough snow in that watershed that a few days of sunlight and above average temperatures could bring a noticeable flow increase.
FYI, if you want to photograph the Horsetail Fall phenomenon this year, you have about a week of good light remaining (as I write this on February 20)—but don’t forget that weekend visits require reservations. The crowds this year seem pretty typical, and shouldn’t pose a problem if you can park and start the 1 1/2 mile walk a couple of hours before sunset (the longer you wait to park, the farther you’ll need to walk). (Learn more about photographing Horsetail Fall in my Horsetail Fall Photo Tips article.)
Last week’s workshop group had two successful Horsetail Fall shoots—neither “epic,” but both very nice in their own way (and definitely worth the walk and wait). The workshop started last Tuesday—given the week’s weather forecast, I was more hopeful than optimistic about our Horsetail Fall chances. Since it looked like that first day might be our best (and maybe only) shot at getting it, after our orientation we headed straight up to Yosemite Valley and got ourselves into position beneath the fall, near the El Capitan Picnic Area (not my favorite spot, but the best for this group because of some mobility challenges).
We found the fall flowing decently (well enough to photograph) and the light good, until about 40 minutes before sunset when the afternoon’s promising mix of sunlight and clouds was replaced without warn by sunlight-swallowing clouds. As we waited (hoped) for the sunlight to return, I kept telling my group about my many last-minute Horsetail Fall miracle experiences, when the has dropped into an unseen (from our location the valley floor) gap on the horizon to paint the fall red.

Red Horsetail Fall, El Capitan, Yosemite
And that’s exactly what we got. This time it came so late that the light completely skipped the golden phase, going straight to red for about five minutes before turning off for the night. While the light this evening wasn’t as intense as I’ve seen it, the color was great and everyone was pretty thrilled.
But we weren’t done. The forecast improved as the week progressed, so after a Wednesday rain that recharged the flow, combined with a (new) “mostly sunny” Thursday promise from the weatherman, I decided to give the group another shot. I wouldn’t have done this if I thought the best we could do would be to repeat Tuesday, but because I knew the fall was flowing better, and I’d formulated a plan to get the whole group into an even better position about a quarter mile east of the picnic area, I thought it would be worth going for it. Still, I gave everyone the option to opt out for a different location, but no one took me up and we all returned to Horsetail.
For most of Thursday evening everything went exactly as planned: the fall’s flow was noticeably better, we ended up exactly where I’d hoped, and the sunlight was brilliant. Better still, a collection of clouds spent the evening performing a beautifully choreographed dance atop El Capitan.
The Horsetail Fall great light window lasts less than 10 minutes, starting out brilliant gold before slowly transitioning to orange, then coral, and ultimately (if the light lasts all the way to the end) ruby red. This evening we clicked like crazy as the shadow approached Horsetail and the light warmed to the intense gold stage. But just about the time started to get just a little optimistic that we might be in store for something truly special, the sunlight faded and never returned.
Fortunately, we did end up catching all of the gold phase, which was further enhanced by a few puffy clouds catching the same light, so all was not lost. Even though we missed the red of Tuesday evening, it seemed pretty unanimous that this was the better of the two shoots.
So I guess maybe sometimes we still can have nice things.
Join Me In Yosemite
Workshop Schedule || Purchase Prints || Instagram
Horsetail Fall
Click any image to scroll through the gallery LARGE


Reflecting on Reflections
Posted on February 14, 2024

Sweet Sunset, Lake Manly and Badwater Basin, Death Valley
Sony a7R V
Sony 24-105 f/4 G
ISO 100
f/11
1/30 second
One of the (many) great things about choosing landscape photo workshops to earn my livelihood is that selling images is optional. Don’t get me wrong, I love selling images (and every image you see on my blog or in social media is for sale), but since my income doesn’t depend on it, I don’t need to sell images. That allows me to photograph only the things I want to photograph, as many times as I want to photograph them, and to never choose a subject based on the image’s potential salability.
It seems like I’m most drawn to subjects and phenomena that feel to me like gifts, with the ability to elevate “ordinary” beauty. People following my blog or browsing my galleries probably have a pretty good idea of what those things are. If you’ve been paying attention, you’ve probably figured out that I find immense joy in the night sky (moon, stars, Milky Way), dramatic weather (lightning, rainbows, and so on), poppies, dogwood, fall color—I could go on, but you get the idea.
Another subject near the top of that list of joys is reflections. Without discounting reflections’ inverted doubling of Nature’s beauty that engages the brain in fresh ways, I think the thing that most draws me to a mirror reflection is the utter stillness required, and the soothing tranquility that stillness conveys.
Water reflections come in many forms, from a mirror-sharp inverted mountain peak atop a still pool, to an abstract shuffle of color and texture on a gently undulating lake. And rainbows are an a particularly special kind of reflection.
Without getting too far into the physics of light, it’s important to understand that every object we see and photograph that doesn’t generate its own light, comes to us courtesy of reflected light. For example, when sunlight strikes Half Dome in Yosemite, some of the sun’s photons bounce straight into our eyes and there it is. Other photons enter the water to reveal submerged sand and rocks, and some strike the surface and carom like a billiard ball ricocheting of the cushion and up into our eyes, creating a reflection. In other words, what we know as a reflection is in fact re-reflected light (reflected first from Half Dome, and again by the river).
When the reflective surface is disturbed by waves, the angle of the reflective light is continuously shuffled—depending on the amount of disturbance (size and frequency of the waves), the reflection can range from slightly distorted to abstract blends of color and shape to totally erased.
The best reflections happen when the reflective subject is fully lit, while the calm reflective surface is shaded from direct light. But that doesn’t mean good reflections aren’t possible when the subject is shaded or the surface is sunlit, or when small waves disturb the water.
Some locations are known for their reflections. That’s usually because they’re in an inherently calm, wind-sheltered environment, and/or the water is especially shallow (relative to its surface area).
The shallowness of the water is an often overlooked aspect of the reflection recipe, but it makes sense if you understand the fundamentals of wave formation. Waves are actually a circular motion in the water imparted by wind, with most of the wave motion happening beneath the surface—the deeper the water, the larger the potential wave. Unimpeded, waves can travel thousands of miles—until they encounter a beach, or shallow water that interferes with their circular motion. But waves that form atop shallow water are limited in size and travel by the lakebed or riverbed. Not only does shallow water mean smaller waves, the shallower the water, the sooner the surface smoothes when the wind stops.
A perfect example of a large, shallow body of water that seems designed for reflections is almost always dry Lake Manly in Death Valley. The origins of Lake Manly in Badwater Basin date back nearly 200,000 years. In its earliest millennia, Lake Manly was much deeper, far more expansive, and persisted year-round. But in recent millennia, it has become an ephemeral lake, usually dry and filling only when rare intense storms generate enough runoff. The life of these recent versions of Lake Manly is measured in weeks or months.
The current version of Lake Manly formed when Tropical Storm (and former hurricane) Hilary saturated Death Valley with more than a year’s worth of rain (2.2 inches) in one day. Because Death Valley isn’t equipped to handle so much water at once, Hilary brought flooding that washed out roads, displaced rocks, carved new channels, and reshaped canyons. And with no outlet for all this water, after doing its damage, this runoff had to come to rest somewhere—and where better than the lowest place in North America?
At its peak volume last August, the newest incarnation of Lake Manly was 7 miles long and 4 miles wide, but no more than 2 feet deep. By late January its surface area had shrunk to half its original size, and the lake’s depth was measured in inches.
Despite its diminished size, Lake Manly was more than big enough to provide spectacular, valley-wide reflections for my workshop group. In addition to photographing mountain and sky reflections from the valley floor, we also enjoyed beautiful sunset reflections from Dante’s View, more than 5000 feet above Badwater.
My group’s first visit was a planned sunrise shoot, but an unprecedented pea-soup fog—I’d talked to 20-year residents who had never seen fog in Death Valley—thwarted our sunrise dreams, as well as our dreams of catching snow-capped Telescope Peak and its neighbors reflecting in glassy water. Even with the fog we enjoyed truly unique photography that morning, but since I wanted my group to get an opportunity for the dazzling reflections I knew were possible, I brought them back to Badwater that night.
We were fortunate that Death Valley’s chronic blue sky held off for another day, delivering instead a cohort of clouds that caught the sunset color and reflected back to us from the surface of Lake Manly. Since the clouds and color were better to the north, I turned my attention away from Telescope Peak and pointed in this direction, just in time to capture this image.
The scene this evening was so special, we ended up staying out until the sky darkened enough for moonlight photography. But that’s a story for another day….
Workshop Schedule || Purchase Prints || Instagram
A Gallery of Reflections
Click any image to scroll through the gallery LARGE


, Yosemite")


Searching for Serendipity
Posted on February 8, 2024
 Dante’s Moon, Badwater, Death Valley
Sony a7R V
Sony 24-105 f/4 G
ISO 100
f/11
1/30 second
Miriam-Webster defines serendipity as, “Finding valuable or agreeable things not sought for.” Wikipedia calls it, “An unplanned fortunate discovery.” Though I can’t quibble with these definitions, I think photographers can create their own serendipity by keeping their eyes and mind open to unexpected opportunities.
Sometimes Mother Nature bludgeons us with serendipitous events that are too obvious to ignore—for example, a double rainbow suddenly coloring a gray downpour, a sunset that ramps up just as you’re about to pack up your gear, or maybe a rocket streaking through your Milky Way scene. But Nature’s more subtle gifts usually require our internal serendipity receivers to be tuned a little more sensitively—the unexpected is there if we keep an open mind.
Unexpected gifts from Nature are probably the single greatest joy I get from photography. But given the importance of planning and execution nature photography requires, it’s easy to understand how we might become so fixated on a specific plan that serendipity slips by undetected. The intense focus on a subject that shrinks the world and enables photographers to extract the best from one scene, also leads to overlooked scenes.
Over my many years photographing Nature, I’ve learned that rather than being mutually exclusive, laser focus and openminded awareness not only can coexist, they can actually collaborate to create photographic synergy.
Toward this goal, I’ve established a few techniques that nudge me into examining my surroundings more closely. These simple steps have become so ingrained in my photographic process that they no longer require conscious thought—in other words, the mere act of concentrating on my primary subject doesn’t mean my surroundings are denied the attention they deserve as well.
The first, and simplest, of these techniques is to periodically stop and do a slow 360, keeping a few questions in mind: What’s going on with the light, sky, shadows? What in the surrounding landscape draws my eye? Is anything moving? Then, to force myself to consider these observations even more closely, I try to anticipate what each of these factors will be doing over the next few minutes.
Another way to shake my single-minded focus while working any given scene is making sure I don’t move on without checking in on different perspectives: switch my camera’s orientation, zoom tighter and wider, reframe and/or adjust focus to emphasize different elements in my composition, and reposition my camera to change foreground/background relationships. I can’t tell you the number of times something unexpected and even better has magically appeared just because I adjusted some aspect of my perspective.
Despite these tools, extended periods away from my camera can make my serendipity generator a little creaky. So, following my recent two-and-a-half month workshop break, last month’s Death Valley / Alabama Hills workshop proved to be just what I needed.
Both locations, with their unique and diverse features, are great places to oil up the works and get my vision humming. And this workshop group in particular showed strong and varied vision that inspired everyone (myself included) during our daily image reviews.
I time this workshop to coincide with the full moon. Because the best full moon views in both Death Valley and the Alabama Hills face west, our moonsets come at sunrise. But that doesn’t mean we never see a sunset moonrise too. Even though the view isn’t great, and I never actually plot and plan a Death Valley moonrise, wherever I photograph a Death Valley sunset, I try to keep an eye on the east horizon for the moon’s arrival.
On our second evening, I took the group out to Badwater for sunset and the rare opportunity to photograph Lake Manly. Badwater Basin is almost always dry, but every once in a while extreme runoff will briefly restore it, adding a few inches of water that can stretch for miles, and for a few weeks or months transform the arid basin into a vast mirror. This version of Lake Manly is the vestigial runoff of Tropical Storm (and former hurricane) Hilary that laid waste to Death Valley last August.
The photography this evening was everything we’d hoped for—calm winds for a pristine reflection, and just enough nice clouds to catch the sunset color. The best Badwater views face west, toward 11,000 foot Telescope Peak, and north, up the valley. So while I knew the nearly full moon would be rising above the valley’s east wall this evening, lacking any kind of a view in that direction, the moon’s arrival wasn’t really a priority. Nevertheless, I occasionally glanced that way, and doubled-down when a cohort of clouds scooted across the eastern horizon and started catching sunset light.
And suddenly there it was, edging above the shear valley wall a little north of Dante’s View. With nothing beneath the moon but nondescript brown cliffs, at first I was content to simply watch it climb, but as the clouds closed in on the moon and their pink continued to intensify, I couldn’t help repositioning my camera.
With the clouds, moon, and color moving fast, the composition I ended up with was as simple as the scene was serendipitous. Since the scene really was all about the pink clouds and rising moon, I zoomed my 24-105 lens until my frame included as little of the surrounding (less appealing) elements as possible, and underexposed slightly to ensure lunar detail, emphasize the color, and darken (deemphasize) the barren mountain ridges.
The Badwater view and reflection this evening was so spectacular, especially when sunset started to color the sky, it would have been easy for this convergence of moon, clouds, and color to have unfolded behind my back, completely unseen. Instead, on an evening filled with the beautiful conditions I’d hoped for, I also got to enjoy one of those serendipity moments I love so much.
Workshop Schedule || Purchase Prints || Instagram
A Gallery of Serendipity Scenes (That I Didn’t Come Looking For)
Click any image to scroll through the gallery LARGE


, Yosemite")


A (Big) Mistake, and a (Small) Rant
Posted on January 29, 2024

Sunstar and Reflection, Lake Wanaka, New Zealand
Sony a7R IV
Sony 12-24 GM
1/320 second
F/18
ISO 100
By the time you read this, I’ll be done with my break and well into my Death Valley Winter Moon workshop. I’ll have gone from a stretch of two-and-a-half months with no workshops, to a stretch of one month with four workshops (and all the travel that entails): Death Valley, Iceland (10+ days), and two in Yosemite. And while I’ll kind of miss going through my old unprocessed images, I’m also really looking forward to creating new stuff—and there’s comfort in the knowledge that I only scratched the surface of my old images, and they’re not going anywhere.
I wrote that paragraph more than a week ago, on the day before I left for Death Valley, fully intending to complete last week’s blog post during workshop breaks. The plan was to expand on a prior post about how I seek and create new takes on scenes I’ve photographed many times, using the above newly discovered and processed image of the solitary Lake Wanaka willow tree in New Zealand.
So. Imagine my alarm (among other things) when I arrived in Death Valley at around 8:00 p.m. Sunday night (the day before the workshop started), and realized that I’d forgotten my computer. Oops. Suddenly, how to squeeze this week’s blog into my busy workshop schedule was the least of my worries, replaced in a heartbeat by concerns about how I’d run my workshop, and my ability to run my business.
I’ve been doing 12 to 18 workshops per year for more than 15 years and have forgotten many things, ranging from dental floss, to my Kindle, to important lenses, but never my computer. I mean, even forgetting my camera bag (which I’m proud to say has never happened…, well, not exactly) would be more frustrating and disappointing than the actual existential crisis this felt like.
Not only was all my workshop material (roster, permits, presentation material, and so on) on my computer, I have to connect my computer to a flatscreen TV to deliver my workshop orientation, training, and image reviews (a major part of the trip). And then there’s the business stuff I need to deal with each day—not just writing my blog, but answering e-mails, organizing upcoming workshops (see list of my next month’s workshops above), website maintenance, social media posts, among many more things that need my attention every day. Some can be accomplished on my iPhone, but at the cost of much time—a rare commodity during a workshop—and great effort.
Following a few minutes of hyperventilation (punctuated with a variety of choice words), I started working on solutions. With my brother Jay assisting me, I reasoned that I could use his computer to display the orientation and training material—which of course is at home on my computer. No problem, since all that material is on Dropbox too, all I have to do is login to Dropbox on his computer and download the files I need. With that insight I started to breath easier, until…
Also in the bag with my computer is the HDMI cable I need to connect to the TV in the meeting room. But surely, even at a place as remote as Death Valley, someone must have an HDMI cable for sale or loan. Apparently not—not even the general store in Furnace Creek (which, it turns out, is pretty much worthless), or the hotel front desk (which I thought must have a box of cables and adapters abandoned by prior guests), could help. My optimism was further dashed when, at some point during my cable search, I realized that even scoring an HDMI cable would be of little value without the USB-C adapter that allows it to connect to the computer.
So I pulled up Google on my phone and searched for the closest Walmart (desperate times), and found one only an hour away, in Pahrump (not a typo), Nevada. Since I’d always dreamed of making the two-hour roundtrip to Pahrump on the morning a workshop starts, you can probably imagine how thrilled I was. But like I say, desperate times…
Workshop solution in place, I went to work on solutions for handling the business stuff. First, I drafted my wife to box up my computer and overnight it first thing Monday morning—UPS Next Day Early ($$$gulp$$$). Next I logged into Dropbox on Jay’s computer, downloaded my business and workshop material, which went refreshingly smoothly. Then I went to bed.
Early Monday morning I made the drive to Pahrump without drama and was back with the necessary cable by 10:00 a.m. This pretty much solved my short term workshop problem, but since Jay’s computer is set up completely differently than mine, and he doesn’t have a mouse (pretty essential for the image review), I was still quite anxious for my computer to arrive.
As simple as that sounds, rest assured, it was not. After dropping the computer with UPS, we learned that FedEx might be better delivering to Death Valley, so my wife retrieved the box from the UPS Store (kudos to them) and drove it to FedEx. So far so good.
Now might be a good time for me to digress and express my overall frustration with national park concessionaires in general, before moving on to Xanterra in Death Valley in particular. Since national park concessionaires win a bid to service their parks, once they’re in they have little competition and, it seems, even less incentive to make their customers happy.
Since I have similar frustrations at all national parks, I can only assume that the concessionaire experience at the parks I don’t visit is similar. But I’ll limit expressing my specific frustrations to the concessionaires at the parks I visit most frequently: Yosemite (Aramark), Grand Canyon (Aramark, Delaware North, Xanterra), and Death Valley (Xanterra).
Most hotels and restaurants out in the real world seem to bend over backward to satisfy their customers, but at the national parks every request seems to be an inconvenience. My latest reminder of this was the difficulty I had simply taking delivery of my computer (that I’d spent significant dollars to get delivered as early as possible on Tuesday) in a timely manner.
For some reason the front desk at Furnace Creek Ranch doesn’t accept packages for customers (maybe this is a thing, but I’ve never encountered this at other hotels), with all incoming shipments going to either the commissary (open 1:00 to 4:00 p.m.) or Post Office (open 8:00 a.m to 4:00 p.m.). Worse still, for any given package, no one seems to know which one will get it.
Since my iPhone wouldn’t connect to the WiFi network (don’t know if the problem was on my end or theirs), and Death Valley cellular service is virtually useless for anything but phone calls, I spent most of my Tuesday break time (between the morning shoots and 1:00 p.m. image review) running around between the front desk, post office, and commissary trying to determine whether my computer had arrived. At each spot all I got was a shrug before being sent to one of the other choices.
It eventually became apparent that I wouldn’t have my computer in time for the Tuesday image review, but surely I’d have it afterward, so I could at least catch up on my business stuff Tuesday evening. When it still hadn’t arrived by the time we departed for our afternoon/sunset shoot, I remained confident that it would be waiting for me when I returned—especially since I’d made it abundantly clear to all parties (front desk, commissary, post office) how important it was that I get it today.
I returned after our sunset/moonlight shoot to learn that my computer had in fact been delivered to the commissary that afternoon (yay!), which as promised had tried to give it to the front desk for me to pick up later, but the front desk refused it (boooooo!) and instead hot-potatoed the package to the post office—which closed at 4 p.m. By the time I picked it up Wednesday I was so far behind with other stuff that finishing my blog was no longer a priority. So here we are, a week late…
So, did anyone die because I didn’t get my computer on Tuesday? No. But I don’t think I could have been more clear (and respectful) expressing my delivery’s importance. Just the slightest effort on the part of the people at the front desk (where my greatest frustration lies) would have meant the difference between an extremely satisfied and an extremely dissatisfied customer. If I treated my customers with the same disregard, I’d be an ex photo workshop leader.
End of rant…
Everything else about this workshop turned out to be wonderful. I had a fantastic group—lots of fun, and across the board extremely good photographers who thoroughly enjoyed each other. And the photography conditions were off-the-charts—between water at Badwater (reflections!), nice clouds (including unprecedented fog!) and great light throughout, spectacular sunrise/sunset color, and a couple of excellent sunrise moonset shoots, this was probably the best overall photography I’ve had in 15 years of Death Valley workshops. But since I haven’t had time yet to process my images, I return you now to the original programming…

Sunstar and Reflection, Lake Wanaka, New Zealand
Rather than duplicate the information in my June Variations on a Tree post, I’ll just add to what I wrote there with a few more words about this New Zealand morning in June 2022.
Every time I Don Smith and I take a workshop group to Lake Wanaka, I try to find a new way to photograph this tree. I’ve featured clouds, sunrise/sunset color, fog, reflections, submerged rocks, the moon, the Milky Way, and stars. I’ve also varied my perspective, focal length, and orientation to vary the background and framing. But for some reason, I’ve never tried a sunstar.
It didn’t take long to realize that this crystal clear morning was ideally suited for checking the Wanaka Tree sunstar box. Not only was the morning sky virtually cloudless, the lake surface was unusually disturbed, making for less than ideal clarity and reflections.
Anticipating the sunstar opportunity with the approaching sun, I put on my 12 – 24 lens (great sunstar lens), dialed my aperture to f/18, and positioned myself for a horizontal frame with the sun offset from the tree. As soon as the sun appeared I started clicking like crazy, adjusting my shutter speed with each click to maximize my exposure options later (not to blend, just so I’d have a lot to choose from). After about 30 seconds of this, I spontaneously decided to race along the lakeshore to align the tree and sun, and had enough time squeeze off a handful of vertical frames before the sun rose too high.
Join Don Smith and me in New Zealand
Workshop Schedule || Purchase Prints || Instagram
Wanaka Tree Collection


Peak Color
Posted on January 9, 2024

Twin Peaks, Mt. Tasman and Aoraki / Mt. Cook, New Zealand
Sony α1
Sony 24 – 104 f/4 G
ISO 100
f/11
.6 seconds
The first time I visited New Zealand (way back in 1995), I was surprised not just by the number of mountains, but also by their size. New Zealand’s mountains reminded me very much of the Eastern Sierra peaks I visit every year for the way their serrated profiles tower above the surrounding landscape. And while the east-side view of the Sierra Crest is truly spectacular, the New Zealand mountain experience also includes glaciers, rainforests, and an assortment of massive, glacier-carved turquoise lakes that are so pristine, locals drink straight from them.
It’s no coincidence that Don Smith and I concentrate our annual New Zealand winter workshop in the Southern Alps, the backbone of the South Island and home to all 20 of New Zealand’s 10,000+ foot peaks and all of its glacial lakes. We choose winter not just for the Milky Way’s prominence in the night sky, but also to maximize the snow on the Southern Alps.
Fox Glacier on the South Island’s West Coast is the farthest north our groups get. Our stated reason for being here is our heli-hike on Fox Glacier (we helicopter onto the glacier for a guided hike and an intimate view of its crevasses, caves, pools, and seracs), we’ve come to appreciate many other features of this segment of our workshop—specifically, the (aptly named) Blue Pools as well as the various waterfalls of Haast Pass, and the spectacular views of New Zealand’s two tallest peaks, Mt. Tasman (on the left in this image; 11,473 feet) and Aoraki / Mt. Cook (12,218 feet).

Dark Sky Dreams, Lake Matheson, New Zealand
Our Lake Matheson hike during our stay in Fox Glacier (also the name of the town where we stay) is a particular highlight because of its mirror reflection of Tasman and Aoraki/Cook. But on our last morning in Fox Glacier, we photograph sunrise on the two peaks from Fox Glacier Vista, an underrated vantage point that’s a great way to wrap up our stay.
Given all the sights we see throughout the 10 days of this workshop, it’s easy to overlook this brief stop before our long drive to Aoraki / Mt. Cook National Park on the other side of the Southern Alps (less than 30 miles as the crow flies, but nearly 300 (breathtaking) miles as the Mercedes Sprinter Van drives). But the view here is nice, even during an ordinary sunrise, and always worth the stop.
The sunrise on our Fox Glacier departure morning in 2022 was anything but ordinary. We always depart for this shoot expecting a nice shoot, but usually my mind is more on the long drive ahead and I’m content to stand back an drink in the view. But this morning we could tell from the instant we arrived that the ingredients were in place for something truly special: Right at our feet, a frosty glaze covered the meadow and spread all the way to the trees, and in the distance, layers of broken clouds hovered above the peaks, which in the crystal clear air appeared etched against the horizon.
Read about the science behind sunrise/sunset color
Though it was still fairly dark, hints of color were already seeping into the clouds behind the Southern Alps. This was Don’s and my first visit following two years lost to COVID, and I immediately saw that the vista we knew so well had been expanded and upgraded, something I initially found disorienting. While the rest of the group rushed to set up at the most obvious vantage point, I took a couple of minutes to explore along the short trail to make sure we weren’t missing something new, before returning confident that we were indeed in the best place. (I was so focused on the view during this little jaunt that I failed to notice a small piece of jutting root that aggressively reached out to send me sprawling in the dirt—my skinned knees and bruised ego were only slightly comforted by the knowledge that no one actually witnessed my face-plant.)
In these situations, when spectacular conditions rival the scene I came to photograph, I try not to get too cute with my compositions. If there’s an obvious complex option that doesn’t distract from the natural beauty of the moment, I’ll take it, but generally I prefer to let the scene speak for itself by keeping my composition as simple as possible.
But that doesn’t mean I don’t pay attention to the entire scene. In this case we were limited by a fence between us and the meadow, and since I already knew the view, I concentrated on simple framing. With the combination of matching snow-capped Tasman and Aoraki bookending the closer Craig Peak, and parallel horizontal layers throughout the scene, it didn’t take a rocket scientist to identify an opportunity for what I call “aggressive symmetry.” The pair of larger foreground trees, while not perfectly in balance with the rest of the frame, were close enough to symmetrically arranged that I was pleased with their (unavoidable) inclusion.
Given the way the color was progressing as the sun brightened behind the mountains, I worked out my composition long before it peaked, clicking every few seconds while saying to myself each time, surely this must be maximum color. But it just kept intensifying—the thrill of witnessing it was matched only by the thrill of listening to the rest of the group react to what we were seeing.
As I clicked, I couldn’t help think that this was turning out to one of those sunrises (or sunsets) with color so vivid that I know people viewing the images won’t believe they’re real. Fortunately, from sunrises/sunsets to wildflowers to auroras, photographers know that there’s nothing subtle about color in Nature, and that when Mother Nature wants to, she really can dial the vivid up past the point of credibility. The best way to describe these moments is that to me it feels like the atmosphere possesses a physical component that penetrates my skin and pretty much everything else it touches until I feel like the entire world is actually humming with color.
You never know when Nature’s little (or big) surprises will happen, but their possibility is the thing gets me out of bed in winter darkness, keeps me out well past dinnertime, and makes all the cold, rain, snow, or whatever other hardships Mother Nature wants to throw my way, tolerable.
Join Don and me in New Zealand
Workshop Schedule || Purchase Prints || Instagram
Sunrise / Sunset Color
Click any image to scroll through the gallery LARGE


The Exception That Proves the Rule
Posted on January 2, 2024
Lush Reflection, Doubtful Sound, New Zealand
Sony a7R V
Sony 24-105 f/4 G
ISO 800
f/8
1/80 second
A few years ago I blogged about shooting sans tripod on my annual Grand Canyon raft trip. You have no idea how large a paradigm shift this was for me, but I tried to rationalize my sacrilege by saying that any shot without a tripod is better than no shot at all. Since then I’ve been a little more willing to forego my tripod when the situation calls for it, but each each time I do only reinforces for me all the reasons I’m so committed to tripod shooting in general.
But I can’t deny that there are times when a tripod just won’t work. For example, sports and wildlife shooters who deal with moving targets can’t be tied down by a tripod. And climbers usually have better things to do with their hands than fumble with a tripod, not to mention the fact that tripods tend to perform less than optimally on a vertical surface. On the other hand, because I only shoot landscapes on solid ground, my own style has evolved to incorporate the tripod’s many benefits, with only extremely rare exceptions.
Part of my landscape-centric, tripod-only approach is a simple product of the way I’m wired—I’m pretty deliberate in my approach to most things, usually tilting toward planning and careful consideration over quick decision making and cat-like reflexes. That likely explains why my sport of choice is baseball, (even though I’m not a golfer) I actually enjoy golf on TV, and prefer chess and Scrabble to any video game (I’m pretty sure that the last video game I played was Pong). It also explains my preference for photographing stationary landscapes—I just need to know that my subject will still be there when I’m ready, no matter how long that takes.
But no matter how stationary the subject is, adding a bobbing boat to the equation pretty much negates the tripod. One example is the Grand Canyon raft trip, which involves many hours each day floating through spectacular, continuously changing scenery, and where every bend in the river advances the story like turning pages in a novel. And every (non-COVID) winter Down Under since 2018, Don Smith and I have done a New Zealand photo workshop, that, among many spectacular solid ground opportunities, features an all day cruise on Doubtful Sound.
Misnamed, Doubtful Sound isn’t a sound at all, but rather a spectacular fiord (FYI, that’s how they spell fjord down there)—a narrow, twisting, multi-fingered ocean inlet lined with towering glacier-carved walls cut by plunging waterfalls. And as if that’s not beautiful enough, consider also the sound’s ubiquitous rainforest green against a background of snow-capped peaks, and you might understand why this breathtaking fiord is near the top of my list of reasons for declaring New Zealand the most beautiful place I’ve ever photographed.
Because I once rigidly proclaimed that I never take a (serious) photo without my tripod, on my earliest Grand Canyon raft trips I settled for low-res, “I was there” jpeg snaps with a waterproof point-and-shoot—fine for social media, but far from the quality a professional photographer requires. But after several years I finally (I’m a slow learner) admitted to myself that I was missing too many great images by only shooting solid ground images, and started breaking out my “adult” camera while floating the Colorado River’s many long stretches between rapids.
So, by the time Don and I started doing the annual Doubtful Sound cruise, I was mentally fortified enough to forego my tripod for a full day without suffering a panic attack. This transition wasn’t without its growing pains—photographing “stationary” landscapes from a moving boat was challenging enough (as far as I was concerned, my subjects were no longer stationary), but me trying to capture, using a camera set-up for tripod-only landscapes, dolphins leaping in our boat’s wake was downright downright comical. The best dolphin images I could manage that first year were of the splashes left after their tails disappeared beneath the water. Since then I’ve just accepted the fact that I’m not a wildlife shooter and have just been content to watch the (thrilling) show—but I do now at least take the time before each cruise to set up my camera for action, just in case…
Thanks to its lofty walls and numerous twists, most of Doubtful Sound is sheltered enough to allow glassy reflections throughout. And given the number of waterfalls plunging into the sound—many that that flow year-round, far more that pop up only after one of the sound’s (frequent) showers—I don’t know if anyone has bothered to name the smaller ones like the one in this image from last year’s cruise.
This waterfall stood out for its verdant surroundings and shimmering reflection. With our boat moving laterally fast enough that the scene changed by the second (my worst nightmare), I moved much more quickly than I’m comfortable to capture it, pretty much just framing and clicking by feel.
Of course this whole experience further underscored why I prefer using a tripod. But it also fortified my resolve not to be limited by my tripod-always-no-exception rule. As this image demonstrates, today’s stabilization and high ISO technology obviates what was once considered the tripod’s primary value: eliminating hand-held motion blur. Despite standing on a rocking boat and shooting at 104mm and 1/80 second, this image really is just as sharp as it would have been with my tripod.
But just as sharp is only part of the quality equation, because capturing it also forced me to compromise by using 800 ISO—far from a dealbreaker, given my camera’s high ISO capability and today’s noise reduction processing tools, but less than ideal. Nevertheless, the thing I most miss without my tripod (or at least, without the stationary world that allows me to use a tripod) is the ability to craft my image and give a beautiful scene like this enough attention to find those extra little somethings that take it to the next level.
As much as I appreciated the ability to fire at will while floating beneath Doubtful’s vertical green walls, the landscape photographer in me missed the ability to savor the scene, and to be the one who decides when it’s time to click, and time to move on. In this case, had my tripod and I been solidly planted on terra firma, I’d have taken the time to study the subtly variegated foliage, identify the most distinctive shrubs and patterns, and monitor the shifting reflection, before framing and clicking. And had I been using a tripod, I’d also have had much more shutter-speed flexibility for managing the scene’s motion—both in the tumbling fall and the undulating reflection.
But alas, none of that was possible in this situation. So I have to settle for being extremely happy that I was able to capture a very small part of what makes Doubtful Sound (and New Zealand) so special.
Don and I would love to share New Zealand with you in person
Workshop Schedule || Purchase Prints || Instagram
The Most Beautiful Place on Earth
Click any image to scroll through the gallery LARGE


A Shot in the Dark
Posted on December 19, 2023

Nature’s Light Show, Aurora Over Dyrhólaey Coast, Iceland
Sony α1
Sony 12-24 GM
6 seconds
F/2.8
ISO 6400
At its best, still photography reveals aspects of the world invisible to, or overlooked by, human vision. In nature photography, we create these visual revelations when we use an extremely fast exposure to freeze the intricate detail of a lightning bolt that’s a memory before our brain registers it. Or when we dial up a long exposure to turn pinpoint stars into symmetrical arcs that reveal Earth’s rotation.
As a lifelong admirer of the night sky, I’m a huge fan of the camera’s ability to see in the dark far better than I can, extracting stars and celestial color too faint for my eyes. This is possible because cameras can accumulate light over an extended period, and because the camera’s ability to “see” color is less dependent on the amount of light it captures than the human eye is.
No subject more clearly demonstrates the camera’s light gathering ability better than the Milky Way. A relatively faint ribbon of light in even the darkest sky, a high ISO (extremely light sensitive), large aperture, multi-second exposure (30 seconds or less to minimize star streaking) brings to life the exquisite color and detail of starlight infused with interstellar dust and gas.
This ability to accumulate light also helps the camera extract color from apparent darkness. But just as important to the camera’s light gathering advantage over the human eye is the way it does it. The human eye uses a collaboration of rods and cones to collect light, with the rods doing the heavy lifting in low light, pulling enough monochrome information for us to discern shapes, while providing little help with color and depth. The cones that complete the scene with color and depth information require much more light to do their job. But a digital sensor, though blind to depth, captures photons using tiny photosites specifically designed to discern color.
With the first DSLRs, way back in the early 2000s, successful night photography required help from external light, like light painting with artificial light (which I never do) or moonlight (which I did all the time). But sensor technology has improved steadily over the years, not just the sensors’ resolution, but their light capturing ability too. Today I don’t hesitate photographing dark sky, the darker the better. Nevertheless, despite many years photographing the night sky, it wasn’t until 5 years ago that I got to photograph an aurora.
In January of 2019 Don Smith and I had traveled to Iceland to scout for a future photo workshop. We chose winter to ensure the longest, darkest nights for the best chance to view an aurora. Having seen thousand of pictures of the northern (and southern) lights, I believed I had an idea of what to expect, but I had no idea. No. Idea.
Before I start raving about the camera’s ability to photograph an aurora’s unseen color, let me just say that no picture can do justice to the experience of witnessing an aurora in person. I’m not talking about the green, horizon-hugging glow that lucky high-latitude Lower-48 residents enjoy from time to time (that’s still worth staying up and freezing for, BTW), but an actual sky-spanning dance of light beams, waves, and swirls. Rivaled only (in my book) by a total solar eclipse and a brilliant comet, a brilliant aurora display might possibly be the most beautiful thing you’ll ever witness in Nature.
But, despite lacking the dynamics of personal aurora experience, a camera does do better than the eye in one important aurora aspect: color. That’s because to the naked eye, many aurora displays aren’t bright enough to engage the cones and appear monochrome to our eyes. A camera, on the other hand, reveals auroras in all their kaleidoscopic glory. And though color in an extremely strong aurora is indeed plainly visible to the unaided eye, no matter how strong the aurora, the camera will always “see” more color than we will.
Since that first visit, I’ve returned to Iceland most winters, and have viewed many beautiful northern lights shows. Each was unique and beautiful in its own way, but hold a gun to my head and ask me to pick a favorite, and I think it would be a tie between back-to-back nights early this year (January)—first at Kirkjufell, then at Dyrhólaey on the South Coast. The Kirkjufell night was special because it featured a spectacular display above an Iceland icon. The Dyrhólaey show, while lacking the instantly recognizable foreground of the previous night, was even brighter and more expansive, at times spanning the entire sky.


I blogged about both nights earlier this year:
- Kirkjufell: It’s All About the People
- Dyrhólaey 1: Lights, Camera, Action!
- Dyrhólaey 2: Blessings
The image I’m sharing today is another one from the Dyrhólaey night. With our eyes we could actually see a little of the green, but not the red. And as beautiful as this image is, even with my 12 – 24 lens at its widest, it didn’t come close to capturing the entire horizon-spanning display.
One more thing
When there’s not enough light for visible color, colors in the night sky become the photographer’s processing choice. For my Milky Way images, that’s mostly a matter of adjusting my white balance in Lightroom until sky color feels right. I find a lot of other photographers’ night images too cyan for my taste, and if you look at my older night images, you’ll see that I used to skew them fairly blue. But in my recent night images, I’ve gone for something closer to black with just a hint of blue/violet, which is what I’ve done with the background sky in this image.
The color of the northern lights is similarly subjective, and starts with the color temperature my camera’s auto white balance chooses. Since I don’t have as much experience photographing auroras as I do the Milky Way, I’ve started identifying northern lights images that I like, taken by other photographers, then try to adjust my own images’ white balance in Lightroom to something that comes close to that. But looking at the gallery below, with greens that skew toward yellow (warmer), and some that skew toward blue (cooler), it’s clear that this is still a work in progress. But it does appear that I’m moving a toward cooler aurora images. And believe it or not, none of my northern lights images have any saturation added because they don’t need it—just giving the scene a little more light than my eyes see is all that’s necessary to bring out this eye-popping color.
The Lights Fantastic
Click any image to scroll through the gallery LARGE


