Eloquent Images by Gary Hart
Insight, information, and inspiration for the inquisitive nature photographer
Starry, starry night
Posted on June 9, 2017

Starry Night, Colorado River and Evans Butte, Grand Canyon
Sony a7S II
Rokinon 24mm f1.4
20 seconds
F/2
ISO 12800
Few experiences in nature surpass a dark sky brimming with an impossible number of stars. The darker the sky the better, and the sky doesn’t get much darker, or more impossible, than a moonless night at the bottom of the Grand Canyon. I schedule my annual Grand Canyon raft trip for the week of the new moon to ensure the darkest skies and the most stars; I prefer May because canyon temperatures are comfortably warm but not yet hot, and the Colorado River runs clear, unmuddied by sediment stirred by the summer monsoon.
As darkness seeps into the mile-deep gorge, the first pinpoints overhead are the planets, some combination of Venus, Jupiter, Mars, Mercury, and Saturn. Soon the darkness is as complete as we ever see it at home, and the planets are joined by the brightest stars in recognizable constellations. But unlike home, the darkening continues, and with every passing minute comes more stars, until it seems the sky can’t possibly hold any more.
Pausing to take it all in, the first thing to catch your eye in the unprecedented dark might be the Big Dipper—in May it’s high overhead as darkness falls, a comforting sight to disoriented observers still not convinced that this sky is real. Perhaps you’ll be temporarily distracted by the blinking lights of a distant jetliner, a silent reminder of the world left behind. A keen eye may discern a faint “star” moving among its neighbors—a satellite, possibly monitoring the weather, or sending GPS coordinates, or maybe even a foreign country secretly observing (smile!). And if you’re patient you might see a streaking meteor (or two, or three…), as if a hidden star has sprinted across the darkness and into a new hiding place.
But this visual feast is only the appetizer, because the main course, the Milky Way’s glowing band, isn’t served until close to midnight (or later, depending on the part of the sky that’s visible from the chosen vantage point). The Milky Way rises in the east, a band of light running north and south, ascending until it eventually spans the sky. Fainter in the north, the Milky Way brightens as your eyes follow it south, toward the glowing galactic core. The photogenic galactic core rises highest in the southern sky, so we hope for campsites with an open view in that direction. Since the Grand Canyon sky is crowded by tight, towering walls, the best views of the sky are usually up- or down-canyon.
Our best south-sky opportunities come on the trip’s first two nights, when we’re in Marble Canyon, the north/south trending section of the Grand Canyon that ends at the Little Colorado River confluence. At the confluence the canyon walls open to offer the trip’s best view of the sky, but just downriver the Colorado turns westward and the walls rise and squeeze closer. Fortunately, rather than beeline to Lake Mead, the Colorado River meanders a bit, bending north here and south there, providing an occasional view of the southern sky throughout the Grand Canyon.
Pulling into camp after a long day on the river, the first thing I do is find a spot for my cot that will ensure the best possible view of the night sky as I fall asleep. With my claim staked, I survey the surroundings for potential night photography scenes. Campsites on the Colorado River are first-come, first-served, and we have to hope we find one that’s oriented properly and has photogenic vantage points. Usually that means down by the river, but sometimes it’s an elevated location with the river in the distance. But if the campsite doesn’t have a photogenic vantage point, I’m not disappointed because nothing can take away my bedtime canopy.
If I find a scene I like, I compose, dial in my night exposure settings, and focus my camera well before dark. Sometimes I’ll compose and leave the camera poised on the tripod, ready for my return in the wee hours of the morning. If I’m afraid someone might stumble on my tripod in the dark, I leave it beside my cot, camera loaded and ready for action when I wake later.
On the trip’s third evening we pulled into camp exhausted but exhilarated after the trip’s most intense day of rapids. I found a view I liked near camp—getting there required a little rock scrambling that was no big deal with the sun out, but would require a bit more care. The Milky Way in May reaches its zenith in the south at around 3 a.m., but since we didn’t have a good view of the southern sky from this site, I decided the best views of the Milky Way would come earlier, when I could photograph it downstream, in the eastern sky. I woke at 1 a.m., grabbed my camera, and stumbled by the screen of my iPhone (the less artificial light my eyes are exposed to, the better they function when I try to photograph in the dark) to the spot I’d chosen. I could tell by a handful of glowing LCDs scattered downstream that I wasn’t the only one shooting. (On the first night I’d given the group instruction and guidance on photographing the Milky Way, but after that everyone was free to pick their spot and time, or stay in bed.)
I shot exclusively with my Sony a7SII and Rokinon 24mm f/1.4 lens. Once I’d perfected the composition and verified the sharpness, sticking with a 20 second shutter speed, I varied my ISO and aperture for more processing options later: ISO 3200, 6400, and 12,800; f1.4 and f2. At these settings I capture more light than my eyes take in—not only does this reveal more of the canyon than I can see, it also reveals even more stars.
I only photographed for about 20 minutes, but was so wired when I returned to my cot that I lay awake for another hour, mesmerized by my glittering ceiling.
Workshop Schedule || Purchase Prints
A Starry, Starry Gallery
Click an image for a closer look and slide show. Refresh the window to reorder the display.


I love you, goodbye…
Posted on November 18, 2015

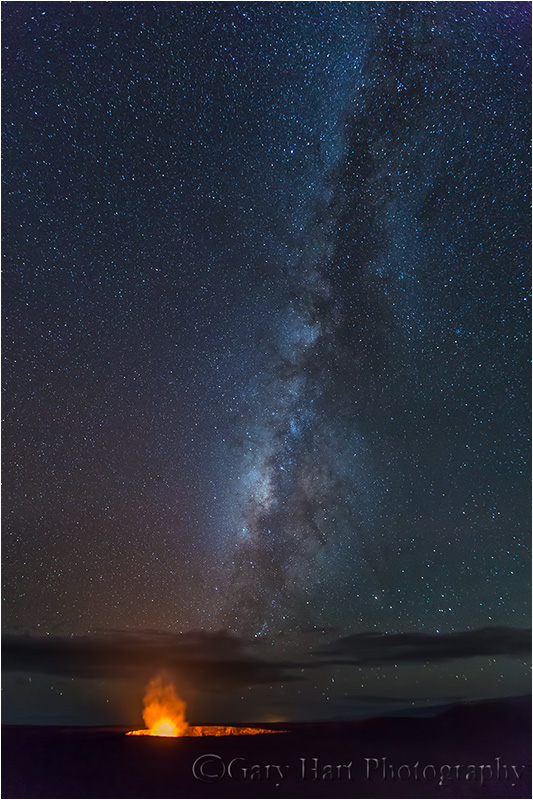
Fire and Mist, Halemaumau Crater, Kilauea, Hawaii
Sony a7S
Sony/Zeiss 16-35 f4
10 seconds
F/4
ISO 3200
Last week I said goodbye to my Sony a7S. More than any camera I’ve owned, this is the camera that overcame photography’s physical boundaries that most frustrated me.
I’ve been interested in astronomy since I was ten, ten years longer than I’ve a been photographer. But until recently I’ve been thwarted in my attempts to fully convey the majesty of the night sky above a grand landscape.
What was missing was light. Or more accurately, the camera’s ability to capture light. Light is what enables cameras to “see,” and while there’s still a little light after the sun goes down, cameras struggle mightily to find a usable amount.
When faced with limited light, photographers’ solutions are limited, and each solution is a compromise. In no particular order, we can increase:
- Shutter speed: We can increase the time the light strikes the sensor. While we can usually keep our shutter open for as long as the battery lasts, the longer it’s open, the more motion we capture.
- Aperture (a ratio measure in f-stops): Larger apertures (the f-stop number shrinks as the aperture opens) allow more light, with a loss of depth of field. While the DOF loss is usually insignificant in most night photography scenes (because all subjects are usually at infinity), the laws of optics limit the size of of a lens’s aperture.
- ISO: We can increase the sensor’s sensitivity to light by increasing the ISO, but not without significant image quality degradation (noise).
Most night photography attempts bump into the limits of each solution before complete success is achieved. For me, the first barrier is usually the f-stop, which is soon maxed. With my f-stop maxed, I’m left with a dance between ISO and shutter speed as I attempt to balance acceptable amounts of motion and noise.
So why not just add more light? Duh. But, while adding light solves some problems, it introduces others. Anything bright enough to illuminate a large landscape (sunlight or moonlight) washes out the stars, and artificial local light (such as light painting or a flash) violates my own natural-light-only objective. Another option some resort to is image blending (one frame for the foreground, one for the sky), but that too violates my personal single-frame-only goal.
My first shot at the night photography conundrum came about ten years ago, when I started doing moonlight photography. I immediately found that the reflected sunlight cast by a full moon beautifully illuminated my landscapes, while preserving enough celestial darkness that the brighter, most recognizable constellations still shined through. But walking outside on a clear, moonless night far from city lights was all the reminder I needed that my favorite qualities of the night sky—the Milky Way and the the seemingly infinite quantity of stars—remained beyond my photographic reach.
To photograph a moonless sky brimming with stars, my next step was star trail photography—long exposures that accumulated enough light to reveal my terrestrial subjects at manageable ISO (not too much noise). Star trails have the added benefit of stretching stellar pinpoints into concentric arcs of light that beautifully depict Earth’s rotation.
While both enjoyable and beautiful, moonlight and star trail photography were not completely satisfying. But the laws of physics dictated that lenses weren’t going to get any faster, and Earth wasn’t going to rotate any slower, so the solution would need to be in sensor efficiency.
Unfortunately, camera manufactures remained resolute in their belief that megapixels sold cameras. So as sensor technology evolved, and photographers saw slow but steady high ISO improvement, we were force-fed a mind-boggling increase in megapixel count.
But cramming more megapixels onto a 35mm sensor requires: 1) smaller photosites that are less efficient at capturing light, and 2) more tightly packed photosites that increase (noise inducing) heat.
The megapixel race changed overnight when Sony, in a risky, game-changing move, decided to offer a high-end, full-frame camera with “only” a 12 megapixel sensor. What were they thinking!?
Acknowledging what serious photographers have known for years, that 12 megapixels is enough for most uses (just 12 years ago, pros paid $8,000 for a Canon 1Ds with only 11 megapixels), Sony bucked the megapixel trend to embrace the benefits of fewer, larger, less densely packed photosites. The result was a light-sucking monster that can see in the dark: the Sony a7S.
Since purchasing my a7S less than a year ago, I’m able to photograph the dark night sky above the landscapes I love. Additionally, I found that its fast shutter lag (since matched by the a7R II) made the a7S ideal for lightning photography. It was love at first click.
And now it’s gone. Last month Sony released the a7S II, and given my satisfaction with the upgrade from the a7R to the a7R II, it was only a matter of time before I upgraded to the a7S II. I’m happy to say that I found a good home for my a7S and in fact may even get to visit it in future workshops.
I haven’t had a chance to use the a7S II, but I assure you it won’t be long, and you’ll be the first to know.
About this image
The image at the top of this post was captured in September (2015) during my Hawaii Big Island Volcanos and Waterfalls photo workshop. Each time I visit here I hold my breath until I see what the sky is doing. I’ve encountered everything from completely cloudless to pea soup fog. I’ve come to hope for a mix of clouds and sky—enough sky for the Milky Way to shine through clearly, but enough clouds to reflect the orange light of the churning volcano.
On this evening we got a combination I hadn’t seen before—clear sky overhead, a few low clouds, and a heavy mist hanging in the caldera. Not only did the mist frame the scene with a translucent orange glow, it subdued the volcano’s fire enough for me to use a long exposure to bring out the Milky Way without blowing my highlights.
We’ll do it again in my next Hawaii Volcanos and Waterfalls workshop
An a7S homage
Click an image for a closer look, and a slide show. Refresh the screen to reorder the display.


More love for the Sony a7S
Posted on May 10, 2015

El Capitan and the Big Dipper, El Capitan Meadow, Yosemite
Sony a7S
Sony/Zeiss 16-35
8 seconds
F/8
ISO 6400
In my previous blog I wrote about the flexibility of carrying three mirrorless (compact) bodies, each with its own strengths: the Sony a7R, a7S, and a6000. The a7S is my low-light body; it enables me to freeze motion and extract detail in conditions the were previously impossible. But more than that, I’ve discovered the a7S also makes photography that I’ve been doing for years, noticeably better.
Once upon a time
I got the a7S largely for its ability to pull light out of moonless night scenes, but the more I use it, the more I appreciate the way my a7S eliminates shortcomings I’ve wrestled with in my ten years of moonlight photography. As bright as a full moon is, the sun is nearly 500,000 times brighter (look it up), so achieving adequate moonlight exposure has always required pushing my camera’s light gathering settings to their quality threatening extremes, combining my lens’s widest, poorest quality aperture with star streaking 30-second exposures.
Mitigating these shortcomings meant increasing ISO, but with more sensitivity comes more noise. As high ISO and noise reduction software capabilities improve, so does the quality of my moonlight images, but the improvement has been slow and steady, only marginally perceptible. And it’s not been enough to push me out of the compromised exposure settings zone.
A new paradigm
Enter the a7S. With its spacious sensor and large photosites, the a7S offers ridiculous low light capabilities and I no longer think twice about shooting at 3200, 6400, or 12,800 ISO. And if I need to go higher than that, I know I have at least two more stops of ISO that usually cleans up quite nicely. Suddenly, I’m free to select an aperture I know will ensure the best quality, and a shutter speed that will freeze the stars, then just crank my ISO to a value that delivers the amount of light I want.
But wait, there’s more
Since I’m always on a tripod, most of my lenses are f4—I just can’t justify the bulk and expense of faster glass. But one downside of f4 glass is a less bright viewfinder, making composition and focus difficult in low light. Composition is often by trial and error, but it’s not too bad (and certainly easier than moonless scenes). My moonlight focus solution has always been to compose my shot on the tripod, detach the camera, turn and autofocus on the moon, then return my camera to the tripod—adequate, but a pain.
My a7S sucks so much light into my electronic viewfinder that composition and manual focus in moonlight are a fast, single-step process (I’m guessing moonlight autofocus works too, but I haven’t tried it). Whether I want to focus on the stars, or a particular foreground subject, I simply compose and dial in the sharpness.
For example
I’ve learned that teaching people moonlight photography in the moonbow chaos on the bridge beneath Lower Yosemite Fall is a recipe for disaster, so I usually take my groups out to El Capitan Meadow the night before our moonbow shoot. This spot is easy to get to, it has lots of room, an iconic Yosemite subject, and not too much light pollution (we can just shoot over the headlights). But I go here so much with my groups, I rarely get my camera out anymore.
This month’s group seemed to be doing fine, and I couldn’t resist the sight of the Big Dipper hanging above El Capitan, so I set up my camera and tried a couple of frames with the a7S. Rather than using my standard moonlight recipe (that I’ve been teaching for years)—ISO 800, f4, 20 seconds—I went to a fast shutter speed and mid-range aperture I’ve always longed for (8 seconds, f8) , and compensated with ISO 6400. In my viewfinder El Capitan throbbed with moonlight, and the stars of the Big Dipper stood out like a glow-in-the-dark star chart, making composition and focus effortless.
On my computer back in the hotel I magnified the image to 100 percent in steps, scrutinizing each magnification for noise. I saw none until I got to 100 percent, when I could detect a fine texture in the void between the stars. This cleaned up easily with very low-level noise reduction (Topaz). Examining the image for sharpness and star motion was pure joy as I realized I’d just captured my sharpest, cleanest moonlight image ever.
Learn more about moonlight photography
Join next year’s Yosemite Moonbow photo workshop
A moonlight gallery
Click an image for a closer look, and a slide show. Refresh the screen to reorder the display.


As far as the eye can see
Posted on March 25, 2015

Starry Night, Mather Point, Grand Canyon
Sony a7S
Zeiss 28mm
15 seconds
F/2.8
ISO 25,600
“As far as the eye can see.” How many times have we heard, and even uttered, those words without really considering their true meaning? Just how far can the eye see? Adults use the expression to convey wide open spaces, and as a kid I remember arguments on the playground about who had seen the farthest, trying to one-up each other with our ocular feats.
To me the words “as far as the eye can see” reveal a misconception that our eyesight somehow travels to a distant location and returns a real-time picture of a person, tree, building, mountain, or whatever for our brain to process. That perception might work for terrestrial scenes, where the time it takes a distant image to reach our eye is so imperceptible that for all intents and purposes, we are witnessing the scene in real time—what we see is happening as we see it.
Let’s take a tour of this night scene from the Grand Canyon to see how that real-time visual model works. Standing at Mather Point on the South Rim, our eyes start with nearby trees lining layered sedimentary cliffs, quickly plummeting to the river-scarred basalt of the inner canyon nearly a mile below. Beyond rise the similarly layered wall of the canyon’s North Rim. So far our eyes have traveled only ten miles or so—on a clear day they could continue another hundred miles or so before dropping off the horizon.
Scan any terrestrial scene this way and it’s easy to believe our eyes have done the work—when we see an object, we feel like we’re sharing its simultaneous reality. But this shared reality concept falls apart when you elevate your eyes above the Grand Canyon and beyond the horizon to the celestial sphere overhead, where everything we see (except the small meteor that’s burning up in Earth’s atmosphere, just a few miles away) was over and done years before it entered my lens.
That delay is the time it takes starlight to span the immense distances of interstellar space. Instead of a simultaneous reality, each star in our sky is on its own clock. In other words, we’re not seeing the stars in this image as they are today, we’re seeing them as they were tens, hundreds, or thousands of years ago.
But back to this distance thing. If starlight takes so long to get here, how far did it travel? Or more specifically, just how far can the eye see? Consider that light travels about 186,000 miles in one second. That’s more than 15 billion (twice the population of Earth, BTW) miles in a day, and nearly 6 trillion miles in a year. These numbers are beyond human comprehension, but suffice to say, a light year is a really long way.
So the next time someone says “As far as the eye can see,” remember this image. Ten miles to the opposite rim of the Grand Canyon, or 100 or so miles to the horizon, aren’t even a drop in the interstellar bucket. To comprehend the limits of our visual distance, individual stars are a good place to start, but they’re still in Earth’s general neighborhood. Beyond the pinpoint stars, this image captures the glow of our Milky Way Galaxy’s spiral arm in which our Sun is a very small player. This glow is a few thousand light years distant—now that’s more like it. But wait, there’s more. In Sagittarius, opposite the view in this frame, is our galaxy’s center. There the Milky Way’s glow reaches our eyes after traveling a mind boggling 25,000 light years. Surely that must be the limit of human vision.
But before you run out and brag to friends that you can see 145,000,000,000,000,000 miles (the distance light travels in 25,000 years), we’re still not done. See that roundish smudge of light on the left side of the frame? That’s the Andromeda Galaxy, the Milky Way’s nearest neighbor, 2.5 million light years away (not counting refueling and bathroom breaks). At 14,500,000,000,000,000,000 miles (count the zeros—moving from left to right, each zero increases the distance by 10 times), that truly is as far as the eye can see.
A few words about this image
Last week I helped Don Smith with his Northern Arizona workshop. After a 12 hour drive from California, Don and I had dinner near the South Rim before heading out to chilly Mather Point to try our new(ish) Sony a7S mirrorless cameras in what is the most difficult location I’ve every tried night photography.
Because I do everything with one click or not at all, I’ve never had any success photographing the stars on a moonless Grand Canyon night. Moonless night photography is difficult in any location, but at the Grand Canyon it’s like photographing a black pit. Honestly, I never imagined I’d be able to make it work.
A close look at this image will reveal that it’s not perfect—there’s a fair amount of noise, and a little motion in the stars (and every flaw is made worse by jpeg compression). Cleaning up the noise softened the image some, but eliminating it completely resulted in an noticeable plastic look, so I tried to find a balance. But flaws notwithstanding, given that the only thing illuminating my scene was the stars and a faint (imperceptible to the eye) ambient glow from the sky, to get this much detail in so much darkness is nothing short of amazing.
This is just my second night shoot with the a7S, so I’m still working out the best combination of f-stop/ISO/shutter-speed variations. I haven’t scrutinized all my images yet, but I have many variations to play with, both from this night at Mather Point, and from the next night as well, when Don and I took a hardy few from the workshop group out to Yavapai Point.
One thing that is an absolute game changer for me is the ease with which I can focus on the stars with the Sony a7S. With my Canon 5D Mark III and its (pretty great) LCD, I am able to live-view manual focus, but it takes some work. With the a7S, focusing is just a simple matter of putting my eye to the viewfinder and dialing the focus ring until the stars sharpen—a couple of seconds at most. Composition is also much easier with the a7S.
But clearly there’s room for more image quality, as the extremely limited light of a moonless night at the Grand Canyon forces many compromises. My Zeiss 28mm f2 lens is generally quite sharp, but it’s noticeably less sharp at its widest apertures. And there’s quite a bit of noise at 25,600 ISO (but the fact that I can shoot anywhere near that high is simply amazing). Of course I’d like to use an even higher ISO to allow a smaller (sharper) aperture and faster shutter speed (less star motion), but I won’t be greedy (yet). Right now I don’t know what excites me more about the a7S—that I’m able to capture night scenes I never dreamed possible, or what low-light technology Sony will deliver next. It’s a great time to be a photographer.
A Stellar Gallery
Click an image for a closer look, and a slide show. Refresh the screen to reorder the display.


It’s all about relationships
Posted on October 18, 2014

Star Trails Above an Ancient Bristlecone, Schulman Grove, White Mountains
Canon EOS-5D Mark III
28 mm
31 minutes
F/5.6
ISO 100
Relationships
Think about how much our lives revolve around relationships: romance, family, friends, work, pets, and so on. It occurs to me that this human inclination toward relationships almost certainly influences the photographic choices we make, and the way our images touch others.
Whether it’s conscious or not, photographers convey relationships in their images. A pretty sunset is nice, but a pretty sunset over the Grand Canyon or Yosemite is especially nice. Likewise, why be satisfied with an image of a rushing mountain stream when we can accent the scene with an autumn leaf? And that tree up there on the hill? It sure would look great with a moon. These are relationships, two distinct subjects connected by a shared moment.
The more we can think in terms of relationships in nature, adding that extra element to our primary subject, or finding multiple elements and organizing them in a way that guides the eye through the frame, the more our images will reach people at the subconscious level that draws them closer and holds them longer.
On the other hand…
Some of my favorite images are of a solitary subject, and element in nature that stands alone in the scene—what’s up with that? I’ve decided (since this is my blog) that this the exception that proves the rule. As much as humans gravitate to relationships, what person doesn’t long for the peace of solitude from time to time? In the case the tree in the image below, it’s the absence of a relationship that draws us, or more accurately, it’s the tree’s relationship with an otherwise empty scene that appeals to the relationship overload we all experience from time to time.

Solitary Tree After Sunset, McGee Creek Canyon, Eastern Sierra
It’s the isolation of this small tree, its relationship with the void, that makes this image work for me.
Star Trails and Ancient Bristlecone: About this image
At 4,000+ years, the bristlecone pines of the White Mountains, east of Bishop, California, are among the oldest living things on Earth. They’re also among the most photogenic. Each year I take my Eastern Sierra photo workshop group to photograph the bristlecones of the Schulman Grove. Given the (rather gnarly) one hour drive would get us back to our hotel in Bishop quite late on the eve of a particularly early sunrise shoot, and night temperatures above 10,000 feet in late September are quite chilly, I’ve never kept the group out here for a night shoot. Until this year.
With clear skies and a 40 percent crescent moon, I couldn’t resist the opportunity to photograph these trees with just enough moonlight to reveal their weathered bark without washing out too many stars. Here was an opportunity to create the kind of relationship we all look for—juxtaposing these magnificent trees against an equally magnificent night sky. So after a nice sunset shoot, but before it became too dark, I had everyone find a composition they liked, lock it in on their tripod, and focus using the remaining light. When the stars started popping out, we began clicking—I started everyone the initial exposure settings, and helped them ensure that their images were sharp, but pretty soon most of them were managing quite fine without my help.
Our first frames were pinpoint stars, relatively short (30 seconds or less) exposures at wide-open apertures and very high ISOs. As the darkness became complete, we were equally thrilled number of stars and the amount of tree and rock detail the faint moonlight brought out in our images. Eventually most in the group wanted to recompose, which required re-focusing, no trivial task in the darkness. Normally an infinity focus on the moon will suffice at night, but the trees were so close, and our apertures so wide, that I felt it would be best to focus on a tree (to ensure its sharpness at the possible risk of slight softness in the stars). We found that by hitting the tree with an extremely bright light (or two), we could see just enough detail to manually focus. But just to be sure, I insisted that everyone verify their focus by scrutinizing a magnified image on their LCD.
When I was convinced that everyone had had success with pinpoint stars, I prepared them all for one final, long exposure star trail shot. Using the last pinpoint composition and focus (after verifying that it was indeed sharp), I did the math that would return the same exposure at 30 minutes that we’d been getting at 30 seconds—in this case, adding 6 stops of shutter speed meant subtracting 6 stops of ISO and aperture. When everyone was ready, we locked our shutters open in bulb mode, and then just kicked back and watched the sky.
My favorite part of these group shoots are these times when we can all just kick back together and appreciate the beauty of the moment, without the distraction of a camera. Overhead the Milky Way painted a faint white stripe through Cassiopeia, a couple of satellites danced faintly among the stars, and several meteors flashed. I didn’t even mind the occasional plane cutting the darkness (it didn’t hurt to know that Photoshop makes removing them quite simple now), and tried to guess its destination.
This shoot was certainly about finding the relationship between the these trees and the night sky they’ve basked beneath every night for thousands of years. But it was also about the stories and laughs we shared that night, cementing relationships between people who were strangers just a couple of days earlier—I know from experience some of these relationships will end with the workshop, but many will continue for years or even lifetimes.
A gallery of relationships in nature
Click an image for a closer look, and to enjoy the slide show


When it rains…
Posted on July 17, 2014

Night Shadow, Kauai, Hawaii
Canon EOS-5D Mark III
28 mm
30 seconds
F/2
ISO 3200
I suspect that nature photographers get themselves into more predicaments than the average person. Case in point:
Following a long day on Kauai that started with a 4:30 a.m. wakeup and continued pretty much nonstop through sunset, I’m not sure why I thought it would be a good idea to extend my day further, especially given that we had another 4:30 a.m. wakeup set for the next day. But there I was, picking my way alone across the wet sand in pitch dark.
I’d wanted to do some night photography on this Kauai visit but had been thwarted by clouds the previous nights. On this night, however, the clouds held back and when I hit the beach it felt like ten thousand stars rushed to welcome me. Living my entire life in areas of light pollution, camera or not I’m always moved by the sight of a truly dark sky. A few thin clouds mingled with the stars, but they were clearly no match for the legions of stars—what could possibly go wrong?
I made my way north along the beach searching something for my foreground. With no moon, the darkness was pretty complete, but once my eyes adjusted I found the easiest going right along the water line, where I could use contrast of the shifting line of lapping surf to keep me on course. Every once in a while a warm wave would wash up and clean the sand from my between my toes.
After a couple hundred yards I came upon a few chunks of wave-worn basalt protruding from the surf and decided I needed to go no further. Exposures between 15 and 30 seconds not only smoothed the waves, they also created a pleasing motion blur in the clouds. I tried a variety of compositions with no illusions I’d get anything special—I just welcomed the excuse to be alone with the stars on a warm Kauai beach. In fact, I was having so much fun that I wasn’t really paying attention to the fact that each frame contained a little less sky and a little more cloud.
The image you see here was one of my last captures. Shortly after clicking it the wind kicked up—spend any time in Hawaii and you learn that a sudden increase in the wind usually means rain isn’t far behind. I looked up. Hmmm. The stars were about gone—when did that happen?
While collapsing my tripod a large raindrop slapped my cheek, then another on my leg. Soon the drops were pelting me and the sand like bullets on Omaha Beach. Getting caught in the rain in Hawaii isn’t nearly as unpleasant as it is most other places (go figure), but Hawaii rain is just as wet as any other rain and I’d gone out with just my camera, one lens, and tripod—sans camera bag I was without rain gear for myself and had nothing to protect my camera (I never claimed to be smart).
I hustled a short distance further up the beach to what I thought would be a shortcut through the condo community situated just above the beach but was blocked by a creek emptying into the ocean—in daylight this wouldn’t have been much of an obstacle, but trying to negotiate rocks and water in the dark wouldn’t have been wise (having already lost one camera to a Hawaii creek this year). I considered scrambling up the hill, but separating me and the easiest route back was a twenty-foot wide, one-foot high groundcover of unknown composition. So I turned and sprinted back down the beach, mindful of the rocks I’d just photographed and suddenly aware that the tide and come in. Surprise number two (see “smart” comment above). My camera was getting a drenched, but to stumble in the dark would risk giving it a saltwater bath.
I considered shoving my camera inside my shirt, but my shirt was about as dry as a bucket of water. Desperate, I looked for a path up the slope and through the ground cover separating me from the manicured lawn (and a quick, illuminated route to safety). Spying a possible gap, I darted into the brush. Dead end. But propelled by momentum and concern for my camera I didn’t break stride, leaping into the brush like Peter Rabbit into a briar patch. (Peter Rabbit I’m not, and I have the scratches to prove it.) Once onto the lawn it was only about a three minute dash back to the resort.
It doesn’t rain like this in California—I’m pretty sure it would have taken a full day to accumulate the amount of rain I got in less than fifteen minutes that night on Kauai. Not only that, it usually takes about a day to build up to it, and then another day to decide it’s done. But of course my rain (it somehow felt personal) stopped right after I made it to the room, before I’d even stopped dripping and huffing.
The next day, while reviewing the images on my computer, I was pleased to find a couple that might have more value than merely the excuse I needed to get out to play with the stars that night. Because it had been so dark while I was out there, it took me a few seconds to sort out the layers in my images, but what you see here, from bottom to top, is the dark, wet sand on which I stood; the white surf washing up on the beach in front of me; an area of dark, calmer water; more waves where the surf hits a volcanic shelf less than 100 yards from shore; a thin stripe of open ocean; and finally sky, clouds, and stars.
The real treat in this image is the unexpected shadow of a tree painted on the nearby surf, cast I’m guessing by the faint light from the condos behind me. I’d love to say this shadow and its perfect position against the white surf was part of my plan, but it wasn’t. Not only did the motion in the surf, which shifted continuously between dark-calm and white-waves, create a constantly changing background, it was just too dark out there for my eyes to register the shadow anyway. But my camera, with its ability smooth motion and absorb more light than my eyes can, gave me something invisible to my eyes. And this ability to capture reality that my eyes miss really is my favorite thing about photography.
* * *

Milky Way and Halemaʻumaʻu Crater, Kilauea, Hawaii
We do night photography in almost all of my photo workshops, including Hawaii
The calm above the storm
Posted on September 12, 2013

The Calm Above the Storm, Grand Canyon and Lightning by Moonlight, Mather Point
Canon EOS 5D Mark III
30 seconds
F/4
ISO 200
73 mm
If you’ve ever taken off in a violent storm, watched the exploding sky just beyond your window, felt the plane buck until you verged on panic, then suddenly broken through the clouds into utter peace, you might appreciate the dichotomy depicted in this scene.
* * * *
Overwhelmed by the euphoria the Grand Canyon workshop’s final sunrise was this moonlight experience on the South Rim a couple of nights earlier, the highlight of the workshop until that unforgettable morning. Don Smith and I had planned all along for this to be the group’s moonlight night, always a workshop highlight, but we got much more than we bargained for when we found the North Rim under a full scale assault from multiple electrical cells. The moonlit tranquility of our South Rim vantage point was a striking contrast to what was happening across the canyon. Several times per minute the clouds would strobe with lightning hidden by the clouds, and once or twice each minute a bolt would land near the rim for all to see. Above all this activity, the stars twinkled peacefully, clearly indifferent to the violence below.
Unlike the moonless experience at Kilauea a couple of weeks later, photographing with a full moon is pretty straightforward. Not only does the moon make a great focus point (just don’t forget to turn off autofocus before clicking your shutter), you can actually see your camera, its controls, the scene itself, and all potential obstacles (photographers, tripods, camera bags). And because exposures are generally short, do-overs are easy. So my job was easy, pretty much reduced to wandering around reminding everyone to vary their compositions, and making sure they’d all had a success.
Everybody got something that excited them that night, and the variety of images was amazing. I saw vertical and horizontal frames, wide and tight, most aimed north like this one, but there were also some great lightning captures to the east, up the canyon. My own favorite was this one that captured a bolt’s origin through a window high in the clouds, and its forked impact with the rim. While a wide composition would have increased the likelihood of capturing a strike somewhere in my frame, it would have also further shrunk the already distant lightning. My 73mm focal length in this case reflects my desire to make the lightning more prominent, and my confidence in the frequency of strikes in this direction (the more disperse the strikes, the wider I compose). Usually my night exposure decisions are designed to minimize star motion, but in this case I opted for 30 seconds to maximize the chance for capturing a strike (or more) during the exposure—a close look at the stars here clearly shows the onset of motion blur despite the fact that I was aimed north, where star motion is minimal.
This image reminds me why video is no substitute for still photography. Video’s benefits are undeniable, but the ability spend forever in a single instant like this is priceless.
Last night, at the volcano…
Posted on September 4, 2013
Milky Way Above Halemaʻumaʻu Crater, Kilauea, Hawaii
Canon EOS 5D Mark III
15 seconds
F/2.8
ISO 3200
16 mm
Sitting here on my balcony above Hilo Bay, it’s hard to believe that 10 days ago I was photographing sunrise lightning on a chilly morning at the Grand Canyon. But there’s Mauna Kea, and over there is Mauna Loa. And it’s 6 a.m. and I’m in shorts and flip-flops, so this really must be Hawaii. Ahhhh.
Oh yeah, it’s all coming back to me…. Last night I took my Hawaii workshop group up to Kilauea to photograph the volcano beneath the stars. I always stress about this shoot in particular because the opportunity to photograph the glow of Halemaumau Crater beneath the Milky Way is what brought many of the workshop participants to Hawaii in the first place. My stress is due to factors largely beyond my control: clouds, inadequate equipment (“The guy at Best Buy said this tripod should be fine”), technical problems (“Oh, I thought a five percent battery charge would be enough”), and just plain user error (“It looked sharp in the LCD”). Each year I do my best to mitigate as many problems as I can: I send copious reminders (“Don’t forget to bring…”) and how-to documents (starting months in advance), give a night photography training session the afternoon of the shoot, do a group equipment set-up and checklist in the parking lot before we walk out to the view point, and frequently check on participants during the shoot. But while all that preparation seems to help, so far I haven’t been able to do anything about the weather. The best I’ve been able to do is time my primary volcano shoot early enough in the workshop to allow us the option of returning in the event of a mass fail.
So yesterday afternoon we drove up to Kilauea, stopping first at the Visitor Center (I’m something of a souvenir T-shirt addict), then walking through the lava tube (always a hit), before wrapping up the daylight portion of the day with a really nice sunset at the Jaggar Museum (the closest point from which to view the caldera). Then we headed to dinner beneath a tantalizing (traumatizing) mix of clouds and sky—were the clouds incoming or outgoing? Dinner was great, but I’d have surely enjoyed it far more if I’d have known we’d leave the restaurant and see starry skies. And stars there were, millions and millions (or so it seemed). Phew.
Once the stars did their part, the rest of the night was up to me—despite all the preparation, I know from experience that basic photography skills such as composition, camera adjustments (even though I’d given everyone starting exposure values in the parking lot, most people usually need to tweak something), and (especially) finding focus, become completely foreign in the near absolute darkness of a moonless night. These problems are compounded by the fact that a flashlight, while necessary to light the path to the location, is absolutely taboo once we’re there (their light can leak into others’ frames, and flashlights make it almost impossible to adjust to the darkness)—instead we rely on the soft glow of our cell phone screen to see our controls.
I started with a test exposure to verify the exposure values I’d had everyone set earlier. So far, so good. Then the real fun began—for the next 45 minutes I bounced from pleading shape to pleading shape (faces are unrecognizable): “My camera won’t focus” (Try auto-focusing on the caldera—if that doesn’t work, we try creative solutions such as auto-focusing on a flashlight 100 feet up the trail or a best-guess manual focus on the caldera rim); “My camera won’t shoot” (Turn off autofocus);“ Is this image sharp?” (Magnify the LCD and zoom in on the stars or caldera wall); “My picture is black” (The correct exposure is 30 seconds, not 1/30 second). And so on. (I should make clear that these problems were more an indication of the disorientation caused by the darkness than a reflection of the photographer’s skill.)
But slowly the cries for help turned to exclamations of joy as successful images started popping up on LCDs. Pretty soon I was wandering around looking for someone who needed help, anyone…. When it finally became clear that my offers to help were more of a distraction, I returned to my camera (no small feat in the dark) and tried a few frames of my own. While I had no illusions of getting anything new (or even anything much different than what others had), I tried several variations. Most of my images were oriented vertically to maximize the length of the serpentine Milky Way, and to minimize the black void surrounding the glowing crater. I also varied my focal length a bit, and played with my ISO and shutter speed settings so I could choose later (with the benefit of a larger screen) between more noise, less star motion and vice versa.
In addition to the photography, I always make a point to stop everyone and remind them to simply appreciate what we’re viewing. The orange glow is molten rock, the newest material on the Earth’s surface; overhead are pinpoints of starlight that originated tens, hundreds, even thousands of years ago. It’s both humbling and empowering.
We finally wrapped up a little before 11. Everyone seemed quite happy (okay, downright giddy) with what they’d gotten. At breakfast this morning a few people said they’d checked their images after returning to the hotel, but most said they just collapsed into bed. Nevertheless, I’m already starting to receive whispered requests to return to Kilauea one more time. I won’t take a lot of convincing.
* * * *
:: Join me next year as we do this all over again in the 2014 Hawaii Big Island Volcanoes and Waterfalls photo workshop ::
How to photograph Comet PanSTARRS
Posted on January 16, 2013

Above: Illustration courtesy of Starry Night software; it shows Comet PanSTARRS 8 degrees above the horizon 25 minutes after sunset on March 12. The software has no idea of the comet’s brightness or the length of its tail (it just adds a generic comet tail)—it’s unlikely PanSTARRS will look this dramatic (but we can dream). That’s a thin (1%) crescent moon just to the right of the comet.
* * * *
PanSTARRS Update, February 6, 2013: Latest word on the street is that PanSTARRS isn’t brightening as fast as hoped. Current predictions put it in the magnitude 2-3 range, about the brightness of the stars in the Big Dipper. This is likely to change, either up or down (welcome to the world of comet watching), as PanSTARRS approaches and passes perihelion (March 10). ISON remains on track for something truly special late this fall. Stay tuned….
PanSTARRS Update, February 23, 2013: After enduring a few weeks of fading hope for PanSTARRS brightness (revised estimates were calling for best-case magnitudes ranging from 2 to 3, and some were in the magnitude 4 range), recent observations have the comet brightening at a faster rate that might put it at magnitude 2 or brighter. I still don’t think we’ll really know what to expect until PanSTARRS reaches perihelion on March 10, but suffice to say it continues to bear watching. Keep your fingers crossed.
PanSTARRS Update, March 4, 2013: Things just keep getting better. PanSTARRS is putting on a great show for the Southern Hemisphere, and it’s about ready to enter Northern Hemisphere skies. Current estimates have PanSTARRS brighter than magnitude 2 right now, and we’re still nearly a week out from perihelion. As it continues to approach the sun, look for PanSTARRS to brighten to magnitude 1 or maybe even brighter. That means it could be visible north of the equator as early as March 7, with improving chances for viewing for at least the next week as it separates from the sun a little each evening.
The year of the comet
There’s a lot of excitement in the astronomy community about a pair of comets heading our way in 2013. In late-November and December (and maybe into January), Comet ISON could put on a once-in-a-lifetime celestial display, but before ISON we may be treated to a pretty good warm-up when Comet PanSTARRS graces Northern Hemisphere skies in March. Media hyperbole notwithstanding, the unpredictability of comets is a source for great anxiety among those anticipating these celestial visitors. The safest bet is that PanSTARRS and ISON will either be brighter or fainter than predicted (comet history is rife with examples of both), but it’s just that kind of uncertainty that makes comets so special.
First the facts (Comets 101)
(If all you’re interested in is the photography stuff, feel free to skip to the “PanSTARRS: When and where” section below.)
A comet is a ball of ice and dust a few miles across (more or less) orbiting the sun in an eccentric elliptical orbit: Imagine a circle stretched way out of shape by grabbing one end and pulling–that’s what a comet’s orbit looks like. Looking down on the entire orbit, you’d see the sun tucked just inside one extreme end of the ellipse.
The farther a comet is from the sun the slower it moves, so a comet spends the vast majority of its life in the frozen extremities of our solar system. Some comets take thousands or millions of years to complete a single orbit; others complete their trip in just a few years.
As a comet approaches the sun, stuff starts happening. It accelerates in response to the sun’s increased gravitational pull (though just like the planets, the moon, or the hour hand on a clock, a comet will never move so fast that we’re able to perceive its motion). And more significantly, as the comet approaches the sun, increased heat starts melting the frozen nucleus. Initially this just-released material expands to create a mini-atmosphere surrounding the nucleus; at this point the comet looks like a fuzzy ball when viewed from Earth. As the heat increases, some of the material set free is discarded to form a glowing tail (glowing by reflected sunlight—a comet doesn’t emit its own light) that points away from the sun. The composition and amount of material freed by the sun, combined with the comet’s proximity to Earth, determines the brilliance of the display we see.
With millions of comets in our Solar System, it would be easy to wonder why they’re not a regular part of our night sky. Actually, they are, though most comets are so small, and/or have made so many passes by the sun that their nucleus has been stripped of reflective material, that they just don’t have enough material left to put on much of a show. And many comets don’t get close enough to the sun to be profoundly affected by its heat, or close enough to Earth to stand out.
Most of the “periodic” comets—comets that make regular appearances—are well known to astronomers. These comets have usually lost so much of their material that they’re too faint to be seen without a telescope; a notable exception is Halley’s Comet, perhaps the most famous comet of all. Halley’s Comet returns every 75 years or so and usually puts on a memorable display. Unfortunately, Halley’s last visit, in 1986, was kind of a dud; not because it didn’t perform, but because it passed so far from Earth that we didn’t have a good view of its performance on that pass.
Then there are the “non-periodic” comets, which pivot the sun only once in thousands or millions of years. New non-periodic comets are discovered each year; every once in a while astronomers determine that one of these discoveries is large enough, with a favorable orbit that sends it close enough to the sun to ensure lots of reflective material will be shed, and close enough to Earth that we’ll have a good vantage point, that it just might put on a spectacular display. Enter Comets PanSTARRS and ISON.
What can go wrong
Every comet has a different physical make-up, so there’s no way we can tell how it will react during its encounter with the sun. Astronomers also suspect that on its first solar approach an incoming comet may shed a thin, highly reflective outer layer when it’s still a good distance out, giving us a false impression of its intrinsic albedo (reflectivity). Therefore we can’t be certain if a newly discovered comet that appears relatively bright at a great distance (but still much too dim to be seen without a telescope) is going to continue shedding reflective material, or peter out before it arrives.
An even bigger concern is whether the comet will survive its encounter with the sun at all. The closer a comet passes to the sun, the more it is likely to shed the ice and dust a spectacular display requires, but some sun-grazing comets have passed so close to the sun that they completely disintegrated.
In other words, we have no way of knowing whether PanSTARRS and ISON dazzle or fizzle—all we can do is wait. And prepare.
PanSTARRS: When and where
Fortunately, we do have one certainty to work with: the comet’s orbit. We know with great confidence where it will appear (or where it should have appeared had it survived its encounter with the sun) and when it will be there.
PanSTARRS makes its closest approach to the sun, “perihelion,” on March 10. If we’re lucky it will appear as a fuzzy ball low on the western horizon of Northern Hemisphere skies shortly after sunset in the second week of March (it’s done with the Southern Hemisphere). Each evening PanSTARRS will appear above the western horizon shortly after sunset, a little higher and (probably) a little dimmer than the night before. But as it rises each night, it moves farther from the sun into darker sky, so while PanSTARRS may be dimming slightly, the sky surrounding it may darken faster than the comet dims, perhaps and for a week or so (this is anybody’s guess). That would make PanSTARRS more visible as the first week after perihelion progresses. Since PanSTARRS’ tail material may have been stripped by its close encounter with the sun, it will need time to reform and may lengthen with each passing day, another variable that can’t be predicted.
PanSTARRS will eventually rise into the darker part of the sky; by the end of April it will be visible all night in the Northern Hemisphere. But by then it’s very unlikely to be bright enough to be viewed with the unaided eye.
But one of the great thrills of comet watching is the uncertainty. Just as some comets disappoint (Google Comet Kohoutek), others astonish. Hale-Bopp was much heralded before it arrived in late 1996, but nobody expected it to remain visible to the naked eye for eighteen months. And in January 2007 Comet McNaught caught everyone off guard by suddenly brightening to become a spectacular (albeit brief) sight trailing the sun to the horizon in the post sunset twilight.

Comet McNaught, January 2007
PanSTARRS approximate location 45 minutes after sunset at 38 degrees north latitude
March 8: Altitude 0º (right on the horizon) Azimuth 260º (due west is 270º)
March 9: Alt. 1º Az. 262º
March 10: Alt. 3º Az. 264º
March 11: Alt. 4º Az. 267º
March 12: Alt. 5º Az. 269º
March 13: Alt. 6º Az. 272º
March 14: Alt. 7º Az. 274º
March 15: Alt. 7º Az. 277º
Photographing PanSTARRS
Composition
Since we know when and where PanSTARRS will be visible, there’s no excuse for not preparing now (right?). Preparation starts with knowing where you’re going to shoot PanSTARRS beforehand. Look for unobstructed views to the west with no terrain for PanSTARRS to set behind before the sky is dark enough for it to appear—think beach, hilltop, mountaintop, or flat landscape. The best scenes are worthy of photographing regardless of what’s in the sky, scenes that can use the comet as an accent to take the image to the next level.
I’m guessing that PanSTARRS won’t have a tail anywhere near as dramatic as the tail in the Starry Night illustration above (though I could be, and hope I am, wrong), so unless it brightens far beyond predictions and the tail lengthens more than normal (it’s happened with comets before), you won’t want to go too wide with your composition if the comet is to be your primary subject. On the other hand, even with a relatively short tail, PanSTARRS could make a magnificent accent to an otherwise nice wide scene. I plan to prepare for both tight telephoto and wider landscape shots.
Because PanSTARRS will be in the relatively bright post-sunset sky, and any foreground subject will be in full shade (the sun’s down, but it isn’t completely dark yet), look for striking nearby shapes to silhouette against the sky with PanSTARRS glowing in the distance. For example, near my home in Sacramento the best candidates will be the oak trees dotting hillsides east of town. I’ll need to be on their east side, facing west.
Mountains that stand out against the horizon will work nicely too, though remember that PanSTARRS will already be quite low as the sky darkens, and it will be dropping toward the horizon with each minute (along with everything else in the sky)—if the mountains you choose are too high, or too close, PanSTARRS will disappear below your horizon before the sky is dark enough. For example, Mt. Whitney as viewed from the Alabama Hills might make a great foreground subject for PanSTARRS, but from the Alabama Hills Mt. Whitney juts about 10 degrees above the horizon—on March 15 PanSTARRS will set behind Whitney (drop below 10 degrees) about 30 minutes after sunset. So unless PanSTARRS is extremely bright, it might not be visible at all before it disappears below the mountains.
And before you ask about photographing PanSTARRS in Yosemite, let me strike preemptively and say that pretty much all of the views in Yosemite Valley face east, which means even if you’re lucky enough to glimpse PanSTARRS above Yosemite Valley’s steep walls, while you’re photographing it Half Dome and El Capitan will be behind you. (Wait for ISON, which could be a spectacular pre-sunrise object in the east.)
Exposure
(I’m assuming you understand the basics of exposure—if not, read this.)
First, it’s important to understand that, unlike ISON in December, photographing PanSTARRS at its brightest will not be night photography, it will be twilight photography. Because it will be in the same area of the sky as a crescent moon, regardless of your focal length choice the rules for photographing PanSTARRS will be similar to those for photographing a crescent moon. (You can read more about that on my Crescent Moon Photo Tips page.)
My general approach to capturing foreground detail in twilight scene like this is to meter on the brightest part of the sky, setting an exposure that’s as bright as possible without overexposing (a graduated neutral density filter helps). After you click, check your histogram to make sure you haven’t blown out the highlights. If at all possible (if your camera shows it and you understand how to read it), I strongly recommend checking each of the channels in the RGB histogram to make sure you haven’t lost any color. On the other hand, if it’s a silhouette I’m going for, I’ll underexpose slightly to hold the color in the sky and/or water. In this case a graduated neutral density filter is unnecessary.
By the time PanSTARRS drops below the horizon, the foreground will be so dark that my exposures will need to be quite long. But since PanSTARRS is in fact moving at the same speed (from our terrestrial perspective) as all the stars and planets, I’ll want to monitor my shutter speed to avoid motion blur (the longer my focal length, the more I’ll need to worry about long exposure motion blur). I’m guessing for my wider shots I’ll be okay at 15 seconds, but I’ll still magnify the image on my LCD to determine whether I need to bump my ISO further to allow an even faster shutter speed.
For wide shots a graduated neutral density filter will help hold down the brightness of the sky enough to enable you to save the twilight color while bringing out some foreground detail. For ocean scenes, where the horizon is flat, I prefer a hard-transition GND; my 3-stop reverse GND will probably get the most use.
Telephoto
You could go super-tight and fill the frame with nothing but comet and sky—I’ll probably try a few of these. But with no foreground, nothing about these compositions will set them apart from the thousands of similar compositions taken from anywhere else in the Northern Hemisphere. Most of my tight shots will include some landscape feature silhouetted against the sky or water. In the telephoto shots that include a foreground subject, the farther from the silhouetted subject I can position myself, the longer the focal length I can use, and the larger the comet will appear in my frame. But don’t forget that the more you magnify with a long focal length, the greater the motion blur you’ll capture—a higher ISO to increase your shutter speed is usually a good idea.
Wide
Remember that we’re photographing PanSTARRS after the sun has gone down, but before the sky is completely dark. So for my wide shots I’m going to look for water because water reflects the twilight sky so nicely. I’ll be leading a workshop on Maui during what promises to be PanSTARRS prime-time (the week of March 8-15), so finding water won’t be a problem for me. But no matter where you are, you should be able to find a westward view of a river, lake, or beach.
A particular advantage of photographing PanSTARRS from the beach is the an unobstructed view of the horizon, giving me a very long and clear line of site to PanSTARRS (even better would be shooting downward at the horizon from a mountaintop, like Haleakala).
Fingers crossed
The night I’m targeting as potentially off-the-charts-special is March 12 (image at the top of the page). That evening PanSTARRS will be aligned with a sliver-thin slice of crescent moon, separated by less than 4 degrees. The next night the moon will be higher, about 10 degrees (the width of a fist held at arm’s length) directly above the moon, with PanSTARRS’ tail pointing directly at the moon. If the tail is long enough, it will appear to pass right through the moon.
On the other hand, I’m fully prepared for disappointment too—I’ve followed comets long enough to understand why astronomer David Levy said, “Comets are like cats: they have tails and do precisely what they want.”
* * * *
Read the history of my relationship with comets in my January 11 post.
Glow in the dark
Posted on September 25, 2012

Kilauea Caldera, Hawaii
* * * *
An unfortunate reality of photographing the things I photograph, at the times I photograph them, is the doubt the results foster—“Is that real?” Sigh. That skepticism is compounded by the (understandable) ignorance of people who expect cameras to duplicate human reality, a fallacy no doubt perpetuated by photographers who proclaim each image to be, “Exactly the way the way my eyes saw it.” And then there are those unscrupulous photographers who alter images for personal or financial gain by adding or moving objects (the moon seems to be a popular subject), cranking up the color, and embellishing the hardship the capture required. It’s no wonder people don’t know what to believe.
So let’s take a look at this night shot of the Kilauea Caldera, captured during my recent Hawaii Big Island photo workshop. Is this the way I saw it? Absolutely not. First, my experience was three dimensional. It included wind motion in the caldera’s vapor plume, a dome of sky saturated with thousands of stars, the Milky Way stretching from horizon to horizon, and clouds wafting in and out, intermittently revealing and obscuring parts of the sky. The magic I experienced was far beyond my camera’s capability.
But my camera has reality of its own, and its own magic. By increasing my ISO (the sensor’s sensitivity to light), aperture (the size of the opening that allows light to reach the sensor), and exposure time, I was able to capture more light in one frame than my eyes could see at any instant. All this additional light on my sensor gave me a section of sky containing even more stars than my eyes saw, and clouds fully illuminated by the volcano’s glow.
This particular image was captured on the second of three nights on the rim. My first workshop group nailed it on the first attempt (see my September 9 post), but the second group’s first attempt was largely thwarted by the large cloud you see in this image. Nevertheless, as you can see, we had a small window of opportunity on this night as well, so while the group wrestled with their camera’s and tripods in the dark, I took a test exposure and gave everyone exposure values. As I moved around making sure they all had their settings dialed in and focus set, it was a blast listening to the gasps up and down the rim when the first image popped on each person’s LCD. But once that cloud settled in, the show was pretty much over. After waiting nearly two hours for more sky we packed it in, but by then everyone was hooked, so we returned a couple of nights later to smashing success.
The processing for this image was minimal. In fact, what you see here is pretty much we all saw on our LCDs, with mostly minor tweaks. In Lightroom I brushed a little color temperature reduction to cool the sky, made some slight exposure adjustments, and bumped the clarity to help the stars stand out. In Photoshop I did moderate noise reduction with Topaz DeNoise (love the high ISO performance of my new 5D III) and dodged the underside of the trailing vapor plume a little. And so intense was the color in the clouds that I desaturated the red channel somewhat. None of these adjustments were major, and in fact I was already mostly satisfied with the raw image and Adobe Standard processing (my Lightroom default) that I started with.
The one significant adjustment I did make in Photoshop was to fix the blown highlights at the caldera’s core, at the very center of the fire where it burned hottest, an area the width of the fire in length and about 2/3 of that width high (about 3/4 of the bright area you see beneath the smoke). That core area, while yellow to my eyes, was hopelessly blown (no color or detail) by the extreme exposure the rest of the scene required. To fix it I used Photoshop’s Eyedropper tool to select the yellow just beneath the cooler orange, and the Paint Bucket tool at about 20 percent opacity to replace the pure white with (very) pale yellow.
The objective of any art form is not to show us exactly what we can all see with our own eyes, but rather to expand our perception of reality and and help us see the world differently. While this is not they way my eyes saw it, it is the way my camera saw it (with the one exception noted above). As with a moonbow that’s not visible to the naked eye, streaking stars or blurred water recorded with a long exposure, and the enhanced contrast and shape of a black-and-white image, the camera gives us fresh insights into the natural world. That’s why I choose not to lament perceived “limitations” such as my camera’s inability to capture the range of light my eyes see, preferring instead to celebrate its ability to reveal things my eyes can’t see—in this case faint stars and the fiery, natural light illuminating the clouds and Kilauea’s plume. Nothing can compete with the experience of being there, but I’m thrilled to have images to remind me of that experience, and to show me what my eyes missed.
* * * *
Join me next September as I try to duplicate this shot in my Hawaii Big Island Volcanoes and Waterfalls photo workshop, September 2-6, 2013.

