Eloquent Images by Gary Hart
Insight, information, and inspiration for the inquisitive nature photographer
Blue moon
Posted on July 30, 2015
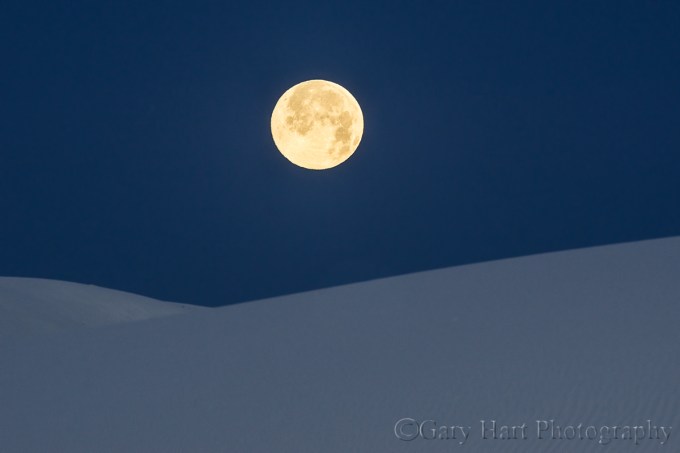
Dune Moon, White Sands National Monument, New Mexico
Sony a6000
Tamron 150-600 (Canon-mount with Metabones IV adapter)
1/8 second
F/11
ISO 400
As you no doubt know, the moon orbits Earth, which orbits the sun, and the percentage of the moon we see each night (its phase) changes with the angle connecting Earth, the moon, and the sun. The lunar cycle—the time it takes the moon to circle Earth and repeat a phase (due to Earth’s orbit of the sun, the moon actually has to travel a little more than a full circle to repeat a phase)—is about 29 1/2 days. Because our 12-month calendar cycles in almost the same time, averaging about 30 1/2 days until we return to today’s day next month, we usually have one full moon each month.
But every few years a coincidence of calendar and orbital geometry gives us a phenomenon that probably generates more attention than it deserves. Labeled a “blue moon,” the second full moon in a calendar month is a lot more rare than it is visually interesting, a fact that is lost on the media. Nevertheless, if you want to see the first blue moon since 2012 (the next one won’t happen until 2018), look to the sky Friday night (July 31, 2015), when July’s second full moon will be overhead. Just don’t expect it to look any different than any other full moon.
So what’s the deal with the moon in this image? Captured in the morning gloaming of White Sands National Monument, the blue dunes in this scene were colored by the short wavelengths of indirect sunlight. With the sun still well below the horizon, these blue and violet wavelengths are all the that’s able to survive the trip around Earth’s curve. Rather than white balancing my capture to give the scene a (misleading) daylight quality, I chose to allow the cool light to imbue the scene a more true twilight feel.
If you want to photograph the upcoming full moon at sunset, I suggest you go out Thursday (July 30), when the moon will rise about 45 minutes before sunset—if you wait until Friday evening, when the moon rises almost an hour later, you’ll likely struggle to capture simultaneous detail in the darkening landscape and the daylight-bright moon.
Or you could go out at sunrise tomorrow and Saturday mornings to photograph the moon as it sets in the west after sunrise. Friday’s moonset will be a little closer to sunrise, ideal if you have a fairly good view of the horizon (no high mountains or other obstructions); Saturday’s moon will set later, making it a little easier to photograph (fewer dynamic range challenges).
Learn more about full moon photography in my “Full Moon” photo tips article.
A full moon gallery
Click an image for a closer look, and a slide show. Refresh the screen to reorder the display.


The Secret Weapon for Overcoming Unsung Landscapes
Posted on July 24, 2015

Crescent at Sunset, Sierra Foothills, California
Sony a7R
Tamron 150-600 (Canon-mount with Metabones IV adapter)
1/6 second
F/9
ISO 800
I travel a lot. A lot. Don’t get me wrong—I know I’m incredibly fortunate to see and photograph the things I do, but sometimes it’s nice to be home. Despite the world-class locations I get to visit, I don’t cease being a photographer just because I’m home. I spend a lot of time exploring and photographing the unsung landscapes near home, landscapes that few would cross borders to photograph, but landscapes that I feel a particular connection to by virtue of a lifetime in California.
Look to the sky
The landscape is only half of an image. Since the best photography is usually more than simply a picture of a pretty thing, I always try to juxtapose my terrestrial subjects with an interesting sky. And unlike stationary terrestrial subjects, you can stand in one place and without moving, watch the sky do some pretty spectacular stuff: moon, stars, clouds, rainbows, whatever.
Sadly, as nice as California’s landscapes are, compared to most places, California has relatively boring skies. If I lived somewhere that gets summer thunderstorms (pretty much anywhere in the United States except the West Coast), I’d find a photogenic tree or creek, then make sure I was there the next time the sky did something special. But in California, I end up doing a lot of moon and star photography (not that there’s anything wrong with that).
Local favorites
My foreground options near Sacramento are rivers and oaks (and wildflowers in spring), and I particularly love our oaks (the rivers near town are often overrun with people). The criteria I use when searching for oaks to put with my sky images are a striking shape (with an oak, that’s usually a given), a distant vantage point that allows me to use a telephoto (to magnify to moon without losing most of the tree), and elevation that puts the tree against the sky instead of other hills and trees. Over the years I’ve collected a number of these spots, and will never tire of looking for more.
Chasing the moon
Last week I drove to the foothills east of Sacramento to photograph a thin slice of moon on the western horizon just after sunset. This wasn’t an exploration mission, it was specifically planned to take advantage of a spot I’d found earlier this year.
Unfortunately, (as I feared) the developers had found my spot too, and I arrived to find “my” trees surrounded by new homes in varying stages of completion—lucky for a handful of homebuyers, but not so much for all the rest of us who enjoy the foothills’ solitude and pristine views.

Tequila Sunset, Sierra Foothills, California

New Moon and Oaks, Sierra Foothills, California
Plan B
Just down the hill from this recently found-and-lost spot was the subject of my very first planned moon shoot, an oak-topped hillside that I’d photographed at sunset many years ago, decided that it would look really nice with a crescent moon, then figured out when to return.
But this time I found the moon far north (to the right) of its position all those years ago (the closer to the summer solstice, the farther north a crescent moon sets), and it soon became clear that only spot that would work was on a shoulderless, blind curve of a busy, two-land road. Compounding the difficulty, the moon this night was also closer to new (thinner and nearer the horizon), significantly shrinking my window of shooting opportunity, which limited the distance I could hike to get there in time. I made several passes in both directions before finding a safe(ish) place to park, then crammed my car all the way up against a tilting fence, two tires in a drainage ditch, and put on my hazard blinkers.
Why did the photographer cross the road?
Getting the alignment I wanted required crossing the road, scaling a barbed-wire fence, and traipsing through knee-high weeds. The knowledge that rattlesnakes pretty much rule these foothills made me acutely aware that the weeds were so thick that I couldn’t really see the landing spot for each step.
I photographed the entire scene with my Tamron 150-600 on my Sony a7R. As the moon dropped, sliding left to right, I moved forward along the fence line to control the relationship between the descending moon and the trees, starting with wider focal lengths that included some or all of the eight to ten trees capping the hill. Because my route dropped as I moved forward, the moon quickly fell into the trees from my perspective, allowing me to include the moon and trees increasingly tighter compositions.
For the night’s grand finale I found an alignment that cradled the moon in the silhouetted branches of a single tree, zooming to 600mm to magnify the moon and eliminate all but one tree. Because a 600mm focal length will catch even the slightest vibration, I went to 800 ISO to maximize my shutter speed in the deepening twilight. Once I shot this I actually rescaled the fence and darted back across the highway attempting to get the moon on the other side of the tree, but by the time I got everything aligned, the trees had been swallowed by the too-dark sky.
Your assignment…
Every location has features that set its landscape apart. Trees, rivers, lakes, mountains, hills, farmland—I could go on, but you get the point. Your local subject doesn’t need to be spectacular, because when the sky is spectacular, all you need is an interesting terrestrial anchor for your image.
The next time you find yourself with time to kill, explore your outskirts and identify unique subjects that you can add to a striking sky. Now, get to work!
Photo workshop schedule
A gallery of unsung landscapes
Click an image for a closer look, and a slide show. Refresh the screen to reorder the display.


Yosemite, weather or not
Posted on July 19, 2015

Clearing Storm, Glacier Point, Yosemite
Sony a7R
Sony/Zeiss 16-35
1/15 second
F/11
ISO 125
Photography weather and tourist weather are polar opposites: What’s good for photography—clouds, rain, snow—isn’t usually so great for being outside. This is especially true in Yosemite, where stormy weather can add an entirely new dimension to the park’s already renowned scenery (not to mention inclement weather’s crowd-thinning effect).
Sometimes Yosemite’s clouds simply diffuse the light, subduing shadows into a much more camera-friendly range, and extending the quality photography window. Other times, the clouds become subjects themselves, contorting into diaphanous curtains or towering pillars whose beauty rivals Yosemite’s granite icons. But rain or shine, there’s always something to photograph in Yosemite if you know where to look.
Wet weather gear
Regardless of the forecast, I never travel to Yosemite without my rain gear duffel containing everything necessary to keep me head-to-toe dry and focused on photography: hat, gloves, parka, rain pants, and waterproof boots for me, and an umbrella for my camera. I haven’t found a satisfactory rain cover for my camera, but a plastic garbage bag is quite handy for keeping the camera dry while it’s on my tripod but I’m not shooting (searching or waiting for a shot). Another essential wet weather accessory is a towel or chamois to dry any gear (especially the front of my lens) that gets wet despite my best efforts.

Elm in Blizzard, Cook’s Meadow, Yosemite
The teeth of the storm
Some of my favorite Yosemite photography has been in the teeth of the storm, when rain or snow has forced all but the most hardy indoors, and obliterated the recognizable landmarks, forcing me to look a little closer for subjects. A bonus during these extreme weather shoots are the occasional cameos by Yosemite’s star attractions (so stay alert).
My go-to mid-storm subjects in Yosemite include: the elm in Cook’s Meadow, the Cascade Creek waterfall above the bridge on Big Oak Flat Road (the road descending into Yosemite Valley from the Big Oak Flat entrance), Bridalveil Creek beneath Bridalveil Fall, Fern Spring and the Pohono Bridge, and El Capitan Bridge. But really, you’ll find shots wherever you look.
Clear skies
As much as I enjoy photographing in stormy weather, I don’t put my camera away when skies are clear. My favorite clear sky spots are the frequently shady locations on the south side of the valley, such as Bridalveil Creek and the forest near Fern Spring and the Pohono Bridge. Depending on the season (the closer to the winter solstice, the better), these spots can offer several hours of shade at the beginning and ends of the day.
Clear skies also open the door to night photography—all those popular spots that were packed with gawkers and washed out by the harsh midday light are peaceful and photogenic by moon- or starlight. My favorite moonlight (full moon) subjects are Yosemite Falls and El Capitan, because they’re the first to be illuminated by the rising moon—the face of Half Dome doesn’t get moonlight until the moon has dropped toward the western horizon, well after midnight on a full moon night. On the other hand, Half Dome does make a nice starlight subject because most views are to the east, where the sky is darkest before midnight. An unappreciated key to successful Yosemite night photography is finding a spot unsullied by headlights.
Midday in the summer, when it’s virtually impossible to find shade that’s not stained with sunlight, is a good time to break for lunch, take a hike, or (especially) explore.
Clearing storm

Warm Light, El Capitan Clearing Storm, Yosemite
Venture out to photograph during Yosemite’s harshest weather is the most reliable way to ensure a clearing storm opportunity. If you wait out the most miserable stuff by the fire, you risk missing the best stuff, which often happens with startling suddenness—for hours visibility might not extend beyond 100 yards, then you blink and there’s a rainbow.
With its bird’s-eye view east, up Yosemite Valley, Tunnel View is the most popular location to photograph a Yosemite clearing storm, but it’s easy to be so mesmerized by the show there that you miss all the great photography elsewhere. Because the west side of Yosemite Valley is where storms usually clear first, I often wait out the storm at Tunnel View, photograph its initial clearing there, then force myself to move on (believe me, it’s not easy to leave) while the shooting is still good.
The best subjects for a Yosemite clearing storm are the icons—El Capitan, Bridalveil Fall, Yosemite Falls, Half Dome—but not necessarily from the standard locations. Pretty much any spot with a view of one or more of these subjects will work, but I often try to include the Merced River and reflections.
Wet and dry seasons
Blue skies rule Yosemite’s summer, with clouds and rain the exception (but still possible). Yosemite’s wet season comes in late fall, winter, and and early spring, with rain and snow always a possibility. In general, in Yosemite Valley rain is far more common than snow, but snow can happen any month from November through April, with December, January, and February being your best bet (but some of my best snow experiences have come in November and April, and in 2015, Yosemite Valley didn’t get any significant snow until April).

Double Rainbow, Yosemite Valley
Rainbows
With its east/west orientation and primarily east-facing views, Yosemite is particularly well situated for afternoon rainbows. Tunnel View, Glacier Point, Valley View are great rainbow spots, but pretty much any valley location with a view of Half Dome, or a view of El Capitan’s west-facing wall, will work.
When the sun is lower than 42 degrees above the horizon (late afternoon in the long-day months, all day in winter), look for signs of clearing in the west (where the clearing usually starts). Sometimes you’ll see a few patches of blue, other times you’ll notice that the sky is brightening slightly. Find your shadow, which will point to the rainbow’s center (if there’s no shadow, draw an imaginary line from where you guess the sun is, through your position, and toward the scene opposite the sun)—if it’s not pointing toward anything interesting, move to another location—set up your shot, cross your fingers, and wait. And don’t forget to remove your polarizer, or orient it to maximize reflections (the opposite from the standard polarizer orientation) because an improperly oriented polarizer will erase your rainbow.
Winter wonderland
You know those images with every Yosemite feature draped in white? Those scenes happen just a handful of times each year (if

Winter Reflection, El Capitan, Yosemite
we’re lucky), and rarely last for more than an hour or two after the snow stops falling. So simply taking a trip to Yosemite in winter is very unlikely to net you fresh snow opportunity. In fact, even if you hear that it just snowed in Yosemite and beeline straight to the park, you’re almost surely too late.
To get that coveted Yosemite winter wonderland shot, you actually need to be there during the storm. And when the snow stops (see clearing storm reference above), move as quickly as you can, because the trees will begin shedding snow almost immediately.
Those of us within a reasonable driving distance of Yosemite have a distinct advantage if we’re good about monitoring the weather forecast. I look for storms with predicted snow levels below 4,000 feet, then try to arrive before the worst weather hits.
About this image
Because I avoid the crowds and blue skies of summer, I don’t make it to Glacier Point as frequently as I do locations in Yosemite Valley. But a few weeks ago my brother and I went to Glacier Point to photograph lightning, then hung around until the storm cleared.
Clearing Storm, Glacier Point, Yosemite
Unlike the California winter storm fronts that originate in the Pacific and sweep eastward across the Central Valley and into the Sierra, summer thunderstorms are usually borne of subtropical moisture encountering High Sierra convection and billowing into towering thunderheads above the Sierra crest. In the right conditions, these thunderstorms can slip far enough west to soak Yosemite Valley and stab the rim with jagged lightning.
At its most intense, the storm that afternoon nearly obscured Half Dome, completely drenching us. With the rain came lightning that soon chased us to the safety of the car. When things calmed we ventured back out to the vista to photograph the storm’s clearing. I can’t tell you how much fun it is to watch the shifting clouds that seem to create an entirely different image with each passing minute. For the this shot I waited for the cloud to part enough to reveal Nevada (above) and Vernal Falls, going wide to frame them with Half Dome on the left, and Mt. Starr King on the right.
The many faces of Yosemite weather
Click an image for a closer look, and a slide show. Refresh the screen to reorder the display.


Anticipating the exceptional
Posted on July 11, 2015

Morning Glory, Sunrise Clearing Storm, Yosemite Valley
Sony a7R
Sony/Zeiss 24-70
1/50 second
F/16
ISO 100
No one denies that an image records a single, unrepeatable instant. But just as each instant is the culmination of a series of connected preceding events, most images have their own history that can be traced backward, often months or years before the shutter clicked. The moon didn’t just materialize above Half Dome that evening, and a moonbow isn’t just some random event at the base of Lower Yosemite Fall—their appearance can be directly connected to celestial dance that was set in motion with the birth of our Solar System, and can be predicted with surgical precision (minus a few wild card variables like weather and water flow to keep photographers from getting too cocky).
Photographers spend a great deal of time trying to anticipate instants like these. We start with the common-knowledge stuff, things like the February sunset light on Horsetail Fall, a shaft of summer light slanting in Upper Antelope Canyon, or a moonbow in the spring mist billowing beneath Lower Yosemite Fall. But the precision of the celestial choreography that delivers light shafts to slot canyons and moonbows to waterfalls is just as predictable for anonymous hidden trees, lakes, and peaks. Iconic or undiscovered, each of these spectacles are the convergence of location and predictable natural processes just waiting to be appreciated (and photographed!).
Image planning isn’t limited to the sun, moon, and stars. Understanding and monitoring a favorite location’s weather can put you in the right place, with the best chance to add a rainbow, lightning bolt, or fresh snow. And simply finding a complementary foreground/background alignment that connects two or more terrestrial subjects can elevate an image to the next level.
Rather than a fortuitous right-place, right-time convergence, the creative aspect of many images starts long before capture. When I find a new location, or identify a potential subject, my brain immediately starts spinning on the ways I can make it better. Can I align it with another foreground or background subject? What natural phenomena will take the scene to the next level, and how I can be there when it happens?
For example…

Bridalveil Dogwood, Valley View, Yosemite
Before capturing my image of a raindrop-festooned dogwood flower with Bridalveil Fall in the background, I had long visualized a scene somewhere in Yosemite that featured a dogwood bloom aligned with a soft-focus but recognizable Yosemite landmark. I knew I’d need overcast skies that would illuminate the entire scene with diffuse, soft light, then filed my vision away until the next time the forecast predicted clouds during the short window the dogwood bloom in Yosemite.
On my drive to the park, I started mentally working on locations where I might be able to align a dogwood with a recognizable Yosemite subject, the lens I’d use, the amount of background sharpness I wanted, and so on. Once I was in the valley, I was able to conduct a pretty orderly search that eventually led me to this flower near Valley View.
Sometimes bringing my ideas to fruition requires a lot more research, planning, and patience. I’ll start with a scene that appeals to me, then mentally add something that I think will take it to the next level. A moon? Stars? A rainbow? Lightning? Fresh snow? Maybe all of the above (so far not at the same time, sadly).
The moon and stars are a relatively straightforward matter of plotting angles and timing (and hoping the weather cooperates). On the other hand, weather phenomena, such as rainbows, lightning, and snow, require an understanding of the processes behind them, careful and persistent monitoring of long- and short-term weather forecasts (only the National Weather Service for me), and a lot patience while waiting for the moment to arrive. Then, when the moment does arrive, I need to move quickly and not allow myself to be swayed by fear of failure (always a distinct possibility).
For example…

Double Rainbow, Tunnel View, Yosemite
I’d long fantasized about adding a rainbow arcing over Yosemite Valley to the already breathtaking Tunnel View scene. And being a lover of rainbows and a photographer, I’d long ago taken the time to become extremely aware of the why, where, and when of rainbows. Which is how, on a spring afternoon a few years ago, I was in perfect position when my rainbow fantasy came true.
I was in Yosemite to meet customers for dinner, and to plan the next day’s guided tour of the park. But when my mostly sunny drive up the Merced River Canyon turned to rain as I entered Yosemite Valley, my mental wheels started turning—Yosemite weather almost always moves west-to-east, which meant soon Yosemite Valley would have rain on the east side and sunlight low on the western horizon. It wasn’t hard to rearrange my customers’ priorities, and this was our reward.
Celestial phenomena are wonderfully predictable, so much so that I make very few non-spontaneous photo trips without factoring in the moon and/or Milky Way. (My spontaneous trips are usually spurred by the weather forecast.) And there are few locations I photograph that I can’t tell you the altitude and azimuth necessary to align a the sun, moon, or Milky Way with the location’s most prominent feature.
Hawaii, Death Valley, Mono Lake, Alabama Hills (Mt. Whitney), plus many personal favorite subjects near home—I know exactly where I want to be and when I want to be there, and do my best to make it happen, sometimes planning several years in advance. In Yosemite my terrestrial subject is usually Half Dome, and and my celestial subject is usually a rising moon. And depending the direction of the moon’s arrival, I have an array of locations that I know will align with the moon’s appearance.
For example…

Rising Crescent, El Capitan and Half Dome, Yosemite
Tunnel View is my favorite location for photographing a Yosemite moonrise, but it’s not my only location. Across the Merced River Canyon on Big Oak Flat Road is Half Dome View, a turnout vista with a slightly different, less popular view of Half Dome and El Capitan.
From Half Dome View, the visual distance separating the two monoliths is quite narrow, meaning an extremely small margin of error for a photographer hoping to catch the moon splitting the gap. But the idea had always intrigued me, so I went to work with my plotting method (I do it manually using topo maps, moonrise tables, and an HP-11C scientific calculator that does trig functions).
When I discovered that a crescent moon would indeed split this gap before sunrise on a certain May morning in about a year, I started a plan of attack. Despite the fact that I’d never photographed a moonrise from this location, and even the slightest error in computation would foil the attempt, I went ahead and scheduled a workshop for this date. Try to imagine my anxiety as the day approached and the realization that failure wouldn’t just impact me, it would impact my entire group, really started to sink in. And imagine my euphoria (not to mention everyone with me) that morning when the moon slid into the gap, right on schedule.
When photography’s less than ideal, I might leave the camera in my bag, but I don’t stop being a photographer. I spend a lot of non-camera time scouting locations, looking for complementary subjects that I can align with the grand scene. If my primary subject is in the foreground, I add move around until I can align it with a complementary background. And when my subject is in the distance (like Mt. Whitney from the Alabama Hills, or Yosemite Valley from Tunnel View), I spend a lot of time exploring the nearby terrain in search of subjects I can align with the grand primary scene.
When I find a subject that merits something exceptional, I try to wait until I can enhance it with similarly exceptional natural phenomenon.
For example…
Morning Glory, Sunrise Clearing Storm, Yosemite Valley
When I “discovered” this tree, it was love at first sight. But rather than photograph it in the more conventional quality light conditions that are fairly easy to anticipate, or wait for one of Yosemite’s inevitable exceptional but fairly regular moments, I saved my discovery for something truly extraordinary. And, after about ten years of waiting for location, light, conditions, and circumstances (this spot is too small and dangerous for a group), extraordinary finally happened this April.
Anticipating snow, I’d traveled to Yosemite the previous afternoon. A little snow had fallen earlier that day, and while the storm had passed, its cloudy vestiges lingered overhead and in the valley below. While not the winter wonderland I’d hoped for, there was enough snow still hugging the trees that I found some very nice images. Nice enough, in fact, that I’d have been completely satisfied with my captures if my trip had ended right then. But I wasn’t done.
Because more snow was promised overnight, I got a room nearby and returned the next morning. I wasn’t too far into my drive back into the park before it became clear that I was in for something special. The snow had just stopped, and while there wasn’t a lot of snow, the air was cold enough that I knew until the morning sunlight made it all the way down into Yosemite Valley, everything would remain in a state of suspended animation. And the clouds that had deposited the snow were doing their typical slow-clear dance on the valley floor.
I first stopped at a spot along the Merced River and photographed dogwood and El Capitan. I got so caught up in that scene that I lost track of the time and didn’t give myself a lot of time for my next stop, up the hill at “my” tree (that I often check but rarely photograph). I also realized that given the light snowfall on the valley floor, I’d severely underestimated the amount of snow that had fallen just a few hundred feet up the hill from Yosemite Valley.
I found an entire world covered with white, and the sun about ready to pop up over Sentinel Dome—once the sun arrived, I’d only have about 60 seconds of quality photography before the sun overpowered the scene. I quickly grabbed my gear and scrambled up to the tree. Fortunately, I’d photographed here the previous afternoon, so I didn’t really have to hunt for a composition (generally a fairly painstaking, trial-and-error process). With the sun about to appear, I knew I’d need to do a sunstar and set my aperture accordingly. Without a lot of time to play with the exposure, I made the snap judgement to spare the highlights and hope I could recover the shadows laters, and click.
This image was literally the first click I made of the scene this morning—subsequent captures showed increasingly blown highlights as the sun rose into the scene. On my LCD this image looked severely underexposed, but I trusted the histogram on my a7R, which indicated there was indeed detail in the shadows. (Yes, I know I could have accomplished it by bracketing and blending multiple exposures, but I’m a one-click guy.) And when I finally found the courage to process the image, I held my breath as I grabbed the Lightroom Shadows slider and watched my scene appear.
A gallery of “planned” images
Click an image for a closer look, and a slide show. Refresh the screen to reorder the display.


Photographic vision: Motion
Posted on July 6, 2015
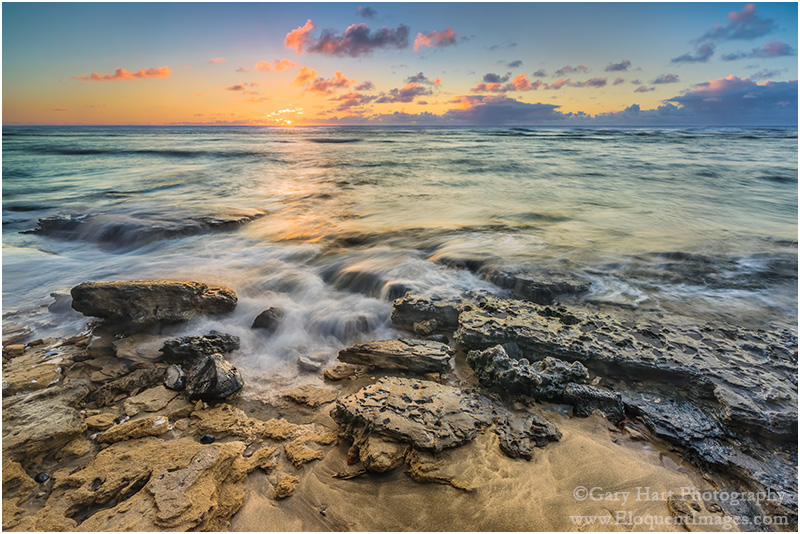
Sunset on the Rocks, Ke’e Beach, Kauai
Sony a7R
Sony/Zeiss 16-35
1 second
F/18
ISO 50
True story
I once had a photographer tell me that he didn’t like blurred water images because they’re “not natural.” The conversation continued something like this:
Me: “So how would you photograph that waterfall?”
Misguided Photographer: “I’d use a fast shutter speed to freeze the water.”
Me: “And you think that’s more natural than blurred water?”
Misguided Photographer: “Of course.”
Me: “And how many times have you seen water droplets frozen in midair?”
Misguided Photographer: “Uhhh….”
Photographic reality
The truth is, “natural” is a target that moves with the perspective. Humans experience the world as a 360 degree, three-dimentional, multi-sensory reel that unfolds in an infinite series of connected instants that our brain seamlessly processes as quickly as it comes in. But the camera discards 80 percent of the sensory input, limits the view a rectangular box, and compresses those connected instants into a single, static frame. In other words, it’s impossible for a camera to duplicate human reality—the sooner photographers get that, the sooner they can get to work on expressing the world using their camera’s very different but quite compelling reality.
Despite the creative opportunities in their hands (or on their tripod), many photographers expend a great deal of effort trying to force their cameras closer to human reality (HDR, focus blending, and so on)—not inherently wrong, but in so doing they miss opportunities to reveal overlooked aspects of our complex natural world. Subtracting the distractions from the non-visual senses, controlling depth of focus, and banishing unwanted elements to the world outside the frame, a camera can distill a scene to its overlooked essentials, offering perspectives that are impossible in person.
Motion
While a still image can’t display actual motion, it can convey an illusion of motion that, among other things, frees the viewer’s imagination and establishes the scene’s mood. Nothing like our experience of the world, a camera can freeze the extreme chaos of a single instant, or combine a series of instants to convey a pattern of motion.
Combining creative vision and technical skill, a photographer chooses where on the continuum that connects these extremes of motion will fall: The sudden drama of a crashing wave, or the soothing calm of soft surf; the explosive power of a plunging river, or the silky curves of tumbling cascades. Or perhaps someplace in the midrange of the motion continuum, stopping the action enough that discrete elements stand out, but not so much that a sense of flow is lost.
Blurred water
One question I’m quite frequently asked is, “How do I blur water?” And while there’s no magic formula, no shutter speed threshold beyond which all water blurs, blurring water isn’t that hard (as long as you use a tripod). In fact, when you photograph in the full shade or cloudy sky conditions I prefer, it’s usually more difficult to freeze moving water than to blur it (which is why I have very few images of water drops suspended in midair).
In addition to freezing motion or revealing a pattern of motion, an often overlooked opportunity is the smoothing effect a long exposure has on choppy water. I photograph at a lot of locations known for their reflections, but sometimes I arrive to find a wind has stirred the water into a disorganized, reflection thwarting frenzy. In these situations a long exposure can often smooth the chop, allowing the reflection to come through. Rather than the mirror reflection I came for, I get an ethereal, gauzy effect still captures the reflection’s color and shape.
The amount of water motion blur you get depends on several variables:
- The water’s speed—the faster the water, and the (especially) the more whitewater (green water, no matter how fast it’s moving, doesn’t usually display obvious motion blur), the greater the blur
- Your focal length—the longer the focal length, the greater the blur
- Your distance from the water—the closer the water, the greater the blur
- And of course, the shutter speed—the longer your shutter is open, the greater the blur
Of these variables, it’s shutter speed that gets the most attention. That’s because focal length and subject distance are compositional considerations, and we usually don’t start thinking about blurring the water until after we have our composition. (This is as it should be—when composition doesn’t trump motion, the result is often a gimmicky image without much soul.)
You have several tools at your disposal for reducing the light reaching your sensor (and thereby lengthening your shutter speed), each with its advantages and disadvantages:
- Reducing ISO: Since you’re probably already at your camera’s native ISO (usually 100), this option usually isn’t available. Some cameras allow you to expand the ISO below the native value, usually down to ISO 50. That extra stop of shutter duration you gain comes with a (very) slight decrease in image quality—most obvious to me is about 1/3 stop of dynamic range lost.
- Shrinking your aperture (larger f-stop value): A smaller aperture also buys you more depth of field, but it also increases diffraction. Also, lenses tend to be less sharp at their most extreme apertures. As a general rule, I resist going with an aperture smaller than f11 unless it’s absolutely necessary. That said, I often find myself shooting at f16 (and only very rarely smaller), but it’s always a conscious choice after eliminating all other options (or a mistake).
- Adding a polarizing filter: In addition to reducing reflections, a polarizer will subtract 1 to 2 stops of light (depending on its orientation). When using a polarizer you need to be vigilant about orienting it each time you recompose (especially if you change your camera’s orientation), and monitoring its effect on the rest of your scene.
- Adding a neutral density filter: A neutral density filter is, as its name implies, both neutral and dense. Neutral in that it doesn’t alter the color of your image; dense in that it cuts the amount of light reaching your sensor. While a dark enough ND filter might allow you to blur water on even the brightest of days, it does nothing for the other problems inherent in midday, full sunlight shooting. ND filters come in variable and fixed-stop versions—because I prefer the flexibility of variable NDs (the ability to dial the amount of light up and down), I live with the vignetting they add to my wide angle images.

Before Sunrise, South Tufa, Mono Lake
Here a 3-second exposure smoothed a wind-induced chop and restored the reflection.
Because blurring water depends so much on the amount of light reaching your sensor, I can’t emphasize too much the importance of actually understanding metering and exposure, and how to manage the zero-sum relationship between shutter speed, aperture (f-stop), and ISO.
Read my Exposure basics Photo Tips article
I use Singh-Ray filters
Bracketing for motion
Back in the film days, we used to bracket (multiple clicks of the same scene with minor adjustments) for exposure. But in today’s world of improved dynamic range and pre- and post-capture histograms, exposure bracketing is (or at least should be) limited to photographers who blend multiple exposures. Today I only bracket for scene changes that will give me a variety of images to choose between later.
Often my scene bracketing is for depth of field, as I run a series of clicks with a range of f-stops, then decide later whether I want a little or a lot of DOF. But my most frequent use of scene bracketing is to capture a variety of water motion effects. I start by finding a composition I like, then adjust my shutter speed (compensating for the exposure change with ISO and/or f-stop changes) to get different motion blur.
River and stream whitewater is usually (but not always) fairly constant, so my adjustments are usually just to vary the amount of motion blur. But when I’m photographing waves, the timing of the waves is as important as the motion blur. It helps to stand back and observe the waves for a while to get a sense for any patterns. Watching the direction of the waves and the size of the approaching swells not only allows me to time my exposures more efficiently, it also keeps me safe (and dry).
Star motion
Few images validate the power of the camera’s unique vision better than a scene etched with the parallel arcs of rotating stars (yes, I know it’s actually not the stars that are rotating). Nothing like human reality, the camera’s view of the night sky is equal parts beautiful and revealing. (Can you think of a faster, more effective way to demonstrate Earth’s rotation than a star trail image?)
Here are the factors that determine the amount of stellar motion:
- Exposure duration: The longer your shutter is open, the more motion your sensor captures.
- Focal length: Just as it is with terrestrial subjects, a longer focal length shrinks the range of view and magnifies the stars that remain.
- Direction of composition: Compositions aimed toward the North or South Poles will display less star motion than compositions aimed toward the celestial equator. That’s because, due to Earth’s rotation on its axis (an imaginary, infinite line skewering our North and South Poles), everything in the sky rotates 360 degrees, around the Poles, in 24 hours. But the farther a star is from a Pole, the greater the visual distance it needs to cover to complete its circuit (it appears to move faster).
As with water motion, you can choose between a long exposure that exaggerates stellar motion, or a shorter exposure that freezes the stars in place to display a more conventional night sky (albeit with more stars than our eyes can discern).
Read more in my Starlight photography Photo Tips article
So what’s the point?
In the static world of a photograph, it’s up to the photographer to to create a sense of motion. Sometimes we achieve this with lines that lead the eyes through the scene, but even more powerful is an image that uses motion to tap its viewers imagination. Your handling of the motion in your scene is a creative choice that’s enabled by your technical skill.
For example
I captured this beach sunset at Ke’e Beach on Kauai last month while co-teaching a workshop with Don Smith. I’ve photographed enough at Ke’e to know there are a couple of very different options there. One option is to follow a short trail west, toward the Na Pali Cliffs, to a rocky section of coast where the waves crash and large, rounded boulders predominate. But I’ve always preferred the calmer scene to the east, along the smooth beach, where the water is shallow and the surf laps gently at wave-carved sand and basalt.
So while Don led most of the group toward the rocky shore, I guided a small handful of outliers about a quarter mile in the other direction, up the beach, beyond the activity and around a bend until we had the pristine beach to ourselves. After a little time spent trying assemble the scene’s variables into a cohesive composition, we settled down and went to work. I finished with several dozen clicks of this composition, or something quite similar, each with different wave action—approaching, breaking, receding—and motion ranging from still to extreme blur.
A gallery of motion
Click an image for a closer look, and a slide show. Refresh the screen to reorder the display.


