Eloquent Images by Gary Hart
Insight, information, and inspiration for the inquisitive nature photographer
Should I or shouldn’t I?
Posted on February 25, 2018

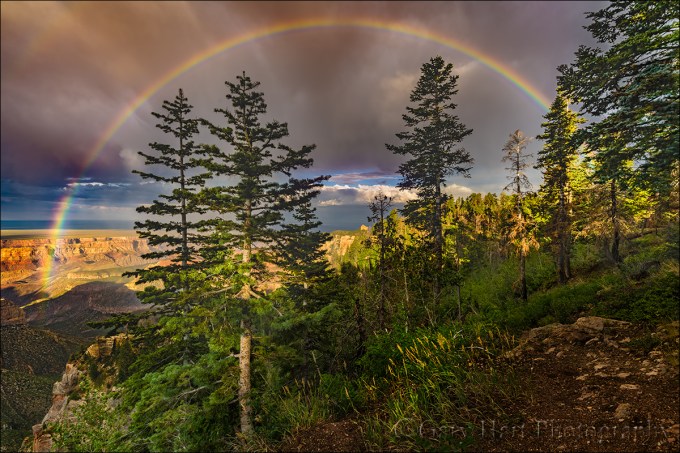
Nature’s Prism, Rainbow Above Marble Canyon, Roosevelt Point, Grand Canyon
Sony a7R II
Sony/Zeiss 16-35
1/60 seconds
F/11
ISO 100
I get a lot of questions in the field during a photo workshop, but about 80% of them are some version of, “Should I do it this way or that way?”:
- “Should I use a polarizer (or not)?”
- “Should I shoot this horizontal or vertical?”
- “Should I shoot this wide or telephoto?”
- “Should I include that rock or leave it out?”
- “Should I…?”
Sometimes people seem so paralyzed by these choices, it seems they’d rather do nothing than make a mistake. Or maybe they’re inhibited by the subconscious belief that we must conserve resources at all costs. From our earliest years, we were admonished to not waste things: don’t leave the water running, turn of the light when you leave the room, clean your plate, and a host of other waste-related rules. Adding to our formative-years stress, when we recovering film shooters got our first adult cameras, already rendered destitute by the new equipment, we were suddenly punched in the wallet by the cost of film and processing. It’s no wonder we try to spare every frame.
Of course conserving resources is important, today more than ever. But my question for digital photographers is, exactly what resources are you conserving? Here’s a revolutionary thought: While every click with a film camera costs money, every click with a digital camera increases the return on your investment. That’s right: every time you take a picture with your digital camera, your cost per click drops.
I’m not suggesting that you put your camera in continuous shooting mode and fire away*. But I am encouraging you to shoot liberally, with a purpose. And there’s no law that says that purpose must be a successful image.
For example, a click can just be a way to get in the mood, or to determine whether there really is a shot there (I don’t always know whether a scene is worth working until I’ve clicked a couple of frames). And I frequently play “what-if?” games with my camera (“I wonder what would happen if I do this…”). I’d be mortified if people saw some of these what-if? images, but I often learn from them. Sometimes I simply learn what not to do, but often I see enough to understand why it didn’t work, and end up with ideas for how it might work the next time.
I usually use my first click the way I use a draft when I’m writing: rather than a completed masterpiece, my goal for the first few clicks of a scene is a foundation to incrementally refine until I reach the finished product. Or when I’m not sure of the best way to handle a scene, I shoot it multiple ways to defer the decision until I view the image on a large monitor.
At the very least, especially when photographing a scene that especially thrills you, shoot it with as much variety as time permits: horizontal/vertical, wide/tight, and as many perspectives as you can come up with. I mean, you never know when a magazine might want a vertical version of the horizontal Grand Canyon rainbow image you just installed on the wall of the local bank.
Photography often requires instantaneous choices, and Nature doesn’t always wait until you’re ready. So because you can’t always have a pro photographer whispering in your ear every time you’re out with your camera, any time you find yourself wondering whether you should or shouldn’t shoot a scene one way or another (or another, or another, or…), just shoot it both ways and rest easy.
* True story: I once had a woman in a workshop put her Nikon D4 in continuous shooting mode, hold the camera in front of her, depress the shutter button, and spin. When I asked her what in the world she was doing, she replied, “It’s Yosemite—there’s bound to be something good in there.”
About this image
I captured this rainbow about 15 minutes after capturing the rainbow in my February 18 post. Pulling into Roosevelt Point a few miles down the road from Vista Encantada (and the earlier rainbow), we were still very much in rush mode. I didn’t have a lot of opportunity to apply my deliberate, what-if?, multiple draft approach. But I did have time to flip my camera and shoot a variety of compositions before the rainbow faded. I started with the wider vertical and horizontal frames you see here, then moved on to tighter compositions.
Grand Canyon Photo Workshops
Grand Canyon Rainbows
Click an image for a closer look and slide show. Refresh the window to reorder the display.


Under the Influence
Posted on February 20, 2018

Winter Light, Yosemite Valley
Sony a7RIII
Sony 100-400 GM
ISO 100
f/10
1/20 seconds
Happy Birthday, Ansel Adams
Ansel Adams’ influence on photography is impossible to measure. Not only Adams’ influence on photographers, but his influence on the viewers of photography as well. Ask 100 people to name a photographer and 99 will name Ansel Adams; ask them to name a second photographer and you’ll get 99 different names.
Through his use of relationships, perspective, and tones, Adams’ images masterfully emphasized light and shape to guide viewers’ eyes and emphasize aspects of his scenes that he found most compelling. An entire generation’s relationship with nature was unconsciously shaped by the prints of Ansel Adams, not because they showed the world as we already knew it, but because they showed us the world in new and exciting ways.
Now that I’m a photographer, Adams’ influence manifests most in the freedom to render the natural world as my camera sees it, liberating me from the impossible task of duplicating human vision. The camera and the eye experience the world differently; rather than fight that difference, Adams’ photography celebrated it.
Today’s photographers perpetuate Adams’ vision with the help of far more advanced tools, tools so advanced that it’s easy to overlook the foundation he laid for us. On blogs and forums I see some rolling their online eyes at all the Ansel Adams adulation, discounting his influence and labeling his photography pedestrian and prosaic when compared to current efforts: “What’s the big deal?” they say. To those dubious photographers I respond, criticizing Ansel Adams’ by comparing his monochrome masterpieces to the striking, vivid, blended, and stitched images captured today is like criticizing Lewis and Clark for toiling more than two years on a route that can now be traveled in a few days.
About this image
Last week’s Yosemite Horsetail Fall workshop wrapped up at one of my favorite spots in Yosemite Valley, a spot I’ve photographed so many times that it’s an enjoyable challenge to find something unique. The light on Half Dome that evening was beautiful, but nothing I hadn’t seen before. Rather than settle for the beautiful but conventional shots of Half Dome and its reflection, I scanned the scene for quality light elsewhere.
It wasn’t long before my gaze landed on a small stand of deciduous trees, stripped bare by winter cold, basking in the warm rays of the day’s last sunlight. As I pondered the scene, a rogue beam slipped through to illuminate the crown of a single evergreen, punctuating the otherwise monochrome scene with a splash of color.
Though my eyes could see a confusion of textured granite and tangled branches in the dark background shadows, I knew that detail would be nothing but a distraction in an image. But as Ansel Adams so magnificently demonstrated, an image’s full potential isn’t realized unless the finished product, and the processing required to get there, is visualized and executed at capture.
Well aware of late afternoon light’s ephemeral nature, I quickly mounted my Sony 100-400 GM lens to my tripod, attached my camera, and framed my composition. Taking advantage of the camera’s limited dynamic range (when compared to human vision), I gave the scene just enough light to reveal the sunlit trees. Given my a7RIII’s extreme dynamic range, I knew I could pull detail from the shadows in Photoshop if I wanted to, but in this case I went the other way. Processing the image in Lightroom on my computer, I enhanced the contrast, banishing the distracting background to virtually black shadows, leaving only the shape and light that drew my eye in the first place.
Workshop Schedule || Purchase Prints
Influenced by Ansel Adams


, California")


Weather or not
Posted on February 18, 2018
Heaven Sent, Vista Encantada Rainbow, Grand Canyon
Sony a7R II
Sony 12-24 f/4 G
1/60 second
F/11
ISO 100
When the weather gets crazy, do you sprint for cover or reach for your camera? Your answer may be a pretty good indicator of your success as a landscape photographer. It’s an unfortunate fact that the light, color, and drama that make the most memorable landscape photos all come when most sane people would rather be inside: at sunrise, when the rest of the world is asleep; at sunset, when everyone else is at dinner; and during wild weather, when anyone with sense is on the sofa in front of the fire.
Not only do clouds keep tourists at bay, they’re usually a prerequisite for the best nature photography. Whether they simply diffuse sunlight to subdue extreme contrast into something much more camera-friendly, or contort themselves into diaphanous curtains and towering pillars that are subjects themselves, clouds are a photographer’s friend.
And with clouds, often comes rain. But the photographer willing to go out in the rain is also the photographer who captures lightning, rainbows, and vivid sunsets and sunrises. The key to photographing in rain is preparation. Regardless of the forecast, I never travel without my rain gear duffel that contains everything necessary to keep me dry and focused on photography: waterproof hat, gloves, parka, rain pants, and boots for me, and an umbrella for my camera. My go-to rain cover is a plastic garbage bag that keeps my camera and lens dry when I’m searching or waiting for a shot. The final essential wet weather accessory is a towel or chamois to dry any gear (especially the front of my lens) that gets wet.
Covered head-to-toe with my waterproof wardrobe, I’m ready to photograph whatever Mother Nature delivers. When I’m ready to shoot, my umbrella always comes out first, then off comes the bag and into a pocket. With one hand managing the umbrella, I have one hand free to compose, expose, focus, and click.
When the wind blows it’s often difficult to manage an umbrella and keep my lens free of water droplets. Since my Sony bodies are sufficiently sealed (as are many other mirrorless and DSLR bodies and lenses), I don’t worry about raindrops (but make sure you have the hot-shoe cap in place). Sometimes, when the wind is too extreme, I even briefly set the umbrella aside (but not too far). Once my composition, exposure, and focus are set, I point the umbrella’s convex side into the wind and lower it until it’s right on top of the camera (for maximum rain protection), pull out my towel and dry the front of the lens (and the rest of the camera and lens too if it’s raining hard), then lift the umbrella and click simultaneously (before more droplets land on my lens).
Learn more
- How to photograph rainbows
- How to photograph lightning
About this image
Last summer’s Grand Canyon Monsoon workshop group had already had a great day. Following a nice sunrise at the always beautiful Point Imperial, we spent two hours on the Grand Canyon Lodge view deck photographing a spectacular electrical storm that delivered multiple lightning captures to everyone in the group. Here’s a sample of the day’s bounty to this point:
When the storm moved too close and drove us inside to safety (we’re resilient and adventuresome, not stupid), it would have been easy to rest on our laurels and call it a day. I mean, who likes getting rained on?
Photographers, that’s who. Don Smith and I herded the group into the cars and headed to Cape Royal Road, where we could follow the Grand Canyon’s East Rim above Marble Canyon all the way to Cape Royal. Knowing that monsoon showers are fairly localized, the plan was to drive out of the cell that was dumping on us at the lodge and either shoot back at it, or (more likely) find another cell firing out over the canyon. In the back of my mind though was the hope for a rainbow above the canyon—dropping in west, the sun was perfectly positioned for rainbows in the east.
The rainbow appeared just after we passed the Point Imperial Road junction, arcing above the forest. Climbing through the trees toward the rim and its views of Marble Canyon, my urgency intensified with the rainbow’s vivid color, but we were stuck behind a meandering tourist who clearly had different priorities. As tempted as I was to pass him, I knew with three more cars following me, that would be a mistake. So we poked along at a glacial pace. After what seemed like hours, the rainbow was hanging in there as we pulled into the Vista Encantada parking area and screeched to a halt—I swear everyone was out of the car and scrambling for their gear before I’d come to a complete stop.
With a full rainbow above an expansive view, I opted for my Sony 12-24 lens on my a7RII, but immediately began to question that choice. While Vista Encantada offers a very pretty view, it’s not my favorite view to photograph because of all the less-than-photogenic shrubbery in the foreground—a telephoto lens would have worked better to eliminate the foreground. But I wanted more rainbow. So after a few failed attempts to find a composition at the conventional vista, I sprinted into the woods in search of something better. This turned out to be a wise choice, as the shrubs here were replaced with (much more appealing) mature evergreens.
In a perfect world I’d have had an unobstructed view into the Grand Canyon, but the world is rarely perfect. I decided to use the nearby trees as my foreground, moving back from the trees just far enough for the rainbow to clear their crowns, then left as far as the terrain permitted, separating the two left-most trees. Composing wide enough to include the trees top-to-bottom also allowed me to include all of the rainbow—suddenly my 12-24 lens choice was genius!
After finishing at Vista Encantada we continued down the road and photographed another rainbow from Roosevelt Point, before wrapping up the day with a sunset for the ages at Cape Royal. A great day indeed, all thanks to weather that would have kept most tourists indoors.
Grand Canyon Photo Workshops
Rainbows, Lightning, and So Much More
A Grand Canyon Monsoon Gallery
Click an image for a closer look and slide show. Refresh the window to reorder the display.


Static Juxtaposition
Posted on February 9, 2018

Framed Sunset, Mt. Whitney and Mobius Arch, Alabama Hills
Sony a7R III
Sony 12-24 f/4 G
.8 seconds
F/11
ISO 100
My previous post was about dynamic juxtaposition in landscape photography—combining static landscape subjects with transient meteorological and celestial elements. The other side of the juxtaposition coin I call static juxtaposition: combining stationary landscape objects. I am a little reluctant to use the word “static” because there is one element that absolutely can’t be static in these compositions: You.
Since I don’t photograph people or wildlife, I often joke that I don’t photograph anything that moves. And because of this, I need to create motion by encouraging my viewers’ eyes to move through my frame, either providing a path for their eyes to follow and/or a place for them to land. Accomplishing this with static subjects isn’t necessarily difficult, but it does require some physical effort.
Most photographers don’t have a problem getting themselves to the general locations that align foreground and background subjects, but many get a little lazy once they’re there, planting their tripods clinging to the spot like a ship an anchor.
Once I’ve arrived at a location and identified my primary subject, I challenge myself to find at least one other element on a different plane. Sometimes that’s easy, other times…, not so much. Nevertheless, when my subject is in the distance, I look for something closer that has visual weight; likewise, if my subject is nearby, I want something with visual weight in my background. Visual weight is something that pulls the eye: a flower, tree, shrub, leaf, reflection, rock—I could go on, but you get the point. Sometimes it’s not even a distinct entity, but rather a pattern, texture, color, or splash of light.
My secondary subject can have strong aesthetic value or not—sometimes it’s there simply to balance the frame, while other times it has almost as much visual appeal as my primary subject. Regardless of its visual strength, my secondary subject’s placement, both in the frame and relative to the scene’s other visual elements, can make or break an image. And lacking a forklift, pretty much the only way to change the relative position of two static objects in a photographic frame is carefull positioning of the camera (and the photographer behind it!).
Some guidelines
As a general rule I avoid merging my essential visual elements—to do conflates those elements and sacrifices the illusion of depth that’s so essential in a two-dimentional image. Another thing I try to avoid is objects with visual weight at the edge of my frame because anything that pulls my viewers’ eyes toward the image’s boundary dilutes its impact.
Viewers’ eyes move most effectively through a scene by following lines. Sometimes those lines are tangible, like a horizontal horizon, vertical waterfall, or diagonal river. But often it’s up to me to create virtual lines—an implicit, connect-the-dots path between visual elements, or textures and shapes that frame my primary subject and constrain my viewers’ eyes. For example:

Diagonal: This is a strong visual connection because the line created traverses the frame’s top, bottom, left, and right hemispheres.

Linear (yes, I know a diagonal line is linear too): I often do this in a vertical composition to guide the eye to my primary subject. Here I use floating autumn leaves to guide my viewer straight to Half Dome.

Circular: Okay, maybe not literally a circle, more of a frame that surrounds the primary subject. In this case I framed Half Dome and its reflection with the color and texture of grass, spring foliage, and vertical tree trunks.
For example
Last week I was at Mobius Arch beneath Mt. Whitney, the final stop of my annual Death Valley photo workshop. After three days of spectacular Death Valley sunrises and sunsets that seem to be trying to outdo the one before it, I didn’t dare to hope that the string would continue when we moved to the Alabama Hills.
The real show here is sunrise, when day’s first rays of sun color the Sierra Crest with alpenglow’s pink hues, even on clear sky mornings. Sunsets here require a little help. The view here faces west, so at sunset you usually find yourself photographing the shaded side of your subjects against the brightest part of the sky—not really a recipe for success. But a few clouds on the western horizon not only add color and texture, they soften the light. And that’s what happened last week.
Before sunset the thin, translucent cirrus layer was lost in the late afternoon glare, but as the sun dropped below the horizon, the clouds picked up its refracted long wavelengths and colored the sky deepening shades of red. Soon the color was so intense that it shaded weathered granite boulders.
The three elements I wanted to feature in my composition were Mobius Arch, the Sierra Crest (Lone Pine Peak and Mt. Whitney), and the colorful sky. As dramatic as the Sierra Crest is, the star of this scene is the arch. With no real access to a telephoto view, filling my frame with the arch means a wide angle lens that includes too much sky. But the vivid color this evening gave me a rare opportunity to include a sky worthy of the rest of the scene.
My Sony 12-24 f/4 G lens allowed me to within a couple feet of the arch while still fitting it in my frame. With the Sierra Crest framed by the arch, I was careful to position myself so both Lone Pine Peak (on the left) and Mt. Whitney (on the right) were visible. Finally, I needed to decide the camera height. When the sky is less interesting, I raise my camera to fill the arch’s opening with the mountains and minimize the sky. But this evening the colorful sky was an asset, so I dropped as low as I could to maximize it.
At such a wide focal length, depth of field was a piece of cake—I didn’t need to check my hyperfocal app to know that I had lots of margin for error. Focusing toward the back of the arch, I easily achieved the front-to-back sharpness I wanted. Click.
Workshop Schedule || Purchase Prints
A Gallery of Static Juxtapositions


Dynamic Juxtaposition
Posted on February 4, 2018

Moonset Eclipse, Zabriskie Point, Death Valley
Sony a7RII
Sony 100-400 GM
ISO 800
f/11
1/4 seconds
Much of my photography is about juxtaposition of elements with the landscape. Sometimes that’s simply combining static terrestrial features, but when possible I try to add something more dynamic, such as meteorological subjects like lightning or a rainbow, or celestial objects like the Milky Way or the Moon. The challenge with dynamic juxtapositions is timing—while the meteorological juxtapositions are usually a matter of playing the odds, celestial juxtapositions are gloriously precise.
Lunar choreography
Just as the Earth revolves around the Sun, the Moon revolves around Earth; at any point in this celestial dance, half of Earth is daylight and half is night, while half of the Moon is lit and half is dark. The amount of the Moon we see (its phase) depends on the relative position of the Sun, Moon, and Earth in this dance, and once each month all of the sunlit side of the Moon faces the dark side of Earth, and we Earthlings enjoy a full Moon.
This alignment of three or more orbiting celestial bodies necessary for a full (and new) Moon is called ‘syzygy.’ Due to the Moon’s orbit around Earth, the Sun, Earth, and Moon achieve syzygy twice each lunar month: once when the Moon is between the Sun and Earth (a new Moon), and again when Earth is between the Sun and Moon (a full Moon).
The Moon completes its trip around Earth every 27.3 days, but it takes 29.5 days to cycle through all its phases, from new to full and back to new again. The Moon’s phases need that extra 2+ days because as the Moon circles Earth, Earth also circles the Sun, taking the syzygy point with it—imagine a race with a moving finish line.
Viewed from Earth, the Sun and Moon are on opposite sides of the sky when the Moon is full, so a full Moon rises in the east at sunset and sets in the west at sunrise. We rarely see a full Moon rising exactly as the Sun sets (or setting as the Sun rises) because: 1) the point of maximum fullness (when the Sun, Earth, and Moon align perfectly) only happens at one instant on the full Moon day—at every other instant of each month’s full Moon day, the Moon is merely almost full (but still full enough to appear full); 2) published Sun/Moon rise/set times assume a flat horizon—if you have mountains between you and the horizon, your view of the true Sun/Moon rise/set is blocked; and 3) The more extreme your latitude (angular distance from the equator), the more skewed the Sun/Moon alignment appears.
Knowing this, it should make sense that the closer the Moon is to full, the longer it’s in the night sky, and a full Moon is in the sky all night long. Less intuitive but very important for lunar photographers to know, each day the Moon rises an average of 50 minutes later (between 30-70 minutes) than it rose the previous day—I usually mentally round to an hour for quick figuring.
Lunar Eclipse
If the Moon orbited Earth on the same plane Earth orbits the Sun, we’d have an eclipse with each syzygy: every new Moon, Earth would pass through the Moon’s shadow and somewhere on Earth would experience a solar eclipse; every full Moon the night side of Earth would witness a lunar eclipse as the Moon passes into Earth’s shadow. But the Moon’s orbit is tilted about 5 degrees from Earth’s orbit, making the perfect alignment an eclipse requires relatively rare.
It turns out that the alignment of the Sun, Earth, and Moon necessary for a lunar eclipse happens from two to four times each year. Of these, about one-third are total eclipses, when Earth’s shadow completely covers the Moon. At totality, most of the sunlight illuminating the Moon is blocked by Earth, and the only light to reach the Moon has passed through Earth’s atmosphere, which filters out all but the long, red wavelengths. For the same reason sunsets are red, during a total lunar eclipse we see a red or “blood” Moon.
Putting it all together
As frequent and familiar as the rise and set of the Moon is, the opportunity to witness the beauty of an eclipse is rare. But in the last six months, after being shut out by schedule or weather for many years, I’ve managed to photograph my first total solar and lunar eclipses. I wasn’t able to juxtapose the August solar eclipse with a favorite landscape, but I wasn’t going to let that happen again for last week’s lunar eclipse.
Viewed from Death Valley’s Zabriskie Point in winter, the setting full Moon’s azimuth aligns nicely with Manly Beacon, one of the park’s most recognizable features. Though this year’s alignment was particularly good, the morning of the eclipse was a day earlier than I’d normally photograph the Zabriskie Point moonset—the next day the Moon would be setting about 45 minutes later, providing ample time to photograph the landscape in the warm early light before the Moon descended behind the Panamints. Nevertheless, I decided that a total lunar eclipse trumps everything, and since Zabriskie was the best place for the eclipse, that’s where we were.
We started with telephoto compositions of the beautiful “blood Moon” phase because there wasn’t enough light to include the eclipsed Moon with the landscape without compositing two exposures. Composites are fine, but I prefer capturing scenes with one click. For wider images that included the landscape I waited until totality had passed, shortly before the Moon set, and switched to the Sony/Zeiss 24-70 with my Sony a7RIII, moving my Sony 100-400 GM to my Sony a7RII.
I captured this image about 25 minutes before sunrise, normally too early to capture landscape detail without over exposing the Moon. But this morning, following the total eclipse, the lit portion of the moon was still darkened by Earth’s penumbral shadow, which reduced the dynamic range to something my cameras could handle.
To enlarge the Moon and emphasize its juxtaposition with Manly Beacon, I went with the 100-400. With my composition and focus set, I slowly dialed up the shutter speed until I saw my a7RII’s pre-capture “zebra” highlight alert. After clicking I magnified my image preview and examined the moon to confirm that I did indeed still have detail. The foreground was quite dark on my LCD, but my histogram indicated the shadows were recoverable, something I later confirmed in Lightroom.
A Gallery of Dynamic Juxtapositions
Click an image for a closer look and slide show. Refresh the window to reorder the display.


Are you tired of eclipse photos yet?
Posted on February 1, 2018

Blood Moon, Death Valley, California
Sony a7RIII
Sony 100-400 GM
Sony 2x teleconverter
ISO 3200
f/11
2 seconds
Since everyone else seems to be doing it, I thought I’d join the party….
I always schedule my Death Valley workshop to coincide with the January (or early February) full Moon, so it was just a coincidence that North America’s first super (a full Moon that’s within 90 percent of its closest approach to Earth), blue (the second full moon of a given month), blood (a lunar eclipse: a full Moon that passes into the Earth’s shadow and is bathed in light stripped of all but its red wavelengths by Earth’s atmosphere) Moon in 150 years coincided with my workshop. But since we were already there….
I got my group up to Zabriskie Point at around 4:30, well into the eclipse but before totality. Unlike most group photo events I’ve experienced, this morning’s crowd at Zabriskie was a little subdued—I suspect due to the early hour. Compared to the solar eclipse I photographed last August, a lunar eclipse moves with the speed of a glacier. While it was underway, I was able to assist my workshop students, set up my own equipment, switch lenses and camera bodies, experiment with exposure, gawk at the spectacle, and still had plenty of time to chat, laugh, and marvel with the rest of my group.
Starting with my Sony a7RIII, Sony 100-400 f/4 GM, and Sony 2x teleconverter, I cranked my focal length all the way out to 800mm and started clicking. After a while I pulled out my Sony/Zeiss 24-70 f/4, putting it on the a7RIII and switching the telephoto setup to my a7RII. Since time wasn’t a concern, I only used one tripod, switching the two bodies back and forth as my needs dictated.
Throughout the eclipse the Moon was softened by a thin layer of cirrus clouds. This image is among my first of the morning, before the Moon reached a band of denser clouds close to the horizon. I ended up with more creative captures, but those will need to wait for another day.
Workshop Schedule || Purchase Prints
The Moon In All Shapes And Sizes


