Eloquent Images by Gary Hart
Insight, information, and inspiration for the inquisitive nature photographer
You Didn’t Tell Me There Would Be Math
Posted on May 30, 2021
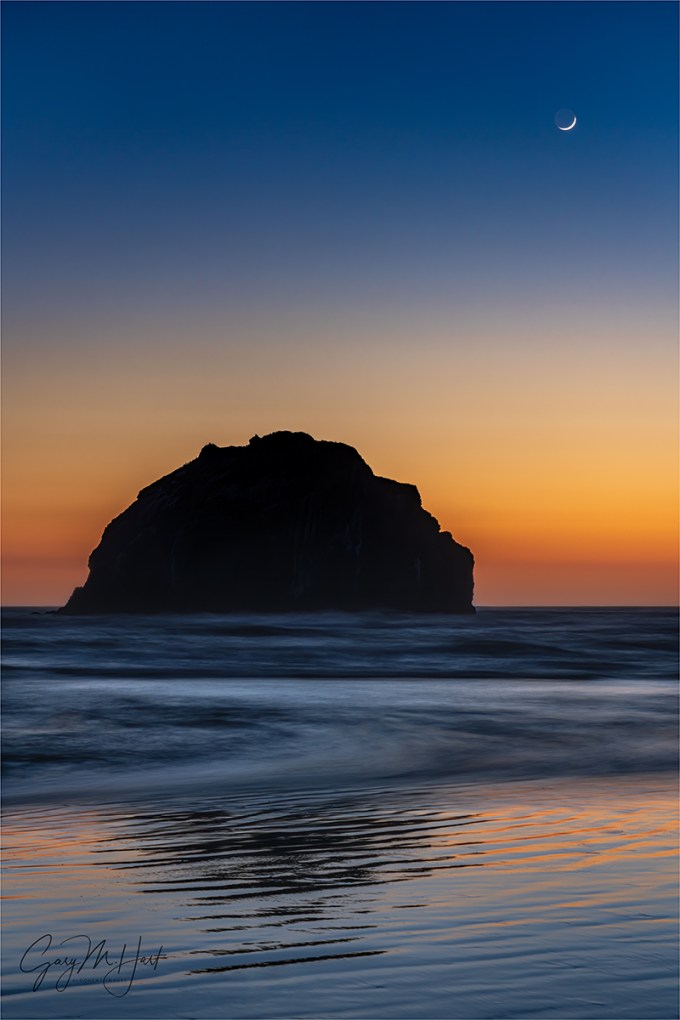
Moongazing, Face Rock, Bandon, Oregon
Sony a7RIV
Sony 24-105 G
6 seconds
F/11
ISO 200
Photography is an art of subtraction. While many photographers seem driven to collect as many objects of visual interest as possible, my favorite pictures usually work as much for what’s not in them than for what is.

Morning Light, Upper Yosemite Fall from Sentinel Dome, Yosemite
Unfortunately, it’s usually easier to see things to add to an image than it is to know what to subtract—and how to do it. The good news is, photographers have many tools for subtracting potential distractions. In fact, one of the reasons I’m such a fan of the tripod is that it allows me to scrutinize my scene, identify distractions, and determine the best way to subtract them from my frame—at my own pace.
Subtracting distractions can be as simple as tightening the composition, shifting the view, or repositioning the camera. For example, admiring a dramatic waterfall in the distance, you might walk around until you find a colorful bouquet of wildflowers to add to your foreground—so far so good. With your camera at eye level, you frame the scene with the flowers at the bottom and the waterfall at the top. But then you notice a vast empty region in the middle of the frame that does nothing more for your image than occupy space. The solution is as simple as dropping your camera to ground level, allowing you to subtract the empty space and replace it with larger flowers and waterfall (because with the flowers and waterfall more aligned, you can increase the focal length).
But compositional subtactions like this are only the beginning. Many photographers don’t stumble until they encounter an opportunity to simplify an image using aspects of their camera’s vision that differ from their own vision: light, focus depth, and motion.

Captive Crescent, El Capitan and Half Dome, Yosemite
Read the story of this image
Light
Photographers frequently lament their camera’s limited dynamic range. And while extra dynamic range in a camera is great, limited dynamic range creates wonderful opportunities to subtract distractions and emphasize shape over detail by burying distractions in deep shadows or overexposed highlights.
Underexposing a backlit scene can saturate color in the brightest part of the image while hiding distracting details in blackness. To achieve this, I often look for striking subjects that stand out against the sky. Hilltop trees work well for this, but I can think of no subjects in nature more suitable to silhouette photography than El Capitan and Half Dome in Yosemite. And since a crescent moon is always in the brightest part of the sky just before sunrise or after sunset, I always look for an opportunity to pair a waning crescent against Yosemite’s striking skyline.
But this approach isn’t limited to silhouettes. I love finding a flower in full sunlight, then under- or over-expose the background to make my subject stand out against a black or white canvas.


Poppy Lanterns, Merced River Canyon
Focus depth
One of my favorite techniques for photographing colorful wildflowers and fall foliage is to narrow the range of focus until just a select part of my subject is sharp, softening the rest of the scene to an appealing blur of color and shape. This blur effect improves as depth of focus shrinks. Depth of focus shrinks with:
- Subject distance—the closer the narrower the range of focus
- Focal length—the longer the narrower the range of focus
- F-stop—small f-stop means a large aperture and a narrower range of focus
While I’ve used pretty much every lens in my bag to blur my backgrounds (and foregrounds), I most frequently use telephoto to decrease my depth of field, and a macro lens and/or extension tubes to focus closer.
Not only does this approach help the primary subject—or specific aspects of the primary subject—stand out, when executed properly it can eliminate virtually any background distraction. When composing shallow depth of field images, it’s important to remember that even when blurred beyond recognition, the background matters.
Motion
Blurred water often gets labeled as “unnatural” or “cliché.” The unnatural part I’ll dismiss as misinformed—it’s no less natural than the alternative: water droplets suspended in midair. While I’ll acknowledge that reflexively attaching a neutral density filter at the slightest hint of whitewater might be overdoing it a bit, the cliché label ignores the fact that blurred is often the only way to render moving water (ever try freezing a waterfall or churning cascade in shade or overcast?).

Dogwood and Rapids, Merced River, Yosemite
Regardless of your position on blurred water, detail in moving water can create a distraction that competes for attention with the primary subject. Smoothing moving water to one degree or another subtracts this distracting busyness.
Motion blur isn’t just about water—pretty much anything that moves can be softened, smoothed, stretched, or eliminated with motion: clouds, blowing leaves and flowers, stars, and so on. And while it’s not landscape photography, a technique employed by architectural (and other) photographers is adding many stops of neutral density to slow the shutter speed so much that people and vehicles moving in the scene completely disappear.
Regardless of the object that’s moving, as with narrow focus depth, softening the secondary areas of a scene also helps the primary subject stand out by allowing viewers to focus their attention where it belongs.
It’s all about control
Because of the zero-sum relationship between exposure variables that control light, depth, and motion—changing one variable requires a complementary change in another to maintain the proper exposure—managing these variables is next to impossible without jettisoning full auto exposure to start making your own exposure decisions. While sufficient control is possible in aperture or shutter priority modes, because I don’t want my camera making any decisions for me, I’ve always used manual metering. In fact, I’ll go as far as insisting that you can’t really call yourself a photographer unless you can shoot in Manual mode (even if you choose not to). The good news is, manual metering not hard.
Rather go into all the detail in this post, here are some links from my Photo Tips tab that will help:
About this image

Moongazing, Face Rock, Bandon, Oregon
I’d love to say that Don Smith and I scheduled this year’s Oregon Coast workshop to coincide with the new moon, but that’s just the way it worked out. I will take some credit for knowing that, once the workshop was scheduled, the best night to capture the crescent moon was our first night, and that the Bandon sea stacks would be the best place to be.
Before setting our group free on the beach, Don and I made sure they knew a 3% crescent moon would appear low in the west shortly after sunset. Because the beach at Bandon is so expansive, with dozens of sea stacks spread over nearly 1-mile stretch of sand and surf, it wasn’t long before the group was so spread out that I spent most of my time wandering around, trying to catch up with everyone. Each person I got to, I updated them on where the moon would be once the sky darkened, encouraged them to plan a moon composition before the moon appeared. I also strongly suggested that they give themselves time to check out the south end of the beach, where the most (and best) sea stacks are.
I made it all the way down past Wizard’s Hat before was satisfied that there were no more workshop participants to check on. By that time the sun was about ready to disappear—it was time to decide on my own crescent moon subject. I ended up heading back up the beach, to the view of (aptly named) Face Rock.
The moon appeared shortly after sunset, faint at first but quickly brightening against the darkening sky. With the moon visible, it became easy to refine my position relative to Face Rock. Aware of other sea stacks trying to photo-bomb my frame on the left and right, I chose a relatively tight vertical composition that made the scene entirely about the moon and Face Rock.
As with many crescent moon images, this scene was mostly about subtraction. Not just the neighboring seas stacks, but also the texture caused by Face Rock’s many nooks and crannies, and the ever-changing surf. Sea stacks, texture, and waves are nice, but this scene was all about the moon above Face Rock’s distinctive profile.
It helped that Face Rock stood out nicely against the brightest part of the sky. Slightly underexposing to turn the rock black had the added benefit of enhancing the sunset’s natural orange hues. To smooth the waves, I waited for the sky to darken enough to allow a multi-second exposure. I clicked a dozen or more frames, timed with the waves, to give myself a variety of motion effects. I chose this one because I like the way the sunset color reflects in the wet sand.
Workshop Schedule || Purchase Prints || Instagram
A Gallery of Subtraction
Click an image for a closer look, and to view a slide show.


Color My World
Posted on May 23, 2021
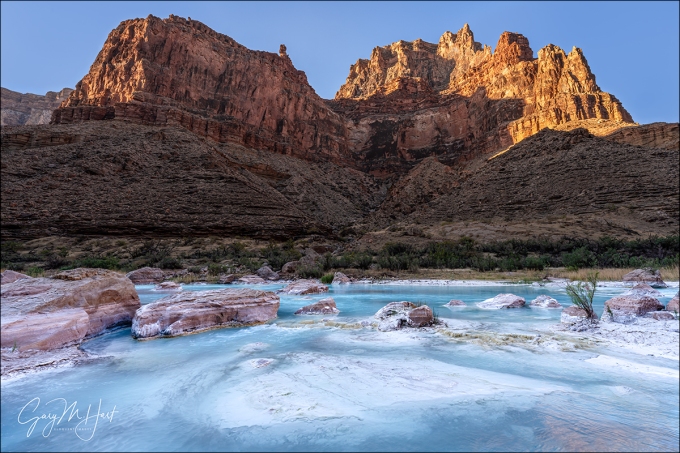
Red, White, and Blue
Little Colorado River, Grand Canyon
Sony a7RIV
Sony 12-24 f/2.8 GM
1/6 second
F/16
ISO 50
Before rafting the Grand Canyon my relationship with the Little Colorado River was limited to the view from the Cameron Suspension Bridge on US 89, a route I’d traveled at least twice a year for many years. Rarely more than puddles connected by a muddy trickle, to me the Little Colorado seemed better suited to be an indicator of recent precipitation than an actual photo destination. So on my first Grand Canyon raft trip way back in 2014, when Wiley (the lead guide for all but one of my now seven(!) trips) said we’d be stopping at the Colorado River’s confluence with the Little Colorado River, I shrugged.
That day had been a mix of clouds and sun, great for photography—all we needed was to pull over and tie up at a worthy subject. When we reached the confluence in early afternoon, Wiley suggested that we be back on the raft in 45 minutes, and I remember thinking, Really? Surely we can find a better spot to take advantage of this great light. I wasn’t even sure whether to grab my camera bag, but since I was the photography leader, I decided I better set a good example. Still skeptical, I followed one of the along a short trail through the shrubs, the rest of the group trailing. Rounding a corner I emerged from the brush and stopped like I’d slammed into a brick wall. Unable at first to process what I was seeing, I finally turned and managed to call back to Wiley, “Uh, we’re going to need more time here.”
Defying expectations
There is nothing subtle about color in nature. In fact, the vivid natural hues that surround us may just be my favorite thing to photograph. But we live our lives taking for granted a certain range of natural color constants: the sky will feature a reliable blue throughout the day, bracketed by certain shades of red or orange at sunrise and sunset, and darken to something close to black at night. Water we expect to be particular shades of green or blue depending on light and clarity. Even when nature’s color intensifies to a hue and intensity that moves us to pause and take note (or photograph), it’s reliably within our range of expectations—a vivid sunset, or the rich blues of Lake Tahoe and Crater Lake.
But sometimes nature throws us a curve. Death Valley’s aptly named Artist’s Palette features and array purple, green, and pink rocks; last summer’s fires turned California’s midday sky an otherworldly orange; it’s impossible not to be gobsmacked the greens and reds of an aurora. And I’ll never forget the first time I laid eyes on the green and blue glacial lakes of the Canadian Rockies and New Zealand. But for me, none of these sights were as disorienting as my first view of the Little Colorado River’s azure hues.
So what’s going on?
What happened to the familiar greenish-brown puddles upstream? Clearly, somewhere in the 55 or so river miles between Cameron and Grand Canyon, the Little Colorado has gotten an upgrade. Not only is there a lot more water, the blue water that’s been added is not a color I’ve seen in nature.
It turns out that, after leaving Cameron the Little Colorado twists along a scenic canyon of its own creation, a canyon deep enough to cut into a travertine-laced aquifer that recharges and colors its flow. The travertine (limestone formed by mineral springs) is infused with magnesium and calcium that adds the blue hue to the water, and leaves deposits that paint the rocks and river’s bed a reflective white, further enhancing the azure hue. Adding to all this magnificence is the rich red of the surrounding Grand Canyon walls.
Of course like most things in nature, the Little Colorado’s color is not guaranteed. When the summer monsoon rains arrive, the Little Colorado’s blue is overpowered by reddish brown sediment washed downstream by frequent torrential downpours. But by scheduling my raft trips for May, I’m usually able to beat this change (in May we also get to enjoy the Colorado River at its translucent green best). Only once have we found the Little Colorado River running brown, and we just kept right on floating downstream.
About this image
My Grand Canyon raft trip has many photographic highlights, but the most memorable (in no particular order) are the Milky Way (in the darkest sky you can imagine), Havasu Canyon, Elves Chasm, Deer Creek Fall, and the Little Colorado River. For the Milky Way we want a campsite that has a good view of the southern horizon, with the river in the foreground (and of course no clouds); for the others we like clouds or shade, and even tougher, few to no other people.
Over the years Wiley and I have gotten pretty good at strategizing our schedule to maximize the photo opportunities at the trip’s photo highlights. We came into this year’s trip knowing we were facing nothing but clear skies—great for the Milky Way, but not so much for the key locations. So before putting in on our first morning, we made our plan.
The first highlight location is the Little Colorado River, about 60 miles downstream from the starting point at Lee’s Ferry. By scoring the campsite directly across the Colorado River from the Little Colorado confluence, we could monitor the comings and goings at the confluence and shuttle the group across when when other rafters cleared out.
The afternoon was hot, with a couple of hours of harsh sunlight remaining—lousy for photography, but spectacular for swimming in the cool, but not cold, Little Colorado. Our guides led us about a half mile upstream to a perfect little swimming hole fed by a natural water slide where we splashed and lounged for a couple of hours.
When the sun started to dip behind the surrounding canyon walls, the non-photographers shuttled back to camp, while the photographers stayed and spread out to enjoy the softly shaded river beneath towering red sandstone kissed by late light. When we returned to camp that evening, everyone seemed quite satisfied with their results, but I couldn’t stop thinking about what the scene might be like in the morning. While I loved the way the sun lit the sandstone across the Colorado River, I realized that the most prominent peak above the confluence, in full shade for all of our afternoon shoot, should get really nice morning light.
At camp that night I talked to Wiley about giving anyone interested another shot at the Little Colorado in the morning, and we came up with a plan that would permit that without jeopardizing our schedule for what would be the trip’s longest, most intense day of rafting.
The guides had coffee ready at 5:15 the next morning, and by 5:30 five of us were motoring back across the river to the confluence. (This may sound early, but with nothing but natural light, we’re usually in bed by 8:30 each evening, and stirring shortly after 5:00 in the morning.
While we had less than an hour to photograph, that turned out to be enough. I only had to walk a short distance upstream before I was stopped by the view I’d visualized the night before. I tried it a little tighter to eliminate the boring sky, but discovered that I couldn’t get much sunlit sandstone into my frame without including sky. And as soon as I did that, I realized that including some regular old blue sky would actually provide context (and credibility) for the river’s otherworldly blue.
Pulling out my Sony a7RIV and Sony 12-24 f/2.8 GM lens, I was able to include the entire sunlit peak (does anyone know what it’s called?). With a general idea of my composition, I moved around a bit until I found a foreground that worked. To get all of the foreground limestone island in my frame, I scaled a small ledge behind me and framed up this scene.
I used ISO 50 and f/16 to stretch my shutter speed a little (but probably not enough to make much difference). Extreme dynamic range made the exposure a little tricky, but I simply monitored the histogram in my viewfinder (have I mentioned lately how much I love shooting mirrorless?) and dialed my shutter speed until the histogram looked right. Click.
Color My World
Click an image for a closer look, and to view a slide show.


Return to Civilization
Posted on May 18, 2021

Rainbow Bridge, Colorado River, Grand Canyon (2016)
Sony a7R II
Sony/Zeiss 16-35 f4
1/80 second
F/11
ISO 100
Yesterday I returned from my annual Grand Canyon raft trip, a week of white water, waterfalls, slot canyons, hiking, and star gazing in some of the most spectacular scenery on our planet—with some of the most spectacular people on our planet. This was my seventh trip, and while each trip is different, each has been unforgettable in its own way.
With highs in the low hundreds and lows in the 60s, this year was probably my hottest trip. But 100 degrees is pretty tolerable when the humidity is low and you’re never far from a splash of 50-degree Colorado River water. And our clear skies, while not ideal for daytime photography, gave us nights-after-night of skies filled with more stars than you’ve ever seen.
I had visions of processing an image or two as soon as I returned to Las Vegas on Sunday afternoon, then whipping out a quick blog post to keep my self-imposed every Sunday blog post schedule. But I hadn’t taken into account the post-trip pizza party I was to host, the shear exhaustion that always follows this trip, and the fact that I’d be breaking my glasses on the trip’s final day (a funny story—more on that in a future post), a mishap that makes spending more than a few minutes at a time on my computer very difficult. So I’ve dusted off this image, and its corresponding blog post (with a few small edits), from 2016.
The Illusion of Genius (May 2016)
Perhaps you’ve noticed that many popular nature photographers have a “hook,” a persona they’ve created to distinguish themselves from the competition (it saddens me to think that photography can be viewed as a competition, but that’s a thought for another day). This hook can be as simple (and annoying) as flamboyant self-promotion, or an inherent gift that enables the photographer to get the shot no one else would have gotten, something like superhuman courage or endurance. Some photographers actually credit a divine connection or disembodied voices that guide them to the shot.
Clearly I’m going to need to come up with a hook of my own if I’m to succeed. Flamboyant self-promotion just isn’t my style, and my marathon days are in the distant past. Courage? I think my poor relationship with heights would rule that out. And the only disembodied voice I hear is my GPS telling me she’s “recalculating.”
Just when I thought I’d reached an impasse that threatened to keep me mired in photographic anonymity, a little word percolated up from my memory, a word that I’d heard uttered behind my back a few times after I’d successfully called a rainbow or moonrise: “Genius.” That’s it! I could position myself as the Sherlock of shutter speed, the Franklin of f-stops, the Einstein of ISO. That’s, well…, genius!
And just as the fact that none of these other photographers are quite as special as their press clippings imply, the fact that I’m not actually a genius will be of no concern.
But seriously
Okay, the truth is that photography is not rocket science, and nature photographers are rarely called to pave the road to scientific or spiritual truth. Not only is genius not a requirement for great photography, for the photographer who thinks too much, genius can be a hindrance. On the other hand, a little bit of thought doesn’t hurt.
It’s true that I’ve photographed more than my share of vivid rainbows and breathtaking celestial phenomena—moonrises and moonsets, moonbows, the Milky Way, and even a few comets—from many iconic locations, but that’s mostly due to just a little research and planning, combined with a basic understanding of the natural world. An understanding that’s basic enough for most people who apply themselves.
Take, for example, this rainbow. It was clearly the highlight of this year’s Grand Canyon raft trip, and while I did predict it about fifteen minutes before it appeared, that doesn’t make me a genius. Like most aspects of nature photography, photographing a rainbow is mostly a matter of being in the right place at the right time. Of course there are things you can do to increase your chances of being in the right place at the right time. Mostly it’s an understanding of the science of rainbows, and the patience to wait, that makes me appear more prescient than I really am.
The essentials for a rainbow are simple: airborne water droplets and sunlight (or moonlight, or any other source of bright, white light) at 42 degrees or lower. Combine these two elements with the correct angle of view and you’ll get a rainbow. The center of the rainbow will always be exactly opposite the sun—in other words, your shadow will always point toward the rainbow’s center. And the lower the sun, the higher (and more full) the rainbow. There are a few other complicating factors, but this is really all you need to know to become a rainbow “genius.”
In this case it had been raining on and off all day, and while rain is indeed half of the ingredients in our rainbow recipe, as is often the case, this afternoon the requisite sunlight was blocked by the very clouds delivering the rain. Not only do rain clouds block sunlight, so do towering canyon walls. Complicating things further, the window when the sun is low enough to create a rainbow is much smaller in the longer daylight months near the summer solstice (because the sun spends much of its day above 42 degrees). So, there at the bottom of the Grand Canyon on this May afternoon, the rainbow odds weren’t in our favor.
But despite the poor odds, because this afternoon’s rain fell from clouds ventilated by lots of blue holes, I gave my group a brief rainbow alert, telling them when (according to my Focalware iPhone app, the sun would drop below 42 degrees at 3:45) and where to look (follow your shadow), and encouraging them to be ready. Being ready means figuring out in advance where the rainbow will appear and finding a composition in that direction, then regularly checking the heavens—not just for what’s happening now, but especially for what might happen soon.
We arrived at our campsite across from Deer Creek Fall with a light rain falling. The sun was completely obscured by clouds, but seeing that the sun would eventually drop into a large patch of blue on the western horizon, I went scouting for possible rainbow views as soon as my campsite was set up. When the rain intensified an hour or so later, I reflexively looked skyward and realized that the sun was about to drop beneath the clouds into a patch of blue that reached all the way to the western horizon. I quickly sounded the alarm (“The rainbow is coming! The rainbow is coming!”), grabbed my gear, and beelined to the spot I’d found earlier.
A few followed my lead and set up with me, but the skeptics (who couldn’t see beyond the heavy rain and no sunlight at that moment) continued with whatever they were doing. After about fifteen minutes standing in the rain, a few splashes of sunlight lit the ridge above us on our side of the river; less than a minute later, a small fragment of rainbow balanced above the right riverbank just upstream. Then, right before our eyes, the color quickly spread across the river to connect with the other side. Soon we had a double rainbow, as vivid as any I’ve ever seen.
Fortunately for the skeptics, this rainbow lasted so long, everyone had a chance to photograph it. Our four guides (with an average of 15 years Grand Canyon guiding experience), agreed that this had been the most vivid and longest lasting rainbow they’d ever seen. (I actually toned it down a little in Photoshop.)
Genius? Hardly. Just a little knowledge and preparation mixed with a large dose of good fortune.
One more thing (May 31, 2016)
The vast majority of photographers whose work I enjoy viewing achieved their success the old fashioned way, by simply taking pictures and sharing them (rather than blatant self-promotion or exaggerated stories of personal sacrifice). In no particular order, here’s a short, incomplete list of photographers I admire for doing things the right way: Charles Cramer, Galen Rowell, David Muench, William Neill, and Michael Frye. In addition to great images, one thing these photographers have in common is an emphasis on sharing their wisdom and experience instead of hyperbolic tales of their photographic exploits.
Read more about the science of rainbows, and how to photograph them
A Gallery of Rainbows


My Lifelong Relationship With Yosemite
Posted on May 9, 2021
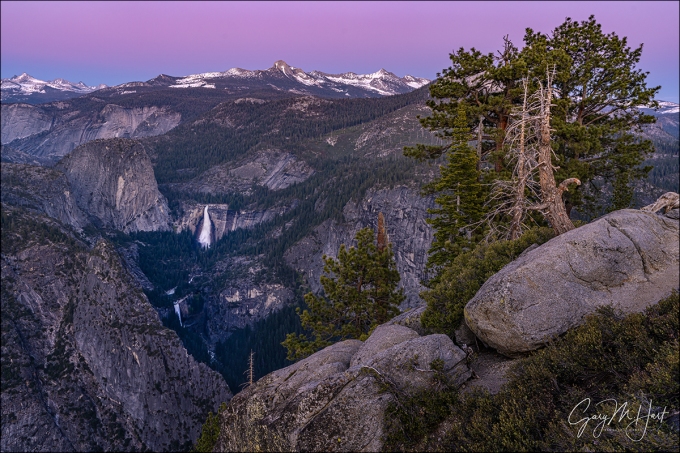
Alpenglow, Nevada and Vernal Falls from Glacier Point, Yosemite
Sony a7RIV
Sony 16-35 f/2.8 GM
1 second
F/10
ISO 100
My relationship with Yosemite doesn’t have a beginning or end. Rather, it’s a collection of asynchronous memories that I’m still forming. In fact, some of my Yosemite experience actually predates my memory (and I have the pictures to prove it—see below). The earliest memories, like following bobbing flashlights to Camp Curry to watch the Firefall spring from Glacier Point, or warm evenings in lawn chairs at the garbage dump, waiting for the bears to come to dinner, are part of the glue that bonds my family.
While my relationship with Yosemite may not have a beginning or end, it does have a few hiccoughs. The most recent, and by far most significant, was the abrupt halt to my regular, and often unscheduled, visits to Yosemite. BC (before COVID) I’d make 20 or 30 trips per year to my home-away-from-home, some planned far in advance (both workshops and personal trips), but many only after dropping everything with just a few hours notice, when it looked like something special might taje place. But COVID closures, and further restrictions that required me to apply for approval to visit, saw my 2020 visits plummet. Let’s see, from March 2020 through January 2021 there were only three: two last July for Comet NEOWISE (8 hours of driving for 1 hour of photography each time), and one for my late October fall color workshop (my only 2020 workshop since February, anywhere).
Glacier Point plays a role in many of my Yosemite memories, but none are more permanently embedded than a visit when I was probably 8 or 9. My father was a serious amateur photographer whose his own relationship with Yosemite influenced me. One of my most vivid Yosemite memories is (foolishly) standing atop Sentinel Dome in an electrical storm, extending an umbrella to shield his camera while he tried to photograph lightning firing across the valley.
Being Californians with little lightning experience, we had no idea how foolish this was—the lightning was a couple of miles away, which seemed a safe distance. But later that afternoon we attended a ranger talk at Glacier Point, we learned that lightning can travel more than 10 miles and that elevated and fully exposed Sentinel Dome is probably the last place you’d want to be in an electrical storm. He said this with a chuckle, as if to imply that he knew no one present would be foolish enough to attempt this. The kicker to this story came at Glacier Point later that afternoon, when seemingly out of nowhere a rainbow arced across the face of Half Dome. I’ll never forget my father’s excitement—the resulting image was the source of his greatest photographic pride, and the print he made still graces my mom’s wall.

Lecturing my first workshop group on the virtues of tripod use
As I grew older, I started creating my own Yosemite memories. On countless trips into its vast backcountry, I relished reclining beside gem-like lakes cradled in granite basins, sipping from streams that started the day as snow, and nights beneath an infinite canopy of stars—all to a continuous soundtrack of wind and water.
Given this history, it’s no surprise that I became a nature photographer, using my camera to try to convey the essence of this magic world. A big part of my “new” (it’s now more than 15 years) career is the opportunity to share Yosemite with other photographers. But despite the fact photography is now my livelihood, visiting Yosemite is never work. Now I get to live vicariously through their excitement, watching them experience firsthand the beauty they’ve previously seen only in pictures, or opening their eyes to new perspectives of familiar Yosemite scenes. I’m humbled that I might be a catalyst for others’ nascent or expanded relationships with this special place, and that they might spread their love to others.
Of course I’ve seen lots of change while accumulating my Yosemite memories. Gridlock is a summer staple, the bears have been separated (with moderate success), the Firefall has been extinguished (no, Horsetail Fall is not the Firefall), and backpacking requires difficult-to-obtain permits, water purifiers, and bear canisters. In recent years, the new park vendor has spoiled many of Yosemite’s institutions with what I can only label as corporate greed that places their bottom line above the visitor’s experience.
But I’m thrilled to return to something resembling the old normal. Each time I return I’m reminded that despite human interference, Yosemite’s soaring granite and plummeting waterfalls are magnificent constants, a vertical canvas for Nature’s infinite cycle of season, weather, and light.
About this image
An extremely dry winter allowed for the early opening of Glacier Point, just three days before the start of my Yosemite Waterfalls and Dogwood photo workshop. It’s a always nice to share this spectacular view with others, and this year’s group had a large number of Yosemite first-timers, a particular treat.
When we arrived I was pleased to see that it wasn’t too crowded, but I still had to spend a little time negotiating space along the rail facing Half Dome and Tenaya Canyon for a few people in my group. One potential spot, where the railing protruded from a steeply sloping granite boulder, was especially precarious (not dangerous, though you definitely didn’t want to drop anything), with tricky footing that required grippy shoes, creative tripod arrangement, and a firm grasp of the bar to stay upright. A couple of people tried it and decided it wouldn’t work for them, so after finding no more takers, I ended up settling there.
Though we did have some nice clouds behind Half Dome and distant Mt. Conness, there was no sign of clouds further south. I focused most of my attention on Half Dome and the clouds, but once the sun set I pointed my camera toward the lovely alpenglow deepening on the eastern horizon above Nevada and Vernal Falls. I thought the nearby trees and vertical granite face made a nice foreground, but couldn’t quite get them all in without also including the wall and railing I was braced against. After even more tripod machinations, I managed to elevate my tripod to the maximum height possible—high enough. Using the trees and cliff face on the right of my frame to balance the visual weight of the waterfalls on left, I focused on the dead tree and clicked.
My Yosemite
Click an image for a closer look, and to view a slide show.


Photography and the Art of Compromise
Posted on May 2, 2021
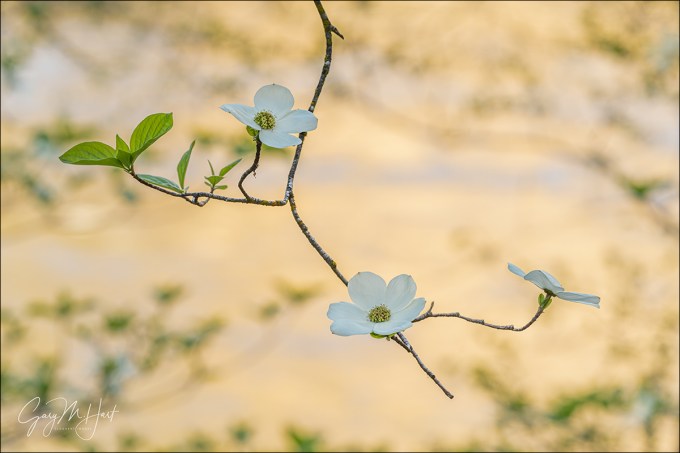
Dogwood Trio, Merced River, Yosemite
Sony a7RIV
Sony 100-400 GM
1/80 second
F/9
ISO 800
The dilemma
Photography is all about compromise. For example, while everyone wants a lens that’s sharp, fast, compact, and cheap, the most we can usually get is two of these things. And photographers’ compromises aren’t limited to our equipment. Simply adding light to a scene can lead to frustrating, make-or-break compromises. Freezing a flower bobbing in an afternoon breeze requires a fast shutter speed. But increasing shutter speed means less light, forcing me to choose between opening my aperture at the cost of depth of field, or increasing my ISO and living with more noise. What’s a photographer to do?
The foundation
The bottom line for me is any compromise, no matter how small, is not acceptable unless it’s necessary.
I approach each scene knowing that my Sony Alpha camera’s (currently an a7RIV) “ideal” ISO is 100—this is the ISO that render’s the cleanest (least noise) image. I’m going to shoot everything at ISO 100 unless I have a specific reason not to. (Or I forgot to reset it from the prior image, always a possibility.)
I also approach my scenes with the understanding that my lens has an ideal f-stop range that I want to stay in unless circumstances dictate otherwise. Because I rarely take the time to test every lens at every possible focal length and f-stop combination, I usually make the mostly safe assumption that my lenses are sharpest between f/8 and f/11. Wide open or stopped all the way down, most lenses tend to be a little less sharp, especially in the corners. And stopping down to a small aperture also increases image softening diffraction (the spreading if light that happens when it passes through a small opening).
Shutter speed manages motion, but using a tripod takes camera motion out of the equation, which means I never need to compromise my ISO or f-stop to avoid camera shake. And as a landscape photographer, most of my subjects are stationary, so whenever possible, I use my camera’s native ISO (100), an f-stop between f/8 and f/11, and control my exposure with the shutter speed: If nothing is moving, what difference does it make if my shutter speed is 1/10 second or 10 seconds? (Hint: None.)
But…
Nature is not static, and sometimes I need to deal with motion in my scene. Whether it’s a tumbling cascade, wind-blown flower, or the celestial sphere circling above, I have to decide the shutter speed that achieves my desired motion effect. Or perhaps getting a frame sharp from foreground flowers to distant peaks forces me to stop my lens all way down to f/22, or capturing foreground detail on a moonless Milky Way night requires me to open up all the way to f/1.4. Either way, compromise has entered the equation.
When compromising my exposure settings it helps to know the limits of my equipment, how far I can push my exposure choices into the compromise zone without significant, unrecoverable quality loss. For example, while my camera’s native ISO is 100, I know I can push it much higher and still get a very usable image. And my Sony lenses are still sharp enough outside their ideal f-stop range that I don’t hesitate to use whatever f-stop the situation calls for. (This quality isn’t exclusive to Sony—other quality cameras and lenses do quite well when pushed to extremes.)
Compromise my image quality to achieve a desired result reduces my margin for error, making it extremely important that I make the right choices. Probably the most extreme compromise situation I encounter is the moonless-night darkness necessary for photographing the Milky Way. Even with my fastest lens, the Sony 24mm f/1.4 GM, wide open, to get a shutter speed that avoids stretching the pinpoint stars to little dashes, I have to push my camera’s ISO beyond thresholds I never imagined would be possible just a few years ago. This forces choices like, do I go with ISO 6400 and less noise but more star motion (longer shutter speed), or ISO 12800 and more noise but less star motion?
It would be nice if there were absolute answers to these compromise questions, but that’s rarely the case. Usually it’s matter of experience-based reckoning shaded by multiple choice processing options. In other words, I make the best guess I can, and often hedge by trying my second-, third-, and (sometimes) fourth-best guess. With several images to choose between, I scrutinize each closely and decide which will give me the best result.
About this image
I’m thinking about all this compromise stuff because I just processed this image from last week’s Yosemite spring workshop. The dogwood were exploding throughout Yosemite Valley, so my group spent several sessions dedicated mostly or entirely to dogwood. With my favorite Yosemite Valley dogwood zone closed due to roadwork, most of our dogwood time was spent on Northside Drive near Valley View.
I look for dogwood flowers or branches I can isolate against a strong background, and quickly landed on this one above the Merced River. It was late afternoon and the granite wall beneath Cathedral Rocks was catching the warm sunlight, spreading its gold reflection on the Merced River. With my Sony 100-400 GM lens (on my Sony a7RIV) to isolate the branch, I shifted position and focal length until I arrived at a composition that set the dogwood blooms against the gold background, framed by soft (out of focus) dogwood festooned branches in the background. I experimented with several f-stops before deciding f/9 gave me the best combination of sharp dogwood and soft background.
The problem was, at ISO 100 and f/9, getting the exposure I wanted meant a shutter speed of 1/10 second, not workable in the afternoon’s gentle but steady breeze. So I increased my ISO to 800, which gave me a 1/80 second shutter speed. A quick magnification of the image in my LCD told me I’d nailed the sharpness, but just in case, I increased the ISO to ISO 1600, for a 1/160 second shutter speed. (Turns out I didn’t need the faster shutter speed, but better to have it and not need it than need it and not have it.)
The Art of Compromise


")


