Storm Chasing Diary: Lucky Strike
Posted on July 20, 2025

Down the Middle, Lightning and Double Rainbow Near Amistad, New Mexico
Sony a7R V
Sony 24-105 f/4 G
ISO 50
f/18
1/8 second
How does one capture an image of a brilliant lightning bolt splitting the inverted prisms of a double rainbow? (No, not with AI or a composite—that’s cheating.) If you said luck, you’d be right—well, at least half right. But, right or not, there’s no surer way to elicit a defensive response from a nature photographer than to blurt some version of, “You were so lucky!”
Nevertheless, the inherent unpredictability of the natural world makes nature photographers’ relationship with luck pretty tight. We need luck.
On the other hand, a big part of the enigma we call “luck” is in fact not random (and therefore not truly luck). Whether it’s a colorful sunrise, vivid rainbow, or explosive lightning bolt, every photographer longs for “lucky” events that make a scene more special—but to turn those events into great photography, we still have to get ourselves out there at just the right time and place, equip ourselves with the right tools, and creatively apply our craft and vision.
My good friend and frequent workshop partner, pro photographer Don Smith, has labeled me the, “luckiest person in the world.” And I’m afraid I must plead guilty as charged—not to just being lucky in both my personal and photography lives, but lucky also with simple things, such as parking spots that always seem to appear just as I pull into a crowded lot, and potential traffic tickets that somehow dissolve into benign warnings.
The parking space thing I can’t really explain, but I imagine my traffic ticket good fortune is shaped at least partially by simple politeness and silent respect—I just do what the officer says, and never argue, make excuses, or attempt to charm. (And lest you think I make a habit of getting pulled over, it hasn’t happened in at least 10 years, I swear.) Regarding my photography luck, I will acknowledge that there’s quite possibly some mysterious parking space magic to my good fortune, but I also pride myself on doing everything possible to be present and prepared when the photography “luck” happens.
But I also need experiences like a double-rainbow lightning bolt to remind me that denying the role of luck in photography is to suppress the joy that accompanies Nature’s surprises. If I were to pretend that capturing an image like a lightning bolt splitting a double rainbow makes me special, I would surely damage (and dishonor) the sense of awe that draws me to nature photography in the first place.
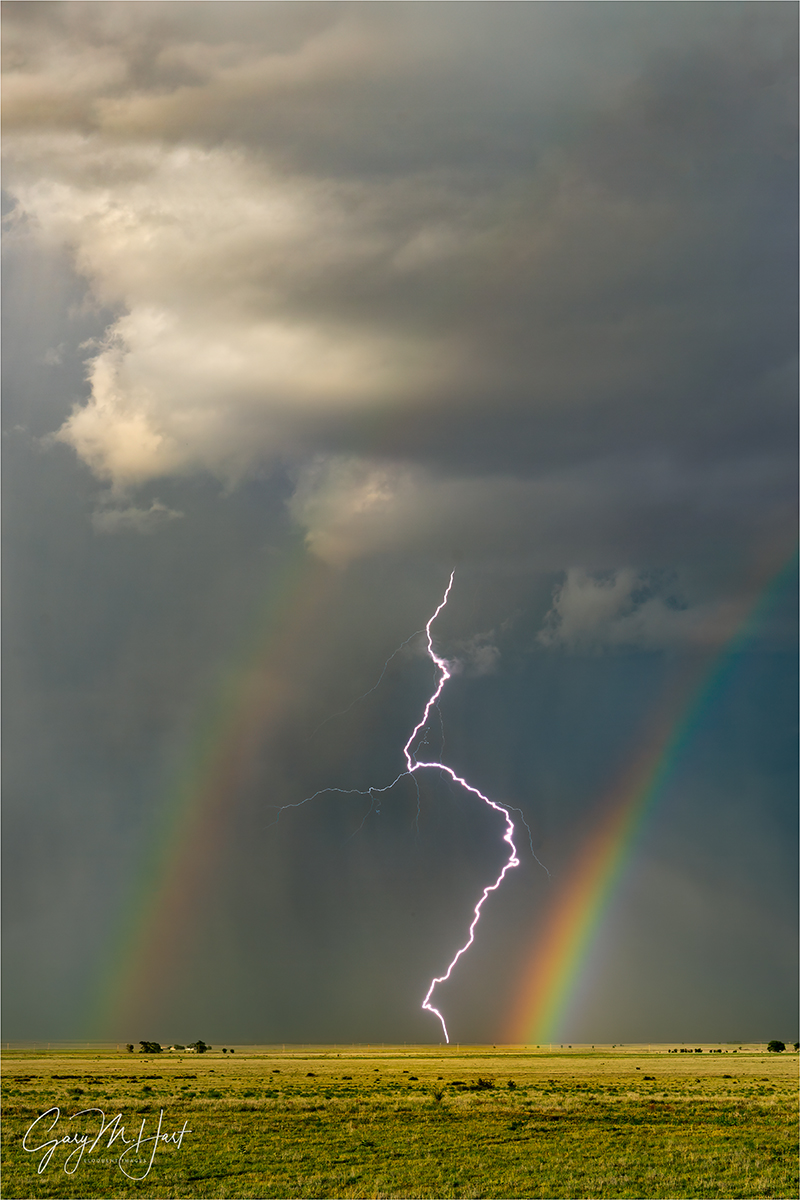
Double Rainbow and Lightning, Amistad, New Mexico :: Here’s a vertical crop of the same frame. This was my original plan for this image, but I decided I like the sunlit rain in the horizontal version, I decided to feature it instead.
This image? Yes, I was definitely anticipating a rainbow, because we were surrounded by, and at times in the midst of, light to moderate rain, while the sun played peek-a-boo with broken clouds in the west. So when shafts of sunlight started pouring through those openings, I instantly turned my attention in the direction a rainbow would form. And the lightning was no big surprise either, because it had been all around us all afternoon, firing up in one direction for a while, eventually diminishing and starting up in another direction. Sometimes these lightning displays would overlap, forcing us to choose which one to target—do I go for the activity producing the most lightning, or roll the dice for the best composition?
My decision that evening wasn’t difficult. The lightning was much more active in the northwest, but there wasn’t really a lot happening composition-wise over there. So when the rainbow popped up behind me, I turned my camera (with Lightning Trigger already fully engaged) in that direction, and crossed my fingers. At the very least, I’d have a rainbow—and if I was lucky, maybe even pair it with a lightning bolt.
Because the sparse lightning in the general direction of the rainbow hadn’t really settled in to one specific area, I composed fairly wide, grateful for a 61 megapixel sensor that would enable me to crop tighter in processing once I had a frame with a lightning bolt somewhere. Fairly confident I’d already bagged a couple of strikes, I congratulated myself for my decision to target the rainbow as I watched the color start fading from the top down. Still, I told myself, the bottom part as intense as ever, maybe more…
And then this happened. The bolt was so unexpected, short-lived, and perfectly placed, that I almost didn’t trust what I’d just seen. So I broke my own cardinal rule of lightning photography: I turned off my Lightning Trigger to check the most recent frame. (Speaking of luck, every photographer knows that the surest way to make a much anticipated event happen is to put away, turn off, or in any other way disable, essential equipment in the middle of a shoot.) But I couldn’t help myself, and was rewarded by confirmation that I had indeed captured a lightning bolt splitting a double rainbow. In fact, what I saw on my LCD was even better than I could have dared to hope: a brilliant, serpentine streak that couldn’t have been more perfectly placed had I hand-drawn it (or, gulp, resorted to AI).
So where does this capture fall on the luck/skill continuum? I don’t know—maybe somewhere in the middle? I’ll take credit for being there (well, at least for scheduling a Midwest storm chasing trip—we were at this specific location because I also had the good sense to trust an expert), for having the right gear, for connecting my Lightning Trigger, and for the decision to point my camera in the direction of the rainbow. But none of that changes the fact that, when this bolt struck, I felt like I’d won the lottery. And I wouldn’t have it any other way.
Join me on another storm chasing adventure next summer
Workshop Schedule || Purchase Prints || Instagram
Making My Own Luck
Click any image to scroll through the gallery LARGE


And that’s the way it goes with nature photography. Most of the best images are some combination of luck and skill.
Gone, But Not Forgotten
Posted on July 14, 2025
Grand Canyon Lodge, North Rim (1928 – 2025)


The images I share in this post were all captured on the North Rim of Grand Canyon, a place I’ve visited and photographed more times than I can count. And while Grand Canyon Lodge is no more, the North Rim will recover, thrive, and ultimately outlast us all.
Yesterday I woke to the devastating news that Grand Canyon Lodge on the canyon’s North Rim had been destroyed by a wildfire. I’d been monitoring last week’s evacuation of the North Rim, but since that evacuation was for a fire burning more than 50 miles away and threatening to close the only exit, my first reaction was denial—surely someone misinterpreted those earlier evacuation reports. But it soon became clear that the loss was real.
Unfortunately, with a workshop scheduled on the North Rim in less than a month, my grief was preempted by the need to save my workshop. That took 24 hours, but I was ultimately able to replace my lost North Rim nights with two more nights on the South Rim, so now I’m back to dealing with this sense of great loss.
As news of the fire trickled in, and I was able to view maps of its destruction, the scope of the disaster became clear: gone are the cabins my workshop groups and I have stayed in every (non-pandemic) summer since 2013; gone is the historic, beautiful main lodge building, with its exquisite 2-story picture-window views into the canyon that served as the backdrop for my “office” (where I wrote many a blog); gone is my favorite National Park Service restaurant, which shared those same views; gone is (much of) the beautiful evergreen and aspen forest that makes the North Rim experience feel so special; gone are the Visitor Center and funky little shops that always seem to convince me I need another Grand Canyon T-shirt or hat; gone is the “deli” that somehow always seemed to be out of my first choice, yet each time was somehow forgivable, thanks to its friendly, mostly international, staff; gone are the two outside view decks where I’ve captured more lightning than any other location. And so much more.
I fully acknowledge that for views alone, the South Rim has it over the North Rim. But the views on the North Rim quite spectacular in their own right, and since they don’t duplicate the South Rim’s, to fully appreciate the Grand Canyon expansive magnificence, you really need to visit both rims. For me, it’s the entire North Rim experience that distinguishes it, and makes the North Rim the favorite of the two rims for the majority of my workshop students.
I do love the South Rim views, but unfairly resent sharing them with so many others. So the North Rim is where I recharge from, or mentally prepare for, the South Rim and its teeming tourists. On the North Rim, it’s actually possible to visit any of its vistas and be the only person there—not every time, or even most times, but frequently enough to feel hopeful each time I arrive. And, while the only compelling reason to be outside on the South Rim requires a view of the canyon, on the North Rim, with its open meadows sprinkled with wildflowers and bounded by forests of pine and aspen, anywhere outside feels special.
Of course Grand Canyon Lodge is not the entire North Rim, but it is the hub of the experience there. At least when I completed my final Grand Canyon raft trip this May, I had full knowledge going in that this would be my last time, enabling me to say a proper goodbye. To one minute be excited about returning in just a month, and the next minute know it could be a very long time before I return, and that when I do return, the North Rim won’t be the place I grew to love so much, is something I’ll struggle with for a while.
I know I’m just one of many feeling a loss today. For a little perspective, losing some buildings, and access to the North Rim for a year or two, can’t compare to the tragedy of human loss following the Texas floods. But both events are a reminder that Mother Nature is in always in charge, and humans are just borrowing space. Wildfires are an essential natural process from which Grand Canyon will ultimately benefit. While we all may be feeling a profound sense of personal loss right now, Grand Canyon will endure as grandly as ever.
Workshop Schedule || Purchase Prints || Instagram
The Grand Canyon North Rim Experience


Storm Chasing Diary: More Tornadoes
Posted on July 10, 2025

Wedge Tornado, Morton, Texas
Sony a7R V
Sony 24-105 f/4 G
ISO 200
f/16
1/40 second
A month ago I shared an image of my very first tornado. As exciting as that experience was, it turns out that was only the beginning….
When a large supercell reaches maturity, the urgency among storm chasers seems to ratchet up exponentially. So one indelible lesson from my first storm chasing experience is that there’s no time to bask in your success, no matter how spectacular, because there’s potentially something at least as good down the road—and we’re on Mother Nature’s schedule.
While chasing supercells is incredible for many reasons, it seems everyone’s number one storm chasing goal is a tornado. But as thoroughly monitored, measured, and studied (and chased!) as tornadoes are, there’s still a lot to be learned about the how, when, and why of their formation. Why does one storm kick out multiple tornadoes, while the next similarly dynamic storm produces none? And why do some tornadoes form and disappear in seconds, while others grow to be a mile or more wide and stay on the ground for hours? Though the answers to these questions and more will undoubtably save lives, they remain frustratingly elusive. Fortunately, despite the lack of life-saving perfect insight, the general mechanism behind tornado formation is understood well enough to already be making a difference.
The action kicks off when daytime heating sends warm, moist air rising into increasingly colder, denser air. Since air cools as it rises, and cool air can’t hold as much moisture as warmer air, condensation occurs and we get clouds. Condensation releases energy that warms the air. The atmosphere is said to be unstable when the heat created by condensation is sufficient to keep the air rising. Lacking instability, the convection driving updrafts shuts off, but as long as the air is unstable, the updraft will persist. Of course what goes up, must come down—eventually the rising air is wrung of its moisture, allowing it to cool enough to descend, and a downdraft is born.
Still, while every thunderstorm forms through some version of this process, most don’t turn into tornado breeding supercells. For that, other atmospheric tumblers must click into place.
Most tornadoes are born in supercells—storms powered by a very powerful rotating updraft called a mesocyclone. A mesocyclone forms when a storm’s updraft encounters wind shear: different wind speed and/or wind direction at different heights in the atmosphere impart a spin to the rising air. Shear-induced spin actually starts horizontally, like rolling logs, but is soon tilted toward vertical by the overpowering updraft. When the vertical column of rising, spinning air reaches the ground, a tornado is born.
On the afternoon we saw our tornadoes, when the first one disappeared and its storm started shifting east, our group quickly loaded back into the vans and raced to get back ahead of it. The goal isn’t to be directly in a cell’s path, it’s (usually) to position ourselves adjacent to and in front of its path, so we can watch the action move across our field of vision.
Storm chasers generally avoid urban areas because traffic, stop signs, and stoplights can be very difficult to navigate, and buildings and trees obstruct views. While chasing tends to be easier in the wide open countryside, the downside there is fewer roads—even if we know exactly where we want to be, that knowledge does little good if there’s no road to take us there. And because many roads in these rural areas are unpaved they could quickly be rendered a completely impassable swamp by a downpour—you definitely don’t want to be spinning your tires in the mud with a large tornado or grapefruit-size hail bearing down on you.
We lucked out this evening. We got our supercell, and roads we found were paved and seemed to be laid out specifically to get us in the right place to continue our pursuit. But we quickly found that we weren’t the only ones appreciating the roads that evening, and as we approached our next target vantage point, we found both shoulders teeming with a veritable fleet of chase vehicles.
This diverse assortment included ordinary street vehicles (think generic rental cars), large passenger vans filled with chase groups like ours, trucks with massive tires, and clearly single-purpose storm-chasing beaters that appeared to sport their hail-inflicted wounds with pride. Some vehicles were outfitted with external cameras, weather stations, or satellite dishes (or all of the above). Of all the cars chasing that evening, I think the highlight for me was Reed Timmer’s heavily armored Dominator. (This is the storm chasing equivalent of a celebrity sighting—if you ever watched “Storm Chasers” on Netflix, you know what I’m talking about.)

Whirl, Tornado Near Morton, Texas
Navigating this stretch, it was impossible to drive more than a few car lengths without having to swerve or brake for a pedestrian bolting across the road. Rather than seek the perfect parking spot, we grabbed the first open spaces we found and raced on foot to a fence separating the road from a recently plowed field. Even though we were outside the most intense storm activity, the wind here was still quite strong, and the clouds overhead seemed poised to open up. Of course all this activity only added to the thrill of the moment.
Soon our trip leader Chris directed our attention across the field and a little west (left), maybe 1/2 mile away, to the tornado precursor we hope for our: a descending, rotating wall cloud. While promising, this isn’t a sure thing, but it wasn’t long before the first funnel dropped. We all watched, and held our breath, as the tornado approached, then appeared to pass just behind, a small farm. Over the next few minutes, a couple more tornadoes spun up and vanished in fairly short order.
Then our attention turned to an expanding wall of brown dust directly across the field. At first there was so much dust, it was difficult to tell exactly what was going on there, but it certainly looked promising. It wasn’t long before everything clearly organized into a very large wedge tornado that was on a different scale from what we’d seen so far, with the inflow feeding it clearly defined by the dust it sucked up.
I only managed a half-dozen or so frames before the wind picked up and approaching hail chased us away; shortly thereafter, the road network failed us and we lost track of the tornado. But given its size and organization, we weren’t surprised to learn later was that this tornado was on the ground for nearly 30 minutes, traveled over 10 miles, and eventually expanded to at least a mile wide. According to some (unverified) reports, it was up to 2.2 miles wide, which would make it the largest tornado ever recorded in Texas. The National Weather Service rated it as an EF2, with winds around 125 MPH. Fortunately, whatever its size, the tornado kept to wide open farmland, which limited its damage to a few downed trees and power poles.
I do it again in 2026
Workshop Schedule || Purchase Prints || Instagram
The Joy of Storm Chasing
Click any image to scroll through the gallery LARGE


And Now for Something Completely Different…
Posted on July 5, 2025

Reflection, Moke Lake, New Zealand
Sony a7R V
Sony 100-400 GM
ISO 200
f/5.6
1/40 second
Take music, for example. One song might fire you up, while another might be the perfect de-stresser at the end of a trying day. Most of us leverage both qualities in our music choices, depending on our state of mind. Photography has a similar power to stimulate or soothe. Whether it’s photographing, processing, or living with them on the walls at home, dramatic lightning and tornado images fall safely the stimulate column. On the other hand, an image of a thin crescent moon hovering above a silhouetted horizon, or the stillness of a mirror reflection, is nothing if not soothing.
In the New Zealand winter workshop Don Smith and I do each June, we’ve seen very little lightning, and (sadly) no tornadoes, but we have had our share of crescent moons (including this year), and reflections are a pretty much daily sight. Most of our New Zealand reflections come courtesy of large glacial lakes and fiords, bounded by snow-capped peaks and maybe even a plunging waterfall or two. Sometimes we’re even able to add the Milky Way or a star-sprinkled sky to our New Zealand reflections.
For this year’s final sunset, we ascended a steep, unpaved road above Queenstown to Moke Lake, a tiny, reflective jewel nestled beneath (you guessed it) snow-capped peaks. The lake’s sheltered setting, tiny circumference, and overall shallowness makes mountain reflections especially reliable here—not every year, but more often than not.
This year the reflection was in place, plus a few nice clouds to boot. But instead of concentrating on these larger reflections, I quickly gravitated to a small patch of reeds jutting from the water just a few feet from the shore. The lake’s still surface perfectly mirrored the reeds’ graceful curves and lines, further enhancing the scene’s tranquil feel.
To minimize peripheral distractions, I decided to compose tightly with my 100-400 lens. After a bit of moving around, I was able to position myself so the reeds and their reflection were transposed atop a reflection of clouds basking in the warmth of the day’s last sunlight. After starting with a horizontal composition, I quickly realized that a vertical orientation would be best for including all of the reeds and their reflection, while eliminating an adjacent, more disorganized clump of reeds.
Once my composition was set, I photographed for at least 10 minutes, clicking frequently as the canvas of reflected blue sky and warming clouds shifted behind my primary subject. Occasionally a few gentle ripples kicked up, creating a little background texture.
As thrilled as I am about my exhilarating storm chasing images, I have to say that it was nice to relax with this one. While I fully expect the storm chasing images to garner the most enthusiastic responses in today’s instant-gratification world, I hope people spend enough time with the more subtle scenes like this to appreciate their value.
All this made me think about the choices people make when they decide to purchase a print, and how sometimes they fail to consider the long-term relationship they’re entering when they choose something they’ll be living with for years. We would all do well to slow down and recognize, as with any relationship, sometimes the quality that draws us in the first place might not be the quality necessary to sustain it.
Rather than reinvent the wheel, I dusted-off and polished-up my (13-year old) essay on this very topic…
The “Oooh” and “Ahhh” of Nature Photography
It’s a getaway weekend and you’re browsing a quiet photo gallery near the wharf. The photography is nice, but soon the aroma of (free) coffee commands your attention, your brain starts bouncing between Thai or Italian for dinner, and you wonder whether you remembered to close the garage door—maybe your brother-in-law can swing by the house and check it on his way home from golf…. Suddenly, just as you reach for your phone, your eyes stop, your brain exclaims, “Oooh…” as your eyes latch onto a Pacific sunset on the far wall, a solitary cypress clinging to the rocks above the surf. Instantly the cell phone is back in its holster and your hunger has vanished.
What just happened? Volumes have been dedicated to identifying the combination of composition, color, and light that “grabs” a viewer in just this way. But what then? Do you simply nod approval and return to your phone? Or do you cross the room, plant yourself before the the scene, and beckon your partner? Maybe you’re even moved enough to check the price, to mentally banish to the attic the flower print above the sofa that has survived three moves, an earthquake, and come to think of it, you can’t even remember what kind of flower it is.
Art of any form appeals on two seemingly contradictory planes: it must stimulate enough to attract, yet soothe enough to sustain. These are art’s “oooh” and “ahhh” factors. You probably understand the “oooh!” that grabs your attention and draws you from afar, but once that initial jolt has faded, it’s the soothing “ahhh…” that holds you. We each have our own oooh and ahhh triggers. Some are touched by an intimate flower portrait, others find inspiration in a sweeping landscape; some seek connection to a familiar place, others long for vicarious exploration. Before reaching for your wallet, you need to know whether this is a scene that will uplift you each time you enter the room.
The way we enjoy art is just as personal as the art itself. I sometimes browse other photographers’ online galleries, but much prefer the intimacy of paging leisurely through a glossy, hardcover photography book. Art shows are fun, but a little frenetic; galleries can be nice, albeit somewhat pretentious. But nothing beats having a special print on my wall, one that reconnects me to a special time or emotion.
I’m very thankful that some people do decide that my prints are worthy of living with. But I can’t pretend to know what inspires your oooh’s and ahhh’s, nor can I let those thoughts influence my photographic choices. Before plunking down $1000 dollars for that stunning sunset print (or the orange and black velvet matador that your partner has been eyeing), spend a little time with it. Does its virtual world transcend your literal world, even briefly? Do the emotions it generates rejuvenate or deplete your energy? My own, private answers to those questions determine the things I photograph and the way I photograph them. Sometimes I need to be stimulated, other times I long to be soothed. Either way, it’s this dichotomy that makes photography a perpetual source of pleasure for me.
Join Don and Me in New Zealand in 2026
Workshop Schedule || Purchase Prints || Instagram
Oooh and Ahhh
Click any image to scroll through the gallery LARGE

")


")


Storm Chasing Diary: Safety, Schmafety
Posted on June 29, 2025
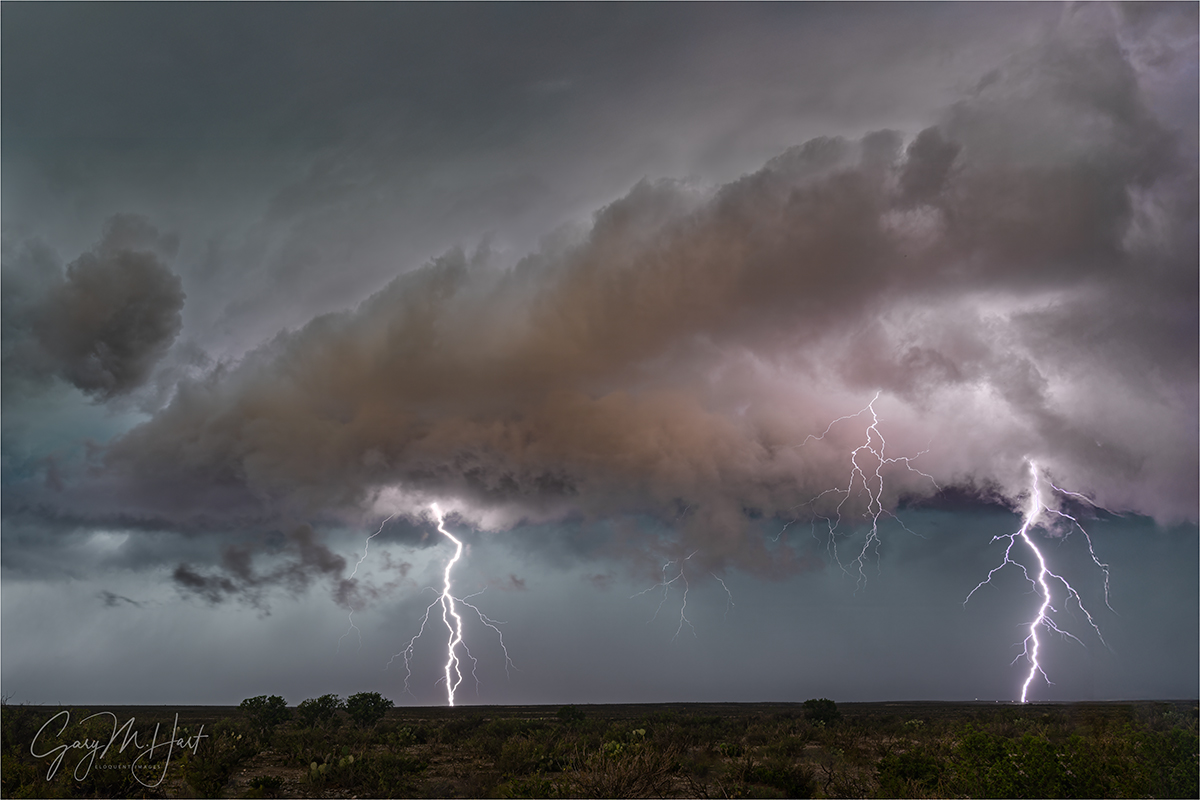
Too Close, Somewhere in West Texas
Sony a7R V
Sony 24-105 f/4 G
ISO 100
f/10
1/2 second
It feels pretty weird writing about sweltering Texas June afternoons while, only a couple of weeks later, shivering through frigid New Zealand June mornings, but welcome to my world. We’ve had some gorgeous photography Down Under again this year, and while I’d love to be able to capture, process, and blog in something closer to real time, my workshop priorities just don’t permit that. So here I am in extraordinarily beautiful New Zealand, still thinking about storm chasing in the Midwest. (But I’m definitely not complaining about this life I’ve chosen.)
So anyway…
It seems like every time I post a lightning image, I get admonished by someone who insists that I’m too close, too foolish, or that I must have a death wish. And while I appreciate the concern about my wellbeing, (tongue in cheek title of this post notwithstanding) I really am not a careless person.
These unsolicited lectures seem to have been exacerbated by this year’s decision to chase storms in the Midwest. After fielding enough (ostensibly) well-intended scoldings, I’ve decided that some people just don’t understand the research and planning that goes into storm chasing, and the care taken to ensure the safety of all—safety really is a non-negotiable priority. And then there those people who, no matter how careful my planning and execution, simply can’t comprehend why someone else would do something they themselves wouldn’t dream of doing.
To the latter group, let me point out that risk management is part of virtually every human activity, from a trip to the store, to free-soloing El Capitan (I’ve actually done one of these things), and pretty much every other activity in between.
Before any act, on some level, conscious or unconscious, we decide whether the benefit justifies the risk. And as you might imagine, the individual calculus behind those choices is all over the map, because one person’s thrill is another person’s terror. Which is why I’m always amused when someone scolds me for doing something simply because they’d never do it.
Yes, pursuing a subject that might kill you—suddenly, violently, and in multiple ways—on the surface sounds pretty nuts. But people every day most of us get behind the wheel fully cognizant of the potential that some random event completely beyond our control, from a sudden mechanical failure to a clueless fellow driver, could injure or kill us without warning. And what about that steak you had for dinner last night? Did you know that more than 5000 American die from choking each year?
Alex Honnold, everyone’s poster-child for risk taking, talks about the difficulty people have distinguishing difference between risk and consequence. He asserts that most people focus too much on the consequence of failure (almost certain death for someone free-soloing), and not enough on its risk. He believes, and so far has proven, that his preparation, physical abilities, and experience, make free-soloing a very low risk endeavor.
Far-be-it from me to compare myself to Alex Honnold, but I will say that majority of people who storm chase (myself included) don’t just race willy-nilly into a violent storm—we do an immense amount of research, arm (or surround) ourselves with the necessary expertise and tools, and make informed decisions on where to be, when to be there, and how we’ll retreat when things don’t go exactly as expected. As a nature photographer, this kind knowledge and preparation enables me to satiate my passion for natural drama and beauty while minimizing the non-zero chance I’ll die doing it. But your results may vary.
Is throwing caution to the wind how I live every aspect of my life? Absolutely not—not even close. For example, living vicariously through climbers, I think free-soloing El Capitan sounds like a blast—but all the preparation, knowledge, and ropes in the world are nowhere near enough to compel me to try rock climbing, in any form. In fact, even the knowledge that simply standing still is enough to keep me completely safe on the rim of Horseshoe Bend (near Page, Arizona—all who have been there know what I’m talking about), couldn’t get me within three feet of that edge. But, as I said, your results may vary.
Back to storm chasing
The big three storm-chasing weather phenomena that can kill you are tornadoes, hail, and lightning. (Despite words to the contrary from self-appointed lightning experts) I have enough general understanding and firsthand experience with lightning to possess a pretty good sense for what’s safe and what’s too close. But a charging tornado? Not so much. Before the trip, all I knew about tornado safety was that the ever popular grizzly attack strategy—just be faster than the person you’re standing next to—doesn’t work for tornadoes. And hail? Just looking at pictures of cars and buildings pummeled by large hail was enough to give me pause, and to seriously wonder whether storm chasers need to don helmets.
Given these concerns, it didn’t take long to appreciate the advantage of a trip leader who is a meteorologist with more than 20 years’ experience chasing storms. Specifically, our leader Chris’s ability to read the storms well enough to not only identify the best burgeoning supercell to target, but also to put us in the safest place to photograph whatever our chosen storm delivered, and when it’s time to exit, paid off time and time again.
From Chris, I learned (and later confirmed through my own observation) that tornadoes tend to form in very a specific region of a supercell, and only after tipping their hand with visible tells. Before dispensing a tornado, supercell starts visibly rotating, then drops a “wall cloud” down to ground level. On the day we saw a half-dozen or so tornadoes, Chris called each in advance, actually pointing out just where they’d drop.
And once on the ground, tornadoes tend to follow a predictable (to those who can read supercells) path. So even though we were within a mile of several tornadoes that day, we were able to safely observe them moving across our line of sight, and never felt the slightest anxiety.
Large hail was another danger novelty for this California boy. After seeing photos and hearing stories graphically depicting an assault by baseball-sized (and larger) frozen projectiles, I had no desire to experience large hail firsthand. But, since (as I know now) large hail tends to fall in certain regions of a storm that can be seen from a great distance, and you can actually hear hail coming, we were always able to avoid dangerous hail.
Lightning, on the other hand, still made me nervous. Turns out our experienced, storm-chasing meteorologist was perfectly comfortable defying all the lightning rules I’ve applied during my Grand Canyon monsoon storm chasing trips (where lightning is our prime target). Wide open spaces? Sure, whatever provides the best view. Nearly simultaneous lightning/thunder? Keep shooting!
I eventually asked Chris if he has some kind of secret lightning-whisperer insight that enables him to get so close to lightning. And though his answer wasn’t exactly comforting (“No.”), he did share that his lightning strategy is founded on more than 20 years of consequence-free exposure to supercell lightning.
Too close for comfort (but I’d do it again)
By the time we were on our tenth day of chasing, I’d come to terms with our cozy relationship with lightning, and certainly couldn’t argue with the results: lots of great lightning captures, and no storm chasers lost. Win/win.
But we weren’t out of the woods yet. Day 10 day found us motoring from the Texas Panhandle into eastern New Mexico, and finally down to southwest Texas, not far (as the crow flies) from Big Bend National Park. The day’s highlight was chasing a beautiful supercell across the Texas badlands in typical (by now) stop/start fashion, tracking the blue hail core, monitoring visible rotation for a possible tornado, and grabbing occasional lightning strikes.
At one point, the limited road network out there forced us to “punch through” the core of the storm, where we endured about 30 minutes of torrential downpour, drifting small (-ish) hail that deposited up to two inches of white, grape-size pellets on the road, and a barrage of frequently close lightning. After reaching the other side, several times we found ourselves far enough out front to stop and photograph the storm’s advance for a few minutes before retreating.
At our final stop, we had enough time to break out the tripods—a real luxury. The closest lightning was no more than a mile or two away as I took up position along a fence and set up my tripod, camera, and Lightning Trigger. Though the foreground here wasn’t great (understatement), the blue of the hail core was clearly visible, and a howling wind continuously pushed spectacular clouds rapidly across the scene, each one armed with an arsenal of ground-stabbing lightning.
After composing and metering, I just stood back and let my Lightning Trigger do all the work, and enjoyed the show. Occasionally, I’d adjust my framing as I became more aware of where the most lightning was firing. As the intensifying blue of the hail core signaled the storm’s approach, I could that the lightning was advancing with it. About the time I started getting a little nervous, Chris called us all back to the vans, but just as I reached for my camera to pack it up, the most spectacular, and closest, strike fired and the thunder exploded almost immediate my camera’s final click of the day.
I made it to the van before the next bolt landed, and we were soon down the road safely ahead of the hail. Had we been too close? Possibly. But as much as we’d grown to trust Chris, who had been right every time leading up to this shoot, we all hung in there. Seasoned storm chasing veterans by now, every single one of us was well aware of the risks, and each made the conscious choice to stay out and keep shooting rather than return retreat to safety as the lightning approached.
I always wear a seatbelt in a car, a helmet when I bike, and wait for the WALK sign. And you’ll never find me clinging to the side of El Capitan, or even standing on the edge at Horseshoe Bend (my Horseshoe bend pictures require a tall tripod and 3-foot remote cable to keep me a comfortable distance from the edge). But I’d do this storm chasing thing again in a heartbeat—even if that heartbeat might be my last.
Workshop Schedule || Purchase Prints || Instagram
Worth the Risk
Click any image to scroll through the gallery LARGE


Storm Chasing Diary: “Large Cloud in the Sky”
Posted on June 18, 2025
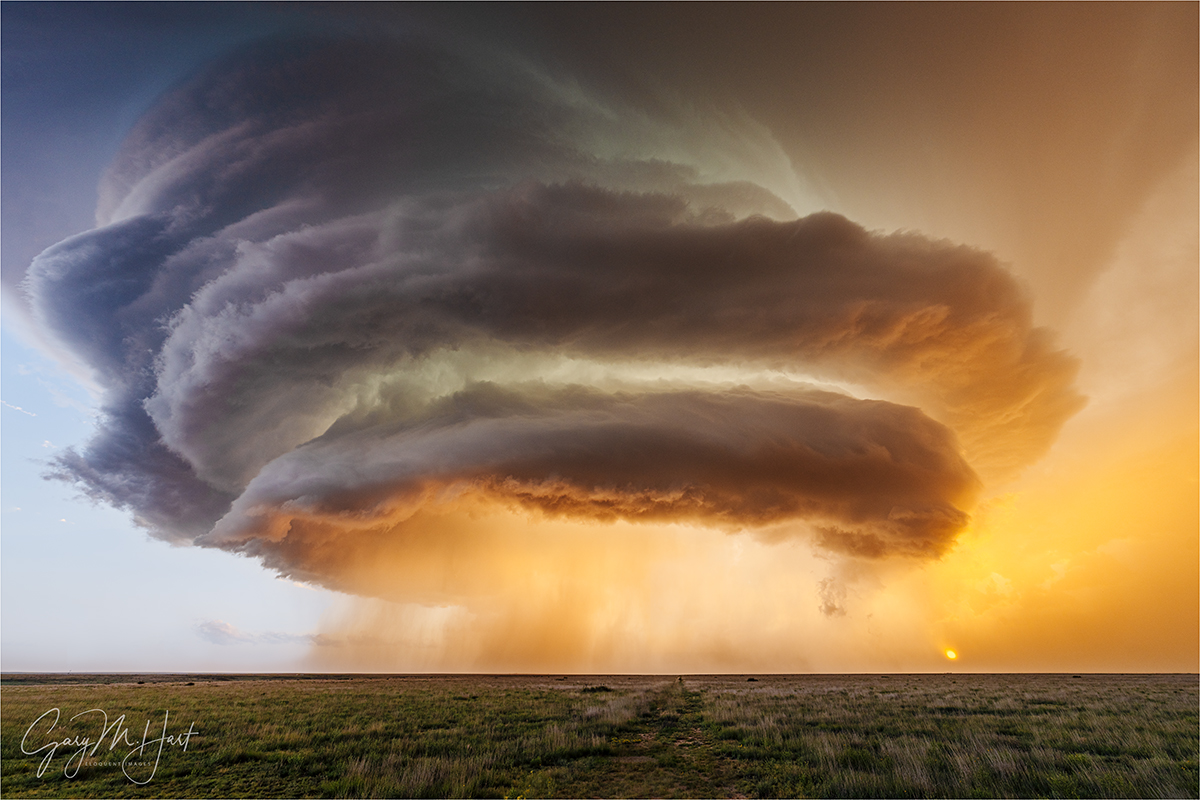
Alien Spaceship, Supercell Near Amistad, New Mexico
Sony α1
Sony 12-24 GM
1/25 seconds
F/9
ISO 100
Because I was traveling and had unreliable connectivity, I started writing this blog in Microsoft Word rather than use the WordPress interface. When I inserted the post’s image at the top of the document, Microsoft’s unsolicited AI description simply said, “Large cloud in the sky.” And while no truer words were ever written, I think a little more context might prove enlightening. So here goes…
You’d think that someone who spends as much time photographing Nature as I do, would at some point cease being surprised by it. I’m here today to disabuse you of that notion.
My primary reason for arranging a Midwest storm chasing trip was to see and photograph a tornado. I simply knew that nothing would be able to top that experience. But just several hours into the trip, I was introduced to my first supercell, literally one of the most beautiful natural sights I’ve ever witnessed. Okay—clearly these trips aren’t just about the tornadoes.
Then, on the third day, after (finally) checking the tornado box (several times), I figured everything after that would be gravy. Wrong again. Because even though we saw no more tornadoes, the magic had only just begun.
While gawking at that day-1 supercell, I distinctly remember telling myself to take a breath and appreciate was I was looking at because I might not see anything this beautiful for the rest of my life. That prediction survived all the way until day-6.
If nothing else, this trip taught me that a supercell is so much more than a very large thunderstorm, it’s a living, breathing entity with a personality and a distinctive lifespan that runs from adolescence to maturity, before inevitably aging out. Achieving supercell status requires a specific combination of atmospheric conditions that cause a conventional cumulous cloud to ascend unchecked into the highest regions of Earth’s troposphere. More than that, a supercell is distinguished from a conventional towering thunderhead, and actually powered by, a rotating convective updraft: a mesocyclone. No mesocyclone, no supercell.
The key atmospheric ingredients necessary to create a mesocyclone are*:
- Atmospheric moisture (humidity): Moisture in the atmosphere provides the latent energy that sustains a thunderstorm’s updrafts.
- Unstable (buoyant) air: The warmer a “package” of air (picture a cube of air of any size), the more water vapor (moisture in gas form) it can hold. Air temperature is the measure of molecular energy; since air becomes less dense as it rises, it naturally cools because it has fewer molecules. Cooler air can hold less water vapor than warmer air, so a package of air that’s heated by the sun (the reason most thunderstorms form in the afternoon, when the sun is highest and warmest) rises and cools. Eventually the rising air cools to a temperature that can no longer hold its contained water vapor, forcing it to condense into liquid, and a cloud forms. Condensation creates heat, so as long as the condensation creates enough heat to keep the rising air warmer than the surrounding air, the updraft will continue.
- Wind shear: Wind shear is wind that travels in different directions at different elevations. When rising, unstable air encounters wind shear, it starts rotating. This rotation tilts the updrafts and downdrafts at the mesocyclone’s core, allowing them to persist independently, without interfering with each other.
* This is not me pretending to be an expert, this is me trying to learn something by researching and writing about it. (No AI was used, so any error is mine alone.)
The sensory manifestations of all the atmospheric machinations necessary to form a mesocyclone are truly (cliché alert) breathtaking: Massive, towering, symmetrical cloud layers; explosive (often seemingly ubiquitous) lightning, some of it intra-cloud, some of it cloud-to-ground (CTG), and its associated thunder; torrential rain (or no rain at all, depending on your position beneath the storm); vivid blue or blue-green regions in the clouds that reveal the supercell’s hail core; a distinct roar as the hail approaches; winds that range from nonexistent potentially hurricane force—airflow feeding the storm’s updraft rushes toward its center, while the storm’s downdraft “exhaust” flows away; rapidly rotating clouds at different elevations, sometimes, but not always, dropping to the ground in the form of a tornado. Experienced storm chasers (i.e., not me), read all of these features, combine combine their observations with the virtually realtime radar and atmospheric data provided by NOAA, and somehow determine the best location to safely view and photograph with storm-whisperer sagacity.
The story of this image
Basking in our day-4 tornado success, our day-5 chase brought another nice supercell and some lightning, but nothing that rivaled our prior sights (admittedly, our standards had been raised significantly). Shortly after noon on day-6, we departed our prior night’s hotel in Lubbock and motored northward through a collection of tiny Texas Panhandle “towns” (often not much more than a church, gas station, and cafe surrounded by a sprinkling of small houses). As with every other chase day, our tour director and meteorologist Chris Gullikson rode shotgun in the lead van, constantly monitoring the (rapidly improving) atmospheric conditions, giving us in the trailing van a play-by-play over the CB. Somewhere west of Amarillo, he identified our target storm and strategized a plan of attack.
In Dalhart, Texas we bent west, toward New Mexico. Chris’s CB updates to our trailing van became more frequent and excitement-tinged: “Tops at 52 (thousand feet)”; “3-inch hail marker”; “Tops at 55,” and so on. We’d learned early in the trip that clouds that stretched above 50,000 feet were especially promising—the higher the better. Similarly, we learned that the larger the hail (determined, it seems, by radar information), while a great indicator of an active supercell, also factored into our route choice—hail much larger than golf-ball-sized risks damaging the van, as well as any chaser who might be outside.
At this point in our tour, Chris’s late afternoon chase-declarations had become fairly routine, so while we were excited by a cell’s potential, we knew that data alone doesn’t ensure success. But soon we were in the thick of the storm, battling rain and hail, and dodging lightning to get in position. At one point we navigated hail that deposited a 2-inch layer on the road.
We’d get out front of the storm, pull the vans over, and everyone would pile out—if Chris’s first command was, “No tripods,” we knew this would be a quick stop—then hustle back when a sudden wind signaled the imminent arrival of rain or hail. Relatively close lightning became fairly routine, but at no point did I ever feel unsafe. (I asked Chris about this later, and learned that he has a pretty good idea of where in the storm the lightning will strike—but he did add that those estimations are far from certain.)
I knew we were on a pretty cool supercell, but had no idea what was in store until the lead van braked without the usual advance CB notice and Chris hustled everyone out with far more urgency that usual. He said, “We really don’t have time to stop here, but you just have to see this! No tripods!”
To this point, virtually every field we passed on this trip was completely fenced, forcing us to stop at the barbed wire just a few feet from the road, and often contend with drainage ditches and power lines in our foreground. But this time we found ourselves at an opening in the fence that allowed us to walk about 100 feet into the field, providing a clear view at the spectacle unfolding in the sky.
Even the experienced storm chasers, including Chris, admitted that this was one of the most magnificent supercells they’ve ever witnessed. But as if that wasn’t enough, the setting sun’s golden disk had burned through the low clouds on the horizon, sending shafts of sunlight skyward to illuminate the clouds’s underside.
With my 12-24 lens as wide as it would go (and still barely able to fit this massive beast), I had time to click 10 frames in fairly rapid succession before I a heard a faint roar coming from just down the road, in the direction from which we’d just come. The roar intensified and while I puzzled about what it could be, Chris yelled with the most urgency I’d heard all trip, “HAIL! Back in the vans now!” Everyone bolted for the opening in the fence, bottlenecking there as the first pellets pelted us. Supercell hail is nothing to mess with, and even these relatively small (grape-size) samples stung. Once through the fence, we loaded in record time and screeched away before the larger stuff reached us, everyone still in complete awe of the beauty we’d just witnessed.
You’d think that this beautiful supercell would be the (non-tornado) highlight of the trip, but it wasn’t even the highlight of the day. But that’s a story for another day…
Join me in a future storm chasing workshop
Workshop Schedule || Purchase Prints || Instagram
Nature’s Best Moments
Click any image to scroll through the gallery LARGE


")


")


")


Storm Chasing Diary: My First Tornado
Posted on June 9, 2025

First Tornado, Lingo, New Mexico
Sony a7R V
Sony 24-105 f/4 G
ISO 200
f/16
1/40 second
Everyone remembers their first time. For me, the experience was as thrilling as I’d imagined, but only lasted about a minute. (I’m talking about my first tornado—what did you think I meant?)
For as long as I can remember, I’ve wanted to see a tornado. Over the years this desire has intensified to the point where a tornado is quite probably my most frequent dream subject. When the NWS suggests just the slightest possibility of rotating thunderstorms in Northern California, I scan the skies and sometimes have even been known to hop in my car to go tornado hunting. (California averages one tornado per year.)
Gary’s Bucket List:
- See a tornado
Raft Grand CanyonRainbow over Yosemite ValleyNaked-eye cometNorthern Lights
Even though a tornado sighting has been number one on my list as all the items below it have fallen away, the opportunity has always eluded me. I suspect it has something to do with an approach based on simply waiting for the tornado to come to me—probably not a winning strategy in California. This year, I decided to change that.
On the recommendation of one of my frequent workshop students, I connected with Jeremy Woodhouse, a fellow photographer and photo workshop leader, who for the last several years has assembled storm chasing tours for photographers. Partnering with Tempest Tours out of Arlington, Texas, Jeremy has put his groups on the scene of some of the Midwest’s most extreme weather. I reached out to Jeremy and told him, if he assembled a storm chasing trip, I’d fill it, and a storm chasing collaboration was born.
In my previous post, I wrote about our first day and the incredible supercell we witnessed. No tornado, but no complaints. But still…
Day-two was quiet—a welcome respite after the initial day’s intensity and miles. We drove from Kansas, through Oklahoma, before finally settling down in Amarillo—without changing plans once. The highlight of that day was dinner at The Big Texan (home of the “free” 72 ounce steak)—trust me, you have to experience this place firsthand to appreciate it. Though there wasn’t much weather happening on day-two, the decision to be in Amarillo wasn’t random—it was to position ourselves for the next day’s chase, which looked far more promising.
In our day-three morning weather briefing (we start each day with a detailed discussion of the day’s weather from our tour-leader/meteorologist, Chris), we learned that the atmosphere was setting up beautifully for supercell development, not just that day, but also over the next three days (at least). We spent most of that afternoon bouncing around New Mexico and West Texas, where we saw lots of rain, hail, beautiful clouds, and (spectacular) lightning, but no tornado. We spent that night back in Amarillo.
Each day Chris identifies a general region to target, based on the morning’s forecast—not the general weather forecast we all get from our weather apps, websites, and TV weatherman, this is extremely detailed atmospheric data from NOAA, with technical analysis that can only be evaluated and subjectively interpreted by an expert. In the day-four briefing, Chris told us conditions were even better than the prior day’s. But despite the promising prospects, the rest of the morning unfolded with little sense of urgency. That’s because the big storms develop from mid-afternoon into the evening, so we generally don’t need to head out on a chase until late morning or early afternoon.
Once we do get on the road, there’s usually a lot of driving around, looping, and backtracking. While Jeremy drives the lead van, Chris rides shotgun and keeps a constant eye on his computer, phone, and ceiling-mounted real-time radar monitor. With every weather update, he further refines our target zone. I ride shotgun in the trailing van; in addition to answering whatever photo question might come up in our van, I provide an essential DJ service (classic rock, anyone?). Our two vans use CBs to stay in touch, and Chris frequently updates Tom, the driver of the trailing van and an experienced storm chaser himself, on all weather changes and other pertinent information.
Words cannot express how fast these supercells explode from a run-of-the-mill thunderstorm into a violent, roiling tower. So, in addition to interpreting weather data, experienced storm chasers must read, on the fly, dynamic features in these building cells (rotation, outflow and inflow, updrafts and downdrafts, to name a few) to determine the supercell’s next move. Once the cell’s direction of motion, speed, growth is established, Chris positions the group as close as possible to the action without subjecting everyone to the inevitable lightning and large hail, not to mention any tornado that might form. No small feat by itself, but factor in the swarm of other chasers seeking similar advantages, and it’s no wonder mayhem ensues whenever a supercell develops.
Once you establish which cell has the best potential to develop into a supercell, merely getting close is not enough. Each supercell has a mind of its own, a unique personality that seems to relish defying expectations. Some have the potential to drop tornadoes, while others might be better lightning producers, or possess spectacular (photogenic) structure (don’t forget your 12mm). Which of these traits you want to go for will determine where to set up to view and photograph.
Ideally we can get out in front of the storm and let it come to us, or better still, watch it move laterally across our view. But a couple of times we’ve had to “punch through the core,” an absolutely thrilling E-ticket ride that includes buckets of rain, punishing hail (and potentially car damaging or even life threatening), and a barrage of simultaneous lightning and thunder.
As you might imagine, the trip leader’s navigation skills are key (the rest of us just follow blindly), as is his ability to think quickly and decisively, and an ability to change plans mid-execution. Terrain is relatively flat in the rural areas we’ve concentrated on so far, with few trees, and lots of agriculture. The network of roads is pretty good, though many are rough and narrow, and often transition to dirt with little notice. Agriculture rules out here, but we also see a lot of livestock (no flying cows so far), and pass numerous oil rigs and wind turbines, vestiges of energy’s past and harbingers of energy’s future, often in very close proximity.
Despite possessing all the elements necessary to spark malevolent competition (crowds, passion, and urgency), the storm chasing community seems to be quite collegial. And despite the challenging roads, everyone seems work well together (creative parking skills help).
Even though the sky was completely overcast as we motored south from Amarillo toward Lubbock—not a good sign, as you need sun to kick-off the all important convection—this was apparently expected, and Chris seemed pretty excited by the atmospheric data he was seeing.
After a few feints and dodges, we ended up tracking south and east toward the most promising region near the Texas, New Mexico border. Apparently we weren’t the only ones who could interpret this cryptic atmospheric data, because it wasn’t long before we started encountering other chasers. Soon it felt like a storm chasing convention—they just kept coming.
By the time we reached ground-zero in eastern New Mexico, our target cell was well into adolescence and on its way to adulthood. We poked around its perimeter a bit, and at one point tried to get closer, then executed a hasty retreat when Chris (somehow) sensed the potential for damaging hail just down the road.
We were no longer on a casual drive, we were in full-on chase mode. We pivoted back the way we came and, looking for anything to put in the foreground of our images, returned to a field of hay bales we’d passed ten minutes earlier.
This gave us a great view of the developing wall cloud (lowering cumulus base from which a tornado usually forms) from a relatively safe distance (maybe a mile or so?). We were close enough to see that it was rotating, and Chris started shouting that a tornado could be imminent.
And then, there it was—a black funnel descending from the cloud base, stretching Earthward. Someone shouted, “It’s on the ground!”, and we were in business.
My first tornado. I just clicked like crazy, and even managed to catch a brief video with my iPhone. Within a minute or so, the funnel was already ascending back where it came from; it vanished shortly thereafter. This was not the last tornado we saw this day, nor was it the most impressive—not even close. But it was my first, and I’ll never forget it.
Gary’s Revised Bucket List:
See a tornadoRaft Grand CanyonRainbow over Yosemite ValleyNaked-eye cometNorthern Lights
Workshop Schedule || Purchase Prints || Instagram
More Wild Weather


, Yosemite")


Storm Chasing Diary: Hit the Ground Running
Posted on June 6, 2025
 Supercell and Lightning, Northeast Colorado
Sony α1
Sony 12-24 GM
.4 seconds
F/14
ISO 50
What would you think if I told you that, on my 12-day storm chasing trip in the Midwest, we drove from Colorado, to Wyoming, to Nebraska, back to Colorado, back to Nebraska, and finally to Kansas? Pretty nuts, right?
Please don’t judge me when I tell you all that was just our first day. But when crazy weather is your subject, lots of miles and crazy hours are not negotiable. Fortunately, our storm chasing leaders did give us a small break on day-two, when we started in Kansas and finished the day in Texas, via Oklahoma. As I write this, it’s day-three and I’m sitting in one of our two vans in Vaughn, New Mexico, waiting with my group for our trip-leader/meteorologist to decide whether to stay put with the current storm, head northwest toward an active storm near Albuquerque, or motor east to Fort Sumner to take advantage of increasingly favorable conditions there. (Note: We ended up with, “None of the above.”)
Day-one (Monday) was my first-ever storm chasing experience, and saying we hit the ground running would be an understatement. After a morning orientation at our Denver hotel that included introductions and a lecture that seemed designed specifically to satisfy my inner weather geek, all 16 of us (me, our tour-guide/meteorologist, my co-leader and driver Jeremy Woodhouse, our other driver, and the 12 photographers/chasers comprising the workshop group) piled into our two 12-passenger vans and pointed northeast. Within a couple of hours we were on a storm in southeastern Wyoming, where I got to photograph my first-ever supercell. But spectacular as that was, we didn’t stay long, because (apparently) a better storm was blooming back in Colorado.
After leaving Wyoming, the rest of our day was filled with so much, I don’t have the memory or time to provide blow-by-blow specifics. We’d be racing to get in position for a brewing storm, then see something too good to pass and make an unscheduled brake-slam/hop-out/click/retreat stop, before continuing on our way. Plan changes were routine and came faster than I could keep up.
The weather only intensified as the afternoon progressed. Near Merino, Colorado, we finally got out in front of a storm, enabling us to settle down long enough for the tripods to come out. I set up up with my Sony a1 and 12-24 f/2.8 lens—the only lens wide enough to capture the entire cell as it bore down on us. When I realized how much lightning was firing (mostly to the right of the cell), I quickly attached my Lightning Trigger and went all the way out to 12mm to maximize my lightning chances.
The plan to follow my standard compose/click/evaluate/refine/click workflow went right out the window when I saw how quickly the storm was moving (right-to-left and approaching). Since I needed to be at 12mm, horizontal, with the supercell centered to include all of it, there wasn’t much opportunity to add variety to my compositions. My Lightning Trigger was clicking my camera so rapidly, at bolts seen and unseen, I adopted a new strategy: just let the Lightning Trigger handle the clicking, while I stood back and absorbed the spectacle. My only job was to monitor my exposure and occasionally reframe to account for the storm’s movement. I even had time to capture some video with my iPhone while my grown-up camera did the real work.
This storm actually displayed enough rotation that we thought it might dispense a tornado, and at one point we even heard a tornado siren, but no such luck. Most of its lightning was intra-cloud and out of my frame, but rather than recompose for lightning shots, I kept my composition on the star of the show: the supercell. Though the scene that afternoon was really about this truly magnificent storm, I was thrilled to find a few frames accented with squiggles of lightning.
That night we finished shooting in Nebraska (I think) with a different cell that generated several tornado alerts on our phones (picture a van with 8 people receiving slightly out of synch tornado warnings), but we never saw one. We finally rolled into our hotel in Goodland, Kansas at around 11 p.m., too late for dinner—a not uncommon experience, I’ve learned.
It’s now day-5 and soooooo much has happened since then. And we still have a week to go. No guarantees, but I’ll try to post occasional updates as time permits. Stay tuned….
Join Me On An Upcoming Storm Chasing Adventure
Workshop Schedule || Purchase Prints || Instagram
Cloud Collection
Click any image to scroll through the gallery LARGE


, Death Valley")


What Would Tom Cruise Do?
Posted on May 31, 2025

Rising Crescent, Grand Canyon
Sony a7R V
Sony 24-105 f/4 G
ISO 400
f/11
.6 second
As you might imagine, at the bottom of Grand Canyon the sleep schedule syncs with the sun. In May, that means flopping into our cots to await the stars around 8:00 p.m., then rising around 5:00 a.m. On a typical day, the morning pace is fairly leisurely, providing time for packing up our campsites, coffee, relaxed chat, breakfast, and even a little photography. While all this happens, the guides clean up breakfast and pack up the kitchen and toilets, then let us know when it’s time to queue up for the 5-minute fire-line that loads the boat. By 8:00 a.m. we’re on the water.
But this was not a typical day. The plan this morning, my annual Grand Canyon raft trip’s final full day, was to compress all that morning activity into one hour so we could beat the crowds to Havasu Creek, and catch the best light there. Photographers love clouds, but when clouds aren’t in the forecast, we go for the next best thing: shade. We formulated the Havasu shade strategy the prior afternoon, then sold it to the group at dinner that night. Though some were dubious of our seemingly impossible mission, the guides assured us it was doable if everyone bought in and worked together. And it didn’t hurt that, unlike the trip’s prior nights, this campsite wasn’t positioned with the view toward the southern horizon necessary for a sleep-interrupting Milky Way shoot.
Turns out I actually had a pretty good sleep that night, waking about 4:45 and instantly springing fully rested from bed, very much geared up for the morning’s tight schedule. The first thing I did was pack my cot and walk it down to the staging area in front of the rafts, greeting a few still groggy fellow rafters on the way. But after depositing my cot, I glanced up upstream and did an actual double-take….
Before continuing, I should probably let you know, or at least remind you, that I’m something of a moon fanatic—which I guess would make me quite literally, a “lunatic,” given that the word derives from the Latin word for moonstruck. I’ve always believed that the moon’s presence enhances pretty much any scene, and work hard to include it whenever possible.
Which is why, more than 20 years ago, I started plotting the moon’s potential arrival upon, or departure from, every scene I hoped to photograph, going to great lengths to capture this arrival or departure whenever possible. In fact, many photo trips and workshops are scheduled specifically for a landscape/lunar confluence. And even when the moon isn’t a prime objective, it’s a rare photo trip that I don’t at least know the moon’s status before departing, its phase and daily rise/set positions and times, just in case.
But since the primary celestial goal of my Grand Canyon raft trip is the Milky Way, and it requires moonless nights for the absolute darkest skies possible, I always schedule this trip for the moonless nights around a new moon. Not only that, given that we spend the entire trip in the shadow of vertical walls soaring up to a mile above us, including the moon in my Grand Canyon raft trip images is never a consideration—I simply don’t think about it.
So imagine my surprise when that casual upstream glance revealed a thin slice of moon suspended in the pre-sunrise gloaming, perfectly framed by the canyon’s towering limestone layers. Overcoming my disbelief, I reflexively shouted, “Look at the moon!,” then ran like Tom Cruise to grab my camera gear and race back to the best view. (I also do all my own stunts.)
For about 10 minutes I photographed in rapturous frenzy, completely forgetting our compressed morning. I composed horizontal and vertical, recording many versions of the ever-changing moon, clouds, color, and light. Given the weight restrictions on this trip, my longest lens was a 24-105, but I didn’t stress and (correctly) reasoned that I have more than enough resolution to crop my images down to the tighter compositions the scene called for.
By the time the crescent ascended behind the south wall and I put my camera away (and remembered the departure deadline I’d lobbied the group so hard for), my adrenaline was ramped so high that I had no problem packing the rest of my stuff and catching the last raft out of camp. (Okay, there are only two rafts and we depart together—I’m reasonably confident they wouldn’t have left without me, though I imagine I’d have had to endure a fair amount of good natured abuse.)
I’m fully willing to acknowledge that my passion for moon photography is extreme, a fact confirmed by the fact that most of the group didn’t join me photographing the moon this morning. But that’s okay—we each have our own relationship with the natural world, and my own deep interest in all things celestial predates my interest in photography by more than a decade. The fact that today’s technology (finally) enables me to combine these loves is a true blessing I will never take for granted.
One more truth was with me as I photographed that morning. All week I’d been fully aware that this was my final Grand Canyon raft trip. Drifting downstream, bouncing over rapids, and hiking to so many familiar spots, I’d spent the week silently saying goodbye to all the scenes that had moved me so profoundly on my ten visits. As I composed and clicked, I couldn’t help feel overwhelmed by the realization that this magic place had bestowed a divine parting gift.
I Still Do My Grand Canyon Monsoon Workshop
Workshop Schedule || Purchase Prints || Instagram
Grand Canyon Raft Trip Collection
Click any image to scroll through the gallery LARGE


Navigating the Path to Exceptional
Posted on May 20, 2025
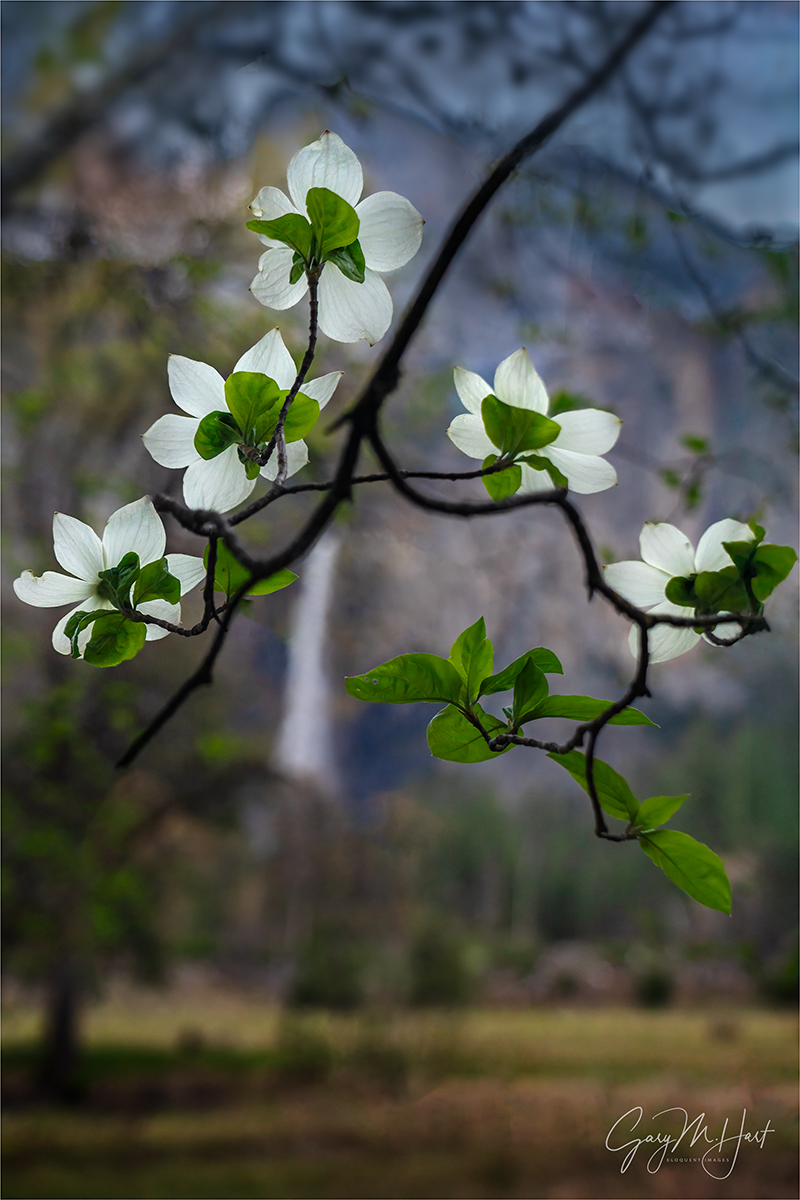
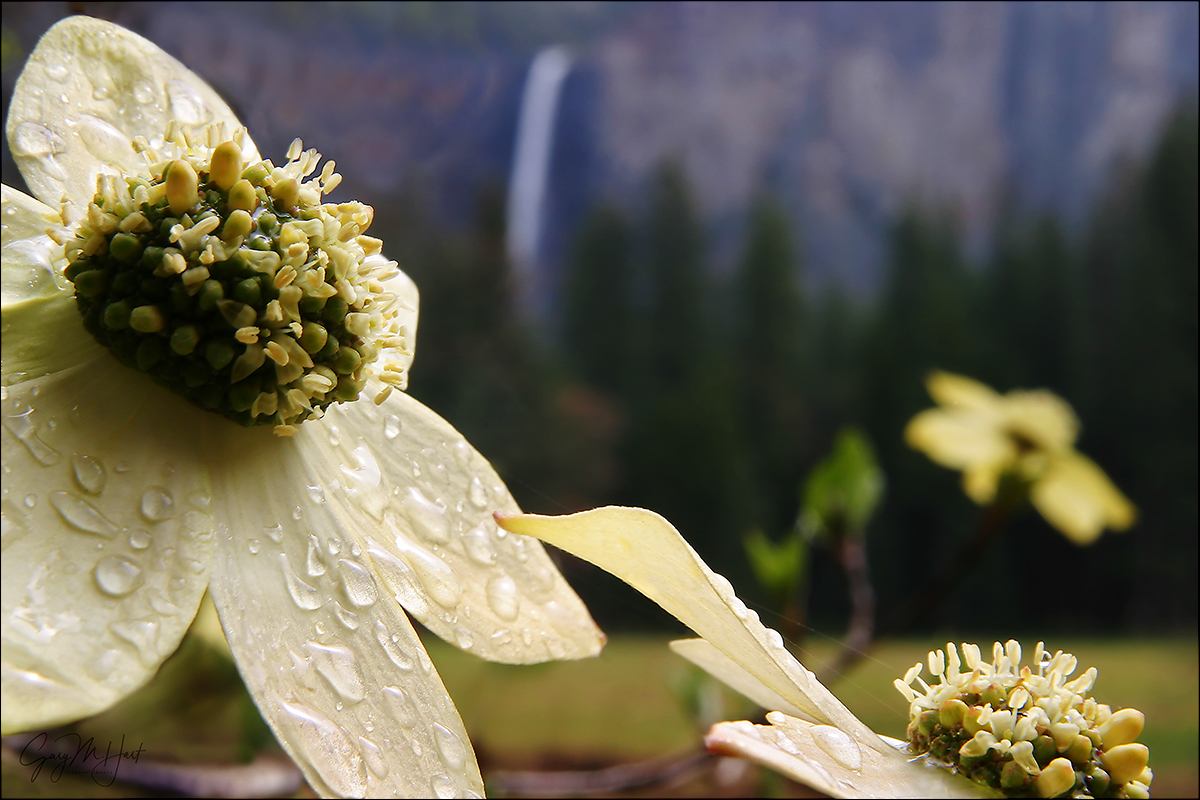
Bridalveil Fall and Dogwood, Valley View, Yosemite
Sony a7R V
Sony 24-105 f/4 G
ISO 800
f/4
1/250 second
Who doesn’t love being exceptional? Exceptional among your friends, or in your camera club, among your peers, or even in the world. Though I suspect the happiest photographers are simply content with being the best possible photographer they can be without measuring themselves against others, what fun is that?
Once upon a time, capturing exceptional images required little more than being at the most beautiful spots during the most spectacular conditions, and having a general sense for composition and metering. Today? Not so much. While there’s nothing wrong with chasing beautiful locations and conditions, these days when you work hard to get someplace special at just the right time, there’s a pretty good chance you won’t be the only one there. (But that doesn’t mean you should stop chasing beauty for beauty’s sake.)
In a world where pretty much everyone carries a camera 24/7, universal access to information makes “expert” guidance just a click away, and there’s virtually no such thing as a “secret” location, I’m afraid the “exceptional” bar just keeps rising. So, instead of settling for beautiful scenes in beautiful conditions (not that there’s anything wrong with that), how can we create images that truly stand out?
Laying the foundation
The key to capturing images that are more creative than cliché starts with understanding the vast difference between your camera’s view of the world and your own. Rather than forcing your camera to see the world as you do, lean into those differences and reveal the world in ways the eye can’t.
Fortunately, the biggest differences between camera and human vision have a corresponding exposure variable to manage them: for depth there’s aperture (f-stop); for motion we have shutter-speed; and ISO gives us control over light sensitivity. Even though you can get a perfect exposure with many combinations of these three exposure variables, there’s often only one combination where all the tumblers fall into place for the perfect combination of depth, motion, and light.
For example, photographing a crashing wave at the beach, (depending on the decisions I make with my exposure variables) the water in a perfectly exposed image could range from individual water droplets frozen in midair, to a homogenous froth of hazy white—or any degree of blur in between. Or, when I photograph a poppy that stands out in a field of wildflowers, my perfectly exposed image could range from every flower sharply defined, to only my subject-poppy sharp and the rest of the flowers some degree of soft—so soft, some are simply shapeless blobs of color.
One more factor to consider before making your depth of field choice, is the difference between humans’ naturally stereoscopic, 3-dimensional view of the world, and the camera’s single lens, 2-dimensional perspective. Even though our cameras can’t render our 3-dimensional world in their 2-dimensional medium, our perspective choices are essential to creating the illusion of depth that elevate an image.
Putting it all together
All of these factors should inform the decisions you make in the field. Instead of settling for the obvious, the path to “exceptional” requires conscious awareness of front-to-back relationships in your frame, and careful, deliberate exposure variable choices to manage the scene’s depth, motion, and light.
Which brings me to this image from last month’s Yosemite Waterfalls and Dogwood photo workshop. For good reason, Valley View (aka, Gates of the Valley for Yosemite purists) is almost certainly second only to Tunnel View on the list of most popular Yosemite photo spots. Which of course is somewhat problematic for those of us seeking to be exceptional.
Pulling into the parking lot here, before you’re even out of the car your eyes are slammed with a view of El Capitan, Cathedral Rocks, and Bridalveil Fall, with the Merced River in the very near foreground. And because the most obvious beauty is very first thing you see at Valley View, many photographers head straight down to the river to claim their version of this classic shot without first considering the other great options here.
For starters, there are three primary places to photograph Valley View: the first, and most obvious, is the view directly in front of the parking area that I just described; next, is the view slightly downstream where, instead of photographing across the river, you can photograph upstream and make El Capitan your prime subject with more foreground options; finally, there’s the view of Bridalveil Fall and its reflection, found just upstream from the parking area.
Each time I arrive at Valley View, I survey the conditions before deciding where to set up. Sometimes the whole scene is fantastic and I stay in front of the parking lot for my version of the shot that’s been taken a million times. But when El Capitan is getting the best light, I usually head strait downstream and try to build a foreground from the rocks, rapids, logs, and grass mounds. And when I want to feature Bridalveil Fall and Cathedral Rocks, I go (just a little) upstream for reflections and maybe a few protruding or submerged rocks. Regardless of my choice, I’m rarely more than 100 feet from my car, but my results are completely different.
Wherever I am, every time I compose a scene, I try to find a foreground that complements my background, or vice versa. At Valley View, my primary subject is almost always in the background (some combination of El Capitan, Cathedral Rocks, and Bridalveil Fall), so I’m usually trying to find a complementary foreground. Looking at the gallery below, you can see that sometimes I succeed, and sometimes I simply settle for a beautiful scene.
Bridalveil Dogwood, Yosemite
What sets today’s image apart in my mind is that my primary subject is in the foreground. I have the dogwood to thank for that. In fact, even though the results are entirely different, this is the very same tree I used for one of my oldest (and still favorite) images.
When I took my original Bridalveil Dogwood image, I visualized the concept (close dogwood subject, soft Yosemite icon background) on my drive to the park, then spent the day driving around until I found this scene.
Since then, that experience has made me very aware of the relationship between this dogwood tree and Bridalveil Fall, and I can’t help checking it out when the dogwood are in bloom. But, aside from the fact that I wasn’t interested in repeating myself, I couldn’t have duplicated that image even if I wanted to, because so much has changed in the last 20+ years.
First, the conditions were completely different. In the original scene, I benefited from clouds that provided softbox light, and a gentle rain and sprinkled water droplets everywhere. This time I was working with a mostly clear sky that, while less than ideal in many ways, made the backlit flowers (technically bracts, but I’m sticking with flower) and leaves light up as if illuminated from within.
The other significant difference was the tree itself, which had grown so much that my once clear line of sight from the flowers to Bridalveil was now clogged with branches, leaves, and other flowers. So instead of getting super-close to one flower, I identified an inverted v-shaped branch sporting a collection of backlit flowers.
Moving back, I shifted until Bridalveil Fall was framed by the flowers. Then I zoomed my 24-105 lens tight and open the aperture wide for maximum background softness. The flowers swaying in a slight breeze, I bumped my ISO to 800 to ensure a fast enough shutter speed. I took a half-dozen or so image, each with micro-adjustments to the composition, until I was satisfied.
Disclaimer
Is this picture “exceptional”? I have no idea. That really isn’t even my call. In fact, many of my images that feel exceptional to me barely register a reaction from others; then I’ll share an image that feels pretty ordinary to me, and people will rave about it. So who knows? But since chasing other people’s definition of exceptional can make you crazy, I just think I’ll call any image that makes me happy exceptional (in my own personal Universe) and leave it at that.
Lots of Yosemite Photo Workshops Here
Valley View: Variations on a Scene
Click any image to scroll through the gallery LARGE


