Color in nature
Posted on February 3, 2012

Red Sky, Oak at Sunset, Sierra Foothills
On consecutive nights last week the post-sunset sky featured a conjunction between the waxing crescent moon and Venus. This event had been on my calendar for a while, so when the first date arrived I was a little concerned to see thin clouds assembling in the west. Nevertheless, my camera and I headed to the foothills south and east of home, hoping to catch the celestial show above silhouetted oaks.
While the moon was too thin to penetrate the clouds that evening, the crimson sunset made my drive absolutely worthwhile. Here I used my 100-400 lens to isolate a hilltop oak (it shares this perch with a mate just out of the frame to the left) against the sunset. To hold the color and ensure that the tree and hillside remained in silhouette (totally black), I spot-metered the sky and set my exposure to +2/3 (above a middle tone).
In contrast to my previous post (a dawn moonset on the Big Sur coast), this image required virtually no processing. While I may have spent close to an hour preparing the Big Sur moonset image, this oak tree at sunset probably required less than five minutes from opening the raw file to saving a completed version, ready for output–and the bulk of that time was (tedious) cloning to remove sensor dust. No layers, no levels, curves, or saturation adjustments, no dodging and burning–nothing. But I know what you’re thinking: How do you get color like that without processing? I thought you’d never ask.
I’m convinced people forget how vivid color is in nature. How else to explain the skeptical looks and cynical questions when I post an image like this? To these people my brain thinks, “You don’t get outside enough,” but my mouth politely suggest that soon, very soon (tonight?), they install themselves on a vantage point with a good view of the western horizon about 30 minutes before sunset, and not take their eyes off the horizon until at least 30 minutes after sunset. No camera allowed. Just focus on the color, and I don’t think you’ll ever doubt sunset color again.
Does this mean that nobody exaggerates color in Photoshop? Of course not. I love color, and actively look for it when I shoot, and do certain things at capture to ensure that I get it. But I’m pretty sensitive to the difference between natural and manufactured (manipulated, enhanced, or whatever you want to call it) color. I find manufactured color is usually incongruous with the rest of the scene. For example, I’ve noticed that many HDR images often have an impossible combination of vivid reds and greens.
One of the most common causes of “lost” color is overexposure–not necessarily blown highlights, but hues washed out by sunlight. Left to its own devices, your camera’s meter might attempt to extract some detail from the hillside and tree, which of course would add exposure to the entire scene and dilute the red in the sky. Which is exactly why I never let my camera make decisions for me.
Digital photography the old fashioned way
Posted on January 29, 2012

Moonlight, Garrapata Beach, Big Sur
Canon EOS-1Ds Mark III
4 seconds
F/8
ISO 400
35 mm
Photoshop processing sometimes gets a bad rap. There’s nothing inherently pure about a jpeg file, and because a jpeg is processed by the camera, it’s actually less pure than a raw file. As a general rule, the less processing an image needs, the better, but sometimes raw capture followed by Lightroom/Photoshop processing is the only way to a successful image.
I’ve always considered myself a film shooter with a digital camera. But that doesn’t mean that I’m opposed to processing an image—in fact, processing is an essential part of every image. But just as Ansel Adams visualized the finished print long before he clicked the shutter, success today requires understanding before capture a scene’s potential, and the steps necessary to extract it later Lightroom/Photoshop.
For example
A couple of weeks ago, while co-leading Don Smith’s Big Sur photo workshop, our group had an early morning shoot that was equal parts difficult and glorious. The plan was a Garrapata Beach sunrise featuring the moon, one day past full, dropping into the Pacific at sunrise. But high tide and violent surf banished us to about 500 square feet of sheltered sand, and the cliffs above the beach (it’s bad for business when workshop participants get swept out to sea). Compounding the difficulty, the most striking aspect of the scene, a nearly full moon, was too bright for the rest of the scene. But despite the morning’s difficulties, I set to work trying to make an image because, well, that’s what photographers do.
As much as I wanted to be on the sand, aligning the moon with the the best foreground from down there would have made me a sitting duck for the waves. So I made my way along the cliff to an off-trail spot above a group of surf-swept rocks. It turns out the higher perspective was perfect for emphasizing the reflected moonlight that stretched all the way to the horizon.
With long exposures on a tripod, photographing the moonlight and beach wasn’t a problem. But adding the daylight-bright moon burning through the pre-dawn darkness made capturing the entire range of light in a single frame (a personal requirement) difficult, and perhaps impossible. Nevertheless, I spot-metered on the moon to determine the maximum exposure that would retain the ability to recover overexposed lunar detail later in the Lightroom raw processor. But even after maximizing the moon’s exposure, I didn’t have nearly enough light for the rest of the scene without first darkening the sky further using five stops of graduated neutral density (stacking my Singh-Ray three-stop reverse and two-stop hard GND filters). So far so good.
Satisfied that I could make the exposure work, but with very little margin for error, my next concern was finding a shutter speed that allowed enough light without risking motion blur in the moon. Because I needed sharpness throughout the frame, from the beach right below me all the way out to the moon, I couldn’t open all my aperture all the way. Whipping out my DOF app, I computed that focusing twenty feet away at f8 would give me sharpness from ten feet to infinity. Bumping to ISO 400 at f8 brought my shutter speed to four seconds, a value I was confident would freeze the moon enough. I clicked several frames to get a variety of wave effects, ultimately choosing this one for the implicit motion in foreground wave’s gentle arc.
In Lightroom, I cooled the light temperature slightly to restore the night-like feel. Using five GND stops at capture required significant Photoshop brightening of the sky to return it to a reasonable range. A few years ago this would have introduced far too much noise, but the latest noise reduction software (I use Topaz) is amazing. As expected, even after all my exposure and processing machinations, I still needed to process the raw file a second time to recover the highlights in the moon. Because the two versions were the same capture, combining them in Photoshop was a piece of cake.
A Gallery of Favorite Seascapes
Click an image for a closer look, and a slide show. Refresh your screen to reorder the display.


")


Alpenglow: Nature’s paintbrush
Posted on January 24, 2012
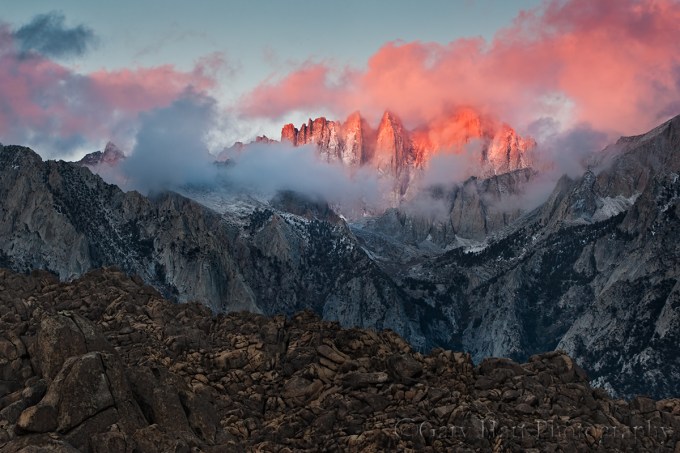
Red Dawn, Mt. Whitney and the Alabama Hills, Eastern Sierra
Canon EOS-1Ds Mark III
168 mm
.8 seconds
F/11
ISO 100
The foreground for Mt. Whitney is the rugged Alabama Hills, a disorganized jumble of rounded granite boulders, familiar to many as the setting for hundreds of movies, TV shows, and commercials. These weathered rocks make wonderful subjects without the looming east face of the southern Sierra. What makes this scene particularly special is the fortuitous convergence of topography and light that rewards early risers with a skyline dipped in pink–add a few clouds and it’s a photography trifecta.
We’ve all seen the pink band above the horizon opposite the sun shortly before sunrise or after sunset. Sometimes called “the belt of Venus,” this glow happens because sunlight that skims the Earth’s surface just before sunrise (or shortly after sunset) has to battle its way through the thickest part of the atmosphere, which scatters the shorter wavelengths (those toward the blue end of the visible spectrum), leaving just the longer, red wavelengths capping the horizon. When mountains jut high enough to reach into this region of pink light, we get “alpenglow.” Towering above the terrain to the east, the precipitous Sierra crest, anchored by 14,500 foot Mt. Whitney (the highest point in the contiguous 48 states) and 13,000 foot Lone Pine Peak, is ideally located to receive this sunrise treatment.
The image above was captured on a frigid January morning. While the best light on the Sierra crest usually starts a couple of minutes before the “official” (flat horizon) sunrise, this morning Mt. Whitney hid behind the clouds until the alpenglow was well underway. Like a piece of art waiting for its spotlight, the cloudy shroud was pulled back just as the sunlight struck Mt. Whitney, and for a couple of minutes it appeared as if a giant paintbrush had dabbed the swirling canvas with pink.
Workshop Schedule || Purchase Prints || Instagram
A Mt. Whitney Gallery
Click an image for a closer look, and to view a slide show.


Trust your instincts
Posted on January 20, 2012

Emergence, Half Dome from Olmsted Point, Yosemite
Canon EOS-1Ds Mark III
70-200L F4
3.2 seconds
F/16
ISO 400
This week I’ve spent some time going through past images that I just haven’t had time to get to. Unlike many of the images I uncover by returning to old shoots, this one from the final night of my October 2010 Eastern Sierra workshop wasn’t a surprise–the sky over Half Dome that night was magic, something I’ll never forget. Shortly after returning home I selected and processed one, but in conditions like that I always shoot enough variety of compositions that I knew there must be more there. While I have a general rule to only select one image of any scene from a single shoot, this is a perfect example of why I refuse to be bound by rules.

From the Clouds, Half Dome from Olmsted Point, Yosemite
Canon EOS-1Ds Mark III
24-105L F4
5 seconds
F/16
ISO 400
Comparing the two images from that night, what strikes me most isn’t the similarity, but the differences. Despite being captured less than a minute apart, they illustrate creative choices that underscore a point I keep hammering on: Photographers are under no obligation to reproduce human “reality” (because it can’t be done). Because photographic reality is an impossible moving target, my obligation as a photographer is to my camera’s reality. And if I do things right, I can use my camera’s reality to transcend visual reality and convey some of the emotion of the moment.
So, in the “Emergence” (tight vertical) composition, I chose to emphasize Half Dome’s power and nothing else. I centered Half Dome and exposed for its granite face, letting the swirling clouds darken and the foreground go completely black. The dark clouds above Half Dome cap the top of the scene–there’s really nowhere else for your eye to go than Half Dome.
Today’s “From the Clouds” composition is more about the moment’s grandeur. I widened the perspective considerably and brightened my exposure enough to encourage your eye to wander about the frame a bit. There’s no question as to where your eye will end up, it just takes a little longer to get there. In other words, expanding the perspective and providing more light invites you to leave and return to Half Dome at your leisure.
Did I consciously plot this that night? Nope. Honestly, I’m rarely this analytical when I shoot–I just don’t want my left (logical) brain to distract my right (creative) brain. But I do believe that if you cultivate (and trust!) your intuition, creative decisions like this will happen organically. (But learn metering and exposure until it becomes automatic!)
So while I had no conscious thought of how to control your experience of this scene, I’ve done this long enough to know that these creative choices don’t just happen by accident. Without getting into the divine intervention claims trumpeted by some photographers (label it what you will), I believe everyone can access untapped creative potential that takes them far beyond what can be accomplished with the conscious mind. And it starts with trust.
BTW—I prefer the first one (Emergence).
There’s no whining in photography
Posted on January 14, 2012

Moonset, Soberanes Point, Big Sur
Canon EOS-1Ds Mark III
10 seconds
F/16
ISO 50
28 mm
January 2012
I just wrapped up a long week that underscores the best and worst of my life as a landscape photographer. In the plus column I’ll put visits to Big Sur and Yosemite and the opportunity to spend quality time with a great bunch of photographers; in the negative column goes long days, dull weather, and lots of solo miles.
Sunday morning I left for Big Sur to co-lead Don Smith’s winter workshop, where we spent three-and-a-half days yo-yoing up and down one of the most beautiful coasts in the world. Wednesday night, after photographing sunset with the group at Point Lobos, I made the long trip home, arriving with barely enough time to repack my suitcase and gas-up before hitting the road for Yosemite Thursday afternoon. Following a sunrise to sunset day guiding two photographers from the Netherlands around Yosemite, I drove home late Friday.
But when a long week includes scenes like today’s image, you can see I have little to complain about. I’m extremely fortunate to live where I do, less than four hours drive from locations people travel around the world to visit: Yosemite, Big Sur, San Francisco, Point Reyes, Muir Woods, the Sonoma and Mendocino coasts, the Napa and Sonoma Wine Country, Mt. Shasta, Mt. Lassen, Lake Tahoe, and Mono Lake.
As has become California’s norm this winter, Big Sur delivered mild temperatures and cloudless skies. But, since poor conditions should never be an excuse for staying inside, here’s a little secret for dealing with bland skies: the best light for photography comes before the morning sun reaches the scene, and after the evening sun leaves. Without direct light, the entire landscape is bathed in even, contrast-smoothing light reflected from the sky, and the pastel hues of the Earth’s shadow colors the sky and paints the horizon. All you need to capture the magic is a decent camera (any digital SLR will do) and sturdy tripod.
I time all of my moonrise/moonset shoots for the small window when the moon is in this day-night transition zone—often, the more clear the sky, the better the twilight color on the horizon opposite the sun (and right where the full moon sets/rises). But adding a full moon in limited light like this can be tricky—the moon is daylight bright, while the rest of the scene is in deep shade. Some photographers blend multiple images to handle the extreme contrast; I prefer graduated neutral density filters. For example, to capture the above image of the moon setting into the Pacific at Big Sur’s Sobranes Point, I used a Singh-Ray three-stop reverse GND filter to subdue the moon and hold the sky’s color during an exposure that had to be long enough to reveal the foreground detail.
It was more night than day when Don and I got the group to Sobranes Point for our sunrise shoot. A white strike of moonlight reflected on the black Pacific, and nearby sea stacks, mere shapes in the dark, were under continuous assault from the violent surf. Following a brief orientation, everyone spread out along the cliffs—Don led some of the group southward along the cliffs; I guided the rest northward toward a not yet visible arch. When my eyes adjusted and the light came up, I wound my way along a narrow path that ended on a granite prominence jutting thirty feet or so above the ocean. While most of the waves crashed harmlessly beneath me, every few minutes a particularly large surge would strike at just the right angle, obliterating my view with spray that rose twenty feet above my head (see below). Had the generally prevailing onshore wind not been absent that morning, I’d have been thoroughly drenched. After the first wave explosion I was a bit uneasy about my location, but once I realized I was out of range I kind of enjoyed the ride.
All the visual activity makes this a tricky scene to photograph—I’ve shot here a number of times, but until now have never come away with anything that completely satisfies me here. With most of the action is on the right side of the frame, I’ve always found wide, horizontal compositions unbalanced. Going for a tighter vertical orientation to emphasize the strong coastline, I never find a left edge that doesn’t cut the sea stacks awkwardly. And horizontal or vertical, with a host of smaller rocks protruding from the nearby surf, I struggle placing the bottom of my frame. But adding the moon’s significant visual weight to the left of the frame gave me the horizontal balance I wanted, and hiding the protruding foreground rocks behind the weathered granite cliff gave a solid base for my composition.
When I finally found a composition that worked, I needed to find the focus point that would maximize the depth of field. A quick check of the hyperfocal app on my iPhone told me that f16 at 28mm would give me sharpness from 2 1/2 feet to infinity if I focused on the foreground granite about five feet away. To ensure correct focus, I used my camera’s live view and magnified my focus point 10x. There wasn’t enough light to even think about freezing the surf at a useable ISO, so I just went with a long exposure that smoothed the water.
When photographing waves, many photographers fail to account for the change from one frame to the next. So, knowing my composition was locked securely in place on my tripod, I stood back and monitored the waves closely, clicking about a dozen frames to capture a range of surf action, from placid to violent. This ten second exposure included a single moderate wave and several minor swells.
I was probably cold, damp, and sleepy, but I don’t remember. And it would have been easy to complain about the boring skies, or feel sorry for myself during my many lonely hours behind the wheel, but mornings like this one are exactly why I do this, and a perfect example of why there really is no whining in photography.

The coast is clear
Posted on January 6, 2012

Out to Sea, Garrapata Beach, Big Sur
California is in the midst of the strangest winter I’ve ever experienced: a rainy season without a drop for nearly two months, daytime highs consistently in the sixties, and a virtually non-existent snowpack in the Sierra. January days in the Central Valley are usually wall-to-wall gray; nights are an opaque muck. But this year it’s been an endless cycle of blue skies and twinkling stars. Mornings have been just chilly enough to fool me into donning my winter flannel or wool; by noon I’m rummaging the back of the closet for a polo shirt I haven’t worn since October.
If I sound bitter about this eternal spring, it’s because I feel cheated–winter is for nature photographers. Not only does dramatic weather make great photography, winter’s frigid temperatures, biting wind, and monotonous rain drive the general public inside, leaving the landscape to us photographers. But this winter the most productive thing I’ve done so far is pack my camera off to Canon for some long postponed TLC. Sigh.
Okay, enough whining. Honestly, every photographer needs conditions to throw a curve from time to time, a reminder that nature photography isn’t all sunsets, rainbows, and shafting light. True creativity rarely comes when Mother Nature smacks you between the eyes with something spectacular, it’s usually best when she forces you outside your box to see the things you miss when the sky lights up or a rainbow arcs.
With that in mind, I head off to Big Sur to co-lead Don Smith’s winter workshop next week. The forecast is for more of the same, but I’m looking forward to the challenge. I do about 80 percent of my photography in the mountains and foothills, so what better location to stretch myself than Big Sur–and what better conditions than blank skies?
Last year Don and I guided the group to Garrapata Beach for sunset. There’s a lot happening here and everyone quickly scattered–some stayed on the cliffs above, some moved up to the creek and calla lilies on the north end of the beach, and others stayed down among the rocks on the south end. To those who stayed near me, I demonstrated some shutter techniques to get different effects from the surf.
When it became clear that the sky wasn’t going to do anything special, I turned my attention to the sand and waves at my feet. To emphasize the textured sand, I opted for an extremely wide, vertical composition, using rocks protruding from the surf a couple of hundred yards distant to frame the upper portion the scene. The bland sky I relegated to a thin stripe at the extreme top of the frame. I decided that f16 gave gave me the best combination depth of field and minimal diffraction–a larger aperture would have risked loss of sharpness throughout the sand; a smaller aperture would have risked loss of sharpness due to diffraction.
When photographing waves, once I get my composition set I click many frames, carefully timing them for various effects. On this evening I added a variable neutral density filter, dialing in a variety of shutter speeds by adjusting the amount of light. Watching my LCD, I decided that my favorite effect was a one second (or so) exposure of a receding wave, and managed several frames like the one above.
I look at this image as the start of a process–it may very well never become particularly “successful” (whatever that means), but I learned a few things that I’m looking forward to applying next week. Stay tuned….
Have you ever seen a moonbow?
Posted on December 29, 2011

Moonbow and Big Dipper, Lower Yosemite Fall, Yosemite
I’m fortunate to have a ringside seat for many of Mother Nature’s most exquisite phenomena, but few excite me more than the shimmering arc of Yosemite’s moonbow. A “moonbow”? I thought you’d never ask….
As you may have figured, a moonbow is a rainbow caused by moonlight. (Don’t be fooled by the fact that your spellcheck doesn’t recognize “moonbow”–it’s a very real thing indeed, and the more technically correct “lunar rainbow” designation just doesn’t seem to convey the magic.) Because a moonbow is a rainbow, all the natural laws governing a rainbow apply. But all this physics isn’t as important as simply understanding that your shadow always points toward the center of the rainbow/moonbow; the rainbow/moonbow will only appear when the sun/moon is 42 or fewer degrees above the horizon (assuming a flat horizon)–the higher the moon/sun, the lower the rainbow. When the moon or sun is above 42 degrees, the rainbow disappears below the horizon.
Each spring, High Sierra snowmelt surges into Yosemite Creek, racing downhill and plunging into Yosemite Valley below. A Yosemite icon, Yosemite Falls drops 2,500 feet in three magnificent, mist-churning steps. On spring full moon nights, light from the rising moon catches the mist, which bends it into a shimmering arc. John Muir called this phenomenon a “mist bow,” but it’s more commonly known today as a moonbow.
While a bright moonbow is visible to the naked eye as a (breathtaking) silver band, revealing the bow’s color requires the camera’s ability to accumulate light. The above image, from a couple of years ago, was captured near the bridge at the base of Lower Yosemite Fall. Not only was it crowded (the moonbow is no longer much of a secret), wind and mist made the necessary 20- to 30-second exposures an exercise in persistence. To include the Big Dipper in this frame (I love the way it appears to be the source of the fall), I composed vertical and wide (19mm). This was a 30 second exposure at f4 and ISO 400.

Moonbow and Big Dipper, Yosemite Falls, Yosemite
Understanding the basic physics of a rainbow makes it possible to photograph a moonbow from other, less crowded locations in Yosemite Valley. In the image on the left, the moon had climbed so high that the moonbow had almost dropped from view. And it was so small at this point that I couldn’t see it at all with my unaided eyes. But I knew it would be there, so I exposed the scene enough to make it nearly daylight bright, again orienting the composition vertical and wide to include the Big Dipper.
<< FYI, as of this writing, I still have a couple of openings in my two 2012 Yosemite Moonbow photo workshops, April 2-5 and May 2-5. >>
Hope for the best, prepare for the worst
Posted on December 20, 2011

First Snow, El Capitan, Yosemite
A regrettable reality of my life is that the best conditions for photography are the absolute worst conditions to be outside. Fortunately, I was hardened by decades of Giants games at Candlestick Park, the coldest place on Earth. As a photographer, I continue to embrace my mantra for warmth at the ‘Stick: Too much is always better than not enough.
For me, cold weather photography is all about layers: some combination of silk, wool, down, and Gore-Tex. I generally start cold winter mornings with wool socks, waterproof and insulated boots, silk long-johns, flannel- or fleece-lined pants, long-sleeve wool or silk upper base layer, wool Pendleton shirt, down jacket, gloves (I have a variety from thin to thick), and a wool hat. I add or remove layers as conditions dictate. If it’s raining or snowing, I add waterproof pants, a waterproof parka, and a wide-brim waterproof hat to keep myself dry; I use an umbrella to keep my gear dry while shooting.
The basic clothes I pack in my suitcase before each trip, but the gloves/hats/umbrella etc. are in a gym bag that is always in my car. In the car I also keep an extra pair of shoes and socks, towel, and garbage bag (to cover my camera when it’s on the tripod). With all this paraphernalia, I’m nice and toasty in whatever extremes the Sierra throw at me. And I can never use weather as an excuse for missing a shot.
While it was quite chilly the morning I captured El Capitan with a veneer of fresh (and unexpected) snow, I didn’t miss a beat. I had packed for cold, and always have wet weather gear in the car. Not only did my waterproof attire keep me warm and dry in the show, it also enabled me to traipse through the frigid Merced River to the small, rocky island that gave me the perspective I wanted. Later, back at the car, I used a towel borrowed from my hotel room (and returned!) to dry my tripod.
Of course a little bit of planning helps. For example, in Hawaii the problem isn’t cold, it’s rain. Since the temperatures in Hawaii are so comfortable, I wear as little as possible, and only clothes that dry fast. Cotton is a big no-no–instead my 24×7 wardrobe is some variation of running shorts or swimsuit, running tank top or T-shirt, and flip-flops or sandals. When it rains, I play in the rain, while the umbrella and plastic garbage bag (poor man’s waterproof camera cover) that live in my camera bag keep my gear dry.

Raindrops, Hawaii Tropical Botanical Garden, Hawaii It was pouring when I took this, but the only thing I needed to worry about was keeping my camera dry.
Finding your camera’s “truth”
Posted on December 17, 2011

Gossamer Twilight, Pfeiffer Beach, Big Sur
Something I teach, write, and lecture on frequently (ad naseum?) is the photographer’s obligation to understand, not fight, the camera’s vision. Some people seem to get this; others, not so much. So I’ve decided to try a slightly different tack.
Visual “Truth” is relative
Without getting too philosophical, it’s important to understand that, like your camera, your view of the universe is limited and interpreted. In other words, there is no absolute visual truth. Instead, we (you, me, and our cameras) each have our own view of the world that’s based on many factors–some we can control, others we can’t. When you look through a viewfinder, the more you turn off your visual biases and understand your camera’s, the more successful your photography will be.
Limited vision
Before lamenting your camera’s limitations, pause to consider that what you and I see is incredibly limited as well. The visible (to the human eye) portion of the electromagnetic spectrum is a minuscule part of the infinite continuum of electromagnetic radiation bombarding each of us, every instant of every day. For example, X-ray machines “see” waves in the one nanometer (one billionth of a meter) range; TVs and radios “see” waves that are measured in centimeters; humans, on the other hand, only see waves between (about) 400 and 750 nanometers.
Using this knowledge, astronomers peer into space with tools designed to see objects at wave lengths invisible to us. X-rays allow doctors to view bones hidden beneath opaque skin, and night vision technology uses “invisible” (to us) infrared radiation (heat) to see objects complete darkness. In other words, in the grand scheme of things, there’s no single absolute visual standard–it’s all relative to your frame of reference.
The camera has its own frame of reference. While it records more or less the same visible spectrum our eyes do, the camera is missing an entire dimension: depth. Not only that (since we’re not talking about movies here), a camera only returns a snap of a single instant. And we all know about limited dynamic range and depth of field.
Despite these differences, photographers often go to great lengths to force their camera to record what their eyes see. Not only is this impossible, it doesn’t take advantage of the camera’s ability to see things in ways we don’t.
Interpreted vision
Our visual input is interpreted before we perceive it, in much the same way a camera’s input is processed before it’s output (to a monitor, printer, or whatever). Visual processing happens in our brain, which makes adjustments for things like color temperature, perspective, motion, and so on.
Likewise, every photograph must be processed (interpreted) in some way before it can be viewed, either by the camera (if camera gives you a jpeg or tiff), or by the photographer, using Photoshop or some other processing software.
Visual synergy
In most ways, the eye’s ability to capture light exceeds that of even the best cameras. On the other hand, the camera does do a few things our eyes can’t do: In the image above, captured a year ago at Pfeiffer Beach on the Big Sur coast, I used my camera’s ability to accumulate light to reveal things that, while invisible to my eye, were still quite real.
According to the EXIF data (try getting your eye/brain to record that), the sun had set twenty minutes prior, but my camera was still able to see in the limited light. This twenty second exposure revealed more detail than my eye registered. In doing so it smoothed the surf into a gauzy mist, and captured reflected color lost in my visual darkness.
Another thing I really like about my camera’s take on this scene is the way it reveals the transition of light and color as the view moves away from the sun. Though the eye does register it, our brains, influenced by the subconscious misperception that a cloudless sky is a uniform sky, often overlook subtle differences like this. But capture it in an image and the transition is both striking and beautiful.
So what about the blurred water?
People who criticize blurred water images for being “false” because that’s not the way water is, completely miss the point (I won’t get into the whole cliché argument here, which has more validity). My question to them is, how would you choose to capture water? (It’s a trick question.) When they answer frozen sharp, I ask them how many times they’ve actually seen a wave or water droplet suspended in midair. (Checkmate.)
The point is, a still camera simply “sees” motion differently than we do. Rather than holding our images to an unattainable human standard, we should feel free to appreciate and convey our cameras’ unique perspective. In this Pfeiffer Beach scene, I like the way smoothing the water to an ethereal gauze more accurately conveys the inviting mystery of the sea.
What is real?
Is this image real? While it’s nothing like what I saw, it’s still a very accurate rendering of my camera’s reality. Understanding my camera’s vision enabled me to share a perspective that expands my limited vision and transcends human reality. Pretty cool.
Finding order in nature, one leaf at a time
Posted on December 6, 2011

Autumn Leaf, Bridalveil Creek, Yosemite
Canon EOS-1Ds Mark II
20 seconds
F/25
ISO 100
168 mm
“Did you put that leaf there?”
I’m frequently asked if I positioned a leaf, moved a rock, or “Photoshopped” a moon into an image. My (truthful) answer is always the same: “No.” I suspect I’m asked this so much because I aggressively search for natural elements and patterns to isolate and emphasize–they’re not hard to find if you look.
We all know photographers who have no qualms about arranging their scenes to suit their personal aesthetics. The rights and wrongs of that are an ongoing debate I won’t get into. But the pleasure I get from photography derives from revealing nature, not manufacturing it. There’s enough naturally occurring beauty to keep me occupied for the rest of my life.
Natural order
Nature is inherently ordered–in the big picture “nature” and “order” are synonyms. But humans go to great lengths to control, contain, and manage the natural world. We have a label for our failure to control nature: chaos. Despite its negative connotation, what humans perceive as “chaos” is actually just a manifestation of the universe’s inexorable push toward natural order.
For example
Imagine all humans suddenly removed from Earth. No lawns would be mowed, buildings maintained, floods “controlled,” oil drilled, etc. Let’s say we return in 100 years–while the state of things would no doubt be perceived as chaos, the reality is that our planet would in fact be closer to its natural state. And the longer we’re away, the more human-imposed “order” would be replaced by natural order.
Embracing the concept that nature is inherently ordered makes it easier to find order when you explore the world with your camera; photographic success suddenly becomes a function of your ability to convey nature’s order with your camera. Elements and relationships, lost in the confusion of 360 degree human sensory input, can snap into coherence in the rectangular confines of a photograph.
What does all this have to do with a leaf on a rock?
The leaf clinging to a wet rock was just one of thousands of colorful leaves decorating the cascades of Bridalveil Creek in Yosemite. By carefully positioning it within the finite boundaries of my frame, I was able to make the leaf stand out from the confusion of the competing elements surrounding me. In other words, I’m controlling your experience of this moment by giving your eyes a single element on which to focus, and capturing it against a simple background that allows you to plug in your own sensory memories. Hear the water? Feel the chill?
An autumn gallery
Click an image for a closer look, and a slide show. Refresh the screen to reorder the display.


