Breaking the Rules
Posted on July 3, 2024

Sky on Fire, Lake Wakatipu, New Zealand
Sony a7R V
Sony 24-105 f/4 G
ISO 50
f/18
25 seconds
Let’s have a show of hands: Who feels like their photography has stagnated? Let me suggest to all with your hands up that what’s holding you back may be the very rules that helped elevate you to your current level of proficiency. I’ll be the first to acknowledge that rules are important—the glue of civilization in fact. Bedtimes, homework, and curfews got us through childhood and taught us to self-police as adults. Now we get enough sleep (right?), meet deadlines at work and home, and with very little supervision toe the line well enough to have become productive members of society—give yourself a gold star! But let me suggest that many of us have become so conditioned to follow rules that we honor them simply because they’ve been labeled “rule.”
As important as this conditioning is to the preservation of society, our reluctance to question rules sometimes impacts areas of our lives that might not be so cut-and-dried. One example would be photographers’ blind adherence to the (usually) well-intended “experts” proliferating online, in print, and at the local camera club. These self-proclaimed authorities spew absolutes for their disciples to embrace: Expose to the right!; Never center your subject!; Tack-sharp front-to-back!; Blurred water is cliché! Blah, blah, blah…. (My standard advice to anyone seeking photographic guidance is to beware of absolutes, and when you hear/read one, beeline to the nearest exit because the truth is, there are very, very few absolutes in photography.)
Rules serve a beginning photographer the way training wheels serve a five-year-old on a bike: They’re great for getting started, but soon get in the way. At first, following expert guidance, beginners’ photography improves noticeably and it’s easy to attribute this success to the rules. But by the time that improvement slows or even ceases altogether, those rules have become so deeply ingrained that it’s difficult to realize they now hold us back. You wouldn’t do Tour de France with training wheels, would you?
If photography were entirely rule-bound, engineers could write algorithms and design robots to do our photography for us. But the very definition of creativity is venturing beyond the comfortable confines of our preconceptions to create something new: if you’re not breaking the rules, you’re not being creative.
The camera club paradox
Camera clubs are great for many reasons: they connect people with a common interest, facilitate the exchange of information and ideas, and provide a forum for sharing our photographic creations. Camera clubs spur us to get out and shoot when we otherwise might stay home, and offer beginners rules that provide a stable foundation upon which to build their craft.
But camera clubs can also be a breeding ground for self-proclaimed experts, a status often not conferred to the person most qualified, but to the person who spouts photographic dogma with the most authority. The result is well-intended but too often misinformed knowledge that infects a camera club like a virus.
I’m especially troubled when I hear of images shared in a camera club photo competition that were dismissed, without consideration, because they violated the designated “expert’s” idea of an unbreakable photographic rule. Here are a few of the most popular camera club “violations” (by no means a comprehensive list):
- Blown highlights
- No detail in the shadows
- Not sharp from front to back
- Centered subject or horizon
Each of these things can be a problem, but they can be a refreshing expression of creativity as well. I can show you multiple examples in my own portfolio that violate these rules. And even if breaking an accepted photography “rule” is a problem, refusing to consider an image because it violates someone’s definition of “perfect” discounts all that’s potentially good about it.
If you’re an aspiring photographer and someone dismisses an image for a technical violation, take a step back, inhale, and remind yourself that there are very, very few absolutes in photography. In general, it’s helpful to remember that no matter how strongly it’s stated, advice that doesn’t feel right (even if you can’t articulate why) doesn’t need to be heeded.
I love using blown highlights or completely black shadows to create a striking, distraction-free background for my primary subject. Through creative selective focus, placing all but a narrow range of a scene way out of focus is a great way to emphasize my subject and soften distracting detail. And I’ll center my horizon whenever I please, thank-you-very-much.
I’ve written about horizon placement many times in the past, but since these myths persist, I’ll bring it up again (and again, and again, and …). While this advice might benefit the beginner who automatically centers everything, most people who have owned a camera for more than a day are far beyond that point. And this horizon 1/3 from the top or bottom of the frame thing? Forget about it. I have no problem giving 80 percent, 90 percent, or even more of my frame to my sky or landscape, and neither should you.
Here’s my (comprehensive) list of guidelines for where to split the sky and landscape in your frame:
- Give the area with the most visual interest the most room.
That’s it. If your scene is all about the clouds (or stars, or rainbow, or…), put the horizon near the bottom of the frame and celebrate the clouds (or stars, or rainbow, or…). The better the sky (or the less interesting the foreground), the lower the horizon can go. Conversely, if the sky is boring, by all means, minimize it and feature the landscape. And if you’re lucky enough to have a sky and landscape of equal beauty, feel free to split the frame right down the middle.
About this image
Last week, for the first sunset of the annual New Zealand winter workshop Don Smith and I do each year, we took our group to Bennett’s Bluff vista on the road to Glenorchy, for a view of Lake Wakatipu and the Southern Alps. The prime view here faces west, toward 6000-foot Tooth Peak directly across the lake, and north, up the lake toward a whole flock of more distant 6000-foot+ peaks. Beautiful any season, these peaks are at their best when sporting their winter snowpack.
When we arrived, the sun was about 15 minutes from disappearing behind the mountains left of Tooth Peak. Sometimes we can get a nice sunstar in the seconds before the sun’s departure, but this time a veil of thin clouds subdued the sun enough to thwart those plans. Not a problem, because the clouds, stained buttery yellow by late sunlight, gave us hope for even more color as the sun dropped. And large sections of the lake were glassy smooth, a rare bonus for any lake this large.
When sunset color starts, you never know what’s in store. From our perspective, the ingredients were in place: broken cloud cover, pristine winter air, and an opening on the western horizon. But the sunset viewer’s perspective is incomplete, because out of sight beneath the horizon could lurk more clouds in the sunlight’s path. So we just watch and hope.
This evening we clicked continuously as the yellow warmed to fiery orange, then held our collective breath as the color intensified and slowly transitioned to red, infusing not only the clouds, but the entire lake surface as well. It was just fortuitous positioning that placed the mountain range reflection in the glassiest water.
Armed with my 24-105 lens, I looked for a composition that emphasized the sky and reflection. And absolutely no brain cycles were wasted worrying about the placement of the horizon in this scene—I just let that happen organically, based on the other elements at play.
Though the foreground foliage couldn’t compete with the sky, peaks, and reflection, going tight enough to eliminate the shrubs entirely would have also sacrificed parts of the scene I couldn’t bear to leave out. Instead, I went wide enough to use the dense foliage to frame the bottom of the scene. My other creative decision was adding my Breakthrough Filters 6-Stop Dark Polarizer, enabling a 25-second exposure that smoothed the small waves along the curved shoreline below me.
So I guess the moral of this story is not to overthink creative decisions. When the scene is changing fast, it’s best to set the rules aside and simply trust your instincts.
Epilogue
I can’t it’s been 10 days already. This morning Don and I said goodbye to a fantastic workshop group, grateful (and relieved) to have checked off every major photography box we hope for at the start of the workshop. (And it didn’t hurt to be watching falling snow while reading about 110+ temperatures back home in Sacramento.)
Join Don and me for next year’s New Zealand adventure
Workshop Schedule || Purchase Prints || Instagram
Rules Broken
Click any image to scroll through the gallery LARGE


")


Something Extra
Posted on June 26, 2024

Autumn Moonset, Oxbow Bend, Grand Tetons
Sony a7R III
Sony 24-105 f/4 G
ISO 200
f/11
1/6 second
Way back when I started getting into photography as a hobby, my subject selection criteria were pretty basic: is it visually appealing, and can I get there relatively easily? This worked well enough, because the world is full of relatively appealing subjects that are relatively easy to get to, and I was content with merely pretty pictures.
But my decision more than 20 years ago to elevate my serious photography hobby into my actual food-on-table livelihood meant I had much more at stake, and merely pretty pictures would no longer cut it. For starters, choosing my subjects could no longer prioritize convenience. To that point I’d had some success concentrating on under-appreciated beauty in everyday natural elements like flowers and trees, but I also wanted to pursue the more heralded scenes that draw gawkers (and photographers) from around the world (like Yosemite), and knew I’d need to do something to distinguish my images from others’.
I started studying the work of other landscape photographers I admired, and soon realized that most successful images of familiar subjects include something extra that sets them apart from the millions of other beautiful images that preceded them. In other words, to up my photography game enough to pay the bills, I too would need to seek that extra something to distinguish my own images of popular photographic icons. And while that realization alone didn’t spawn instant success, it was an important insight that guided me as I honed my craft and sought subjects.
So, armed with new motivation, after choosing a primary subject, I wouldn’t attempt to photograph it until I could identify an ephemeral element that would (I hoped) set my image apart. Rarely, that extra something might be a beautiful sunset or dramatic light, but I really wanted to match my target subject with something more special, and soon found that this process became much easier when I sought to include things that move me personally.
This helped me understand that a photographer’s best path to creative success is to concentrate on the scenes that cause a reflexive, “Oooh, look at that!,” when sharing time in Nature with a loved one. For me, that long list includes (in no particular order) things like rainbows, reflections, lightning, the Milky Way, and the moon.
Not only do these ephemeral gifts from Nature have the ability to elevate a scene from (merely) beautiful to truly special, each resonates with me personally. Instead of being a chore to pursue, the extra effort, no matter how extra, that’s necessary to incorporate them into already beautiful scenes actually becomes part of the appeal and is never a burden.
One of my very first pursuits was the moon, whose phase and position could be timed with mathematical precision. Soon I was targeting iconic subjects, or identifying striking (but anonymous) landscape features near home, doing the calculations (in the days before computer or smartphone apps could do it for me), and traveling to photograph the convergence. And even if the goal of a trip wasn’t the moon, I’d never visit a location without knowing the moon’s phase and when and where it would appear.
In 2018 I was assisting Don Smith with his annual autumn Grand Tetons workshop. I’d been to the Tetons a few times, mostly with Don, and find the entire park absolutely spectacular, but hadn’t really spent enough time there to make images that really excited me. But this year, at some point before my departure, I checked the moon and discovered that it would be full during the workshop. With a little plotting, I found that from Oxbow Bend we’d be able to align it perfectly with the Tetons and Mt. Moran at sunrise on one particular morning. Since this trip is always timed for peak fall color, the full moon was just a fortuitous confluence, but I was absolutely going to take full advantage.
Speaking of fortuitous confluences, when we got the group out there on the appointed morning, not only did we find the moon in place as expected, we had peak fall color, a reflection, a thin sheet of fog hovering above the water, and another layer of low clouds beneath the peaks.
I don’t really remember a lot of specifics from that morning, but I do remember that there were a lot of people (no surprise). Fortunately, there’s also a lot of room to spread out, and I took full advantage, moving up and down the riverbank to set the moon’s position relative to Mt. Moran and the other peaks. This image came about 15 minutes before sunrise, not long after the foreground had brightened enough to enable me to get detail in the moon and the landscape. (As always, it’s a single click, not a composite.)
I love this image, but believe it or not, I only just processed it 4 days ago. I think what happened was that I had just returned from my Hawaii workshop before doing a quick turnaround for the Tetons, then immediately after returning from there, headed off for my Eastern Sierra workshop. Since I usually prioritize the images from my own workshops, and I was suddenly buried with those, the Teton images just fell off my radar. But a couple of weeks ago, someone else from that workshop posted their own image from that morning (thanks, Bernie!), and my first reaction was, “Holy crap, that’s beautiful!” And then it dawned on me that I was there too—so on the 15-hour San Francisco to Sydney leg of my New Zealand flight, I pulled it up, processed it, and here it is.
Something Extra


")


, Yosemite")


New Zealand After Dark
Posted on June 19, 2024

Dark Night, Milky Way and Tasman Lake, New Zealand
Sony a7S II
Sony 12 – 24 f/4 G
ISO 10,000
f/4
30 seconds
This week I have New Zealand on my mind. In preparation for the New Zealand Winter photo workshop that begins next week, I started going through unprocessed images from prior New Zealand visits. I was actually looking for something else when I stumbled upon this Milky Way image from the 2019 trip, when Don Smith and I guided a group of Sony influencers around the South Island. I’d already processed a virtually identical composition of this scene back then, but since my Milky Way processing has evolved (improved), I decided to give it another shot.
Day or night, I love this Tasman Lake scene in particular because it so beautifully captures what I love most about New Zealand. We only do this workshop in winter, which of course leads to the inevitable question: “Why?” The simple answer is that the modest sprinkling of tourists, consistently interesting skies, and snowy peaks I love so much, are only possible in winter. I could go on and on with my answer, but since a picture is worth a thousand words, I’ll just save you some time and give you six-thousand words worth of examples. (You’re welcome.)


But even once I convince skeptics that winter in New Zealand is in fact quite beautiful, I’m usually hit with a follow-up: “But isn’t it cold?” Sure it’s cold, but by most people’s expectations of winter, New Zealand’s South Island is actually quite mild—with average highs in the 40s and 50s, and lows in the 30s, it’s similar to winter in Northern California and Oregon. I would venture that there’s not a single person reading this who doesn’t already have in their closet enough winter warmth to ensure cozy comfort in a New Zealand winter. Also like Northern California and Oregon, in winter New Zealand’s South Island gets rain and fog in the lowlands, and snow in the mountains, conditions I find so much better for photography (and for just plain being outside) than the sweltering blank-sky California summers I left back home.
All that said, for me the strongest argument for winter in New Zealand is Southern Hemisphere’s night sky. Inherently pristine air and minimal light pollution makes New Zealand is an astrophotographer’s paradise any season. But winter is when the Milky Way’s brilliant core shines in the east after sunset, already much higher above the horizon than my Northern Hemisphere eyes are accustomed to. The galactic core remains visible all night, ascending further and slowly rotating westward, before finally fading on the other side of the sky in the pre-sunrise twilight. That means more than 12 hours of quality Milky Way time, and the ability to place it above landscapes facing east, north, or west, by simply choosing the time of night you photograph it. And joining the celestial show are the Large and Small Magellanic Clouds—satellite galaxies of our Milky Way, only visible in the Southern Hemisphere.
Benefiting from our years of experience on the South Island, Don and I have identified many very nice locations for photographing the Milky Way, but our two favorites feature the galactic core above glacial lakes that are bounded by snowy peaks. One of these is on the shore Lake Wakatipu near Queenstown; the other is a vista above Tasman Lake in Mt. Cook / Aoraki National Park. This week’s image, from the 2019 trip, is of the Tasman Lake scene.
From the very first time my eyes feasted on it, I marveled at what a spectacular place the Tasman Lake view would be to photograph the Milky Way. In 2019, Don and I were especially pleased to be guiding this group of young photographers who were as excited about photographing the Milky Way as we were, so this shoot was in our plan since before the workshop started.
The sky this evening was crystal clear, but as the sky darkened, I found myself still down at the foot of the lake (just out of the frame on the far right), where I’d photographed sunset with most of the group. The majority decided to stay put for the Milky Way shoot, and while I couldn’t deny that this spot would likely be no less spectacular, I couldn’t pass the opportunity at the elevated lake view that had been on my radar for so long. I also thought the Milky Way would align better with the most prominent peaks from this vantage point. So I scrambled back up the boulders to the trail and race-walked more than a mile, then scaled more than 300 stairs in near darkness, to get in position.
I expected to find the few who weren’t down at the lakeside sunset spot (this group always scattered) would already be up here, but I arrived to find the view empty. While I was happy to eventually have the company of a couple of others, the utter solitude I enjoyed for the first 30 minutes felt downright spiritual.
Going with my dedicated night camera, the Sony a7S II, I started with my default night lens at the time, the Sony 24mm f/1.4. But the scene was so expansive, I quickly switched to my Sony 16-35 f/2.8 GM for a wider view. While that did the job for a while, it wasn’t long before I found myself wanting an even bigger view, so I reached for my Sony 12-24 f/4 G lens. Because light capture is the single most important factor in a Milky Way image, in general I find f/4 too slow. (Today I’d use my 14mm f/1.8 or 12-24 f/2.8, but back then those lenses were still at least a year away.) But really wanting the widest possible view, I rationalized that since the a7S II can handle 10,000 ISO without any problem, and the star motion of a 30-second exposure at 12mm would be minimal, and just went for it. Mitigating the f/4 exposure problems was the fact that the best parts of the scene’s foreground, the snow and water, were highly reflective, while the dark rock wasn’t really essential to the scene.
The result as processed in 2019, while noisier than ideal, was still usable. But as time passes, I’ve become less and less thrilled with many of my old Milky Way processing choices—that image was no exception. Since I’ve been pretty thrilled with the results reprocessing old Milky Way images with Lightroom’s latest noise reduction tool, I thought this might be a great time to reprocess this old scene to see if I could do it better.


For no reason in particular, I chose different image to process, but the compositions are nearly identical. As expected, the new Lightroom noise reduction did a much better job minimizing the inevitable noise that comes at 10,000 ISO, so I was already ahead of the game. The only other major processing improvement I made was the color of the sky, which, as my night sky processing evolves, I’m making much less blue.
Because no one knows what color the night sky supposed to be when given the amount of exposure necessary bring out foreground detail, I’ve always believed that the color of the sky in a Milky Way image is the photographer’s creative choice. I mean, scientists might be able to tell you what color it should be (there’s a very strong case for green), but to me the bottom line is image credibility (and green just won’t do it).
Whatever night sky color I’ve ended up with has entirely a function of the color temperature I choose when I process my raw file in Lightroom—no artificially changing the hue, saturation, or in any other way plugging in some artificial color. Since I do think the foreground (non-sky) of a night image looks more night-like (I don’t want a night image that looks like daylight with stars) with the bluish tint I get when the color temperature is cooled to somewhere in the 3000-4000 degrees range (photographers will know what I’m talking about—non-photographers will just need to take my word), for years I cooled the entire image that way—hence the blue night skies. But Lightroom now makes it super easy to process the sky and foreground separately and seamlessly, so I no longer cool my night skies nearly as much as before (or at all). Now my night skies tend to be much closer to black, trending almost imperceptibly to the purple side of blue (avoiding the cyan side).
Oh, and the color of Tasman Lake you see in this image is real, I swear—the color of the South Island’s glacial lakes is another reason to love this country, but that’s a story for another day.
Workshop Schedule || Purchase Prints || Instagram
This year’s New Zealand workshop is full, but Don and I will do it again next year.
New Zealand After Dark


Channeling Your Camera’s Vision
Posted on June 13, 2024
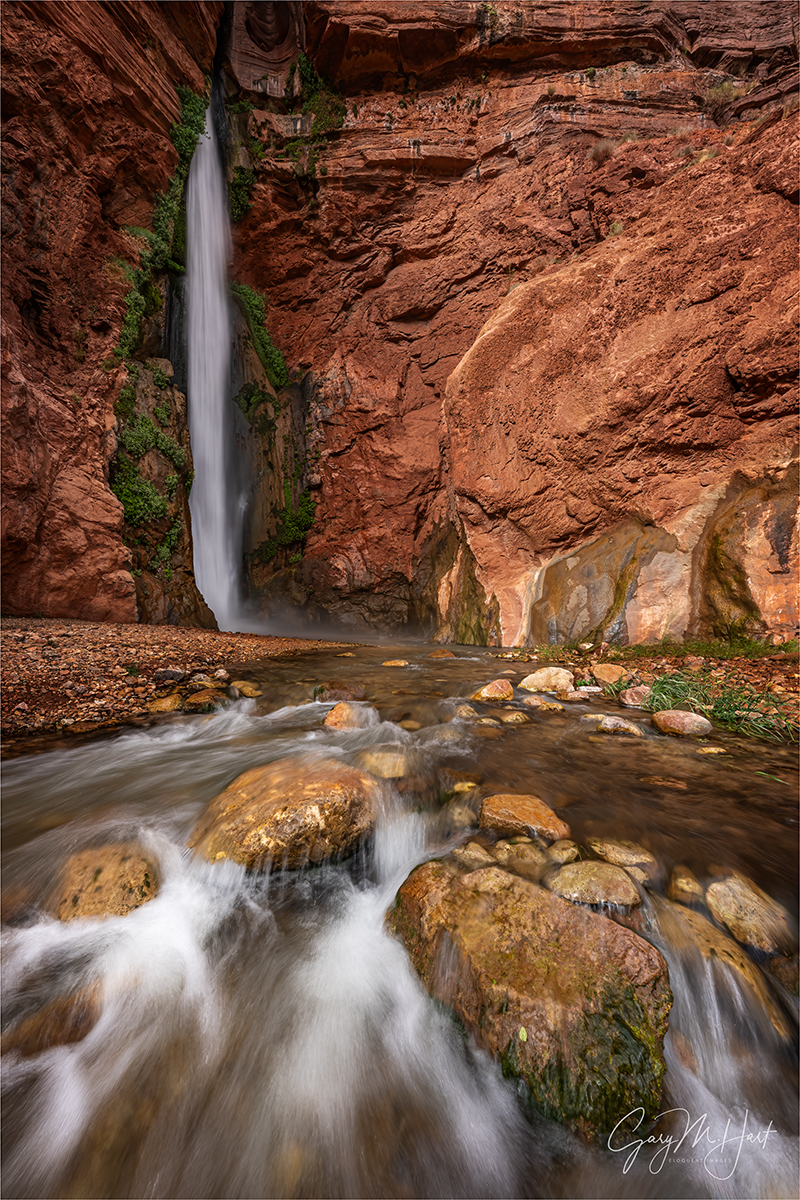
Whitewater, Deer Creek Fall, Grand Canyon
Sony α1
Sony 12-24 GM
1/5 second
F/16
ISO 50
About a month ago I wrapped up my ninth Grand Canyon raft trip. As my guides and I get better at identifying the best spots and when to be there, there’s an aspect of similarity from trip to trip, but thanks to group dynamics, weather conditions, and the secondary stops we chose to make on any given year, each trip always feels unique.
As with most spectacular locations, Grand Canyon has more worthy subjects than we have time to visit, but there are five primary spots we never miss: Nankoweap granaries, Little Colorado River, Elves’ Chasm, Deer Creek Fall, and Havasu Creek. Additionally, we have a couple of south-facing campsites we target for the best possible Milky Way photography. But making all this happen in the best conditions for photography sometimes feels like three-dimensional chess. Starting with our first evening, our campsite choice (the number of river miles we cover) creates a cascading effect on the timing of our photo stops and campsites for each subsequent day of the trip—not enough, or too many, miles on any given day and we’re completely out of synch.
But my guides and I have gotten really good at it, and I’ve really grown to appreciate the rhythm of this trip. The moderate pace and not too crazy rapids of our first two days allows everyone to get comfortable with the whole rafting experience—both on the river and in camp. That’s a good thing, because Day 3 is Rapid Day! To set us up for downstream stops, on that third day we cover nearly 60 miles and navigate dozens of large to massive rapids (the vast majority of the canyon’s largest rapids). Finishing with a celebratory party in camp that evening, the entire day is a blast, and the bonding is complete.
Given the frenetic pace of Day 3, everyone is ready for our (relatively) relaxing Day 4. Without too many miles to cover, we make it to Deer Creek Fall early enough (fingers crossed) to snag the campsite directly across from the fall—this year we made it by lunchtime—where we can hang out (kick back) in camp, waiting for the crowds to clear out so we have the fall to ourselves for the rest of the day.
Of course rafting Grand Canyon isn’t all river and campsites. The photography down here is downright spectacular, and we get to do quite a bit of it. As with every workshop I lead, I try to get an idea of what everyone hopes to accomplish and do all I can to accommodate them. But since safety and schedule have to take priority on the river, and the conditions are beyond my control, I can’t always grant everyone’s wish—but I can’t imagine anyone ever being disappointed.
Having done this trip as many times as I have, I’ve become a little more selective about my own photo choices, with many of those decisions depending on the conditions. But one subject I never miss, regardless of conditions, is Deer Creek fall. Gushing from a red rock slot canyon, Deer Creek Fall is truly one of the most beautiful waterfalls I’ve ever seen. But, as with most natural beauty, the real challenge here is doing it justice.
Every nature scene worthy of a photograph possesses inherent beauty—the nature photographer’s job is to identify that beauty and figure out the best way to convey it with a camera. Anyone who has been disappointed by their images from a beautiful moment in nature (that would be pretty much everyone) knows that a good picture isn’t a simple matter of pointing a camera and clicking the shutter. There are just too many differences between the human and camera views of the world to expect a point and click approach to succeed reliably.
Subjects like Deer Creek Fall, especially at first sight, are surprisingly difficult to photograph well because of the instinctive tendency to just frame up the first beautiful thing we see and start clicking, wrongly assuming that our pictures will look just like what our eyes see. But that’s literally impossible.
The better approach starts with understanding the camera’s unique vision and accepting that it is no less valid than the human perspective. Once we start channeling our camera’s vision (rather than trying to force our camera to submit to our vision), we can leverage the exposure variables (that control depth, motion, and light), subject relationships, and creative framing, to provide a fresh view of familiar subjects.
Since this Deer Creek Fall image from the most recent raft trip illustrates many of the differences between human and camera vision, I thought sharing my approach to its capture would be a good opportunity to (once again) distinguish the camera’s vision from human vision. But first, let me cite the significant human/camera vision differences I had to deal with this afternoon:
- Boundaries: While my own world was unbounded, the world in my viewfinder was surrounded by a rectangular box. To a certain extent I can control the size of that box with focal length choice, and where I point it in the scene, but every image has a boundary.
- Depth: Photography is an attempt to render a 3-dimensional world in a 2-dimensional medium. Of course that’s impossible, but there are things we can do to create the illusion of depth.
- Dynamic range: The human eye can see a much wider range of tones, from the darkest shadows to the brightest highlights, than the camera can. The many ways to handle this difference are a creative choice.
- Motion: A still image can’t display actual motion, but it can create an illusion of motion that stimulates the viewer’s brain into imagining the scene’s motion. While nothing like our experience of the world, a camera can freeze the extreme chaos of a single instant, or combine a series of instants into a blur that conveys patterns in the motion indistinguishable to the eye.
Though this image isn’t high dynamic range, that doesn’t mean I didn’t have to factor dynamic range into my calculus this afternoon. Despite a fair amount of cloud cover, some of it rather threatening, Deer Creek Fall spent most of the afternoon in full sunlight. And while my camera can handle this extreme dynamic range, I try to avoid mixing brilliant highlights and deep shadows whenever possible. Studying the clouds, I decided there was a decent chance that they’d eventually provide the shade on the fall necessary to shrink the dynamic range, then went to work searching for my composition while I waited.
I wanted to feature the waterfall, but I also wanted to take full advantage of the abundant foreground subjects that would significantly enhance the illusion of depth. I explored many options, from looking up at the base of the fall, as close as I could get without soaking myself and my camera, to scaling a nearby slippery rock ledge for a different perspective. I finally decided the perspective that worked best was actually in the creek. Once I made that decision, I spent nearly 10 minutes micro-positioning myself relative to the nearby rocks until I was satisfied with the way the rocks and rapids moved the viewer’s eyes through the frame. Finally, to emphasize the rocks and shrink the (less interesting) open rocky beach, I dropped as low as I could go—less than a foot above the water—without merging the large nearby boulders with the smaller ones behind them.
With my perspective established, it was time to frame up the scene. There were other photographers in my group just out of the scene on the left; on the right was a large boulder and unattractive shrubs, and above the fall was bright sky that really didn’t add anything. Adjusting my focal length, I was able to use my frame’s boundaries to completely eliminate these distractions and distill the image to the most important visual elements: Deer Creek Fall, the whitewater of Deer Creek itself, and the array of boulders protruding from the creek.
My final decision was how to handle the extreme water motion. With the fall in full sun, I played with some images that froze the water in place, but those turned out to be practice shots that just helped me refine my composition. Since most of the creek was already in shade, and the fall would soon be as well (even if the clouds didn’t come through for me, I was willing to wait for the sun to drop behind the rocks), I knew my real decision wasn’t whether or not to blur the water, it was how much to blur it. When the clouds finally delivered, my composition was ready, and all I had to do was click. But I didn’t just click once—I ran through a range of shutter speeds so I’d have a variety of motion effects to choose from later—when I wasn’t standing on slippery rocks in chilly whitewater.
Grand Canyon: The View From the River


(Mostly) Unrelated Ramblings on Editing and Color in Nature
Posted on June 5, 2024
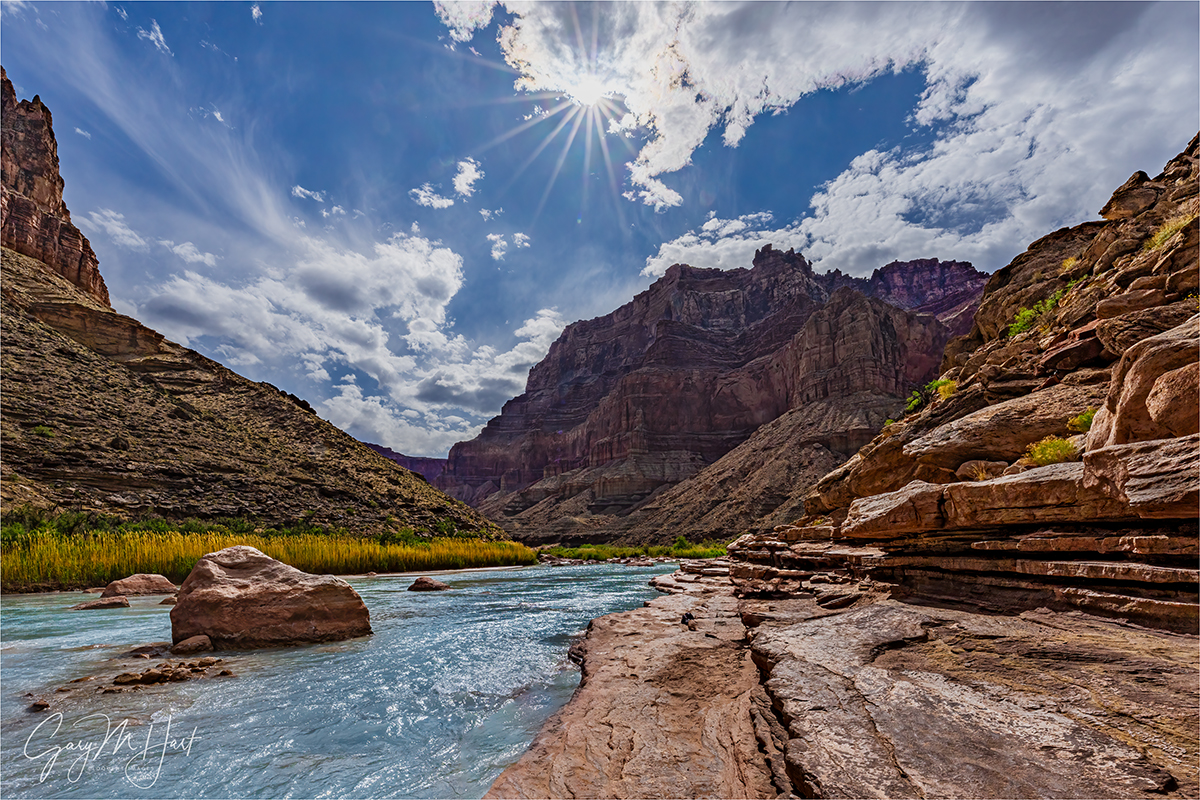
Brilliant, Little Colorado River, Grand Canyon
Sony α1
Sony 12-24 GM
1/800 second
F/18
ISO 100
Lately I’ve been on a bit of a crusade against manufactured images in general, and AI use in particular. But, lest you perceive me as a luddite and old-school photography codger (“In my day, every shoot was a 5-mile uphill walk through snow in both directions, and sunrise always came at 1:00 a.m.”), let me just say that I am all-in on digital capture and all most of its benefits, from instant image review, to the histogram, to the ability to dodge and burn my color captures. It’s been more than 20 years since my digital conversion, and I can’t think of a single thing I miss about shooting film. (Okay, maybe my Olympus OM-2, and being able to use the same camera for more than 25 years.)
Most of my digital editing is stuff like setting the color temperature, simple dodging and burning, and an occasional crop. But one capability that I’ve grown especially fond of is the ability to remove things that don’t belong. But before I talk about that, let me set the scene for this image.
I’ll never forget the first time I laid eyes on the Little Colorado River where it intersects with the Colorado River. Prior to my Grand Canyon raft trip, my only exposure to the Little Colorado came far up stream, where I’d get a quick view of its muddy brown puddles or (in wet years) thin brown stripe, briefly visible from the bridge as I zipped through Cameron, Arizona, on my way to and from the North Rim or Page.
By the second day of my first Grand Canyon raft trip, I was already completely blown away by the unique and completely unexpected features at the bottom of the canyon. That day had been a mix of clouds and sun—ideal for photography, but since I still wasn’t completely sure that the guides knew what was important to us photographers, I stayed vigilant for worthy subjects as we floated beneath the towering walls. After spending most of the trip to this point in relatively narrow Marble Canyon, just upstream from (what I now know to be) the confluence with the Little Colorado River, the canyon walls separated a bit and I could tell the geology was changing. When we tied up at a nondescript sandy beach, I remember looking around and thinking, Really? Surely we can find a better spot to take advantage of this great light.
When Wiley, my lead guide, suggested that we grab our cameras and go explore for 45 minutes or so, at first I wasn’t even sure whether I wanted to lug my camera bag, but since this was my group, I decided needed to set a good example. Camera bag in tow but still skeptical (me, not the camera bag), I followed a short trail through the shrubs with the rest of the group on my heals like a string of ducklings. Rounding a corner, I emerged from the brush and stopped like I’d slammed into a brick wall. Unable at first to process what I was seeing, I finally turned and managed to call back to Wiley, “Uh, we’re going to need more time here.”
Defying expectations
This might be a good time to mention that there is nothing subtle about color in nature. Perhaps you’ve noticed? In fact, the vivid natural hues that surround us may just be my favorite thing to photograph. I’m afraid most of us live our lives taking for granted a certain range of natural color constants: that the sky will feature a familiar blue throughout the day, bracketed by certain shades of red or orange at sunrise and sunset, before darkening to something close to black at night. Our daytime clouds are white or gray, and water is some predictable shade of green or blue, depending on light and clarity. Even when nature’s color intensifies to a hue and brilliance that moves us to pause and take note (or photograph), it’s reliably within our range of expectations—a crimson sunset, spring wildflowers, or the extra rich blues of a mountain lake.
But sometimes nature throws us a curve. It’s impossible not to be gobsmacked the greens and reds of an aurora; Death Valley’s aptly named Artist’s Palette features a bizarre array of purple, green, and pink rocks; smoke from wildfires can turn the midday sky an otherworldly orange, sometimes thousands of miles distant. And I’ll never forget the first time I laid eyes on the green and blue glacial lakes of the Canadian Rockies and New Zealand. But for me, none of these sights were as disorienting as my first view of the Little Colorado River’s azure hues.
So what’s going on?
What happened to the familiar brown puddles I remember upstream? Clearly, somewhere in the 55 or so river miles between Cameron and Grand Canyon, the Little Colorado had gotten an upgrade. Not only was there a lot more water, its shade of blue was not a color I’d ever seen in water.
As it turns out, after leaving Cameron, the Little Colorado twists along a scenic canyon of its own creation, carving deep enough to puncture a travertine-laced aquifer that recharges, and colors, its meager flow. The travertine (limestone formed by mineral springs) is infused with magnesium and calcium that adds the blue hue to the water, and deposits other minerals that paint the rocks and riverbed a reflective white, creating a complementary contrast to the azure hue. Adding to all this magnificence is the rich red of the surrounding Grand Canyon walls.
Threading the needle
Of course like most things in nature, the Little Colorado’s color is not guaranteed. When the source of its flow is runoffs, either from snowmelt or the summer monsoon, the Little Colorado’s natural blue is overpowered by reddish brown sediment washed downstream. So each year I try to thread the needle between the end of the snow runoff and start of the monsoon runoff, scheduling my raft trips for May. Not only does May usually ensure a blue LCR, we also get to enjoy the Colorado River at its translucent green best by avoiding the Colorado River’s monsoon sediment that’s not unlike chocolate pudding.
Since I have to schedule this trip more than a year in advance, there’s no way of knowing whether the LCR will be blue until we arrive at it. Even the guides can do no more than guess at its current status because there’s no webcam or other direct monitoring at the confluence, and reports from prior trips need to wait until they’ve navigated the final 200 miles downstream.
The other tricky thing is the sky—without clouds, midday visits aren’t great for photography, so in recent years we try to time our LCR arrival for late afternoon. This puts large segments in deep shadow, even on sunny days, and also pretty much guarantees that we’ll be the only ones there.
I’ve only found the LCR brown once—that year we could tell as we approached the LCR confluence and saw the brown mixing with the Colorado’s deep green. We just aborted our landing and continued on downstream.
This year’s visit
This year’s trip enjoyed a really nice mix of clouds and blue sky throughout. Most of the clouds were of the puffy, photogenic variety, but we did have a few that looked pretty threatening. And aside from a handful of raindrops one night (not enough that anyone who wasn’t already awake would have even noticed), we stayed completely dry—while we were on solid ground.
There was a small disagreement among the guides about our chances for a blue LCR—Lindsay was skeptical because of brown water a couple of weeks prior; Wiley said there had been enough time for the brown runoff to abate. I couldn’t tell if Wiley’s take was just whistling in the dark optimism, or if he really believed it, so I held my breath as we approached the LCR confluence. When I heard his reaction at the first sight of distinctive blue (“Gary, you’re the luckiest guy I know!”), I could tell he hadn’t been quite as confident as he’d sounded.
This year’s LCR visit was a preview of the mix of sky and clouds we’d enjoy all week, and we took full advantage. For most of the group, the reaction to their first view of the otherworldly blue was similar to my reaction the first time I saw it. But the scene here is about far more than striking blue water—towering buttes, jutting red boulders, polished sandstone shelves, and green-gold reeds create an abundance of compositional variety. But with an open campsite directly across the river, we had the schedule flexibility to enjoy plenty of quality time there before setting up camp.
As soon as we were off the boat people scattered. With so much going on visually, scenes like this can be a little overwhelming to first time visitors, so I took my time wandering upstream, answering questions and making suggestions on the way. It was really cool to see people using everything from ultra-wide to telephoto—all valid approaches.
At first the clouds dominated the sky, but I couldn’t really take advantage and only managed a handful of shots, none of which especially thrilled me. But when the clouds started to break up, I saw an approaching opportunity to create a sunstar and looked around for a composition to go with it. With little time to spare before the sun emerged, I found something nearby that would work—the only problem was, one of the people in my group was set up and firing away at his own scene no more than 10 feet in front of me.
Since my personal rule when I’m with a group is that my images always take backseat to my groups’, I never ask anyone to move when they’re actively working on something. So I just framed up my shot anyway, and waited for the sun. It popped out about 30 seconds later, long enough for me to get a half-dozen or so frames with a beautiful sunstar, as well a not so beautiful photographer, before the clouds swallowed the sun and I moved on to other opportunities.
The sun came and went several times that afternoon, and I got a few more sunstar images that didn’t include another photographer, but when I got home and loaded my images, that first one was my favorite. Enter Content-Aware Fill.
In a matter of seconds—just the time it took to circle the offending subject in Photoshop and hit my Delete key—I ended up with the scene you see here. The resulting replacement was amazingly close to what it would have been had he not been there, and I defy anyone to tell me exactly where the replacement happened.
Of course this opens another can of worms that I don’t want to get into today: what’s an “appropriate” edit? All I’ll say is that each photographer draws his or her own line, and there are no absolute rules besides honesty. Where’s my line? I will remove things that (in my opinion) don’t belong—e.g., contrails, other people, car lights—as long as I can do it in a way that doesn’t noticeably alter the scene from what it would have been had those unnatural elements not been there. I absolutely don’t add or move things.
As someone who tries to photograph the natural world as it would be without human interference, Lightroom/Photoshop remove tools are a godsend. Just don’t get me started AI fabrication…
Workshop Schedule || Purchase Prints || Instagram
Color in Nature
Click any image to scroll through the gallery LARGE


, Yosemite")


Organic Discovery
Posted on May 30, 2024

Sunbeams, Lóndrangar, Iceland
Sony a7R V
Sony 24-105 f/4 G
ISO 100
f/13
1/40 second
When I sit down each week to write a new blog post, I usually have a general idea of where I want to go, but little plan for how I’m going to get there. I’ll start with a couple of relevant sentences, then just see where that leads me. Depending on the topic, and my state of mind at the time, the effort that gets me from concept to completed blog can range from simple to Sisyphean. Regardless of the struggle, I’m always surprised by the insights the creation process itself uncovers—I learn so much about myself, photography, and the natural world in general, simply through exploring with words, that I realize writing this blog is as much for me as it is for my audience.
It occurs to me that this is very much the way I approach my photography—I’ll arrive at a location and identify something I like, but am usually not quite sure how I want to handle the scene until I frame it in my camera and start working. Or more accurately, I might think I know how I want to handle the scene from that initial spark of attraction, but usually discover much more as I work.
Whether I’m writing or taking pictures, beyond an overall general concept or theme (like coffee table books, or a moonrise), I prefer my creation to happen organically. That’s because, for me at least, I find going in with a predetermined mindset stifling. In life, the instant you think you know the answer is the instant you stop learning; in photography, the instant you think you have the shot is the instant you stop seeing.
I’m reminded of this every time I conduct a workshop image review and see the mind boggling variety of images shared. We’re all going to the same places, but everyone’s seeing something different. Even if the execution isn’t perfect, the vision that shines through can be downright inspiring.
Just as every writer starts with a blank page, when looking for photographs I try to challenge myself with the reminder that the shots are there, that my ability to see them is limited only by my own creativity. I’ve learned that my best view into a scene’s essence doesn’t come instantly—it happens organically, and can’t be rushed. Much like the first draft of whatever I’m writing, my first click is only the starting point that serves as a catalyst for the discovery process to follow.
Landscape photography in particular, with its primarily stationary subjects, lends itself to this organic discovery approach. Rather than anticipate and react, as sports and wildlife photographers must, as a photographer of mostly stationary landscape subjects, landscape photography (usually) provides all the time I need to identify a potential subject and evaluate it fully before pressing my shutter. I just feel more creative when I know that, no matter how long I take, my subject will still be there when I’m finally ready.
This need to spend time with my subjects, adjusting my compositions as they come to me, is a prime reason I feel so strongly about using a tripod. I’m old enough to remember writing longhand on paper with pen or pencil. And while it’s undeniable that some of the greatest writing in human history happened this way, largely because of my need to edit as I go, my own writing took a significant leap forward when I started using a computer and word processor.
I can say the same thing about the switch from the delayed results of film to the instant feedback of digital, and the tripod played a major part in that. I’ve always used a tripod with most of my photography because it allows me frame up my scene and study it as long as necessary. But since the arrival of digital capture and its instant feedback, my tripod plays an even bigger role. In addition to allowing me to spend time with my scene before clicking, with a digital camera I can immediately study my results and identify necessary adjustments secure in the knowledge that the composition that needs tweaking is patiently waiting in the viewfinder atop my tripod.
As happens with my writing, this edit on the fly approach almost always takes my images places I hadn’t imagined when I started. I can’t tell you the number of times I’ve ended up with something much different, and better, simply because I had quality, unhurried time with my scene.
The image I share above was from this year’s version of the Iceland photo workshop that Don Smith and I partner on each winter. Snaefellsnes Peninsula is filled with visual highlights, especially in winter, but Londrangar is a highlight among highlights. This image features several of the (many) reasons we choose winter for our Iceland workshop: brooding clouds, pounding surf, and fresh snow. And while the prime focal point here is the Londrangar sea stack, the volatile conditions always provide something new to consider with each visit.
So this year when the group arrived at Londrangar, I was initially drawn to the dramatic surf and clouds, starting pretty wide to include more of these features—including very large waves battering the rocks about 40 feet below me. But as I worked the scene, the dusting of white snow on the rugged basalt drew my eye, so I tightened my composition to emphasize it.
Given how much I dislike a disorganized foreground and messy borders, in a scene like this, with its jumble of rocks and ever-shifting surf, create a particular challenge. It took me awhile to find a composition that satisfied those instincts, but once I had a working composition fixed atop my tripod, I was free to play with different motion effects in the surf. With churning surf, I’ll often use multi-second exposures, with the help of my Breakthrough Filters 6-Stop Dark Polarizer, but this time I was so enamored of the white-water explosions with each wave, I also tried freezing the collision with a fast shutter speed.
As I grew familiar with the waves’ patterns—how to anticipate their arrival point and timing—I refined my composition further. Then, with little warning, the sun broke through to cast golden beams on the gray horizon, forcing me to jettison my casual pace and respond quickly to the sudden beauty. Fortunately, by this time I’d become so familiar with the scene and all its idiosyncrasies that I didn’t feel at all rushed. With only slight adjustments to my current composition to balance the sea stack with the shafting sunlight, I spent the next five or so minutes timing the surf and enjoying the view.
The Motion of the Ocean
Click any image to scroll through the gallery LARGE


Feeding My Muse
Posted on May 22, 2024
Spring Cascade, Tamarack Creek, Yosemite
Sony α1
Sony 16-35 f/2.8 GM
ISO 800
f/11
1/4 second
Ode to the Coffee Table Book
I grew up in an era when coffee table books were a thing. For decades, these dense rectangular blocks, packed with thick, glossy pages containing far more picture than text, dominated living rooms across America. Whether acquired by purchase or gift, once installed on a coffee table, most coffee table books would rest unopened for years, virtually untouched except by an occasional dust cloth, and maybe a micro-adjustment on the way to answer the door for company. It seems the CTB’s prime function was to generate the illusion of sophistication by enabling its owner to feign interest in a variety of esoteric subjects: the churches Europe, windmills, Iceland’s waterfalls, and so on.
But here’s a little secret. Turns out, many of these books were actually quite enjoyable. Who knew? As a child naive to the hands-off rules, to occupy myself while the adults were busy chatting about boring stuff, I’d sometime heft one of these beefy tomes onto my lap and page through it.
I found myself most drawn to books dedicated to nature and landscapes—pretty much anything with pictures of mountains, forest, desert, or coastline. For many years my attention was solely on the pictures and I paid no attention to the photographer responsible for them. But eventually I became aware that the images I lingered on longest came courtesy of David Muench. While some were in theme-based CTB photo anthologies filled with images from many photographers, I got to where I could instantly identify Muench’s beautiful captures before checking the photo credit. And I was especially excited whenever I found a book filled exclusively with Muench’s beautiful images of the American outdoors: the Southwest, National Parks, the Rockies—it didn’t really matter.
As a child, my analytical skills and photography aspirations were still many years in the future—I just knew I could spend several minutes on each page, visually caressing each mountain, lake, rock, tree, leaf, and flower. In hindsight, I know that my own photography today, both the scenes I’m drawn to as well as the way I approach them, were organically and profoundly influenced by this exposure to David Muench’s images.
Revelation
I’m writing about this because last month I had the good fortune to get my hands (and eyes) on William Neill’s latest book, “Yosemite: Sanctuary in Stone.” The instant I cracked it open, those childhood feelings of profound awe came flooding back, and instantly I was reminded how much, in this age of ubiquitous screens, I miss the tactile relationship with beautiful photography that can only be provided by a large, well-printed book.
Though it would be undeniably true, labeling “Yosemite: Sanctuary in Stone” a book full of pretty pictures would be a gross understatement. The opposite of derivative, Neill’s images are revelatory in their vision, a reminder that, in any scene, there’s so much more to photograph than we see at first glance.
Most of the images Neill shares in this book are intimate portraits featuring interactions of Earth’s more permanent features with its ephemeral elements, such as light, shadow, water, clouds, rain, fog, and snow. Though few depict the recognizable icons we associate with Yosemite (monoliths and waterfalls), each reveals the natural patterns, color, and contrast that makes Yosemite unique, somehow blending all this into coherent scenes that are so simple, it’s hard to believe no one saw them sooner. The product is a celebration of Nature’s most subtle beauty, rendered all the more beautiful because it’s been pulled from obscurity by a photography master. These images inspire me to continue cultivating my own personal vision, and to bolster my creative foundation by spending more time with profound photography like this.
Feeding My Muse
When I set out to write this, my intent was a straightforward piece honoring William Neill’s beautiful book, and acknowledging the role of the muse in its more conventional sense: an external influence that stimulates an artist’s creative instincts. But the more I wrote, the more I found myself leaning toward my own muse as an internal collaboration between a lifetime of external inputs.
Huh? What I mean is, we’re all influenced by the creations of others, and by our general interactions with the world. That influence can be conscious, like my experience paging through “Yosemite: Sanctuary in Stone,” or unconscious, like my childhood exposure to David Muench’s photography, or simply by spending a night on my back beneath a dark sky generously sprinkled with stars. Regardless, all that input is processed by my internal muse and organically output as inspiration: my internal muse.
A successful image happens at the intersection of vision and craft. Craft taps the analytical part of the brain, enabling us to master a scene’s motion, light, and depth through the control of the camera’s exposure variables, as well as command of hyperfocal technique for managing focus. Vision, more than the mere “eye for composition” many photographers talk about, is the ability to conjure unseen possibilities, and to channel the camera’s unique vision to uncover hidden patterns and relationships. Craft can be refined and honed by study and repetition, while vision is more elusive.
This is where I call on my internal muse to blend vision and craft to create (I hope) photographic synergy. But like any creative instinct, the internal muse must be nurtured and fed. I fear that the decline of big photography books like Neill’s has robbed many photographers’ internal muse of a prime source of sustenance. For proof, look no further than the proliferation of derivative photography online, a feedback loop of sameness where Photoshop amplification and AI manufacturing substitutes for inspiration and vision.
Of course taking my muse out into the field is easier said than done. I love sharing beautiful locations with my workshop students, but when I’m leading a photo workshop, my own priorities take backseat to theirs. I can’t explore and experiment the way I do when I’m on my own. But that doesn’t keep me from trying.
Putting My Muse to Work
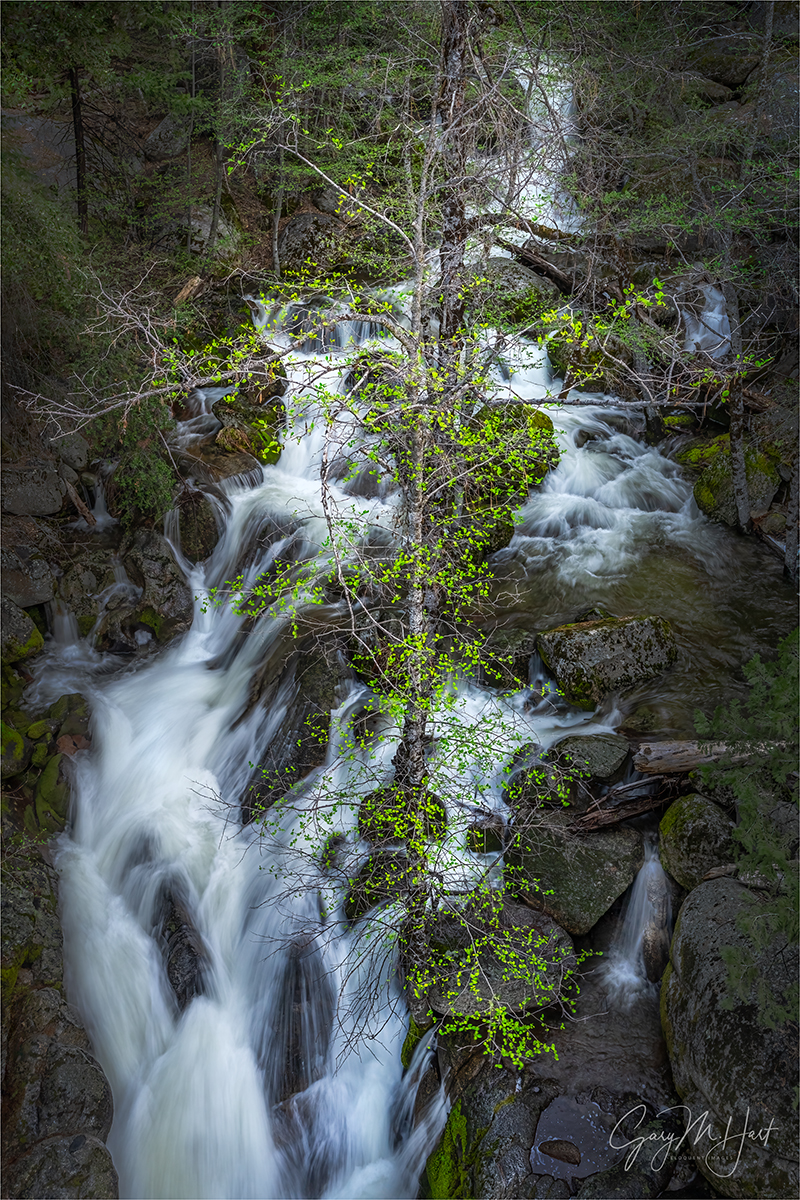
In April I did two Yosemite workshops that focused on Yosemite at its saturated spring best. Both groups chased rainbows in Yosemite’s booming waterfalls, mirror reflections in the valley’s many ephemeral pools, and pristine dogwood blooms decorating the swollen Merced River. A particular highlight this year was the opportunity to share the Upper Cascades in full flow.
The Upper Cascades vantage point I like is the Cascade Creek Bridge on Big Oak Flat Road, just upstream from the Cascade Creek and Tamarack Creek confluence (which is visible from the bridge). Like most waterfalls, Upper Cascades is best in overcast or full shade. So the open southern exposure, and the fact that overcast is relatively rare in California, makes it difficult to find Upper Cascades in ideal light. And since Upper Cascades is fed entirely by snowmelt, its window of opportunity is very small. So I’m thrilled any time I can make it here when the water’s flowing and the light is soft.
On the visit with my first group, after a brief orientation and getting everyone set up, almost as an afterthought I pointed to the bridge over Tamarack Creek just 50 yards or so up the road, telling them it’s a beautiful little creek, but so overgrown that it’s pretty difficult to photograph. But when I noticed a couple heading that way a little later, I couldn’t help wander up there myself to see what they’d found.
This might be a good time to mention that one exercise I use to stimulate my muse when I’m in the field is to think of specific favorite images that were almost certainly not the obvious shot, then challenge myself to find my own less obvious shot. One of those favorite images is William Neill’s Dawn, Lake Louise, Banff National Park, Canada; another is Charles Cramer’s (wait for it…) Cascade Creek, Spring, Yosemite, captured just yards from where I stood that morning. (William Neill also has his own version of the Cascade Creek tree—not a duplicate and equally beautiful—and I honestly don’t know which came first. I default to Charles Cramer’s because it’s the first one I saw, but I love them both.)
So anyway, scanning my the scene, I was first bothered by a single alder tree, just starting to sport its spring green, right smack in the middle of the scene. Then it occurred to me that I could actually use that tree to anchor my scene. My idea was a wide, vertical composition that placed the tree front and center, with the creek racing down the steep slope directly behind it. After working with it for a while, I decided that, while I really liked the composition, the tree needed more leaves. So I made a mental note to try again in a week, on my second group’s Upper Cascades visit, when the leaves might have filled in more.
And that’s exactly what I did. While not as full as I’d hoped, on that second visit the leaves were definitely more visible than the first time and I went straight to work. Though it’s difficult to tell in a two-dimensional image, Tamarack Creek approaches waterfall steep right here. Since there wasn’t enough light to freeze the water at any reasonable ISO, so I just went all-in on motion blur.
Having already worked out the composition on my first visit, I just ran a range of shutter speeds from 1/10 to 5 seconds. Examining my results as I worked, it quickly became clear that the speeds from 1/5 to 1/2 would be best: faster than 1/5 looked scratchy (still blurred, but not smooth); longer than 1/2, the water started to lose definition. This image used 1/4 second—I chose it because it smoothed the water nicely, while still retaining all the definition that conveys its extreme speed.
Opportunities like this during a workshop are fairly rare because I usually need to put my muse on hiatus to focus on my group. When that happens, my best images are usually the more obvious beauty, such a vivid sunrise/sunset, arcing rainbow, rising/setting moon, or any of the many other natural phenomena nature photographers covet and chase relentlessly. But as beautiful as those special moments are, my muse and I are never happier than the quiet times I get to spend working in subtle light, using my creative instincts to extract a scene’s essence.
Workshop Schedule || Purchase Prints || Instagram
My Muse and I
Click any image to scroll through the gallery LARGE


, California")

Go With the Flow
Posted on May 16, 2024
Blur, Diamond Beach, Iceland
Sony a7R V
Sony 24-105 f/4 G
ISO 50
f/11
1 second
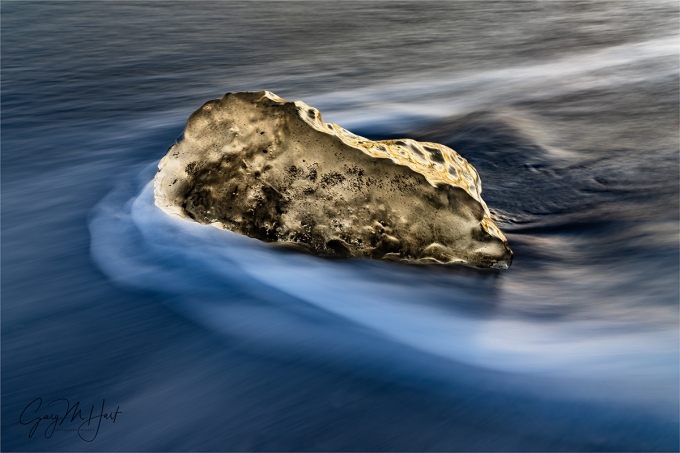
Despite many visits to Diamond Beach over the last half-dozen or so years, I still don’t feel like I’ve mastered the iceberg blurred water shot to my complete satisfaction. But I keep working on it, and this year I was at least was able to capture something I like.
In previous visits, when my attempts to capture the perfect motion blur shot failed, I’d fall back on sunstar images—partly because I find them easier, but mostly because the backlit translucence of an iceberg is spectacularly beautiful. But as much as I like these sunstar images, I’ve seen other photographers’ Diamond Beach flowing surf images that I like even better, and can’t help going for my own.
The problem (aside from only getting one shot at it per year), is getting all the scene’s many moving parts working together. Blurring a waterfall, or the whitewater of a flowing river or creek, is relatively simple because, even though the water is moving, the surrounding scene, including the position of the water feature itself, is stationary. And while crashing surf is fairly random from one wave to the next, again the surrounding scene (the beach or rocks upon which the surf is crashing) is fixed. But nothing at Diamond Beach is still for long.
Foremost among the Diamond Beach moving parts the frigid North Atlantic’s unpredictable power, which requires unwavering attention—in 2022, a rogue wave swamped four workshop members who reasonably believed their position above the beach was safe. Trying to coordinate all the other variables with one eye constantly on the ocean is the photography equivalent of patting your head while rubbing your belly.
The first essential element to consider is the location of whatever mini iceberg I target, which needs to be planted in sand, yet close enough to the water for an occasional wave to wash up and around it. Too far from the surf and the waves never reach the ice; too close, and the subject will actually float away mid-exposure. Often it’s difficult to tell whether a potential subject is properly positioned until actually attempting to photograph it for awhile. And even the best ice subject doesn’t in one place for more than a wave or two.
Adding more frustration to these Diamond Beach iceberg scenes is the power of moving water, which, even when it doesn’t reposition the ice, can still impart micro-movement during the long exposure. I can’t tell you how often I’ve thought I’d nailed a Diamond Beach shot, only to zoom in on the ice afterward to find an imperceptible rotation or wobble had made it too soft to use.
Then there’s the timing of the click. I’ve found that the most appealing blur happens when the wave has swept past the ice and is actually washing back out. Equally important is the duration of the exposure, which needs to be long enough to blur the water, but not so long that all definition in the water is lost. Even if I’ve nailed all the above variables, since I focus on my chosen ice subject before the wave arrives, even if it stays perfectly stationary during my exposure, just the slightest shift in the ice’s position before my shutter click can invalidate my chosen focus point.
Of course all these machinations are irrelevant to the people don’t like the silky water effect in any image. And while I agree that at times blurring water verges on cliché, the truth is that fast water illuminated by anything less than full sunlight usually offers little choice. In those conditions the question isn’t whether to blur the water, it’s how much to blur it?
The argument against blurring moving water that always amuses me most is the one that says blurred water “isn’t natural.” The reasoning is that blurred-water images should be disqualified because we never see blurred water in nature. My question for these “purists” is, how many times have you seen the alternative to blurred water: individual water droplets suspended in midair?
This question just underscores a photographic truth I’ve been hammering on for years: The camera and human eye experience the world entirely differently. Discarding images simply because they aren’t “natural” would eliminate not only all black and white images, but also every image that’s not, uhhh, three-dimensional. Hmmm—let’s count how many images that leaves us with….
On the other hand, embracing your camera’s unique vision is empowering. It opens doors to many creative possibilities, of which blurred water is just a scratch on the surface. While there’s no magic formula to achieve it, blurring water isn’t hard once you learn to see the world as your camera does.
The prime determining factor in blurred water is the distance any individual water drop traverses your frame while the shutter is open: the more of the frame it spans, the greater the blur effect. The amount of blur you capture starts with the speed of the water, over which you have no control. But take heart, because there are several variables you can control:
- Focal length: The longer your focal length (more telephoto), the shorter the distance from one side the frame to the other (a wide angle vista can encompass many miles; a telephoto from the same vantage point can reduce the image’s width to a few hundred yards or less), so our imaginary water droplet will span a greater percentage of the frame’s width in a telephoto exposure.
- Subject distance: Moving closer achieves the same thing a telephoto lens does because the closer you are to the moving water, the shorter the distance our water droplet has to travel to span the frame.
- Shutter speed: The longer the shutter is open, the farther our droplet can travel during exposure. You can keep the shutter open by reducing your ISO, shrinking your aperture, and/or cutting the amount of light with a polarizer or neutral density filter.
Because long shutter speeds increase the amount of blur, blurring water is easier when you photograph in reduced light, such as overcast or shade, that requires a longer shutter speed. In full sunlight it’s pretty much impossible to blur water without a neutral density filter to cut the light illuminating the scene.
In a river or creek, whitewater generally works best because not only does it move fast, it also shows the blur effect much better than rapidly flowing green water. In other words, for any given combination of conditions and settings, while the amount of blur is the same for green water as it is for white water, the blur will be much more noticeable in the white water.
When the blur subject is ocean waves, there’s always an abundance of white water to work with. But rather than the relatively consistent flow pattern of river rapids, each ocean wave is significantly different from the others. I think this extreme variability from one wave to the next is what I most enjoy about ocean wave motion-blur images.
Approaching Diamond Beach this February morning, I scanned for ice in the narrow subject zone. I’ve had visits with more potential targets, but also some with less, so overall I was pleased with this year’s opportunities. I spent most of my time there strolling the black sand, working with workshop students, and occasionally targeting an ice chunk of my own for a few unsuccessful frames.
It wasn’t until I was confident everyone in the group was comfortable with the surroundings and happily at work on shots of their own that I got serious about my own photography.
I approached this little iceberg, maybe the size of a large microwave, and set up my tripod a couple of feet away. For the next 15 minutes or so, I worked carefully as up to 10 waves approached my subject, wrapped it, then flowed back out. Each wave nudged the ice slightly, forcing me to move my tripod and recompose before every frame.
Having an LCD and viewfinder to immediately scrutinize each capture was a huge advantage that allowed me to zero in on the shutter speed that worked for my focal length and distance, as well as verify the sharpness of my subject. Having waterproof boots that went up to within six inches of my knees was another advantage I quickly appreciated.
I still don’t think this Diamond Beach blurred wave image is as good as others I’ve seen, but I’m working on it…
Join Don Smith and me in Iceland next year
Workshop Schedule || Purchase Prints || Instagram
Water on the Move
Click any image to scroll through the gallery LARGE


, California")
Visualize the Future
Posted on May 6, 2024

Twin Falls, Ribbon Fall and Bridalveil Fall, Yosemite
Sony α1
Sony 16-35 f/2.8 GM
ISO 50
f/16
2.5 seconds
Virtually every scene I approach with a camera is beautiful, but a beautiful scene isn’t enough if all the parts don’t work together. Human experience of the world differs greatly from what the camera captures—the photographer’s job is to understand and use those differences.
Ansel Adams and visualization
Most photographers know that Ansel Adams visualized his final print, and the darkroom work necessary to create it, before clicking the shutter. This ability to look into the future of each capture is part of what set Ansel Adams apart from his peers.
But Adams’ extensive darkroom work is often cited by digital photographers defending their over-processesed images. We’ve all heard (and perhaps even uttered ourselves) statements like, “Ansel Adams spent more time in the darkroom than he did in the field,” or “Ansel Adams would love Photoshop.” Perhaps true, but using Ansel Adams’ darkroom mastery to justify extreme Photoshop processing misses a significant point: Adams’ mental picture of the ultimate print was founded upon a synergistic relationship between his own vision and his camera’s vision, coupled with a master’s control of capture variables like composition, light, motion, and depth. In other words, Adams’ gift wasn’t merely his darkroom skills, it was an overarching vision that enabled him to make decisions now based on invisible realities he knew he’d encounter later.
I bring this up because I’m concerned about many photographers’ Photoshop-centric “fix it later” approach that seriously undervalues capture technique. This mindset ranges from simple over-reliance on the LCD for exposure with no real understanding of the histogram or how metering works (shoot-review-adjust, shoot-review-adjust, shoot-review-adjust, until the picture looks okay; or shoot so it looks good, not realizing the exposure is wrong until they get it on their computer), to photographers who channel their disappointment with an image into an overzealous Photoshop transformation, pumping color, adding “effects,” or inserting/removing objects until they achieve the ooooh-factor the image lacks.
The better approach is to understand the potential in a scene while actually viewing it in Nature, camera in hand, then to anticipate the processing the image will require and shoot accordingly. In other words, Photoshop should inform capture decisions, not fix them.
Putting Photoshop in its place
Every image ever captured, film or digital, was processed. Just as the processing piece was easy to ignore when the exposed film you sent to a lab magically returned as prints or slides, many digital shooters, forgetting that a jpeg capture is processed by their camera, brag that their jpeg images are “Exactly the way I shot them.” Trust me, they’re not.
Whether you shoot monochrome film, Fuji Velvia slides, low-compression jpegs, or (especially) the latest smartphone there’s nothing inherently pure about your “unprocessed” image. On the other hand, digital landscape photographers who understand that processing is unavoidable, rather than relinquish control of their finished product to black-box processing algorithms built into the camera, usually opt for the control provided by raw capture and hands-on processing.
Unfortunately, Photoshop’s power makes it difficult for many (myself included) to know where to draw the processing line. And every photographer draws that line in a different place—one photographer’s “manipulation” is another’s “masterpiece.” The reality is, Photoshop isn’t a panacea—its main function should be to complement the creativity already achieved in the camera, and not to fix problems created (or missed) at capture.
While I’m not a heavy Lightroom/Photoshop user, I readily acknowledge that they’re amazing tools that are an essential part of my photography workflow. I particularly appreciate that LR/PS give the me ability to achieve things possible with black and white film and a decent darkroom, but difficult-to-impossible with the color transparencies I shot for over 25 years. Of course processing is an ever-evolving art itself, one I’m still learning. I’m afraid to this day I find myself mortified by some of my earlier processing choices—as I no doubt will be at some later date by processing choices I make today.
Creating an image, from start to finish
Normally when I find myself at a popular Yosemite location like Valley View, I won’t get my camera out unless I can find something that feels truly unique. Last month, not wanting to stray from my workshop group, I was content to observe and assist. But when the clouds draping El Capitan and Cathedral Rocks started turning pink in the evening’s last light, I couldn’t resist.
I raced to my car and grabbed my tripod and Sony a1, already loaded with my 16-35 GM lens, and headed down to the large log embedded along the riverbank, just downstream from the parking lot. This log has been a Valley View fixture for years, but each year it gets nudged a little by spring runoff—some years more than others. I’m sure it will eventually be swept away entirely.
A trio of photographers was already in place on and around the log, but spying a spot I could squeeze into, I scaled the log and tightroped my way toward the small opening. Despite an extreme language mismatch, we were able to pantomime our way into a friendly equilibrium—lots of smiles and pointing, with a mutual thumbs-up for punctuation—that enabled me to set up in a spot that worked for me without disturbing them.
With the light changing quickly, I went right to work, framing up a wide draft version that included the entire Valley View scene: clouds, Ribbon Fall (on the left), El Capitan, Cathedral Rocks, Bridalveil Fall, and the Merced River. I was especially excited to be able to frame the scene with the two prominent waterfalls: well known and year-round Bridalveil on the right, and somewhat anonymous, seasonal Ribbon Fall (Yosemite’s highest vertical drop).
I wasn’t super crazy about the log in the middle of the river, but since it was right in the middle of the scene I wanted to photograph, I decided to lean into it and just make it part of my composition. And while I liked the whitewater, I was less than thrilled by its position in the lower right corner of my frame. Again, just something I’d need to accept and deal with.
Balanced atop my log, I raised my tripod as high it would go to prevent the foreground log’s protruding vertical branch from intersecting the far riverbank. To remove distracting texture from the whitewater, I decided to smooth the water with a long shutter speed, dialing to ISO 50 and stopping down to f/16. Exposure was tricky because the sky still held onto a fair amount of light, while the foreground was darkening fast, so I took care to monitor my histogram until I found a shutter speed that didn’t wash out the color, while still creating a pleasing (to my eyes) motion blur.
The preview image on my LCD looked mostly too dark, with the sky too bright, but I know my camera well enough to know that all the beautiful detail in the shadows and highlights would return like magic in Lightroom. Besides pulling down my highlights and dragging up my shadows, a small color temperature tweak, and some selective dodging/burning, this turned out to be a relatively simple image to process and get to come out exactly as I’d visualized it that evening.
One more thing
Check out the gallery below. All of these images were captured at Valley View. Rather than base my composition on the “standard” shot here, I crafted each to take advantage of whatever conditions were before me at the time. And while a few images do indeed settle for the more conventional composition, my decision to photograph that way was justified (in my mind) by the exceptional conditions that told me I should just get out of the way and let the scene speak for itself. So I guess the moral is, trust your instincts and don’t settle for the obvious—unless the obvious just hits you right over the head and you just can’t ignore it.
Valley View Variety
Click any image to scroll through the gallery LARGE


, Yosemite")


The Battle of the Brains
Posted on May 3, 2024

Intimate Dogwood, Yosemite Valley
Sony a7RV
Sony 200-600 G
ISO 1600
f/10
1/125 second
Two photographers approach a dense forest festooned with blooming dogwood: One is drawn to a lovely bloom and can clearly visualize a uniquely beautiful image, but he has no idea how to manage his exposure variables to achieve it; the other photographer is so intent on minimizing diffraction while identifying the shutter speed that will freeze the gently swaying bracts without compromising the ISO, that to her, the scene is nothing more than a disorganized assortment of white splashes.
While most photographers don’t fall at these extremes of the creative/analytical continuum, the vast majority do approach their craft with a dominant intuitive or analytical bias, a right-brain versus left-brain struggle with one side or the other significantly stronger than the other. Compounding the problem, rather than simply getting out of the way and letting the strong side do its work, much like an irritating little brother, the less developed (notice I didn’t say “weaker”) side often seems committed to distracting its dominant counterpart.
But every once in a while I run into a photographer who seems to have negotiated a synergistic truce between her conflicting mental camps. She’s able to efficiently analyze and execute the plan-and-setup stage of a shoot, then check-in with her aesthetic counterpart for creative inspiration. As the time to click the shutter approaches, she seamlessly switches between the two camps: the right brain knows how much to soften the background and blur the water, while her left brain knows exactly how to make this happen. The result is images that consistently amaze with their creative inspiration and technical execution.
My job as a photo workshop leader (among other things) is to identify where each photographer falls on this analytical/intuitive spectrum so I can honor and refine the dominant side, and encourage and nurture the less developed side. And after more than 18 years leading photo workshops, I’ve learned that what most photographers perceive as a terminal shortcoming in their creative or analytical aptitude can usually be resolved once it’s untangled from the dominant side.
When I hear, “I have a good eye for composition…,” I know before the “but” exits the photographer’s lips that I’ll need to prove that he’s smarter than his camera (he is). Our time in the field will be spent working on jettisoning the camera’s automatic modes because as smart as it might seem, your camera is not creative. I try to demystify and simplify metering, exposure, and depth management until they become second nature, comforting allies rather than distracting antagonists. Fortunately, despite the fact that much of the available photography education seems designed to intimidate Einstein, laying a foundation for mastering photography’s technical side is ridiculously simple.
On the other hand, before the sentence that starts, “I know my camera inside and out…,” is finished, I know I’ll need to foster this photographer’s curiosity, encourage experimentation, and help her disengage the rules that constrain her creativity. We’ll think in terms of whether the scene feels right, and work on what-if camera games (“What happens if I do this”) that break rules. Success won’t require a brain transplant, she’ll just learn to value and trust her instincts.
Intuition is the key to breaking the rules that inhibit creativity, while simplification and repetition create technical confidence. Alone, these qualities are incomplete; in conflict, they’re mutually exclusive anchors that prevent movement; in concert, their synergy is the foundation of photographic success.
For example
Coincidentally, just this week I happed to find myself in a dense forest festooned with blooming dogwood. Go figure. A few minutes earlier I’d set my workshop group free just upstream from Valley View, and after making sure everyone was content, I grabbed my camera, tripod, and 200-600 lens and went dogwood hunting.
I started by switching on my creative brain and wandering slowly, scanning the surroundings for a dogwood flower (yes, I know they’re technically not flowers, they’re bracts) to isolate from its surroundings. Eventually I made my way across the road, and soon my eyes landed on a single bloom swaying gently in full shade. Its slightly green tint and pristine center (this is where the actual dogwood flowers reside) told me this specimen was young—exactly what I was looking for.
Instead of framing my subject up and clicking, I scanned the background and found a branch with more young flowers a couple of feet away. Positioning myself to align my target flower with the background flowers, I framed up a vertical composition. Briefly engaging my analytical brain, I opened my aperture wide for the absolute softest background, increased my ISO to mitigate the effects of the breeze, and focused on the dogwood’s center. Then I dial my shutter speed until the histogram looked right, checking to be sure my chosen speed could freeze the flower”s gentle bobbing.
My favorite moment when doing these creative selective focus shots is the instant my subject snaps into focus. Suddenly, the world in my viewfinder is completely different from the one outside my camera. In addition to the pillowy background flowers, I liked the way a few rays of sunlight had penetrated the dense branches overhead to illuminate a couple of green leaves in my frame.
My creative brain really liked the framing I’d found, but thought the background could use just a little more definition. So back to my analytical brain I went, stopping down to f/10—just enough to distinguish individual flowers in the soft background. But stopping down also reduced my exposure—since I couldn’t increase my shutter speed to add light, instead I increased my ISO knowing that whatever noise the higher ISO introduced would easily clean up in processing. Click.
Of course this creative/emotional switching doesn’t really happen consciously anymore, but there was a time when I was far more deliberate about the distinction. Like most things in life, the longer I do this, the more unconscious and seamless this switching becomes, and the better my two sides play together.
Workshop Schedule || Purchase Prints || Instagram
More Dogwood!
Click any image to scroll through the gallery LARGE


