Eloquent Images by Gary Hart
Insight, information, and inspiration for the inquisitive nature photographer
Spring has sprung
Posted on May 15, 2017

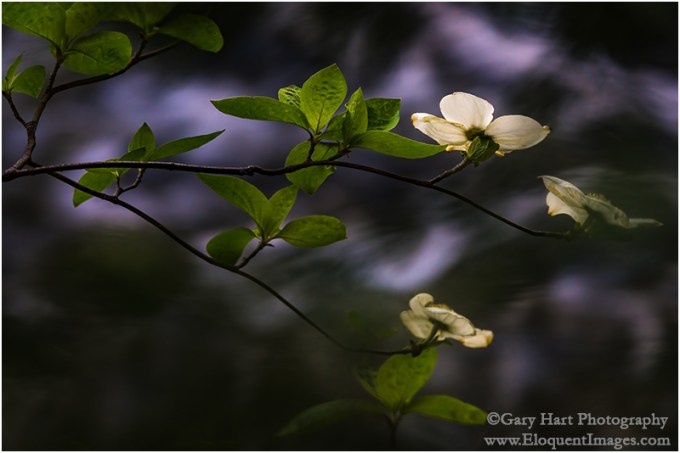
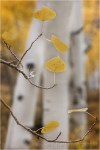
Dogwood and Redbud, Merced River, Yosemite
Sony a7R II
Sony 70-200 f/4
1/40 second
F/4
ISO 200
I spent most of the last week in Yosemite and can confirm that spring has definitely sprung there. The Merced River, swollen by snowmelt, is overspilling its banks, flooding meadows and submerging riverside trails. Reflections are everywhere, and viewing the waterfalls without getting wet? Forget about it.
Another spring highlight is the moonbow that colors the mist beneath Yosemite Falls. A fortunate convergence of Yosemite Falls’ southeast exposure and the angle of the rising full moon when the snowmelt is at its peak make Yosemite one of the best locations in the world to witness a lunar rainbow. I was able to photograph it three times last week, twice with my workshop group and once with a private tour customer. Easily visible to the naked eye as a silvery arc in the billowing mist, a long exposure reveals the moonbow’s true colors.
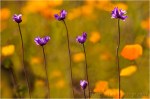
But of all the spring treats Yosemite offers, for creative photography I think the dogwood might be my favorite. For just a few short weeks in April and May, these graceful blooms shower Yosemite Valley with splashes of white that remind me of the Fourth of July sparklers of my childhood. But unlike the ephemeral sparks of a sparkler, the dogwood progress in slow motion so I can appreciate them at a much more relaxing pace.
I found this branch at the Bridalveil Fall vista on Northside Drive, about a mile east of Valley View. The river was gold with late light, and the air was still as I went to work on the scene. Careful positioning allowed me to juxtapose three layers in my frame: in the foreground is the dogwood branch with varying degrees of detail; the middle-ground is a blend of heavily blurred redbud and more dogwood; all this spring beauty stands out against a backdrop of the sunlit Merced River. I experimented with different depths of field by varying my f-stop, focal length, and focus distance until I was satisfied.
Yosemite Spring
Click an image for a closer look and slide show. Refresh the window to reorder the display.


Dogwood days
Posted on April 21, 2017

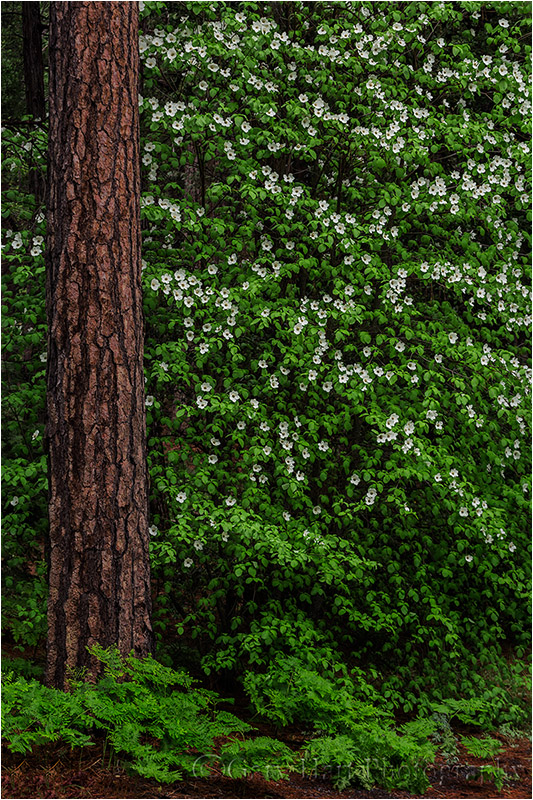
Forest Dogwood, Yosemite Valley
Canon EOS 5D Mark III
1/80 second
159 mm
ISO 800
F4
People ask all the time for my favorite season in Yosemite, and I really can’t give them an answer that doesn’t sound like a press conference by a waffling politician—there are things I love about each season in Yosemite, so asking me to choose is like asking me to pick a favorite child. But I can tell you what I like about each season, and I’ve always felt that spring in Yosemite is the most consistently photographable—it doesn’t really matter what the conditions are, I can always find something to photograph.
Spring is when Yosemite’s waterfalls peak, and Yosemite Valley starts to green up. Many of the meadows are home to ephemeral pools that reflect Yosemite’s iconic monoliths, soaring cliffs, and plunging waterfalls. And with all the water in the falls, spring sunshine means rainbow opportunities from many spots if you know when to be there.
Maybe my favorite Yosemite spring treat is dogwood, which usually peaks around May 1, give or take a week or two. I enjoy photographing dogwood in any kind of light, from sunshine, to overcast, to full shade. In sunshine, I put backlit blooms against a dark background, expose for the flower, and go to town. The translucence of these backlit flowers gives them a luminosity that appears to originate from within. In overcast and shade, I opt for soft focus that emphasizes my primary subject and reduces the background to colors, lines, and shapes.
Regardless of the light, I start with a bloom, group of blooms, or entire branch, that I can isolate from surrounding distractions. Once I identify a likely candidate, I maneuver myself until I can get the subject against a complementary background, such as shade, shape, and color.
I worked this scene for about a half hour before I was satisfied. I started with the flower-laden branch and moved around a bit until the background was right. Then I tried a variety of focal lengths to simplify, balance, and soften the composition. Once I was satisfied with my composition, I used live-view to focus toward the front of the center cluster. Finally, I ran the entire range of f-stops from f4 to f16, in one-stop increments, to ensure a variety of bokeh effects to choose from.
A Dogwood Gallery


Can you defend your exposure settings?
Posted on July 15, 2016
Dogwood Above the Merced River, Near Fern Spring, Yosemite
Sony a7R II
Tamron 150-600, Canon-mount with Metabones IV adapter
1/125 second
F/8
ISO 1600
While I’m a huge advocate of manual metering (it’s all I’ve ever used), I stop short of saying everyone shoot shoot in manual mode. But I do believe that anyone who is serious about their photography should at least be comfortable shooting in manual mode. That means understanding how a light meter “sees” a scene, the information the meter returns, and how each of the camera’s three exposure variables affect an image. (I won’t get into the rudiments of metering now, but you can brush up here: Exposure basics.)
We have three ways to control the amount of light our sensor records:
- Aperture, measured in f-stops, is the size of the opening that allows the light in. Controlling exposure by changing the aperture affects your depth of field—larger aperture (smaller f-stop), means less depth of field.
- Shutter speed is how long the light strikes the sensor. Controlling exposure by changing the shutter speed affects the way the camera captures motion—a faster shutter speed freezes motion, a longer shutter speed blurs motion.
- ISO is the sensor’s sensitivity to light. Controlling your exposure by adjusting the ISO affect the digital noise in the image—increasing the ISO to make the sensor more sensitive to light increase’s the resulting image’s noise.
Every image you capture uses a combination of these three variables to establish the exposure (amount of light) for every image. And because the variable you choose to adjust affects more than just the exposure of your image, if you can’t justify your choice for each of the three exposure settings for every shot (if it’s not a conscious decision), you have a wonderful opportunity to improve.
To illustrate, I’ll explain my exposure choices in the dogwood image above (a new image, captured during my 2016 Yosemite Moonbow and Wildflowers workshop in April). Though I used f/8, 1/125 second, and ISO 1600 to achieve my desired exposure, keep in mind that I could have achieved exactly the same exposure by choosing f16, 1/4 second, and ISO 100. Or f5.6, 1/500, and ISO 6400. Or a virtually unlimited variety of other combinations that all would have captured the same amount of light. But since whatever exposure combination I decide on will potentially yield a completely different image (different depth, different motion, different noise), I had to be very careful with my decisions.
So here goes:
- f/8: Because the f-stop determines the depth of field for my chosen focal length and focus point, and I try to compose with front-to-back relationships in every frame, f-stop is usually my primary, non-negotiable exposure variable. In this case I wanted my background soft to force my viewers’ eyes to the dogwood only, but not so soft that the background whitewater was unrecognizable. I decided that f/8 gave me the right balance of foreground sharpness and background softness.
- 1/125 second: When photographing a stationary landscape on a tripod, I can go with whatever shutter speed I need, but when there’s motion in the scene, my shutter speed becomes as important as my f-stop. On this afternoon, in addition to the water moving in the background, I was dealing with a slight breeze. If the breeze hadn’t been a consideration I could have chosen whatever shutter speed gave me the best motion effect, but I needed to freeze the swaying dogwood and was confident I could do that at 1/125 second.
- ISO 1600: Because it gives me the cleanest images, I always go with ISO 100 when possible, but that wasn’t an option here. Given that I needed f/8 for my desired depth of field, and I wasn’t comfortable keeping my shutter open longer than 1/125 second, ISO was the only remaining variable to control the light in my scene. I spot-metered on the brightest dogwood and increased the ISO until my meter indicated the flower was as bright as I could make it without overexposing. The dynamic range in this scene was great enough that even though the dogwood bloom was fully exposed, the shadows remained quite dark, but fortunately that helps the dogwood stand out.
This was my process and rationale for this image. Depending on the factors I’m dealing with, my process might follow a completely different path for another image.
In general I tell people just learning to master manual metering to approach every scene with a tripod (non-negotiable—with no tripod, my suggestions below aren’t valid) and this mindset:
- F-stop: f/11, because this provides the most depth of field possible at an f/stop that is in most lens’s sharpest range, and without significant diffraction.
- ISO: 100 (or whatever your camera’s native ISO is), because this is where you’ll get your cleanest (least noise) images.
- Shutter speed: Adjust until you’ve achieved the proper exposure.
These guidelines certainly don’t apply to all situations, but they’re a good starting point that will simplify the decision making process until you get more comfortable juggling your exposure variables. And keep in mind that you’ll need to deviate from f/11 and ISO 100 whenever your creative needs and the scene conditions (such as wind or moving water) dictate. Practice makes perfect.
I cover all this stuff in much greater detail in my photo workshops.
Walking the Exposure Tightrope
(Images that required a very specific combination of exposure variables)


A new way of shooting
Posted on May 6, 2015

Forest Spring, Valley View, Yosemite
Sony a7S
Sony/Zeiss 16-35
1/125 second
F/8
ISO 6400
Regular readers of my blog know of my recent switch from Canon DSLR to Sony mirrorless. I started the transition with the Sony a7R, fully expecting to prefer it over my Canon 5D Mark III enough to justify the switch, but not so much that I’d completely jettison my Canon gear. In addition to 60 percent more resolution than my 5D III, the a7R gave me dynamic range that I never dreamed possible, and significantly better high ISO performance. So, despite a less than trivial adjustment to mirrorless shooting, it didn’t take long to realize that I wasn’t going to miss Canon at all—I haven’t picked up a Canon camera since October.
When it became clear that I was with Sony for the long haul, and because I can’t afford to travel without a backup camera, I started thinking about a backup body. My usual backup body strategy is to complement my full-frame primary body with a crop sensor backup body in case I ever want extra reach with any of my lenses. The Sony a6000 seemed the perfect choice—extremely compact (without a lens, the a6000 fits in the hip pocket of my Levis), more than enough resolution (24 megapixels), compatible with all of my Sony lenses, and inexpensive (easily found for under $600).
Usually my backup bodies gather dust and only come out in an emergency, or perhaps for the occasional long-distance moonrise (when my foreground subject is far enough away that I want as much telephoto reach as possible). What I wasn’t expecting from the a6000 was primary-body image quality in an extremely compact package—not only does the a6000 have (slightly) more resolution than my 5DIII, its high ISO performance and dynamic range is better than the 5DIII (though not as good as the full-frame Sonys). Given all this, I don’t hesitate using the a6000 when I think I might want a little more reach, often juggling it with the a7R for extra flexibility.
Routinely carrying two bodies is certainly not groundbreaking, but it’s new for me. But I wasn’t finished with the a7R and a6000. Given my passion for night photography, it wasn’t long before I added the 12 megapixel Sony a7S to my bag. It took just a couple of night shoots to confirm the raves I’d heard about the a7S’s “magic” ability to see in the dark, but as with the two previous Sony bodies, the a7S proved its value in unexpected ways. More than just a night camera, the high ISO capability of the a7S allows me to freeze daylight motion at twilight and in full shade.
I knew I’d appreciate the size and weight savings of a significantly smaller body and (slightly) smaller lenses, but I thought the primary benefit would simply be a smaller bag. And while I do appreciate the option to travel and hike with a more compact, lighter bag without sacrificing the 20-200mm focal range I consider essential, my primary bag has actually gotten a little heavier since I switched to mirrorless. But with that slight increase in weight comes a significant increase in shooting power and flexibility.
For my entire photography life I switched lenses as my needs dictated (like pretty much every other SLR photographer). Now, with bodies this small, my bag easily holds three, and rather than switching lenses on one primary body, I first decide which body to use based on the composition (wide or long) and conditions (light and motion).
Here’s what I carried in my F-Stop Tilopa during my Canon days:
- 5D Mark III
- Canon 16-35 f2.8L
- Canon 24-105 f4L
- Canon 24-70 f4L
- Zeiss 28 f2
And here’s what my F-Stop Tilopa carries now:
- Sony a7R
- Sony a7S
- Sony a6000
- Sony/Zeiss 16-35 f4
- Sony/Zeiss 24-70 f4
- Sony/Zeiss 70-200 f4
- Zeiss 28 f2 (Canon mount)
- Tamron 150-600 f5-f6.3 (Canon mount)
- Metabones Mark IV Canon to Sony adapter
My primary body is the a7R, but when I want extra reach, I don’t hesitate going to the a6000. Sometimes I carry my a7R with a wide lens and my a6000 with a telephoto. And when I need to freeze motion in low light, the a7S is my body of choice. The addition of the a7S to my bag has made the biggest difference, allowing me to shoot in conditions I’d never have considered before.
Moonrise above a ridge five miles away? No problem—out comes the a6000 and Tamron 150-600 for 900mm of telephoto reach. Breeze-blown dogwood in a shady forest? No problem—here’s my a7S at 6400 ISO.

Ridgetop Moon, Yosemite
Sony a6000
Tamron 150-600 (Canon-mount with Metabones IV adapter)
600mm (900mm full frame equivalent)
1/100 second
F/11
ISO 400
For example
In Yosemite last week I broke out the a6000 and Tamron 150-600 (225-900 full-frame millimeters) for the dogwood, and for a rising full moon. The a7S was my moonlight camera, and just what the doctor ordered when I wanted to photograph wind swaying dogwood in full shade.
On our final morning I guided my workshop group to Valley View to photograph the first light on El Capitan. Beautiful as that scene is, it wasn’t long before a few drifted across the road to an evergreen forest sprinkled with blooming dogwood. A breeze, further augmented by speeding vehicles, limited everyone else to distant views and brightly backlit flowers. I, on the other hand, simply switched to the a7S and bumped my ISO to 6400 to enable a fast enough shutter speed for extreme close photography.
With my 16-35 lens at 16mm, I put the front element about three inches from a bloom in full shade, dialing to f8 to ensure enough depth of field to keep my flower sharp throughout. Even in the dense shade, I was able to achieve a shutter speed fast enough to freeze the breeze. Noise at 6400 ISO? What do you think?
Six months of Sony captures
Click an image for a closer look, and a slide show. Refresh the screen to reorder the display.


When seasons collide
Posted on April 11, 2015

Spring Snow, El Capitan, Yosemite
Sony a7R
Sony/Zeiss 24-70
1/8 second
F/11
ISO 100
Ever notice how the best photography happens at nature’s boundaries, the interface separating disparate elements? Sometimes it’s visual elements, like the collision of surf and shore or the intersection of shadow and light. But often we’re moved by images that capture the transition of our experience of the world, such as the color and light that happens when we shift between night and day, or distinctive elements of two seasons together in one frame.
Sunrises and sunsets are a daily occurrence, but the opportunity to capture snow and autumn leaves, or snow and spring flowers, comes just once a year. And until last week, with Yosemite’s waterfalls approaching a summer trickle, and the spring dogwood bloom at least a month early, prospects for the elusive snow with dogwood opportunity didn’t look good.
Storm brewing
Despite Yosemite Valley’s snowless winter, the optimist in me steadfastly monitored an incoming storm, openly defying my internal pessimist that knew the promise of snow would surely fade as the designated day neared. In recent years the pessimist has prevailed in these internal conflicts, thanks to a stream of promising storm after promising storm detoured into the Pacific Northwest by a persistent ridge of high pressure.
But for some reason this storm was different, and while the forecast details changed daily, the one constant was that it seemed determined to defy the ridge. Not only that, this new storm originated in the arctic—what it lacked in tropical (drought busting) moisture, it made up for with air cold enough to deposit snow all the way down to Yosemite Valley.
Obi-Wan Kanobe, you’re my only hope
So, despite the fact that I’d just returned Saturday night from four days in Yosemite (for my spring photo workshop), I found myself on the road back Tuesday morning. With my (4-wheel-drive) Pilot in the shop for some minor body work, I congratulated myself for having the good sense to rent a Jeep when I scheduled the work, even though at the time snow was the last thing on any Californian’s mind.
The queue at the Yosemite entrance station was backed up about a 1/4 mile, and as I idled in a steady rain (the outside temperature was 38F, and with 1500 more feet to climb, I had no doubt it was snowing in Yosemite Valley), it occurred to me that I didn’t actually see anything indicating 4WD anywhere in or on the vehicle. Of course surely a Jeep will have 4WD, but for peace of mind I reached for the manual in the glovebox….
The manual provided no encouraging or discouraging words. As I crept toward the entrance, chain requirement signs seemed to be taunting me, I saw several cars ahead of me turned away for not having chains or 4WD. Approaching the booth, I still wasn’t sure whether I had 4WD (I think I knew, but I was in serious denial), but it dawned on me that without it, my trip was in jeopardy. I rolled to the entrance window and the ranger eyeballed my Jeep—I waved my National Park pass in front of him, and without coming to a complete stop uttered, “These aren’t the droids you’re looking for”, then held my breath as he moved me along. Phew.
Of course my problem was more than simply getting into the park—if conditions truly did merit chains, I knew of no Jedi tricks that would spare me. The snow appeared just a couple of miles up the road, but by the time I got there it was no longer falling and the road turned out to be clear all the way up to the valley. The rest of the afternoon I photographed Yosemite Valley sporting a light but nice dusting of snow. Parking the car for dinner at Yosemite Lodge, I crossed my fingers that the predicted overnight snow would hold off until I retreated to my hotel below the snow line.
No such luck. Stomach full, I exited the cafeteria to at least an inch of new snow, now falling fast enough that my visibility was severely limited and traction was dubious—beautiful indeed, but extremely stressful for this driver. With no other cars on the road, I split the gap in the trees (all actual signs of a road had been obliterated) all the way down the mountain, poking along at about 10 miles per hour but still occasionally unable to resist flipping on my high-beams to recreate a slow-motion Millennium Falcon shift into hyperspace effect.
All’s well that ends well
I made it down the hill without incident, then immediately started stressing about the next morning. If the snow fell this hard all night, Yosemite would surely be spectacular, but lacking chains or 4WD, I’d not be able to get there to enjoy it.
I rose at 5:30 and headed back into the park in the dark. Much to my relief, the snow had stopped in the night, and at each “Chains required” sign I rationalized that the warning was left over from the night before and decided to continue until I actually encountered snow and ice on the road. In Yosemite Valley I found every tree and rock fringed with snow, but the roads were fine.
Freed to concentrate on photography, I knew I had about two hours of quality shooting before the clouds departed, the light hardened, and snow dropped from the trees. My first stop was a personal favorite spot beside the Merced River, too small for a group, where I hoped to find blooms on the dogwood tree that aligns with El Capitan and the Merced River.
I arrived just in time to catch the morning’s first light on El Capitan, the moment made even more dramatic by the diaphanous vestiges of the departing storm. I worked the rapidly changing scene hard, shooting entirely with my 24-70 lens, but using pretty much every millimeter of the lens’s focal range before heading up the hill to Tunnel View.
I drove home thankful for enough snow to photograph, but not so much that I couldn’t navigate, and for the rare opportunity to leverage the late snow and early spring into images capturing the best of both seasons.
Join me in Yosemite next spring
An El Capitan Gallery
Click an image for a closer look, and a slide show. Refresh the screen to reorder the display.


Being a better fisherman
Posted on February 28, 2015
Bridalveil Dogwood, Valley View, Yosemite
Canon EOS 10D
1/15 second
F22
ISO 100
48 mm
“Many of us would probably be better fishermen if we did not spend so much time watching and waiting for the world to become perfect.”
― Norman Maclean, A River Runs Through It
I don’t fish. But then, Norman Maclean’s words really aren’t about fishing anyway. I’m reminded of his quote every time I see photographers frozen by minutia, mired in the moment by small distractions that matter very little on the path to their grand objectives (better pictures). Do any of these sound familiar?: “There’s dust on my sensor”; “This lens is soft”; “The light was better yesterday”; “The light will be better tomorrow”; “It’s too cold”; “It’s too hot”; “It’s too wet”; and so on.
Near the top of photographers’ list of self-imposed obstacles seems to be an insecurity about their gear. Instead of doing what photographers do (photograph), many spend far too much time reading reviews, scouring specifications, checking prices, and abusing the social media of other photographers. Whether their goal is to justify the expense of new equipment, or to rationalize the status of their current equipment, all these machinations make me wonder how much they enjoy the actual act of photography.
There’s nothing wrong with your camera (or mine)
A related behavior I’ve observed since my switch from a Canon SLR system to Sony mirrorless is an irrational obsession with the photo equipment of other photographers (for example, mine). I’m always happy to answer questions about my photo gear (okay, almost always), but I’ve detected an underlying tone of insecurity in some (not all) of the queries, as if my camera choice somehow invalidates theirs. Some have wanted reassurance that their camera is still okay (it is), and others have actually tried to “suggest” that I’ve made a mistake (I haven’t).
I know I haven’t made a mistake because my needs are my own, I’m quite happy with Sony Alpha gear, and I’m getting pictures I couldn’t have gotten before. End of debate. And for those who fear that my choice means their camera may be less than perfect, let me just say that there are many good reasons to get a new camera, to switch entire systems even, but seeing another photographer do it is not one of them.
A blast from the past
If you have a working DSLR or mirrorless camera of pretty much any vintage, you can get nice captures. To illustrate this point in my workshops and training, I sometimes go all the way back to 2003 and my Canon 10D, my first DSLR.
Shooting with my 10D today, I’d probably be crazy-frustrated with the 6 megapixel, 1.6 crop sensor, its postage-stamp LCD, poor low-light performance, and narrow dynamic range—but that doesn’t change the fact that I got great images from that now ancient beast, images that I’ve enlarged and sold as prints up to 24×36, in person, to people who walked right up and scrutinized each pixel. Images that people still buy. In other words, if the images I got from that prehistoric DSLR are still usable, there’s no reason the images from whatever ancient camera you might have won’t be usable.
Time is on your side
So how long should you wait before replacing your camera? That’s an individual decision based on many personal factors. My general recommendation is to hold off on a new camera until you’ve upgraded all your primary glass (the lenses you might use on any shoot) and your support system (tripod and head) to the best possible.
These things will serve you far longer than whatever the latest and greatest camera might be. In fact, the longer you can postpone that new camera purchase, the better the technology will be when you finally pull the trigger on a new camera.
I digress
That doesn’t mean there won’t be temptations. For example, like an ex-girlfriend trying to lure me back with triple-D implants, Canon is now (January 2020) promising an 80-megapixel sensor. Yikes. But if she really understood me, she’d have known I’m not impressed.
But anyway….
Once you have all your lens and support ducks in a row, maybe it’s time to think about upgrading your body. Maybe. Start by asking yourself what’s important to you.
The Canon 5D Mark III filled most of the basic camera criteria for me: full frame, 100 percent viewfinder, pretty good weather sealing, functional live-view (much better than my 1DS Mark III had), and multiple card slots. I ignore many oft-touted features that might be important to others but mean little to me, such as: frame rate, autofocus speed, video, in-body image stabilization, and touch-screen LCD.
Landing the metaphor
I guess the point is that buying a new camera is never an emergency unless you dropped your only camera in a creek (been there… twice). Take your time, set your budget, and be honest with yourself about what you need and don’t need. In the meantime, get off the computer, grab whatever camera you have, and get out and shoot. You can’t land fish without putting a line in the water, and you can’t take pictures without putting the world in your viewfinder.
Visit my website to see my photo workshop schedule
A Canon 10D Gallery
Click an image for a closer look, and a slide show. Refresh the screen to reorder the display.


A camera’s reality
Posted on April 24, 2014

Spring, Dogwood and Bridalveil Fall, Yosemite
Canon EOS 5D Mark III
1/250 second
260mm
ISO 400
F5.6
I knew the dogwood bloom in Yosemite had really kicked in this week (quite early), so when the forecast called for rain in Yosemite on Tuesday, I cleared my schedule and headed up there for the day. It turns out I only got an hour or so of rain and solid cloud cover before the sun came out and started making things difficult, but it was still worth the drive.
On my way out of the park that afternoon I stopped at the Bridalveil Fall view turnout on Northside Drive, spending about an hour lying in the dirt with my 100-400 lens, trying to align dogwood blossoms with Bridalveil Fall (about 1/3 mile away). I found the more impressive aggregation of blooms were about ten feet too far downstream to align perfectly, but as I headed back to my car I took a closer look at a single, precocious little flower in a much more favorable position. I’d overlooked it earlier because, in my haste to get to the more impressive flowers, I wasn’t seeing like my camera. To my human eye, this flower was imprisoned by a jumble of disorganized, distracting stems. But this time I decided to give it a try, knowing that the narrow depth of field of my 100-400 lens would render the scene entirely differently from what my eyes saw.
While the flower is clearly the only point of focus, the way the out-of-focus branches and buds blurred to shapes and accents that actually enhance the image was a pleasant surprise. While Bridalveil softens beyond recognition, I was pretty sure most viewers would still recognize it as a waterfall; even if they don’t, I didn’t think it was a distraction.
Words can’t express how much fun I had playing with this little scene. I’ve been photographing things like this for a long time, but I still find myself caught off guard sometimes by the difference between my vision and my camera’s vision. I love these reminders. I guess if there’s a lesson here, it’s to emphasize how important it is to comprehend and master your camera’s very unique view of the world. Images that achieve that, while nothing like the human experience, are no less “true.” Rather than confirming what we already know, they expand our world by providing a fresh perspective of the familiar.
More rain in the forecast tomorrow—guess where I’ll be….

Raindrops, Dogwood Leaf, Yosemite
When I arrived in Yosemite that morning a light rain was falling. Used my 100mm macro and 20 mm of extension to focus extremely close to this backlit dogwood leaf. It’s difficult to see, but these droplets are actually on the opposite side of the leaf. There is one way to tell—can you see it?
Canon EOS 5D Mark III
1/200 second
100 mm
ISO 800
F7.1
Going for bokeh
Posted on April 17, 2014

Forest Dogwood, Yosemite Valley
Canon EOS 5D Mark III
1/80 second
159 mm
ISO 800
F4
In this day of ubiquitous cameras, automatic exposure, and free information, a creative photographer’s surest path to unique images is achieved by managing a scene’s depth. Anyone with a camera can compose the left/right/up/down aspect of a scene. But the front/back plane, a scene’s depth, that we human’s take for granted, is missing from a two-dimensional image. Managing depth requires abstract vision and camera control beyond the skill of most casual photographers.
While skilled photographers frequently go to great lengths to maximize depth of field (DOF), many forget the ability of limited DOF to:
- Guide the viewer’s eye to a particular subject
- Provide the primary subject a complementary background
- Provide background context for a subject (such as its location or the time of day or season)
- Smooth a busy, potentially distracting background
- Create something nobody will ever be able to duplicate
They call it “bokeh”
We call an image’s out of focus area its “bokeh.” While it’s true that bokeh generally improves with the quality of the lens, as with most things in photography, more important than the lens is the photographer behind it. More than anything, achieving compelling bokeh starts with understanding how your camera sees the world, and how to translate that vision. The image’s focus point, its depth of field (a function of the f-stop, sensor size, focal length, and subject distance), and the characteristics of the blurred background (color, shapes, lines) are all under the photographer’s control.
No special equipment required
Compelling bokeh doesn’t require special or expensive equipment—chances are you have everything you need in your bag already. Most macro lenses are fast enough to limit DOF, have excellent optics (that provide pleasing bokeh), and allow for extremely close focus (which shrinks DOF). A telephoto lens near its longest focal length has a very shallow DOF when focused close.
Another great way to limit your DOF without breaking the bank is with an extension tube (or tubes). Extension tubes are hollow (no optics) cylinders that attach between your camera and lens. The best ones communicate with the camera so you can still meter and autofocus. Not only are extension tubes relatively inexpensive, with them I can focus just about as close as I could have with a macro. They can also be stacked—the more extension, the closer you can focus (and the shallower your DOF). And with no optics, there’s nothing compromise the quality of my lens (unlike a teleconverter or diopter). But there’s no such thing as a free lunch in photography—the downside of extension tubes is that they reduce the amount of amount light reaching the sensor—the more extension, the less light. On the other hand, since I’m using them to reduce my DOF, I’m always shooting wide open. And the high ISO capability of today’s cameras more than makes up for the loss of light.
Many of my selective focus images are accomplished without a macro or even a particularly fast lens. Instead, preferring the compositional flexibility of a zoom, I opt for my 70-200 f4 (especially) and 100-400 lenses. While my 100 macro is an amazingly sharp lens with beautiful bokeh, I often prefer the ability to isolate my subject, in a narrow focus range, without having to get right on top of it. On the other hand, if I have a subject I want to get incredibly close to, there’s no better way than my macro and an extension tube (or two, or three).
Managing depth of field
When using creative soft focus, it’s important that your background be soft enough that it doesn’t simply look like a focus error. In other words, you usually want your background really soft. On the other hand, the amount of softness you choose creates a continuum that starts with an indistinguishable blur of color, includes unrecognizable but complementary shapes, and ends with easily recognizable objects. Where your background falls on this continuum is up to you.
Your DOF will be shallower (and your background softer):
- The closer your focus point
- The longer your focal length
- The larger your aperture (small f-stop number)
A macro lens and/or extension tube is the best way to get extremely close to your subject for the absolute shallowest DOF. But sometimes you don’t want to be that close. Perhaps you can’t get to your subject, or maybe you want just enough DOF to reveal a little (but still soft) background detail. In this case, a telephoto zoom may be your best bet. And even at the closest focus distances, the f-stop you choose will make a difference in the range of sharpness and the quality of your background blur. All of these choices are somewhat interchangeable and overlapping—you’ll often need to try a variety of focus-point/focal-length/f-stop combinations to achieve your desired effect. Experiment!
Foreground/background
Composing a shallow DOF image usually starts with finding a foreground subject on which to focus, then positioning yourself in a way that places your subject against a complementary background. (You can do this in reverse too—if you see a background you think would look great out of focus, find a foreground subject that would look good against that background and go to work.)
Primary subjects are whatever moves you: a single flower, a group of flowers, colorful leaves, textured bark, a clinging water drop—the sky’s the limit. A backlit leaf or flower has a glow that appears to originate from within, creating the illusion it has its own source of illumination—even in shade or overcast, most of a scene’s light comes from the sky and your subject will indeed have a backlit side. And an extremely close focus on a water droplet will reveal a world that’s normally invisible to the unaided eye—both the world within the drop and a reflection of the surrounding world.
My favorite backgrounds include parallel tree trunks, splashes of lit leaves and flowers in a mostly shaded forest, pinpoint jewels of daylight shining through the trees, flowers that blur to color and soft shapes, sunlight sparkling on water. I also like including recognizable landscape features that reveal the location—nothing says Yosemite like a waterfall or Half Dome; nothing says the ocean like crashing surf.
The final piece of the composition puzzle is your focus point. This creative decision can make or break an image because the point of maximum sharpness is where your viewer’s eyes will land. In one case you might want to emphasize a leaf’s serrated edge; or maybe its the leaf’s intricate vein pattern you want to feature. Or maybe you’ll need to decide between the pollen clinging to a poppy’s stamen, or the sensual curve of the poppy’s petals. When I’m not sure, I take multiple frames with different focus points.
Exposure
Exposing selective focus scenes is primarily a matter of spot-metering on the brightest element, almost always your primary subject, and dialing in an exposure that ensures that it won’t be blown out. Often this approach turns shaded areas quite dark, making your primary subject stand out more if you can align the two. Sometimes I’ll underexpose my subject slightly to saturate its color and further darken the background.
Tripod
And let’s not overlook the importance of a good tripod. In general, the thinner the area of sharpness in an image, the more essential it is to nail the focus point. Even the unavoidable micro-millimeter shifts possible with hand-holding can make the difference between a brilliant success and an absolute failure.
Virtually all of my blurred background images are achieved in incremental steps. They start with a general concept that includes a subject and background, and evolve in repeating click, evaluate, refine, click, … cycles. In this approach, the only way to ensure consistent evolution from original concept to finished product is a tripod, which holds in place the scene I just clicked and am now evaluating—when I decide what my image needs, I have the scene sitting there atop my tripod, just waiting for my adjustments.
Forest Dogwood, Yosemite Valley
I worked this scene for about a half hour before I was satisfied. I started with this dogwood branch and moved around a bit until the background was right. Then I tried a variety of focal lengths to simplify and balance the composition. Once I was satisfied with my composition, I used live-view to focus toward the front of the center cluster. Finally, I ran the entire range of f-stops from f4 to f16, in one-stop increments, to ensure a variety of bokeh effects to choose from.

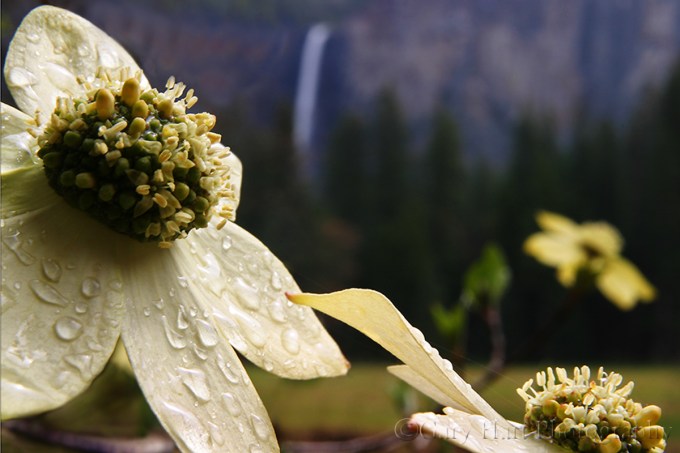
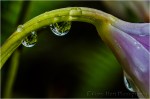
Bridalveil Dogwood, Yosemite
This raindrop-laden dogwood image uses Yosemite’s Bridalveil Fall as a soft background to establish the location. An extension tube allowed me to focus so close that the nearest petal brushed my lens.

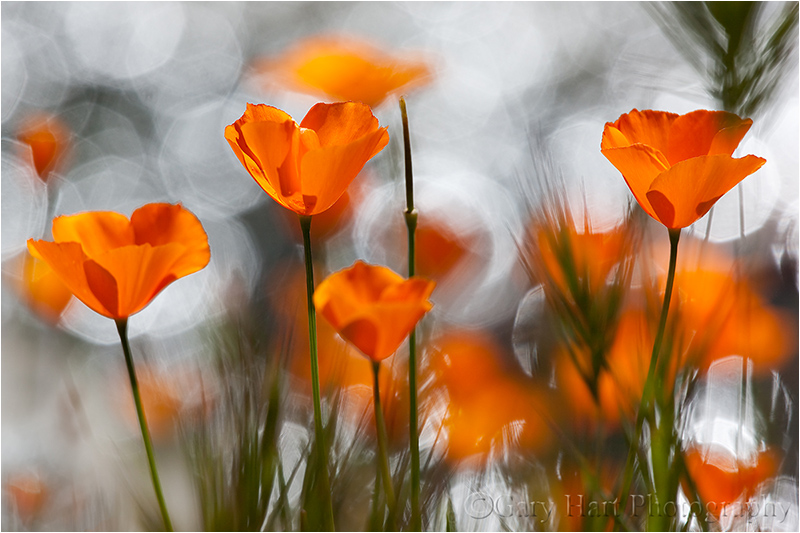
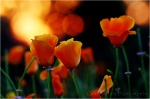
Champagne Glass Poppies, Merced River Canyon, California
The background color you see here is simply a hillside covered with poppies. To achieve this extremely limited DOF, I used an extension tube on my 100mm macro, lying flat on the ground as close as my lens would allow me to focus. Since my tripod (at the time) wouldn’t go that low, I detached my camera, rested the tripod on the ground in front of the poppy, propped my lens on a leg, composed, focused on the leading edge, and clicked my remote release.

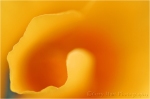
Autumn Light, Yosemite
I had a lot of fun playing with the sunlight sneaking through the dense evergreen canopy here, experimenting with different f-stops to get the effect I liked best.
Sparkling Poppies, Merced River Canyon
The background jewels of light are sunlight reflecting on the rippling surface of a creek. I had a blast controlling their size by varying my f-stop.

Dogwood, Merced River, Yosemite
Looking down from the Pohono Bridge, finding the composition was the simple part. But as soon as I started clicking I realized that the sparkling surface of the rapidly Merced River was completely different with each frame. So I just clicked and clicked and clicked until I had over 30 frames to choose between.

Forest Dogwood, Tenaya Creek, Yosemite
Here, rather than background bokeh, I framed my dogwood flower with leaves in front of my focus point.
Bokeh Gallery
-

- Poppy Pastel, Sierra Foothills, California
-

- Dogwood Branch, Pohono Bridge, Yosemite
-

- Floating Dogwood, Yosemite
-

- Dogwood and Bridalveil Fall, Yosemite
-

- Poppy With a View, Point Reyes National Seashore
-

- Forest Dogwood, Tenaya Creek, Yosemite
-
- Forest Dogwood, Yosemite Valley
-

- Solitude, Dogwood Bloom Above the Merced River, Yosemite
-

- Champagne Glass Poppies, Merced River Canyon, California
-

- Wildflowers and Aspen, North Rim, Grand Canyon
-
- Aspen, Bishop Creek Canyon, Eastern Sierra
-
- Backlit Poppies, Folsom, California
-
- Raindrops, Orchid in Lava Tree State Park, Hawaii
-
- Intimate Poppy, Point Reyes National Seashore
-

- Forest Autumn, Yosemite
-

- Poppies, Hite Cove Trail, Merced River Canyon
-

- Autumn Light, Yosemite
-

- Bridalveil Dogwood, Yosemite
-

- Poppy Lanterns, Merced River Canyon
-

- Autumn Bouquet, Zion National Park
-
- Wildflower Collage, Sierra Foothills, California
(More) Yosemite spring reflections
Posted on May 13, 2013

Dogwood and Pine, Valley View, Yosemite
Canon EOS 5D Mark III
1/20 second
F/11.0
ISO 800
131 mm
I just wrapped up two Yosemite spring workshops, four and five day visits separated by less than two weeks. What struck me most about these two workshops was, despite pretty similar conditions (maximum waterfalls, green meadows, blooming dogwood, and lots of people), how the tremendous difference in weather dictated a completely different approach to photographing Yosemite Valley.
In the first workshop our weather was fairly static, with a nice daily mix of clouds and sun that allowed me to plan shoots early in the day and pretty much stick with the plan throughout the day. We had a couple of night shoots, including one night photographing a moonbow (lunar rainbow) at the base of Lower Yosemite Fall. A particular highlight for this group was the variety of daylight rainbows on Bridalveil and Yosemite Falls. These rainbows appear with clockwork reliability at various viewpoints when the sun is out. Getting the group in position to photograph them is a particular source of personal pleasure (that makes me appear far smarter than I actually am).
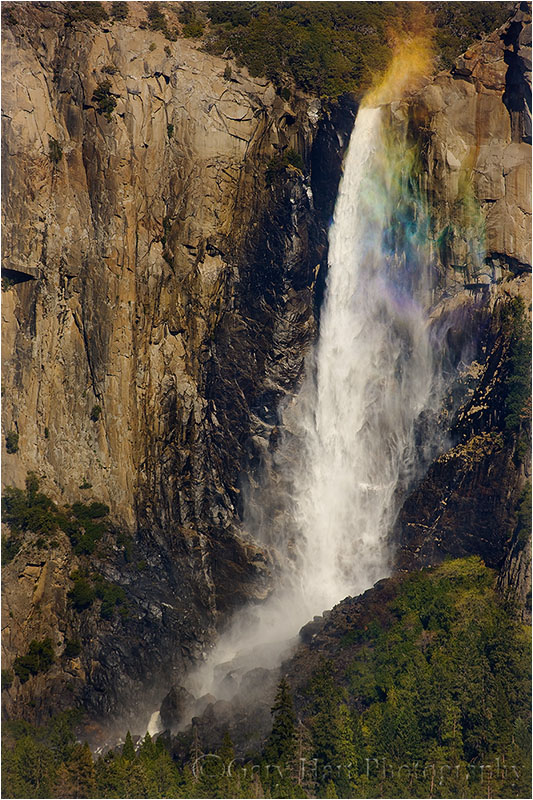
Spring Rainbow, Bridalveil Fall, Yosemite
In the second workshop we received rain each day, rarely a downpour, but frequently heavy enough to cause me to alter our plans, sometimes completely ad-libbing locations at the last second based on what I saw the conditions. With rain comes clouds, to our detriment when they dropped low enough to obscure the view, and to our great advantage when they parted enough to accent Yosemite Valley and frame the soaring monoliths and plunging waterfalls everyone had traveled to photograph. And because Yosemite’s clearing storms such are a rare treat, this group made frequent (and productive!) visits to Tunnel View as wave after wave of rain and clearing passed.

Clearing Storm at Twilight, Yosemite Valley
Another, more subtle, difference between the two workshops was the state of the dogwood bloom. The April group caught the dogwood just as it started to pop out, while the May group found the dogwood far more mature. Ample sunlight allowed the April group to concentrate on backlit flowers and leaves, and the freshness of the blooms provided lots of intimate compositions featuring one or two flowers.

Solitary Dogwood Bloom, Pohono Bridge, Yosemite
In May the blooming dogwood was more widespread, but many of the flowers were a bit tattered. With heavy overcast and a persistent breeze, close portraits were difficult (but not impossible), so I encouraged the group to concentrate more on larger, more distant dogwood scenes.
Dogwood and Pine, Valley View, Yosemite
On the drive home from the May workshop I reflected a bit on the two workshops and was glad I didn’t have to choose a favorite. With summer almost upon us, as Yosemite’s skies clear, its waterfalls dry, and the tourists swarm, I have plenty of images and memories to hold me over until fall, when my next “favorite” season will deliver an entirely different set of new opportunities.

Sunset Reflection, Half Dome and Mirror Lake, Yosemite
* * * *
I do it all over again next spring, April 11-14 and May 11-14.
Pictures, pictures everywhere
Posted on May 3, 2013

Single Dogwood, Pohono Bridge, Yosemite
Canon EOS 5D Mark III
1/40 second
F/9.0
ISO 400
400 mm
I’m always telling my workshop students that there are pictures everywhere, that we’re only limited by our ability to see them. How many shots have we just walked by because we were so focused on the larger world, or because we were simply distracted by life? But sometimes I need to be reminded to listen to my own words.
Last week in Yosemite I gave my group a couple of hours to explore the dogwood blooming above and beside the Merced River near the Pohono Bridge. After a brief orientation, I told everyone to be back at the cars by 5:00, then set them free. A few minutes before 5:00 I was back at my car waiting for the others to return; as I started to pack up my gear I noticed a single dogwood suspended no more than fifteen feet from the road. The breeze had eased somewhat, and I already had my 100-400 lens on my camera, so I figured, what the heck.
I started by setting up my composition, positioning myself so the branch moved diagonally from one corner of the frame to the other, and zooming as close as possible to eliminate peripheral distractions and soften background distractions. I placed the bloom in one of the rule-of-thirds “hot-spots,” and raised my tripod to allow a downward view into the flower’s still intact central cluster (older dogwood blooms tend to look raggedy at their center, but this one was still nice). I spot-metered on the bright flower, setting my exposure to one stop over a middle tone—the flower was actually a little brighter than this, so slightly underexposing like this set the bright flower against a nice dark background. With everything else in place I live-view focused on the central cluster.
I started with f5.6 (the lens’s widest aperture at that focal length), but quickly realized that focused as close as I was, the background was still nicely blurred at smaller apertures. So for the next five minutes or so I kept my composition but dialed in different apertures in (mostly) one stop increments. This is one of the things I love most about photographing with a tripod, this ability refine an earlier shot without having to reconstruct the composition each time. In this case I just counted f-stop/shutter dial clicks without even looking through my view finder before snapping the next frame: 3 clicks (one stop) less f-stop light + 3 clicks more shutter speed light. When I got concerned about the breeze, I replaced my shutter speed adjustment with an ISO adjustment. As I worked the rest of the group started to tickle in and I was able to share my process with those who were interested (I love the large LCDs and live-view for training).
When I got my images on my big screen at home I had a dozen or so versions of the same composition to select between, each with a different f-stop, shutter, ISO combination (but all with the same exposure). I selected this one because it’s sharp (a few images suffered from slight wind blur), and it has the best combination of foreground DOF and background blur. (The soft circles in the background are distant flowers and backlit leaves.)
Based on “Likes” and comments, these intimate scenes are rarely as popular as the vivid, dramatic landscapes, but in many ways the make me happier because they’re an opportunity to rally my creative and logical instincts toward an image that’s uniquely mine. And it’s these little scenes that make me wonder how many images I’ve left behind simply because I was too lazy to set up my camera, was focused elsewhere, or simply just in a hurry to move on.

