Eloquent Images by Gary Hart
Insight, information, and inspiration for the inquisitive nature photographer
Happy Nature Photography Day!
Posted on June 15, 2016

Aspen, Bishop Creek Canyon, Eastern Sierra
Canon EOS-1Ds Mark III
1/13 second
F/7.1
ISO 400
36 mm
Today is Nature Photography Day. Of course every day is Nature Photography Day in my world, but if designating a day to remind everyone the joys of photographing nature helps drive people outdoors with their cameras, I’m all for it.
Nature photography can be enjoyed in many forms. For some it’s simply the passive act of viewing images that inspire vicarious travel or that rekindle happy memories; for others nature photography takes a more active as an excuse to get outside or an opportunity to explore.
The stakes are higher for those of us who make our living with our images. Our ability to get outside and explore is tied to our ability to create images that touch others. For me that starts with finding scenes that touch me, then trying to find ways to convey them that will resonate with others.
My process is rarely a simple click. Once I’ve identified a scene, I devise a plan for the best way to organize and emphasize the significant elements, then get to work with a series of clicks that continue until I’m satisfied (or decide there’s no image to be had). The first click is like a writer’s draft, and subsequent clicks are revisions. After each click, I stand back and evaluate the image on my LCD, refine the variables (exposure, relationships, focal length, depth of field, focus point), click again, then repeat as necessary.
I find this approach particularly valuable in macro and close-focus images, intimate scenes where even the slightest adjustment in composition, depth of field, and focus point can dramatically alter the result. It’s the primary reason I’m such a strong tripod advocate (evangelist)—when I’m done evaluating, the shot I just evaluated is sitting right there on my tripod, waiting for me to apply the adjustments I deem necessary.
I often look for a leaf, a flower, a rock, a place for my viewer’s eye to land, and try to isolate it from the rest of the scene. In the above image, captured several years ago in an aspen stand in the Eastern Sierra west of Bishop, I had a pretty good idea what I wanted to do and was quite content just exploring in the peace of a solitary autumn morning. When I found this collection of four vertically stacked leaves knew immediately I’d found what I was looking for. Starting with my 70-200 lens and a 25 mm extension tube, I set up my tripod with the leaves suspended in front of a receding line of bleached aspen (they’d have been lost against the background foliage) and played with the framing until I was satisfied—vertical orientation, fairly tightly composed.
Exposure was straightforward in the soft overcast, and a neutral polarizer helped the color come through the leaves’ waxy sheen. Though I settled on the general framing pretty quickly, an intermittent breeze meant I still had some decisions to make. The breeze ranged from light to apparently nonexistent, but I increased my ISO to 400 to enable a faster shutter speed and prevent my camera from picking up micro-movement I couldn’t see. I timed my clicks for pauses in the breeze.
Though I don’t always catch compositional balance, relationship, and border problems immediately, after several click/evaluate/refine cycles I felt I had the composition nailed. But that was only the first step. I wanted the leaves sharp, with the receding trunks soft but recognizable. I don’t trust critical depth of field decisions made in camera, so when an important composition (one I really like) relies heavily on DOF and focus point, I always take a series of frames, bracketing my f-stop around the DOF I think is best. Sometimes I’ll range all the way from f2.8 to f22. In this case I tried frames ranging from f4 (my 70-200’s fastest aperture) to f16 (at f16 I increased my ISO to 800), in one-stop increments. Since I thought f8 would give me about the right combination of sharp foreground and soft background, I even took a couple of extra frames in 1/3 stop increments around f8. Back home on my large monitor I scrutinized each frame closely and ended up choosing this one at f7.1.
In Lightroom I warmed the image slightly to remove a blue cast on the white trunks. Because I intentionally underexposed the scene a little at capture (to ensure that I didn’t clip any of the red channel, where most of the yellow is), in Photoshop I dodged the trunks to remove the dinginess introduced by my underexposure. Otherwise my processing was pretty much standard stuff—a subtle wiggle in Curves to add contrast, Topaz noise reduction, and selective sharpening of everything in focus with Unsharp Mask.
I’m pretty happy with this image, probably happier with it than the attention it generates. But that’s okay because every time I look at it I remember how much fun I had out there in the woods that chilly autumn morning.
Photo Workshop Schedule
A gallery of my favorite nature images
Click an image for a closer look, and a slide show. Refresh the screen to reorder the display.


Beware the “expert”
Posted on March 4, 2016
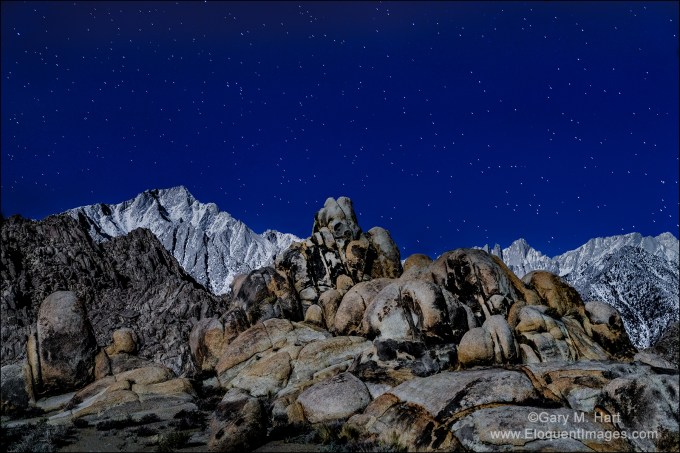
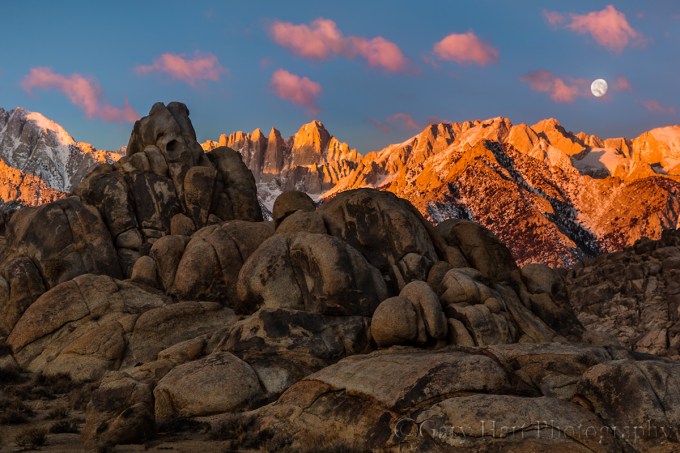
Sierra Moonlight, Mt. Whitney and Lone Pine Peak, Alabama Hills, California
Sony a7R II
Sony/Zeiss 24-70 f4
15 seconds
F/5.6
ISO 3200
Rules are important. The glue of civilization. And after a childhood constrained by bedtimes, homework, and curfews, it’s no wonder that as adults we honor rules simply because, well, simply because. (I mean, who doesn’t wait for however long it takes and with no car or cop in sight, for a light to change?)
As much as civil society relies on universal obedience, not all “rules” are created equal. And our reluctance to question authority inhibits growth. One example would be blind adherence to the (usually) well-intended photography “experts” proliferating in print, online, and (especially) in your local camera club. These self-proclaimed authorities have figured out that people who are just learning are less confident, and tend to respond more to authority than substance.
The camera club paradox
I think camera clubs are great for many reasons: they connect people with a common interest, facilitate the exchange of information and ideas, and provide a forum for sharing our photographic creations. Camera clubs spur us to get out and shoot when we otherwise might stay home, and offer the beginner rules that provide a stable foundation upon which to build her craft.
But camera clubs can also be a breeding ground for self-proclaimed experts, a status often not conferred to the person most qualified, but to the person who spews photographic dogma with the most authority. The result is well-intended but misinformed knowledge that infects a camera club like a mutated virus.
I’m especially troubled when I hear of images shared in a camera club photo competition that were dismissed without consideration because they violated the local “expert’s” idea of an unbreakable photographic rule. Some camera club capital “violations” I’ve seen firsthand or heard about (by no means a comprehensive list):
- Centered subject
- Centered horizon
- Blown highlights
- No detail in the shadows
- Not sharp from front to back (this one really bothers me)
Each of these things can be a problem, but they can be a refreshing expression of creativity as well. And even if they are a problem, refusing to consider an image because it violates someone’s definition of “perfect” discounts all that’s potentially good about it.
If you’re an aspiring photographer and someone dismisses an image for a technical violation, take a step back, inhale, and remind yourself that there are very, very few absolutes in photography. In general, it’s helpful to remember that no matter how strongly it’s stated, advice that doesn’t feel right (even if you can’t articulate why) doesn’t need to be heeded. In fact, the next time someone starts feeding you photography advice in absolutes, run (don’t walk) to the nearest exit.
About this image
I jumped on my anti-expert soapbox after observing several recent workshop participants who were clearly constrained by “rules” enforced by their local camera club. And looking at this image, I realized that there are camera clubs that probably wouldn’t even consider it because I centered the horizon and the teddy-bear shaped rock in the foreground. I also captured a little more star motion than is ideal. But deal breakers? Not to me.
I’d taken my January Death Valley workshop group out to the Alabama Hills for a moonlight shoot on the workshop’s last night. A few in the group walked out to the arch, but most gravitated to this group of boulders a little south of the parking area. As I worked to get the group up to speed with moonlight photography, I tried a few frames of my own.
Most of my moonlight images are fairly wide, and even the closest focus point is far enough away to be at infinity, even wide open. But the rocks here were close enough, and my focal length was long enough (57mm), that I stopped down from f4 to f5.6 to increase my margin for error. And rather than autofocusing on the moon as I normally do, I focused toward the back of the foreground rocks. As I hope you can see in this low-res web version, I made the right focus choices.
The other problem I had to contend with was motion blur in the stars. At the 16mm to 24mm I typically use for night photography (to maximize the number of stars), motion blur isn’t much of a problem, even at 30 seconds. But at nearly 60mm, I didn’t think I could get away with 30 seconds. This is the first time I’d tried my Sony a7RII at night—I usually use my a7S, but I’d heard such good things about the a7RII’s high ISO capability that I thought I’d try it.
Bumping the ISO to 3200 (from my moonlight standard of 800), I was able to drop my shutter speed to 15 seconds. This image is so clean at 3200, and the star motion is visible enough, that I regret now that I didn’t go to ISO 6400 and cut my shutter speed to 8 seconds. Next time….
Workshop schedule
A gallery of potential rejects
(Images that might not make the cut at a camera club competition)
Click an image for a closer look, and a slide show. Refresh the screen to reorder the display.


Getting ahead of the shot
Posted on November 28, 2015
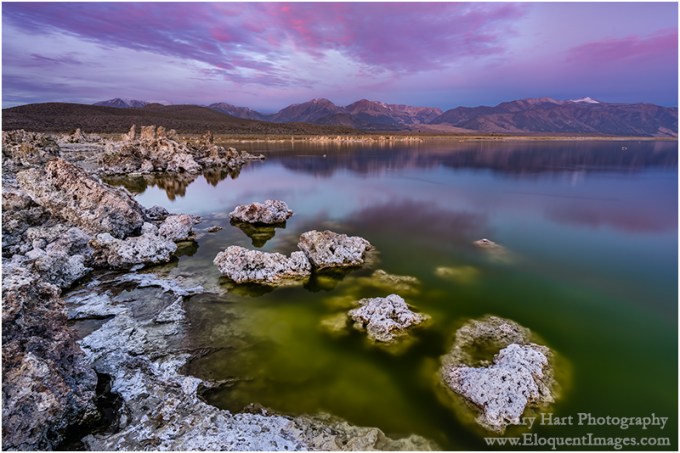
Dawn, Mono Lake and the Sierra Crest
Sony a7R II
Sony/Zeiss 16-35 f4
8 seconds
F/10
ISO 100
I hate arriving at a photo destination for the first time and having to immediately hit the ground running. Over the years I’ve come to appreciate the value of advance knowledge of landscape and light, and always try to factor in ample scouting time before getting down to serious shooting.
On the other hand, a prime reason people sign up for a photo workshop is to shortcut the scouting process, and for the most part this works pretty well. I (like any other experienced workshop leader) can share my knowledge of a location’s terrain and light to put my groups in the right place at the right time, and to provide insights into what’s in store and how they might want to approach it.
But sometimes there’s no substitute for firsthand exposure to a location before the good stuff happens. This is particularly true for sunrise spots, because the good shooting usually starts before it’s light enough to see the landscape. Unfortunately, a photo workshop’s tight schedule doesn’t always provide the luxury of exposing my groups to a location before it’s time to photograph it, but I do my best.
Mono Lake is a perfect example. The serpentine shoreline of South Tufa, the lake’s most photographed location, is a series of points and coves that offer lake views to the east, north, and west, depending on where you stand. Often nice at sunset, sunrise at South Tufa can be downright world class in any one of these compass directions. The best sunrise photography frequently cycles through (and sometimes overlaps) all three directions as the sunrise progresses. Overlaying South Tufa’s directional light are the vivid sunrise hues that can paint the sky in any direction at any time, and glassy reflections that double the visual overload.
After many years photographing South Tufa, I’ve established a fairly reliable sunrise workflow that helps me deal with these shifting factors. I usually start with tufa tower silhouettes facing east, into the early twilight glow in the east, then do a 180 to capture the magenta alpenglow on the Sierra crest in the west, and finally pivot northward as sidelight warms the tufa towers once the sun’s first rays skim the lake.
But just knowing the direction to point the camera is only part of the Mono Lake equation. In fact, with so many composition possibilities, South Tufa can overwhelm the first time visitor. Not only is there a lot going on here, on most mornings you need to contend with photographers that swarm the shore like the lake’s ubiquitous black flies.
Because of these difficulties, I make a point of getting my Eastern Sierra workshop group out to South Tufa for the sunset preceding the sunrise shoot. In my pre-shoot orientation, I strongly encourage my students to walk around before setting up their cameras, to identify compositions in each direction, and to envision the sunrise light.
It turns out, this year’s South Tufa sunset shoot was beneficial to me as well. With the lake level lower than I’ve ever seen it, the shoreline was virtually unrecognizable—many familiar lake features were now high and dry, and a number of new features had materialized. As alarming as it was to see the lake this low, the photographer in me couldn’t help but feel excited about the fresh compositions the new shoreline offered.
While showing the group around South Tufa’s various nooks and crannies, I spotted a stepping stone set of newly exposed tufa mounds on a north- and west-facing section. I pointed out to those still with me the way tufa could lead the eye through the bottom of the frame to the distant Sierra peaks, and made a mental bookmark of the spot. Sunset that night, with nice color a glassy reflection that’s more typical of sunrise than sunset, that everyone was a little dubious when I told them sunrise could be even better.
The next morning, all the conditions were in place for something special: a mix of clouds and sky, an opening on the eastern horizon to let the light through, calm winds to quiet the lake. Armed with knowledge from the night before, the group quickly dispersed to their pre-planned spots and I found myself mostly alone.
I’ve photographed Mono Lake so many times that I had no plans to shoot that morning, so I wandered around checking on everyone. As often happens when the photography is good (especially late in the workshop, when people have become pretty comfortable handling difficult light and extreme depth of field), I felt like my presence was more distraction than benefit, so I headed over to the spot I’d spied the previous evening (it had the added benefit of being pretty centrally located and well within earshot of my distributed students).
By the time I got there the show was well underway in the east and quickly moving west. It would have been easy to slip into panic-shooting mode and try to find something where things were good right now, but I’ve learned (for me at least) that it’s best to anticipate than react. Instead, because I’d already mentally worked this scene, I knew the composition I wanted and was ready for the color when it arrived.
The extra sixty seconds this bought me was enough to refine my composition, find the f-stop and focus point that would maximize sharpness throughout the scene, meter the scene and set my exposure, and orient my polarizer for the best balance between reflection and lakebed. It turns out that this anticipation was a difference-maker, as the vivid color peaked and faded in about 30 seconds.
Join my next Eastern Sierra Fall Color photo workshop
A Mono Lake Gallery
Click an image for a closer look, and a slide show. Refresh the screen to reorder the display.


The best time of day
Posted on October 20, 2015

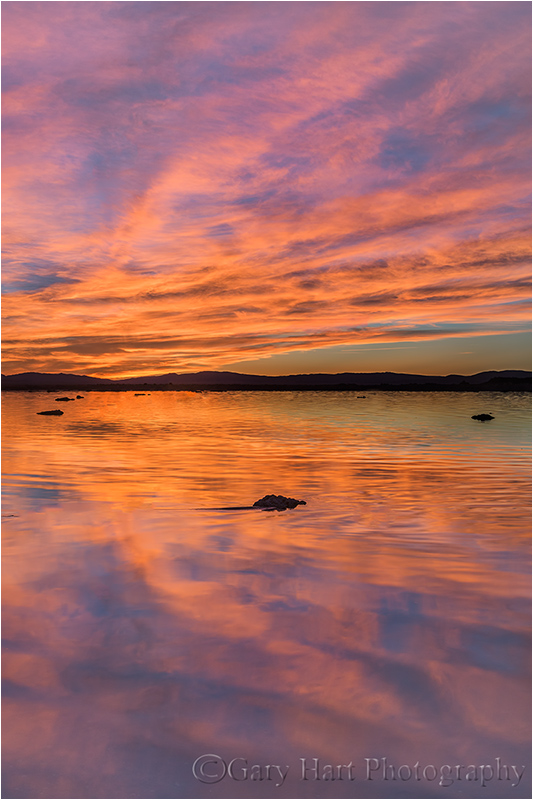
New Day, Sunrise Sunstar, Mono Lake
Sony a7R II
Sony/Zeiss 16-35 f4
1/4 second
F/20
ISO 125
Imagine a world that’s so quiet you can hear nature’s every stirring, a place where each breath holds a pristine bouquet of subtle fragrances, and the sky is a continuously shifting kaleidoscope of indigo, blue, yellow, orange, and red. In case you haven’t figured it out, I’m describing the very world we live in, before the sun’s light and warmth draw out the dirty, noisy, oblivious masses.
As a nature photographer, I’m quite familiar with this world. And while I can’t say that I relish a 4:30 a.m. alarm, I’ve come to terms with its darkness, frigid temps, and sleep depravity. I also understand why most people despise early wake-ups, because that used to describe me. We’ve been conditioned by a lifetime of rising for school and work and completely bypassing early morning’s benefits as we rush to obligations, appointments, and responsibilities that are almost invariably less pleasant than staying in bed.
But if you haven’t learned to appreciate the joy of the pre-sunrise world, let me help you reset your bias with a few tips for making early mornings happen:
- For the full experience, plan to be at your spot at least 45 minutes before the “official” (flat horizon at that latitude and longitude) sunrise for that location. The eastern horizon will already be brightening noticeably by then, but the stars will be visible. (This is for mid-latitude locations—twilight starts earlier in the high latitudes, later in the low latitudes.)
- Get organized before you go to bed. Lay your clothes out, assemble your gear, make sure everything’s charged, and prime the coffee maker. You do all this so you can…
- Set your alarm for the absolute minimum time necessary to get ready. Your resolve will be much stronger at bedtime than when it goes off—the less time you have to delay, less the chance that you’ll lose your resolve to the cozy warmth of your bed. This also gives you the maximum amount of sleep possible. And don’t forget, one of the best things about being up when no one else is up and it’s dark is that it really doesn’t matter how you look (so you don’t really need to spend a lot of time on personal hygiene).
- Under no circumstances use the snooze button on your alarm. Rising early is like ripping off a Band-Aid—the sooner you get it over with, the happier you’ll be; the longer you drag it out, the harder it is. Trust me.

The weather report called for clear skies and no chance of rain this morning. But the lightning was already firing when we walked out to Grand Canyon’s Bright Angel Point in the dark, and it was still going when we finally ran out of compositions over two hours later.
- Don’t be discouraged by the conditions at bedtime or wake-up. Some of my most memorable sunrises have happened on mornings I’d have skipped if I’d relied solely on weather reports, or on the way things look when I peek out the window after the alarm. Photography is just one of the benefits of being out before the sun. Even when the photography conditions don’t materialize as hoped, I rarely regret those mornings when I dragged myself out of bed to sit in the cold and dark. And for some reason, the most special stuff seems happen when I go out with the lowest expectations, driven solely by the attitude that I’m just going to enjoy this special time of day.

For example (the above image)
Getting to this remote location on Mono Lake’s north shore is always an adventure; getting there early enough before the sun can feel downright crazy. We depart an hour-and-a-half before sunrise, navigate a bone-jarring maze of unpaved roads that worsen with each mile, and drive until we can drive no further. From there the lake is still a half mile walk. Most of the hike is in volcanic sand, but the last couple hundred yards are through shoe-sucking mud; with no trail or light, it’s no wonder I never end up at the same spot from one year to the next.
Earlier this month my Eastern Sierra workshop group made the annual pilgrimage out here for our final sunrise. We’d been incredibly blessed with great conditions throughout the workshop—great sunrise and sunset color, nice clouds, and glassy reflections at Mono Lake’s South Tufa the day before (always a highlight when it happens). Our luck held as we got all three—color, clouds, and reflection—for this final sunrise.

I started shooting in near darkness, with wide, east-facing compositions that included a thin slice of moon flanked by Venus, Jupiter, and Mars. My focus turned more south and west as the sun started to rise and paint the clouds with color. Soon the mountains in the west were bathed with warm light and I turned my attention there. The wind stayed calm, so every direction I shot, I was able to double the beauty with a reflection.
Watching the shadow slide down the mountains, I was able to anticipate the sun’s arrival at my position and turn back to the east just in time to make my sunstar composition. I used a trio of nearby rocks to anchor my foreground, removed my polarizer (I wanted a maximum reflection and didn’t want to worry about differential polarization at my wide focal length), extracted my 3-stop reverse graduated neutral density filter (Singh-Ray), and stopped down to f-20 to enhance the sunstar effect.
When the sun appeared I clicked a half-dozen or so images, each with a little bit brighter sunstar. I chose this one because it was a good balance between brilliant sunstar without washing out too much of the sky around it. Thanks to my GND and the ridiculous dynamic range of my a7R II, I got this scene with a single click. In Photoshop I dodged the top 2/3 of the sky and burned the water to disguise the GND effect, but did very little else.
Workshop Schedule || Purchase Prints|| Instagram
The joys of sunrise


Mirrorless and my telephoto renaissance
Posted on February 7, 2015

Dawn Portrait, Mt. Whitney, Alabama Hills, California
Sony a6000
Tamron 150-600 @256 mm (384 mm full-frame equivalent)
Metabones Canon EF to Sony NEX Mark IV adapter
.4 seconds
f/11
ISO 200
Going smaller
Like most people, my original expectation for my nascent mirrorless world was a significantly lighter backpack, and indeed, I haven’t been disappointed. In my Canon days my primary pack was an F-Stop Tilopa with a medium ICU (F-Stop’s interchangeable internal module for storing and organizing gear), which held my 5D Mark III, Canon 16-35 f/2.8, 24-105 f/4, and 70-200 L lenses, plus a Zeiss 28 f/2 (for night photography). Unless I specifically planned a shoot that required it, my Canon 100-400L and 100 macro lenses traveled with my backup Canon body in a separate bag—not a big deal when I’m driving to a destination, but pretty much a non-starter when I have to fly (which I’m doing more and more).
After moving to the mirrorless Sony a7R, I immediately started using my smaller F-Stop Guru backpack, which easily handled the new body and the Sony equivalent of my primary Canon glass: Sony/Zeiss 16-35 F/4 and 24-70 f/4, Sony 70-200 f/4 G, plus the (Canon mount) Zeiss 28 f/2 and a Metabones adapter that allows me to use my Canon glass on a Sony EF mount body. This configuration gave me essentially the same focal range I had with Canon, in a significantly smaller, lighter package. Not only that, I can use a lighter tripod and head. Score.
But, since I hate shooting without a backup body and had heard fantastic things about the camera, I soon purchased a Sony a6000. This amazing little mirrorless camera’s 1.5 crop sensor makes it an ideal complement to my full-frame a7R, has (slightly) more resolution than the 5DIII, and (so far) appears to offer (at least) comparable image quality, with better dynamic range than the Canon. And with a little bit of rearranging, I found I could fit the a6000 into my Guru bag without jettisoning anything else.
The result of this downsizing is a camera pack that’s light enough for hiking without feeling like a backpacker, and and for cycling without feeling like I’m about to tip over.
Going bigger
For my ultra-telephoto needs, my plan all along had been to to use the Canon 100-400 with the Metabones adapter. But since the 100-400 had always been my least favorite lens—awkward to use, and not particularly sharp—I had no real plans to add it to my regular lens rotation. But my ears perked up when I started hearing my friend and similarly recent Sony convert (and fellow pro photographer) Don Smith raving about the Tamron 150-600 lens. Hmmmm….
The Tamron 150-600 arrived shortly before I departed for last week’s Death Valley / Mt. Whitney Winter Moon photo workshop. Because the Tamron lens isn’t available with a Sony FE mount, it would require an adapter as well. Don had been shooting the Sony A-mount version of the Tamron paired with Sony’s converter; I opted for the Canon mount version, reasoning that I could use it on my remaining Canon bodies should the need ever arise, and I already have the Metabones adapter. (Word on the street is that the Sony A-mount Tamron with the Sony adapter has much better autofocus than the Canon/Metabones combination, but I don’t need autofocus.)
First reaction? This is not a small or light lens. But as soon as I started using it, two things became clear: it’s much easier to use than my Canon 100-400, and it’s noticeably sharper. Suddenly, size notwithstanding, I had a lens that I could see myself using regularly.
If I’d still been lugging my Canon gear, I’d have had to sacrifice essential lenses each time I planned to use the 150-600. But with the mirrorless system and a little reconfiguring of the compartments in the Tilopa ICU (moving around the padded, Velcro-attached partitions), I can now carry in a single camera backpack (that fits in every overhead bin I’ve ever encountered, including the puddle-jumpers): three Sony bodies (a7R, my brand new a7S, and the a6000), plus lenses that give me a focal length range from 16 to 900 mm (the 150-600 lens is a full-frame equivalent of 225-900 mm on the 1.5-crop a6000). Life’s good.
In the field
So, what does a photographer do with all this new imaging power? Use it, of course. Visiting familiar locations as much as I do, I can’t tell you how refreshing it is to find a completely new way to see these landscapes.
The image at the top of this post was from my first time using the Sony a6000 and Tamron 150-600. To get a better handle on the conditions, I left home two days before the workshop, spending the first night in Lone Pine, near the Alabama Hills just beneath Mt. Whitney. After a moonlight shoot in the Alabama Hills, the next morning I rose before sunrise, strolled from my hotel room across the highway, and set up my tripod with the Tamron 150-600 mounted and a6000 attached.
The first time I aimed this combination at Mt. Whitney (the highest peak in the 48 contiguous United States), zoomed all the way out to 900mm (600mm x 1.5), and dialed in the focus, was an epiphany. Previously unseen rocks and trees snapped into view, and vortices of wind-swept snow spun on the summit. Amazing to my eye, but at 900 mm actually too close to find a composition I liked. So I pulled all the way back to a little less than 400 mm (256 x 1.5), framed up the mountain, and waited for the pink that always kicks off a Mt. Whitney clear-sky sunrise.
I captured this frame about ten minutes before sunrise. Being a little concerned about such a long focal length in low light, I hedged my bets slightly by using ISO 200 to halve my shutter speed. Since I notice little difference between ISO 100 and 200 on the a6000, I think 200 will be my standard ISO when I use the 150-600 on this body. But we’ll see.
The rest of the week was a rediscovery of ultra-telephoto photography. When I first switched to digital about twelve years ago, I started with a 1.6 crop Canon 10D, and my only telephoto lens was a 70-300, making images up to 480 mm a routine part of my capture paradigm. Isolating distant subjects, magnifying closer subjects, compressing foreground and background subjects—it was all a simple matter of reaching into my camera bag. But since switching to full-frame, and replacing the 70-300 with the (faster, optically better) 70-200, ultra-telephoto photography took backseat to more conventional landscapes, and I eventually forgot how much I enjoyed it when it was more convenient. Ultra-telephoto became something I had to plan, rather than a creative option available whenever the inspiration struck.

Moonset, Wildrose Peak, Death Valley
This is a 563 mm equivalent (375 mm X 1.5) sunrise moonset capture from Dante’s View
Don was assisting my Death Valley workshop (Don and I trade off assisting many of each other’s workshops), and I’m sure by the end of the week the group had grown weary of hearing Don and I gush about the fun we were having with our new toys. Sand dunes, moonrise, moonset, distant peaks—no natural feature was safe from our magnifying eye. A particular highlight came dark and early one morning at Dante’s View, when I turned the a6000 and 150-600 to Jupiter, low on the horizon near Telescope Peak, gathered the group around my LCD, zoomed to 600mm, and shared the glowing disk of our solar system’s largest planet surrounded by the four Galilean moons.
The bottom line
Mirrorless has definitely meant a significantly smaller, lighter bag to handle my “meat and potatoes” 16-200 mm focal length range (that I never leave home without) when mobility is paramount—hiking or biking, I hardly know there’s anything on my back.
But equally significant is the way compact mirrorless gear also allows me expand my creative options without hiring a Sherpa. Now, in the same backpack that once maxed out with a single Canon body (most recently a 5D Mark III) and Canon lenses covering 16-200 mm, I can travel with three mirrorless bodies, plus lenses covering an effective focal range from 16-900 mm (including my 28 mm f/2 Canon-mount Zeiss for night photography). Life’s good.
Visit my website to purchase prints and see my photo workshop schedule
An ultra-telephoto gallery (>200 mm)
Click an image for a closer look, and a slide show. Refresh your screen to reorder the display.


Links
Death Valley Winter Moon Photo Workshop

Moonrise Silhouette, Death Valley
Plan B
Posted on October 30, 2014

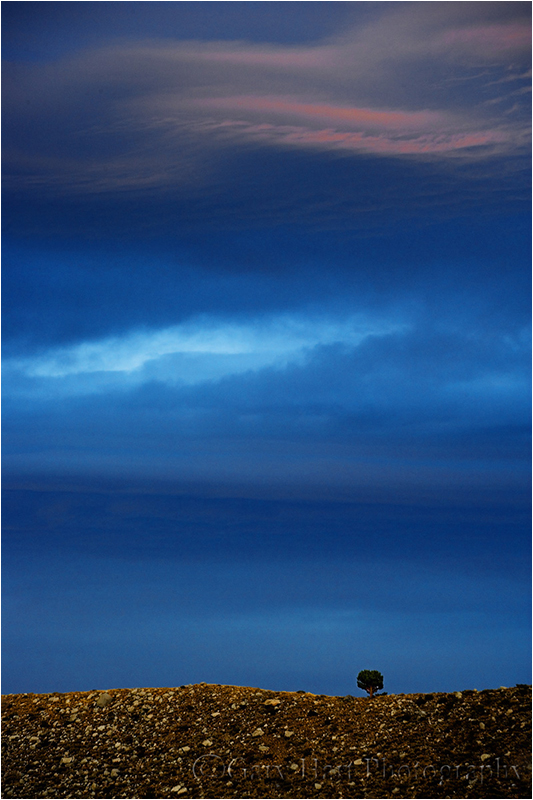
Bristlecone Moon, White Mountains, California
Canon EOS-5D Mark III
40 mm
1.3 seconds
F/16
ISO 100
I usually approach a scene with a plan, a preconceived idea of what I want to capture and how I want to do it. But some of my favorite images are “Plan B” shots that materialized when my original plan went awry due to weather, unexpected conditions (or my own stupidity).
In my recent Eastern Sierra workshop, the clouds I always hope for never materialized. Whenever this happens I try to use the clear skies for additional night photography, but I’ve always been a little reluctant to keep my groups out late in the bristlecones because: 1) it’s colder than many are prepared for (late September or early October and above 10,000 feet); 2) it’s an hour drive back to the hotel the night before a very early sunrise departure. But this year, after spelling out the negatives, I gave my group the option of staying out to shoot the bristlecones beneath the stars. My plan was to arrange for a car (or two) to take back those who didn’t want to stay, but it turned out everyone was all-in.
In most of my trips I know exactly where the moon will be and when, but for this trip I hadn’t done my usual plotting—I knew it would be a 40 percent crescent dropping toward the western horizon after sunset, but hadn’t really factored the moon into my plans. But as we waited for the stars to come out, I watched moon begin to stand out against the darkening twilight and saw an opportunity I hadn’t counted on.
Moving back as far as I could to maximize my focal length (so the moon would be as large as possible in my frame) required scrambling on a fairly steep slope of extremely loose, sharp rock (while a false step wouldn’t have sent me plummeting to my death, it would certainly have sent me plummeting to my extreme discomfort). Next I moved laterally to align the moon with the tree, and dropped as low as possible to ensure that the tree would stand out entirely against the sky (rather than blending into the distant mountains). Wanting sharpness from the foreground rocks all the way to the moon, I dialed my aperture to f/16 and focused on the tree (the absolute most important thing to be sharp).
With the dynamic range separating the daylight-bright moon and the tree’s deep shadows was almost too much for my camera to handle, I gave the scene enough light to just slightly overexpose the moon, making the shadows as bright possible. Once I got the raw file on my computer at home, in Lightroom/Photoshop I pulled back the highlights enough to restore detail in the moon, and bumped the shadows slightly to pull out a little more detail there.
As you can see, even at 40mm, the moon is a tiny white dot in a much larger scene. But I’ve always felt that the moon’s emotional tug gives it much more visual weight than its size would imply. Without the moon this would be an nice but ordinary bristlecone image—for me, adding the moon sweetens the result significantly.
A Plan B gallery (images that weren’t my original goal)
Click an image for a lager view, and to enjoy the slide show


If it’s Tuesday, this must be Bishop
Posted on September 30, 2014

Bristlecone Moonrise, Patriarch Grove, White Mountains, California
Canon EOS-1Ds Mark III
60 mm
.3 seconds
F/11
ISO 100
I have no one to blame but myself (a significant downside of being self-employed), and know I’m not going to get a lot of sympathy, but I just need to share how crazy my last few weeks have been. I’m in the final third of a stretch of three photo workshops in three time zones in three weeks, separated by a grand total of 20 hours at home.
Today I’m in Bishop, California, for day-two of my Eastern Sierra workshop that started yesterday in Lone Pine (California) and wraps up Friday morning in Lee Vining (California). This marathon travel schedule kicked-off on Thursday, September 12, when I left Sacramento for my Hawaii Big Island workshop. I finished that workshop with a Kilauea night shoot on Friday the 19th; Saturday morning I was back to the Hilo airport for my flight home (plane change and layover in Honolulu), finally dragging in the front door about 11 p.m. Saturday night.
At 8:00 a.m. Sunday morning my daughter deposited me back at the Sacramento airport for a flight to Salt Lake City, where I met Don Smith for the five-hour drive to Jackson Hole to help Don with his Grand Tetons workshop. Because the Hawaii/Wyoming weather conditions are so different, and my turnaround was so quick, I actually packed for the Teton before leaving for Hawaii (I’m so glad I did).
After a week in the Tetons, we wrapped up that workshop with a wet sunrise shoot on Saturday morning—then it was straight to the Jackson airport for a series of flights and airport shuttle that got me home Saturday night. I had just enough time to upload my images, refresh my suitcase, catch five hours sleep, and pack the car before heading back out the door early Sunday morning for the six-hour drive to Lone Pine for my Eastern Sierra workshop.
Am I tired? Probably, but I won’t feel it until my drive home on Friday. Am I complaining? Absolutely not. Not only did I do this to myself, how could anyone complain about three weeks filled with Hawaii, the Grand Tetons, and the Eastern Sierra?
And honestly, you can’t really be happy doing what I do without at least being able to tolerate travel. This year, before my current marathon travel stretch, I’ve been to Death Valley, Yosemite (many times), Maui, Kauai, the Grand Canyon three times (including a raft trip), plus Page and Sedona. And truth be told, I enjoy driving, and don’t mind flying. Driving relaxes me, and flying is an opportunity to catch up on my reading and writing. Nevertheless, it will be nice to have consecutive days home, in my own bed,with the alarm off—before next month’s trip to the Columbia River Gorge….
A little more about the Eastern Sierra and this image
Everyone knows about Hawaii, and most know about the Grand Tetons, but mention of the Eastern Sierra still elicits a blank stare from many people. That’s probably because most tourists haven’t discovered it yet (the photographers certainly have). With Mt. Whitney and the Alabama Hills (if you’ve ever seen a John Wayne, Gary Cooper, or John Ford western, you know the Alabama Hills), the bristlecone pines (in the White Mountains, across the Owens Valley from the Eastern Sierra), Mono Lake, Yosemite’s Tuolumne Meadows, and lots of fall color, it’s my most diverse photo workshop.
We started yesterday evening with a nice shoot of the Whitney Portal waterfall, in the shadow of Mt. Whitney. This morning we photographed alpenglow on Mt. Whitney and the Sierra crest from Whitney Arch (aka, Mobius Arch) in the Alabama Hills. After breakfast we made the easy, scenic one hour drive to Bishop, which is where I am now (thank you, Starbucks). Tonight it’ll be the bristlecone pines, at more than 4,000 years, among the oldest living things on Earth (older even than Larry King!).
For tonight’s bristlecone shoot I’ll take the workshop to the relatively accessible Schulman Grove. But when I’m on my own, I often continue thirteen unpaved miles to the Patriarch Grove. And that’s the trip I made a few years ago, because I thought the bristlecones would make a nice foreground for the rising full moon, and because the Patriarch Grove has a clearer view of the eastern horizon than the Schulman Grove.
At the Patriarch Grove, finding the clear view I wanted required me to take off cross-country. Unfortunately, when I scaled the final ridge, I found the horizon obscured by clouds. Not to worry, the light was perfect for photographing these weather-worn, gnarled trees. I’m usually pretty good about catching the moon’s appearance, but because I’d written it off for this evening (shame on me), I failed to register that the clouds were breaking up. Which is why I was both surprised and pleased to find the moon’s glowing disk hovering just above the clouds a few minutes after sunset.
I’d been wandering so much, and so focused on the nearby scene, that I hadn’t identified a particular tree for any potential moon shot (also shame on me). With very little time before the foreground/moon contrast became un-photographable, I felt quite fortunate to find this tree so quickly. A wide composition would have shrunk the moon to nearly invisible, so I stepped back as far as the terrain allowed so I could zoom closer and compress the separation (and enlarge the moon a little). With a vertical composition, I had to decide on rocks or sky, but it wasn’t hard to decide that foreground rocks were far more interesting than empty sky.
Let’s see, what’s tomorrow? Wednesday. Lee Vining, here I come….
An Eastern Sierra gallery
Click an image for a larger view, and to enjoy the slide show


Staying out of the way
Posted on August 1, 2014
Sunrise Fire, Mono Lake
Canon EOS-5D Mark III
32 mm
1/4 second
F/11
ISO 200
Previously on Eloquent Nature: Road trip!
Sometimes when Mother Nature puts on a show, the best thing a photographer can do is just get out of the way. I’d driven to Mono Lake the previous afternoon to do some night photography and photograph the waning crescent moon before sunrise. After spending the night in the back of my Pilot, I woke at 4:30 and hiked down to the lake. The crescent moon arrived right on time, about an hour before the sun, but I didn’t get any moon images that thrilled me. I was, however, encouraged by the glassy calm of the lake (a distinct change from the previous night) and the promising spread of clouds and sky connecting the horizons.
Waiting in the morning’s utter stillness, it was easy to forget how sleep deprived I was. After fifteen minutes of slow but steady brightening, the color came quickly and for about 30 minutes I was the sole witness to a vivid display that transitioned seamlessly from deep crimson, to electric pink, and finally soft, pastel peach hues. The entire show was duplicated on the lake surface—I could have pointed my camera in any direction to capture something beautiful.
When I get in a situation like this, one that’s both spectacular and rapidly changing, I risk blowing the entire shoot by thinking to much. Thinking in dynamic conditions usually results in things like including foreground elements just because that’s what you’re supposed to do, or spending too much time searching for just the right composition. This problem is particularly vexing at a place like Mono Lake, which is chock full of great visual elements.
I’ve seen many Mono Lake images featuring spectacular color and sparkling reflections, only to be ruined by the inclusion of disorganized or incongruous tufa formations (limestone formations that are the prime compositional element of most Mono Lake images). If you can include the tufa in a way that serves the scene, by all means go for it. But in rapidly changing conditions like I had this morning at Mono Lake, unless I already have my compositions ready, I’m usually more productive when I simplify through subtraction.
This morning I had just enough time before the color arrived to find a spot that didn’t have too much happening in the foreground. Rather than a confusion of tufa formations, I was working with a glassy canvas of lake surface that stretched with little interference to the distant lakeshore. The visual interruptions were few enough, and distant enough, that assembling them into a cohesive foreground was a simple matter of shifting slightly left and right. Handling my shoot this way allowed me to emphasize the scene’s best feature—the vivid color painting the sky and reflecting on the lake. The small tufa mounds dotting the lake surface were relegated to visual resting places that add depth and create virtual lines leading into the scene.
If you look at the images in the Mono Lake Gallery below, you’ll see a variety of foreground treatments that range from simple to complex. The more complex foregrounds are generally the result of enough familiarity and time to anticipate the conditions and assemble a composition. But when I couldn’t find something that worked, I simply stopped trying and allowed the moment to speak for itself.
A Mono Lake Gallery


Where did you get those shoes?: Storytelling for landscape photographers
Posted on June 25, 2013
Tree at Sunset, McGee Creek Canyon, Eastern Sierra
Canon EOS-1Ds Mark II
1/40 second
F/7.1
ISO 400
126 mm
Let’s have a show of hands: How many of you have been advised at some point in the course of your photographic journey to “tell a story with your images”? Okay, now how many of you actually have a clue as to what that actually means? That’s what I thought. Many photographers, with the best of intentions, parrot the “tell a story” advice simply because it sounded good when they heard it, but when pressed further, are unable to elaborate.
Telling a story is more easily accomplished in the photographic forms that allow photographers to arrange scenes and light to suit their objective (an art in itself), or journalistic photography intended to distill the the essence of an instant in time: a homeless man feeding his dog, dead fish floating in the shadow of belching smokestacks, or a wide-receiver spiking a football in the end zone.
This isn’t to say that landscape photographers can’t tell stories with our images, or that we shouldn’t try. Nor does it mean that one photographic form is inherently more or less creative than another. It just means that the rules, objectives, advantages, and limitations are different from form to form. Nevertheless, simply advising a landscape photographer to tell a story with her images is kind of like a coach telling a pitcher to throw strikes, or a teacher instructing a student to spell better. Okay, fine—now what?
Finding the narrative
First, let’s agree on a definition of “story.” A quick dictionary check reveals this: A story is “a narrative, either true or fictitious … designed to interest, amuse, or instruct….” That works.
The narrative part is motion. Your pictures need it. Narrative motion isn’t the visual motion of the eyes through the frame (also important), it’s a connection that pulls a viewer into a frame and compels him to stay. While narrative motion happens organically in media consumed over time, such as a novel or a movie, it can only be implied in a still photograph. And unlike the arranged or journalistic photography forms I mentioned above, landscape photographers are tasked with reproducing a static world as we find it—another straightjacket on our narrative options. But without some form of narrative motion, we’re at a dead end story-wise. What’s a photographer to do?
Photography as art
Every art form succeeds more for what happens in its consumer’s mind than for what it delivers to the consumer’s senses. Again: Every art form succeeds more for what happens in its consumer’s mind than for what it delivers to the consumer’s senses. A song that doesn’t evoke emotion, or a novel that doesn’t paint mental pictures, is soon forgotten. And just as readers of fiction unconsciously fill-in the visual blanks with their own interpretation of a scene, viewers of a landscape image will fill-in the narrative blanks with the personal stories the image inspires.
Of course the story we’re creating isn’t a literal, “Once upon a time” or “It was a dark and stormy night” (much more effective in photography than literature, I might add) story. Instead, the image we make must connect with our viewer’s story to touch an aspect of their world: revive a fond memory, provide fresh insight into a familiar subject, inspire vicarious travel, to name just a few possible connections. If we offer images that tap these connections, we’ve given our image’s viewers a reason to enter, a reason to stay, and a reason to return. And most important, we’ve given them a catalyst for their internal narrative. Bingo.
Shoot what you love
Think about your favorite novels. While they might be quite different, I suspect one common denominator is a protagonist to whom you can relate. I’m not suggesting that immediately upon finishing that book you hopped on a raft down the Mississippi River, or ran out to have a dragon tattooed on your back, but in some way you likely found some personal connection to Huckleberry Finn or Lisbeth Salander that kept you engaged. And the better that connection, the faster the pages turned.
And so it is with photography: Our viewers are looking for a connection, a sense that there’s a piece of the photographer in the frame. Because we can’t possibly know what personal strings our images might tug in others, and because those strings will vary from viewer to viewer, our best opportunity for igniting their story comes when we share our own relationship with a scene.
What? Didn’t I just say that it’s the viewer’s story we’re after? Well, yes—but really what needs to happen is the viewer’s sense of connection between our story and hers. If you focus on photographing the scenes that most move you, those scenes (large or small) that might prompt you to nudge a loved-one and say, “Oooh, look at that!,” the greater your chance of establishing each viewer’s sense of connection. Whether you’re drawn to mountains, crashing surf, delicate wildflowers, or prickly cactus, that’s where you’ll find your best images.
But what about the shoes?
The cool thing is that your viewer doesn’t need to understand your story; he just needs to be confident that there is indeed a story. That’s usually accomplished by avoiding cliché and offering something fresh (I know, easier said than done). For some reason this makes me think of Steely Dan lyrics, which rarely made sense to me, but they were always fresh and I never for a second doubted that they did indeed (somehow) make sense. In other words, rather than becoming a distraction, Steely Dan’s lyrics were a source of intrigue that pulled me in and held me. So when I hear:
I stepped up on the platform
The man gave me the news
He said, You must be joking son
Where did you get those shoes?
I’m not bewildered, I’m intrigued. Donald Fagen’s lyrics aren’t trying to tap my truth, they simply reflect his truth (whatever that might be). And even though I have no idea what he’s talking about, the vivid mental picture Fagen’s lyrics conjure (which may be entirely different, but no more or less valid, than your mental picture) allows me to feel a connection. You, on the other hand, may feel absolutely nothing listening to “Pretzel Logic,” while “I Want To Put On My My My My My Boogie Shoes” might give you goosebumps for KC and the Sunshine Band. Different strokes….
Returning from the abstract to put all this into photographic terms, the more your images are true the world as it resonates with you, and the less you pander to what you think others want to see, the greater the chance your viewer’s story will connect with yours.
The story of this image
My own story of this image involved a frantic rush to capture a beautiful but rapidly fading sunset. I was with my brother on a dirt road in the Eastern Sierra. I’d been on this road many times and knew this tree well. Despite its rather ordinary appearance, the tree’s solitary perch atop a barren, rocky ridge had always intrigued me. I’ve always longed for a home with a sweeping view, and envied this tree’s perpetual 360 view of the Sierra crest to the west, the White Mountains to the east, and Crowley Lake below.
As the sunset started to materialize that evening, I realized that we were close enough that I might be able to include the tree in the sunset shoot. We hustled my truck back down the road, pulling into to a wide spot beneath the ridge several minutes after the best color had faded. Jay, who had no personal connection to “my” tree, stayed in the truck while I sprinted along the road with my camera and tripod until my position aligned the tree with the final, rippled vestiges of sunset. I only clicked a couple of frames, slightly underexposed to hold the color. (The slight blue cast is the color of the twilight light.)
That’s my story, and while it’s personally satisfying, I have no illusions that any of that comes across in the image. I’ve displayed this print in many shows and watched people walk right by without breaking stride. But I’ve also been pleased to watch many people stop, linger, and return. While I have no idea what “story” this image taps for them—solitude? conquest? perseverance?—I don’t think it really matters.
Later that same morning…
Posted on March 1, 2013
Moonset, Mt. Whitney and the Alabama Hills, California
Canon EOS-5D Mark III
24-105L
1/2 second
F/11
ISO 100
It’s fun to browse the thumbnails from a shoot in chronological order to see the evolution of that day’s process. While can’t always remember specific choices, it’s always clear from the progression of my images that I was indeed quite conscious of what I was doing. I can look at one thumbnail and usually predict what the next will be.
This January morning in the Alabama Hills started for me about forty-five minutes before sunrise. When the sun finally warmed Mt. Whitney, a 95% waning gibbous moon was about to dip below the Sierra crest; comparing images, it’s clear I’d moved no more than twenty feet from the location of that morning’s earliest images. This is pretty typical of my approach—unlike many (but not all) photographers, who actively bounce around a location in search of something different, I tend to seek the scene until I find it, then work it to within an inch of its life. If I’m moving around, it usually means I haven’t found something that completely satisfies me.
Is mine the best approach? Of course not, but it is the best approach for me. There is no all encompassing rule for workflow in the field, except maybe to be true to your instincts. Because I happen to be very deliberate in my approach to many things, and can be incredibly (obsessively?) patient when I sense the potential for something I want, that’s the way I shoot. But, regardless of changing conditions and possible compositional variations, some photographers would go crazy locking into one scene. And just as my deliberate approach continually reveals details I’d have missed had I moved on sooner, it sometimes cheats me of even better opportunities waiting just around the corner. But I learned a long time ago not to stress about what I might be missing (because for me it’s even worse to chase what’s around the corner only to find what I end up with doesn’t match what I left).
Early on this chilly morning I found a relationship between a nearby stack of boulders and the distant Sierra peaks (Mt. Whitney in particular); the more time I spent with the scene, the more I saw and the better all the elements seemed to fit for me, so I just kept working. It didn’t hurt that conditions were changing almost as quickly as I could compose. Clouds ascended from behind Mt. Williamson as if churned out by a cloud making machine, sprinted south past Mt. Whitney, and disappeared behind Lone Pine Peak. On their way they took on whatever hue the rising sun was delivering, from white (before the sun) to vivid pink to amber.
Comparing today’s image to the image in my previous post, I see that my composition shifted to account for the moon. In the earlier image the most prominent boulder and Mt. Whitney serve as a set that anchors the center of the frame. In the later image I keep the set together but offset them to the left to balance the moon’s extreme visual weight. And while at first glance it appears both images were captured from the same spot with just slight focal length and direction adjustments, the height and position of the foreground boulder relative to Mt. Whitney’s summit shows that I’ve moved a little left and about twenty feet closer.

Before Sunrise, Mt. Whitney and the Alabama Hills, California
Relationships between elements in a frame are essential to an image’s success—controlling these relationships is a matter of moving up/down, left/right, forward/backward. Without remembering my decision to move that morning, I can still reconstruct my likely thought process: The more I worked the scene, the more clear I became on where the boulders’ left and right boundaries should be. Moving left and closer let me go wide enough to include the moon and clouds, fill the foreground with no more of the foreground boulders than I wanted, and balance the frame with the boulder/Whitney pair on the left and the moon on the right.
So while I do indeed stick with one scene for a long time, I’m far from static. Each frame is slightly different from the previous one. Like most of my favorite images, this Whitney sunrise moonset is an evolution; it started in the dark, evolving with the conditions and my growing familiarity with the scene’s elements.
There are no guarantees in nature, and I’ve had my share of “panic shoots” when something unexpected forced me to run around frantically searching for a scene to go with the moment. But when this morning’s dance of light, clouds, and moon blended into one of those magic moments photographers dream about, I was ready.
Photo Workshop Schedule
An Eastern Sierra Gallery
Click an image for a closer look and slide show. Refresh the screen to reorder the display.


