Eloquent Images by Gary Hart
Insight, information, and inspiration for the inquisitive nature photographer
Encore!
Posted on November 11, 2012
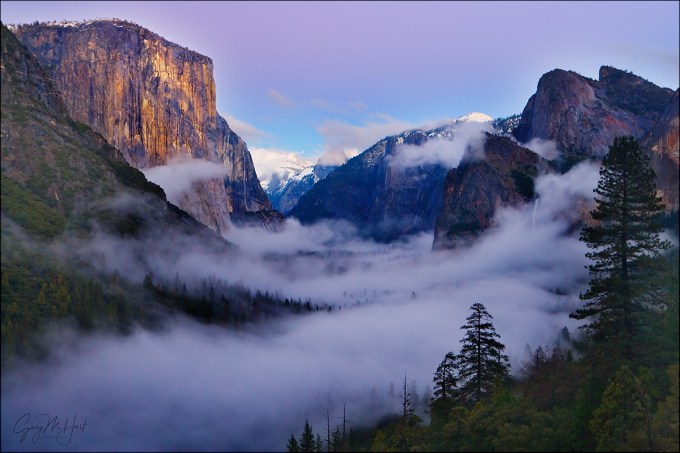
Twilight Fog, Tunnel View, Yosemite
Canon EOS-1Ds Mark II
1.6 seconds
F/7.1
ISO 200
48 mm
Yesterday I spent an incredible day in Yosemite, guiding a group of photographers from the Sacramento area. When I schedule these trips, I do my best to time them for nice conditions, but of course there’s no guarantee things will work out. Yesterday they worked out. Big time. Not only did we catch Yosemite Valley at its fall color peak (it’s late this year), we found everything blanketed with fresh snow that continued to fall lightly, and intermittently, throughout the day. I have lots of images I can’t wait to get to, but until then I offer this one from a few years ago, chosen because it’s quite similar to the scene with which we wrapped up the day yesterday.
Much like last night, the view on this 2005 evening was a classic Yosemite clearing storm. My brother Jay and I arrived at Tunnel View to find El Capitan and Half Dome, partially obscured by swirling clouds, teasing the audience like exotic fan dancers; a carpet of plush fog cushioned the valley floor. With sunlit clouds and granite above a shaded valley, the light was tricky, but as the sun dropped, so did the contrast, making metering simpler. Eventually the direct sunlight left Half Dome entirely, but small, shifting patches spotlighted El Capitan right up until sunset. While the clouds never achieved brilliant sunset pinks and reds, they radiated an ethereal gold that intensified over several minutes before fading.
When the sunlight left entirely, as if on cue, the fog hugging the valley floor expanded, slowly obscuring the scene like a curtain signaling the show’s end. With the view gone, the crowd packed up and headed to wherever they needed to be; suddenly we were alone. But I’ve photographed Yosemite enough to know that it’s a mistake to try to predict the conditions in five minutes based on the conditions now, so I stayed, hoping for an encore.
As quickly as the scene had closed, the foggy curtain pulled back, unveiling Yosemite Valley once more, this time illuminated by the magnificent pink and blue pastels of the Earth’s shadow and belt of Venus. By now the sky was fairly dark, but the remaining faint, shadowless light was enough to reveal the most beautiful view on Earth.
Though this image adds to the seemingly infinite number of Yosemite Tunnel View pictures in my portfolio it remains one of my personal favorites. It’s one of the images I think about every time I consider leaving a scene, and it’s what I showed the group last night when some suggested leaving. So we stayed and were among the very few rewarded with memories of Yosemite Valley’s sweet encore for the drive home.
Workshop Schedule|| Purchase Prints || Instagram
A Gallery of Yosemite Weather
Click any image to scroll through the gallery LARGE


, Yosemite")


I love it when things work out
Posted on October 29, 2012

Autumn Moon, El Capitan and Half Dome, Yosemite
Canon EOS-5D Mark III
190mm
.8 seconds
F/11
ISO 100
October 29, 2012
My Yosemite autumn workshop wrapped up last night with a spectacular moonrise above Half Dome at sunset. That my group was there to photograph it was both a source of pride, and great personal satisfaction—I doubt few things on Earth are more beautiful than a full moon rising above Half Dome at sunset, and I love being able to share it.
Some lunar perspective
Imagine a line connecting the sun and moon—the half of the moon skewered by that line is always fully lit. Because the moon orbits Earth, our position relative to that line changes daily. Once every 29 days Earth is on that line too, aligned with (and between) the sun and the moon, perfectly positioned to see all of the moon’s sunlit side during our night (in other words, the side of Earth facing the moon is the side facing away from the sun). Because this alignment is the only time the moon’s fully lit face is visible all night, a full moon always rises at sunset and sets at sunrise.
Why do we rarely see the moon rise exactly as the sun sets? There are a couple of reasons: First, local terrain usually gets in the way—if the moon has to rise above mountains, or the sun sets behind mountains, their rise and set times will be skewed. And second, the moon, sun, and Earth are only perfectly aligned for an instant—we see the moon as full on the day it’s most closely aligned with the sun and Earth, but we’ll only see the rising full moon precisely at sunset when sunset for our location coincides with the instant of perfect alignment, and no mountains are in the way. (There are other orbital and positioning factors, but sometimes technical minutia can clutter understanding, so I’ll just leave it here.)
Targeting Yosemite’s autumn moon
For most Yosemite visitors, viewing a glowing lunar disk above Yosemite Valley doesn’t require much more than being outside and looking up at the right time. But photographers have to be much more precise than that—the camera’s constrained view means anything but a tight composition reduces the moon to small accent (albeit a very beautiful one) to a very large scene. And the camera’s relatively limited ability to simultaneously capture shadows and highlights makes for an extremely narrow time window to photograph a full moon—too early and the moon is lost in still-bright sky (not enough contrast); too late and the dynamic range separating the rising (daylight bright) moon and (rapidly dimming) shadowed foreground terrain is to great for a camera to capture (too much contrast).
So what we want is a moon that rises in very close proximity to Half Dome, at just the right time. When I started planning my 2012 workshops more than a year in advance, I circled October 28 as the date for my favorite Yosemite full moon rise of the year. That was when the moon, 99 percent full, would rise above the steep granite walls of Yosemite Valley, in the general direction of Half Dome as viewed from the valley, at just the right time. I usually choose the famous Tunnel View vista, just east of the Wawona Tunnel, for the autumn moonrise, but my calculations told me that from Tunnel View the moon would rise a little farther to the right of Half Dome than I like, and just a little later than ideal (difficult to expose for anyone without rock-solid understanding of metering and exposure)—still a nice shot, and doable if you’re careful, but I thought there might be something better.
Wanting to be at a higher elevation than, and a little farther north of, my Tunnel View vantage point, I soon realized that the less heralded vista just west of the Wawona Tunnel would be just about right. Not only would this perspective better align the moon with Half Dome, it’s about a mile farther back and over 400 feet higher than Tunnel View (for a slightly earlier moonrise). And being farther back also meant we could use a longer focal length to maximize the distant moon’s size relative to the closer Half Dome. This vantage point doesn’t offer a view of Bridalveil Fall (it wouldn’t be in a telephoto image that includes Half Dome anyway), but that late in the afternoon in autumn Bridalveil is in full shade, and an extremely dry year had reduced it to a mere trickle anyway.
There are lots of apps and software that plot moonrise relative to terrain (Photographer’s Ephemeris being the most popular among photographers), but my moonrise (and set) workflow was in place long before they were available, so I still do it my “old fashioned” way. My technique involves getting the phase, rise/set time, altitude, and azimuth from a website or app (Focalware gives me everything I need), then plotting the moon’s direction with my (now obsolete) National Geographic Topo! software. Topo! gives me the horizontal and vertical distance separating my location and target feature (Half Dome). Plugging that info into my HP11C (scientific calculator) app, I compute the horizon’s altitude in degrees. I plot this altitude and the moon’s azimuth on my Topo! map to pinpoint when and where the moon will appear (or disappear) from any location I choose. I like my approach because I can do everything I need to without Internet or cell service, but for most people it’s probably just simpler to use Photographer’s Ephemeris or PhotoPills before leaving home.
So anyway, I was able to determine that on October 28, from the vista west of the Wawona Tunnel, the moon would rise behind Half Dome’s Ahwiyah Point at around 5:45, and would be directly above (basically, appearing to sit on top of) Half Dome at around 5:50. With a 6:05 sunset, this was just about as perfect as could be.
The moon arrives
I got my group in position at around 5:30 and we just watched and waited. By the end of any workshop everybody has gotten to know each other quite well and idle time is an excuse for fun. This group was no exception. Though I’ve done this enough to be pretty confident the moon would deliver as promised, I couldn’t help feeling secretly anxious that a miscalculation would somehow render my promised workshop grand finale a flop (despite the fact that I’d checked, double-checked, triple-checked, and then checked some more). But a little after 5:40, just as the joviality peaked, a white arc started to glow behind Ahwiyah Point (below) and we were instantly down to business. With foreground for perspective you can really get a sense for how quickly the moon rises—fortunately, everyone was ready with their exposure and composition, so the clicking was pretty much instantaneous and I don’t think anyone missed anything.
As we shot, I encouraged the group to vary their compositions—while it was mostly a telephoto scene, there were wider and tighter versions, as well as horizontal and vertical orientations. I also frequently reminded everyone to monitor the moon’s highlights—as the moon rises, the foreground darkens but the moon remains daylight bright, making exposure increasingly difficult.
My favorite time of evening is the ten or fifteen minutes after sunset, when the shadows have left the landscape and the east horizon is layered with pink and blue pastels. As Earth’s shadow rises from the eastern horizon, the sky’s glow deepens to a rich magenta that and paints entire landscape. The image at the top of the post was one of the last of the evening, several minutes after sunset. If you look closely, you can see the sky’s pink glow bathing Half Dome’s reflective granite (my camera actually picked more of this color than you see here, but I desaturated it slightly in Photoshop).
(I’d love to say that this was the highlight of my day, but as beautiful as the moonrise was, it was trumped by listening to my Giants World Series victory on the drive home.)

This is the moon when it first appeared, about 20 minutes before sunset. As you can see, the contrast is pretty good, but the light isn’t nearly as nice as it was shortly after sunset.
A Yosemite Autumn Moon Gallery


It’s my pleasure
Posted on June 7, 2012

New Day, Half Dome and Crescent Moon, Yosemite
Have you noticed a pattern here? Every spring I post an image or two (or three) of a delicate crescent moon rising above Yosemite Valley at sunrise. This spring is no exception, nor will next year’s be. Or the next. Or the next….
I certainly can’t justify this lunar obsession from a business perspective. While the moon rises in a slightly different spot each year, I have more than enough pictures of Half Dome and/or El Capitan silhouetted beneath a sliver of moon, in every possible variation—horizontal, vertical, wide, tight, and everything in between—to last until the next Venus transit.
But here’s the deal. Photography needs to be a source of pleasure. Otherwise what’s the point? So when I decided to make my living taking pictures, I promised myself that I’d photograph only what I want to photograph, without concern for what will or will not sell. For me that’s natural light landscapes. Only. Nothing that moves, nothing that breathes. No people, no wildlife, and nothing manmade. No flash, light painting, or any other artificial light. I don’t blend images or do any fancy Photoshop stuff. And I don’t shoot stock images. (Not that I have a problem with others doing all this other stuff–doing it just doesn’t give me pleasure.)
In other words, if I don’t want to shoot it, I don’t. I joke that if I were photographing a field of poppies and a mountain lion were to leap into my frame, I’d shoo it away. (Okay, so I might have other impulses, but you get the idea.) It also means that when something’s going to happen in nature that I really want to see, you can bet I’ll do my best to be there with my camera. Fresh snow forecast for Yosemite? I’m on the road early enough to be there before the snow starts falling. Moonlight on Badwater in Death Valley (a recent discovery)? Gotta do it. Milky Way above Kilauea Caldera? What do you think?
And of course a crescent moon rising above Yosemite Valley at sunrise. In my world it just doesn’t get any more special than this. And as nice as the images are, nothing compares to the experience of witnessing it. Take one of the most beautiful vistas in the world, add the purity of sunrise, and garnish it with a delicate crescent moon—can’t get enough of it.
Last year I scheduled a workshop to coincide with this event; next year I’ll do the same. But this year I kept it to myself. While the time and position of the moon is never a secret—the information is available all over the Internet, not to mention software and smartphone apps—I never cease to be amazed at how many times I’m the only person present. Maybe that just means a crescent moon above Yosemite Valley doesn’t move others the way it moves me, but that’s fine with me.
Depending on the moon’s azimuth (the number of degrees south of due north) as it crests the horizon behind Yosemite Valley, I have several go-to locations. This year I decided the best spot was Tunnel View, Yosemite’s most popular vista. Each year I fear everyone has figured it out and I’ll be joined by a Horsetail Fall-style riot of photographers. So I held my breath as I approached the parking area a little after 4:30 a.m., and immediately exhaled when I found the lot empty. I set quickly set up two tripods, one with my 1dsIII and my 100-400 lens, the other supporting my new 5dIII and 24-105 lens. While waiting for the moon I composed, exposed, focused each camera, and fired a couple of test frames. Then I waited some more.
The moon appeared right on schedule, a few minutes before 5:00, a fine spear of light peeking above Half Dome. Flanked by my two cameras, a remote release in each hand, I started clicking, pausing every few clicks to adjust the exposure and recompose. I continued like this for about 25 minutes, capturing the moon’s ascent through pre-dawn twilight that transitioned from indigo to blue and finally gold right before my eyes.
As the brightening sky swallowed the moon another car pulled into the parking area and a trio of photographers rolled out, the first people I’d seen all morning. I was detaching cameras and collapsing tripods when they ambled over and casually began setting up, clearly confident that they’d arrived in plenty of time for sunrise. The moon was a faint sliver by then and I heard one of the newcomers comment that maybe they could include it their first few frames. I resisted the urge to show them what they’d missed, but couldn’t help feeling a degree of smug pleasure in what I knew was on my media cards.
Does that make me a bad person?
Photographic reality: The missing dimension
Posted on June 4, 2012

Nature’s Palette, Half Dome from Sentinel Dome, Yosemite
![]()
“Photography’s gift isn’t the ability to reproduce reality, it’s the ability to expand it.”
(The sixth and final installment of my series on photographic reality.)
So far I’ve written about focus, dynamic range, confining borders, motion, and time, but I think most obvious (and also I’m afraid most overlooked) difference separating the camera’s vision from our own is the missing dimension: depth.
Photography attempts to render a three dimensional world in a two dimensional medium—the most photographers can hope for is the illusion of depth. While anyone can put a camera to their eye and compose the lateral, left-to-right aspect of a scene, translating their own three-dimensional experience to their camera’s two-dimensional reality is a leap that many miss. This may explain why a sense of depth is often the most significant quality separating a merely good image from an outstanding image.
Achieving the illusion of depth starts with looking beyond your primary subject and finding a complementary foreground or background: If your primary subject is nearby, find a background object, shape, or color that frames, balances, and/or helps your subject stand out; conversely, if your primary subject is in the distance, look for foreground elements that can lead your viewers’ eyes through the frame without distracting or competing for attention.
Once you have your foreground/background elements worked out, your composition isn’t complete. In your three-dimensional view, size and distance are easily interpreted, something we stereographic humans take for granted. But your scene’s depth is lost to your camera. In a two-dimensional world aligned objects at varying distances loose the separation that makes them stand out—you need to visually separate these merged objects—put them on different lines of sight—to allow your viewer to imagine the depth you see at capture. I can’t emphasize how important this is.
In my many years of observing and assisting other photographers working to improve their images, I’ve decided that the single most significant factor holding them back is their ignorance of, or unwillingness to wield, their control over their images’ depth relationships. There seems to be an invisible force that binds tripods to their first landing place. Overcoming this force (to which I’m not immune) requires vigilant attention to each visual element in your frame and taking whatever steps necessary to ensure that each stands alone. If you can’t achieve separation from your current position, move! Simply repositioning a little left/right, up/down, forward/backward really can make a huge difference. In other words, in a static landscape, it’s your job to be dynamic.
For example
With the benefit of a 360 degree view, it was clear that all the elements were in place for a spectacular sunset atop Yosemite’s Sentinel Dome. An afternoon rain had scoured the air of color-robbing particles, and an opening on the west western horizon left a clear path for the setting sun to illuminate the clouds above Half Dome to the east. But as spectacular as I expected the color above Half Dome to be, I wasn’t going to be satisfied with just another pretty picture of Half Dome at sunset.
One of the things I like most about photographing from Sentinel Dome is the variety of foreground subjects: rocks, cracks, and of course the solitary jeffrey pine made famous by Ansel Adams and others, now dead and on its side. On this evening, guessing (hoping) that the earlier downpour had filled indentations I remembered on Sentinel’s southeast flank, I headed over there.
One thing I pride myself in is arriving at a location early, well before the best conditions, to allow time to anticipate the light and assemble the elements of my composition. Being such a deliberate shooter, this is really a necessity for me. So when I found these pools right where I’d hoped, I was able to take the time to figure out how to use them. I started by moving around quite a bit, first to find the angle that would best frame Half Dome with the pools, then forward and backward to get an idea of the best distance and focal length that would give Half Dome enough size while giving the pools enough room. A factor in these distance/focal-length considerations was finding the angle that would allow me to include a reflection of the clouds, which meant moving up and down as well. In this case I dropped quite low, probably no more than a foot off the ground, taking care not to get so low that the bottom of Half Dome merged with the edge of Sentinel Dome. With the composition worked out, I did some depth of field figuring and decided that I’d better stop all the way down to f20 to ensure a perfectly sharp foreground and acceptably sharp Half Dome.I focused on the granite about eight feet away and think I did a pretty good job achieving front-to-back sharpness. (Today I’d use the DOF app on my iPhone, but checking it now confirms that I did okay.)
Being on a tripod with no motion in the scene meant I was able to go with whatever shutter speed gave me the exposure I wanted, at my camera’s native ISO 100. I metered on the foreground and used a graduated neutral density filter to darken the bright sky, starting my exposures before the best color started (you never know when the color will peak—it’s best to have a few too many images than to realize after the fact that the color you’re waiting for isn’t coming), monitoring my histogram and adjusting down in 1/3 stop increments as the light dropped.
On this evening the color just kept getting better and better, until the air seemed to buzz with color and the entire landscape glowed red. Believe it or not, the red was even more vivid than what you see here, but I decided to tone down the saturation a bit because there comes a point where Mother Nature seems to defy credibility. This remains one of my favorite images.
Photographic Reality: See the light
Posted on May 21, 2012

Crescent and Oaks at Dusk, Sierra Foothills, California
“Photography’s gift isn’t the ability to reproduce your reality, it’s the ability to expand it.”
(The third installment of my series on photographic reality.)
Dynamic range
One of photographers’ most frequent complaints is their camera’s limited “dynamic range,” it’s inability to capture the full range of light visible to the human eye. To understand photographic dynamic range, imagine light as water you’re trying to capture from a tap–if the human eye can handle a bucket-full of light, a camera will only capture a coffee cup. Any additional light reaching your sensor simply overflows, registering as pure white.
Limited dynamic range isn’t a problem when a scene is lit by omnidirectional, shadowless light. But while I can’t speak for other planets, here on Earth we’re illuminated by only one sun. Since most Earthlings prefer blue skies and brilliant, (unidirectional) sunshine that buries everything that’s not directly lit in dark shadows. Fortunately, human vision has evolved to the point where we can see detail in shadows and sunlight simultaneously.
Cameras haven’t evolved quite so far–on sunny days, photographers must choose between photographing what’s in the shade or what’s in direct sunlight. Exposing to capture detail in the shadows brings in so much light that everything in sunlight is overexposed; exposing to avoid overexposure of sunlit subjects doesn’t permit enough light to see what’s in the shadows.
Managing the light
Experienced photographers understand their camera’s limited dynamic range and take steps to mitigate it. For example, artificial light (such as a flash) can be used to fill shadows, or multiple exposures (covering a scene’s range of light) can be digitally blended into one image. But as a natural-light landscape photographer, I don’t even own a flash (really), and given that I only photograph scenes I can capture with a single exposure, I also never blend exposures.
The simplest solution for me is to avoid harsh, midday light. Full shade (absolutely no direct light) works, and a layer of clouds that spreads sunlight over the entire sky illuminates the landscape with even (low contrast), shadowless light that’s a joy to photograph. And the low, very early or very late light that occurs just after sunrise or before sunset has been subdued enough by its long journey through the thick atmosphere that the contrast falls into a camera’s manageable range. I’m also a huge advocate of graduated good old fashioned neutral density filters to reduce the difference between a bright sky and darker foreground.
Less is more
The best photography often results from subtraction. Photographers who merely take steps to make their camera’s world more like their own miss a great opportunity to show aspects of the world easily missed by the human experience. In the right hands, a camera’s limited light capturing ability can be used to emphasize special aspects of nature and eliminate distractions.
Exposing to hold the color in bright sky or water can eliminate unlit distractions and render shaded subjects in shape-emphasizing silhouette. And compositions that feature brightly backlit, translucent flowers and leaves explode with natural color that stands out against a shaded, black background.
Whether the image is a silhouetted mountain or translucent dogwood, the camera’s rendering is nothing like your experience of the scene. But it is a true rendering from the camera’s perspective, achieved without digital manipulation.
For example

Daybreak, El Capitan and Half Dome, Yosemite
Last week I rose at 4:00 a.m. to photograph a thin crescent moon rising above Half Dome almost an hour before sunrise. It was one of those, “I’m witnessing the most beautiful thing on Earth” moments, and I couldn’t believe no one else was there to enjoy it. I arrived about fifteen minutes before I expected the moon to rise, more than enough time to set up one tripod with my 1DS III 100-400 lens bulls-eyed on Half Dome at 400 mm. Another tripod had my 5D III and 24-105 composed to include El Capitan and Half Dome (above).
When the moon arrived I gave the scene just enough light to reveal the rich blue in the twilight sky. At that exposure the thin sliver of moon was completely overexposed (no lunar detail), a crescent of pure white that stands out boldly against the dark blue sky. A few stars pop through the darkness as well.
My eyes had adjusted to the predawn light enough for me to barely discern the trees and granite in Yosemite Valley below, and the rising sun had already started to wash out some of the sky’s color. But at the exposure I chose, my camera saw only Yosemite’s iconic skyline, El Capitan on the left and Half Dome on the right, as distinct black shapes against the cool blue sky. Rendering the image this way reduces erases the rocks and trees that add nothing to the scene, reducing this special Yosemite moment to its most compelling elements, color and shape.

Autumn Light, Yosemite: Here I metered on the brightest part of the backlit leaves, slightly underexposing to capture the leaves’ exquisite gold and turn the shaded background to complementary shades that range from dark green to nearly black. A small aperture softened dots of sky to small jewels of light.
Up next: Accumulate light
It’s personal
Posted on May 8, 2012

Top of the World, Glacier Point, Yosemite
Some of my oldest, fondest Yosemite memories involve Glacier Point: Craning my neck from Camp Curry, waiting for the orange glow perched on Glacier Point’s fringe to grow into a 3,000 foot ribbon of fire; stretching on tiptoes to peer over the railing to see the toy cars and buildings in miniature Yosemite Valley; standing on the deck of the old Glacier Point Hotel my father’s breathless excitement at the sudden shimmering rainbow arcing across Half Dome’s face.
The National Park Service doused the Firefall in 1968 and my father died almost eight years ago. While El Capitan’s Horsetail Fall delivers a no less spectacular (albeit less reliable) February show across the valley, and my father’s rainbow image is a vivid reminder on my mom’s living room wall, those Glacier Point memories are irreplaceable.
Glacier Point closes with the first significant snow each fall, and doesn’t open until the snow melts in late spring–avoiding summer’s crowds and interminable blue skies means I don’t make it to Glacier Point much anymore. So I was thrilled to learn that this year’s dry winter enabled the NPS to open Glacier Point on April 20, early enough for me to share it with last week’s workshop group.
Because I already had plans for Mirror Lake, moonrise, and moonlight photography later in the workshop, I decided that the workshop’s first sunset was the best time time for the Glacier Point trip. Stopping first at Washburn Point just a short distance up the hill, we were treated to a harbinger of what was to come later–a mix of wave clouds and alto-cumulus above the Sierra crest to the east, and wonderfully warm light on Half Dome. Not knowing how long the light would last, I hustled the group to Glacier Point, arriving soon enough to get a front row seat for what turned out to be the best sunset experience I’ve ever had at Glacier Point.
The light held out all the way to sunset, warming from amber to pink and finally red, painting the sky and saturating the granite landscape with shades of magenta. As it turned out we had many other photogenic moments (dogwood, a moonbow, and the rise of the “super” moon above Yosemite Valley) in the workshop’s remaining three days, but this sunset on Glacier Point will be my fondest memory.
That’s Half Dome front and center, Cloud’s Rest behind it to the right, and Nevada (top) and Vernal Falls in the lower right.
Starry, starry night
Posted on March 14, 2012

Winter Star Trails, Half Dome and the Merced River, Yosemite
Canon 1Ds Mark III
28 mm
24 minutes
F/2.8
ISO 400
Yosemite is beautiful any time, under any conditions, but adding stars to the mix is almost unfair. I started doing night photography here on full moon nights about six or seven years ago, but recently I’ve enjoyed photographing the exquisite starscape of moonless Yosemite nights. With no moonlight to wash out the sky, the heavens come alive. Of course without moonlight visibility is extremely limited, and focus is sometimes an act of faith. But eyes adjust, and focus improves with experience (I promise).
After photographing, among other things, Yosemite Valley with a fresh blanket of snow and Horsetail Fall in all its illuminated splendor, last month’s Yosemite winter workshop had already been a success. Nevertheless, after dinner on our next to last night I took the group to this peaceful bend in the Merced River to photograph Half Dome beneath the stars.
I started with a high ISO test shot to get the exposure info for everyone, then converted to a long exposure that allowed me to ignore my camera for a half hour or so while I worked with the rest of the group. Helping with focus, composition, and exposure, I made sure everyone had had a success before suggesting we wrap up.
The fabulous photography is only part of what makes these night shoots memorable–they’re also just plain fun. That night we ended up staying out for about an hour, shooting, shivering, and laughing–lots of laughing. And as the group packed up, I returned to my camera and found this waiting for me.
Check out next year’s Yosemite winter workshop.
Trust your instincts
Posted on January 20, 2012

Emergence, Half Dome from Olmsted Point, Yosemite
Canon EOS-1Ds Mark III
70-200L F4
3.2 seconds
F/16
ISO 400
This week I’ve spent some time going through past images that I just haven’t had time to get to. Unlike many of the images I uncover by returning to old shoots, this one from the final night of my October 2010 Eastern Sierra workshop wasn’t a surprise–the sky over Half Dome that night was magic, something I’ll never forget. Shortly after returning home I selected and processed one, but in conditions like that I always shoot enough variety of compositions that I knew there must be more there. While I have a general rule to only select one image of any scene from a single shoot, this is a perfect example of why I refuse to be bound by rules.

From the Clouds, Half Dome from Olmsted Point, Yosemite
Canon EOS-1Ds Mark III
24-105L F4
5 seconds
F/16
ISO 400
Comparing the two images from that night, what strikes me most isn’t the similarity, but the differences. Despite being captured less than a minute apart, they illustrate creative choices that underscore a point I keep hammering on: Photographers are under no obligation to reproduce human “reality” (because it can’t be done). Because photographic reality is an impossible moving target, my obligation as a photographer is to my camera’s reality. And if I do things right, I can use my camera’s reality to transcend visual reality and convey some of the emotion of the moment.
So, in the “Emergence” (tight vertical) composition, I chose to emphasize Half Dome’s power and nothing else. I centered Half Dome and exposed for its granite face, letting the swirling clouds darken and the foreground go completely black. The dark clouds above Half Dome cap the top of the scene–there’s really nowhere else for your eye to go than Half Dome.
Today’s “From the Clouds” composition is more about the moment’s grandeur. I widened the perspective considerably and brightened my exposure enough to encourage your eye to wander about the frame a bit. There’s no question as to where your eye will end up, it just takes a little longer to get there. In other words, expanding the perspective and providing more light invites you to leave and return to Half Dome at your leisure.
Did I consciously plot this that night? Nope. Honestly, I’m rarely this analytical when I shoot–I just don’t want my left (logical) brain to distract my right (creative) brain. But I do believe that if you cultivate (and trust!) your intuition, creative decisions like this will happen organically. (But learn metering and exposure until it becomes automatic!)
So while I had no conscious thought of how to control your experience of this scene, I’ve done this long enough to know that these creative choices don’t just happen by accident. Without getting into the divine intervention claims trumpeted by some photographers (label it what you will), I believe everyone can access untapped creative potential that takes them far beyond what can be accomplished with the conscious mind. And it starts with trust.
BTW—I prefer the first one (Emergence).
Magenta moonrise, Half Dome, Yosemite
Posted on November 21, 2011

Magenta Moonrise, Half Dome, Yosemite
With my camera I’m able to create my own version of any view, adjusting focal length (the amount of magnification) and composition to emphasize whatever elements and relationships I find most compelling. Today’s image was captured on the final shoot ofmy most recent fall workshop, three sunsets after my previous image, from virtually the same location.
On Sunday evening (the first sunset), with Yosemite Valley emerging from swirling clouds and the moon high above Leaning Tower, I chose a wide composition that encompassed the entire scene. Wednesday evening the eastern horizon was partially obscured by a uniform layer of translucent clouds. As the sunset progressed, we watched the moon’s glow rise through the throbbing pink clouds. When it slipped into a small opening I quickly tightened my composition to create a frame that was all about Half Dome and the moon. I made the Sunday moon a delicate accent, the Wednesday moon a bold exclamation point. These decisions remind me that photography is more than simply documenting a moment; it’s taking that moment and using the camera’s unique vision to convey its essence.
One more thing: By the last day of a workshop, relationships have been forged and inside jokes have blossomed. The group interaction feels more like a family gathering (minus the disfunction) than the assembly of diverse strangers we were three-and-a-half days earlier. On this evening in particular we had a great time laughing about things that anyone who hadn’t been in the workshop couldn’t appreciate. It was lots of fun, and a wonderful way for me to wrap up this year’s fall workshop season.
A landscape photographer’s time
Posted on June 25, 2011

Double Rainbow, Yosemite Valley
Canon EOS-1Ds Mark II
38 mm
1/5 seconds
F/16
ISO 100
On my run this morning I listened to an NPR “Talk of the Nation” podcast about time, and the arbitrary ways we Earthlings measure it. The guest’s thesis was that the hours, days, and years we measure and monitor so closely are an invention established (with increasing precision) by science and technology to serve society’s specific needs; the question posed to listeners was, “What is the most significant measure of time in your life?” Most listeners responded with anecdotes about bus schedules, school years, and work hours that revealed how our conventional time measurement tools, clocks and calendars, rule our existence. Listening on my iPhone, I wanted to stop and call to share my own relationship with time, but quickly remembered I wasn’t listening in realtime to the podcast. So I decided to blog my thoughts here instead.
Landscape photographers are governed by far more primitive constructs than the bustling majority, the fundamental laws of nature that inspire, but ultimately transcend, clocks and calendars: the Earth’s rotation on its axis, the Earth’s revolution about the Sun, and the Moon’s motion relative to the Earth and Sun. In other words, clocks and calendars have little to do with the picture taking aspect of my life; they’re useful only when I need to interact with the rest of the world on its terms (that is, run the business).
While my years are ruled by the changing angle of the Sun’s rays, and my days are inexorably tied to the Sun’s and Moon’s arrival, I can’t help fantasize about the ability to schedule my spring Yosemite moonbow workshops (that require a full moon) for the first weekend of each May, or mark my calendar for the blizzard that blankets Yosemite in white at 3:05 p.m. every February 22. But Nature, despite human attempts to manipulate and measure it, is its own boss. The best I can do is adjust my moonbow workshops to coincide with the May (or April) full moon each year; or monitor the weather forecast and bolt for Yosemite when a snowstorm is promised (then wait with my fingers crossed).
The insignificance of clocks and calendars is never more clear than the first morning following a time change. On the last Sunday of March, when “normal” people moan about rising an hour earlier, and the first Sunday of November, as others luxuriate in their extra hour of sleep, it’s business as usual for me. Each spring, thumbing its nose at Daylight Saving Time, the Sun rises a mere minute (or so) earlier than it did the day before; so do I. And each fall, on the first sunrise of Standard Time, I get to sleep an an entire minute longer. Yippee.
Honestly, I love nature’s mixture of precision and (apparent) randomness. I do my best to maximize my odds for something photographically special, but the understanding that “it” might not (probably won’t) happen only enhances the thrill when it, or maybe something unexpected and even better, does happen. The rainbow in today’s image was certainly not on anybody’s calendar; it was a fortuitous convergence of rain and sunlight (and ecstatic photographer). My human “schedule” that evening was a 6 p.m. get-to-know/plan-tomorrow dinner meeting with a private workshop customer. But seeing the potential for a rainbow, I suggested that we defer to Mother Nature, ignore our stomachs, and go sit in the rain. Fortunately he agreed, and we were amply rewarded for our inconvenience and discomfort.
Workshop Schedule || Purchase Prints
A Gallery of Rainbows
Click an image for a closer look, and a slide show. Refresh the screen to reorder the display.


