Eloquent Images by Gary Hart
Insight, information, and inspiration for the inquisitive nature photographer
Natural Light Painting
Posted on October 16, 2022

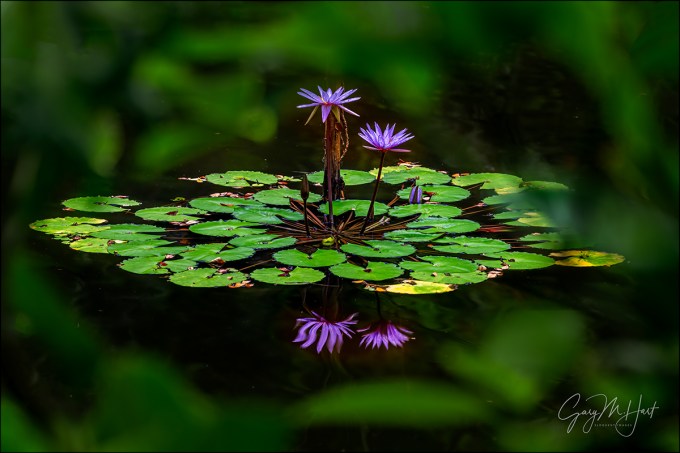
Mono Moonlight, South Tufa, Mono Lake
Sony 𝛂1
Sony 16-35 f/2.8 GM
20 seconds
F/8
ISO 3200
Once upon a time, moonlight was the only kind of night photography I did. As lifelong astronomy enthusiast, I’ve always been mesmerized by all the stars that come out when the moon is down, but film and the earliest digital cameras were just not capable of adequately capturing the world after dark without help from multiple exposures or artificial light (dealbreakers for me).
While waiting for digital technology to catch up with my Milky Way aspirations, I watched other photographers achieve beautiful results using night photography techniques that didn’t appeal to me: Light painting (long exposures with foreground subjects illuminated by artificial light), and blue-hour blends (one image captured with the foreground illuminated by twilight “blue hour” sky, blended with a second image of the stars from later total darkness at the same location).
Longing for something different than moonlight, while staying true to my one-click natural light objective, I added star trails to my night sky toolbox. Start trails allowed me to keep my shutter open long enough to reveal the landscape beneath a moonless, star-fill sky—albeit with star streaks that bore no resemblance to the pinpoint stars I was so fond of gazing at. Another perk star trail photography was the opportunity to kick back beneath a star-filled ceiling while waiting for my exposure to complete.
When digital sensors finally improved enough to enable usable starlight (moonless) images, I was all-in. Armed with my newly acquired Sony a7S camera (and subsequent versions) and super-fast and wide prime lenses, I aggressively pursued images of the Milky Way’s brilliant core above my favorite landscapes.
So thrilling was this Milky Way revelation, I all but dropped moonlight photography. In fact, moonlight and Milky Way photography are mutually exclusive because when the moon is full, the Milky Way is lost in the moon’s glow. So by 2015, the only moonlight photography I was doing came during my annual spring moonbow workshops in Yosemite, where bright moonlight is required for the lunar rainbow’s appearance.
As much as possible I time my trips, both personal and workshops, for moonless nights to maximize the Milky Way photography opportunities. One exception is my annual autumn visit to the Eastern Sierra, which is always timed for early October to coincide with the best fall color while letting the moon phase fall where it may.


When the moon cooperates, the dark skies east of the Sierra are ideal for Milky Way photography
This year’s Eastern Sierra visit was joined by a waxing gibbous moon that was well on its way to full (the day after my scheduled return home). Yet despite the nearly full moon, I longed for a night shoot. So on my first night in Lee Vining I decided to revisit (non-moonbow) moonlight photography for the first time in seven years and drove out to Mono Lake’s South Tufa after dinner. (Shout-out to the Whoa Nellie Deli.)
With my very first click, memories of how enjoyable moonlight photography is came rushing back: Composition and (especially) focus are orders of magnitude easier than with Milky Way photography; there’s no worry about getting lost or tripping over something (or someone); and even with the sky washed out by moonlight, the camera captures many times more stars than my eyes see. None of these insights were actually new, but they still felt like revelations because I’d been doing nothing but dark sky photography for so long.
This might be a good time to mention that for anyone interested getting into night photography, I strongly encourage starting with moonlight. Unlike Milky Way photography, you don’t need fancy gear—just a decent tripod, any mirrorless or DSLR body, full frame or cropped, made in the last 20 years (pretty much since the first digital cameras) will work, and an f/4 lens is plenty fast enough. Read my Photo Tips article on moonlight photography for more detailed instruction on moonlight photography.
One thing that made this Mono Lake night especially nice was the disappearance of the light breeze that had chopped up the reflection at sunset a couple of hours earlier. The lake wasn’t quite mirror-like, but the surface had settled to gentle undulations that smoothed completely in my multi-second exposures, revealing a gauzy reflection that stood out beautifully in each image. And the 82% moon, while not quite full, was more than bright enough to illuminate the water and limestone tufa towers better than any light painting could have.
I started with images of just water and Mono Lake’s iconic “shipwreck” tufa feature beneath the stars, but soon went exploring for a more interesting foreground. When I found the scene in this image, I oriented my Sony 𝛂1 vertically to maximize the sky, and widened my Sony 16-35 f/2.8 GM lens to 16mm to include more foreground than I usually do in a night image.
In almost all of my night images I simply focus on the stars, but this foreground started about 5 feet away and had so much interesting (important) detail, I stopped down to f/8 and focused about 6 feet from my camera to ensure front-to-back sharpness. Using my 𝛂1’s Bright Monitoring feature (I highly recommend to Sony mirrorless shooters who do night photography that they assign it to a custom button), I was able to manually focus through my viewfinder.
To compensate for the light lost to the smaller aperture and less than completely full moon, I bumped my ISO to 3200 and exposed for 20 seconds—less than ideal, but the 𝛂1 handles ISO 3200 easily, and at 16mm there’s not much visible star movement in a 20 second exposure, so I wasn’t worried.
I was only out here for about an hour, but it was such a joyful experience, and I’m so pleased with my results, that I know there’s a lot more moonlight photography in my future.
More Moonlight
Click any image to scroll through the gallery LARGE


Surf’s Up
Posted on October 9, 2022

Surf’s Up, Puna Coast, Hawaii
Sony 𝛂1
Sony 16-35 f/2.8 GM
15 seconds
F/18
ISO 50
To prove that Hawaii Big Island photography isn’t all just magma, Milky Way, and macro, I’m sharing this image from last month’s workshop on my favorite Hawaiian island. With all due respect to Big Sur, the combination of shimmering tide pools and rugged black basalt hammered by violent surf makes Hawaii’s Puna Coast the most beautiful coastline I’ve ever seen. What especially thrills me here is the creative opportunities provided by the ocean’s motion on and around the rocks.
Of the many differences between our world and our camera’s world, few are more obvious than motion. Image stabilization or (better yet) a tripod will reduce or eliminate photographer-induced motion (camera shake), but photographers often make unnecessary compromises to stop motion in their scenes, sacrificing depth of field with a too large aperture, or introducing noise with a high ISO that shortens the shutter speed enough to freeze motion in the scene.
Understanding that it’s impossible in a static photo to duplicate the human experience of motion actually opens creative opportunities. Because a camera records every instant throughout the duration of an image’s capture, photographers who can control their exposure variables have the power to reveal motion in ways that are both visually appealing and completely different from the human experience. Whether it’s a lightning bolt frozen in place, stars streaked into parallel arcs by Earth’s rotation, a vortex of spinning autumn leaves, or violent surf blurred to silky white, your ability to convey the world’s motion with your images is an important skill that’s limited only by your imagination and ability to manage your exposures.
I’ve had a blast freezing lightning bolts with fast shutter speeds, not just for the undeniable thrill of the chase, but also for the opportunity to scrutinize the intricate detail of these explosive, ephemeral phenomena. But on the other end of the motion continuum are long exposures that reveal nature’s movement patterns—movement that’s either too slow for our eyes to register (such as stars or clouds), or too complex to mentally organize into something coherent (like surf).
Silky water images take a lot of flak for being overused and unnatural, but there really are only two ways to capture moving water in a still photo: frozen in place, or blurred. Each has its place, but because the world unfolds to humans like a seamless movie of continuous instants, while a camera accumulates light throughout its exposure to conflate those instants into a single frame, neither is “natural” from the human perspective.
Fortunately, your options for expressing water motion in a still frame aren’t truly binary (frozen or blurred)—they’re a continuum of choices ranging from discrete airborne droplets to blur completely devoid of detail. And there’s a big difference between slight blur that expresses a wave’s movement while retaining its overall size and shape, and extreme blur that purees every detail into a homogenized soup.
For this image from last month’s Hawaii Big Island photo workshop, I wanted to convey both the intensity and the extent of the pounding surf. Not only were the waves exploding on the young basalt, many were surging far onshore.
It was it still quite dark when I pulled my group up to this sunrise spot. Dark isn’t a problem, but the pounding rain was. So we waited in the cars until the rain slowed to something more manageable and the sky had brightened to a dull gray. I gave my group a brief orientation on the location and set them free. Since this was toward the end of the workshop, everyone scattered pretty quickly in search of their own inspiration, and I was left to my own devices.
Along with a couple of others in the group, I made my way down the shoreline a bit, carefully picking my way over the slick volcanic rocks. Stopping occasionally to survey the options, I ended up playing with several compositions before landing on this one. I especially liked the way the large waves climbed the rocks here, then followed a curved channel to a large pool at my feet. The biggest waves replenished the pool, leaving swirling patches of foam in their wake and creating motion that was ideal for a long exposure.
Using my Sony 16-35 f/2.8 GM lens on my Sony 𝛂1 camera, I set up my composition so the channel moved across the scene’s left foreground—at 16mm, I found I could fill the rest of my frame with the wave action lining the receding coastline. I minimized the homogenous gray sky to maximize the far more interesting rocks and wave action below. The final compositional consideration was finding the left/right position that avoided any white surf or spray from leaking out of the frame.
After a little trial and error, I found the composition that worked. But where surf is involved, framing is only half of the composition equation, because each wave completely alters the scene. With help from my Breakthrough 6-stop Dark Polarizer, I tried shutter speeds up to 15 seconds, timing the start of each exposure for different points in the wave. I ended up with 16 versions of this composition that ranged from a completely still foreground pool, to the pool overflowing with frothing white. I chose this image because the motion was in the middle of that range, with foam covering most of the pool, but not so much that it lost all definition.
Though I was set up on a rock ledge a couple of feet above the pool, the largest wave actually reached my elevated perch. After this year’s experience in Iceland, I was extremely careful not to take my eye off the ocean, so I saw this big wave coming all the way. I was actually in the middle of an exposure, but seeing that the wave would lose its power by the time it reached me (fingers crossed), and since I was wearing shorts and sandals, I just held my ground and let it sweep over the rocks and wash up around my ankles. Quite refreshing, actually.
Playing With Motion
Click any image to scroll through the gallery LARGE


, California")


Intimate Beauty
Posted on October 2, 2022

Raindrops, Indian Rhododendron, Lava Tree State Park, Hawaii
Sony α1
Sony 100-400 GM
ISO 400
f/5.6
1/100 second
One of my favorite things about Hawaii’s Big Island is the diversity of the photo opportunities—not just its variety of beautiful subjects, but also the opportunities to apply many different types of nature photography. Between Kilauea, the Milky Way, black sand beaches, rugged coastline, numerous waterfalls, and an entire nursery-worth of exotic flowers, I have no problem employing every lens in my bag on subjects near and far.
For example, while I can’t be much farther from my subject than I was for the Milky Way image in my last post, I can’t be much closer to my subject than I was to this raindrop laden flower in Lava Tree State Park near the Puna Coast. Ironically, to photograph the distant Milky Way, I used an extreme wide lens (Sony 14mm f/1.8 GM) that shrinks everything even more, while this pink Indian rhododendron, though only a few feet away, I photographed using my Sony 100-400 GM lens at 400mm, to get even closer.
Lava Tree State Park is a lush, peaceful 1/2 mile loop liberally decorated with a variety of exotic subjects. Though not necessarily spectacular, the trail’s colorful flowers, dense foliage, and ghostlike lava-encrusted trees, make it a workshop favorite. Better still, my groups are often the only people there.
Lava Tree’s abundant greenery sprinkled with vivid blooms create intimate scenes that I especially love photographing in Hawaii’s (frequent) overcast and rain. This year’s visit came on a very wet morning that had already caused my workshop group to sit in the cars for 30 minutes at our sunrise location, waiting for a downpour to ease (it did).
Lava Tree was the morning’s second stop, and it was obvious the rain that had delayed our sunrise shoot had only recently ended here. Rather than guide the group to a specific spot, I gave an orientation summarizing what to expect and offering suggestions for how to approach it, then set them free to wander (the best way to photograph here). Giving everyone a head-start, I slowly made my way along the trail, checking on each person as I encountered them. At each stop I found every exposed surface festooned with sparkling jewels of rain, creating a seemingly infinite number of compositions.
The pink flower (that I now believe to be a malabar melastome, also known as Indian rhododendron—correct me if I’m wrong) in this image caught my attention for the the way it stood out from its verdant surroundings. When I paused to look closer, I found that positioning myself just right let me frame the flower with a V of delicate fern fronds.
Working with my Sony α1, I went strait to my 100-400 GM and added a 15mm extension tube. Being able to zoom tight and focus close allowed me to eliminate nearby distractions, either banishing them to the world outside my frame, or blurring them until they softened into the background.
For me the world looks a lot different in a telephoto close-up, particularly using when extension tubes shrink my focus distance even more. Unlike larger landscapes, I often don’t have a clear idea of what my composition will look like until I actually see these close scenes in my viewfinder. Every image becomes a process of capture, refine, capture, repeat until I’m satisfied (or give up)—an approach that’s especially important in close-focus photography, when even the slightest shift of composition, focal length, or focus can completely change an image.
It took a handful of frames to land on this composition, but when I did, I knew I’d found something worth working on. Needing to keep track of my group, I didn’t spend as much time at this spot as I ordinarily would have, but I moved on pretty happy with what I had.
One thing I did try before leaving was a horizontal composition, but I didn’t like the way making the composition tight enough to eliminate background distractions (bright spots and dead ferns), also cut off the top of the framing ferns’ graceful arc—a dealbreaker.
Fortunately, just one pink flower in the background saved the day for my vertical composition. Without it, the top half of my frame would have been too empty. By simply including that little splash of color, even though the flower is very soft, was enough balance the frame.
The lesson of this image (and the gallery below, I should add), is that beauty is everywhere if we slow down and take the time to see it. As much as I like this little scene (I do), on this short walk I no doubt walked right past thousands of others that were just as beautiful. Next time…
Selective Focus || Join Me in Hawaii
Intimate Beauty
Click any image to scroll through the gallery LARGE


, California")


Near and Far, Now and Then
Posted on September 25, 2022
 Glow, Milky Way Above Kilauea, Hawaii
Sony a7SIII
Sony 14mm f/1.8 GM
ISO 6400
f/1.8
15 seconds
So what’s happening here? (I thought you’d never ask.)
The orange glow at the bottom of this frame is light from 1,800° F lava bubbling in Halemaʻumaʻu Crater atop Hawaii’s Kilauea, the world’s most active volcano. It’s also a beautiful example of the final act of our planet’s auto-recycling process.
Propelled by the mantle’s inexorable convection engine, Earth’s tectonic plates endlessly jostle about, sometimes sliding past each other, often colliding. When the lighter of the colliding plates is pushed upward, mountains form. While this is happening, the denser plate is forced downward, beneath the uplifting plate, a process called subduction. As the downward force persists, the subjected crust continues downward into the mantle, where intense heat melts the rock until it’s absorbed into the mantle.
Around the globe subduction is constantly, albeit very slowly (on the human scale), adding new material to the mantle. To make room for this new material, magma somewhere else is forced out at weak points in Earth’s crust and volcanoes are born. Sometimes these volcanoes push up above the land in front of the subducting plate—that’s what’s happening in the Cascade Range of the the Pacific Northwest.
A hot spot can also form in the middle of a tectonic plate. For the last 40 million years the Pacific Plate has drifted slowly northwest above a hot spot, leaving a string of 80 or so volcanoes in its wake. Most of these have since eroded away, or never made it to the surface at all. The Hawaiian Islands as the youngest in this island chain, haven’t had time to erode into their eventual oblivion. The Big Island of Hawaii is the youngest of the islands, and the only one still volcanically active, though it’s believed that Maui isn’t completely finished.
Another island, Kamaehuakanaloa Seamount, is building up south of Hawaii and should make its appearance sometime in the next 100,000 years (could be much sooner). But until that happens, we get to enjoy Kilauea—and eventually (inevitably) Mauna Loa (last eruption, 1984), Hualalai (last eruption, 1801), and maybe even Kohala (last eruption, 120,000 years ago) and Mauna Kea (last eruption 4 million years ago) could come back to life.
The vertical white band above the crater represents world building on an entirely different scale. You no doubt recognize it as light cast by billions of stars at the center of our Milky Way galaxy. So dense and distant are the stars in the Milky Way’s core, their individual points are lost to the surrounding glow. The dark patches partially obscuring the Milky Way core’s glow are large swaths of interstellar gas and dust, the leftovers of stellar explosions—and the stuff of future stars. Completing the scene are pinpoint stars in our own neighborhood of the Milky Way, stars close enough that we see them as discrete points of light that humans imagine into mythical shapes: the constellations.
The Milky Way galaxy is home to every single star we see when we look up at night, and 300 billion (-ish) more we can’t see—that’s nearly 50 stars for every man, woman, and child on Earth in our galaxy alone. And recent estimates put the total number of galaxies in the Universe at 2 trillion—a number too large to comprehend.
Our Sun, the central cog in the Solar System, is an insignificant outpost in the Milky Way suburbs. It resides in a spiral arm, a little more than halfway between the urban congestion at the galaxy’s core and the empty wilderness of open space.
Everything we see is made possible by light—light created by the object itself (like the stars and lava), or created elsewhere and reflected (like the planets, or Halemaʻumaʻu’s walls). Light travels incredibly fast, fast enough that it can span even the two most distant points on Earth faster than humans can perceive, fast enough that we consider its arrival from any terrestrial origin instantaneous. But distances in space are so great that we don’t measure them in terrestrial units of distance like miles or kilometers. Instead, we measure interstellar distance by the time it takes a photon of light to travel between two objects: one light-year is the distance light travels in one year—nearly 5.9 trillion miles.
The ramifications of cosmic distances are mind-bending. While the caldera’s proximity makes its glow about as “right now” as anything in our Universe can be—for all intents and purposes, the caldera and its viewers are sharing the same instant in time. On the other hand, the light from the stars above the caldera is tens, hundreds, or thousands of years old—it’s new to me, but to the stars it’s old history.
Imagine Proxima d, a planet orbiting Proxima Centauri, a mere four light-years distant and the star closest to our solar system. If we had a telescope with enough resolving power to see all the way down to Proxima d’s surface, we’d be watching what was happening there four years ago. Likewise, if someone on Proxima d today (2022) were peering at us, they’d be viewing a pre-Covid world and learn that Dunkin’ Donuts was dropping “Donuts” from their name (how did I miss that?). Halemaʻumaʻu Crater, which paused its activity in August 2018, would be black. (Anything you regret doing in the last 4 years? Take heart in the knowledge that everywhere in the Universe outside our Solar System, it hasn’t happened yet.)
So what’s the point of all this mind bending? Perspective, I guess. To me, the best landscape images don’t just tip the “that’s beautiful” scale, they also activate deeper insights into our relationship with the natural world. And few things do that better for me than combining, in one frame, light that’s 25,000 years old with light caused by the formation of Earth’s newest rock.
About this image

Glow, Milky Way Above Kilauea, Hawaii
In 2018, after years of reliable activity, Halemaʻumaʻu Crater went out in a blaze of glory. This renewed vigor included fountaining lava, daily earthquakes, and the complete collapse of the crater as I’d known it.
Even more impactful, lava draining from the summit flowed into the Pacific to create nearly 900 acres of brand new land, on the way overrunning nearly 14 square miles of land and destroying more than 500 homes. The spectacle ended in August, one month before that year’s Big Island workshop.
Kilauea’s current eruption started in September 2021, just two weeks after that year’s workshop ended. Between sporadic eruptions and Covid, I haven’t been able to enjoy one of my favorite sights, the Milky Way above an active Kilauea, since 2017. Needless to say, in the weeks leading up to this year’s trip I kept my fingers crossed that Kilauea would keep going. It didn’t disappoint.
Given the caldera’s collapse and the new eruption, I knew things on Kilauea were completely different from any previous visit. So on my first evening back on the Big Island (I always fly in 3 days before the workshop to check all my locations), I made the 40 minute drive up from Hilo to get my eyes on it.
At the vista that once housed the now closed Jagger Volcano Museum, and that used to be the primary place to view the eruption, I started chatting with a photographer who was set up with a long telephoto, waiting for the full moon to rise. It turned out that she volunteers at Hawaii Volcanoes National Park and does a lot of photography for the park. She very generously provided me with great information that saved me a lot of scouting time, including the best places to view the new eruption, and how to avoid the crowds I’d heard so much about.
Based on her input, after sunset I parked at the Kilauea Visitor Center and took a 1/2 mile walk along the Crater Rim Trail to the point where my new friend had promised the lava would be visible. I chose this spot over the closer view that most people seemed to prefer for a couple of reasons: fewer people (and easier parking), it would be an easier walk for my group (you can only go as far, or as fast, as the slowest person), and (especially) because I thought it would align better with the Milky Way.
To say that I was thrilled with the new view would be an understatement. Though clouds obscured the Milky Way that evening, I was pretty confident the alignment would be fine—not the perfect alignment I got from the spot I’d always used before, but definitely close enough that it would be no problem getting the eruption and Milky Way in the same frame.
The thing that excited me most was that I could actually see the lava. In my 12 years visiting Kilauea, I’ve only been able to see lava at the summit once (check the gallery below)—in the other visits we could clearly see the lava’s beautiful orange glow, but the lava lake was too low to be visible from the rim. But now not only was the lava visible, the perspective was close enough to actually see it bubbling and splattering on the lake’s surface. I hadn’t brought my camera, but I took a quick snap with my iPhone, then walked back to the car in the dark, pretty stoked by what I’d be able to share with my group.
I returned to the volcano the next night to check out more locations, especially interested in my old viewing spot. I was pleasantly surprised to find that I could still see the glow at least as well as I could with the earlier eruption, and that it still aligned perfectly with the Milky Way.
I took my workshop group up to Kilauea on our second night—since it’s a real highlight, I like to do the volcano early in the workshop so we can come back if clouds shut us out. After a few other stops waiting for darkness, we started the short (and easy) hike out to the new lava viewing sight shortly after sunset.
Fog hovering over the caldera obscured the sky at the vista, but no one cared because for most (all?), it was the first time they’d seen lava. Without stars, this was a total telephoto shot—since everyone in the group was shooting mirrorless, we could all magnify our viewfinder and get an up-close, live look at the bubbling lava. It appeared to be bursting from a vent near the caldera wall, like a massive waterfall springing from a mountainside. In addition to the constant rolling and popping on the lake’s surface, every minute or so we could see a much bigger explosion that sent lava careening about the crater—pretty cool for all of us.
I spent most of my time working with people in the group and didn’t photograph too much. Eventually I did manage a few telephoto frames and was pretty happy with how things were going in general—not so much for my images, but mostly because everyone seemed as excited as I’d hoped they’d be.
About the time I was thinking of heading over to my other spot, the fog suddenly thinned and the Milky Way appeared. Everyone immediately switched to wide angle lenses and started working on completely different images. For the next 20 minutes or so we alternated between clicking and waiting as the fog came and went. Again I spent much of that time working with my group, but I managed to get in a few Milky Way frames, including this one.
I’ve got my Milky Way exposure down, and focus for this image was actually easier than most Milky Way scenes because of the brightness in the caldera. Since the Milky Way requires an exposure too long to freeze most motion, all detail in the lava was lost, but I still think it’s pretty cool to know what that glow really is. (Full disclosure: I used Photoshop’s Content Aware Fill tool to fill in a tiny blown-out white patch where the hottest lava was too bright for my night exposure.) The biggest problem I had to deal with is the guy standing next to me (not in my group), who insisted on using a red light (great for telescope or naked eye view, but absolutely the worst light source for night photography). So I had to time my clicks for the times he turned it off, then hope he kept if off until my exposure complete.
Eventually the clouds thickened and showed no sign of leaving. Since everyone was pretty happy with what they had, we packed up and headed back. But it turns out we weren’t done, because by the time we made it backto the cars, the stars were back out—so I took everyone over to my other view. There was no fog at this spot and the Milky Way remained out the entire time we were there. We had another great shoot, despite a crazy wind that hadn’t bothered us at all at our first spot. But that’s a story for another day…
Near and Far
Click any image to scroll through the gallery LARGE


Paradise Found (Again)
Posted on September 18, 2022
Lily Reflection, Hawaii Tropical Botanical Garden, Hawaii
Sony a7RIV
Sony 100-400 GM
ISO 400
f/5.6
1/15 second
On Friday morning I said goodbye to Hawaii until next year. Leaving Hawaii, I always make sure to reserve a seat on the left side of the plane so I can plaster my eyes to the glass on takeoff for a farewell look as we parallel the shoreline. There’s Onomea Bay and the Hawaii Tropical Botanical Garden, Akaka Fall, Umauma Falls, Laupahoehoe Point….
It’s pretty cool, the special connection I feel to these places I only visit once a year. In Hilo, every time I pull my rental car out of the airport and point it toward the Hilo Hawaiian Hotel that will be my home for the next week, it feels like I’m coming home to a place I left just yesterday.
From the Milky Way, to magma, to macro, the Big Island may have the widest variety of quality photography of any place I visit. Throw in rugged black sand beaches, exploding surf, frequent rainbows, and temperatures warm enough to photograph sunrise in flip-flops and shorts, and it’s easy to fantasize about selling my house and moving here fulltime.
I’ve barely scratched the surface of this year’s images. In fact, I was so busy with the workshop that I didn’t even have time to load them onto my computer until my flight home. But I didn’t need to check my captures to know that this year’s trip was pretty special. On my group’s first shoot, we enjoyed a rainbow segment (not a full arc) beautifully positioned above our beach scene, then got another partial rainbow at the next morning’s sunrise shoot. By the time the workshop ended, we’d hit all the other Hawaii highlights I cross my fingers for: Kilauea’s eruption (for the first time since 2017), the Milky Way, rainbows, and perfect light for creative focus photography at each of our rainforest stops.
It’s hard to know where to begin, but since it’s the only image I’ve processed so far, I’ve chosen this little scene from the incomparable Hawaii Tropical Botanical Garden. This year I used every lens in my bag there, but with soft, overcast light (that turned to a warm downpour just as we were leaving), I spent most of my time photographing flowers and leaves with my Sony 100-400.
One of the points I try to impress on my workshop students is that, whether near or far, a landscape image isn’t just a click, it’s an iterative process that starts with an idea—a plan for the best way to organize and emphasize the scene’s significant elements, then improves with each subsequent click. The first click is like a writer’s rough draft, and subsequent clicks are revisions on the way to perfection. After each click, the photographer should stand back and evaluate the image on the LCD (I love the large, bright viewfinders and LCDs on today’s mirrorless cameras), refine (exposure, composition, depth of field, focus point), then click again. Repeat as necessary.
This approach is particularly valuable in macro and close-focus images of intimate scenes where even the slightest adjustment to composition, depth of field, and focus point can dramatically alter the result. It’s a prime reason I’m such a strong tripod advocate (evangelist)—when I’m done evaluating, the shot I just evaluated is sitting right there on my tripod, waiting for me to apply whatever adjustments I deem necessary.
Whether it’s fall color or colorful flowers, I try to find a subject to isolate from the rest of the scene. This afternoon at the botanical garden I was drawn to floating lilies and their reflection, and ended up working this one little scene for at least 30 minutes.
Starting with my Sony 100-400 GM lens on my Sony a7RIV, I added a 25mm extension tube so I could focus closer. A neutral polarizer reduced the floating leaves’ waxy sheen, which helped emphasize their deep green. Of course this also reduced the flowers’ reflection, but I found that they were bright enough to still stand out against the darkened water. Exposure was pretty straightforward in the shadowless light. Though the air was fairly still, I used ISO 400 to ensure a shutter speed fast enough to control for slight undulations on the pond’s surface.
At 250mm and f/5.6 (wide open for the 100-400 GM), I shot through foliage lining the shore between me and the flowers. The extremely narrow depth of field allowed me to use this nearby foliage to frame my subjects with soft shades of green. After two or three click/evaluate/refine cycles, I had the framework of my composition in place.
Following a few minutes of shooting that saw me try a variety of f-stops, horizontal/vertical framing variations, and a range of polarizer orientations (minimum to maximum reflection, as well as points in between), I shifted about four feet to my right, to a spot that I thought provided even better foliage framing.
I played with this new composition even longer, running all the variations I’d tried at the previous spot, and adding some focal length changes as well. One thing that became especially obvious the longer I worked the scene was how much the polarizer helped me achieve the effect I was going for. Eliminating the reflection darkened the water to the point that the lilies appear to be floating on air. When I dialed up the reflection with my polarizer to brighten the flower reflection, I lost the contrast between the water and reflection, which made the flowers less prominent—the exact opposite of my objective.
With all my composition variations, I ended up with enough choices that I’ll probably find one or two more versions to process, but this version of the simple composition that first drew me seemed like a good place to start. And while I know these intimate images don’t generate the attention that the more in-your-face images do, photographing and viewing them makes me really happy, and that’s all that matters.
Workshop Schedule || Purchase Prints || Instagram
A Creative Selective Focus Gallery


Creative Juices
Posted on September 4, 2022

Infinity, Lake Wanaka, New Zealand (June 2019)
Sony a7RIII
Sony 16-35 f/2.8 GM
30 seconds
F/8
ISO 100
One of my favorite summer treats is the smoothie I whip up for lunch on hot days. I grab whatever fruit is available, toss it in my Vitamix with a little macadamia milk and ice, and let it rip. Each smoothie tastes different, but it’s always delicious.
Why am I sharing food prep tips in a photo blog? Because I can think of no better analogy for the Sony Kando event I experienced this week in Sun Valley, Idaho. Though Kando is truly indescribable, I’ll attempt the impossible and explain that it’s Sony’s gift to the creative photographers and videographers who share their love for Sony products with the world (that’s my definition, not Sony’s). Each year Sony takes a couple hundred of these Creatives, tosses them together at Kando, mixes in a variety of creative, social, and educational opportunities (and food!), and presses Blend. The result is a concoction that’s distinctly different from anything that preceded it, but always delicious. Just like my smoothies.
Kando is a Japanese word without a perfect English equivalent, but as near as I can tell it is the feeling of intense pleasure and excitement that happens when we encounter something truly exceptional. I’ve attended each of the four in-person Kando gatherings—Kando 1.0, just north of Santa Barbara; 2.0 at Asilomar near Carmel; 3.0 in Bend, Oregon; and this year’s 4.0 in Sun Valley, Idaho—enough to know that the event is aptly named. There are fundamental similarities between each one: the multi-day structure, the positive energy, and it is populated by many of the same people (blended each year with a liberal sprinkling of new faces)—yet somehow each event feels different in its own stimulating way.
Creativity is always on display at Kando, but this year I think the creativity was on steroids. The mix of Sony Creatives, as always, included a cadre of established photographers/videographers with a massive body of work (many of whom you’d recognize by name, or if not by name, by their work), infused with a liberal dose of young social media “influencers” with 6- and 7-digit followers. Still-photography, video, and even audio were well represented.
Some of the Creatives taught classes or participated in panels discussing their creative process and insights, and everyone shared by example. We were all encouraged to shoot and share throughout the week, with opportunities ranging from models, action, elaborate sets, and field trips available both day and night. At any given instant, it seemed half the Creatives would be creating, and the other half was watching. And I can’t begin to express how much fun it is to watch creative people do their thing.
For me Kando’s greatest lesson is the reminder that creative opportunities are infinite, and we’re limited only by our ability to see them. To say I was in awe of the creativity surrounding me would be an understatement. But I don’t think there was a single person present who wasn’t in awe of the creativity surrounding all of us.
So, fresh off my Kando week with my creative juices still flowing, I’m reaching into the archives for and image from one of my most memorable shoots in recent years. I chose this image for several reasons: in the context of creativity, there’s my recent post about finding unique takes on this solitary tree; then there’s my recent post about fog; and (especially) because a couple of weeks ago I discovered that, for some reason I’m unable to explain, and despite having shared this image many times since its capture in 2019, I’ve never written about it or the shoot—a blatant violation of my personal rule to never share an image without writing something on its capture and/or inspiration.
And in the spirit of full disclosure, my original Wanaka Tree Fog image had some minor flaws that (though not necessarily visible to anyone else) always bugged me, so I reprocessed it. And when I went back to the original raw file, I found another frame captured just a minute or so later that was compositionally very similar, but just a little cleaner to my eye.

Red Sunset, Lake Wanaka, New Zealand
This was the first of two New Zealand winter workshops Don Smith and I did in June 2019. The prior evening our group had enjoyed what was probably the best sunset we’ve ever had in New Zealand. We went to bed basking in the glory of that shoot, and woke to dense fog that obscured everything beyond 100 yards.
Since this was a sunrise, and the tree was easy walking distance from our hotel, we’d instructed the group to meet us out there 40 minutes before sunrise. Walking out in the dark, Don and I ran into one workshop participant who told us it was too foggy and he was going back to bed. We tried to convince him that the fog created a spectacular opportunity for something unique, but his mind was made up. At the tree, a couple of others in the group were already shooting, and a few more joined us soon, but I can’t remember whether anyone else was turned away by the fog.
Despite the darkness, it was obvious that something special was happening and I started shooting as soon as I could get set up. To give you an idea of how dark it was when we started, today’s image is a 30-second exposure at f/8 and ISO 100.
As special as the scene was, given its static nature, my biggest concern was finding a sufficient variety of unique takes. The conditions pretty much wiped out the go-to creative tools I use to vary a composition: the air and water was completely still, removing motion as a tool; the lack of any background and my distance from the tree eliminated any depth-of-field opportunities; though the morning brightened slowly, the light was completely uniform and shadowless; and the fog completely obliterated the visibility beyond 100 yards, so it did little good to move around to juxtapose the tree against different backgrounds.
Looking the images in Lightroom’s grid view, I count 38 frames over a 40 minute span this morning. And while I have very little specific memory of most of them, just looking at this history I can see what my mindset was.
The first two frames I captured in rapid fire (well, as rapid as 30-second exposures can be) the instant I hit the lakeshore. I remember being so excited by what was in front of me, I just shot to make sure I had something in case the fog lifted.
The next set of frames, and the bulk of my images from this morning, started about 3 minutes later. I know after comparing the tree in the two sets, that I realized the angle at the first spot was poor and the tree was noticeably compressed. To fix this, I moved along the lakeshore until I had the best possible angle on the tree’s distinctive low, sweeping branch (now gone).
Once I was here and confident that I’d captured something nice, I slowed down and started really working the scene. Each of the 36 images I captured after moving into the better position was distinct from the rest of the images (no duplicates). Of this 36, 20 were horizontal and 16 were vertical. I also varied my focal length and framing, sometimes going wider, other times tighter.
In nearly every frame, the tree is centered on the horizontal axis, and sometimes on the vertical axis too (smack-dab in the middle of the frame). This was because there wasn’t really anything to balance the frame horizontally if I put the tree off-center. But just to cover myself, toward the end I did take a couple of horizontal frames with the tree left and right of center.
I had the most fun playing with my polarizer, emphasizing the reflection in some frames, and revealing the submerged foreground rocks in others. As you can see, I went with one with the rocks visible, but revisiting the images now, I can see others I’d like to process, including one that’s all reflection and no rocks.
Circling back to Kando and this whole creativity thing, I feel like my creativity pales in comparison to some of what I saw last week. But I also know that my own creative process that I tried to share a small part of here, is very personal, and that it serves my objective to share Nature’s beauty and (I hope) inspire others to appreciate Nature as much as I do. But whatever gets your creative juices flowing, I can tell you absolutely that being around other creative people is good for the soul and a great place to start.
The Shot Less Taken
Click an image to scroll through the images LARGE


, California")
My Favorite Things
Posted on August 28, 2022

Sunset Triple Lightning, Hopi Point, Grand Canyon
Sony a7RIV
Sony 24-105 G
1/4 second
F/11
ISO 320
Maria von Trapp had them, you have them, I have them. They’re the favorite places, moments, and subjects that provide comfort or coax a smile no matter what life has dealt. Not only do these “favorite things” improve our mood, they’re the muse that drives our best photography. Sometimes they even inspire dreams about making a living in photography.
But sadly, turning a passion into a profession often comes at the expense of pleasure because suddenly earning money is the priority. When I decided to make photography my livelihood, it was only after observing other very good (formerly) amateur photographers who, lulled by the ease of digital photography, failed to anticipate that running a photography business requires far more than taking good pictures. Rather than an opportunity for further immersion in their passion, their new profession forced them to photograph not for joy, but to pay the mortgage and put food on the table. And with the constant need for marketing, networking, bookkeeping, collections, taxes, and just plain keeping customers happy, these newly minted photographers soon found that precious time remained for the very thing that led them to become photographers in the first place.
Nearly 20 years ago (yikes), armed with these observations I changed from photographer to Photographer. After seeing what this change had done to others, my transition was founded on a vow to photograph only my favorite things.
It shouldn’t take much time in my galleries to figure out where I find my photographic joy. I could point to locations like Yosemite, Grand Canyon, and New Zealand, but even more important to me than locations are the natural phenomena that fascinate me. Whether celestial or terrestrial, I find myself inexorably drawn to the natural processes that created and affect the world we share.
The why of this starts with growing up in a family that camped for our vacations—I just have lots of great memories of nature. But the other significant factor behind my favorite photographic subjects comes from a fascination with the physical sciences that started in my single-digit years with an interest in comets, and quickly grew to include pretty much anything in the night sky. But even then I wasn’t satisfied with simply looking at the night sky, I wanted to understand what was going on up there. And with that came a realization that Earth is actually part of the cosmos, and soon I was reading about geology and meteorology and pretty much any other ology that had to do with my place in the Universe.
All of this came before I ever picked up a camera. But it might explain why I feel so strongly actually understanding the things I photograph—if they give me join, they’re worth knowing. Whether it’s lightning, reflections, the Milky Way, rainbows, a beautiful location, or whatever, I’ve reached the point where I simply won’t post an image of something I don’t understand.
And because I enjoy writing as much as I enjoy photography, you may have noticed that I also virtually never share an image without writing something about it. I know a lot of people just follow my blog to see my images, and that’s totally fine. But these really are my favorite things in the world, and I truly appreciate that you’ve taken the time to view, and (especially) to read this far.
Keeping in that spirit, here’s a little information about lightning, excerpted from my Lightning Photo Tips article:
A lightning bolt is an atmospheric manifestation of the truism that opposites attract. In nature, we get a spark when two oppositely charged objects come in close proximity. For example, when you get shocked touching a doorknob, on a very small scale, you’ve been struck by lightning.
In a thunderstorm, the up/down flow of atmospheric convection creates turbulence that knocks together airborne water (both raindrops and ice) molecules, stripping their (negatively charged) electrons. Lighter, positively charged molecules are carried upward in the convection’s updrafts, while the heavier negatively charged molecules remain near the bottom of the cloud. Soon the cloud is electrically polarized, with more positively charged molecules at the top than at the base.
Nature really, really wants to correct this imbalance, and always takes the easiest path—if the easiest path to electrical equilibrium is between the cloud top and cloud bottom, we get intracloud lightning; if it’s between two different clouds, we get intercloud lightning. And the less frequent cloud-to-ground strikes occur when the easiest path to equilibrium is between the cloud and ground.
With lightning comes thunder, the sound of air expanding explosively when heated by a 50,000-degree jolt of electricity. Thunder travels at the speed of sound, a pedestrian 750 miles per hour, while lightning’s flash zips along at the speed of light, more than 186,000 miles per second—nearly a million times faster than sound.
Knowing that the thunder occurred at the same instant as the lightning flash, and the speed both travel, we can calculate the approximate distance of the lightning strike. While we see the lightning pretty much instantaneously, regardless of its distance, thunder takes about five seconds to cover a mile. So dividing by 5 the number of seconds between the instant of the lightning’s flash and the arrival of the thunder’s crash gives you the lightning’s approximate distance in miles (divide by three for kilometers).
But anyway…
About this image
As a lifelong Californian, lightning was just something to read about, and maybe see in movies, but rarely viewed in person. And photographing it? Out of the question.
That changed in 2012 when Don Smith and I traveled to the Grand Canyon with our brand new Lightning Triggers and absolutely no clue how to photograph lightning. We returned with enough success to be completely hooked on lightning photography, and a plan to offer Grand Canyon photo workshops focused on the Grand Canyon monsoon and (fingers crossed) lightning. After a few years Don cut back on his schedule and dropped most of his domestic workshops (we still partner for New Zealand and Iceland workshops), but I’ve continued with the Grand Canyon Monsoon workshops. This year I did two Grand Canyon Monsoon workshops, the second of which was probably my most memorable lightning workshop so far—if not for the quantity of the lightning (very good but not record breaking), certainly for the quality.
The image I’m sharing today came on that workshop’s penultimate evening, and came the day after a similarly spectacular lightning show at Cape Royal (I blogged about it two weeks ago). At Cape Royal I commented that this was one of the top five lightning shoots I’ve ever had. Little did I know…
The following night we rode the shuttle out Hermit’s Rest Road, stopping first at the very underrated Pima Point. After spending nearly an hour at Pima, pointing at a potential cell that only teased us, we packed up and headed to Hopi Point for sunset. There really wasn’t much going on when we got there, but the clouds were nice and the sky looked promising for a good sunset.
As sunset approached, what may have been the remnants of the cell that had disappointed us at Pima Point seemed to regroup and start moving from left to right across our scene and toward the canyon. The first reaction to this development was, “No big deal” (fool me once, …). But just one relatively weak bolt was enough to send us all scrambling for our Lightning Triggers. Everything after that is pretty much a blur because as the storm slowly advanced, some unseen force turned the lightning up to 11—both its frequency and intensity.
In my July 31 post I shared an image of a rogue Hopi Point lightning bolt that was somehow perfectly placed above the canyon right at sunset. As the only lightning we saw all evening, this one felt like a gift from heaven. This evening’s lightning was similarly positioned, but much bigger, and I lost track of the number of bolts we saw: double strikes, triple strikes, serpentine strikes—pretty much a lightning photographer’s entire wish list all in one show.
Hopi Point access is by shuttle-only, which means if we miss the last shuttle we’re walking more than 2 miles back in the dark. The lightning was still going strong when we hopped onto the final shuttle in growing darkness, but given what we all knew we had, no one was too disappointed.
Here are a couple of images from Cape Royal the night before this image


And here are the two more images from this night’s shoot at Hopi Point


I realize that I get far more excited about lightning than the average person. And I’m truly sorry for sharing so many lightning images, but you’ll just have to understand that not only is lightning a novelty for me, and (please) recognize my good fortune for being able to make my living photographing nothing but my favorite things.
These Are A Few Of My Favorite Things
Click an image for a closer look, and to view a slide show.


")
In a Fog
Posted on August 21, 2022

Morning Glory, Point Imperial Sunstar, Grand Canyon
Sony 𝛂1
Sony 24-105 G
.6 seconds
F/20
ISO 100
Born and raised in California, my relationship with fog is both long and complex. I spent the first 12 years of my life in the San Joaquin Valley, where winter “tule fog” could be so thick that sometimes drivers could only navigate by opening the door and hanging their head out to follow the yellow line. Accidents involving dozens of cars were common. In elementary school (we called it grammar school back then), my classmates and I celebrated the “fog days” when school was cancelled because the visibility was too poor for the school buses to safely navigate their routes. On the foggy days school wasn’t cancelled, a favorite recess activity was to venture far enough onto the playground for the school to disappear, spin a few times to erase all sense of direction, then try to find our way back to school before the bell rang. And at least once I actually got lost walking to school in a dense fog.
When we moved to Berkeley the summer before I started middle school (a.k.a., junior high), my relationship with fog changed. No longer a winter phenomenon, fog in Berkeley blew in through the Golden Gate on summer afternoons, turning a shorts and T-shirt lunchtime into a long pants and sweater dinnertime. Most summer days required multiple wardrobe changes.
Playing baseball at Skyline College (San Bruno) and San Francisco State University, I realized that Bay Area fog provided a true home field advantage. I have very vivid memories of sitting in the dugout or bullpen, toasty-warm in my insulated warm-up jacket, and watching our opponent, who had arrived dressed for the comfortable warmth of pretty much any other California location, huddled against the wind and fog in the visitors’ dugout—and, I suspect, contemplating rubbing bats together to start a fire (yes, all baseball bats used to be made of wood, even in college).
Photographing Yosemite in my adult years, I quickly grew to appreciate the fog that hovers on the floor Yosemite Valley on chilly, still mornings. And to many, the shape-shifting fog that wraps Yosemite Valley as a storm clears is the Holy Grail of Yosemite photography.
Though fog comes in many forms, it can be a simple matter of perspective: to the viewer at sea level, a missing mountain peak has been swallowed by clouds; the mountain climber on the summit, however, thinks she’s ascended into a fog bank. Both are right. And while many processes are at play, the bottom line is that fog (and clouds) will form when the temperature of moist air drops to its saturation point.
Despite (or maybe because of) my lifelong relationship with fog, I’m afraid I’ve taken it for granted. This fact became pretty clear one morning at the Grand Canyon earlier this month. On a trip where lightning was the undeniable goal, the most memorable shoot of the first workshop was a foggy sunrise at Point Imperial. To say this wasn’t on my radar would be an understatement.
At 8900 feet above sea level, Point Imperial is the highest vista in Grand Canyon National Park. This extreme elevation provides a top-of-the-world view to the north, east, and south to a who’s who of Northern Arizona landmarks: the Vermillion Cliffs, the Painted Desert, Marble Canyon, and the confluence of the Colorado and Little Colorado Rivers (you can’t see the rivers themselves, but you can see the intersection of their canyons). And as if weren’t enough, Point Imperial’s foreground landscape is dotted with an assortment of prominent mesas, buttes, and other rocky outcrops. My favorite view here is facing east and south, where a natural bowl filled with layered sedimentary prominences is anchored by nearby Mt. Hayden, a towering spire that dominates the view.
Sunrise was still more than 30 minutes away when I guided my first workshop group into the parking lot at Point Imperial. Below us, a few wisps of fog dotted the bowl, but offered no hint of what was in store. With several spots to set up here, in the darkness I was more focused on making sure my group was situated than I was on the scene, but when I looked back toward the view it was pretty clear that the fog was spreading and rising. With everyone in place, I raced back to the car and grabbed my camera bag.
For the next hour or more, we watched (and photographed!) the rocky features become islands in the clouds, submerge completely, then gradually reappear. A couple of times the fog rose enough to completely engulf us and erase the view. The first time this happened, the group was ready to pack up and return to the cabins with the morning’s (already thrilling) spoils, but remembering similar fog formation experiences in Yosemite, I suggested that there’s a good chance the fog will retreat as quickly as it advanced, and that we might be able to photograph everything we just witnessed, only in reverse. Sure enough, within five minutes the rocky island reemerged, and soon the entire view was back. And just when it looked like the show might be over, here came the fog again.
Because my group gets a little spread out at Point Imperial, I wasn’t able to take as many pictures as I otherwise would have, but here are three of the morning’s highlights I did manage to capture (with brief descriptions below).
One Foggy Morning at Point Imperial (July 28, 2022)


Before rising into a cloud layer that covered most of the sky, the sun slipped through a small opening on the horizon long enough to fringe the billowing fog with golden light just as I’d set up for a sunstar. And the sun wasn’t quite done. I’ve always been a fan of the way the rising sun illuminates Mt. Hayden and the surrounding rocks with warm light, but when I glanced in that direction, I saw no direct sunlight on the rocks. I did, much to my surprise, see a small fragment of rainbow that served as a perfect accent to the foggy scene in that direction. The third image came toward the end of the shoot, shortly after the final wave of fog had started to retreat. The rocky spire peaking through the fog in the foreground is Mt. Hayden.
Lots More Fog
Click an image for a closer look, and to view a slide show.


Beam Me Up
Posted on August 7, 2022

Evening Glory, Desert View, Grand Canyon
Sony a7RIV
Sony 24-105 G
1/100 second
F/20
ISO 100
I won’t lie: The primary reason I go to the Grand Canyon in monsoon season—and for that matter, the primary reason most people sign up for my Grand Canyon monsoon workshops—is to photograph lightning. But as we all know, lightning is a fickle phenomenon, even during the Grand Canyon’s usually electric monsoon season. Because lightning is never guaranteed, I always do my very best to moderate my own expectations, and to let people who sign up for a workshop know I can’t promise it. But still…
Fortunately, the Grand Canyon in any season is pretty spectacular, and especially so during the monsoon. The carved sediment’s enduring beauty, combined with billowing cumulus clouds that turn some shade of pink, red, and/or orange at sunrise/sunset, and sometimes (fingers crossed) deliver vivid rainbows, makes the Grand Canyon summer monsoon my favorite time to be on the rim, even without lightning. But still…
The forecast the for the final day of this year’s second (and final) workshop was “Sunny,” the first such forecast I’d seen in my nearly two weeks at the Grand Canyon. But I’ve learned that a monsoon “Sunny” forecast just means fewer clouds, and rarely no clouds. And you never know—even with no rain or clouds in the forecast, I made sure everyone in the group packed a Lightning Trigger because I can share multiple stories of similar Grand Canyon forecasts that nevertheless resulted in lighting. Alas…
If you were expecting one of those plot-twist happy endings, you’ll be disappointed. Because as you might infer from this image, we did not get any lightning this evening. But as you can also see, we had no reason to be disappointed.
After a short stop at Moran Point, the group and I spent the rest of that afternoon and evening photographing my three favorite Grand Canyon vistas, first at Lipan and Navajo Points, before setting up for our final sunset at Desert View.
All three of these views stand out for their view of the Colorado River’s 90 degree detour from a north/south trending river to an east/west trending river. Standing on the rim at any of these vistas offers expansive views north, upstream and into Marble Canyon, and west, downstream toward what’s arguably Grand Canyon’s most iconic stretch. I can’t think of any other rim view that offers bigger, better views of the canyon than these east-most South Rim vistas. (But Hopi Point is close.)
Despite lowered expectations, we departed this afternoon hoping for lightning (which, I should add, given the two sunset lightning shoots that preceded this sunset, was downright greedy). Instead we found the canyon walls bathed in warm light shafting through scattered clouds hang above the western horizon. Not lightning, but too shabby either.
Even before the light started to warm, I decided that the best show this evening would be to the west, featuring the canyon’s receding ridges below the setting sun. And with a slight haze hanging in the canyon, what excited me most was the potential for sunbeams streaming through openings in the clouds and gaps in the ridges.
I digress
This might be a good time to explain the difference between some popular but different phenomena popular among landscape photographers: sunstars (or sunbursts, starbursts, and probably some other labels I’ve missed), sunbeams, and crepuscular rays.
- Sunstars are diffraction spikes that are created in the lens when sunlight is bent by the slight change of direction at the intersection of the lens iris’s blades (that comprise the aperture). They’re a photographic phenomenon, visible in the viewfinder and resulting image, but not to the unaided eye.
- Sunbeams are atmospheric phenomena caused when sunlight passes through openings in clouds or landscape features like tree branches or mountain peaks. They’re visible to the unaided and most prominent when the atmosphere is filled with water or dust particles that scatters the sunlight.
- Crepuscular rays are sunbeams that happen at twilight, only when the sun is below the horizon and its light passes through clouds, mountain peaks, or some other unseen obstruction beneath the horizon. As a subset of sunbeams, crepuscular rays are also atmospheric phenomena visible to the unaided eye, and benefit from airborne dust or water vapor.
So anyway…
Expectations reset, I shifted to the dual potential for both a large sun and sunbeams, and prepared accordingly: already on my Sony a7RIV was my Sony 24-105 f/4 G lens; to my Sony 𝛂1 I added my Sony 100-400 GM lens and Sony 2X Teleconverter. I started shooting as soon as the sunbeams appeared, using the wider setup to capture as much canyon and shafting light. Early on I occasionally switched to the telephoto; once the sun dropped below (most of) the clouds and the sunbeams faded, I finished up entirely with the telephoto combination.
The trick to exposing a scene like this with one click (always my goal) is to make sure I don’t blow out (overexpose) the highlights. While I had no expectation of capturing detail or color in the sun (it was too bright to prevent from blowing out), I knew the surrounding clouds and sky had the potential to turn a rich yellow-gold before the sun dropped below the horizon. Saving the sky color would mean underexposing the canyon, but closely monitoring my histogram enabled me to capture just enough foreground light to retain the outline of the ridges shrinking in the distance, at the same time preventing that great sky color from washing out.
The result is this image, with a sky that’s remarkably close to what I saw and a foreground that’s much darker than my eyes saw. Since this image is all about the sky and sunbeams, letting the canyon go dark (-ish) aided that emphasis. Even though the canyon looked nearly black on my camera’s image-review screen, a moderate Lightroom Shadow-slider increase confirmed later that the dark foreground contained exactly the amount of detail I wanted. Score another win for the histogram. (And if you’re wondering why I used f/20, it’s because I’d set up for a possible sunstar and forgot to switch back to the f/11 I usually default to.)
One more thing
Lest you feel sorry for my second workshop group for not getting lightning, let me reassure you that this group did not lack for quality lightning. At Cape Royal two nights before this, we witnessed what I instantly called one of the top-5 lightning shoots of my life. Then at Hopi Point the next night, we witnessed a lightning display that arguably topped it. I have so many excellent lightning images from these two shoots that I haven’t had time to go through them and decide which ones to process. And since I shared a lightning image (from the first workshop) last week, I figured I’d share something that’s not lightning. But rest assured, I’ll be sharing more lightning soon. Lots more.
Grand Canyon Photo Workshops
More Monsoon Magic
Click an image for a closer look, and to view a slide show.


Wait for it…
Posted on July 31, 2022

Electric Sunset, Hopi Point Lightning, Grand Canyon
Sony 𝛂1
Sony 24-105 G
.4 seconds
F/16
ISO 200
Landscape photographers have a couple of ways to make nice images. By far the most important is the ability to see the special but less obvious, then know how to compose and expose that special vision in ways that clarify and convey the previously unseen beauty. But sometimes we just need to know when to show up and where to point the camera, and the patience to wait for the special to come to us.
Pretty much any sunrise or sunset at a nice location qualifies for the show up and wait approach, as can popular classics such as Yosemite’s Horsetail Fall in February, or the midday shaft of light in Upper Antelope Canyon’s main room. But whether it’s a planned sunset that went even better than hoped, or a rainbow that seemed to materialize out of nowhere, in their own way these gifts from Nature that don’t require great vision are just as thrilling as the hidden discoveries we work so hard for.
-

- Horsetail Fall and El Capitan, Four Mile Trail, Yosemite
-
- Heavenly Beam, Upper Antelope Canyon, Arizona
Lightning photography requires a lot of the show up and wait approach, because all the compositional skill in the world can’t make a great lightning image if the lightning doesn’t happen. I can’t tell you how many times I’ve been photographing lightning and seen a beautiful composition—some perfect combination of landscape and conditions—in a different direction, and said to myself, “Wow, wouldn’t it be great if the lightning fired right there.” Unfortunately, lightning is a fickle phenomenon that rarely does what photographers want it to do. In fact, it sometimes feels like the lightning is consciously avoiding the composition I want, always in favor of something much less interesting. Sigh…
Right now I’m at Grand Canyon, trying to take advantage of its expansive vistas that frequently provide views of multiple rain cells with lightning potential. While the vast majority of these potential lightning sources never deliver, my original approach to photographing them was to maximize my chances by identifying and targeting the cell with the most potential, without concern for the composition. An alternate approach to photographing lightning is to target the rain cell with the nicest composition, regardless of the strength of its potential—then hope.
Because I’ve learned that lightning neophytes are usually thrilled to capture any lightning, I generally encourage my workshop students, most of whom have never captured great (or any) lightning images, to favor success over the best composition by simply pointing in whatever direction the lightning is most likely to fire.
I’ll never forget the first time I traveled to the Grand Canyon with the sole desire to photograph lightning, and those first few fruitless days on the rim, pointing my camera toward a promising cell only to see it fizzle. I’d have given anything to have just one frame with lightning, composition be damned. And I also never forget the thrill the first time my camera captured lightning.
Ten years later, I’ve reached the point in my lightning photography where I’ve had enough successful captures that I can afford to be a little more selective. In recent years I frequently find myself pointing at the potential lightning spot that has the composition I like most, shunning the one that appears most likely to produce lightning. It’s often a recipe for failure, but the infrequent successes more than compensate.
I got my most recent dose of compensation last Wednesday evening, in this year’s first (of two) Grand Canyon monsoon photo workshops. My group had already enjoyed several lightning shoots from various locations on the South Rim, but nothing spectacular so far. For sunset Wednesday evening, we took the shuttle out Hermit’s Rest Road (no cars allowed). There are many vistas on this route, so I gave my group enough time to visit as many stops as the wanted to, with the understanding that we’d all gather back at Hopi Point to shoot sunset together there.
Soon after arriving at Hopi Point about 45 minutes before sunset, I checked my My Lightning Tracker app and saw that all of the activity was at least 50 miles away and didn’t really align with anything interesting. While the view at Hopi Point is one of my favorites, I’ve photographed here so much that now I only bring out my camera when there’s potential for something spectacular—either lightning, or great color and/or clouds. So my camera stayed in the bag.
With almost 100 percent cloud cover, my decision seemed reasonable, but as the sun dropped, a small opening appeared on the western horizon, directly in the sun’s path. “Hmmmm,” I said, inching toward my bag. I looked again. A sky filled with clouds and a hole on the horizon is the ideal combination for a colorful sunset, so I pulled out my Sony α1, already loaded with my Sony 24-105 G lens, and set up shop along the rail to wait with the rest of my group.
As we chatted, it became pretty clear that the opening would persist through sunset, and that something nice was in store. A few minutes later, when a small rain curtain spread just to the right of the sun’s path, I said out loud, “All this scene needs is a lightning bolt.” I was half joking, but this thought prompted me to check my lightning app one more time. Still nothing really exciting, but there were hints of distant, minor lightning activity in the general direction of the sunset, so I pulled out my Lightning Trigger—just in case. I encouraged the rest of the group to get theirs out too, then quickly scanned the horizon for other rain curtains with potential for lightning—I saw a couple that might produce, but nothing promising enough to justify anyone diverting from the sunset.
Then we waited and clicked as the sun dropped and started to light the sky. It turned out that the opening wasn’t as open as we’d hoped, so not enough sunlight made it through to color the entire sky, and we never actually even saw the sun. But all was not lost, as the clouds near the horizon throbbed a brilliant reddish orange and I could tell by all the clicking that everyone was pretty thrilled.
When a few higher clouds lit, I oriented my camera vertically and angled farther upward for more sky than I usually include here (Pro tip: the Grand Canyon is usually more interesting than the sky.) Already pretty content with what I had so far, imagine my surprise when, just as the color reached its crescendo, a streak of light darted from the clouds and kissed the horizon. My first reaction was that it came from higher in the sky than I’d have expected, but it happened so fast and unexpectedly that I really wasn’t sure what I’d seen. In fact, if the rest of the group hadn’t exclaimed in unison, I might not have believed I’d seen it at all.
The unified exclamation quickly turned to joyful laughter from those who had taken the time to attach their Lightning Triggers, and regretful moans from those who hadn’t. When a couple of people defied my recommendation to not check to see if they’d captured the bolt (you have to turn off the Trigger to review images, and often lightning’s not as visible on the review screen as it is on a computer) and reported success, I couldn’t resist and checked mine too.
There it was. I instantly saw why it had appeared to originate so much higher: the bolt had emerged high, slid across the front of the thunderhead, and weaved through a window in the clouds before disappearing and emerging one last time. And perfectly aligned with the Colorado River, it couldn’t have struck in a more ideal place if I’d have drawn it in myself.
I’ll admit that this image isn’t a creative masterpiece (the composition isn’t much different from several of my other Hopi Point images), but I will take a little credit for being there, and also for the foresight to be ready for lightning when its possibility wasn’t obvious. And honestly, it was simply an honor to be there for something so magnificent—my only job was to wait, and not screw it up.
My Lightning Gallery || My Lightning Photo Tips Article
Worth Waiting For
Click an image for a closer look, and to view a slide show.


