Eloquent Images by Gary Hart
Insight, information, and inspiration for the inquisitive nature photographer
Twin Peaks
Posted on March 7, 2025

Blue Hour Reflection, Vestrahorn, Iceland
Sony a7R V
Sony 12-24 GM
1/6 second
F/10
ISO 125
In the canon of iconic Iceland mountains, Vestrahorn is rivaled only by Kirkjufell, the much-photographed wizard-hat on Snaefellsnes Peninsula. While Kirkjufell’s acclaim is much deserved, as a photographer, one thing in particular that distinguishes Vestrahorn from Kirkjufell for me is its variety of compositional options.

Winter Chill, Kirkjufell and Kirkjufellsfoss, Iceland
Kirkjufell is arguably Iceland’s most visually striking mountain, but the vantage points from which to photograph its distinctive outline are for the most part limited to the trail that starts at the parking lot, climbs briefly to a small bridge, then circles down a short but steep slope. I’ve never been there in summer, but in winter it’s pretty difficult to venture anywhere off this trail.
I can’t discount the fact that Kirkjufell also comes with its very own foreground waterfall, but Vestrahorn (despite lacking a waterfall of its own) has acres and acres of diverse terrain for a creative (and mobile) photographer to explore. So expansive and varied is the surrounding terrain, I’ve been coming here since 2019 and am still finding completely new foregrounds to add to my Vestrahorn images.
Exploring for new foregrounds is probably my favorite part of photographing popular subjects. The first two or three years I visited Vestrahorn, I’d do most of my photography at the beach, where the barely sloping sand stretches far into the distant surf, and the area separating the beach from open ocean is (I estimate) at least a half mile—distant enough that the swells (finally) break on the sand as the smallest, least aggressive waves imaginable.

Vestrahorn Reflection, Stokksnes Beach, Iceland
Once reaching the beach, what these waves lack in height, they more than make up for in length, gently washing up a hundred yards or more onto the black sand, before running out of gas and slowly sweeping back. In their wake is an ephemeral mirror that, when timed right (before the water percolates into the sand, or is overrun by the next wave), paints the bottom half of any image with an inverted duplicate of Vestrahorn and its surroundings. And because these waves are so low and slow, it’s possible to safely stand in the approaching surf wearing mid-calf waterproof boots, and keep your socks completely dry.
But the experience at the beach isn’t all about reflections. Each wave deposits, or repositions, an assortment of shells and smooth stones. After tiring of photographing reflections, I’ll often switch to these transient elements for my foreground. Other times, I’ll make my foreground all about the waves themselves, capturing the intersecting lines and arcs of waves arriving at different times and angles, or playing with long exposures to blur the leading or trailing edges advancing or receding water. And depending on how I time these shots, it’s also possible to create single frames that include reflection, shells/stones, and wave effects.
As much as I enjoy playing with all the visual elements at the beach, a couple of years ago I decided I should spend more time in the dunes. I’ve photographed the dunes of Death Valley and White Sands quite a bit, but these dunes are completely different. For starters, they’re black. They’re also much smaller, and capped with patches of grass like blonde toupees. But their small size, easy navigability, and distinctive curves are ideal for strategic juxtaposition, allowing me, with careful positioning, to assemble them into strong foreground elements that guide the eye elegantly to the mountain and sky beyond.
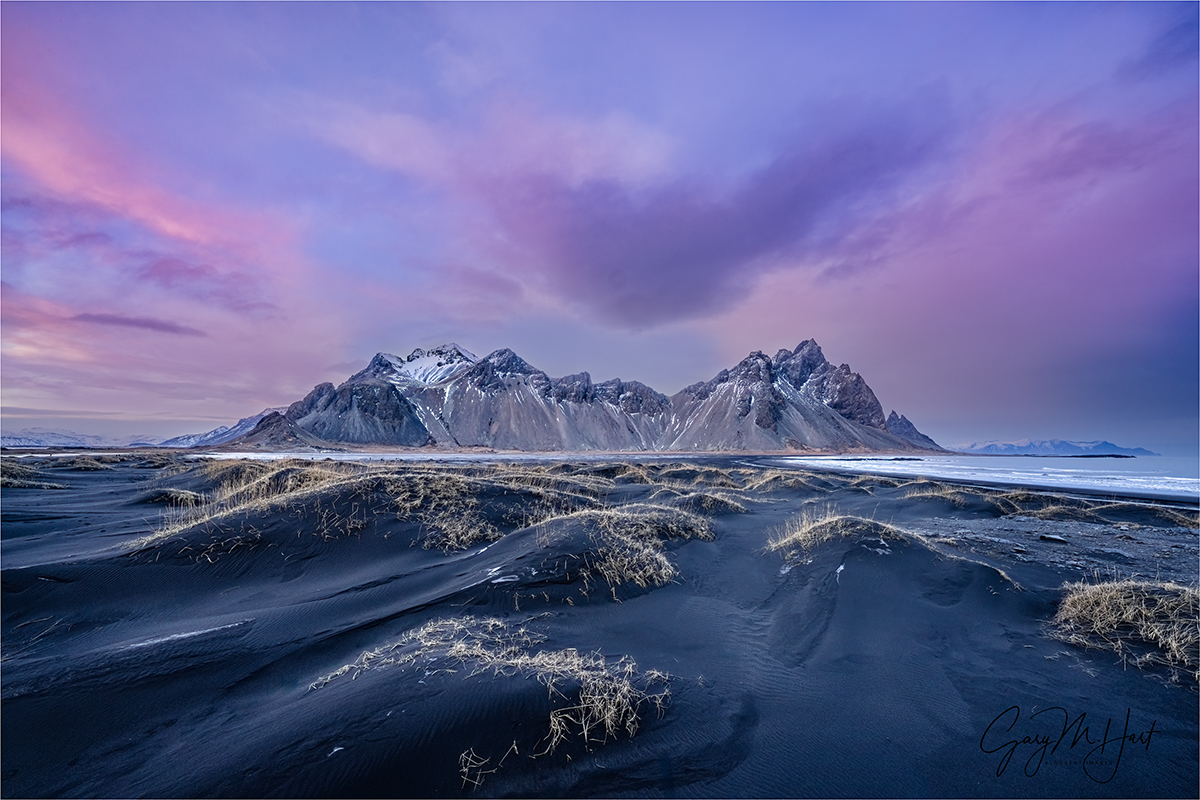
Winter Twilight, Vestrahorn and Dunes, Iceland
And then there are the components that vary with each Vestrahorn visit: clouds, light, snow, and ice. On last year’s visit, we didn’t have a lot of snow and ice, but the sunset light was off the charts, allowing me to capture one of my favorite Vestrahorn images that used an ultra-wide lens to fill my frame with the nearby dunes and colorful clouds, while shrinking the massive mountain to a small, distantive centerpiece.
Don Smith and I have been bringing our Iceland photo workshop groups to Vestrahorn for as long as we’ve been visiting Iceland. It’s always been a sunset spot, but one thing we’ve learned after many years photographing Iceland in winter is the need to constantly monitor the weather and stay flexible. Which is why we rely heavily on our Icelandic guides, and almost always follow their experience-based advice. This year’s Vestrahorn visit was a perfect example.
Our original plan was Vestrahorn for sunset, and the ice cave for the next morning. But this year the threat of extreme wind on our Vestrahorn afternoon caused us to flip-flop our sunset/sunrise locations so we’d be in the sheltered ice cave when the wind was strongest. This ice cave worked out great, and the next morning we traveled to Vestrahorn for our first-ever sunrise here.
Our group arrived in the blue hour and scattered almost instantly. Though Vestrahorn gets nice light at both sunrise and sunset, this time it wasn’t sunrise light or color that excited them, but rather, the spectacular clouds swirling about the peak, As I made my way around to check on everyone in the chilly twilight, I soon found myself beyond the dunes to an area of shallow pools I knew of, but had never photographed. Usually these pools are frozen, creating intricate patterns that make excellent foregrounds themselves, but this year, instead of ice we got blue-gray reflections of the mountain and clouds, framed by frozen sand.
Blue Hour Reflection, Vestrahorn, Iceland
Walking the perimeter of the largest pool while helping one of my workshop students identify a suitable foreground, I pointed out a mini-cove that seemed to cradle Vestrahorn. After my student finished with his shot, I stepped in to try a composition of my own. After working the scene for a couple of minutes, I was so excited by what I saw on the back of my camera, I walked around herding as many in my group as I could find over to this spot. Unfortunately, not everyone made it before the clouds descended and obscured much of the peak, but by that time it seemed that most of the group had found something that pleased them before the mountain went away.
My point is not that Vestrahorn is “better” than Kirkjufell (or vice-versa). But based on the photos shared by others, it does seem that Kirkjufell gets more attention than Vestrahorn. And I will say that if the joy you get from photography is found in creating unique images rather than collecting icons (not that there’s anything wrong with that), you might just be happier at Vestrahorn.
Join Don Smith and me in Iceland
Workshop Schedule || Purchase Prints || Instagram
Twin Peaks
Click any image to scroll through the gallery LARGE


Shock and Awe
Posted on February 27, 2025
Night Lights, Snaefellsnes Peninsula, Iceland
Sony α1
Sony 14mm f/1.8 GM
ISO 3200
f/1.8
5 seconds
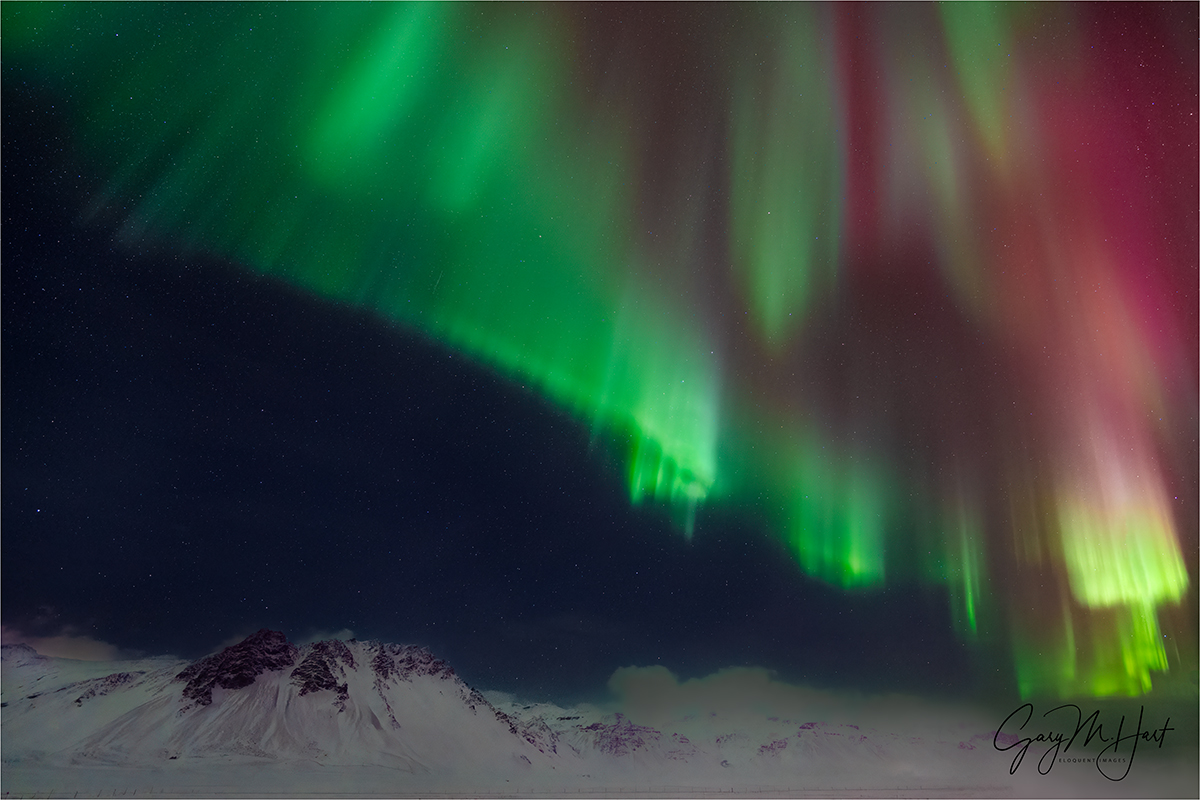
That night at dinner, one person in the workshop group asked if there was a chance we’d see the northern lights, or if he could safely have another beer. I laughed and told him, while I can’t predict the future, I’d be shocked if the northern lights happened this night and to just go ahead and have that beer. I’ve never been happier to be wrong (and that my advice didn’t ruin his evening).
Each winter Don Smith and I do a winter workshop in Iceland. There are many reasons to visit Iceland in winter, but for most of our workshop students, at the top of the list is the northern lights. Because northern lights success doesn’t just happen, each day Don and I powwow with our Iceland guide to assess our odds for aurora success that night, and to plan our strategy to be there when it happens. We base these decisions on forecast aurora activity, expected cloud coverage, dark sky (no light pollution) views of the northern sky, and the experience we’ve gained from prior northern lights shoots.
Our second night on Snaefellsnes Peninsula (the workshop’s third night), the expected KP-index (the universally accepted 0 to 9 scale of aurora activity) was a very disappointing 1—about as low as we ever see in Iceland. Worse still, an incoming storm had already started to spread clouds, further reducing the night’s aurora expectations.
But regardless of the target (aurora, lightning, Milky Way, and so on), past surprises have taught us to never not have a plan in the event of the unexpected, so at dinner this evening we laid out the bad news to the group, but promised to keep an eye on the sky and notify them if anything changes. Though the incoming storm meant we wouldn’t be able to drive to another location if the aurora surprised us, we told the group that just across the road from our remote hotel was an unobstructed, dark-sky view of the northern sky above snowy peaks—perfect for the northern lights.
With a plan in place, everyone retreated to their rooms for the night with the lowest of expectations. At about 9:30 I was still up, answering e-mails and doing other boring business stuff, when I glanced at my phone and saw at least a dozen notifications from the WhatsAp Iceland group thread. Well that’s interesting…
It seems that Siggi, our exceptional Icelandic guide, had gone outside at around 9:15 and discovered clear skies and aurora. Without bothering to read all the other exclamations from the group, I bundled up, grabbed my gear, and rushed out as fast as I could. I expected something similar to the aurora display we had over Kirkjufell the prior night—enough to show up in the camera, but not bright enough for our eyes to register—but as soon as I stepped out into the cold and looked up, I spotted a soaring shaft of light that told me tonight would be different. Much different.
I hurried to the outline of photographers assembled across the road and quickly trudged through two feet of snow to set up at barbed wire fence. Out here, away from the hotel’s lights, it was even more apparent that something special was underway.
Don, Siggi, and I had prepared the group for photographing the northern lights, but with any type of night photography, there’s no substitute for experience. Since this was the first aurora experience for many in the group, I spent my first few minutes out there moving around, helping get people up to speed. While focus is always tricky at night, aurora focus is no different than any other night scene. The greatest challenge for aurora first timers, even those with lots of night experience, is the need to constantly monitor the rapidly changing exposure. An exposure bright enough to reveal foreground detail and aurora color one minute, might completely blow out the aurora the next. And a 15 second exposure might be fine when the aurora is changing slowly, but it blurs intricate detail when the aurora’s activity ramps up. Fortunately, it didn’t take long for everyone to settle in, and soon my instructions were down to occasional shouts reminding everyone that the brightness had changed, or to point out a different area of the sky that had ramped up.
The WhatsAp notice had gone out to everyone, but I soon realized it had only been a fluke that I’d noticed, so after a few minutes I decided to take attendance. Easier said than done in the extreme darkness, especially since there were a few people out there who weren’t in our group, and everyone was bundled head-to-toe. But I did determine that Don wasn’t out there, and one other person in the group (turns out there was a second person missing, but we didn’t realize it until the next morning). I called the missing workshop participant first, but that call went straight to voicemail—then another person in the group said she’d called him and he’d decided to pass (apparently he’d been asleep and regrettably wasn’t thinking rationally when he got that call). Don, on the other hand, was especially grateful for the call and made it out in record time.
An aurora show is special anytime, but it wouldn’t be an understatement to say this one truly shocked me by its unexpected splendor that ranks right up there with the very best I’ve seen in my half dozen years of photographing Iceland in winter. It was very bright, covered most of the sky, and was infused with lots of red, but what stood out most for me this evening was the dancing waves and shafts that twisted and fold right before our awestruck eyes.
Join Don and me for a very special Iceland photo workshop in 2026
Iceland Aurora Collection, 2019 – 2025
Click any image to scroll through the gallery LARGE


Iceland, Weather or Not
Posted on February 14, 2025

The Green Night, Aurora Above Kirkjufell, Iceland
Sony α1
Sony 16-35 GM
10 seconds
f/2.8
ISO 3200
As I’ve probably said a million times before, and likely will say a million more times, the best weather for photography is the worst weather to be outside. I mean, why else would Don Smith and I schedule a workshop for Iceland in January?
Of course our number one reason for an Iceland winter trip is the northern lights, which means winter clouds aren’t always our friend. But when I’m not waiting for the aurora to fire up, I love the way Iceland’s storm clouds are illuminated (all day) by beautiful low-angle sunlight (the sun never rises above 10 degrees during our visits). There are Iceland’s 2-hour winter sunrises and sunsets, its storm-churned surf, and ocean to mountaintop snow-covered landscape. And a surprising truth I’ve come to appreciate over the years is that, while Iceland in January is indeed quite cold, it really isn’t as cold as most people expect. (I swear.)
In this year’s workshop, that “not as cold as you expect” claim was challenged on our very first day of shooting, when we piled out of the bus at our first stop into 5°F air. Fortunately, that’s the coldest we experienced all workshop, and great photography creates an inexplicable warming factor that seems to make even the harshest conditions more tolerable. And regardless of the quality of the photography, even temperatures as low as 5°, (especially without wind) are quite tolerable with the right clothing.
My first year I attacked Iceland’s cold with copious layers of conventional California cold-weather gear. That worked well enough, but following each subsequent visit, I refined my non-California winter-wear (warmest) to the point where I’m now armed with an entire Iceland ensemble that rarely comes out for my domestic trips.
For example, a few years ago I decided that I was tired of having to layer a rain-shell on top of my (extremely warm but not waterproof) puffy down jacket, not to mention having to deal with a chronically cold butt exposed by a jacket that barely hung below my belt (yes, I was still wearing pants). So I sprung for LL Bean’s warmest waterproof down parka that covers me all the way down to mid-thigh. I still travel to Iceland with a lightweight, waterproof down jacket that’s compact enough to stuff in my camera bag and is ideal for milder days and short jaunts from the bus to a restaurant or hotel.
This two-way system—one heavy-duty option for the coldest, windiest conditions; another that’s lightweight but still warm enough for normal daily activity—works really well for me in Iceland. In addition to two jackets, I also have a couple of hats, pairs of gloves, and boots, that I can choose between, depending on the conditions. And, unlike many in this year’s group, I managd to pack everything into one (large) suitcase that I (barely) keep below Icelandair’s 23 kg (50-ish pounds) weight limit.
This year’s difference-maker upgrade was my new warm boots. I’m a cold feet (and fingers) kind of person, cursed with digits that never seem to be warm enough. Where my boots are concerned, it’s not so much the walking that’s a problem, but photography requires a lot of standing around in frigid cold (especially at night, when the aurora is dancing). In previous years I’ve gone more conventional, trying an assortment of insulated hiking boots and thick wool socks, upgrading to something warmer after almost every trip, vowing that next year will be better. The result has been persistently cold toes, and a boot-graveyard in my garage that rivals Imelda Marcos’ closet.
This year I tried something different, switching to super-warm, waterproof, lined Sorel work boots. But that was just the start. In New Zealand last July, I stocked up on (wait for it) possum fur socks. Possum fur (it’s actually a possum/merino blend) is absolutely the warmest material I’ve ever worn (also soft and lightweight), and it’s everywhere in New Zealand. But before you start visualizing acres of bred possums, caged and awaiting slaughter, and imagine that I’m supporting the heartless New Zealand possum-breeding industry, you need to know New Zealand’s possums (which are quite different from American possums) are a non-native scourge that’s decimating the country’s native bird population (among other things). A massive effort is underway throughout the country to eliminate possums by 2050—the only possum fur apparel I purchase in New Zealand is a byproduct of possums trapped for eradication (they were doomed anyway). But anyway…
And as if new boots and socks weren’t enough, I also sprung for a few thin merino wool liner socks from REI, to wear under my possum socks (no, possum don’t wear socks—you know what I mean). After returning last week following nearly two weeks in Iceland’s winter cold. After that first morning, I exited the 5° chill confident that my popsicle toes days were behind me.
Though the temperature warmed slightly throughout the day, by afternoon the wind had picked up and we started to see a few clouds heralding the approach of the storm that would batter us the following day. Nevertheless, after dinner we drove out to Kirkjufell hoping for some northern lights because in Iceland in winter, you always have a northern lights plan.
Seeing clouds from the Kirkjufell parking area, it would have been easy to pack it in and return to our warm hotel. But a few breaks were enough to give us pause, and when quick test snaps revealed green sky behind the broken clouds, we decided to stay and shoot for a while. We shot from the parking area, using our bus as a windbreak.
What started as a low expectation, “What the heck, we’re here anyway” shoot, turned into a very productive evening of photography, and a harbinger of the great stuff in store. It also gave us an opportunity to get the group up to speed with night photography—some had never done it before, while others were pretty rusty.
It’s especially fun when a group gets to witnesses something exciting. Many in this group had never seen an aurora, and though the color wasn’t bright enough to see with our eyes, everyone was pretty thrilled to capture images that featured Iceland’s most iconic mountain. But the real star this evening was the clouds, which built and raced behind Kirkjufell, but never completely filled in the window to the sky and aurora behind the peak.
After we’d finished, Don and I talked about the relief we felt getting at least enough aurora to please people, but agreed that more would be better, because those who’d never seen a good display didn’t really understand what they were missing. It turns out we didn’t need to wait long, but I’ll get to that in a future post.
Join Don Smith and Me in Iceland
Weather or Not
Click any image to scroll through the gallery LARGE


Grand Finale
Posted on February 6, 2025

Lunar Lift Off, El Capitan, Yosemite
Sony α1
Sony 200-600 G
Sony 1.4x teleconverter
ISO 800
f/13
1/25 second
For most of my full moon workshops, I try to schedule the moonrise main event for the workshop’s final sunset. Sometimes other factors prevent this (for example, in Yosemite I try to avoid weekends), but when the schedule works, a nice moonrise gives the group something exciting to anticipate throughout the workshop. This becomes especially important when some or all of the workshop’s hoped-for conditions fail to materialize.
Last month’s Yosemite Winter Moon workshop lacked to winter snow and cloudy skies we hope for in a Yosemite winter workshop, but the moon (among other things) saved the day for us by not only giving us something to look forward to, but also by photobombing an earlier sunset. The true star of that prior sunset was the clouds and color, and as nice as it was to accent the scene with the moon, it was the final night moonrise that I most looked forward to.
As I’ve written before, despite all the unjustified “supermoon” hype, the key to photographing a big moon is focal length—the longer the better. Period. If you don’t care about what’s in the foreground, or for that matter choose not to include any foreground at all, any location where the moon is visible will do. But if you want to complement your legitimate big moon (a moon image that happens in one click) with a striking landscape feature, the farther you position yourself from your landscape subject, the longer the focal length you can use, and the bigger the moon will be. Of course if you make the moon bigger with a longer focal length, the less of your foreground you can include, and the more precise the moon/foreground alignment must be.
In Yosemite, the best place to set up for a telephoto moonrise that also includes photo-worthy foreground features, is Tunnel View. At Tunnel View, the prime moonrise subjects are El Capitan and Half Dome, three and eight miles distant. From there, I can include all of Half Dome with a focal length up to 400mm; with a longer lens, I can enlarge the moon further, while still including some of Half Dome—if the alignment is right.
The most important part of photographing a moonrise from Tunnel View is to align it with a desirable foreground subject. Most of the year, the moon rises much too far south to include in a Tunnel View scene, but for 2 or 3 months each winter, the full moon rises far enough north to align beautifully with Tunnel View’s magnificent monoliths.
But success is not simply a matter of showing up at Tunnel View the night of the full moon. Each winter the solar/lunar choreography is different, which is why the moon is all over the place in my many Tunnel View moonrise images in the gallery below: left of Half Dome, right of Half Dome, directly aligned with Half Dome, and occasionally closer to El Capitan than Half Dome.
This winter’s geometry was especially exciting to me when I realized the January moon would rise farther north, and therefore closer to El Capitan, than I’d ever photographed it. I have photographed the moon arriving from behind El Capitan’s vertical face, but I’d never seen it come up from behind the top of El Capitan. Always up for photographing something new (especially in Yosemite), I scheduled a workshop for it.
Which is how my workshop group and I ended up at my favorite Tunnel View vantage point on a Sunday evening last month. Sunset that evening was 5:05, and my calculations said the moon would at just about the same time—pretty much perfect timing for a moonrise, because you want the sky dark enough for the moon to stand out in contrast, while still bright enough that the landscape has enough light to reveal detail without blowing out the moon.
I’d set up with two tripods and cameras, one with my 200-600 lens, the other my 24-205 lens. The long telephoto was for the moon’s arrival; the wider lens was for when the moon elevated enough to separate from El Capitan. I’d planned to increase the magnification of the telephoto with my 2x teleconverter, but trying to attach the teleconverter to the lens, I fumbled it and helplessly watched it roll down the steep granite toward a vertical drop of several hundred feet. Fortunately, it lodged in small crack just before taking the plunge, but when I put it on the view was completely blurred, so I switched to my 1.4X teleconverter, giving me a focal range of 280-840.
As the sun dropped and the time approached, I became aware that a thin film of clouds had drifted across the eastern horizon above El Capitan—so thin that they weren’t visible at all in daylight brightness, but just substantial enough to reflect some color as sunset approached.
The moon arrived right on schedule, and we immediately started clicking. My earliest shots were almost entirely long telephotos, like this one at 840mm. It’s always shocking to see how fast the moon moves across a long telephoto frame, but I soon started mixing in a few wider frames (that required less frequent adjustments) as the moon started separating from El Capitan. By this time sky had pinked up beautifully, adding an element of color I hadn’t expected.
We all come to a workshop with expectations, students and leaders alike, but rarely are all of them met. And while the January group’s hopes for snowy winter scenes were dashed, I think that loss was more than made up for by other things we witnessed, some complete surprises, and some just a little better than our already high expectations—like this sunset moonrise to finish the workshop.
Join me in a Yosemite photo workshop
Workshop Schedule || Purchase Prints || Instagram
Yosemite Moonrise Collection
Click any image to scroll through the gallery LARGE


Ten Reasons to Take Up Nature Photography
Posted on January 16, 2025

Lunar Peek, Zabriskie Point, Death Valley
Sony a7R V
Sony 24-105 f/4 G
ISO 125
f/11
1/4 second
Recently I was talking to a friend on the cusp of retirement, and while she was looking forward to her impending freedom, she wasn’t sure what she was going to do with all her free time. I instantly blurted, “Nature photography!,” then started listing reasons. I surprised even myself with everything I came up with, and how quickly it came, which got me thinking the subject would make a good blog post. So here are my (very biased) thoughts on why nature/landscape photography makes the ideal pastime. (After reviewing the list, it turns out that most of my points apply to many other kinds of photography as well.)
- Save experiences: Ours is a beautiful, dynamic world. Over my lifetime, I’ve been fortunate to have witnessed Nature at its very best, more times than I can count. Though he’s no longer here to thank, for this I’m most grateful to my father—a serious amateur photographer who wouldn’t dream of traveling without a camera—for modeling the importance of recording these moments. It’s no wonder that, almost as soon as I was old enough to make my own major financial decisions, I purchased a 35mm SLR system of my own—mostly because (thanks to my dad) I thought that’s just what adults do. Thanks to my camera, the knowledge that I can revisit Nature’s ephemeral moments any time I want to is a source of great comfort.
- Share experiences: I think my father got as much pleasure sharing his travel experiences as he did recording them. Back in Dad’s time, most non-professional photographers’ images only reached other eyes when (captive?) visitors were sequestered in front a projection screen in a darkened living room (because there was really only one answer to the dreaded question, “Hey, do you want to see the pictures from our vacation?”). And while I won’t pretend Dad never subjected our visitors to the occasional slide show, as a United Methodist minister, he had a whole congregation filled with potential viewers, not to mention access to a large space ideal for sharing. Given the number of people who attended his shows without being compelled or held hostage, I’d say his images were well received. Today, the thrill of taking pictures that please others is as great as it’s ever been, but the opportunities to share them in our digitally connected world have increased exponentially.
- Low start-up cost: Camera gear can be ridiculously expensive, but it doesn’t need to be. Your smartphone will take surprisingly good pictures—good enough to reap most of the benefits listed here long enough to determine whether a bigger investment is justified. And when you do decide you want more serious dedicated photo gear, you can find quality equipment at pretty much any price point. In other words, expense should not be a reason not to pursue photography.
- Flexible income potential: I encounter many people who would like to make a living with their photography. And while there is still excellent money to be made with a camera, nature photography is not among the more lucrative options—not by a long shot (sorry). Fortunately, earning money with a camera doesn’t require you to quit your day job. You can pursue photography as an avocation, reaping the many personal benefits while dipping your toes into selling images (for publication), prints, and services until it grows into something lucrative. That was my path: More than 20 years ago I started doing weekend art shows while keeping my adult job, then gradually segued into workshops, training, and photography-related writing, until I felt confident pursuing photography as a profession. For a while after going fulltime I continued with the art shows, which were both lucrative and fun, but doing art shows and workshops felt like working two different jobs, and the path to a fulltime income with workshops was much clearer, so I dropped the art shows. On the other hand, I know photographers who earn a good living through art and gallery shows. And today, social media has increased the money-making opportunities far beyond what was available when I started.
- See the world (large): Need an excuse, or maybe just a catalyst, to travel? Try photography. It’s easy to get so locked into a day-to-day comfort zone that our dreams of visiting yearned-for locations are never fulfilled. I’m afraid that would probably describe my life were it not for photography. But, going all the way back to when photography was just a hobby, my camera and I have visited remote corners of the globe, enjoyed river rafting adventures in Grand Canyon, and witnessed more celestial and meteorological sights than I ever imagined possible.
- See the world (small): More than just visiting exotic locations, viewing the world with a photographer’s eye enables me to see beauty everywhere, from the distant horizon to right at my feet. I can say with absolute certainty that my own photographer-eyes have become hyperaware of my surroundings, noticing colors, textures, relationships, and minute detail everywhere—not just when I’m actively taking pictures, but pretty much as long as I’m awake: driving, walking, running, or simply sitting still. Not only that, to this day, the more time I spend taking pictures, the more this heightened vision improves.
- Commune with Nature: For many people, myself included, few things are more soothing than quiet time with Nature. This enhanced relationship with the natural world can be active or passive. When I’m immersed in a natural environment, away from the din of “civilization,” all of my senses intensify and seem to work in synergy, providing peace I don’t feel at any other time. But there’s more—even when I’m stuck inside, my life as a photographer inspires me to pursue deeper understanding of my subjects that helps me appreciate them even more.
- Ideal solitary activity: Are you an introvert who recharges by being alone? Nature photography has you covered. I think most of us have times when we just need to dial down the pressures and sensory dissonance of daily life. I can think of no better way than full immersion in the serene sights and sounds of the natural world, completely absent the need to please, impress, or in any other way interact with the rest of the world. When I’m alone in Nature, time seems to stand still, my senses amplify, and my connection to my surrounding is never stronger.
- Ideal group activity: Are you an extrovert who recharges by being around others? Nature photography has you covered. Some of the most memorable experiences of my photography life were made that way because I was able to share them with other like-minded individuals. The joy of these moments is contagious, at times amplified enough by the presence of others to move me to tears.
- Cultivate your creative and analytical brains: I can think of few endeavors that more perfectly blend the right and left brain than photography. Some photographers are drawn by photography’s creative opportunities to view and express the world; others love the technical aspects of managing exposure and focus with their camera’s many controls. While it’s possible to take pictures with just one side of the brain or the other engaged, most people who take up photography are surprised to learn that there is indeed life on the other side of the brain.
About this image
Lunar Peek, Zabriskie Point, Death Valley
The Zabriskie Point moonset is always a highlight of my Death Valley Winter Moon photo workshop. Often we get no clouds, making this sunrise moonset a no-stress event for me. This time (January 2024), when clouds threatened to wash out the shoot entirely, was not one of those events.
The moon was visible above the clouds when we arrived, but the sky was much too dark to capture lunar and foreground detail with one click (my personal requirement). When the moon dropped into the clouds and disappeared completely, I tried to rationalize that at least we’d have nice clouds for our moonless sunrise, but I used all the positive energy I could muster to will the clouds into parting.
Though it lasted for only a couple of minutes, the moon did indeed slip into a small opening long enough for everyone in the group to get a few frames before being swallowed for good. Though only had time for a handful of frames with enough moon to be worthwhile, I think most photographers would take quality over quantity any time.
Workshop Schedule || Purchase Prints || Instagram
The Joy of Nature
Click any image to scroll through the gallery LARGE


")


, Yosemite")


It’s Not All Skill and Hard Work
Posted on December 7, 2024

Molten Churn, Kilauea, Hawaii
Sony a7R V
Sony 100-400 GM
ISO 800
f/5.6
1/1250 second
There’s not a nature photographer alive who hasn’t heard someone exclaim about a coveted capture, “Wow, you were so lucky!” And indeed we are lucky—but that sentiment completely discounts the time and effort that put us in the right place at the right time.
Louis Pasteur’s assertion that chance favors the prepared mind has been co-opted by photographers—mostly, I suspect, to reclaim some (much deserved) credit for capturing Nature’s ephemeral beauty: vivid sunrises/sunsets, rainbows, lightning, the aurora and other celestial displays, volcanic eruptions, and on, and on….
Yes, it was indeed very lucky when that rainbow appeared, or the sky turned crimson, or the clouds parted to reveal a rising full moon—at just the moment I happened to be there with my camera. Most of those times, despite insinuations to the contrary, my presence wasn’t a total fluke and I’d like credit for it thankyouverymuch.
On the other hand…
Let’s not forget that two things can be equally true. I fear that some photographers become so defensive of the effort they put into capturing a special moment, they fail to appreciate that there was indeed luck involved too. But conceding our good fortune doesn’t diminish our skill and vision, it just acknowledges that we are never in complete control of Nature’s fickle whims. Not only that, appreciating the luck involved helps bolster the sense of wonder and awe a nature photographer must have.
As hard as I try to anticipate an outcome, and the number of times that effort has succeeded, I have to admit that sometimes my presence for a beautiful moment was an absolute fluke. I mean, I still had to know how to work my camera and frame a composition, but what I witnessed was not part of the original plan.
For example, scheduling my 2013 Maui workshop more than a year in advance, I had no inkling of Comet PanSTARRS. When I did learn about the approaching potential naked-eye comet, and that it would be paired with a crescent moon on possibly the best day for viewing, I checked my schedule and discovered that I’d be on Maui for a workshop. In fact, the day the comet would appear closest to the moon just happened to be the day I’d planned to photograph sunset from the summit of Haleakala—coincidentally, the site of the very telescope that discovered PanSTARRS more than a year earlier.
Another special experience I can’t take much credit for was morning I got to photograph the most active, longest lasting Grand Canyon lightning display (that included a rainbow right at sunrise) I’ve ever seen. Based on that morning’s weather forecast (clear skies, 0% chance of rain), and the 12-hour drive home following the shoot, I’d probably have stayed in bed had there not been a workshop group counting on me.


I’m thinking about these unexpected blessings because recently I’ve been going through old, unprocessed images and came across this one (of many) from the September 2023 Kilauea eruption. I’d love to be labeled a Pele-whisperer capable of anticipating a Hawaiian eruption early enough to get myself to the Big Island, blessed with prescient insight into the ideal vantage point before the lava fountains appear. But alas….
I’ve been leading a Hawaii Big Island workshop every year since 2010 (minus the 2020 COVID year). Since Halemaʻumaʻu (Kilauea’s summit caldera) had been erupting continuously since 2008, for the first eight of those years it was easy to take Kilauea for granted. I’d show up, take my group at least one time (often more) to the spot I’d found that perfectly aligned the eruption with the Milky Way. As long as the clouds didn’t deny us, I’d have a workshop full of thrilled photographers.
But in 2018 Pele sent a “don’t ever take me for granted” message, providing a dazzling, 4-month pyrotechnic display before rolling over and going to sleep less than a month before my workshop started. Since 2018, Kilauea has stirred only periodically, so scheduling workshops more than a year in advance has made it impossible to time my workshops to coincide with an eruption.
Putting a positive spin on it, that has made the good fortune of the eruptions we have witnessed even more special. For example, I completely lucked out in 2022 with a nice, albeit distant, eruption that included lava fountains and an opportunity to get the caldera and the Milky Way in the same wide frame.
And then there was 2023. As the workshop approached, things appeared to be back to business as (post-2018) usual. After a couple of minor eruptions over the past year or so, Kilauea had been quiet for several months leading up to my September workshop. Though it had been showing a few signs of stirring, by the day before my workshop, nothing seemed imminent. There’s so much more than enough to photograph on the Big Island, so this wasn’t a big concern, but it was still a minor personal disappointment because I never tire of viewing an erupting volcano.
With the workshop starting Monday, my brother Jay and I had arrived the Friday prior to check out all my workshop locations. We spent Sunday afternoon out of cell phone range, scouting along the Puna Coast, our final area before the workshop. Entering the relatively isolated Puna region, Kilauea was quiet when my phone went dark—so imagine my surprise when we emerged from the cellular void a few hours later to see two notifications from the USGS in my inbox. When I saw Kilauea in the subject line, my heart jumped, but when I opened the first e-mail and saw that it started with, “Kilauea is not erupting,” I scanned the message enough to see that it report signs of increased activity. Okay, then what’s this second message about?
The first sentence grabbed my eyeballs and I didn’t bother to read further: “Kilauea is erupting.” I instantly punched the gas detoured straight to the volcano. The eruption had started at 3:15 p.m., and at exactly 5:00 p.m. we were rolling up to the Visitor Center. There we learned that we could view the eruption right across the street, from Volcano House.
Racing over there, we joined the crowd oooh-ing and ahhh-ing at the billowing smoke, orange glow, and occasional bursts of lava that jumped high enough to be visible the steep crater wall. Rather than photograph from there, I decided to see if there might be a better view. We found more of the same at the steam vents: spurts of lava, lots of smoke, and a distinct orange glow. But while there we ran into a couple who told us the best view was at Keanakakoi, on the other side of caldera. So off we went.
At Keanakakoi we snagged one of the last parking spots, grabbed our camera bags, and bolted down the trail (a paved road now closed to non-official vehicles). After a brisk (understatement) one-mile walk, we made it to the vista about 10 minutes before sunset.
I’ll never forget the sight that greeted us. On the caldera floor clearly visible directly below us were at least a two-dozen lava fountains of varying size, churning among a honeycomb of just-cooled black lava that appeared etched by thin, glowing cracks. Splitting this fiery orgy was a broad lava river, and several narrower streams. We quickly joined the throngs who had jumped the improvised rope that had not doubt been placed to prevent us gawkers from plunging to our deaths (safety-schmafety).
What followed was a clicking frenzy. I started with my 24-105 lens, eventually switching to my 100-400. (I also snuck in a couple of quick iPhone photos—the lava field was close enough to fill the frame without cropping). Monitoring my RGB histogram, I quickly determined that an exposure that completely spared the red channel skewed the rest of the histogram far to the left, which of course made perfect sense and was no problem because pretty much the only thing that mattered in this scene was the orange lava.
So focused was I on scene below me that it was a couple of minutes before I registered that I was working in what might be the windiest conditions I’ve ever photographed in. I’ve probably experienced stronger gusts (I’m looking at you, Iceland), but this wind was steady, brutal, and relentless. So strong in fact that it nearly ripped the glasses of my face, and forced me to actually keep one hand on them most of the time.
Given the rapidly approaching darkness, with most subjects this wind would have been a significant problem. But because my primary (only?) subject was imbued with its own built-in light source, and was in constant, frenetic motion that required an extremely fast shutter speed anyway, I found it all quite manageable—I was actually more concerned about getting blown into the maelstrom than I was about camera shake.
Throughout the evening I varied my exposure settings, shooting wide open with shutter speeds varying between 1/500 and 1/1500 second, and ISOs ranging from 800 to 3200. Focal lengths ranged from fairly wide (wider than 50mm at the start) to 400. In fact, many of my 100-400mm frames were closer to the 100mm range so I could include groups of fountains. I tried to time each shot for peak explosiveness in whatever fountain or fountains I’d targeted, but honestly, since these peaks came every second or two, that wasn’t much of a challenge.
Every once in a while I got a strong whiff of sulfur, a reminder of the risks of being so close to a volcanic eruption. It seemed like we’d been out there at least an hour when I was aware of shouting behind me. I turned to see rangers running around shoeing us from the edge. At first I thought all of us who had crossed the rope barrier were in trouble, but it turns out we were being evacuated—and they meant business. A review of the timestamps on my images showed that what seemed like more than an hour was in fact only 33 minutes.
How close were we to the eruption? I calculated later that we’d been only 1/2 mile away from the lava field, but it seemed much closer. Unfortunately, the closure that caused us to be evacuated wasn’t lifted until the eruption ended, so I wasn’t able to take my group out there. But I did learn about other vantage points that were nearly as good, and got my group out there two more times.
How lucky was I (and my workshop group)? This eruption that started the day before the workshop started, was finished the day after the workshop ended.
Join me in Hawaii
Workshop Schedule || Purchase Prints || Instagram
Lucky Shots
Click any image to scroll through the gallery LARGE


, Yosemite")


One Night, Two Moons
Posted on November 27, 2024

Through the Clouds, Tunnel View Moonrise, Yosemite
Sony a7R V
Sony 24-105 f/4 G
ISO 100
f/10
1/3 second
I wrapped up this year’s workshop schedule at the beginning of this month and am now enjoying a much anticipated Holiday breather before my schedule ramps up again in January. This isn’t exactly a vacation, because the end of the year is when all my permit reporting and next year’s permit applications are due, and my 2025 workshop prep starts to ramp up, but my schedule does get a bit less frenetic when the travel (and all its prep and recovery) is over.
As I often do when my travel schedule eases around the Holidays, I prioritize family over photography. That doesn’t mean no new pictures, but it does mean that most (all?) of the new pictures I share over the next couple of months will probably be pictures captured months, or even years, ago, but never got around to processing.
Going through my vast repository of unprocessed images is something I started doing while isolated during the early months of the pandemic (has it really been 4 1/2 years?!). I’d always been aware that I had lots of untapped gems languishing on my hard drive(s), but was nevertheless surprised by how much I enjoyed searching them out. Sometimes I’ll start by randomly picking a photo trip and scanning the Lightroom thumbnails for something that stops me, but the most productive approach has been going through my collection of already processed favorites to identify particularly special shoots, reasoning that there must certainly be more there. (I write more about this in my Back to the Future blog post.)
It always surprises me how much I enjoy revisiting past photo trips and workshops. Not only does the experience revive memories of special moments in Nature, lots of the best memories are of the people I was with. Sometimes that’s been other photo buddies, but since so much of my photography is centered around my workshops, the majority of those memories are actually my workshop groups.

Moonrise, Half Dome, Yosemite
Case in point: The seed for this “new” image was my “Moonrise, Half Dome, Yosemite” image from my February 2024 Yosemite Winter Moon workshop. Going through this workshop’s image folder, all the cloud-induced stress surrounding this particular moonrise came flooding back. And with it also came memories of the euphoria we all felt when the clouds opened just enough, at exactly the right time, to reveal the Half-Dome/moon/sunset alignment I’d been thinking about for more than a year. (Read the details here: Moon Swoon.)
Within minutes, the moon had climbed into the rapidly thickening clouds, and it looked like the show might be over—until, shortly before darkness was complete (or at least too dark to photograph the moon and foreground in one frame), it rose into a patch of slightly thinner clouds and briefly reappeared.
My strategy for moonrises is to go long until the moon separates from the landscape, then go progressively wider as it rises. This evening I’d set up two tripods, one with my Sony α1 and 200-600 lens, the other with my a7RV and 24-105 lens. So when the moon made its brief return, I was instantly ready to start clicking.
I chose a vertical composition to emphasize the foreground and minimize the lateral aspects of the scene. I also tried a few that were wide enough to include more of El Capitan, but ultimately decided to process this one to avoid shrinking the moon too much with a wider focal length.
Viewing these two images together provides a fantastic opportunity to make a point I’ve tried to make many times before: how to photograph a large moon. Thanks to the continued emphasis (and hype) focused on the largely irrelevant “supermoon” phenomenon, many people seem to believe the size of the moon in the sky is the most import part of a large moon image. It’s not.
The size of the moon in any image is almost entirely a function of the focal length used, not the relatively small difference between a “regular” size moon and a supermoon. Compare the size of the moon in these two images, noting that they were captured from the same location, on the same night, less than 10 minutes apart. For the big moon image, I used a 450mm focal length that magnified both Half Dome and the moon and eliminated everything else. For today’s smaller moon image, I chose a 50mm focal length that enabled me to fit far more of the surrounding beauty, but also shrunk the moon.
I should add that as far as I’m concerned, the absolutely best light for photography is the shadowless light that starts 10-15 minutes after sunset. I captured my (wide) image about 15 minutes after sunset. To my eyes, the scene appeared much darker than what you see in the image. I had to be careful with the exposure to avoid blowing out the moon, making the foreground in my raw original nearly black, but by monitoring my histogram and knowing my camera, I knew that the shadows would be recoverable. And I think the thin clouds helped subdue some of the lunar highlights, enabling to give the scene a little more exposure.
I still have a few openings in my 2025 Yosemite photo workshops
The Moon Large and Small, from Full to Crescent
Click any image to scroll through the gallery LARGE


")

")


Do You Really Need a New Camera?
Posted on November 22, 2024

Dancing Aspen, North Lake, Eastern Sierra
Sony a7R V
Sony 24-105 f/4 G
ISO 800
f/16
1/3 second
I had an idea germinating for this week’s blog post, but when Sony announced the brand new α1 II Tuesday, I pivoted to an experienced-based public service message. (You’re welcome.)
As you may have noticed, a new camera purchase is a significant investment. Nevertheless, for many photographers the new camera decision seems more emotional than rational. Case in point: Me. That is, once upon a time (okay, as recently as a couple of years ago), I’d have been all over this week’s Sony announcement, and by now almost certainly would have already ordered my new camera—regardless of how great my current camera is.
This new-camera purchase reflex takes me back to my first grown-up job, working for a small independent vehicle leasing company in the San Francisco Bay Area. “Independent” meant we were not affiliated with any auto manufacturer or dealership, which enabled us to offer our customers any make or model of vehicle and freed me to make honest recommendations rather than push a particular model. Handling every kind of car imaginable, from Toyota to Porsche to Rolls Royce, I soon noticed that many of my leasing customers seemed to be intent on replacing their perfectly excellent car (or truck) that still had lots of useful years remaining. It seemed they’d become so blinded by the allure of “new” that they’d lost contact with rational thought. Though their lease payments would persist for years after the car’s “new” wore off, they seemed to believe that driving this new Whatever would somehow make their life complete—trying to talk them down was fruitless. Sigh.
You’d think that experience would have immunized me against making similar emotional purchases, but sadly, I too have fallen into the trap of coveting the latest and greatest. In my case it hasn’t been cars (I do love new cars, but I usually wait 8-10 years between purchases, and only when I have enough saved to avoid car payments). No, my irrational exuberance skews more toward technology.
For example, many years ago I got sucked into Apple’s iPhone upgrade program (pay a monthly fee for the newest model, then return it for the next model as soon as it’s released) and so far haven’t been able to extricate myself (this is my weakness—it’s not like leaving Apple’s upgrade program is like trying to cancel a gym membership). And for more than a decade, I replaced my Intel-based Macs every 2 or 3 years. Fortunately, this costly predisposition was cured by Apple’s M processors, which are good enough to prevent me from fabricating any kind of credible rationalization for upgrading. So yay me.
Anyway, back to the camera thing. Earning my living as a photographer, it’s always been easy to justify buying the latest camera model. But despite all the marketing hype to the contrary (this applies to all manufacturers, not just the brand I use, Sony), I realized long ago that I’ll probably notice very little (or no) practical improvement in image quality from the new model—especially since I’m almost always replacing the model immediately preceding the new one. So what was my motivation? Being completely honest with myself, a large part of the appeal was simply the idea of owning the latest and greatest.
Given that my current cameras, a Sony a7RV and Sony α1, are everything I need (and more), my rational mind tells me that simply can’t justify spending $6500 to replace one. This isn’t a new insight, but what is new is that this time my rational mind is winning. In previous upgrade iterations, I’ve sometimes used the “photography needs to make you happy” mantra to rationalize the new purchase. After trying that on for this camera, I had to acknowledge that the is fallacy in my argument is confusing pleasure for happiness: Yes, getting that new camera will indeed give me a great deal of pleasure, but when transient pleasure comes at the price of enduring happiness, the biggest winner is Sony (or whoever your camera manufacturer is).
The truth is, regardless of who makes your camera (they’re all great), today’s (and yesterday’s as well) cameras capabilities surpassed the needs of most photographers many years ago. And no matter how great the marketing promoting the latest upgrade makes the camera sound, most photographers have better things to do with their money.
Am I saying you shouldn’t upgrade your camera? Absolutely not. I’m saying the criterion for springing for a camera upgrade shouldn’t simply be, “Is the new camera better than the camera I have?” (it almost certainly is); it should be, “Will the new camera make an appreciable difference in my photography?” (it probably won’t).
Here are some thoughts to bring to your next camera purchase:
- Filter the hype. Manufacturers are really good at spinning modest improvements into “game changing” essentials. Don’t buy it.
- Never, never, never chase megapixels. I can pretty much guarantee that you already have more megapixels than you’ll ever need, but megapixels sell. Until the photography public gets wise to the fact that adding resolution comes at the cost of image quality (really), manufacturers will keep giving us pixels we don’t need.
- Upgrade your more permanent gear first. Lenses and tripods might not be as sexy as a new camera, but there’s a decent chance you’ll notice more improvement in your images by upgrading your lenses and tripod than upgrading your camera.
- Take a trip. If you have all the lenses you need and already own the tripod of your dreams, consider spending that new camera money visiting locations you’ve always wanted to photograph. (Or sign up for that photo workshop you’ve had your eye on. Just sayin’….)
- And don’t forget, the longer you wait, the better your next camera will be. Seriously, your new camera, no matter how great, will probably be “obsolete” within a couple of years.
I need to make it clear that this is in not a review, or an indictment, of the Sony α1 II. I haven’t seen the camera, and have only scanned the (impressive) specs and (predictably hyperbolic) marketing claims. It looks like a fantastic camera. But as with any new camera, if it doesn’t add something that you believe will make a significant difference in your photography, there are probably better things to do with your money.
So what would induce me to replace one of my cameras? Believe it or not, fewer megapixels. Despite the perception (and marketing claims) to the contrary, megapixels are not a measure of image quality, they’re a measure of image size. Period. For any given technology, the fewer the number of photosites (measured in megapixels), the better the camera’s image quality will be. That camera manufacturers can continue cramming more and more photosites onto a 35mm sensor without sacrificing image quality speaks to the progress of technology. But the only way they can add photosites to a fixed space (like a 35mm sensor) is to shrink them, and/or reduce the distance separating them. Imagine the image quality spike we’d see if instead more photosites, they took the technological advances that enables more photosites without sacrificing dynamic range and high ISO performance, and created a sensor with larger (better light gathering) and more spread out (cooler) photosites.
Of course your priorities may (probably are) be different from mine, so I can’t tell you whether any new camera is right for you and your situation. Just don’t fall into the trap of buying the next model simply because it’s “better,” because where technology is concerned, better is quite possibly not good enough.
I return you now to your regular programming…
Dancing Aspen, North Lake, Eastern Sierra
On my way back to the parking area following an especially nice North Lake sunrise shoot, a stand of aspen grabbed my eye. I knew I was well into the 1o minutes I’d given the group to wrap up and make the short walk back to the cars (the light was changing fast and I had two more stops in mind), but these aspen were just too perfect to resist: backlit leaves at peak fall color, parallel trunks, and pristine white bark.
With the clock ticking (it’s never a good look when the leader is one everyone is waiting for), I’d normally just take a couple of iPhone snaps to preserve a beautiful scene I don’t have the time to do justice with a “serious” image. Even though I rarely do anything with these quick iPhone snaps, I find it hard to just walk away from scenes like this without a record of having witnessed it.
But in this case, my phone was buried deep in a pocket of one of my seemingly infinite layers of clothing. On the other hand, I (for some reason I can’t remember) was carrying my camera (which I usually return to my camera bag when I finish a shoot). So rather than mine for my phone, I turned my camera on, put it to my eye, and squeezed off a couple of frames, before continuing to the cars.
Because I have such a strong (irrational?) tripod bias (click, evaluate, refine, repeat…), I honestly didn’t think about these pictures again for the rest of the workshop. But going through my images after the trip, these aspen images stopped me. Slowly the memory of my quick stop returned, and as I spent more time with them, the more I liked what I saw.
Processing this image, and as much as I liked it, I could also tell that I didn’t give the scene my usual (obsessive) attention to detail, quickly identifying a few things I’d have done differently if I’d taken a little more time. For example, I’d probably have shifted around a bit to see if I could eliminate, or at least minimize, some of the gaps in the foliage, and to get a little more separation between some of the trunks. And I’d definitely have paid more attention to some of the minor distractions on the frame’s border. But despite these oversights, I was surprised by how much I like this image, and how well it captures so much about what I love about aspen.
So I guess the moral of this story is, even though a tripod almost always makes my pictures better, just because I can’t use one doesn’t mean I shouldn’t take the picture.
Join my next Eastern Sierra photo workshop
Workshop Schedule || Purchase Prints || Instagram
If you’ve made it this far, thank you. If you enjoy reading my blog, please share it with your friends.
More Aspen
Click any image to scroll through the gallery LARGE


Dome Sweet Dome
Posted on November 15, 2024

Sunset Sentinel, Half Dome, Yosemite Glacier Point
Sony a7R V
Sony 24-105 f/4 G
ISO 100
f/13
1 second
Poll 100 random people about the feature they most associate with Yosemite, and you’ll probably get a variety of answers. Near the top of the list will be El Capitan and Yosemite Falls. Bridalveil Fall might get some love too. But I’d wager more than half of the votes would go to Half Dome, both for its striking profile, and for the way it towers in prominent magnificence over its granite domain.
The Half Dome story began more than 150 million years ago, with the start of the slow-motion collision between the oceanic Farallon, and continental American, tectonic plates. The Farallon Plate, being heavier, was subducted beneath the westward plowing American Plate. Over the next 100 million or so years, the Farallon Plate was driven deeper, toward the super-hot mantle, where it became hot enough melt and form large pockets of magma. Some of this magma made it to the surface as volcanic eruptions. The magma that didn’t reach the surface slowly cooled and hardened into the granitic batholith (a large, subterranean mass of igneous rock) that forms today’s Sierra Nevada range.
But how did this subterranean granite, still miles beneath Earth’s surface, come to rise to the nearly 3 miles above sea level we see today? I thought you’d never ask.
Deep beneath Earth’s surface, the same inexorable tectonic forces that initiated the subduction process continued (and continues to this day), slowly deforming and pushing upward the crust and underlying granite. The uplifted overlying sedimentary rock was far more easily eroded than the much harder granite and eventually swept away, exposing the Sierra’s signature granite backbone.
Once exposed to wind, rain, and snow on the surface, granite is subject to its own form of erosion. Rather than consisting of a single molecular structure, granitic rock is made up of a variety of minerals in varying percentages (for simplicity, I’ve just lumped all the various granitic rocks into a single “granite” designation). Depending on its composition, some granites are prone to horizontal jointing that causes it to break along parallel planes. Other granites experience exfoliation, breaking away in concentric sheets. The jagged granite of the Sierra Crest near Mt. Whitney is the result of jointing; Yosemite’s rounded granite domes (like Half Dome) are the result of exfoliative sheeting.
The granite that would eventually become Half Dome formed deep beneath Earth’s surface nearly 90 million years ago. Of course at formation it was just a blob of granite that didn’t resemble the Half Dome we know today, but through millions of years of uplift, exfoliation, and exposure to the elements, a rounded granite pedestal began to take shape. But it still wasn’t Half Dome.
Though one look will tell you why it’s called Half Dome, the truth is, that’s a misnomer. A better, albeit less glamorous, name would be Eighty-Percent Dome. That’s because there is no missing half—we still enjoy about 80 percent of this prestigious monolith’s original form.
Another common misconception is that Half Dome was carved by glaciers: it was not. Instead of half of its bulk being carved off by glaciers, Half Dome’s flat northeast face got that way incrementally, as the most exposed of many preexisting parallel cracks filled with water, that froze and expanded each winter. Each freezing cycle expanded the crack a bit more, until eventually the exposed sheet of granite fell away. This exposed another crack, and the freeze/expand cycle continued, until about 20 percent of the rock was lost.
Many people are surprised to learn that no glacier ever reached the top of Half Dome—the largest, the Sherwin Glacier, which receded about one million years ago, still left 800 feet of Half Dome’s summit exposed; subsequent glaciers were much smaller. But while glaciation didn’t carve and polish Half Dome, glaciers did sweep away the granite debris that had fallen from what we now call the face.
It’s fun to travel around Yosemite and photograph the product of all this natural sculpting from as many angles as possible. Since I time my personal trips and Yosemite workshops to avoid summer crowds, my viewing locations are mostly limited to Yosemite Valley. But even from the valley, there are extreme differences: compare the Tunnel View perspective in the west, to the many views from the valley’s east side: Sentinel Bridge, Cook’s Meadow, Ahwahnee Meadow, and (especially) Mirror Lake.
I do get to see Half Dome from Olmsted Point each October, and when a fall color trip happens before Glacier Point closes for the winter. This year’s Yosemite Fall Color and Reflections workshop threaded the needle between a couple of temporary snow closures (it will close for the season with the next major storm) and I managed to get my group up there for sunset one evening.
I love the face-to-face relationship with Half Dome that Glacier Point offers, but I’ve been here enough that I rarely photograph this view anymore. But when the sunset sky started to pink up this evening, I couldn’t resist clicking off a few frames. As you can see, I didn’t really come up with anything terribly unique, but I enjoyed creating a close-up portrait of Half Dome beneath a beautiful sky. In fact, as I took this picture, I thought the composition was so ordinary that I’d probably never process it. But going through my images while trying to view them through the eyes of people much less familiar with Yosemite’s magic, I decided to go ahead and share it.
Let me share Yosemite’s beauty with you in a photo workshop
The Many Views of Half Dome
Click any image to scroll through the gallery LARGE


Gifts From Heaven
Posted on November 3, 2024

Heaven Sent, Comet Tsuchinshan–ATLAS Above the Sierra Crest, Alabama Hills
Sony a7R V
Sony 24-105 f/4 G
ISO 3200
f/4
5 seconds
As much for its (apparently) random arrival as its ethereal beauty, the appearance of a comet has always felt to me like a gift from the heaven. Once a harbinger of great portent, scientific knowledge has eased those comet fears, allowing Earthlings to simply appreciate the breathtaking display.
Unfortunately, scientific knowledge does not equal perfect knowledge. So, while a great comet gives us weeks, months, or even years advance notice of its approach, we can never be certain of how the show will manifest until the comet actually arrives. For every Comet Hale-Bopp, that gave us nearly two years warning before becoming one of the most widely viewed comets in human history, we get many Comet ISONs, which ignited a media frenzy more than a year before its arrival, then completely fizzled just as the promised showtime arrived. ISON’s demise, as well as many highly anticipated comets before and after, taught me not to temper my comet hopes until I actually put eyes on the next proclaimed “comet of the century.” Nevertheless, great show or not, the things we do know about comets—their composition, journey, arrival, and (sometimes) demise—provide a fascinating backstory.
In the simplest possible terms, a comet is a ball of ice and dust that’s (more or less) a few miles across. After languishing for eons in the coldest, darkest reaches of the Solar System, perhaps since the Solar System’s formation, a gravitational nudge from a passing star sends the comet hurtling sunward, following an eccentric elliptical orbit—imagine a stretched rubber band. Looking down on the entire orbit, you’d see the sun tucked just inside one extreme end of the ellipse.
The farther a comet is from the sun, the slower it moves. Some comets take thousands, or even millions, of years to complete a single orbit, but as it approaches the sun, the comet’s frozen nucleus begins to melt. Initially, this just-released material expands only enough to create a mini-atmosphere that remains gravitationally bound to the nucleus, called a coma. At this point the tail-less comet looks like a fuzzy ball when viewed from Earth.
This fuzzy phase is usually the state a comet is in when it’s discovered. Comets are named after their discoverers—once upon a time this was always an astronomer, or astronomers (if discovered at the same time by different astronomers), but in recent years, most new comets are discovered by automated telescopes, or arrays of telescopes, that monitor the sky, like ISON, NEOWISE, PANSTARRS, and ATLAS. Because many comets can have the same common name, astronomers use a more specific code assembled from the year and order of discovery.
As the comet continues toward the sun, the heat increases further and more melting occurs, until some of the material set free is swept back by the rapidly moving charged particles of the solar wind, forming a tail. Pushed by the solar wind, not the comet’s forward motion, the tail always fans out on the side opposite the sun—behind the nucleus as the comet approaches the sun, in front of the comet as it recedes.
Despite accelerating throughout its entire inbound journey, a comet will never move so fast that we’re able to perceive its motion at any given moment. Rather, just like planets and our moon, a comet’s motion relative to the background stars will only be noticeable when viewed from one night to another. And like virtually every other object orbiting the sun, a comet doesn’t create its own light. Rather, the glow we see from the coma and tail is reflected sunlight. The brilliance of its display is determined by the volume and composition of the material freed and swept back by the sun, as well as the comet’s proximity to Earth. The color reflected by a comet’s tail varies somewhat depending on its molecular makeup, but usually appears as some shade of yellow-white.
In addition to the dust tail, some comets exhibit an ion tail that forms when molecules shed by the comet’s nucleus are stripped of electrons by the sun’s ultraviolet radiation. Being lighter than dust molecules, these ions are whisked straight back by the solar wind. Instead of fanning out like the dust tail, these gas ions form a narrow tail that points directly away from the sun. Also unlike the dust tail that shines by reflected light, the ion tail shines by fluorescence, taking on a blue color courtesy of the predominant CO (carbon monoxide) ion.
One significant unknown upon discovery of a new comet is whether it will survive its encounter with the sun at all. While comets that pass close to the sun are more likely to shed large volumes of ice and dust, many sun-grazing comets approach so close that they’re overwhelmed by the sun’s heat and completely disintegrate.
With millions of comets in our Solar System, it would be easy to wonder why they’re not a regular part of our night sky. Actually, Earth is visited by many comets each year, though most are so small, and/or have made so many trips around the sun that they no longer have enough material to put on much of a show. And many comets never get close enough to the sun to be profoundly affected by its heat, or close enough to Earth to shine brightly here.
Despite all the things that can go wrong, every once in a while, all the stars align (so to speak), and the heavens assuage the disappointment of prior underachievers with a brilliant comet. Early one morning in 1970, my dad woke me and we went out in our yard to see Comet Bennett. This was my first comet, a sight I’ll never forget. I was disappointed by the faint smudges of Comet Kohoutek in 1973 (a complete flop compared to its advance billing), and Halley’s Comet in 1986 (just bad orbital luck for Earthlings). Comet Hale-Bopp in 1996 and 1997 was wonderful, while Comet ISON in 2012 disintegrated before it could deliver on its hype.
In 2013 Comet PANSTARRS didn’t put on much of a naked-eye display, but on its day of perihelion, I had the extreme good fortune to be atop Haleakala on Maui, virtually in the shadow of the telescope that discovered it. Even though I couldn’t see the it, using a thin crescent moon I knew to be just 3 degrees from the comet to guide me, I was able to photograph PANSTARRS and the moon together. Then, in the dismal pandemic summer of 2020, Comet NEOWISE surprised us all to put on a beautiful show. I made two trips to Yosemite to photograph it, then was able to photograph it one last time at the Grand Canyon shortly before it faded from sight.
October 2024 promised the potential for two spectacular comets, Comet Tsuchinshan–ATLAS (C/2023 A3) in the first half of the month, and Comet ATLAS (C/2024 S1) at the end of the month. Alas, though this second comet had the potential to be much brighter, it pulled an Icarus and flew too close to the sun (RIP). But Comet Tsuchinshan–ATLAS was another story, brightening beyond expectations.
I shared the story of my trip to photograph Tsuchinshan–ATLAS in my October 16 I’m Not Crazy, I Swear… blog post, but have a couple of things to add about this image. First is how important it is to not get so locked into one great composition that you neglect capturing variety. I captured this wider composition before the image I shared a couple of weeks ago, and was pretty thrilled with it—thrilled enough to consider the night a great success. But I’m so glad that I changed lenses and got the tighter vertical composition shortly before the comet’s head dropped out of sight.
And second is the clearly visible anti-tail that was lost in thin haze near the peaks in my other image. An anti-tail is a faint, post-perihelion spike pointing toward the sun in some comets, caused when larger particles from the coma, too big to be pushed by the solar wind, are left behind. It’s only visible from Earth when we pass through the comet’s orbital plane. Pretty cool.
When will the next great comet arrive? No one knows, but whenever that is, I hope I’ve kindled enough interest that you make an effort to view it. But if you plan to chase comets, either to photograph or simply view, don’t forget the wisdom of astronomer and comet expert, David Levy: “Comets are like cats: they have tails, and do precisely what they want.”
Join me in my Eastern Sierra photo workshop
More Gifts From Heaven
Click any image to scroll through the gallery LARGE

")


")


")


