Eloquent Images by Gary Hart
Insight, information, and inspiration for the inquisitive nature photographer
Going Out a Winner
Posted on January 17, 2026
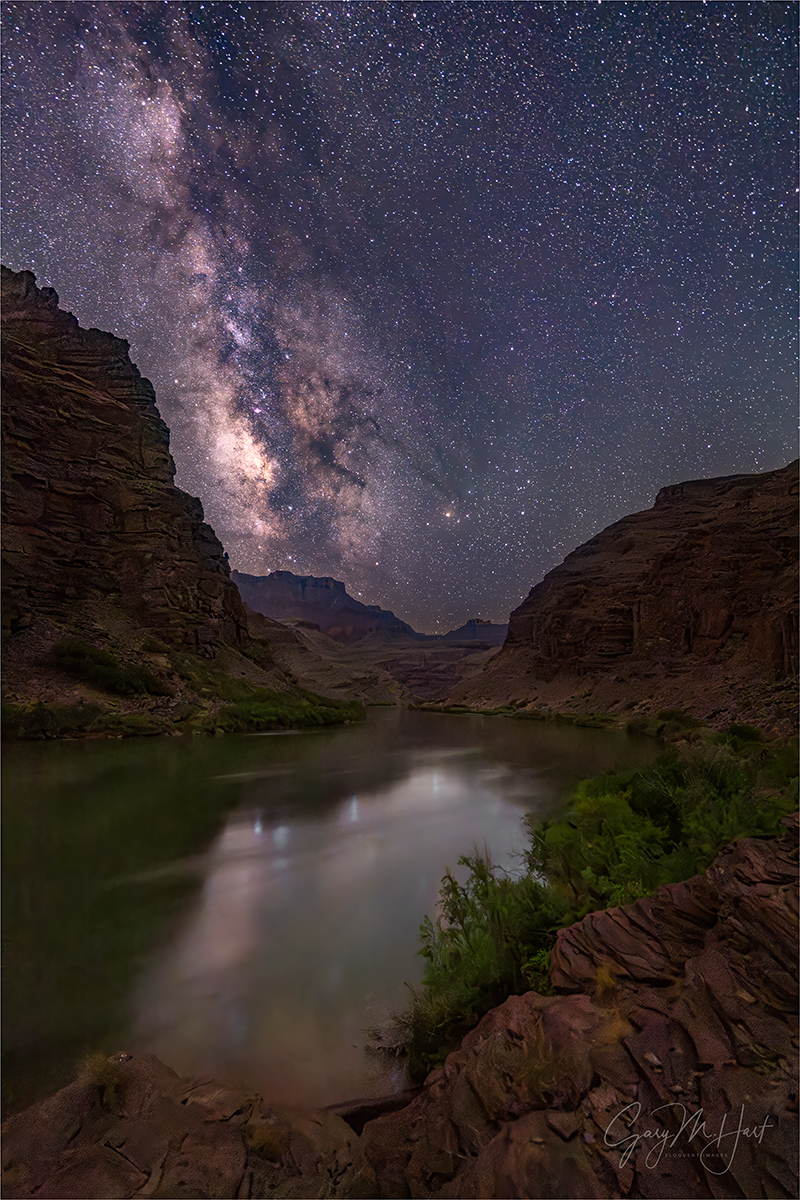
Milky Way Reflection, Colorado River, Grand Canyon
Sony α1
Sony 14mm f/1.8 GM
ISO 6400
f/1.8
20 seconds
There was nothing easy about this picture. Milky Way photography in general is a challenge, but trying it at the bottom of Grand Canyon is especially harrowing. In addition to the standard Milky Way photography difficulties, like insufficient light essential for composition and focus, any kind of night photography at the bottom of a mile-deep hole adds another level of dark.
In this extreme darkness, some locations are worse than others, and navigating to this one in particular was difficult enough to put it on the fringe of my safety comfort zone. Not only did getting here require a longer than usual walk on uneven and sometimes trailless (is that a word?) terrain, the last section was along a series of narrow ledges where a single misstep might result in a sudden plunge into the Colorado River. Oh, and as if all that wasn’t enough to test me, on the entire walk out here this night, I couldn’t push down the thought that the name of this particular camp is Rattlesnake.
But I was especially motivated to make this shoot work, because…
I knew before the trip started that this, my tenth Grand Canyon raft trip, would be my last one. Rafting Grand Canyon had been a bucket-list item for as long as I could remember, but when I scheduled my first trip way back in 2014, I had no plan to continue once it was it off my list. But, for many reasons, that initial experience so far exceeded expectations, I vowed to continue doing it until people stopped showing up. Fast forward nine more trips: turns out, I’m the person who will stop showing up…
Let me explain. The trip still fills, but not nearly as quickly as it did those first few years, when I already had a waiting list for the next year before the current year’s trip even pushed off. And with costs rising faster than I’ve been able increase the price (see slowing enrollment reference in the previous sentence), and understanding that I’m on the financial hook for a full trip whether or not it fills, somehow my Grand Canyon raft trip had become the most stress-inducing offering on my schedule. So, while I still love the whole rafting experience as much as ever, when I decided to pare a few workshops from that schedule, it seemed like ten (!) Grand Canyon raft trips was a nice round number to go out on.
But I will miss it. Between the sights, the rapids, the guides, and the fantastic people I got to share it all with, it’s pretty difficult to single out one thing I’ll miss most about rafting Grand Canyon. But hold a gun to my head, and I’d have to say it will be the night sky filled with more stars than I’ve ever seen, and so dark the Milky Way actually casts a shadow.
As desperately as I craved a good Milky Way experience (and when I say Milky Way, I refer specifically to our galactic core) on this farewell trip, I always go in knowing that, for many reasons, Milky Way success is far from a sure thing. Even though it’s always a priority, before this one, I’d had trips that had two nice Milky Way shoots, one nice Milky way shoot, and zero nice Milky Way shoots.
First obstacle is that, despite Grand Canyon’s typically clear skies, clouds do happen—I had two trips with so many clouds we never even saw the Milky Way. But even when the sky is clear every night, we still need a little luck to even see the galactic center because, from most campsites, the Colorado River’s general east/west orientation through the canyon puts views of the southern horizon (where the Milky Way hovers in May) behind the looming south wall. It helps that over the years I’ve been able to identify a handful of campsites that are either on the north/south trending Marble Canyon section of the canyon (where we spend our first two nights), or (more rarely) on a south-facing bend in the river. But they’re few and far between.
Since all Colorado River campsites in Grand Canyon are first-come, first-served, my trips can never count on getting one with a Milky Way view. And the Colorado River is unforgivingly one-way—if your first choice campsite is taken, there’s no way to return to that wide open second choice campsite you passed two miles back. This fact sometimes forces us to settle for whatever campsite is available. And with a schedule to maintain, even coming upon an empty ideally oriented campsite is of no value if we’re floating past it at 11 a.m. because we don’t have enough wiggle room in our schedule to lose a half day of rafting.
With all this in mind, at the start of each trip I powwow with the guides to explain (emphasize) my Milky Way and other photography priorities (for example, if it’s sunny, there are several key locations I only want to photograph in the full shade of early morning or late afternoon). We come up with the framework of a plan that by Day-2 is usually out the window, or at least is significantly renegotiated, as things invariably don’t go exactly as planned. And each plan change factors in downstream Milky Way possibilities.
The first thing I do after arriving at a new camp is check its Milky Way opportunities—specifically, I identify south and whether it’s behind a canyon wall (bad), or between the two walls (good). But even an open southern exposure isn’t enough—I know of at least one campsite with a great view of the southern sky, but it’s so overgrown along the river that all we get for a foreground is a bunch of scruffy shrubs. And my groups have also had several campsites where the only place to park the boats is smack in the middle of the only open view of the southern sky. So all the tumblers need to click into place for the Milky Way to work at the bottom of Grand Canyon.
If I determine that tonight’s campsite does have a good view of the Milky Way, at some point (usually at dinner) I give group the night’s Milky Way plan: where it will appear, when it will appear, and the best place to photograph it. I also give a basic Milky Way photography primer (focus, composition, and exposure tips), lecture them about the damage flashlights will do to everyone’s shots (especially red lights!), then make myself available for the inevitable, “Which lens…?,” “How do I get my camera to do…?” questions. By bedtime, most people who hope to photograph the Milky Way are ready (-ish). And of course they know where I’ll be set up if they have problems (but they’ll need to come me, because it’s too dark to safely move around to everyone).
All of my Grand Canyon night shoots are no-host: I tell people where I’ll be and roughly when I’ll be there. In May the earliest the Milky Way rises into view is around 1:30, but to avoid disturbing people who value their sleep more than I do, I never set an alarm because that might disturb those nearby who would rather sleep. Fortunately, I have no problem waking myself up at a specific time, give or take 15 minutes.
There are six nights on this trip. The way the trip usually unfolds, our best chances for the Milky Way are the first two nights, and (if we’re very lucky) the fourth night. On our first night of this trip, we ended up at a spot beneath a wall that blocked the lower half of the Milky Way, but the few of us went for it and did okay—but I knew we could do much better.
Not wanting to hang all our hopes on getting the very nice but difficult to secure campsite on night four, I felt very motivated to make the second night work. But as the afternoon wore on and we continued to encounter good campsites that were already taken, we just floated on. And there comes a point where you just have to take whatever is available so we can start the business of setting up camp and making dinner before it gets too dark. Which is why the guides were actually relieved as we floated up to Rattlesnake camp and found it open, Milky Way be damned. The first thing I did when we landed was pull out my phone and check the compass to find south, and as feared, the S-needle pointed right at a towering wall. Oh well…
But after setting up my campsite, I got my (iPhone) compass out and went exploring. My eye was on a bend in the river a few hundred yards downstream, and I wondered if it might bend far enough to the south to provide a view to the southern sky, and whether it was even possible to get down that far.
As I moved downstream, the route along the river got rockier, eventually turning into a series of sandstone ledges with a steep drop straight to the water. Each time it looked like I couldn’t go any farther downstream, I found a I found a route that got me a little farther. I was at least a quarter mile downstream before reaching a spot where I could go no farther without climbing. (A quarter mile doesn’t sound very far, but in total darkness and without a trail, it feels like forever.) Looking downstream, I saw that this vantage point still didn’t face due south as I’d hoped, but it did provide a clear view southwest. Hmmm—not ideal, but… maybe?
Checking (and re-checking) my astronomy app, I guessed (crossed my fingers) that we might have about a 45-minute window from the time the Milky Way rotated out from behind the canyon wall, until the sky started to brighten enough that we’d start losing essential contrast. And the longer I took in the entire view, the more I liked the river scene we’d be able to put with the Milky Way. If it worked.
Walking back, I took special note of the route, identifying distinctive rocks and shrubs I might be able to use as landmarks in the dark. At camp, I told my group what I’d found, and that the window of opportunity is very small (even the slightest miscalculation on my part could make a difference). I also warned the that the route out there, while only slightly treacherous in daylight, would be exponentially more-so in virtually total darkness. I also told them I’d be going for it. I finished by encouraging anyone even considering going out there in the dark to scout it and make a route plan now.
Before crawling into my sleeping bag, I got my camera and lens combo set up on my tripod and stood it next to my cot. The last thing I did before closing my eyes was set my mental alarm clock for 3 a.m.
I woke up a little before 3:00, grabbed my tripod, and made my way out. Because other people might be either shooting or sleeping, I try not to use any kind of flashlight or headlamp when walking around at night, but using only my cell phone screen to illuminate my next step, I didn’t really have much trouble finding the way, one step (as far as I could see) at time until I was there.
I was surprised and pleased to see how many people were already out there—on this trip I have a lot of non-photographers who join photographer friends and loved-ones, but I’d guess close to a third of the group was there already, and a few more joined shortly after I arrived. With no light, I poked around on the sandstone until my eyes to completely adjusted, and eventually edged my way out to the farthest ledge. Then I went to work.
I did my usual vertical (first) and horizontal composition mix, trying different ISO and shutter speed settings to give myself more processing options. I also moved around a little, eventually photographing from three different positions within about a 30-foot radius. From my first frame to my last was only 25 minutes, but by the time I’d finished, I knew I’d had a Milky Way success I so wanted on my final trip.


Open Mind and Open Eyes
Posted on November 1, 2025

Splash of Rainbow, South Tufa, Mono Lake
Sony α1
Sony 16-35 GM II
6 seconds
F/11
ISO 100
As landscape photographers, it’s easy to arrive at a photo location with a preconceived idea of what we’re going to shoot. That’s often because there’s a single perspective that gets all the attention, dominating the images of the location shared online and skewing the perception of what its images should look like.

Stillness, South Tufa, Mono Lake
At Mono Lake, despite its sprawling layout with lake views that span 270 degrees, photographers (myself included) tend to gravitate the east-facing beach with a solitary tufa tower that resembles a battleship floating just a couple hundred feet offshore. I can’t deny that it’s a striking feature worthy of photographing, but certainly not to the exclusion of other opportunities at South Tufa.
Fortunately, since this spot is at the most distant corner of South Tufa, getting out there requires walking past most of the other views on the route. So each time I take a workshop group for its first visit to South Tufa, as I guide them out to this distant beach, I make a point of emphasizing all the possibilities along the way, encouraging them to stick with me all the way out to the battleship view, but to file away other scenes they might want to return to as they go.
But photography at South Tufa isn’t just about the views—equally important is the light. So another point I try to emphasize on that initial walk is understanding—given that there are photo-worthy views that include both lake and tufa facing east, north, and west—how much the scene will change with the direction of the sunlight. Since our first visit is usually a sunset shoot, I remind everyone how different the light will be when we return for sunrise the next morning. I point out where the sun will rise and encourage them to visualize the different light we’ll see that will opportunities in multiple directions, and to identify potential compositions that might work in that light.
Since we’d been there the prior evening, as soon as this year’s group arrived dark and early on this autumn morning, everyone scattered quickly. I brought up the rear, checking in with everyone on my walk out to the battleship tufa beach. As much as I like the scene at this east-facing beach, one challenge is that it’s in the midst of what might be best describes as a tufa garden—a collection of stubby shrubs and 10-15 foot high tufa towers—that makes it very difficult to see what’s happening in the other directions. But with a nice mix of clouds and sky this morning, I knew the potential existed for a nice sunrise and made a point of keeping my head on a swivel to avoid missing something in the other directions.
About 15 minutes before sunrise I noticed the clouds in the west start catching light, and shortly thereafter the Sierra peaks in the same direction lit up. I let the near me know that this might be a good time to wander over to the other side of the tufa garden and headed in that direction. The walk to the other side is probably less than 100 feet, but by the time I got there the light on the base of the clouds had intensified significantly. And much to my amazement—given that there was no sign of rain here, nor any rain at all forecast for the area that morning—realized that a splash of rainbow was perched atop the hills across the lake.
Not knowing how long the rainbow would last, I ran around hailing as many in my group as possible, and we all went straight to work trying to make a photo before it went away. I’m a strong proponent of finding compositions where all the elements work together, which is no small feat at South Tufa, given all the randomly situated tufa towers and rocks jutting from the water. Fortunately, as I moved around trying to organize all the visual elements in my scene, not only did the rainbow seem to be waiting for me to finish, it actually intensified as I did it.
It probably didn’t take more than a minute or two, but it felt like forever before I found a composition that satisfied me. As you can see, this rainbow was never destined to be the main subject—at its best it was simply a colorful accent to an already beautiful scene. But what an accent it was.
In addition to the distant rainbow and sunlit clouds, the other important elements I needed to organize were primarily in my foreground: the tufa peninsula jutting in from the left; the small tufa island at my feet, the submerged tufa stones; and (especially) the reflection.
To make all this work together, I started by centering the little island in my frame, and balancing the rainbow with the tallest spire of the peninsula. With the scene left/right balanced, I decided I need to get my boots muddy and set my tripod in shallow water to turn the foreground tufa into an actual island. Since the best clouds were fairly low, I only included enough sky to include them (by putting the top of my frame where I did, viewers can infer that the clouds stretch much farther than they did), and was careful not to put the little blip of tufa on the far right too close to the edge.
Now for the reflection. I didn’t really care for the empty water between the reflection and the little island, so I slowly dropped my tripod, keeping an eye on my LCD and stopping when the reflection filled almost all of that watery void. I put on my Breakthrough 6-stop dark polarizer to smooth the water, and it to reveal the interesting detail on the lakebed without erasing the colorful part of the reflection. Finally, I focused on the small rocks just beyond my foreground island, and clicked.
This is not a scene I’d have normally gravitated to, but I was drawn by the light (and stayed for the rainbow). Had I not seen the rainbow, I’m not even sure I’d have taken the time to build the composition I ended up with, but this is just one more reminder that if you open your mind and your eyes, things just have a way of working out.
Workshop Schedule || Purchase Prints || Instagram
Mono Views
Click any image to scroll through the gallery LARGE


Hold My Gear (the Sequel)
Posted on October 18, 2025

Color and Clouds, North Lake Autumn Reflection, Eastern Sierra
Sony α1
Sony 16-35 GM II
1/100 seconds
F/9
ISO 100
After sharing in my prior post that I’ve been lugging a 30 pound camera bag through airports, it occurred to me that I haven’t updated you on the ever-changing contents of said camera bag lately. But before I continue, let me remind you that a photographer’s gear choice is no more relevant to his images than a writer’s pen is to her stories, or a chef’s cutlery is to her cuisine. Yes, these choices might make a difference on the fringe, but I imagine most would agree that a great chef will almost certainly get better results with Kirkland knives (with all due respect to Costco) than an average chef would get with top-of-the-line Zwilling.
But that doesn’t mean that I would voluntarily discard my current gear for some other brand. Far from it. I love the gear I use, and am always happy to share why. So what follows is a revised version of the first Hold My Gear post, from 2021—below that, you’ll find the story of today’s image.
I’ll start with my camera bag
Shimoda Action X50 with a Large Core Unit: This bag simply checks all the boxes for me: for starters, it’s large enough to carry everything I consider essential, with room to spare for a few things that are less than essential and that may change depending on the trip and my objective. In addition to 2 bodies and 5 lenses, it fits all the miscellany I always want with me (headlamp, rain and/or cold weather apparel, extra batteries and media cards, tools, among many things).
But more than capacity, my bag also needs to be comfortable on long hikes—whether across rugged High Sierra terrain, Iceland’s winter icescapes, or the endless concourses of Sydney International Airport—and (just as important) it must fit fully loaded into any overhead compartment I encounter. My Shimoda passes all these tests with flying colors.
Always in my bag
- Sony a7R V and Sony a1 bodies
- Sony 12-24 f/2.8 GM lens: Though I don’t use it as much as a couple of other lenses, having a lens as wide as 12mm allows me to photograph things I never could before, and I love that it’s still relatively compact.
- Sony 16-35 f/2.8 GM II lens (plus a Breakthrough polarizer), which is usually mounted on the a1: This focal range is covered by other lenses in my bag, but I love the lens too much to leave it behind—crazy sharp, and f/2.8 means it’s fast enough for night photography in a pinch. Plus, unlike the 12-24, I can use it with conventional polarizing and ND filters.
- Sony 24-105 G lens (plus a Breakthrough polarizer), which is usually mounted on the a7R V: Not only is this lens wonderfully sharp, its middle-of-the-road focal range fits so many situations—it’s no wonder this lens is my workhorse.
- Sony 100-400 GM lens (plus a Breakthrough polarizer): Replacing my 70-200 with this slightly bigger lens doubled my focal range, without adding tons of extra weight—and it’s a good match with the Sony 1.4X teleconverter.
- (Usually) Sony 14mm f/1.8 GM lens: This is my night lens, and though I only use it at night and don’t do night photography on every trip, since I have a slot for it and it’s not too heavy, my 14 GM usually just lives in my camera bag.
- Sony 1.4X teleconverter—I used to use the 2X, but found a noticeable sharpness improvement after switching to the 1.4X.
- Filters: Breakthrough 72mm and 77mm neutral polarizers (nearly fulltime on the 16-35, 24-105, and 100-400 lenses), Breakthrough 72mm and 77mm 6-Stop Dark polarizing filters (to switch out with my standard polarizers when I need a longer shutter speed).
- Memory cards: Each camera has two 128 GB Sony Tough cards, then I have a handful of other 128 GB and 64 GB SD cards rattling around in a pocket, just in case.
- Other stuff: Lens cloths, headlamp, insulated water bottle, extension tubes, memory cards, multiple spare batteries, Giotto Rocket Blower, and a couple of Luna Bars (because photography always trumps meals).
Specialty Equipment (lives in a second camera bag that gets tossed in the back of the car and stays there when I don’t need to fly to my destination)
- Sony 20mm f/1.8 G lens: For Milky Way and other moonless night photography—this one’s even more compact than the 24mm.
- Sony 24mm f/1.4 GM lens: For Milky Way and other moonless night photography—I can’t believe how compact this lens is.
- Sony 90mm Macro: I use this lens a lot with extension tubes to get super close for my creative selective focus work (wildflowers, fall color).
- Sony 200-600 G lens: When I want to go big on a moonrise/moonset—often pared with the 1.4x teleconverter. I also use this lens with extension tubes for selective focus fall color and wildflowers.
- 2 Stepping Stone LT-IV Lightning Triggers
Support
- Really Right Stuff Ascend-14L tripod with integrated head: Absolutely the best combination of light, tall, and sturdy I’ve ever found in a tripod. It’s so light and compact that I just attach it to my camera bag, even when flying, and just forget about it until it’s time to shoot (never a problem with TSA).
- Really Right Stuff 24L Tripod with a RRS BH-55 ball head: Sturdy enough for whatever I put on it, in pretty much whatever conditions I encounter. I also like that, even though it doesn’t have a centerpost, when fully extended (plus the head and camera), it’s several inches taller than I am. As much as love my Ascend, this is my tripod of choice in strong wind, or when I’m shooting extra long. As with my bag that carries my specialty lenses, this tripod usually lives in the back of my car and doesn’t usually fly with me (it would need to go in the suitcase), but is always available when I drive to a destination.
Color and Clouds, North Lake Autumn Reflection, Eastern Sierra
A few words about today’s image
Thanks to a great group and beautiful conditions, this year’s Eastern Sierra workshop was a great success. Though today’s image didn’t come during the workshop, you could call it ES workshop adjacent, because it came the day before the workshop, on my annual pre-workshop scouting visit to North Lake.
As familiar as I am with all my locations, I hate taking my groups to locations I haven’t been to in a year, because you just never know what might have changed. That’s especially important when the goal is fall color, which can vary significantly from year to year. It’s not always practical to pre-scout every location, but I do my best to make it happen when I can.
For my Eastern Sierra workshop, I always leave early the morning of the day before the workshop, which gives me time to hit all my spots on the way down. I can make it as far as Bishop, which makes for a long day, but from Bishop can finish my scouting the next morning by driving the final hour to Lone Pine, and leaving early enough to get eyes on my Lone Pine locations (Whitney Portal, Mt. Whitney, and the Alabama Hills) before the workshop starts that afternoon.
With the workshop always starting a Monday, Sunday is dedicated to scouting my locations. But this year’s Sunday scouting mission was a little problematic because I’d only just returned from Jackson Hole at 9 p.m. Saturday night, after assisting Don Smith’s Grand Teton National Park workshop (I’d get instant payback because Don would be assisting my Eastern Sierra workshop). After unpacking and repacking, the plan was to rise dark and early Sunday morning and be on the road by 7:00 a.m. This year, instead of bounding out the door at 7:00, I pretty much dragged myself out (with a shove from my wife) closer to 8:30. Still enough time, but not a lot of wiggle room.
I perked up pretty quickly once on the road, helped no doubt by an intermittent light-to-moderate rain that followed me down 395, and (especially) the beautiful clouds that came with it—a significant upgrade from the chronic blue skies that often plague this trip.
To ensure that I made it up to North Lake before dark, I didn’t take my usual swing through the June Lake Loop, and skipped the drives up to the McGee Creek and Mosquito Flat trailheads as well. Since these aren’t workshop stops (though I do recommend them as possible extra locations for anyone looking to photograph more color on the drive from Bishop to our Lee Vining hotel on Day 3), I felt okay about missing them in favor of North Lake.
On the steep ascent up Bishop Creek Canyon, I got a front row view of the peaks playing hide and seek with the clouds. By the time I climbed the last mile on the (mostly) unpaved, one-lane road to North Lake, a few sprinkles dotted my windshield. With so much workshop prep on my mind, I virtually never photograph at any point on this pre-workshop scouting trip, but for some reason (beautiful sky), this time I swung my camera bag onto my back for the 100-yard walk from the parking area to the lakeshore. I was beat, and hungry, and with darkness coming soon, I just wanted to get back to Bishop to check-in to my hotel to prepare (and rest up) for the workshop—but if the lake is real nice, maybe I’ll fire off a couple of frames before calling it a day.
The color couldn’t have been better, and the clouds were off the charts. A couple of other photographers were set up on the lakeshore where I usually like to shoot the reflection, but with a light breeze spreading small ripples across the water, I passed on the reflection in favor of the gold and green grass to fill my foreground.
After about five minutes I was pretty happy with what I had and was just about to pack up when I noticed that the water across the lake had flattened out, and a reflection had formed. It was a long way away and hardly visible, but looking closer, I could see the stillness expanding toward me. Soon—in no more than a minute—the entire lake surface a calmed to a reflection and all thoughts of leaving vanished.
With my usual reflection spot occupied, I moved about 30 feet closer to the road, to a tiny micro-cove sheltered by grass and a large rock. Here you can’t get as much reflection, but being so sheltered, it’s usually the last place the reflection leaves if a breeze picks up.
Given the narrowness of my foreground reflection here, combined with beautiful clouds and light high above, I opted for a vertical composition. Dropping lower, I positioned myself to include two small rocks as foreground anchors, then composed wide to include as much sky and reflection as possible.
Despite occasional sprinkles, the rain mostly held off and I ended up staying for nearly an hour, finally moving over to my usually spot when the other photographers moved on.
This was Sunday evening. I returned with my group for sunrise Wednesday morning. I was pretty confident the color would still be great, but crossed my fingers all the way up the canyon hoping we’d get a reflection. I was right about the color, and the reflection gods smiled on us as well, delivering an absolutely flawless mirror atop the water. We also had a couple of clouds, but nothing like my evening a couple of nights earlier, and as excited as my group was, I didn’t have the heart to tell them that I had it even better.
I Love Reflections (Perhaps You Noticed)
Click any image to scroll through the gallery LARGE


, Death Valley")


, Yosemite")


Ruminating on my Workflow—Both Digital and Analog
Posted on May 10, 2025

Spring Sunset, Half Dome, Yosemite
Sony a7R V
Sony 24-105 f/4 G
ISO 50
f/16
2 1/2 seconds
In one of the training sessions during last week’s Yosemite Spring Waterfalls and Dogwood photo workshop, someone asked about my digital workflow. During my (riveting) file management summary, I mentioned off-handedly that I never delete a raw file, regardless of its content. The amount of push-back I got surprised me, but it caused me to consider more closely my reasons for doing something I never imagined could be so controversial.
For starters, in addition to my primary reason for never deleting my raw files which I’ll get to shortly, I can cite several valid secondary reasons:
- Processing improvements might someday render a previously unusable image salvageable. For example, once considered a pipe dream, the ability to sharpen previously soft images has arrived, and capability continues improving. And today’s noise reduction software has allowed me to process images I once deemed so unprocessable that I would never have considered keeping them.
- I often use images from past shoots for information. Keeping each camera’s timestamp accurate (by adjusting it before each shoot) enables me to return virtually to prior locations and determine things like the time sunlight strikes a particular feature, or (by checking against past moon/sun rise/set image) the number of degrees a peak or mountain range rise above a hypothetical flat horizon.
- Applying my click-evaluate-refine-click… approach to arrive the final (“perfect”) image, it’s helpful to me to be able to reference the steps that got me to any given image.
- Knowing that I never delete anything saves me from the inevitable panic that would ensue when I can’t locate image where I expected to find it.
Each of these is a valid reason that, to me, by itself might be enough to justify a no-delete policy. But honestly, the biggest reason I don’t delete images is time. Going through each image one-by-one wastes minutes or hours that could have been spent on more productive endeavors; accelerating the image purge process by deleting large groups of images in one fell swoop, risks inadvertently expunging something important.
The most common arguments I hear in favor of culling images are organization and storage space. To which I say, locating any image isn’t a problem if you have an organized import procedure—mine is quite simple, involving a folder for each year, embedded with folders for each of that year’s shoots, then letting my Lightroom import rename each file to something descriptive. And storage space? Consider that on my desk is an 18 TB hard drive that cost me around $300. Not only does it contain every digital original (jpeg for a year or two, then raw ever since) I’ve captured since I transitioned to digital more than 20 years ago (2003), it’s still is only a half full. In other words, storage is cheap—really cheap.
I’m not advocating for my approach as much as I’m explaining it. As with pretty much everything else in photography, and despite what you might hear from self-proclaimed experts, there is no universal “best” way to do something: choose the workflow that’s best for you.
Awkward segue
“Workflow” has become something of a buzzword in the photography world, generally apply to image management. But really, it can describe the processes that guide any task from start to finish. Thinking about last week’s Yosemite dogwood workshop, it occurs to me that I also have an analog workflow for running my workshops, developed over the past 20 or so years (has it really been that long?).
A workflow is only as good as its ability to handle the unexpected or uncommon: flexibility. In my image management workflow, flexibility includes (among other things) multiple and redundant backups, including at least one offsite backup, to safeguard against any imaginable threat to my images. But that flexibility should also factor in the ability to quickly locate and access any image quickly, and in multiple ways, whether I’m at home or the road.
In my Yosemite workshops, flexibility starts with my lifetime of accumulated Yosemite knowledge that enables me to structure each workshop on the fly, based on the conditions. (FYI, I’m not trying to portray myself as the only photographer with this kind of intimate knowledge.) I start with a (mental) A-list of locations I want to get my group to no matter what, and a B-List of locations that I tap based on the conditions. And whether a photo spot is the A- or B-list, the when of each location visit is always determined by the conditions.
Last week’s workshop was a perfect example of why I never want to get too locked into a plan. We enjoyed conditions that were equal parts beautiful and challenging, requiring a lot of quick thinking and abrupt shifts to take full advantage. The fickle weather included low clouds (we didn’t even see all of Half Dome until the third day), high clouds, blue skies, light drizzle, torrential downpours, lightning and thunder, and a short-lived but generous dose of hail. Compounding the complications for me were especially unreliable weather reports that at some points felt downright random.
In a blue-sky Yosemite workshop, we may only get to Tunnel View once or twice, but when we enjoy actual weather, each visit to Tunnel View provides a completely different look. In this workshop, we made it to Tunnel View at least a half dozen times. And in a typical (more benign weather) dogwood workshop, I try to give my group time to get themselves in their creative zone by holding off on the serious dogwood shoots until day three (of four). But this time, the conditions on days one and two were so perfect for photographing dogwood (peak bloom, dense clouds, no wind), we started photographing dogwood on our first afternoon, saving the larger views for later in the workshop when the weather forecast promised that there would be fewer clouds obscuring Yosemite’s monoliths.
But photographing El Capitan and Half Dome requires El Capitan and Half Dome to actually be visible (not my first Yosemite rodeo)—since they usually disappear into the clouds when it rains, I grew increasingly concerned when the forecast for our final day started trending toward rain. One week before the workshop, our last day was “Mostly sunny, with a 10% chance of showers”; by the time the workshop started, the final day forecast was “Party sunny, with a 30% chance of showers.”
Forecasts are important because I plan locations based on conditions—not just conditions now, but my expectations of conditions later in the workshop (an inexact science at best). For my A-list locations especially, I don’t want to risk missing one entirely because I delayed until later in the workshop, only to find conditions deteriorated more than I’d expected.
For several reasons, I like finishing my Yosemite workshops with a sunset view of Half Dome from a peaceful bend in the Merced River on Yosemite Valley’s the east side. Though it’s a personal favorite that I visit a lot on my own, I also love sharing this spot with my groups. But when the workshop’s penultimate day presented a nice mix of clouds and blue sky, and the rain forecast for the final day had increased to 60%, I upended my preferred workshop workflow one more time and bumped my planned last-day Half Dome shoot to that evening.
I can’t say that my decisions always work out this well, but the personal validation is sure nice when they do. We arrived about an hour before sunset and found beautiful conditions from top to bottom. I love the fresh green of Yosemite’s brand new leaves each spring—I’d been to this spot with my moonbow group earlier in April, but the green was just starting then. This time the trees had completely leafed out and the difference was glorious. In autumn we can get mirror reflections here, but with peak spring flow swelling the Merced River, the reflection was a nice abstract of color and shape instead. And to top it all off, the clouds above Half Dome changed by the minute, making the sky much more interesting than the boring blue that’s so common in Yosemite.
Still, despite all this, my camera bag stayed on the ground nearby as I worked with my group, pointing out composition opportunities and encouraging them to find foregrounds and maybe try a neutral density filter to enable a long exposure that might reveal hidden (to the naked eye) patterns in the flowing water. As sunset approached and the light faded, some started packing up their gear. I told them not so fast: Half Dome can get light up to five minutes after sunset, and we have no way of knowing whether there’s an opening on the horizon for the sun to slip through. In other words, we’ll just sit tight for a few more minutes.
As if on queue, almost immediately I saw some of the highest clouds start to brighten and warm, so I opened my camera bag and extended my tripod, just in case. Within a minute or two the clouds above Half Dome started to pinken and I had my camera out and mounted within seconds.
There’s no time for creativity and experimentation when I’m with a group, but I’m extremely familiar with the many composition options here and went straight for my go-to good sky and reflection framing: vertical, Half Dome slightly right of center, just wide enough to include all of the best parts of the clouds (more specifically in this case, the color) and their reflection. You could call this compositional workflow (there’s that word again) that enabled me to get a nice image as quickly as possible.
Focus was easy since everything was at infinity. I wanted to emphasize the water’s motion with a long exposure, but didn’t have time to retrieve and screw on a neutral density filter. Fortunately, it was late enough that I was able to get a 2 1/2 second shutter speed using ISO 50 and f/16.
The pink only lasted a minute or two, and the direct light never reached Half Dome, but no one complained. As it turned out, our final sunset the next day was completely washed out by an electrical storm that swallowed Half Dome and El Capitan, and included some of the heaviest rain I’ve ever seen in California (and at one point chased me into the Wawona Tunnel to escape marble-sized hail).
One more thing
Going back to this compositional workflow I idea, in general I’m opposed to formulaic composition because it stifles creativity, but every image doesn’t need to break new ground, and like I said, nothing in photography is absolute…
More Yosemite Photo Workshops
Workshop Schedule || Purchase Prints || Instagram
Variations on a Scene: Images From This Location Through the Years
Click any image to scroll through the gallery LARGE


Twin Peaks
Posted on March 7, 2025

Blue Hour Reflection, Vestrahorn, Iceland
Sony a7R V
Sony 12-24 GM
1/6 second
F/10
ISO 125
In the canon of iconic Iceland mountains, Vestrahorn is rivaled only by Kirkjufell, the much-photographed wizard-hat on Snaefellsnes Peninsula. While Kirkjufell’s acclaim is much deserved, as a photographer, one thing in particular that distinguishes Vestrahorn from Kirkjufell for me is its variety of compositional options.

Winter Chill, Kirkjufell and Kirkjufellsfoss, Iceland
Kirkjufell is arguably Iceland’s most visually striking mountain, but the vantage points from which to photograph its distinctive outline are for the most part limited to the trail that starts at the parking lot, climbs briefly to a small bridge, then circles down a short but steep slope. I’ve never been there in summer, but in winter it’s pretty difficult to venture anywhere off this trail.
I can’t discount the fact that Kirkjufell also comes with its very own foreground waterfall, but Vestrahorn (despite lacking a waterfall of its own) has acres and acres of diverse terrain for a creative (and mobile) photographer to explore. So expansive and varied is the surrounding terrain, I’ve been coming here since 2019 and am still finding completely new foregrounds to add to my Vestrahorn images.
Exploring for new foregrounds is probably my favorite part of photographing popular subjects. The first two or three years I visited Vestrahorn, I’d do most of my photography at the beach, where the barely sloping sand stretches far into the distant surf, and the area separating the beach from open ocean is (I estimate) at least a half mile—distant enough that the swells (finally) break on the sand as the smallest, least aggressive waves imaginable.

Vestrahorn Reflection, Stokksnes Beach, Iceland
Once reaching the beach, what these waves lack in height, they more than make up for in length, gently washing up a hundred yards or more onto the black sand, before running out of gas and slowly sweeping back. In their wake is an ephemeral mirror that, when timed right (before the water percolates into the sand, or is overrun by the next wave), paints the bottom half of any image with an inverted duplicate of Vestrahorn and its surroundings. And because these waves are so low and slow, it’s possible to safely stand in the approaching surf wearing mid-calf waterproof boots, and keep your socks completely dry.
But the experience at the beach isn’t all about reflections. Each wave deposits, or repositions, an assortment of shells and smooth stones. After tiring of photographing reflections, I’ll often switch to these transient elements for my foreground. Other times, I’ll make my foreground all about the waves themselves, capturing the intersecting lines and arcs of waves arriving at different times and angles, or playing with long exposures to blur the leading or trailing edges advancing or receding water. And depending on how I time these shots, it’s also possible to create single frames that include reflection, shells/stones, and wave effects.
As much as I enjoy playing with all the visual elements at the beach, a couple of years ago I decided I should spend more time in the dunes. I’ve photographed the dunes of Death Valley and White Sands quite a bit, but these dunes are completely different. For starters, they’re black. They’re also much smaller, and capped with patches of grass like blonde toupees. But their small size, easy navigability, and distinctive curves are ideal for strategic juxtaposition, allowing me, with careful positioning, to assemble them into strong foreground elements that guide the eye elegantly to the mountain and sky beyond.
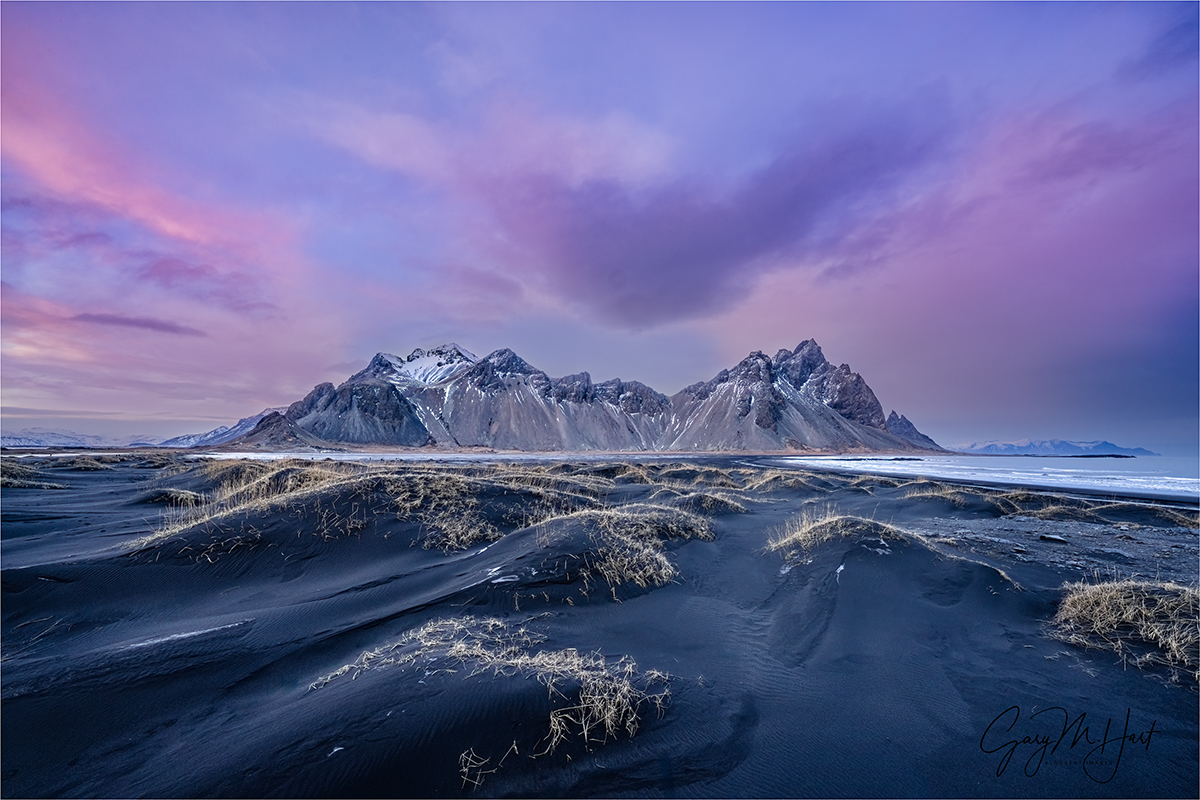
Winter Twilight, Vestrahorn and Dunes, Iceland
And then there are the components that vary with each Vestrahorn visit: clouds, light, snow, and ice. On last year’s visit, we didn’t have a lot of snow and ice, but the sunset light was off the charts, allowing me to capture one of my favorite Vestrahorn images that used an ultra-wide lens to fill my frame with the nearby dunes and colorful clouds, while shrinking the massive mountain to a small, distantive centerpiece.
Don Smith and I have been bringing our Iceland photo workshop groups to Vestrahorn for as long as we’ve been visiting Iceland. It’s always been a sunset spot, but one thing we’ve learned after many years photographing Iceland in winter is the need to constantly monitor the weather and stay flexible. Which is why we rely heavily on our Icelandic guides, and almost always follow their experience-based advice. This year’s Vestrahorn visit was a perfect example.
Our original plan was Vestrahorn for sunset, and the ice cave for the next morning. But this year the threat of extreme wind on our Vestrahorn afternoon caused us to flip-flop our sunset/sunrise locations so we’d be in the sheltered ice cave when the wind was strongest. This ice cave worked out great, and the next morning we traveled to Vestrahorn for our first-ever sunrise here.
Our group arrived in the blue hour and scattered almost instantly. Though Vestrahorn gets nice light at both sunrise and sunset, this time it wasn’t sunrise light or color that excited them, but rather, the spectacular clouds swirling about the peak, As I made my way around to check on everyone in the chilly twilight, I soon found myself beyond the dunes to an area of shallow pools I knew of, but had never photographed. Usually these pools are frozen, creating intricate patterns that make excellent foregrounds themselves, but this year, instead of ice we got blue-gray reflections of the mountain and clouds, framed by frozen sand.
Blue Hour Reflection, Vestrahorn, Iceland
Walking the perimeter of the largest pool while helping one of my workshop students identify a suitable foreground, I pointed out a mini-cove that seemed to cradle Vestrahorn. After my student finished with his shot, I stepped in to try a composition of my own. After working the scene for a couple of minutes, I was so excited by what I saw on the back of my camera, I walked around herding as many in my group as I could find over to this spot. Unfortunately, not everyone made it before the clouds descended and obscured much of the peak, but by that time it seemed that most of the group had found something that pleased them before the mountain went away.
My point is not that Vestrahorn is “better” than Kirkjufell (or vice-versa). But based on the photos shared by others, it does seem that Kirkjufell gets more attention than Vestrahorn. And I will say that if the joy you get from photography is found in creating unique images rather than collecting icons (not that there’s anything wrong with that), you might just be happier at Vestrahorn.
Join Don Smith and me in Iceland
Workshop Schedule || Purchase Prints || Instagram
Twin Peaks
Click any image to scroll through the gallery LARGE


The Best Camera Is…
Posted on January 22, 2025
Framed Reflection, El Capitan, Yosemite
Apple iPhone 16 Pro
24mm focal length equivalent
ISO 64
f/1.8
1/1150 second
… The one that’s with you
Yes, I know it’s a cliché, but like most clichés, this one is founded on truth. Even people like me, who pay the bills with our pictures, don’t carry our “real” cameras 24/7. In those instances, when I see beauty I deem worthy of recording, I’m happy that my iPhone (which is always with me) gives me serviceable images.

Mobile Dinosaur
In my prior post, I listed 10 reasons to become a nature photographer. Number one was saving memories; number three was low-cost start-up, and cited the very good cameras included in every smartphone.
I resort to iPhone photography not to save money, but for convenience in day-to-day living. Virtually all of my iPhone photos are quick snaps of transient life moments, from special family times that I want to save, to quirky observations worthy of sharing (like a dinosaur riding in the back of a pickup on Highway 99), to simply saving things I don’t want to forget (for example, a business card, or a humorous comment on my daily Starbucks drink).

Inner Beauty, Japanese Maple, Portland Japanese Garden
I’m definitely not one of those photographers who actively pursues creative smartphone photography, but I don’t hesitate to pull out my iPhone when natural beauty moves me and my adult equipment isn’t available. Though the resulting images rarely amount to anything, the simple ability to save the moment gives me comfort.
On the other hand, there was that time in May 2023, when my iPhone enabled me to capture the famous maple tree at the Portland Japanese Garden. I’d arrived just hoping to get a simple snap of the celebrity tree, but soon found myself in full photographer mode, switching my phone to raw capture, dropping down to grass level, and going ultra-wide to get an angle that emphasized the web-like canopy and its shadow on the grass. Even though there are already thousands of similar images of this beautiful little tree, my own version turned out to be one of my favorites of the year.
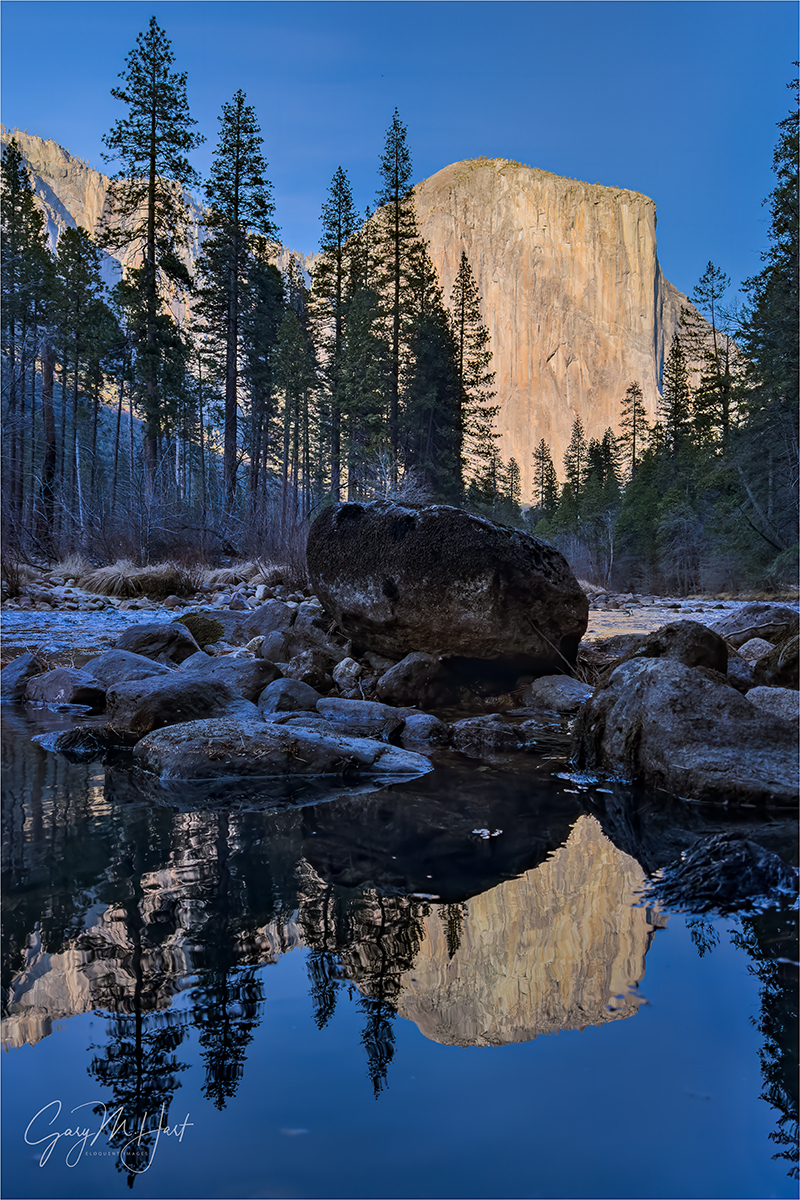
In that case, I was on vacation with my wife and had made the conscious decision before leaving not to take my camera gear, with zero regrets. The situation behind today’s image, that found me with my workshop group a mile or so downriver from El Capitan, was a little different.
It was earlier this month, and I’d taken my group to a view of El Capitan that I’ve photographed so many times, in far more photogenic conditions, that I didn’t expect to find anything new. Given the blank sky, I just left my camera bag in the car and I guided them on the short walk to my spot, fully intending to simply enjoy the view.
I actually have history with this location that goes way back to my earliest digital photography days. One night I was here with my Canon 10D for moonlight photography. Perched 15 vertical feet above the Merced River, I set up my tripod and reached for my 17-40 f/4 L lens, but somehow fumbled it into the dark void below. I couldn’t see a thing, but will never forget the sounds: thump (one bounce off the dirt wall), crack (another bounce off a rock), and splash. Without hesitation, I grabbed my tripod and camera bag and pivoted to the car. The next morning I returned, risking life and limb to scramble down to the river, where I eventually extracted my lens from about 18 inches of water. There was no sign of external damage, but the front lens element revealed water to above the mid-point—enough that if this had been a cartoon, I’d no doubt have seen small fish swimming by.
This spot has changed somewhat since then. Directly on the downstream side of a 90-degree bend in the river, 20 or so years of spring high water have eroded the riverbank, at some point taking a fairly large tree with it. Though the route down to the river is still quite steep, it’s no longer as treacherous as it was when I recovered my drowned lens all those years ago. When one of the people in my group found his way down to the river, a couple more followed, and soon I had to climb down to check out the view myself.
I’d never actually photographed from river level here, so it was cool to find a new perspective. As I can’t help doing, even when I don’t have my camera with me, I started composing shots in my head. My eyes went to a nearby pool, mostly walled-off by rocks from the Merced River’s main flow, reflecting nothing but blue sky. But when I got down on my knees and leaned out over the water as low and as far as my body would allow, I found a position that included a mirror reflection of El Capitan’s upper half—definitely photo-worthy. Because I didn’t have my gear, I hailed one of my workshop students and pointed the shot out to him. He came over to check it out, but decided getting his camera in position for the reflection would be a little too treacherous—both for him and his camera.
When he returned to what he’d been working on, I got the bright idea to whip out my iPhone and give it a try. Had I had my own camera and tripod, I might have tried the shot that way, come to the same conclusion my student did, and just forgotten about it. But with my phone, I was able to lie on my stomach, stretch my arm as far across the water as I could, and snap a one-handed picture.
Since I couldn’t actually see the screen while taking that picture, I retracted my arm and reviewed my result. Despite being not straight, and riddled with several other compositional flaws, it was instantly clear that there really was something photo-worthy there. I switched my Camera app to raw capture and tried again. And again, and again, reviewing and refining like this about a half dozen times, until I was satisfied that I’d gotten it right—the last shot I took is the one you see here.
I know people who claim that today’s smartphone cameras rival full frame cameras, and that there really is very little reason to invest in large-sensor mirrorless or DSLR camera systems anymore. And I’ll acknowledge that today’s smartphone cameras are indeed amazing, absolutely worthy of “best” camera status when no other cameras are available. Which is why I’m very happy to have had my iPhone when I came across a view of El Capitan that I didn’t have. For digital display, and even decent size prints, this iPhone image is fine. But at full resolution, when compared side-by-side with this iPhone 16 Pro image, the difference in detail and clarity captured by my full-frame Sony gear is not even close. (Other large-sensor cameras, versus other smartphone cameras, will yield similar differences.) So it should come as no surprise that, for the foreseeable future, I’ll be lugging my full frame cameras, bulky lenses, and sturdy tripod, any time quality is essential.
Join Me in Yosemite
Workshop Schedule || Purchase Prints || Instagram
Speaking of Seeking Different Views of El Capitan…

, Yosemite")


No Sky? No Problem…
Posted on October 10, 2024

Autumn Symmetry, North Lake, Eastern Sierra
Sony a7R V
Sony 24-105 f/4 G
ISO 100
f/16
13 seconds
Anyone who has been in one of my photo workshops will confirm that I’m kind of obsessed with skies. Not just the good skies, but the bad ones too. While the sky can add a lot to an image, it can detract just as much. Viewing images online and in my workshop image reviews, it seems that many people pay outsize attention to the landscape, while ignoring the sky. But since all the components of an image need to work together, the way you handle the sky is just as important as the way you handle the landscape that you’re most likely there to photograph.
From rainbows, to dramatic clouds, to vivid sunrises and sunsets, great skies are easy, regardless of the landscape. But what do you do when the sky is bland and boring? The rule of thumb I’ve always followed and taught is that amount of sky you put in an image should be based on the relative appeal of the sky versus the landscape: determine which has the most visual appeal and by how much, then allocate your frame’s sky/landscape real estate percentage accordingly. I’m not suggesting that you whip out a calculator and do actual math in the field, but you get the idea.
Every autumn I visit North Lake, east of Bishop in the Eastern Sierra, hoping to catch the peak fall color there. Prepping for this post, I started reviewing my North Lake images from the 20 or so years that I’ve been visiting, and was immediately struck by the variety of the images taken from more or less the same location (somewhere along a 50-foot stretch of shoreline). The variety is both in the compositions and the conditions, but the compositions are largely determined by those conditions.
The annual variables at North Lake include the state of the fall color in the aspen across the lake (early, late, peak), the reflection (from serene mirror to windy chop), the level of the lake (and the rocks that are visible), the clouds and color in the sky, and the crowds (how much freedom is there for me and my workshop group to set up where we want).
Here’s a handful of North Lake images captured over the years. Without plunging too deep into the weeds, it’s pretty clear to me how the conditions on each day influenced my composition and exposure decisions.


Autumn Symmetry, North Lake, Eastern Sierra
The morning I captured the image I share today was impacted by a combination of scene variables, some positive, others negative. On the positive side, the color was as good as good as it can get there, and the reflection was really nice all morning. On the negative side, despite arriving an hour before sunrise, there were already a number of cars in the parking lot, which I knew would mean my group and I would be settling for whatever spaces were available, as well as limited ability explore (giving up a nice spot to search for something better risks finding nothing, while losing the nice spot you just left). And the sky sucked. (If you know me at all, you know that means there were no clouds.)
Rather than take the easy path up the road directly to the lakeshore (no more than 100 yards from the parking lot), I guided my group into the woods and along the creek to the lake—no farther, but the trail was a little muddy and slightly overgrown in spots. My rationale was that, since the most popular spots to set up were likely taken, this route would let them see that there are other very nice options that most visitors never make it to.
At the lake I found enough room for several in my group to set up in the “popular” area with the foreground rocks, and guided the rest just a few feet farther to a somewhat sheltered mini-cove on the other side of a large boulder. Just because the other spot is more popular doesn’t mean it’s better—this second spot, being more sheltered, means it’s more likely to have a reflection, even when the rest of the lake is shuffled by a breeze, and the foreground tall (and photogenic) grass aligns nicely with the peaks (the Autumn Morning, North Lake, Eastern Sierra image in the gallery above was taken from this spot).
Once everyone in my group was set up and happy, I squeezed into a remaining opening at the small reflective cove and went to work. In the fading twilight, I started to work out a plan, quickly deciding that this morning I would not take a single picture that includes the sky. This isn’t the approach I’d recommend for first-time North Lake visitors because excluding all of the sky also means excluding the beautiful peaks surrounding the lake. But I have so many images of the peaks here, many with much nicer skies, and didn’t really feel like I needed any more.
So I had a blast all morning playing with a variety of compositions that completely ignored the sky, ending up with about 2 dozen images to choose from when I got home. Below are the Lightroom thumbnails from that morning. (You can see that while I didn’t include the sky or peaks, more than half of the morning’s captures did include their reflections)

Not only do the Lightroom thumbnails show my compositional options this morning, they also reveal a little of my process. In general, my first capture is a “proof of concept,” and if I like what I see I start making refinements until I’m satisfied. And even though some of these thumbnails look identical, I can assure you that each one is at least a slight adjustment of the one preceding it.
I chose the composition I share today because I love the symmetry, the strong diagonals, and the way it emphasizes my favorite features of this beautiful little lake—but nothing else.
I return to the Eastern Sierra and North Lake next fall
Workshop Schedule || Purchase Prints || Instagram
No Sky, No Problem…


, California")


Full Circle
Posted on September 7, 2024

Sunset Mirror, Lake Manly (Badwater), Death Valley
Sony a7R V
Sony 24-105 f/4 G
ISO 100
f/11
1/15 seconds
For many people of my generation, their earliest memories of landscape photography are some version of Dad pulling the family wagon up to an iconic vista and beelining (camera flapping around his neck) to the railed viewpoint to snap a few frames—if you were lucky, he’d take long enough for you to use the bathroom. In most cases these pictures would be quickly forgotten—until 50 years later when, while searching through Mom and Dad’s garage/attic/basement/closets arguing with siblings about what stays and goes, you come upon shoe boxes stuffed with prints or slides of scenes that you feel absolutely no connection to.
I think the fact that I became a landscape photographer has something to do with an intermediate step that most people missed: when my dad’s slides came back from the lab, he would meticulously peruse and purge, then label and organize the survivors, before sequestering the family in our darkened living room until the each Kodak Carousel had completed its cycle. Sometimes we’d have to sit through multiple shows of the same pictures as friends and family visited.
I won’t pretend that my brothers and I loved these shows, or (let’s be honest) that we enjoyed them in any way. But in hindsight, I think on some level the message came through each time we visited Yosemite, the beach, or drove across the country (have tent trailer — will travel), that the beauty we experienced was worth preserving.
Learning that pictures could possess an actual aesthetic value that others could enjoy also helped me register that a camera could be much more than a mere outdoor accessory. Which probably explains why, when I became old enough to start creating outdoor memories of my own, preserving on film the beauty that moved me just seemed the natural thing to do.
Of course when I first picked up a camera, I naively believed that the only ingredients necessary for a successful picture were a camera and a pretty scene. That might have something to do with the fact that Dad’s photo stops were rarely timed for light or conditions, because vacations and photography don’t mix: the best time for photography is the worst time to be outside. Despite prioritizing family over photography like the good father he was, I appreciate now that he really did know his way around a camera, and how to frame a scene.
(Like many blog posts, I started with a point I wanted to land on, and now have ended up following a most circuitous route getting there. But here we are.)
I’m thinking about the influences that got me to where I am today, and need to give Dad a twofer on this one: prioritizing family over photography, while still modeling a photographer’s aesthetic. My own pursuit of photography started after childhood, but long before I married and had children, and while it went somewhat dormant during my daughters’ formative years (limited mostly to snaps of family moments), the interest came roaring back when the girls spread their wings and rendered my wife and me empty nesters—an event that (fortuitously) coincided with the advent of digital capture.
Acquainting myself with the new digital paradigm, I couldn’t help reliving some of my father’s enthusiasm for photography and the cutting-edge technology of his time (autofocus, through-the-lens automatic metering), that (I realize now) coincided with my parents’ own sudden empty-nester status. Digital photography was perfect for me—similar enough to film photography that there wasn’t lots to relearn, but with an infusion of the technical world I’d spent nearly 20 years in. Also like my father’s experience, the new-found freedom to research, study, and explore taught me (among other things) the importance of light on the landscape, and that I must prioritize the conditions when scheduling my photo trips.
Since virtually every family vacation of my childhood was a camping trip somewhere scenic, it made sense that my first instinct was to return to the locations of my strongest childhood memories. While a few vacations were rigorously planned interstate adventures with a different stop each night (I’m having flashbacks to KOA campgrounds and AAA TripTiks), more frequently we’d pick a picturesque setting and set up camp for a week or two, relaxing and enjoying day-trips to nearby sights. These are the locations that especially drew me with my new digital camera.
My strongest childhood memories of vacations were our summer Yosemite trips, but a couple of times Dad got a week off during Christmas break and Death Valley was the logical destination. So after I’d harvested Yosemite’s low hanging visual fruit, Death Valley was the next logical step for my burgeoning photography aspirations.
As a kid I was more interested in Death Valley’s mining and ghost town attractions, but returning as a photographer, it was the uniquely beautiful geology that got my juices flowing. In my previous blog post, I wrote about the proximity of the highest point in the 48 contiguous United States (Mt. Whitney) to the lowest point in the Northern Hemisphere, so I guess it makes sense to circle back to Death Valley.
That lowest point is Badwater, which also happens to be a personal Death Valley favorite. So what’s going on here? When you’re lower than all surrounding terrain, not only does water tend to find you, it can only exit via evaporation. In an inherently arid environment like Death Valley, inundation usually outpaces evaporation, leaving behind only minerals carried by the water but too heavy to evaporate. The predominant residual mineral at Badwater is salt, with a little more accumulating with each evaporation. As the mud beneath the salt layer dries, polygonal cracks form, creating openings that can accumulate extra salt. Death Valley’s intense summer heat causes this salt to expand and form corresponding polygonal shapes that stretch for miles atop the otherwise flat surface.
Extending miles in the shadow of 11,000 foot Telescope Peak, Badwater is always photographable, but its year-to-year variation is a source of great angst and celebration. Some winters I find these shapes filled with water, sparkling like faceted jewels; or when dry their color can range from muddy brown to as white as a bleached sheet. But by far my favorite happens when recent rains have flooded Badwater Basin to form Lake Manly, a shallow ephemeral lake that turns the entire basin into a giant mirror. During my 2005 visit, I watched a kayaker glide across the lake.
To explain a little more about Lake Manly, here’s an excerpt from my February 14, 2024 blog post:

Sweet Sunset, Lake Manly and Badwater Basin, Death Valley
The origins of Lake Manly in Badwater Basin date back nearly 200,000 years. In its earliest millennia, Lake Manly was much deeper, far more expansive, and persisted year-round. But in recent millennia, it has become an ephemeral lake, usually dry and filling only when rare intense storms generate enough runoff. The life of these recent versions of Lake Manly is measured in weeks or months.
The current version of Lake Manly formed when Tropical Storm (and former hurricane) Hilary saturated Death Valley with more than a year’s worth of rain (2.2 inches) in one day. Because Death Valley isn’t equipped to handle so much water at once, Hilary brought flooding that washed out roads, displaced rocks, carved new channels, and reshaped canyons. And with no outlet for all this water, after doing its damage, this runoff had to come to rest somewhere—and where better than the lowest place in North America?
At its peak volume last August, the newest incarnation of Lake Manly was 7 miles long and 4 miles wide, but no more than 2 feet deep. By late January its surface area had shrunk to half its original size, and the lake’s depth was measured in inches.
Despite its diminished size, Lake Manly was more than big enough to provide spectacular, valley-wide reflections for my workshop group. In addition to photographing mountain and sky reflections from the valley floor, we also enjoyed beautiful sunset reflections from Dante’s View, more than 5000 feet above Badwater.
I captured today’s blog image on the same evening as the image I shared in that February post. Because the sky is important as the foreground in a landscape image, my compositions this evening followed the rapidly scooting clouds, capturing the changing color as I went. I shifted my position on the lakeshore (and have the muddy boots to prove it) to ensure the best foreground/clouds relationship, and continued moving and tracking the clouds until they encountered a nearly full moon rising above the looming Amargosa Range.
On those childhood visits to these special places, rolling my eyes Dad’s goofy obsession and the inevitable boring slideshow in store, I had no appreciation for the foundation that was being laid, or for the full circle journey I was embarking on.
2026 Death Valley Winter Moon Photo Workshop
Workshop Schedule || Purchase Prints || Instagram
Death Valley


, Death Valley")


Every. Single. Thing.
Posted on August 23, 2024

Sunset Reflection, North Lake, Eastern Sierra (2008)
Canon EOS-1Ds Mark III
Canon 17-40 f/4 L
10 seconds
F/11
ISO 200
A few days ago, while browsing old images looking for something else, I came upon this one from a solitary sunset visit to North Lake above Bishop almost 16 years ago. It’s a great reminder to appreciate my past efforts, and to not forget that, even though some images from my distant photography past evoke a “What was I thinking?” face palm, I really did have an idea of what I was doing—even if my execution wasn’t always perfect.
One of the earliest lessons I learned on this path to where I am as a photographer today, a lesson I work hard to impart on my workshop students, is the photographer’s responsibility for each square inch (and pixel) in the frame. Not just the beautiful elements, but everything else as well. Every. Single. Thing.
It’s always heartening to see the genesis of that approach in my older images. Rather than just framing and clicking the obvious, I can see signs that I took the time and effort to assemble the best possible image. That assembly process might start weeks or months before I arrive (planning for a moonrise, fall color, the Milky Way, and so on), or it could simply be a matter of making the best of whatever situation I’m presented when I arrive.
Either way, once it’s time to take out the camera and get to work, before clicking the shutter I try to make a point of surveying the scene to identify its most compelling elements. Once I’m comfortable with the possibilities, I position myself to create the ideal relationships between the various elements, then frame the scene to eliminate distractions, and finally, choose the exposure variables that achieve the motion, depth, and light that create the effect I want. And while my execution still isn’t always perfect (and will always have room for improvement), I think this image in particular illustrates my assembly process.
I’ve been visiting North Lake in autumn for nearly 20 years, both on my own and in my workshops. Most of these visits come at sunrise, but this time, by myself in Bishop with an evening between workshops, I decided to explore some of my favorite spots near the top of Bishop Creek Canyon. I pulled into North Lake and was surprised to find it completely devoid of photographers—a refreshing difference from the customary autumn sunrise photographer crowds that usually outnumber the mosquitos.
Early enough to anticipate the sunset conditions and plan my composition, I was especially excited by the western sky above the peaks, which was smeared with broken clouds that just might (fingers crossed) color up when the sun’s last rays slipped through. Without the swarm of photographers I was accustomed to here, I took full advantage of the freedom to roam the lakeshore in search of a composition that would do the (potential) sunset justice. Rather than simply settle for the standard version of this inherently beautiful scene that might be further enhanced by a nice sunset, I wanted a composition that assembled the best of the scene’s various features—colorful sunset sky, serrated peaks, golden aspen, crisp reflection, small granite boulders—into coherent relationships that allowed everything to work together that might be a little different.

Autumn Reflection, North Lake, Eastern Sierra
I eventually rock-hopped to this mini granite archipelago near the lake’s outlet and found what I was looking for. Since I’d always gone horizontal at North Lake to feature the arc of peaks framing the aspen-lined lake, this time I decided to emphasize the foreground rocks and reflection with a vertical composition. (I’ve since had great success with vertical frames at North Lake, but this is the one that really opened my eyes to the vertical possibilities here—see the image on the right from two years later.)
First I positioned myself so the line of small granite rocks formed a diagonal along the bottom half of the frame, enhancing the scene’s illusion of depth. Next, I lowered my camera (on a tripod, of course) to minimize the empty patch of lake between the rocks and reflection.
As much as I like my images to have uncluttered borders, in nature it’s often impossible to avoid cutting something off, or to prevent a small piece of an object outside the frame from jutting in (like a rock or branch). In this case, from my chosen location, including the foreground rocks I considered essential meant cutting off other rocks. When I run into these situations where a clean border is impossible, I at least need to make my border choice very deliberate. In this case, I took care to include all of the rocks at the bottom, but chose to cut the rocks on the left boldly, right down the middle, so they don’t look like an afterthought (or a never-thought).
As much as I liked the mountain, aspen, and sunset parts of the reflection, I found the reflection of the sky above the colorful clouds pretty dull. So I dialed my polarizer just enough to erase the bland part and reveal the (more interesting) submerged rocks near the lakeshore, taking care not to lose the best part of the reflection.
Of course, including the nearby rocks added another layer of complication: ensuring that everything, from the foreground rocks to the distant mountains, was sharp. Because every image has only one perfectly sharp plane of focus, in a scene like this, finding the right focus point and f-stop is essential.
Of the various techniques photographers apply to ensure proper focus, Hyperfocal focusing is the most reliable. Hyperfocal focusing determines the combination of focal length, f-stop, sensor size, and focus point that ensures the ideal position and depth of the frame’s zone of “acceptable” sharpness. Since identifying the precise hyperfocal point (the point of maximum depth of field) requires plugging variables into a chart (the old fashioned way) or smartphone app (the smart way), many photographers foolishly decide it’s not worth the effort. But, like most things that start out difficult, regularly applying hyperfocal focus technique soon reveals its underlying simplicity. (I rarely have to check my app anymore, usually relying instead on experience-based seat-of-the-pants hyperfocal focusing.)
Today, with my mirrorless cameras, I am able to precisely position my focus point using a magnified viewfinder view, and I completely trust my camera’s autofocus. But because the evening of this image was back in my DSLR days, when I never completely trusted autofocus when the margin for error was small, I know I manually focused it.
So where did I focus? Well, even though I no longer remember, I’d bet money that it was on first small rock beyond the trio of rocks at the bottom. I think that because, 1) that just seems like where I’d instinctively focus, and 2) my hyperfocal app tells me that the hyperfocal distance for this image’s settings (thank you EXIF data) was a little less than 3 feet, and that rock was about 3 feet away. Since close scrutiny at 100 percent confirms that the image is sharp from front to back, I’m pretty confident that’s where I focused.
The final piece of the puzzle was exposure. At the time I was shooting with a dynamic range limited (compared to my Sony Alpha cameras) Canon 1DSIII, so I’m pretty sure I used a 3-stop soft graduated neutral density filter to subdue the bright sky. (FYI, I no longer carry a GND.) This always requires a little extra work in Photoshop because I hate, hate, hate the GND transition’s darkening effect on the landscape immediately beneath the sky, which always requires a little dodging and burning to eliminate.
There really was a lot going on in this scene, and I’m pretty pleased that I was able to make everything work together. Of course that doesn’t always happen, but I find the more I’m able to consider every single thing in a scene, the happier I am with my results.
Workshop Schedule || Purchase Prints || Instagram
Image Building
Click any image to scroll through the gallery LARGE


, Yosemite")


New Zealand After Dark
Posted on June 19, 2024

Dark Night, Milky Way and Tasman Lake, New Zealand
Sony a7S II
Sony 12 – 24 f/4 G
ISO 10,000
f/4
30 seconds
This week I have New Zealand on my mind. In preparation for the New Zealand Winter photo workshop that begins next week, I started going through unprocessed images from prior New Zealand visits. I was actually looking for something else when I stumbled upon this Milky Way image from the 2019 trip, when Don Smith and I guided a group of Sony influencers around the South Island. I’d already processed a virtually identical composition of this scene back then, but since my Milky Way processing has evolved (improved), I decided to give it another shot.
Day or night, I love this Tasman Lake scene in particular because it so beautifully captures what I love most about New Zealand. We only do this workshop in winter, which of course leads to the inevitable question: “Why?” The simple answer is that the modest sprinkling of tourists, consistently interesting skies, and snowy peaks I love so much, are only possible in winter. I could go on and on with my answer, but since a picture is worth a thousand words, I’ll just save you some time and give you six-thousand words worth of examples. (You’re welcome.)


But even once I convince skeptics that winter in New Zealand is in fact quite beautiful, I’m usually hit with a follow-up: “But isn’t it cold?” Sure it’s cold, but by most people’s expectations of winter, New Zealand’s South Island is actually quite mild—with average highs in the 40s and 50s, and lows in the 30s, it’s similar to winter in Northern California and Oregon. I would venture that there’s not a single person reading this who doesn’t already have in their closet enough winter warmth to ensure cozy comfort in a New Zealand winter. Also like Northern California and Oregon, in winter New Zealand’s South Island gets rain and fog in the lowlands, and snow in the mountains, conditions I find so much better for photography (and for just plain being outside) than the sweltering blank-sky California summers I left back home.
All that said, for me the strongest argument for winter in New Zealand is Southern Hemisphere’s night sky. Inherently pristine air and minimal light pollution makes New Zealand is an astrophotographer’s paradise any season. But winter is when the Milky Way’s brilliant core shines in the east after sunset, already much higher above the horizon than my Northern Hemisphere eyes are accustomed to. The galactic core remains visible all night, ascending further and slowly rotating westward, before finally fading on the other side of the sky in the pre-sunrise twilight. That means more than 12 hours of quality Milky Way time, and the ability to place it above landscapes facing east, north, or west, by simply choosing the time of night you photograph it. And joining the celestial show are the Large and Small Magellanic Clouds—satellite galaxies of our Milky Way, only visible in the Southern Hemisphere.
Benefiting from our years of experience on the South Island, Don and I have identified many very nice locations for photographing the Milky Way, but our two favorites feature the galactic core above glacial lakes that are bounded by snowy peaks. One of these is on the shore Lake Wakatipu near Queenstown; the other is a vista above Tasman Lake in Mt. Cook / Aoraki National Park. This week’s image, from the 2019 trip, is of the Tasman Lake scene.
From the very first time my eyes feasted on it, I marveled at what a spectacular place the Tasman Lake view would be to photograph the Milky Way. In 2019, Don and I were especially pleased to be guiding this group of young photographers who were as excited about photographing the Milky Way as we were, so this shoot was in our plan since before the workshop started.
The sky this evening was crystal clear, but as the sky darkened, I found myself still down at the foot of the lake (just out of the frame on the far right), where I’d photographed sunset with most of the group. The majority decided to stay put for the Milky Way shoot, and while I couldn’t deny that this spot would likely be no less spectacular, I couldn’t pass the opportunity at the elevated lake view that had been on my radar for so long. I also thought the Milky Way would align better with the most prominent peaks from this vantage point. So I scrambled back up the boulders to the trail and race-walked more than a mile, then scaled more than 300 stairs in near darkness, to get in position.
I expected to find the few who weren’t down at the lakeside sunset spot (this group always scattered) would already be up here, but I arrived to find the view empty. While I was happy to eventually have the company of a couple of others, the utter solitude I enjoyed for the first 30 minutes felt downright spiritual.
Going with my dedicated night camera, the Sony a7S II, I started with my default night lens at the time, the Sony 24mm f/1.4. But the scene was so expansive, I quickly switched to my Sony 16-35 f/2.8 GM for a wider view. While that did the job for a while, it wasn’t long before I found myself wanting an even bigger view, so I reached for my Sony 12-24 f/4 G lens. Because light capture is the single most important factor in a Milky Way image, in general I find f/4 too slow. (Today I’d use my 14mm f/1.8 or 12-24 f/2.8, but back then those lenses were still at least a year away.) But really wanting the widest possible view, I rationalized that since the a7S II can handle 10,000 ISO without any problem, and the star motion of a 30-second exposure at 12mm would be minimal, and just went for it. Mitigating the f/4 exposure problems was the fact that the best parts of the scene’s foreground, the snow and water, were highly reflective, while the dark rock wasn’t really essential to the scene.
The result as processed in 2019, while noisier than ideal, was still usable. But as time passes, I’ve become less and less thrilled with many of my old Milky Way processing choices—that image was no exception. Since I’ve been pretty thrilled with the results reprocessing old Milky Way images with Lightroom’s latest noise reduction tool, I thought this might be a great time to reprocess this old scene to see if I could do it better.


For no reason in particular, I chose different image to process, but the compositions are nearly identical. As expected, the new Lightroom noise reduction did a much better job minimizing the inevitable noise that comes at 10,000 ISO, so I was already ahead of the game. The only other major processing improvement I made was the color of the sky, which, as my night sky processing evolves, I’m making much less blue.
Because no one knows what color the night sky supposed to be when given the amount of exposure necessary bring out foreground detail, I’ve always believed that the color of the sky in a Milky Way image is the photographer’s creative choice. I mean, scientists might be able to tell you what color it should be (there’s a very strong case for green), but to me the bottom line is image credibility (and green just won’t do it).
Whatever night sky color I’ve ended up with has entirely a function of the color temperature I choose when I process my raw file in Lightroom—no artificially changing the hue, saturation, or in any other way plugging in some artificial color. Since I do think the foreground (non-sky) of a night image looks more night-like (I don’t want a night image that looks like daylight with stars) with the bluish tint I get when the color temperature is cooled to somewhere in the 3000-4000 degrees range (photographers will know what I’m talking about—non-photographers will just need to take my word), for years I cooled the entire image that way—hence the blue night skies. But Lightroom now makes it super easy to process the sky and foreground separately and seamlessly, so I no longer cool my night skies nearly as much as before (or at all). Now my night skies tend to be much closer to black, trending almost imperceptibly to the purple side of blue (avoiding the cyan side).
Oh, and the color of Tasman Lake you see in this image is real, I swear—the color of the South Island’s glacial lakes is another reason to love this country, but that’s a story for another day.
Workshop Schedule || Purchase Prints || Instagram
This year’s New Zealand workshop is full, but Don and I will do it again next year.
New Zealand After Dark


