Eloquent Images by Gary Hart
Insight, information, and inspiration for the inquisitive nature photographer
Too Much of a Good Thing
Posted on March 10, 2026

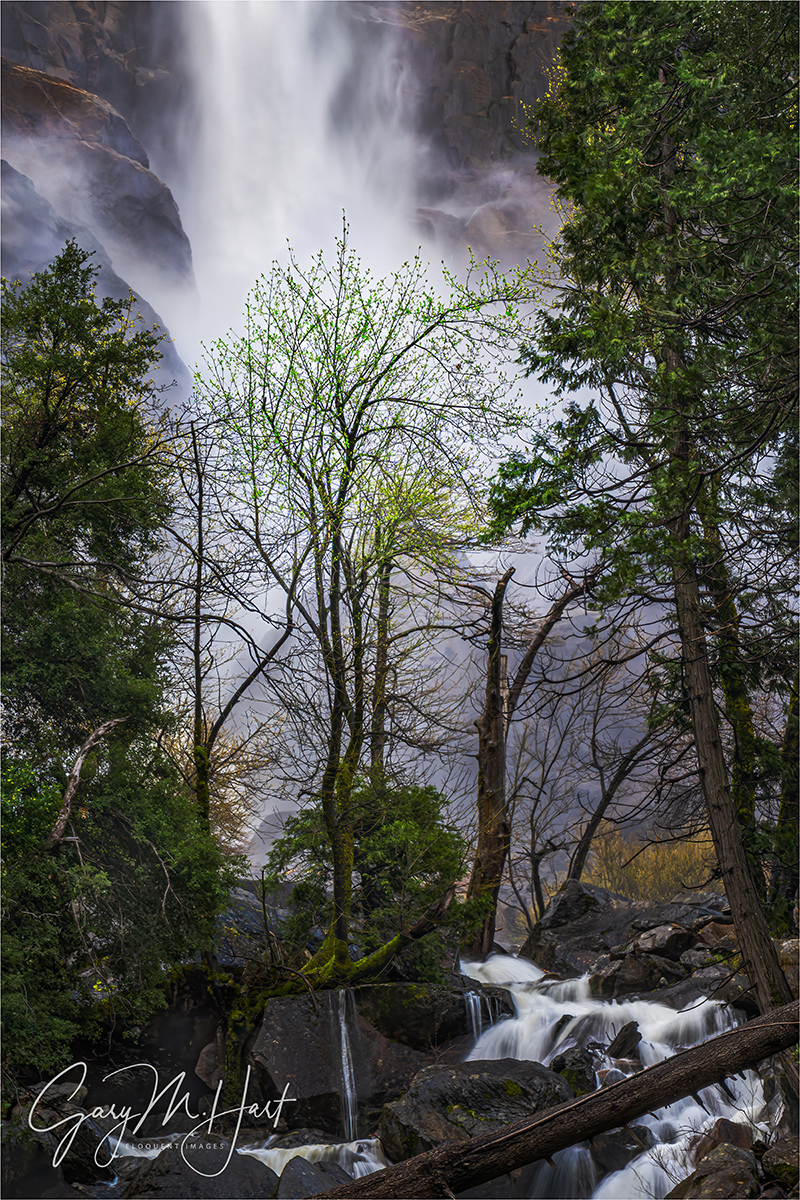
Snowfall, Upper Cascade Fall, Yosemite
Sony a7R V
Sony 24-105 G
2.5 seconds
F/11
ISO 100
Greetings from Iceland! And no, despite appearances to the contrary, this image is not Iceland (or even Snowland), it’s Yosemite. (Actually, if you know Iceland, the “not Iceland” giveaway would be all the trees.)
People ask me all the time, what’s the best season to be in Yosemite? While I honestly can’t pick a “best” Yosemite season, I can say that each season in Yosemite offers its own set of good things that distinguish it from the other seasons. Even my least favorite season—yes, I can give you a least favorite Yosemite season—has many good things that I feel fortunate to have witnessed.
My least favorite is easy: summer. Summer is when the crowds swarm every square inch of Yosemite Valley, the waterfalls and meadows dry up, and the sky is chronically blank. But summer is also the only time Yosemite’s high country—Tuolumne Meadows, Olmsted Point, Glacier Point, Sentinel Dome, Taft Point, and the breathtaking High Sierra backcountry—is easily accessible.
While spring is when the tourists start returning to the park after their winter hiatus, it has enough booming waterfalls, fresh green meadows, reflective vernal pools, and ubiquitous dogwood blooms to make the increasing crowds (more than) tolerable. Spring is the Yosemite of postcards and calendar pictures, and probably the best season for first-timers.
In autumn, the now depleted snowpack has completely dried, or at least slowed to a trickle, Yosemite’s heralded waterfalls. But that diminished flow means the low and slow Merced River splits the length of Yosemite Valley like a twisting, reflective ribbon. Adding to these reflections a surprising abundance and variety of fall reds and golds elevates autumn to my personal favorite Yosemite season for creative photography.
That brings me to Yosemite’s most variable of seasons: winter. Come to Yosemite during a dry winter and you’ll find lots of dirt, bare deciduous trees, dry meadows, and unimpressive to nonexistent waterfalls. On the other hand, with the exception of the last couple of weeks in February, Yosemite in winter is refreshingly serene—and even late February’s Horsetail Fall mayhem doesn’t compare to the summer swarms. And even at its worst, winter reflections are quite nice, and it’s still Yosemite (El Capitan, Half Dome, et al haven’t gone anywhere), so I’ll take even the driest Yosemite winter without people over the nicest summer day.
But a Yosemite winter at its best is a sight to behold. Winter is Yosemite’s wet season, making it the best season for capturing a clearing storm. Most of the precipitation in Yosemite Valley falls as rain, but if you’re fortunate enough for your Yosemite visit to coincide with a cold storm that smothers Yosemite Valley in white, you’ll see it at its hands-down most beautiful. And while you may find yourself sharing this beauty with other ecstatic photographers, even the slightest threat of inclement weather seems to repel virtually all tourists.
Falling snow does introduce a host of difficulties that include: limited to impossible access to certain locations, treacherous driving, the potential for chain requirements (usually limited to vehicles without 4WD/AWD), and clouds temporarily shrouding Yosemite’s soaring monoliths and waterfalls. Not to mention the difficulties inherent to photographing in snowy conditions. But if you can overcome these hardships, the payoff is worth it.
The thing is, to witness Yosemite’s fresh-snow majesty, you need to be present among the falling flakes, no matter how cold the temperature or poor the photography. That’s because swirling clouds of a clearing storm vanish so quickly, and the trees start shedding their white coats almost the instant the sun comes out—if you wait until you hear it snowed in Yosemite Valley before rushing to the park, you’re too late. In fact, even if you’re actually present in the park and simply retreat to the shelter of your hotel room or a valley restaurant until the clearing starts, you risk missing some or all of the best stuff.
Living less than four hours from Yosemite Valley, monitoring the Yosemite forecast gives me enough advance notice to get to the park while the snow is still falling. In other words, it’s not by accident that my galleries are filled with so many Yosemite snow images.
But sometimes I just get lucky. Scheduling workshops a year or more in advance means no clue what the conditions will be—the best I can do is try to maximize the chances for something. Horsetail Fall happens in mid to late February, but all the tumblers clicking into place is never guaranteed. Similarly, while I know February is one of the most likely months for snow in Yosemite Valley, no snow is always more likely—but that doesn’t keep me from wishing. (As much as I hope for ideal Horsetail Fall conditions for my workshop—lots of water in the fall and unobstructed sunlight at sunset—I’ll take snow any day.)
This year’s Yosemite Horsetail Fall workshop, which wrapped up just a week before I departed for Iceland, fulfilled those snow dreams many times over. How much snow did we get? Look at the picture above, and consider that it came on our first day, at our second photo location, and that at least two more feet above what you see here fell before the workshop finished.
The compactness of Yosemite Valley, combined with lifetime of Yosemite visits, enables me to adjust my plans on the fly in rapidly changing conditions. On that first afternoon, with a moderate snow falling in the valley I expected poor visibility, so my original plan was to start at Bridalveil Creek, where we could photograph nearby scenes. But when I saw that Bridalveil Fall and El Capitan were still visible despite the falling snow, I headed straight to Valley View.
We enjoyed about 30 minutes of quality photography there before the ceiling dropped and erased everything more than a few hundred yards away. I quickly collected the troops and we beelined up Big Oak Flat Road to Upper Cascade Fall, which I was confident would provide the best combination of photogenic scene that was close enough to still be visible.
I was actually a little surprised to find the top segment of this multitiered waterfall (upper left corner of the image) slightly obscured by the falling snow—fortunately it was visible enough to still be worth photographing. Our biggest challenge turned out to be a strong breeze blowing snow straight down the mountainside and directly onto the front element of any lens trained on the scene.
Normally I shield my camera with an umbrella in rain and snow, but the wind made using an umbrella problematic, so I switched to Plan B and pulled out the large microfiber cloth that lives in my camera bag. While composing, metering, and focusing, I just ignored the snowflakes accumulating on the front of my lens. When everything was ready, I wiped the lens clean, then draped the cloth over it while waiting for my 2-second timer to count down (have I mentioned lately how much I hate Sony’s cable and Bluetooth remotes?), whipping the cloth away at the latest possible instant before the shutter clicked. I continued this way through a series of compositions, until I was confident I’d captured something worthy of processing.
Turns out, this was just the first of many spectacular shoots my group enjoyed. As the workshop continued and we handled every single discomfort and inconvenience the storms served up, all while watching the photography just keep getting better and better, I became more and more convinced that there was no such thing as too much snow in Yosemite, and just kept hoping for more. And more, and more, and more…
On the afternoon before our final day, just as I started believing nothing could go wrong, the National Park Service said, “That’s enough,” and closed the park. I was stunned, and for some reason recalled the time my college baseball team, while on a roadtrip to a distant city, was gorging at an “all you can eat” buffet—until the manager came out and informed us, “That’s all you can eat.”
Even though we were shut out of the park for the workshop’s final day, we still gathered for one last image review on that final day. Based on the images shared, and the excitement everyone had with all of their captures, no one was too disappointed. It was almost as if we all felt that, given what we’d seen so far, to expecting more might just be a little greedy.
I couldn’t agree more. And honestly, despite missing a day and not having access to every location, I have to say this turned out to be one of the most photographically successful workshops in my 20 years leading photo workshops.
Workshop Schedule || Purchase Prints || Instagram
Yosemite Snow
Click any image to scroll through the gallery LARGE


Hidden Treasures
Posted on January 8, 2026
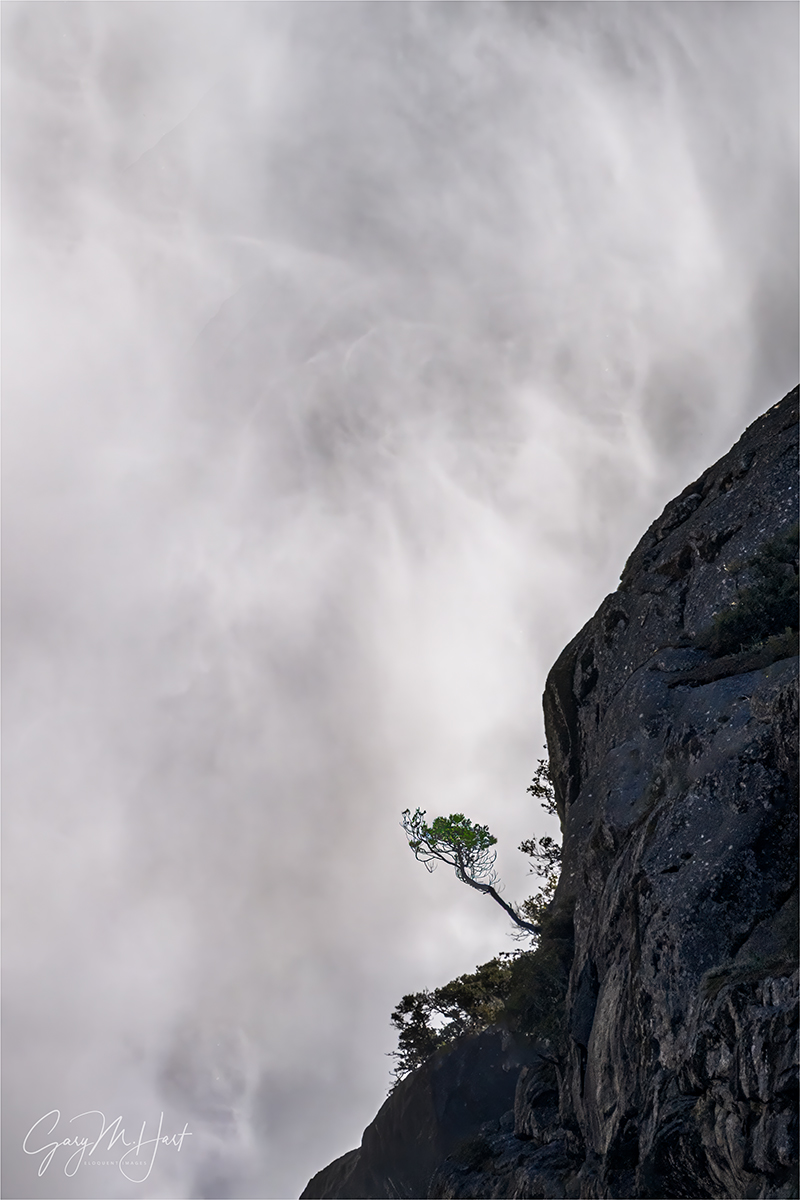
Clinging Tree, Upper Yosemite Fall, Yosemite
Sony a7R V
Sony 100-400 GM and 1.4X teleconverter (560mm)
ISO 800
f/11
1/1600 second
I’m aware that most of the images I share feature familiar subjects and eye-grabbing vistas that (justifiably) attract thousands of daily visitors and inspire millions of photographs—Nature’s celebrities. But that’s not a complete reflection of my personal photographic instincts. There are several reasons the subjects I share skew toward more acclaimed beauty: for example, the relatively close proximity of that beauty to my home in Northern California; and the obvious fact that I make my living leading photography workshops that I need to fill.
Though celebrated subjects are coveted by the vast majority of nature photographers, today I’d like to issue a shout-out to “ordinary” beauty that doesn’t jump out and grab the eye of everyone present (and doesn’t necessarily inspire people to sign up for workshops). I’m talking specifically about Nature’s hidden treasures that require the photographer to look closer and work harder to uncover. These little scenes may not garner the acclaim of their more spectacular counterparts, but I’ve come to realize that I’m never more content than I am when I photograph them.
Given Yosemite’s proximity, and the fact that I lead 4 to 6 Yosemite photo workshops each year, I probably spend more of my photography time there than anyplace else. But as the years click past, I find that I take my camera out in Yosemite far less than I once did—not because I find it less beautiful, or that I’ve tired of photographing it, but simply because it’s become harder and harder to find the unique scenes I covet. And of course when leading a workshop, my priority is never my own photography. I have to honor the fact that most of my workshop students want to photograph the beautiful Yosemite they’ve seen in pictures, not a leaf, or flower, or tree they could probably find at home.
That said, one of the points I emphasize to my students is trying to make the iconic shots that drew them their starting point, not their goal. So we spend a lot of time, both in the field and in the daily image reviews, on how to see and use the less obvious elements in a scene, with the goal of creating images that are uniquely their own. It’s a mindset that once established, starts becoming automatic.
To jumpstart that mindset, I have certain subtle features I point out at many of the locations I take my groups to—hidden treasures I’ve uncovered over the years that are potentially powerful but easily missed. One of my favorites is this little tree in front of Upper Yosemite Fall, only visible from a certain location on the trail to the bridge beneath Lower Yosemite Fall. It’s been on my radar for decades, though I rarely photograph it anymore. In fact, I hardly ever take my camera on my groups’ walks to Lower Yosemite Fall anymore. But in April of last year, with the fall booming and thin clouds diffusing the morning sunlight, I grabbed my camera bag with the sole purpose of shooting this tree again.
For me this is a telephoto shot, the longer the better. So on the walk back down from the bridge (where we photographed a rainbow at the base of Lower Yosemite Fall), I pulled out my 100-400 lens, added my 1.4X teleconverter, and went right to work. To avoid losing the tree against the dark, wet granite, the key here is waiting until the wind blows the water behind the tree. There was so much water on this spring morning that I rarely had to wait long.
I’m sure I clicked more than 50 frames, repositioning the tree from time to time in both horizontal and vertical orientation. Each time I recomposed, I shot at least a half dozen frames just to get different background water patterns—it’s amazing how much it changes from one second to the next. Pretty soon others in the group joined me, and it was fun watching them get excited about this anonymous little tree that’s so easily overlooked.
Of course the moral of this story is that there are hidden treasures like this everywhere, just waiting to be discovered—and hunting for them is half the fun.
Workshop Schedule || Purchase Prints || Instagram
Hidden Treasures
Click any image to scroll through the gallery LARGE (best viewed on a computer)


")


Let’s Get Vertical (Again)
Posted on November 16, 2025

New Day, Tunnel View, Yosemite
iPhone 17 Pro
(This seed of today’s blog is a post from many years ago—but the image and its story are brand new.)
What’s your orientation?
I’ve always questioned the reasoning behind labeling horizontally oriented images, “landscape,” and vertically oriented images, “portrait.” Despite my profession as a landscape (-only) photographer, nearly half of my images use “portrait” orientation. So it concerns me that this arbitrary naming bias might subconsciously encourage photographers to default to a horizontal orientation for their landscape images, even when a vertical orientation might be best.
The orientation of an image imparts implicit visual motion that’s independent of the eyes’ movement between an image’s visual elements. Photographers who understand that viewers’ eyes tend to move along the frame’s long side have an extra tool for guiding those eyes, and even to convey a mood.
For example, when orienting an image of a sunset on the coast, it’s easy to default without thinking to the same horizontal orientation that the distant horizon follows. And a waterfall image that’s oriented vertically certainly encourages the viewers’ eyes to move in the same direction as the water’s motion, so orienting the frame to match certainly seems reasonable. But, despite the natural instinct to match the frame’s orientation to the scene’s dominant flow, there is no absolute best way to orient an ocean, waterfall, or any other scene—there’s always a choice, and that choice matters. While matching the image’s orientation to the scene’s natural movement in this manner can instill a calmness to the image, a vertical ocean sunset, or horizontal waterfall, can create visual tension that can also be quite compelling.
Since I don’t need to convince most landscape photographers to take more horizontal pictures, I’m going to concentrate on the benefits of a vertical frame. One thing I especially like about orienting my landscape scenes vertically is the way it moves my viewer’s eyes through the scene from front to back, enhancing the illusion of depth that’s so important in a two-dimensional photo. And because of a vertical frame’s relative narrowness, a foreground element (that might get lost in a wider horizontal frame) instantly becomes the focal starting point that starts my viewer’s visual journey through the frame to whatever striking background I want to feature.
More than just guiding the eye through the frame, vertical orientation narrows the frame, enabling me to eliminate distractions or less compelling objects left and right of the scene’s prime subject(s). This makes vertical my preferred orientation when I want to emphasize an especially striking foreground from above (like Tunnel View), or a sky brimming with colorful clouds or a host of stars.
While a horizontally oriented scene is often the best way to convey the sweeping majesty of a broad landscape, I sometimes enjoy guiding my viewers’ eyes with vertical compositions of traditionally horizontal scenes. Tunnel View in Yosemite, where I think many photographers tend to compose too wide, is a great example. The scene to the left of El Capitan and the right of Cathedral Rocks just can’t compete with the El Capitan, Half Dome, Bridalveil Fall triumvirate, yet the world is full of Tunnel View images that shrink this trio to include (relatively) nondescript granite.
That’s why, when the foreground and sky aren’t particularly interesting, I often go for fairly tight horizontal compositions at Tunnel View. And while Tunnel View is among the most spectacular views on Earth, the foreground beneath the vista is usually quite bland, and overhead California’s chronic blue skies are frustratingly boring. So I’m afraid many of my Tunnel View images are horizontal, and rarely stray far left of El Capitan, or right of Cathedral Rocks.
Fortunately, there are exceptions. One of my favorite exceptions is those rare times when fresh snow smothers the evergreen valley floor. Another favorite is dramatic clouds, whether in the valley below or sky above. Faced with visual treats like this, vertical frames are wide enough to feature the foreground and/or sky without diluting the Tunnel View drama by including extraneous granite.
More specifically…
In Yosemite, one thing I never count on when there’s no weather in the forecast is a nice sunrise. That’s because Yosemite’s (default) blank skies, coupled with Tunnel View’s east-facing view, forces sunrise shooters to photograph fully shaded subjects (El Capitan, Half Dome, Cathedral Rocks, and Bridalveil Fall) against the brightest part of the sky. That’ why, without clouds, Tunnel View is much better late afternoon to sunset. For me, on a typical (empty sky) Yosemite morning, the real show is the first light on El Capitan, which arrives about 15 to 20 minutes after sunrise. On mornings with no clouds forecast, I usually start my groups with an El Capitan reflection of that first light—not only is this a reliably beautiful sight, everyone gets to sleep an hour longer (since going for the actual sunrise means being on location at least 30 minutes before sunrise instead of 20 minutes after).
But for whatever reason, and despite a promise of clear skies all morning (until a storm was forecast to start moving in that afternoon), I decided to hedge my bets on the final sunrise shoot of this month’s Yosemite Autumn Moon photo workshop. Normally we spend this final morning at Bridalveil Creek, arriving as soon as it’s light enough to start shooting in the dense shade there. Instead, I got everyone out about 30 minutes earlier and headed straight to Tunnel View. While this wouldn’t be early enough to shoot sunrise from start to finish, it would get us there in time for the best color in the remote chance the clouds arrived earlier than forecast. And that’s exactly what happened.
We were pulling in just as the cirrus precursors to the evening rain started lighting up. Since my group had already been up here twice, everyone was out of the cars and grabbing their gear before my seatbelt was off. Half the group beelined to the standard view with my brother (who was assisting me in this workshop), while the rest joined me on a granite ledge above the TV parking lot (a similar view, but with fewer people—also a little more physically challenging, and not the favorite spot of anyone bothered by heights).
As beautiful as the sky was, since I rarely photograph at Tunnel View anymore, my camera stayed in the car and I was content to just enjoy the show. Or so I believed. But as I stood there watching the color keep getting better and better, I started to second guess my decision to forego my camera. I knew I could be down to my car any back in less than 5 minutes, but the color was changing so rapidly, I also knew that would mean missing the best stuff. So I whipped out my iPhone 17 Pro, put it into RAW mode, and quickly framed up the scene.
With the great sky and bland foreground, I didn’t consider anything but vertical compositions. At first I went wide enough to include Bridalveil Fall, and though it was flowing nicely for autumn, it really wasn’t impressive enough to justify going that wide. So I quickly tightened my framing to include only El Capitan and Half Dome, putting in only the minimum amount of foreground so I could maximize the spectacular sky. I’d love to tell you what focal length, f-stop, and shutter speed I used, but my iPhone made all those decisions for me, and clearly did a pretty great job. What a time to be alive!
A few thoughts on iPhone image quality
Okay, seriously, as great as the iPhone (or any other current smartphone) camera is, let me remind you that smartphone image quality is nowhere near the quality of today’s full frame sensors and lenses. And I actually got a firsthand reminder of this fact while processing this image. Though I was truly blown away by the detail my iPhone captured, on the day I processed today’s image, I also prepared three large prints that had been ordered by an interior designer for the home of one of her customers. Though two of these images were captured more than 15 years ago with my Canon 1DS III (21 megapixels); the other was about 10 years old, from my Sony a7R II (42 megapixels), I was pretty confident the quality and detail this job required was all there.
-

- Stillness, South Tufa, Mono Lake
-

- First Light, Yosemite Valley
-

- Yosemite Sky, Tunnel View, Yosemite (2016)
And because maximizing this quality was the highest priority for her customer, she opted for custom prints rather than just going through my standard (much cheaper) SmugMug prints website (www.garyhartprints.com), where the images are pre-uploaded, medium resolution jpegs waiting for anyone to order (full disclosure: I’ve never had a single complaint about one of these prints). To prepare the images for printing, I returned to the original files and did extensive prep (using the latest processing technology) to ensure that the noise reduction, up-res, and sharpening got the most out of every single pixel.
I am absolutely certain I could print an iPhone image as large as these custom orders were (24×36) without apologizing. But getting up-close and personal with these three full-frame sensor prints at the same time I was processing an iPhone image, the detail captured left little doubt that, for anything much larger or more demanding than computer/web display, smartphone capture has a long way to go to catch “real” cameras. (But I’m still pretty thrilled to know that I can get useable quality any time Nature catches me without my real camera.)
Join me in Yosemite
Workshop Schedule || Purchase Prints || Instagram
Let’s Get Vertical
Click any image to scroll through the gallery LARGE
, Yosemite")


Super? Moon
Posted on November 8, 2025
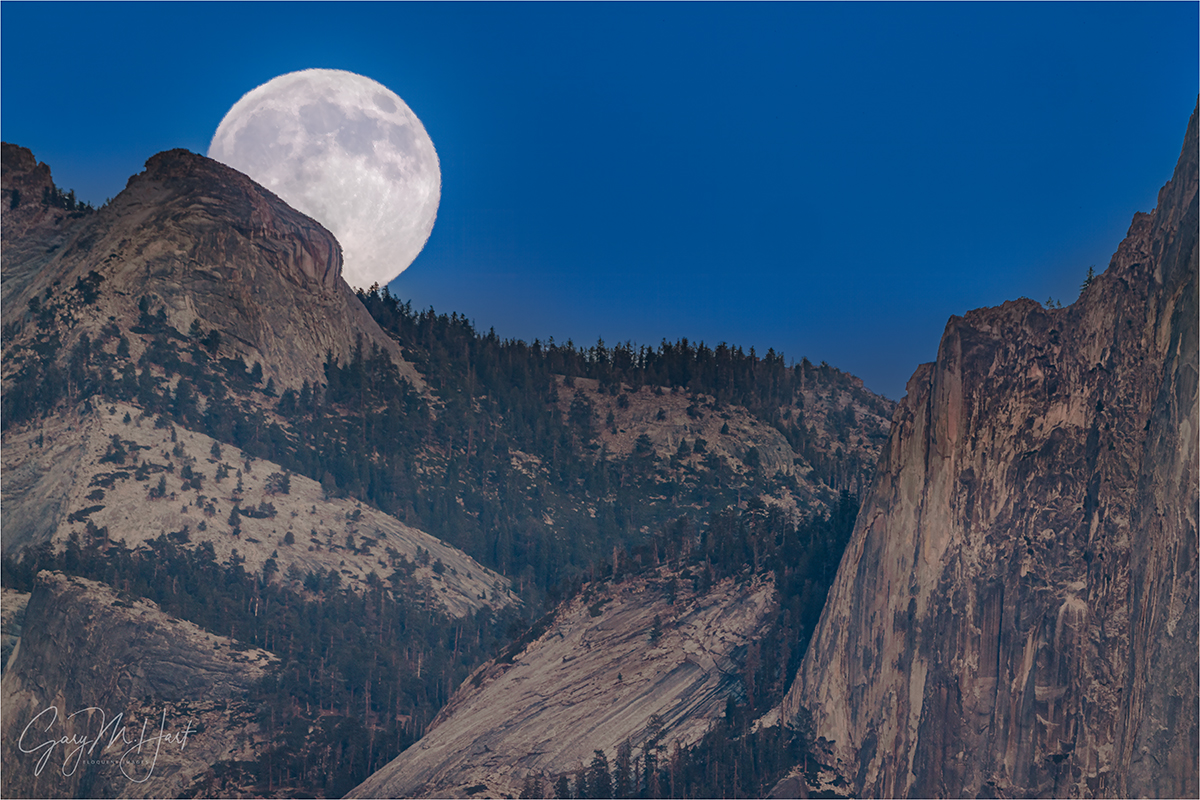
November Moon, Half Dome from Tunnel View, Yosemite
Sony a7R V
Sony 200-600 G
Sony 1.4x teleconverter
ISO 200
f/9
1/80 second
This week’s full moon was a “supermoon”—or, as the media frequently proclaimed, “The biggest moon of 2025!” And while that is technically true, the size difference between a super and average moon is barely perceptible.
So, as a public service, I’ve dusted off and updated a prior article explaining the supermoon phenomenon (any hyperbole)—and what better time to share it than just days after photographing the November supermoon?
What’s the big deal?
So what exactly is so “super” about a “supermoon?” Answer: Not much. Or, maybe a better way to answer the question would be: When presented with a random series of full moon images, would you in fact be able to identify the supermoon? Doubtful. So why the media frenzy? And why do we see so many huge moon images every time there’s a supermoon? So many questions….
Celestial choreography: Supermoon explained
To understand what a supermoon is, you first have to understand that all orbiting celestial bodies travel in an ellipse, not a circle. That’s because, for two (or more) objects to have the gravitational relationship an orbit requires, each must have mass. And if they have mass, each has a gravitational influence on the other. Without getting too deep into the gravitational weeds, let’s just say that the mutual influence the earth and moon have on each other causes the moon’s orbit to deviate ever so slightly from the circle it seems to be (without precise measurement): an ellipse. And because its orbit isn’t round, as the moon circles Earth, its distance varies with the position in its orbit.
An orbiting object’s closest approach to the center of its ellipse (and the object it orbits) is at perigee; its greatest distance from the ellipse’s center is apogee. And the time it takes an object to complete one revolution of its orbit is its period. For example, earth’s orbital period around the sun is one year (365.25-ish days), while the period of our moon’s orbit is slightly more than 27 days.
But if the moon reaches perigee every 27 days, why don’t we have a supermoon every month? That’s because we’ve also added “syzygy” to the supermoon definition. In addition to being a great Scrabble word, syzygy (though it would cost you 2 blank tiles) is the alignment of celestial bodies—in this case it’s the alignment of the sun, moon, and earth (not necessarily in that order). Not only does a supermoon need to be at perigee, it must also be syzygy.
Syzygy happens twice each month, once when the moon is new (moon between the sun and Earth), and again when it’s full (Earth between the sun and moon). While technically a supermoon can also be a new moon, the full moon that gets all the press because a new moon is lost in the sun’s brightness and never visible, so no one cares. Since Earth circles the sun while the moon revolves around Earth, to achieve syzygy, with each orbit the moon has to travel a couple extra days to catch up. That’s why the moon reaches perigee evey 27 days, but syzygy comes every 29.5 days—the moon’s distance from earth is different with each syzygy because it comes at different points in the orbit.
The view from earth: Supermoon observed
While lunar perigee, apogee, and period are precise terms that can be measured to the microsecond, a supermoon is a non-scientific, media-fueled phenomenon loosely defined as a moon that happens to be at or near perigee when it’s full. To you, the viewer, a full moon at perigee (the largest possible supermoon) will appear about 14% larger and 30% brighter than a full moon at the average distance. The rather arbitrary consensus definition of the distance that qualifies a moon as a supermoon is a full moon that is within 90 percent of its closest approach to earth.
I really doubt that the average viewer could look up at even the largest possible supermoon and be certain that it’s larger than an average moon. And all those mega-moon photos that confuse people into expecting a spectacular sight when there’s a supermoon? They’re either composites—a picture of a large moon inserted into a different scene—or long telephoto images. (I don’t do composites, but they’re a creative choice that I’m fine with others doing as long as they’re clearly identified as composites.)
For an image that’s not a composite, the moon’s size in the frame is almost entirely a function of the focal length used. I have no idea whether most of the moons in the full moon gallery below were super, average, or small.
Can you identify the supermoon?
, Yosemite")

Well, if you said the big moon is a supermoon, you’d be right. But it’s kind of a trick question, because these are both images of Tuesday’s supermoon. The size difference is entirely a function of the focal length I used: around 100 mm for the small moon, more than 800 mm for the large one. What these images also make clear is that what I gain in moon size, I lose in field of view—you can’t have both. So when you see a wide angle scene with a huge moon, don’t think supermoon, think composite: a big moon dropped into a wide scene. Or worse still: AI. (Yuck.)
Every full moon is super
As far as I’m concerned, a rising or setting full moon is one of the most beautiful things in nature. But because a full moon rises around sunset and sets around sunrise, when most people are eating dinner or sleeping, seeing it is often an accident—maybe the moon catches your eye as you walk out of the store, or you spot it in near the horizon when your car rounds a bend. But viewing a moonrise or moonset doesn’t need to be an accident. There’s loads of information available online that will tell you which night to look for a full moon, and the general time and direction to look. And for people like me, who try to photograph moonrises and moonsets around an alignment with a terrestrial feature, there is also slightly more technical info that enables more precise planning.
About this image
Which brings me to this week’s image (images), captured Tuesday evening from my very favorite location to view a moonrise: Tunnel View in Yosemite. Why is Tunnel View my favorite moonrise location? Because I can’t think of a better combination beautiful subjects and distant view (nearly 9 miles to Half Dome), that allows me to photography the moon large with with a long telephoto lens and include a striking foreground subject. And if I just want to use the moon to accent a broader scene, the wide angle view at Tunnel View is not too shabby either.
As with most of my moonrise images, this one had been on my radar for over a year. And like many of my moonrise opportunities, I scheduled a workshop so I could share it with other enthusiastic nature photographers. But, since I don’t care about supermoons, I had no idea this November full moon would be a supermoon—and as I grew tired of hearing in the preceding weeks, the largest full moon of 2025! (Yawn.)
The way this month’s full moon set up, I was able to get my group a couple of practice moonrises from other Yosemite locations leading up the Tuesday moonrise—one with a reflection of Half Dome, and another from Glacier Point. Not only did they lear exposure and processing techniques that allow the capture of lunar and landscape detail with a single click, they got beautiful (albeit wider, with a small moon) moon images. I also demonstrated in a training session how I plot the moonrise (without using celestial plotting apps like Photographer’s Ephemeris and Photo Pills).
There’s often drama surrounding an impending moonrise as I stress about forecasts that promise clouds, or a sky filled with more clouds than forecast. This year, despite the threat of rain the following day, the Tuesday evening forecast was clear skies. And true to expectations, the entire afternoon was cloud free.
I got my group up to Tunnel View about a half hour before the moon’s expected arrival, so we all had plenty of time to get set up and settled in. About half of the group joined me on a granite slab above the Tunnel View parking lot, with the rest of the group setting up with my brother Jay and the hoards of other photographers at the wall in front of the parking lot (the standard Tunnel View vista).
I had two tripods set up: one with my (big and sturdy) RRS TVC-24L, with my Sony a7R V and 1.4X teleconverter; one with my Sony a1 and 100-400. My plan was to switch between the two bodies, and to switch out the 200-600 for my 24-105 once the moon separated from the landscape. In other words, I’d be using the a1 with the 100-400 for the entire shoot, and the a7R V with the 200-600 (first) and 24-105 (after a few minutes).
As we waited, I reminded my group that the moon would appear just a little left of Half Dome at around 4:45 (about 15 minutes before sunset), plus/minus 5 minutes. I also told my group that, depending on their camera and metering skills, we’d be able to continue photographing up to 15 minutes after sunset before the foreground became too dark to capture both lunar and landscape detail with one click. The moon arrived right on schedule, right around 4:44 and we were in business….
So maybe the best thing to come of the recent supermoon hype is that it’s gotten people, cameras or not, to appreciate the beauty of a full moon. If you like what you see, mark your calendar for every full moon and make it a regular part of your life—you won’t be sorry.
Join me in a Yosemite workshop
Workshop Schedule || Purchase Prints || Instagram
Tunnel View Moonrise Collection (Super and Otherwise)
Click any image to scroll through the gallery LARGE


, Yosemite")


Navigating the Path to Exceptional
Posted on May 20, 2025
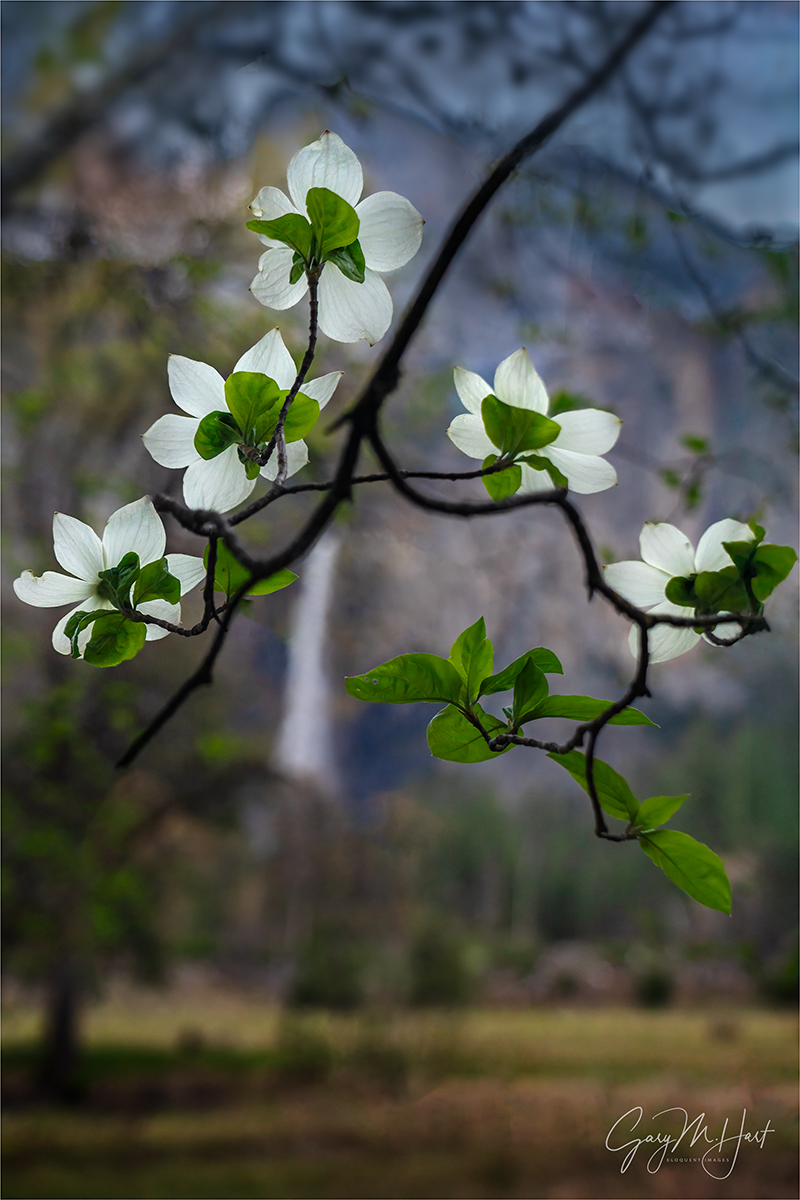
Bridalveil Fall and Dogwood, Valley View, Yosemite
Sony a7R V
Sony 24-105 f/4 G
ISO 800
f/4
1/250 second
Who doesn’t love being exceptional? Exceptional among your friends, or in your camera club, among your peers, or even in the world. Though I suspect the happiest photographers are simply content with being the best possible photographer they can be without measuring themselves against others, what fun is that?
Once upon a time, capturing exceptional images required little more than being at the most beautiful spots during the most spectacular conditions, and having a general sense for composition and metering. Today? Not so much. While there’s nothing wrong with chasing beautiful locations and conditions, these days when you work hard to get someplace special at just the right time, there’s a pretty good chance you won’t be the only one there. (But that doesn’t mean you should stop chasing beauty for beauty’s sake.)
In a world where pretty much everyone carries a camera 24/7, universal access to information makes “expert” guidance just a click away, and there’s virtually no such thing as a “secret” location, I’m afraid the “exceptional” bar just keeps rising. So, instead of settling for beautiful scenes in beautiful conditions (not that there’s anything wrong with that), how can we create images that truly stand out?
Laying the foundation
The key to capturing images that are more creative than cliché starts with understanding the vast difference between your camera’s view of the world and your own. Rather than forcing your camera to see the world as you do, lean into those differences and reveal the world in ways the eye can’t.
Fortunately, the biggest differences between camera and human vision have a corresponding exposure variable to manage them: for depth there’s aperture (f-stop); for motion we have shutter-speed; and ISO gives us control over light sensitivity. Even though you can get a perfect exposure with many combinations of these three exposure variables, there’s often only one combination where all the tumblers fall into place for the perfect combination of depth, motion, and light.
For example, photographing a crashing wave at the beach, (depending on the decisions I make with my exposure variables) the water in a perfectly exposed image could range from individual water droplets frozen in midair, to a homogenous froth of hazy white—or any degree of blur in between. Or, when I photograph a poppy that stands out in a field of wildflowers, my perfectly exposed image could range from every flower sharply defined, to only my subject-poppy sharp and the rest of the flowers some degree of soft—so soft, some are simply shapeless blobs of color.
One more factor to consider before making your depth of field choice, is the difference between humans’ naturally stereoscopic, 3-dimensional view of the world, and the camera’s single lens, 2-dimensional perspective. Even though our cameras can’t render our 3-dimensional world in their 2-dimensional medium, our perspective choices are essential to creating the illusion of depth that elevate an image.
Putting it all together
All of these factors should inform the decisions you make in the field. Instead of settling for the obvious, the path to “exceptional” requires conscious awareness of front-to-back relationships in your frame, and careful, deliberate exposure variable choices to manage the scene’s depth, motion, and light.
Which brings me to this image from last month’s Yosemite Waterfalls and Dogwood photo workshop. For good reason, Valley View (aka, Gates of the Valley for Yosemite purists) is almost certainly second only to Tunnel View on the list of most popular Yosemite photo spots. Which of course is somewhat problematic for those of us seeking to be exceptional.
Pulling into the parking lot here, before you’re even out of the car your eyes are slammed with a view of El Capitan, Cathedral Rocks, and Bridalveil Fall, with the Merced River in the very near foreground. And because the most obvious beauty is very first thing you see at Valley View, many photographers head straight down to the river to claim their version of this classic shot without first considering the other great options here.
For starters, there are three primary places to photograph Valley View: the first, and most obvious, is the view directly in front of the parking area that I just described; next, is the view slightly downstream where, instead of photographing across the river, you can photograph upstream and make El Capitan your prime subject with more foreground options; finally, there’s the view of Bridalveil Fall and its reflection, found just upstream from the parking area.
Each time I arrive at Valley View, I survey the conditions before deciding where to set up. Sometimes the whole scene is fantastic and I stay in front of the parking lot for my version of the shot that’s been taken a million times. But when El Capitan is getting the best light, I usually head strait downstream and try to build a foreground from the rocks, rapids, logs, and grass mounds. And when I want to feature Bridalveil Fall and Cathedral Rocks, I go (just a little) upstream for reflections and maybe a few protruding or submerged rocks. Regardless of my choice, I’m rarely more than 100 feet from my car, but my results are completely different.
Wherever I am, every time I compose a scene, I try to find a foreground that complements my background, or vice versa. At Valley View, my primary subject is almost always in the background (some combination of El Capitan, Cathedral Rocks, and Bridalveil Fall), so I’m usually trying to find a complementary foreground. Looking at the gallery below, you can see that sometimes I succeed, and sometimes I simply settle for a beautiful scene.
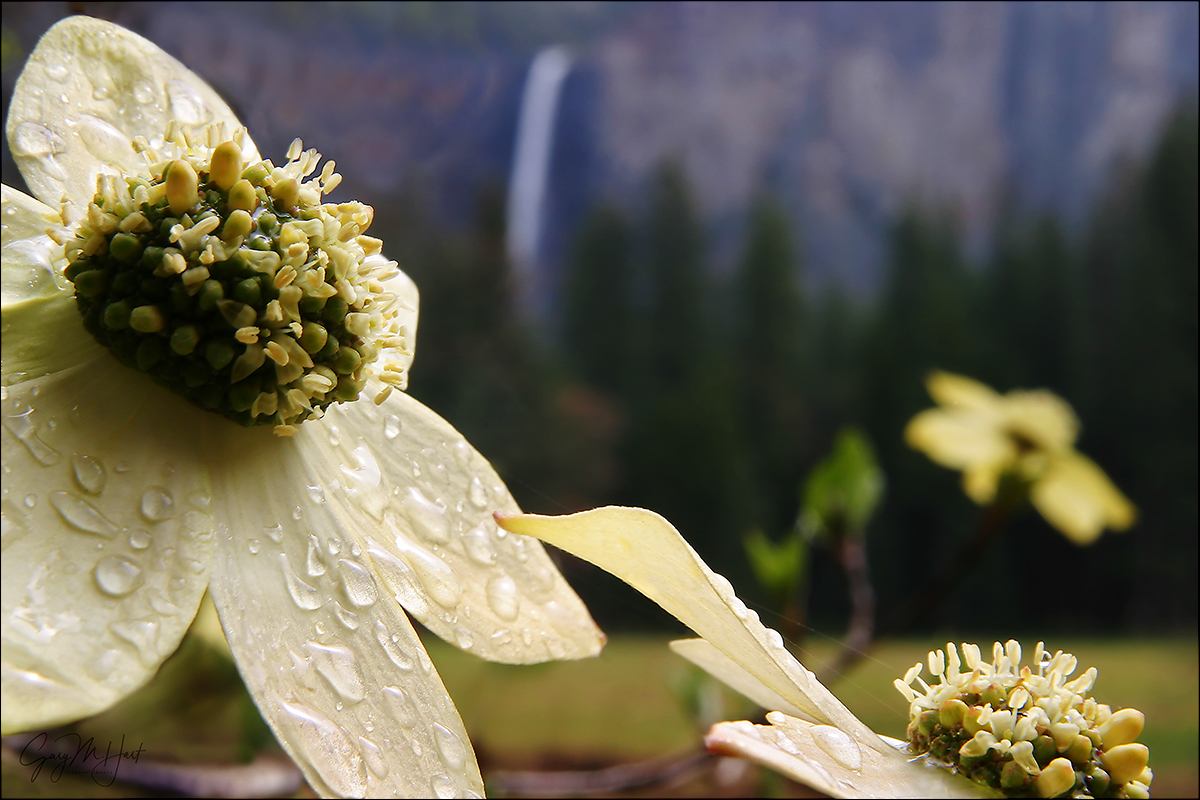
Bridalveil Dogwood, Yosemite
What sets today’s image apart in my mind is that my primary subject is in the foreground. I have the dogwood to thank for that. In fact, even though the results are entirely different, this is the very same tree I used for one of my oldest (and still favorite) images.
When I took my original Bridalveil Dogwood image, I visualized the concept (close dogwood subject, soft Yosemite icon background) on my drive to the park, then spent the day driving around until I found this scene.
Since then, that experience has made me very aware of the relationship between this dogwood tree and Bridalveil Fall, and I can’t help checking it out when the dogwood are in bloom. But, aside from the fact that I wasn’t interested in repeating myself, I couldn’t have duplicated that image even if I wanted to, because so much has changed in the last 20+ years.
First, the conditions were completely different. In the original scene, I benefited from clouds that provided softbox light, and a gentle rain and sprinkled water droplets everywhere. This time I was working with a mostly clear sky that, while less than ideal in many ways, made the backlit flowers (technically bracts, but I’m sticking with flower) and leaves light up as if illuminated from within.
The other significant difference was the tree itself, which had grown so much that my once clear line of sight from the flowers to Bridalveil was now clogged with branches, leaves, and other flowers. So instead of getting super-close to one flower, I identified an inverted v-shaped branch sporting a collection of backlit flowers.
Moving back, I shifted until Bridalveil Fall was framed by the flowers. Then I zoomed my 24-105 lens tight and open the aperture wide for maximum background softness. The flowers swaying in a slight breeze, I bumped my ISO to 800 to ensure a fast enough shutter speed. I took a half-dozen or so image, each with micro-adjustments to the composition, until I was satisfied.
Disclaimer
Is this picture “exceptional”? I have no idea. That really isn’t even my call. In fact, many of my images that feel exceptional to me barely register a reaction from others; then I’ll share an image that feels pretty ordinary to me, and people will rave about it. So who knows? But since chasing other people’s definition of exceptional can make you crazy, I just think I’ll call any image that makes me happy exceptional (in my own personal Universe) and leave it at that.
Lots of Yosemite Photo Workshops Here
Valley View: Variations on a Scene
Click any image to scroll through the gallery LARGE


, Yosemite")


Yosemite and the Joys of Spring
Posted on May 15, 2025
Tree and Bridalveil Fall, Bridalveil Creek, Yosemite
Sony a7R V
Sony 24-105 f/4 G
ISO 200
f/16
1/5 second
Probably the number one question I’m asked about Yosemite is, “What’s the best season for photography?” My response always sounds as if crafted by a waffling politician, but I swear I just don’t have the absolute answer everyone wants. And since I get to photograph Yosemite far more than the average photographer, and have for many years, my priorities are quite likely different than those of the average photographer.
I can say that my least favorite season is summer, because that’s when the waterfalls dry, the sky suffers from a chronic case of the blues (great for tourists, not so much for photography), and tourists swarm the park like ants to ice cream on pavement. But even summer offers beauty not possible any other season, mostly in the form of High Sierra splendor. Closed by snow most of the year, (usually) by late spring the high country roads to Glacier Point and Tuolumne Meadows have opened vehicular access to the exposed granite, wildflower-sprinkled meadows, gem-like lakes, and all the other pristine joys of Yosemite’s incomparable backcountry. And while Yosemite’s high country isn’t quite the respite from crowds it once was, its wide open spaces make solitude still much easier to find.
My own personal favorite season for creative photography is autumn. Though the waterfalls have dried completely or (at best) dwindled to a trickle, in autumn Yosemite Valley’s abundant assortment of deciduous trees throb with yellow and red. Adding to this varied color are mirror reflections in the Merced River, which has been slowed to a crawl along the length of the valley. As an added bonus, by the time the color arrives (mid/late October), dry waterfalls also mean most of the crowds have disappeared.
Winter is probably Yosemite’s most photographically variable season. Show up on a blue sky day in the midst of an (not uncommon) extended dry spell, and you’ll likely find brown meadows, trickling waterfalls, and dirt instead of snow. But arrive during or shortly after a snowstorm, and you’ll enjoy Yosemite Valley at its hands-down most beautiful—arguably one of the most beautiful sights anywhere on Earth. And since winter is the heart of California’s rainy season, the swirling clouds of a clearing storms are never more likely—even when the temperatures aren’t cold enough in Yosemite Valley to turn the rain to snow. Winter (specifically, mid/late February) is also when Horsetail Fall might turn molten red at sunset. Then there’s the rising full moon, which aligns most perfectly with Half Dome only in the winter months.
Yosemite in spring is all about the water—the season when the vertical granite can’t seem to shed the winter snowpack fast enough. Not only are the spring views dominated by well known Yosemite, Bridalveil, Vernal, and Nevada Falls, a seemingly infinite supply of ephemeral falls appear as well for a few weeks or months each spring. Rainbows on the waterfalls, dogwood everywhere, and reflective vernal pools decorating the meadows offer enough beauty to thrill tourists and photographers alike. All that water, paired with fresh green foliage, make spring the time I recommend for first-time visitors—it’s simply the season most likely to live up to expectations, and the least likely season to disappoint.
I stress about the conditions for my students before every workshop, but spring is the least stressful season for me because in Yosemite, there’s just no such thing as a bad spring day. Even though this is a relatively down year for the snowmelt that feeds the falls, last month’s Yosemite Waterfalls and Dogwood got a firsthand taste of all the joys of a Yosemite spring: plenty of water in all the falls, still pools dotting the meadows, and dogwood approaching peak bloom. And despite more clouds than usual, we had enough sunlight to photograph waterfall rainbows from four locations: three from different views of Bridalveil Fall, and one at the base of Lower Yosemite Fall.
One spot I never miss in spring is Bridalveil Creek, which offers an infinite number one-0f-a-kind scenes despite being in the heart of one of the most photographed locations in the world. Autumn is my favorite time to photograph Bridalveil Creek because I can add colorful leaves to the chain of cascades and pools beneath the fall, spring is a close second. While the creek in autumn seems to linger between each cascade, in spring it’s in far too much of a hurry to dally among the rocks.
Because of the intimate setting, its lack of a single obvious subject, and the sheer number of compositional elements begging to be composed into an image, I usually wait until the final day to bring my groups here. By then, everyone has refamiliarized themselves with their cameras, benefited from several days of training and image reviews, and had ample opportunity to get their creative juices flowing.
As usual, I started this group’s final morning at Bridalveil Creek, arriving just as the sky brightened ahead of the rising sun. Because this is an area to wander rather than stick together and photograph as a group, I began with a pretty thorough orientation, then set everyone free. I spent nearly an hour without my camera bag, just walking around trying to reach everyone to answer questions and make sure they were happy. Satisfied that all was well, I walked back to my car and grabbed my camera bag to see what I could find in the nearly one hour remaining.
I often head to the third bridge and work my way to some larger cascades (or small waterfalls) upstream; other times, especially when the group seems to require more help, I just shoot from one of the bridges. But this time I took advantage of a new gap in the trees that opened a new view of the fall just upstream from the third bridge. I’d been especially drawn to a young tree with brand new leaves, and envisioned juxtaposing it against the explosive white mist at the base of the fall. Three or four others in the group were working this scene, so I worked around them and finally ended up with the composition I’d visualized earlier.
With my 24-105 lens I started quite a bit wider, and gradually tightened my compositions as familiarity with the scene’s nuances enabled me to eliminate things. The patterns at the base of the wall changed continuously, so once I found a composition I liked, (true to form) I photographed it more than a dozen times, at several shutter speeds, to give myself a variety of water patterns and blur effects.
Join Me In Yosemite
The Joy of a Yosemite Spring
Click any image to scroll through the gallery LARGE


Ruminating on my Workflow—Both Digital and Analog
Posted on May 10, 2025

Spring Sunset, Half Dome, Yosemite
Sony a7R V
Sony 24-105 f/4 G
ISO 50
f/16
2 1/2 seconds
In one of the training sessions during last week’s Yosemite Spring Waterfalls and Dogwood photo workshop, someone asked about my digital workflow. During my (riveting) file management summary, I mentioned off-handedly that I never delete a raw file, regardless of its content. The amount of push-back I got surprised me, but it caused me to consider more closely my reasons for doing something I never imagined could be so controversial.
For starters, in addition to my primary reason for never deleting my raw files which I’ll get to shortly, I can cite several valid secondary reasons:
- Processing improvements might someday render a previously unusable image salvageable. For example, once considered a pipe dream, the ability to sharpen previously soft images has arrived, and capability continues improving. And today’s noise reduction software has allowed me to process images I once deemed so unprocessable that I would never have considered keeping them.
- I often use images from past shoots for information. Keeping each camera’s timestamp accurate (by adjusting it before each shoot) enables me to return virtually to prior locations and determine things like the time sunlight strikes a particular feature, or (by checking against past moon/sun rise/set image) the number of degrees a peak or mountain range rise above a hypothetical flat horizon.
- Applying my click-evaluate-refine-click… approach to arrive the final (“perfect”) image, it’s helpful to me to be able to reference the steps that got me to any given image.
- Knowing that I never delete anything saves me from the inevitable panic that would ensue when I can’t locate image where I expected to find it.
Each of these is a valid reason that, to me, by itself might be enough to justify a no-delete policy. But honestly, the biggest reason I don’t delete images is time. Going through each image one-by-one wastes minutes or hours that could have been spent on more productive endeavors; accelerating the image purge process by deleting large groups of images in one fell swoop, risks inadvertently expunging something important.
The most common arguments I hear in favor of culling images are organization and storage space. To which I say, locating any image isn’t a problem if you have an organized import procedure—mine is quite simple, involving a folder for each year, embedded with folders for each of that year’s shoots, then letting my Lightroom import rename each file to something descriptive. And storage space? Consider that on my desk is an 18 TB hard drive that cost me around $300. Not only does it contain every digital original (jpeg for a year or two, then raw ever since) I’ve captured since I transitioned to digital more than 20 years ago (2003), it’s still is only a half full. In other words, storage is cheap—really cheap.
I’m not advocating for my approach as much as I’m explaining it. As with pretty much everything else in photography, and despite what you might hear from self-proclaimed experts, there is no universal “best” way to do something: choose the workflow that’s best for you.
Awkward segue
“Workflow” has become something of a buzzword in the photography world, generally apply to image management. But really, it can describe the processes that guide any task from start to finish. Thinking about last week’s Yosemite dogwood workshop, it occurs to me that I also have an analog workflow for running my workshops, developed over the past 20 or so years (has it really been that long?).
A workflow is only as good as its ability to handle the unexpected or uncommon: flexibility. In my image management workflow, flexibility includes (among other things) multiple and redundant backups, including at least one offsite backup, to safeguard against any imaginable threat to my images. But that flexibility should also factor in the ability to quickly locate and access any image quickly, and in multiple ways, whether I’m at home or the road.
In my Yosemite workshops, flexibility starts with my lifetime of accumulated Yosemite knowledge that enables me to structure each workshop on the fly, based on the conditions. (FYI, I’m not trying to portray myself as the only photographer with this kind of intimate knowledge.) I start with a (mental) A-list of locations I want to get my group to no matter what, and a B-List of locations that I tap based on the conditions. And whether a photo spot is the A- or B-list, the when of each location visit is always determined by the conditions.
Last week’s workshop was a perfect example of why I never want to get too locked into a plan. We enjoyed conditions that were equal parts beautiful and challenging, requiring a lot of quick thinking and abrupt shifts to take full advantage. The fickle weather included low clouds (we didn’t even see all of Half Dome until the third day), high clouds, blue skies, light drizzle, torrential downpours, lightning and thunder, and a short-lived but generous dose of hail. Compounding the complications for me were especially unreliable weather reports that at some points felt downright random.
In a blue-sky Yosemite workshop, we may only get to Tunnel View once or twice, but when we enjoy actual weather, each visit to Tunnel View provides a completely different look. In this workshop, we made it to Tunnel View at least a half dozen times. And in a typical (more benign weather) dogwood workshop, I try to give my group time to get themselves in their creative zone by holding off on the serious dogwood shoots until day three (of four). But this time, the conditions on days one and two were so perfect for photographing dogwood (peak bloom, dense clouds, no wind), we started photographing dogwood on our first afternoon, saving the larger views for later in the workshop when the weather forecast promised that there would be fewer clouds obscuring Yosemite’s monoliths.
But photographing El Capitan and Half Dome requires El Capitan and Half Dome to actually be visible (not my first Yosemite rodeo)—since they usually disappear into the clouds when it rains, I grew increasingly concerned when the forecast for our final day started trending toward rain. One week before the workshop, our last day was “Mostly sunny, with a 10% chance of showers”; by the time the workshop started, the final day forecast was “Party sunny, with a 30% chance of showers.”
Forecasts are important because I plan locations based on conditions—not just conditions now, but my expectations of conditions later in the workshop (an inexact science at best). For my A-list locations especially, I don’t want to risk missing one entirely because I delayed until later in the workshop, only to find conditions deteriorated more than I’d expected.
For several reasons, I like finishing my Yosemite workshops with a sunset view of Half Dome from a peaceful bend in the Merced River on Yosemite Valley’s the east side. Though it’s a personal favorite that I visit a lot on my own, I also love sharing this spot with my groups. But when the workshop’s penultimate day presented a nice mix of clouds and blue sky, and the rain forecast for the final day had increased to 60%, I upended my preferred workshop workflow one more time and bumped my planned last-day Half Dome shoot to that evening.
I can’t say that my decisions always work out this well, but the personal validation is sure nice when they do. We arrived about an hour before sunset and found beautiful conditions from top to bottom. I love the fresh green of Yosemite’s brand new leaves each spring—I’d been to this spot with my moonbow group earlier in April, but the green was just starting then. This time the trees had completely leafed out and the difference was glorious. In autumn we can get mirror reflections here, but with peak spring flow swelling the Merced River, the reflection was a nice abstract of color and shape instead. And to top it all off, the clouds above Half Dome changed by the minute, making the sky much more interesting than the boring blue that’s so common in Yosemite.
Still, despite all this, my camera bag stayed on the ground nearby as I worked with my group, pointing out composition opportunities and encouraging them to find foregrounds and maybe try a neutral density filter to enable a long exposure that might reveal hidden (to the naked eye) patterns in the flowing water. As sunset approached and the light faded, some started packing up their gear. I told them not so fast: Half Dome can get light up to five minutes after sunset, and we have no way of knowing whether there’s an opening on the horizon for the sun to slip through. In other words, we’ll just sit tight for a few more minutes.
As if on queue, almost immediately I saw some of the highest clouds start to brighten and warm, so I opened my camera bag and extended my tripod, just in case. Within a minute or two the clouds above Half Dome started to pinken and I had my camera out and mounted within seconds.
There’s no time for creativity and experimentation when I’m with a group, but I’m extremely familiar with the many composition options here and went straight for my go-to good sky and reflection framing: vertical, Half Dome slightly right of center, just wide enough to include all of the best parts of the clouds (more specifically in this case, the color) and their reflection. You could call this compositional workflow (there’s that word again) that enabled me to get a nice image as quickly as possible.
Focus was easy since everything was at infinity. I wanted to emphasize the water’s motion with a long exposure, but didn’t have time to retrieve and screw on a neutral density filter. Fortunately, it was late enough that I was able to get a 2 1/2 second shutter speed using ISO 50 and f/16.
The pink only lasted a minute or two, and the direct light never reached Half Dome, but no one complained. As it turned out, our final sunset the next day was completely washed out by an electrical storm that swallowed Half Dome and El Capitan, and included some of the heaviest rain I’ve ever seen in California (and at one point chased me into the Wawona Tunnel to escape marble-sized hail).
One more thing
Going back to this compositional workflow I idea, in general I’m opposed to formulaic composition because it stifles creativity, but every image doesn’t need to break new ground, and like I said, nothing in photography is absolute…
More Yosemite Photo Workshops
Workshop Schedule || Purchase Prints || Instagram
Variations on a Scene: Images From This Location Through the Years
Click any image to scroll through the gallery LARGE


Grand Finale
Posted on February 6, 2025

Lunar Lift Off, El Capitan, Yosemite
Sony α1
Sony 200-600 G
Sony 1.4x teleconverter
ISO 800
f/13
1/25 second
For most of my full moon workshops, I try to schedule the moonrise main event for the workshop’s final sunset. Sometimes other factors prevent this (for example, in Yosemite I try to avoid weekends), but when the schedule works, a nice moonrise gives the group something exciting to anticipate throughout the workshop. This becomes especially important when some or all of the workshop’s hoped-for conditions fail to materialize.
Last month’s Yosemite Winter Moon workshop lacked to winter snow and cloudy skies we hope for in a Yosemite winter workshop, but the moon (among other things) saved the day for us by not only giving us something to look forward to, but also by photobombing an earlier sunset. The true star of that prior sunset was the clouds and color, and as nice as it was to accent the scene with the moon, it was the final night moonrise that I most looked forward to.
As I’ve written before, despite all the unjustified “supermoon” hype, the key to photographing a big moon is focal length—the longer the better. Period. If you don’t care about what’s in the foreground, or for that matter choose not to include any foreground at all, any location where the moon is visible will do. But if you want to complement your legitimate big moon (a moon image that happens in one click) with a striking landscape feature, the farther you position yourself from your landscape subject, the longer the focal length you can use, and the bigger the moon will be. Of course if you make the moon bigger with a longer focal length, the less of your foreground you can include, and the more precise the moon/foreground alignment must be.
In Yosemite, the best place to set up for a telephoto moonrise that also includes photo-worthy foreground features, is Tunnel View. At Tunnel View, the prime moonrise subjects are El Capitan and Half Dome, three and eight miles distant. From there, I can include all of Half Dome with a focal length up to 400mm; with a longer lens, I can enlarge the moon further, while still including some of Half Dome—if the alignment is right.
The most important part of photographing a moonrise from Tunnel View is to align it with a desirable foreground subject. Most of the year, the moon rises much too far south to include in a Tunnel View scene, but for 2 or 3 months each winter, the full moon rises far enough north to align beautifully with Tunnel View’s magnificent monoliths.
But success is not simply a matter of showing up at Tunnel View the night of the full moon. Each winter the solar/lunar choreography is different, which is why the moon is all over the place in my many Tunnel View moonrise images in the gallery below: left of Half Dome, right of Half Dome, directly aligned with Half Dome, and occasionally closer to El Capitan than Half Dome.
This winter’s geometry was especially exciting to me when I realized the January moon would rise farther north, and therefore closer to El Capitan, than I’d ever photographed it. I have photographed the moon arriving from behind El Capitan’s vertical face, but I’d never seen it come up from behind the top of El Capitan. Always up for photographing something new (especially in Yosemite), I scheduled a workshop for it.
Which is how my workshop group and I ended up at my favorite Tunnel View vantage point on a Sunday evening last month. Sunset that evening was 5:05, and my calculations said the moon would at just about the same time—pretty much perfect timing for a moonrise, because you want the sky dark enough for the moon to stand out in contrast, while still bright enough that the landscape has enough light to reveal detail without blowing out the moon.
I’d set up with two tripods and cameras, one with my 200-600 lens, the other my 24-205 lens. The long telephoto was for the moon’s arrival; the wider lens was for when the moon elevated enough to separate from El Capitan. I’d planned to increase the magnification of the telephoto with my 2x teleconverter, but trying to attach the teleconverter to the lens, I fumbled it and helplessly watched it roll down the steep granite toward a vertical drop of several hundred feet. Fortunately, it lodged in small crack just before taking the plunge, but when I put it on the view was completely blurred, so I switched to my 1.4X teleconverter, giving me a focal range of 280-840.
As the sun dropped and the time approached, I became aware that a thin film of clouds had drifted across the eastern horizon above El Capitan—so thin that they weren’t visible at all in daylight brightness, but just substantial enough to reflect some color as sunset approached.
The moon arrived right on schedule, and we immediately started clicking. My earliest shots were almost entirely long telephotos, like this one at 840mm. It’s always shocking to see how fast the moon moves across a long telephoto frame, but I soon started mixing in a few wider frames (that required less frequent adjustments) as the moon started separating from El Capitan. By this time sky had pinked up beautifully, adding an element of color I hadn’t expected.
We all come to a workshop with expectations, students and leaders alike, but rarely are all of them met. And while the January group’s hopes for snowy winter scenes were dashed, I think that loss was more than made up for by other things we witnessed, some complete surprises, and some just a little better than our already high expectations—like this sunset moonrise to finish the workshop.
Join me in a Yosemite photo workshop
Workshop Schedule || Purchase Prints || Instagram
Yosemite Moonrise Collection
Click any image to scroll through the gallery LARGE


The Best Camera Is…
Posted on January 22, 2025
Framed Reflection, El Capitan, Yosemite
Apple iPhone 16 Pro
24mm focal length equivalent
ISO 64
f/1.8
1/1150 second
… The one that’s with you
Yes, I know it’s a cliché, but like most clichés, this one is founded on truth. Even people like me, who pay the bills with our pictures, don’t carry our “real” cameras 24/7. In those instances, when I see beauty I deem worthy of recording, I’m happy that my iPhone (which is always with me) gives me serviceable images.

Mobile Dinosaur
In my prior post, I listed 10 reasons to become a nature photographer. Number one was saving memories; number three was low-cost start-up, and cited the very good cameras included in every smartphone.
I resort to iPhone photography not to save money, but for convenience in day-to-day living. Virtually all of my iPhone photos are quick snaps of transient life moments, from special family times that I want to save, to quirky observations worthy of sharing (like a dinosaur riding in the back of a pickup on Highway 99), to simply saving things I don’t want to forget (for example, a business card, or a humorous comment on my daily Starbucks drink).

Inner Beauty, Japanese Maple, Portland Japanese Garden
I’m definitely not one of those photographers who actively pursues creative smartphone photography, but I don’t hesitate to pull out my iPhone when natural beauty moves me and my adult equipment isn’t available. Though the resulting images rarely amount to anything, the simple ability to save the moment gives me comfort.
On the other hand, there was that time in May 2023, when my iPhone enabled me to capture the famous maple tree at the Portland Japanese Garden. I’d arrived just hoping to get a simple snap of the celebrity tree, but soon found myself in full photographer mode, switching my phone to raw capture, dropping down to grass level, and going ultra-wide to get an angle that emphasized the web-like canopy and its shadow on the grass. Even though there are already thousands of similar images of this beautiful little tree, my own version turned out to be one of my favorites of the year.
In that case, I was on vacation with my wife and had made the conscious decision before leaving not to take my camera gear, with zero regrets. The situation behind today’s image, that found me with my workshop group a mile or so downriver from El Capitan, was a little different.
It was earlier this month, and I’d taken my group to a view of El Capitan that I’ve photographed so many times, in far more photogenic conditions, that I didn’t expect to find anything new. Given the blank sky, I just left my camera bag in the car and I guided them on the short walk to my spot, fully intending to simply enjoy the view.
I actually have history with this location that goes way back to my earliest digital photography days. One night I was here with my Canon 10D for moonlight photography. Perched 15 vertical feet above the Merced River, I set up my tripod and reached for my 17-40 f/4 L lens, but somehow fumbled it into the dark void below. I couldn’t see a thing, but will never forget the sounds: thump (one bounce off the dirt wall), crack (another bounce off a rock), and splash. Without hesitation, I grabbed my tripod and camera bag and pivoted to the car. The next morning I returned, risking life and limb to scramble down to the river, where I eventually extracted my lens from about 18 inches of water. There was no sign of external damage, but the front lens element revealed water to above the mid-point—enough that if this had been a cartoon, I’d no doubt have seen small fish swimming by.
This spot has changed somewhat since then. Directly on the downstream side of a 90-degree bend in the river, 20 or so years of spring high water have eroded the riverbank, at some point taking a fairly large tree with it. Though the route down to the river is still quite steep, it’s no longer as treacherous as it was when I recovered my drowned lens all those years ago. When one of the people in my group found his way down to the river, a couple more followed, and soon I had to climb down to check out the view myself.
I’d never actually photographed from river level here, so it was cool to find a new perspective. As I can’t help doing, even when I don’t have my camera with me, I started composing shots in my head. My eyes went to a nearby pool, mostly walled-off by rocks from the Merced River’s main flow, reflecting nothing but blue sky. But when I got down on my knees and leaned out over the water as low and as far as my body would allow, I found a position that included a mirror reflection of El Capitan’s upper half—definitely photo-worthy. Because I didn’t have my gear, I hailed one of my workshop students and pointed the shot out to him. He came over to check it out, but decided getting his camera in position for the reflection would be a little too treacherous—both for him and his camera.
When he returned to what he’d been working on, I got the bright idea to whip out my iPhone and give it a try. Had I had my own camera and tripod, I might have tried the shot that way, come to the same conclusion my student did, and just forgotten about it. But with my phone, I was able to lie on my stomach, stretch my arm as far across the water as I could, and snap a one-handed picture.
Since I couldn’t actually see the screen while taking that picture, I retracted my arm and reviewed my result. Despite being not straight, and riddled with several other compositional flaws, it was instantly clear that there really was something photo-worthy there. I switched my Camera app to raw capture and tried again. And again, and again, reviewing and refining like this about a half dozen times, until I was satisfied that I’d gotten it right—the last shot I took is the one you see here.
I know people who claim that today’s smartphone cameras rival full frame cameras, and that there really is very little reason to invest in large-sensor mirrorless or DSLR camera systems anymore. And I’ll acknowledge that today’s smartphone cameras are indeed amazing, absolutely worthy of “best” camera status when no other cameras are available. Which is why I’m very happy to have had my iPhone when I came across a view of El Capitan that I didn’t have. For digital display, and even decent size prints, this iPhone image is fine. But at full resolution, when compared side-by-side with this iPhone 16 Pro image, the difference in detail and clarity captured by my full-frame Sony gear is not even close. (Other large-sensor cameras, versus other smartphone cameras, will yield similar differences.) So it should come as no surprise that, for the foreseeable future, I’ll be lugging my full frame cameras, bulky lenses, and sturdy tripod, any time quality is essential.
Join Me in Yosemite
Workshop Schedule || Purchase Prints || Instagram
Speaking of Seeking Different Views of El Capitan…
, Yosemite")


One Night, Two Moons
Posted on November 27, 2024

Through the Clouds, Tunnel View Moonrise, Yosemite
Sony a7R V
Sony 24-105 f/4 G
ISO 100
f/10
1/3 second
I wrapped up this year’s workshop schedule at the beginning of this month and am now enjoying a much anticipated Holiday breather before my schedule ramps up again in January. This isn’t exactly a vacation, because the end of the year is when all my permit reporting and next year’s permit applications are due, and my 2025 workshop prep starts to ramp up, but my schedule does get a bit less frenetic when the travel (and all its prep and recovery) is over.
As I often do when my travel schedule eases around the Holidays, I prioritize family over photography. That doesn’t mean no new pictures, but it does mean that most (all?) of the new pictures I share over the next couple of months will probably be pictures captured months, or even years, ago, but never got around to processing.
Going through my vast repository of unprocessed images is something I started doing while isolated during the early months of the pandemic (has it really been 4 1/2 years?!). I’d always been aware that I had lots of untapped gems languishing on my hard drive(s), but was nevertheless surprised by how much I enjoyed searching them out. Sometimes I’ll start by randomly picking a photo trip and scanning the Lightroom thumbnails for something that stops me, but the most productive approach has been going through my collection of already processed favorites to identify particularly special shoots, reasoning that there must certainly be more there. (I write more about this in my Back to the Future blog post.)
It always surprises me how much I enjoy revisiting past photo trips and workshops. Not only does the experience revive memories of special moments in Nature, lots of the best memories are of the people I was with. Sometimes that’s been other photo buddies, but since so much of my photography is centered around my workshops, the majority of those memories are actually my workshop groups.

Moonrise, Half Dome, Yosemite
Case in point: The seed for this “new” image was my “Moonrise, Half Dome, Yosemite” image from my February 2024 Yosemite Winter Moon workshop. Going through this workshop’s image folder, all the cloud-induced stress surrounding this particular moonrise came flooding back. And with it also came memories of the euphoria we all felt when the clouds opened just enough, at exactly the right time, to reveal the Half-Dome/moon/sunset alignment I’d been thinking about for more than a year. (Read the details here: Moon Swoon.)
Within minutes, the moon had climbed into the rapidly thickening clouds, and it looked like the show might be over—until, shortly before darkness was complete (or at least too dark to photograph the moon and foreground in one frame), it rose into a patch of slightly thinner clouds and briefly reappeared.
My strategy for moonrises is to go long until the moon separates from the landscape, then go progressively wider as it rises. This evening I’d set up two tripods, one with my Sony α1 and 200-600 lens, the other with my a7RV and 24-105 lens. So when the moon made its brief return, I was instantly ready to start clicking.
I chose a vertical composition to emphasize the foreground and minimize the lateral aspects of the scene. I also tried a few that were wide enough to include more of El Capitan, but ultimately decided to process this one to avoid shrinking the moon too much with a wider focal length.
Viewing these two images together provides a fantastic opportunity to make a point I’ve tried to make many times before: how to photograph a large moon. Thanks to the continued emphasis (and hype) focused on the largely irrelevant “supermoon” phenomenon, many people seem to believe the size of the moon in the sky is the most import part of a large moon image. It’s not.
The size of the moon in any image is almost entirely a function of the focal length used, not the relatively small difference between a “regular” size moon and a supermoon. Compare the size of the moon in these two images, noting that they were captured from the same location, on the same night, less than 10 minutes apart. For the big moon image, I used a 450mm focal length that magnified both Half Dome and the moon and eliminated everything else. For today’s smaller moon image, I chose a 50mm focal length that enabled me to fit far more of the surrounding beauty, but also shrunk the moon.
I should add that as far as I’m concerned, the absolutely best light for photography is the shadowless light that starts 10-15 minutes after sunset. I captured my (wide) image about 15 minutes after sunset. To my eyes, the scene appeared much darker than what you see in the image. I had to be careful with the exposure to avoid blowing out the moon, making the foreground in my raw original nearly black, but by monitoring my histogram and knowing my camera, I knew that the shadows would be recoverable. And I think the thin clouds helped subdue some of the lunar highlights, enabling to give the scene a little more exposure.
I still have a few openings in my 2025 Yosemite photo workshops
The Moon Large and Small, from Full to Crescent
Click any image to scroll through the gallery LARGE


")

")


