Eloquent Images by Gary Hart
Insight, information, and inspiration for the inquisitive nature photographer
Moon chasing: The rest of the story
Posted on November 19, 2013
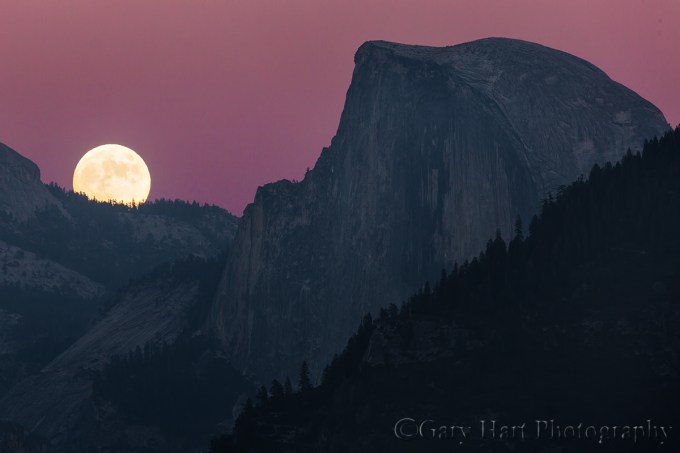
Moon!, Half Dome, Yosemite
Canon EOS 5D Mark III
1/13 second
F/11
ISO 200
400 mm (slightly cropped)
Wow, it seems like only yesterday that the moon was just tiny dot hovering above Half Dome.

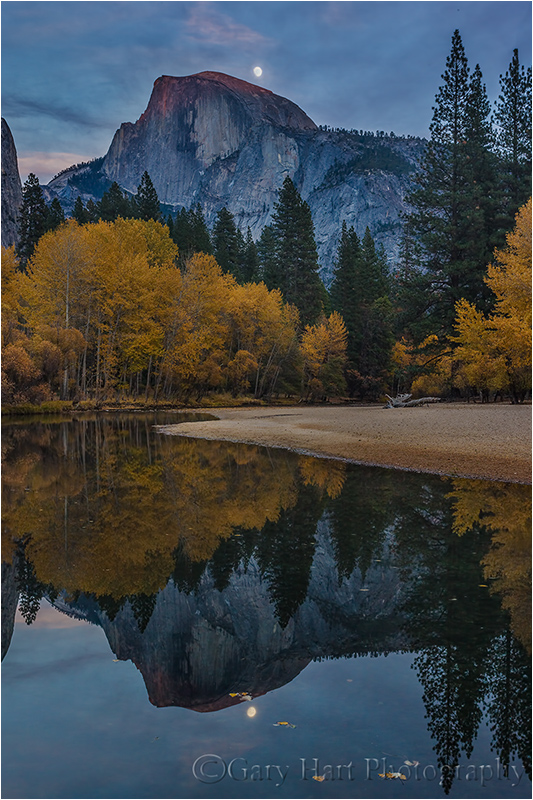
Moonrise Reflection, Half Dome and the Merced River, Yosemite
What happened?
No, the moon didn’t magically expand, nor did I enlarge it digitally and plop it into this image. What happened is that I waited two days and moved back; what happened is the difference between 40mm and 400mm; what happened is a perfect illustration of the photographer’s power to influence viewers’ reaction to a scene through understanding and execution of the camera’s unique view of the world.
The rest of the story
My workshop group captured the “small” moon at sunset on Thursday, when it was 93% full and the “official” (assumes a flat, unobstructed horizon) moonrise was 3:09 p.m (an hour and 40 minutes before sunset). That night the moon didn’t rise to 16 degrees above the horizon, the angle to Half Dome’s summit as viewed from our location beside the Merced River, until almost exactly sunset. Because it’s so much higher than anything to the west, Half Dome gets light pretty much right up until sunset—look closely and you can see the day’s last rays kissing Half Dome’s summit.
Flat horizon moonrise on Saturday, when the moon was 100% full, was at 4:24 p.m., only about twenty minutes before sunset. But Tunnel View is nearly 500 feet above Yosemite Valley; it’s also 5 1/2 miles farther than Half Dome than Thursday’s location—this increased elevation and distance reduces the angle to the top of Half Dome to just 6 degrees. So, despite rising over an hour later, when viewed from Tunnel View, the moon peeked above the ridge behind Half Dome just a couple of minutes after sunset (if we’d stayed at Thursday night’s location, in addition to being hungry and cold, by Saturday we’ have had to wait until after 6:00 for the moon to appear).
Exposure
My objective for full moon photography is always to get the detail in the moon and the foreground. As I mentioned in yesterday’s post, these were workshop shoots, and experience has shown me that the most frequent failure when photographing a rising moon in fading twilight is getting the exposure right—the tendency is to perfectly expose the foreground, which overexposes the daylight-bright moon (leaving a pure white disk). This problem is magnified when the moon catches everyone unprepared.
So, both evenings I had my group on location about 30 minutes before the moon. While we waited I made sure everyone had their blinking highlights (highlight alert) turned on, and understood that their top priority would be capturing detail in the moon. I warned them that an exposure without a blinking (overexposed) moon would slightly underexpose the foreground. And I told them that once they had the moon properly exposed (as bright as possible without significant blinking highlights), they shouldn’t adjust their exposure because the moon’s brightness wouldn’t change and they’d already made it as bright as they could. This meant that as we shot, the foreground would get continually darker until it just became too dark to photograph.
(A graduated neutral density filter would have extended the time we could have photographed the scene, but the vertical component of Yosemite’s horizon made a GND pretty useless. A composite of two frames, one exposed for the moon and one exposed for the landscape would have been a better way to overcome the scene’s increasing dynamic range.)
Compare and contrast
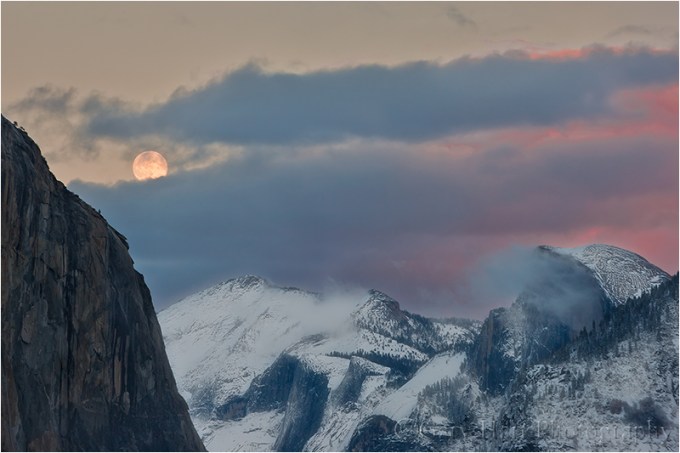
Winter Moonrise, Half Dome, Yosemite
Thursday night’s scene, which would have been beautiful by itself, was simply accented by the (nearly) full moon. Contrast that with my visit a few years ago, when I photographed a full moon rising slightly to the left of its position last Saturday’s night. But more significant than the moon’s position that evening was the rest of the scene, which was so spectacular that it called for a somewhat wider composition that included the pink sky and fresh snow. And then there’s the above image, from last Saturday night—because the sky was cloudless (boring), and snow was nowhere to be seen, I opted for a maximum telephoto composition that was all about the moon and Half Dome.
The wide angle perspective I chose Thursday night emphasized the foreground by exaggerating the distance separating me, Half Dome, and the moon; the snowy moonrise image found a middle ground that went as tight as possible while still conveying the rest of the scene’s beauty. Saturday night’s telephoto perspective compressed that distance, bringing the moon front and center. Same moon, same primary subject: If Thursday night’s moon was a garnish, Saturday’s was the main course.
Learn more about photographing a full moon
Join me next fall as we do this all over again
A gallery of Yosemite moons
Click an image for a closer look and slide show. Refresh the window to reorder the display.


Chasing the moon in Yosemite
Posted on November 18, 2013
Moonrise Reflection, Half Dome and the Merced River, Yosemite
Canon EOS-1Ds Mark III
1.3 seconds
F/16.0
ISO 200
40 mm
The highlight of my just completed Yosemite Autumn Moon photo workshop was a full moon rising above Half Dome at sunset. But rather than settle for just one Half Dome sunset moonrise, I’d “arranged for” three. Clouds shut us out on sunset-moonrise number two, but sunset-moonrise number one was a huge success. (And sunset-moonrise number three, from Tunnel View, was so special that I’ll dedicate a whole blog post to it.)
Any location’s “official” sun and moon rise/set times assume a flat horizon—if you read that today’s moonrise is at 5:00 p.m., you need to account for the time it takes for the moon to rise above whatever obstacles (mountains, hills, trees) are between you and the flat horizon. And due to the same motion around Earth that causes the moon’s phases, anyone planted in the same location night after night would see the moon rise about fifty minutes later each day (this is an average—the nightly lag varies with many factors). For example, a moon that hovered right on the horizon at sunset last night will rise too late to photograph tonight.
While you can’t do anything about the moon’s absolute position in the sky, you can control the elevation of your horizon simply by changing your location. In other words, careful positioning makes it possible to photograph a moonrise at sunset on multiple nights—move lower and/or closer to the horizon to delay the moon’s appearance, higher and/or farther to view the moon sooner.
The earlier the moon will rise, the closer to your subject (for example, Half Dome) you should be to increase the angle of view; the later the moonrise, the farther back and higher you should be. So, positioning ourselves on the valley floor, close to Half Dome, provided a steep angle of view that delayed the moon’s appearance on Thursday night, when it rose (above a flat horizon) several hours before sunset. Conversely, standing at elevated Tunnel View a couple of nights later decreased our angle of view, enabling us to see the moon sooner when official moonrise is closer to sunset.
Last Saturday night, from Tunnel View on Yosemite Valley’s west side (farthest from Half Dome) the moon was “scheduled” to appear about five minutes after sunset—that would put it in the magenta, post-sunset band with just enough light for about ten minutes of shooting before the dynamic range (the brightness difference between the sunlit moon and darkening foreground) shut us down. While that was the shoot we were most looking forward to, for Friday night I’d picked a mid-valley spot by the Merced River that would put the moon above Half Dome just about sunset. And for our initial sunset on Thursday evening, I took the group to a riverside spot on Yosemite Valley’s east side, much closer to Half Dome.
Clouds obscured the moon Friday night, but Thursday night was a real treat. Not only did we find the fall color in the cottonwood trees upriver still hanging in there (despite a fairly early autumn in most of Yosemite Valley), the clouds parted just in time for the moon’s arrival. In addition to Half Dome, the trees, and the moon in the distance, we were able to get a mirror image of the scene reflected on the glassy surface of the Merced River at our feet.
While the downside of moving closer to Half Dome (or whatever your subject is) is that the wider focal length necessary to include the entire scene also shrinks the moon, I’ve always believed a small moon adds a powerful accent that makes an already beautiful scene even more special. But what if you prefer your moon big? Simple: just wait a day or two, and move back as far as possible. Stay tuned….
Join me next fall as we do this all over again.
* * *
One final point: Notice the cool (blue) color cast of this scene. This is an indication of not just the rapidly advancing twilight, but also the depth of the shade there in the shadow of the steep valley walls and dense evergreens. An image’s color temperature is a creative choice made during processing by photographers capturing in raw (unprocessed) mode. While warming the light would have made the trees more yellow, I decided that the coolness adds a soothing calmness that is lost in the warmth of a daylight scene.
A Yosemite Autumn Moon Gallery


Variations on a stream
Posted on November 7, 2013
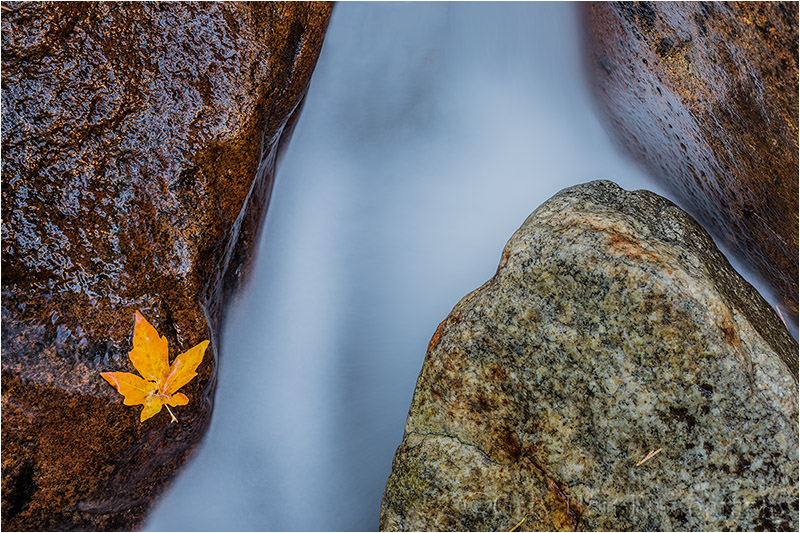
Leaf and Rocks, Bridalveil Creek, Yosemite
Canon EOS 5D Mark III
5 seconds
F/11
ISO 200
100 mm
In my November 4 post, I wrote at length about a recent morning spent photographing a single leaf I found plastered to a rock beside Bridalveil Creek in Yosemite (and my feelings about staged scenes). While my entire shoot that morning was all about one found leaf, it was just the latest in a long succession of focused visits to Bridalveil Creek. Each time I visit here the creek is different: In spring Bridalveil Creek spills into three distinct branches, each bulging with rushing snowmelt; most autumns, the creek has shrunk one branch, a trickle of its former self, decorated with yellow leaves; in winter the banks are lined with snow and ice crusts the surface. On each visit I usually choose a scene and work it to within an inch of its life. On this most recent morning I spent an hour photographing this one leaf, making sure I left no shot un-shot: Multiple lenses, a range of focal lengths, horizontal and vertical orientation, and a variety of perspectives.
Here are more samples:

Here’s the version of the leaf I featured in my November 4 post. I started with wider compositions and gradually moved to tighter frames like this one. (If I were one to arrange leaves in my scenes, I might have been tempted to place one about where the pine needle sits on the rock opposite the leaf.)
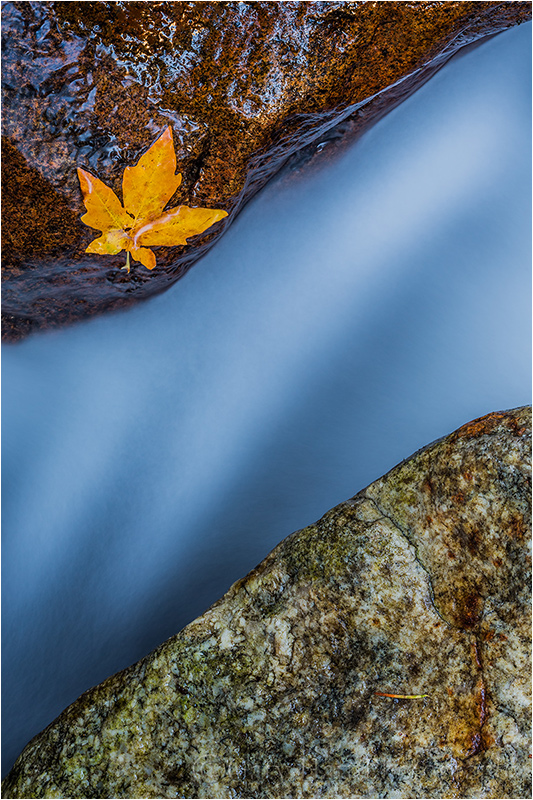
Here’s the same image rotated into a vertical. Whenever possible, I like to horizontal and vertical version of each scene I photography, but rarely do they come out identical because each orientation requires its own crop. But an advantage of photographing a scene from directly above is that there’s no top or bottom to the scene. To make the horizontal scene into a vertical, I could have rotated my camera 90 degrees and re-shot, but it was much easier to simply rotate the image in Photoshop.
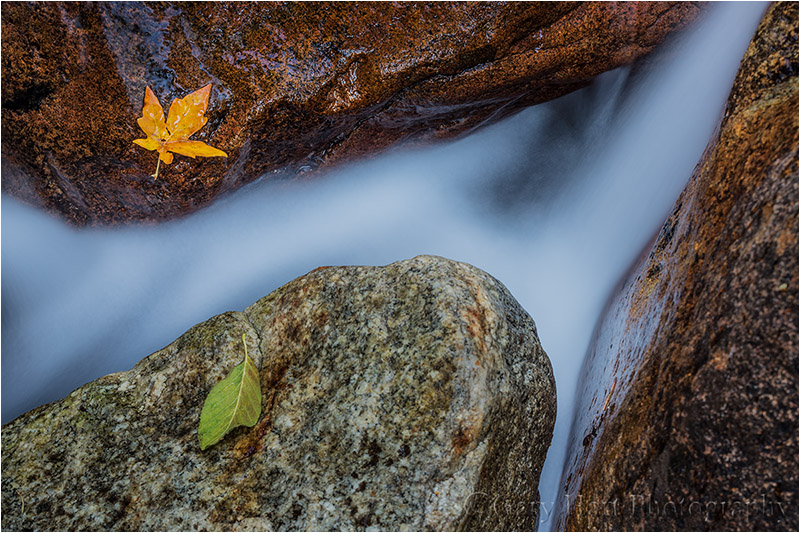
Shortly after I started working on the scene, a breeze kicked up and deposited a green leaf right on top of the pine needle mentioned above. Not only was it a not particularly photogenic leaf, it was upside-down (clearly I need to work on my powers of telepathic manifestation). But rather than knock the rogue leaf into the creek, I included it in my composition, capturing several frames before the breeze returned and did the dirty work for me.
No leaves were harmed in the making of this image
Posted on November 4, 2013
Leaf, Bridalveil Creek, Yosemite
Canon EOS 5D Mark III
10 seconds
F/16
ISO 200
78 mm
“Did you put that leaf there?”
I’m not sure how many more times I’ll need to answer that question, but let me just say that my answer will never change: No. I feel very strongly that photography needs to be a source of pleasure, and my pleasure from photography comes from discovering beauty in its natural state. But that’s just me—others enjoy staging images by adding or moving elements to suit their composition, which, as far as I’m concerned, is fine as long as the photographer is forthright about what she’s done.
Sadly, the ease of digital manipulation has made people hyper-sensitive to the possibility that an image might not be “real” (whatever that means). Analog manipulation (like arranging leaves) has gone on since the first photon/film connection. And darkroom manipulation, while not nearly as easy as digital manipulation, has been around since the first darkroom—Ansel Adams was a notorious darkroom manipulator who often revisited older images and re-printed vastly different versions. Adams actually got a kick out of people who believed he was capturing the world exactly as he saw it.
Whatever the “manipulation” (a word with a much more negative implication than it deserves in this context), the ultimate litmus test is whether deception is involved. Most people who arrange the elements in their scenes do so without devious intent; while I may not be as excited about an image when I learn that the photographer placed the leaf on that rock, or Photoshopped the moon above between those mountains, I won’t think less of him as a person or photographer if he’s honest about it.
Nevertheless I sometimes find myself getting a little defensive when the “Did you put that leaf there?” question is posed. It’s not so much the question itself (which I understand), as it is the implication that I’ve been caught in a deception that so frequently wraps the question. Nevertheless, regardless of the questioner’s tone, I just smile and affirm my innocence of whatever nefarious act they might suspect me of. I try my best not to expose their ignorance, and when I’m in a more patient frame of mind, I’ll even attempt to educate anyone who wants to be educated. But sometimes I just feel like asking, “Do you really not believe that nature can be this beautiful?”

Fallen Color, Rock Creek Canyon, Eastern Sierra
Here’s one that gets the “Did you do that?” question all the time. I didn’t touch the leaves, but because any two objects in the Universe can be connected by a straight line, I did position myself to emphasize the line connecting this pair.
Oh well. I’m sure I get the question so much because of what and how I shoot—browse my galleries and you’ll see many images with a single leaf, or maybe a small group of leaves. But that’s because I aggressively seek solitary elements to isolate from whatever larger scene I’m in, or multiple elements that I can compose into a natural pattern by simply positioning my camera a certain way.
When I find a compositional element I think will work, I stick with it until I’m sure I’ve found every possible way to shoot it, then continue just a little longer. Which brings me to today’s leaf. I photographed it and nothing else for a full hour—it was the only thing I photographed that morning.
On the final morning of last week’s Yosemite Fall Color and Reflections workshop I guided those workshop students who didn’t mind a little rock scrambling to my favorite spot on Bridalveil Creek. Within easy earshot of the fall, the creek back here tumbles between boulders as large as cars, descending in cascading steps interrupted by quiet pools. In autumn, the scene is augmented by yellow leaves that dart through the cascades, drift on the pools, and cling to wet rocks.
While the others zeroed in on a triple cascade (that I’d photographed many times before), I hopped nearby boulders in search of something new. My search ended when I found this single, rock hugging leaf. Unfortunately, the star of my show was in a most inaccessible spot, inches from the rushing water at the bottom of a steep and slippery rock, deep in a narrow notch between a trio of large boulders.
From atop a nearby rock I could shoot down at about 45 degrees from maybe fifteen feet away, but I soon realized that a tighter composition from directly above was really the shot I wanted. Getting in position for this required angles I didn’t know my tripod legs were capable of, and gymnastic contortions this body hasn’t attempted in years. I can’t even begin to describe how awkward this was, but of course that won’t stop me from trying:
It was clear from the outset that securing my tripod in the open air above the leaf would require help from three widely separated rocks. After much trial, error, and imminent mishap, I finally managed to splay each tripod leg onto its own rock with the camera in positioned directly above the leaf. Okay, now what? There was no way I could even get close to the viewfinder, but spread-eagled between two rocks and using the tripod for balance (but not for support), through the genius of live-view, I was able to get close enough to my LCD that I was pretty sure I could compose and focus. So far so good.
I next removed the camera from the tripod to meter. With Bridalveil Creek in the shadow of six-hundred vertical feet of granite (in these low-sun months I can photograph here in low contrast, full shade for most of the morning), my exposure choices were pretty straightforward. I guessed that I’d need a least a foot of depth of field, that my camera would be about five feet above the leaf, and that my focal length would be around 80mm. Plugging these values into my hyperfocal app told me f16 would give me the one-and-a-half feet of depth of field I thought I’d need.
Experience with workshop students has shown me that many photographers vastly underrate the value of a polarizer in a shaded scene like this (and vastly overrate its value for the sky!). Without a polarizer, the glare on the wet rocks and leaf risked rendering this image unusable (even with the scene fully polarized, the glare remains quite noticeable). So, before returning my camera to the tripod, I oriented my polarizer by pointing my camera in the direction of my scene, looking through the viewfinder, and turning the polarizer’s outer ring until the wet rocks darkened.
At this distance and focal length, with water moving as fast as this, there’s virtually no difference in the blur effect between 2 and 20 seconds. Given that I see little noise difference between 100 and 200 ISO, rather than exposing 20 seconds at 100 ISO, I went with 10 seconds at 200 ISO for no better reason than it halved the wait time for each image.
Okay. Camera back on the tripod, I switched on live-view and found my composition. Moving the focus box to the leaf, I magnified 10x and focused carefully. Almost ready, but before clicking I returned to 1x view and reevaluated my composition. Then I clicked, evaluated, refined, and clicked again. But even with the LCD a few feet away I could see that those first couple of meticulously composed and focused attempts were slightly soft and framed wider than I knew I’d composed them. Hmmm. I double-checked my tripod and confirmed that everything was solid. Scratching my head, I recomposed and focused once more. Watching my camera closely this time, I saw that the extreme downward angle was causing the telescoping barrel of my 24-105 lens to slowly extend during my exposure. Crap. Camera back off the tripod, I retreated from my perch. Returning to my camera bag, which was safely balanced on a rock about ten feet away, I switched to my 70-200 lens.
While switching lenses was a pain, not only did it solve the drifting problem, the longer lens forced me to tighten and simplify my composition to its most basic elements: one leaf, two rocks, water. And variations on those elements are pretty much what I did for the next hour or so. The longer I worked the scene, the more variations I found, and also the more adept I became at adjusting my tripod, camera angle, and even myself, to achieve whatever shot I wanted. Every once in a while I descended to assist someone in the group (leaving the tripod and camera, thank-you-very-much), taking advantage of the break to relieve my cramping legs, back, and neck. By the time I finished my muscles were screaming and my hands were little pink ice cubes, but I was happy.
I walked back to the parking lot knowing I had some really nice images. And despite all the effort and discomfort, I had a complete blast. But please, please don’t ask me if I put that leaf there.
Cliché for a reason
Posted on October 29, 2013

Autumn Snow, Valley View, Yosemite
Canon EOS 5D Mark III
1/15 second
F/16
ISO 100
24 mm
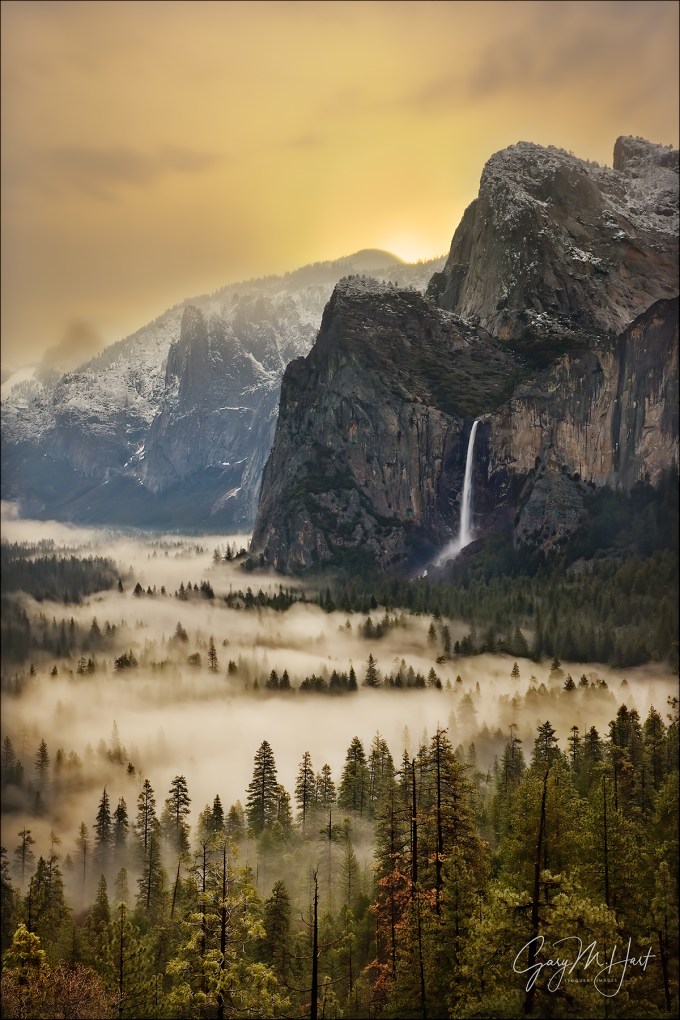
It’s actually even a cliché just to say it, but some things really are “cliché for a reason.” And as much as I try to avoid the cliché shots in Yosemite, sometimes they just can’t be helped.
My Yosemite Fall Color workshop began yesterday, and even though I’d spent all day Saturday in the park, yesterday morning a storm filled Saturday’s blue skies with rain and I felt like I should go check on the conditions before we started. The wet weather had slowed me enough that I didn’t really have time to take pictures, but when I found not only the red and yellow leaves I’d seen on Saturday, and the swirling clouds I’d hoped for, but also Yosemite Valley’s colorful trees and meadows etched with snow, I was tempted at every turn to reach for my camera. Nevertheless, with the exception of a brief breakdown at Cook’s Meadow, I managed to resist temptation.
Unfortunately, the Cook’s Meadow stop had put me even more behind schedule, so I told myself while approaching Valley View that any stop here would be just reconnaissance. And anyway, Valley View images are a dime a dozen, clichés that I’d done more than my share to perpetuate over the years. Then I got there….
I mean seriously, cliché or not (deadline or not), how does a photographer pass up a scene like this? With my group meeting me in just an hour, I really, really didn’t have time for pictures, which is exactly what I kept reminding myself as I leaped from my car, snatched my camera and tripod, and sprinted down to the river. I only snapped four frames, two vertical and two horizontal, before racing back to the car and toward my impending rendezvous.
It’s images like this that remind me that nature’s beauty transcends any human judgement of “cliché.” Pro photographers, myself included, can get a little snobbish about frequently photographed scenes. And while I think it’s important to take the time to find a unique perspective, sometimes it’s best to let Mother Nature speak for herself.
Happy ending
I made it to my workshop with minutes to spare, conducted a lightning-fast orientation, and hustled everyone back outside as quickly as possible. We ended up circling Yosemite Valley several times, photographing without a break until dark. I heard no complaints.
A gallery of clichés


Favorite: Sunset Palette
Posted on October 17, 2013

Sunset Palette, Half Dome from Sentinel Dome, Yosemite
Canon EOS-1Ds Mark II
Canon 24-105
2 seconds
F/20.0
ISO 100
Usually an image comes together on the spot, an organic blend of location and light unique to the moment. But some images I carry around in my brain for years, fully aware of the elements and how I want them assembled, and hopeful to be present when that happens. I have a number of these “dream” images rattling around between my ears, and every once in a while the stars align and I actually get to capture one. For example, on every visit to Sentinel Dome I would eye the granite indentations on the southeast flank and picture them as pools of rainwater reflecting the sunset sky, framing Half Dome in the distance. Wouldn’t it be great if….
One showery October afternoon a few years ago I made the hike to Sentinel Dome with these indentations in mind. I knew that the recent rain would quite likely have filled them, allowing at least part of my dream to come true. After summiting the dome I beelined to the other side and found “my” pools exactly as I’d hoped. The sky was a promising mix of blue and gray, but the sun was still at least an hour above the horizon. Nevertheless, the air was clean and western horizon was clear, essential ingredients for the colorful sunset I so wanted. Dare I hope?
I walked around a bit and mentally refined my composition—rather than set up close and use an ultra wide-angle, I moved back as far as the terrain would permit. This allowed me to fit the pools in the frame at a longer a focal length, which would compress the distance separating Half Dome and the pools. To reduce the expanse of granite behind the pools, I flattened my tripod as far as it would go and framed my shot. With closest pool about six feet in front of me, stopping down to f20 and focusing on a point about twelve feet away gave me sharpness throughout the frame. With my composition set and waiting on my tripod, I readied my two-stop hard graduated neutral density filter and adjusted my polarizer, then sat down on the (hard) granite, and waited.
The sunset color that finally came was more than I dared hope for. The sun was at my back, but with clouds overhead and the western horizon wide open, the crimson glow stretched all the way to the eastern horizon. I clicked this frame when the color was at its most intense, so brilliant in fact that every exposed surface seemed to throb with its glow.
Workshop Schedule || Purchase Prints || Instagram
A Few Images On or Including Sentinel Dome


Picking favorites
Posted on August 1, 2013
First Light, Yosemite Valley
Canon EOS-1Ds Mark III
3/10 second
F/16.0
ISO 100
65 mm
A few weeks ago I added a Favorites gallery to my website, which of course forced me to make all kinds of difficult choices. First I had to figure out what “favorite” means. Is the gallery going to represent my favorites, or will it be the images that sell best (often not the same thing)? My mercenary instincts told me that, since this is page allows people to click to purchase ($$$), I should go with the bestsellers. But when I decided to make my living with photography, I vowed to only photograph what I want to photograph, and to never base my decisions on what will sell.
While things became easier once I decided to go with my personal favorites, that decision put me in something of a Sophie’s Choice quandary. I really never select any image to display unless I like it a lot, but if I want to keep my Favorites gallery down to a manageable number, I need to choose my favorite “children.” (It occurs to me in hindsight that choosing a favorite image by what sells best would be kind of like choosing a favorite child based on who gives the best presents. Hmmm….)
Once I hardened myself to the process (sorry kids), it became an enlightening exercise that, among other things, showed me how my style has evolved. Disabling the analytical side of my brain and going with “feel” enabled me to revisit my entire portfolio with new eyes, to shed old biases and reject images that had become default favorites, in favor of images for which I discovered a new affinity.
It also became clear to me that “favorite” is a moving target—what I choose today isn’t necessarily what I’ll choose tomorrow. (I’ve even made a few changes as I work on this post.) I plan to make this a pretty dynamic gallery, so please feel free to visit often (no purchase necessary).
First Light, Yosemite Valley
Labeling the image in this post a “favorite” was a no-brainer—it’s always been a personal favorite, and it has become one of my top sellers (not to mention my WordPress avatar). And even though Tunnel View images are a dime a dozen, this was a special, one-of-a-kind spring morning that I never tire of revisiting.
I was there with a workshop group, and if memory serves, we’d had a nice sunrise shoot, but nothing truly unique. The air was crystal clear and quite cold for April, still enough to allow the moist valley air to condense into a radiant fog that hugged the floor, ebbing and flowing like liquid. As the sky brightened we photographed a pink veneer of translucent clouds, a particular treat for those who’d never been to Yosemite.
When the color started to fade, I was about to move the group on to our next location when a brightness behind Sentinel Dome caught my attention. So I waited. And as we watched, the light intensified, expanding before our eyes into a diaphanous film that spread a buttery glow that turned our world into an amber light box. I captured several frames; this is my favorite.

Join me in an upcoming photo workshop
A gallery of favorites


, California")


Moon over wherever
Posted on July 26, 2013
Winter Moonrise, Half Dome, Yosemite
Canon EOS-1Ds Mark III
1/6 second
F/11.0
ISO 100
188 mm
Often, including a rising or setting moon will turn an ordinary landscape into something special. Of course, like most things worth doing, moon photography adds a couple of layers of complication: First, there’s the matter of getting there at the right time, with the moon in the right place (it does little good to arrive as the moon rises if it’s skewed 90 degrees from the scene you came to photograph); and once you have everything lined up, you still have to contend with the almost always tricky exposure issues.
A little lunar geometry (you can skip this section of you’re more interested in “how” than “why”)
Many factors, some within our control, some completely beyond our control, determine the time, location, and phase of the moon at any time. The factors beyond our control are things like the earth’s rotation and the moon’s orbit, which determine the moon’s phase and its absolute position in the sky. On the other hand, we can control our location, and take the steps necessary to get us in the right place at the right time.
A full moon always rises and sets directly opposite the sun, rising in the east at sunset and setting in the west at sunrise. This actually makes perfect sense when you take a little time to understand the monthly choreography of the earth, moon, and sun. Just as the earth revolves around the sun, the moon revolves around the earth; at any point in this dance, half of the earth is lit (daytime) and half of the earth is dark (nighttime), half of the moon is lit and half of the moon is dark.
What we on earth see as a full moon is simply that one day each month that the moon’s entire lit side faces the earth’s dark side—that is, when the earth is directly between the sun and the moon (picture a beam of light that follows a straight line that starts at the sun, passes through earth, and ends on the moon). On that day only, as the point of your location on earth rotates from day to night, you’ll see the sun disappear in the west and the moon rise in the east. As the earth keeps rotating away from daylight and into night, the full moon rises higher and higher, reaching its highest point around midnight, then dropping as your location rotates back toward the sunlit side (and sunrise).
So then why do we rarely see a full moon rising exactly as the sun sets? That’s because: 1) the point of maximum fullness (when the sun, earth, and moon align perfectly) only happens at one instant each month—at every other instant of each month’s full moon day, the moon is only almost full (but still full enough to appear completely full); and 2) sun/moon rise/set times we see published always assume a flat horizon—if you have mountains between you and the horizon, your view of the actual sun/moon rise/set will be blocked.
Due to its monthly orbit about the earth, each day (or night) the moon rises a little later and gains or loses a little bit of its disk (the farther it has revolved from that sun->earth->moon line, the less of the moon’s lit side we see). So the night after the moon is full, it rises after sunset and is a little less full. The next night it rises a little later still, and is even less full, and so on. Eventually (in a little more than two weeks after it was full) the moon has revolved all the way around the earth until it lies between the earth and sun (now our imaginary line goes sun->moon->earth); all of its sunlit side faces away from the earth and we have a new (invisible) moon.
We call the moon “new” because the night before it disappears into the sun, all that was left of the shrinking moon (that was completely full about two weeks ago) was a small sliver that shined briefly on the eastern horizon just before sunrise, then disappeared as soon as the sky brightened (it’s still up there, but completely overpowered by the sun’s brightness). The next day the moon won’t appear at all because seeing it would require looking directly into the sun; but the following day, there it is, this time as a thin sliver on the western horizon immediately after sunset (again, it was up there most of the day, we just can’t see it until the sun sets and the sky darkens). This brand new crescent slips below the horizon shortly after it appears. And for the next two-plus weeks it will rise a little later, and grow a little larger, each night, until it’s full again and rising at sunset. Cycle complete.
If we do the math (this won’t be on the test), we can infer that if the moon takes 29.5 days to complete its cycle (from full to new and back to full), and there are 24 hours in a day, the moon must be rising about 50 minutes later each day (29.5/24=48.8). This rough approximation varies with many factors; for simplicity I usually round it to an hour when I do rough calculations in my head. And I always rely on much more precise software or astronomical charts for my critical calculations.
Locating the moon
Those who don’t do a lot of moon photography are amazed at how much the moon shifts above the landscape throughout the year—you can sight a full moon rising between Half Dome and El Capitan one month, and a few months later it’ll be rising above Leaning Tower (far to the south). Fortunately, like many things in nature that appear random to the uninformed, there is actually nothing random about the moon’s location once you take the time to figure it out.
If the idea of figuring anything saps the pleasure from your photography (or sends you into a panic), you’ll be happy to know that sometimes it’s enough to simply know that the moon will be rising in the east a little before sunset (this info is available in many places, in many forms, but the most complete source I’ve found is the US Naval Observatory website). Armed with that knowledge, you can go out to a location with a view of the western horizon, wait for the moon to appear, and start shooting.
On the other hand, juxtaposing the moon with a specific landmark requires more planning. And because its position is so not random, many others have done the heavy lifting for the rest of us. There are far too many moon phase/position resources to name even a small percentage of them, so rather than even try, I’ll just give you a couple of techniques, and the tools that enable them:
- My old fashioned way (old trick for an old dog): I figured out my technique for locating the moon long before computer software and smartphone apps took away most of the effort. Nevertheless, I continue to do it this way because I’ve already done all the hard work (figuring out how to do it), and I can do it in the field, with zero connectivity (no wifi or cell signal required). After relying for years on a the US Naval Observatory website for the info I need (moon phase and moon/sun rise, set, altitude, and azimuth), I now get all the pertinent data from my Focalware iPhone app (I never said I’m opposed to new technology), plugging it into my National Geographic Topo! (that’s NG’s exclamation point, not mine) mapping software (discontinued) to plot the direction of the moon’s rise/set. To determine when the moon will appear above (or disappear behind) the surrounding terrain, I plug distance and elevation information from Topo! into the trigonometric functions of my HP 11C scientific calculator (originally an actual calculator, but now also an iPhone 11C emulation app) to compute the elevation in of my horizon.
- Software (the better way for 99.999 percent of you): The Photographer’s Ephemeris (a free computer download or fairly inexpensive smartphone app) is the most complete solution that I know of (though I’m sure there are others I don’t know of)—I probably would have never taken the time to figure out my technique if TPE had been available. Not only does TPE give you the sun and moon’s location and elevation above the flat horizon, it also figures out the the actual (terrain included) horizon. The downside is that because it uses Google Maps, TPE requires connectivity and is better used in advance of your shoot (usually not a problem). Recent TPE versions also allow you to download the maps to your device for offline access—if I were a TPE user, I’d be doing this before every trip.
Exposure
My rule for photographing a rising/setting full moon is that I must capture detail in the landscape and the moon. If my landscape is black (or just too dark), or my moon is a white disk (or blob), my image has failed. But since the post-sunset landscape is in full shade, and the moon is as bright as a sunlit landscape (because it is a sunlit landscape), the dynamic range of a full moon scene is pretty extreme, often too extreme for a camera to handle with a single click (always my goal).
But here’s the great part—if you figure that the moon rises about an hour later each day, and the full moon rises at sunset, then it stands to reason that the day before it’s full the moon will rise about an hour before the sun sets. Factoring in the terrain on the horizon (and assuming you’re not at the base of a mountain), that means that the day before the moon is full is the best opportunity to photograph a nearly full (say 97%, give or take a percent or two) moon rising in the east above a landscape painted with the warm sunlight of the golden hour. Conversely, if your view is to the west, you can photograph a nearly full moon setting in warm sunrise light the day after it’s full. Either way, the day before or after the full moon gives you everything you need to capture your scene in nice, photographable light that’s still sufficient to hold the moon’s highlights at bay.
I’ve found that if I’m really careful with my exposure, I can usually capture enough foreground and lunar detail until five or ten minutes after sunset. Shooting after sunset usually requires raw capture, then massaging the dark foreground brighter, and bright moon darker, in the raw processor. A graduated neutral density filter can increase this threshold to maybe fifteen or twenty minutes after sunset—after that my foreground is unusably dark (or my moon is recoverably bright).
Another technique that works when the light gets too extreme is a composite—two images, one exposed for the landscape and the other exposed for the moon, combined in Photoshop. In the “Rules According to Gary,” this isn’t cheating if you don’t change the size or position of the moon. (Though it doesn’t break my rules, I no longer do composites because I have this weird compulsion to get everything with one click.)
The final piece of exposure advice I’ll add is to make sure your camera’s blinking highlights (also called highlight alert) are set (as far as I’m concerned, they should be set anyway because I see no downside to highlight alert). The moon is usually so small in your frame that it won’t register in the histogram, which means blinking highlights are usually the only way to know that you’re blowing out the moon. I monitor my highlights closely after each exposure and have found that, when shooting raw (jpeg shooters don’t have as much margin for error), I can usually recover enough detail with an exposure 2/3 to 1 stop brighter than the exposure that first showed blinking.
Just do it
Like most things photographic, don’t expect resounding success the first time you try adding a full moon to your landscape. But each time you go out, not only will you improve, you’ll probably come away with ideas for how to do it differently the next time.
Read more about moon photography


Nature is only as random as our ability to understand it
Posted on June 11, 2013

Double Rainbow, Tunnel View, Yosemite Valley
Canon EOS-1Ds Mark III
1/5 second
F/16.0
ISO 100
17 mm
Louis Pasteur said that chance favors the prepared mind. It was one of Ansel Adams’ favorite quotes. But, as appropriate as the quote is, I’m sure Adams cited Pasteur only after enduring countless “Wow, you were so lucky to be there for that” reactions.
To the casual observer, nature’s wonders do indeed feel random. Who doesn’t feel lucky when a full moon pops over the mountains just as the monotonous highway bends east, or when dirty snow and bare trees are suddenly glazed in white by an unexpected snowstorm? (Or when Yosemite Valley is suddenly framed by an arcing double rainbow?) But there’s nothing random about any of these phenomena. Some natural phenomena can be predicted with absolute precision—for example, it’s easy to pinpoint the position and phase of the moon for any location and time, past or future. And while weather can sometimes (usually?) appear random, every weather condition, from temperature to the most violent storms and purest blue skies, is a precise function of atmospheric conditions, ocean currents, and terrain; we perceive weather as random only because its complexity overwhelms our current capabilities.
Nature photographers should feel blessed by these natural wonders over which we have no control, but our good fortune is not random. By taking the time to understand our subjects and study our environment, we do our best to anticipate image-worthy events. While we can never guarantee that the sky will be clear enough to reveal the rising moon we counted on, or that the predicted convergence of moisture, temperature, and barometric pressure will manifest to transform our world from crusty brown to pristine white (or that the setting sun will find the perfect path to the falling rain), we can put ourselves in position to be there when it happens.
None of this stuff makes me unique—though we all approach our photography in our own way, most successful nature photographers do everything they can to minimize the randomness in our efforts, to maximize the chance for “special.” My own path was fairly organic. My entire life, beginning long before my first camera, I’ve been drawn to science, to the how and why of nature. As a child I devoured books by Herbert S. Zim and Isaac Azimov (he wasn’t just a science fiction writer). In school I took every possible astronomy, geology, meteorology class. I even started college as an astronomy major, then geology, before the (necessary) quantification of the concepts I loved so much threatened to sap my passion (that is, I couldn’t handle the math beyond calculus). Fortunately my passion survived and I’ve been able to find a career that rewards me for understanding and anticipating natural phenomena. (It hardly seems like work.)
About this image
Which brings me to today’s Yosemite Valley rainbow image, an incredible stroke of good fortune that I (proudly) take credit for anticipating. This was a May evening a few years ago. May is usually the beginning of California’s interminable blue sky summer, but this year a persistent low pressure system that had set up camp off the coast pumped daily impulses of moisture into Northern California. I was in Yosemite to meet a private workshop customer and his girlfriend for dinner so we could plan the following day’s photo tour of the park. That afternoon’s drive from home had been a mixture of sun and showers; I entered Yosemite Valley in the midst of a steady rain that had been splashing my windshield for at least thirty minutes. But despite clinging rainclouds that obscured the surrounding granite walls, I knew the broken sky I’d recently driven through was headed this way and would probably arrive before sunset, about two hours away—and with that clearing would come the potential for openings that could allow sunlight to reach the still falling rain. With the sun already low and dropping, and its angle pointing any Tunnel View shadow in the direction of Yosemite Valley, I had the potential for all the rainbow recipe ingredients.
But of course I had dinner plans, and no phone number to reach my customers. So I beelined to Yosemite Lodge to meet them as planned, plotting my sales pitch the entire way. I was pleased to find them waiting when I arrived—while in my mind I was jumping up and down, pointing and shouting (“Rainbow! Soon! Hurry!”), I maintained the illusion of calmness through our introductions, then explained as cooly as possible that there was a chance for a rainbow, if they were interested. Fortunately they were open to the change of plans and I wasn’t forced to resort to begging.
On the twenty minute drive back to Tunnel View I’d calmed enough to remind myself that we could very well be chasing wild geese and did my best to moderate their expectations, explaining that a rainbow is far from a sure thing, and that what we’re doing is merely putting ourselves in position in the event that does happen.
At Tunnel View the rain was still falling, but I could see signs of clearing to the west. So far, so good. I guided my customers to my favorite Tunnel View vantage point, above the parking lot and away from the crowds, where we sat on the granite in the rain and waited. Despite their positive attitude, as the cold and wet began to seep in, it dawned on me that convincing new customers to skip dinner to sit in the rain isn’t the most sound business strategy.
The view of had opened considerably from what it had been when I first pulled into the valley, so I encouraged them to go ahead and shoot, rainbow or not. I really can’t remember how long we waited—long enough to get pretty soaked—before a shaft of sunlight broke through to illuminate the rain falling along the north rim of the valley, for about five minutes painting a vivid partial double rainbow in front of El Capitan and disappearing into the clouds above Half Dome. Yay! While this wasn’t a complete rainbow (only one pot of gold), it was definitely the nicest rainbow I’d ever seen at Tunnel View and we clicked without a break until the rain stopped and the rainbow faded.
When the show was over we just sat and marveled at the view, giddy about our good fortune, completely oblivious to the dark cloud approaching from behind. As quickly as the rain had stopped a few minutes earlier, it returned, this time with a vengeance, coming down in diagonal sheets (visible across the top of the frame above). Behind us and out of sight the sun had almost completed its journey to the horizon and, rather than being blocked by clouds as it had been earlier, was able to slide its final rays beneath them to completely illuminate the rain falling across the valley’s breadth. The rainbow appeared almost immediately, intensifying to quickly become a double bow connecting Yosemite Valley’s north and south walls. It lasted so long that I actually started running out of compositions.
We had a great day the next day, but nice as it was, the photography was a bit anticlimactic. Much like starting the Fourth of July fireworks show with the “grand finale” extravaganza, I realized that it would have been nice to have arranged for the rainbow to appear at the end of our session. Back to the drawing board.
It’s geek to me
Posted on June 2, 2013
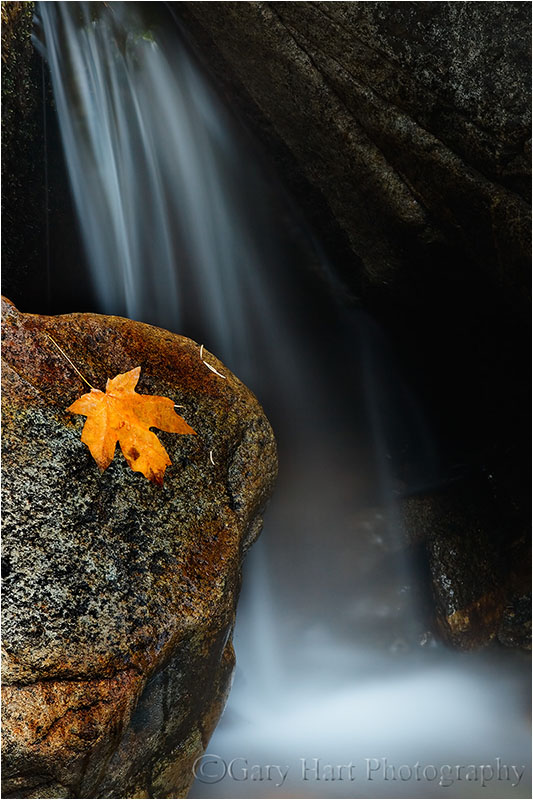
Autumn Leaf, Bridalveil Creek, Yosemite
Canon EOS-1Ds Mark II
20 seconds
F/25.0
ISO 100
168 mm
While it would be silly to pretend that digital photography hasn’t changed my photographic life, at heart I’m simply a film shooter with a digital camera. If you read my writings or have attended my workshops, you’ve no doubt heard me say that photography, at any level, must be a source of pleasure. How each of us derives our pleasure varies greatly, from what we shoot, to how we shoot, to what we do with (to) our images after we shoot them. From what I’ve observed, many photographers relish their time at the computer, scrutinizing corner sharpness, high ISO shadow noise, and working Photoshop magic to take their images to the next level. I’ve always been so much happier outside, simply enjoying, and making pictures of, the things I love—the computer, while necessary, always feels too much like work.
That’s probably because I came to photography as a career after twenty-plus years in the high-tech industry. During those twenty years my time with my camera was pure pleasure, a creative escape from the technical geek-speak of my everyday life—what would be the point of leaving a good job with a great company (Intel) only to turn my joy into just another job? So when I decided to take the full-time photography plunge, it was with the very conscious personal commitment that I’d only photograph what I want to photograph, the way I want to photograph it. For me that means the natural light, color landscapes that I’d been photographing since the first shutter click of my Olympus OM-2, over thirty years ago: no people, no wildlife—basically, nothing that moves.
Ensuring my photographic pleasure also means doing things the way I’ve always done them: in addition to all natural light (I’m probably the only pro photographer alive who doesn’t own a flash), I choose to do no multi-image (HDR, manual blending, stitching) captures. I also rarely deviate from the 35mm 2/3 aspect ratio I was weaned on. But that’s just me. And just because I don’t do it, doesn’t mean I don’t marvel at other photographers’ monochrome, HDR, and artificial light wizardry.
I’ve also grown to become a huge fan of Photoshop, and the control it gives me: After all those years envying black and white shooters for their darkroom magic, it’s nice to see the playing field leveled a bit for us color shooters. In fact, many of my most successful images wouldn’t have been possible with the color transparencies I shot in my OM-2 days. But ultimately, despite Photoshop’s power, I still want my creativity to be in my camera, not my computer. On the other hand, I have no problem with photographers who use Photoshop creatively (as long as they do it honestly).
What I do have a problem with is the people who have so thoroughly embraced photography’s technical side that not only have they lost their joy, they seem bent on sapping the joy from anyone with a different idea or approach. These are the blog posters and forum contributors who will go to the mat for Canon vs. Nikon, Nik Dfine vs. Noise Ninja, or whatever their technical pulpit might be (I once witnessed a heated online debate about how to sign a print). So here’s a tip: If you find yourself arguing with somebody about some piece of photographic minutia, step away from the computer (these things rarely happen face-to-face), grab your camera, and go take some pictures. In other words, turn off your inner geek and connect with your creative side—the world (yours and mine) will be a better place for it, I promise.
I had no illusions of making money when I snapped the autumn leaf in this post. Nor was I wringing my hands about about shadow noise or corner sharpness. I was simply doing what I love, in this case scrambling on creekside rocks in the forest beneath Bridalveil Fall on a crisp autumn morning. Completely alone among rocks, leaves, and gentle cascades, I knew I was surrounded by far more images than I’d ever be able to find. The emotion I feel at these times is closer to the pure joy of a childhood Easter-egg hunt than anything else I experience in my adult life, and it’s no different from the feeling I used to experience when I was out with my Olympus. I never want to lose that.
Yosemite Photo Workshops
Autumn in Yosemite


