Eloquent Images by Gary Hart
Insight, information, and inspiration for the inquisitive nature photographer
Aspen abstract
Posted on February 25, 2017
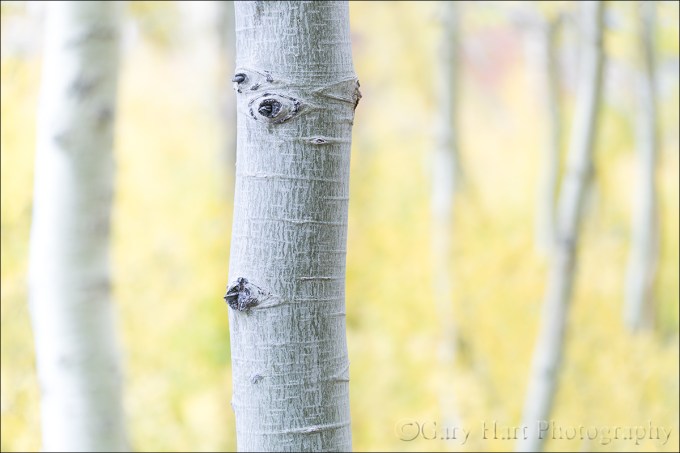
Aspen Abstract, Lundy Canyon, Eastern Sierra
Sony a7R II
Sony 70-200 f/4
1/25 second
F/4
ISO 400
I recently started rereading Ansel Adams’ “Examples: The Making of 40 Photographs,” a book I’d recommend to anyone interested in the thinking side of photography. Though much of the book covers equipment and techniques that are irrelevant to today’s digital photographer, Adams’ words reveal a vision and mastery of craft that transcends technology. Like him or not (I do!), you can’t deny that Ansel Adams possessed an artist’s vision and an ability to convey that vision in ways the world had never seen.

©Ansel Adams
Aspen, New Mexico, 1958
“The majority of the viewers (of this image) think it was a sunlit scene. When I explain that it was diffused lighting from the sky and also reflected light from distant clouds, some rejoin, ‘Then why does it look the way it does?’ Such questions remind me that many viewers expect a photograph to be a literal simulation of reality.”
Ansel Adams in “Examples: The Making of 40 Photographs”
Another takeaway from the book is Adams’ clear disdain for pictorialism, a more abstract approach to photography that (among other things) uses the camera’s unique vision to interpret the world in ways that are vastly and intentionally different from the human experience. Preferring instead the more literal front-to-back sharpness of the f/64 group that became his hallmark, Adams had little room for pictorialists’ soft focus and abstract images.
I, on the other hand, love using limited depth of field to emphasize my primary subject and disguise potential distractions. When we explore the world in person, our ability to pivot our head, move closer or farther, and change perspective allows us to enables us to lock in on a compelling subject and experience the scene in the way we find most meaningful. But an image is a constrained, two-dimensional approximation of the real world as seen by someone else. The photographer shares his or her experience of the scene by guiding our eyes with visual clues about what’s important and how to find it.
This reality wasn’t lost on Ansel Adams. Despite his distaste for soft focus techniques, Adams guided viewers of his images with in other ways, particularly his use of light. He knew that the camera and human eye handle light differently, and used every trick at his disposal, both at capture and in the darkroom, to leverage that difference.
At the risk of initiating a debate about the relative merits of the two techniques, I’ll just say that I’m a fan of both and am not afraid to apply whichever approach best suits my objective. And I suspect that if Ansel Adams were photographing today, he would be taking full advantage of the creative possibilities created by today’s technology.
Last October I was exploring the aspen grove at the end of the Lundy Canyon road near Mono Lake. With fall color peaking I put extension tubes on my Sony 70-200 f/4 looking for subjects that I could get close to, but with a distant enough background to maximize focus contrast (sharp/soft). I’ve always felt that soft focus aspen make a great background, but they need to be soft enough that individual leaves and trunk detail don’t distract.
I started looking for dangling leaves, either individual or bunches, but soon turned my attention to stark white aspen trunks that stood out in striking contrast against the distant wall of yellow leaves. I soon zeroed in on this trunk for its well-spaced knots, gentle curve, and clean, textured bark, plus the nice assortment of parallel trunks at varying distances in the background.
This frame I shot wide open at the closest possible focus distance to get the softest background focus. To emphasize the white trunks, I exposed the scene as bright as I could without clipping the highlights in the primary trunk. On my camera’s LCD at capture this image looked pretty much as you see it here, and required minimal processing.
Workshop Schedule || Purchase Prints
A Selective Focus Gallery
Click an image for a closer look and slide show. Refresh the window to reorder the display.


The Range of Light
Posted on February 19, 2017

Twilight Crescent, Mt. Whitney
Sony a7R II
Sony 70-200 f/4
1/3 second
F/11
ISO 160
“… the mighty Sierra, miles in height, and so gloriously colored and so radiant, it seemed not clothed with light but wholly composed of it, like the wall of some celestial city…. Then it seemed to me that the Sierra should be called, not the Nevada or Snowy Range, but the Range of Light.” — John Muir
Anyone who has spent time in or around the Sierra Nevada has to agree that there’s something special about its interaction with light. Towering one to two miles above the surrounding terrain for nearly all of its 400-mile length, the Sierra Nevada are California’s most prominent natural feature. But it’s not just prominence that sets the Sierra apart. The Sierra are almost entirely granite, an intrusive igneous rock comprised primarily of light-toned feldspar and liberally infused with lustrous quartz and mica. Because igneous intrusive rocks form deep beneath the Earth’s surface, constituent minerals cool and harden slowly enough for large, reflective crystals to form.
In addition to its inherently reflective qualities, granite is quite hard and resistant to erosion. Unlike the overlying sedimentary and metamorphic rock that washed downhill as the Sierra pushed (and continues to push) upward, granite remains intact when subjected to wind and rain. Eventually small cracks form; water percolating into these cracks expands as it freezes, widening the cracks further until the granite fractures and a large block separates. The result is large vertical and domed surfaces whose extreme slope and hardness are particularly inhospitable to plant life, even well below the timberline. Granite’s hardness also means that rather than crumbling beneath the weight of the numerous glaciers to scour the Sierra, much of the Sierra granite has been polished to a glassy sheen.
Granite’s light complexion, reflective inclusions, and abundance of exposed, polished surfaces make the Sierra particularly inclined to reflect the color of whatever light illuminates it. This relationship with light is quite evident in Yosemite Valley, nestled in the range’s more moderately sloped west side. When the sun strikes Yosemite’s Half Dome and El Capitan at day’s end, warm sunset light paints these monoliths in brilliant orange and red hues just before the sun is snuffed by the horizon. While this color can be seen at sunset year round, it takes center stage each February when sunset shadow and light conspire to highlight normally insignificant Horsetail Fall’s tumble down El Capitan’s east face.
As exquisite as the light on Yosemite’s granite is, I’m even more drawn to the Sierra’s east side, which gets its best sun at sunrise. Unlike the Sierra’s gradually sloped, relatively moist, and largely foliated west slopes, the Sierra’s east side is much steeper, drier, and therefore sparsely foliated and more exposed. Enhancing the drama, the Eastern Sierra’s towering granite face also catches the earliest possible sunlight, sunlight that has traveled farther and through purer air (because there fewer airborne pollutants in the morning in general, and the sunlight east of the Sierra traverses much less densely populated terrain).
My favorite place to watch the light play on the Eastern Sierra granite is in and near the Alabama Hills, two vertical miles beneath Mt. Whitney and the Sierra’s most precipitous section. Looming above the Owens Valley, 14,505 foot Mt. Whitney is the highest point in the 48 contiguous United States. Unlike many towering peaks that stand by themselves, Mt. Whitney is bounded by 13,000 foot Lone Pine Peak and 14,000 foot Mt. Williamson, all connected by a serrated ridge of 13,000+ foot sharks tooth prominences.
Before sunrise I like to arrive early enough to see the Sierra crest reflect the pale blue of the pre-dawn sky, then watch it warm gradually as the sky brightened before the approaching sun. The color reaches a crescendo when the sun’s longest wavelengths first kiss the highest peaks with pink alpenglow. As the rest of the sun’s visible wavelengths join the party, the crest warms to amber before finally cooling beneath the daylight-blue sky.
At the end of the day the best color arrives after the sun has long disappeared behind the crest and the entire scene is illuminated by a sky well on its way to night. Though the mountains’ color is more subtle than the sunrise show, the Eastern Sierra’s granite when imbued with the pale mauve of evening twilight is no less beautiful. Eventually night takes over and once again the Sierra granite throbs a soft blue.
Early last October I guided my Eastern Sierra workshop group up to Whitney Portal at the base of Mt. Whitney to photograph cascading Whitney Portal Fall in late afternoon shade. On the drive back down we squeezed into a small turnout not too far down the road for the closest view of Whitney that doesn’t require a serious hike. This year’s group got a bonus when a thin slice of brand new moon appeared shortly after sunset.
Mounting my Sony 70-200 f4 on my a7RII, I framed the scene as tightly as I could while still including both Mt. Whitney and the crescent moon. Though the sky was clear, a steady stream of small clouds materialized as if issued by a cloud making machine just out of sight behind the crest to the right of Whitney. Each new cloud scooted to the left and dissipated quickly in drier air near the summit. After composing, metering, and focusing, I waited for the next cloud to appear and clicked this frame in the purple twilight.
PURCHASE PRINTS || PHOTO WORKSHOPS
The Many Colors of Mt. Whitney


Up a creek
Posted on February 12, 2017
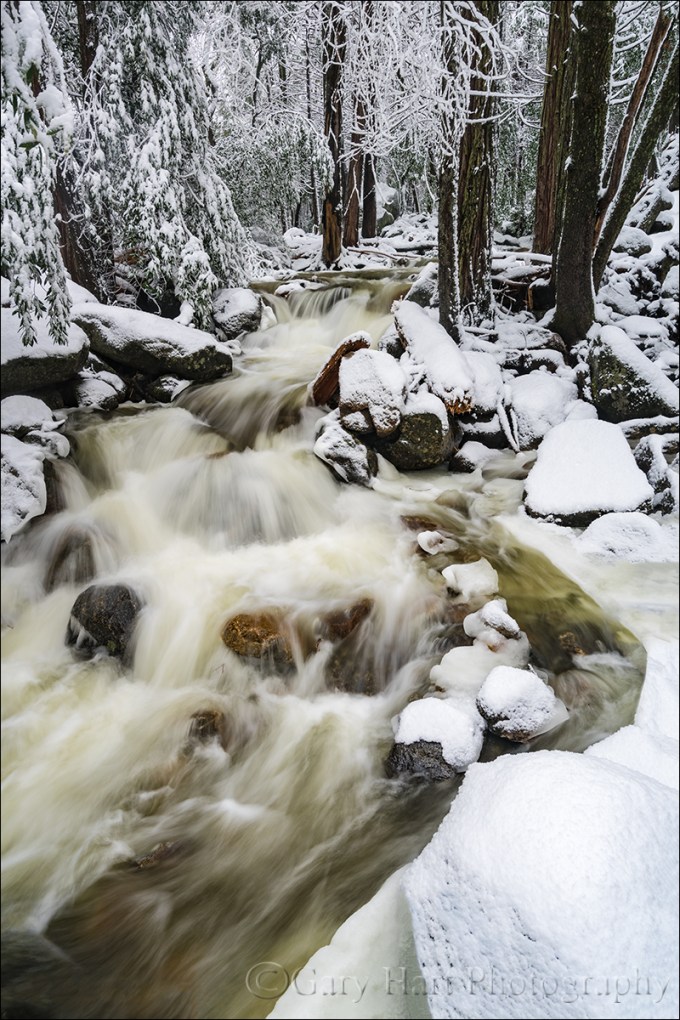
Wonderland, Bridalveil Creek, Yosemite
Sony a7R II
Sony/Zeiss 16-35 f/4
1/4 second
F/10
ISO 100
Many photographers vary their portfolios by visiting as many locations as possible. While I love visiting new locations, I’ve always preferred the kind of intimate familiarity that’s only possible with frequent, quality visits. And as enjoyable as it is photograph the icons, for my personal pleasure I’m most drawn to quiet pastorals and intimate portraits of nature that could be anywhere—wildflowers, fall color, solitary oaks, sparkling reflections, and tumbling creeks can keep me happy for hours.
One of my favorite intimate settings is Bridalveil Creek beneath Bridalveil Fall in Yosemite. Not only is there lots to photograph here, it’s different every time I visit. In spring the water in all three of the creek’s branches roars down the slope beneath Bridalveil Fall like it can’t get to the Merced River soon enough. And I’m especially fond of Bridalveil Creek in autumn, when the flow is often down to a single leisurely trickle, its whispering cascades and spinning pools adorned with vivid yellow leaves. Winter can find Bridalveil Creek in a variety of states that range from a gentle rivulet to a raging torrent. During one particularly cold winter the creek was solid ice, as if some frostbitten wizard had waved his wand and frozen the flowing water in place.
For some reason I haven’t had as much success here in winter as autumn or spring, so this winter I redoubled my efforts. On last month’s snow trip, while waiting for Yosemite’s monoliths to emerge from the clouds, I headed to Bridalveil Creek and found every square inch covered with snow—not a fine etching, but a dense glazing that covered virtually every exposed surface with several inches of white powder.
I hadn’t even crossed the first bridge when I was stopped by the scene here. I extended my tripod and evaluated the possibilities, starting on the bridge before moving down to a rock right on the creek. My first compositions were horizontal, but I eventually adjusted to vertical to emphasize the creek. Following my standard click, review, refine, click process, I finally landed on this composition—just wide enough to include both sides of the creek, and tall enough to include the parallel tree trunks and the creek’s exit from the bottom of the frame. I had to drop down quite low to get beneath an overhanging branch and keep it from occluding part of the creek.
The non-compositional variables I had to consider were motion and depth of field—there was no wind to sway the branches, but I knew the water’s blur would vary greatly with my shutter speed choice. And because I wanted everything in my frame sharp, I needed to be careful with my f-stop choice. The closest point of interest, the snowy foreground rock, was about five feet away. My hyperfocal app told me that at my 22mm focal length and f/8, my hyperfocal distance was about six feet (sharp from three feet to infinity). Because hyperfocal data draws the acceptable sharpness line a little less critically than I do, I stopped down to f/10 and focused on a small rock about eight feet away. Playing with a few ISOs to vary my shutter speed for different water motion effects, I decided I liked 1/4 second because it blurred the creek enough to clearly convey the water’s speed, but not so much that it lost its definition.
Intimate and Anonymous
Click an image for a closer look and slide show. Refresh the window to reorder the display.


The illusion of depth
Posted on February 4, 2017
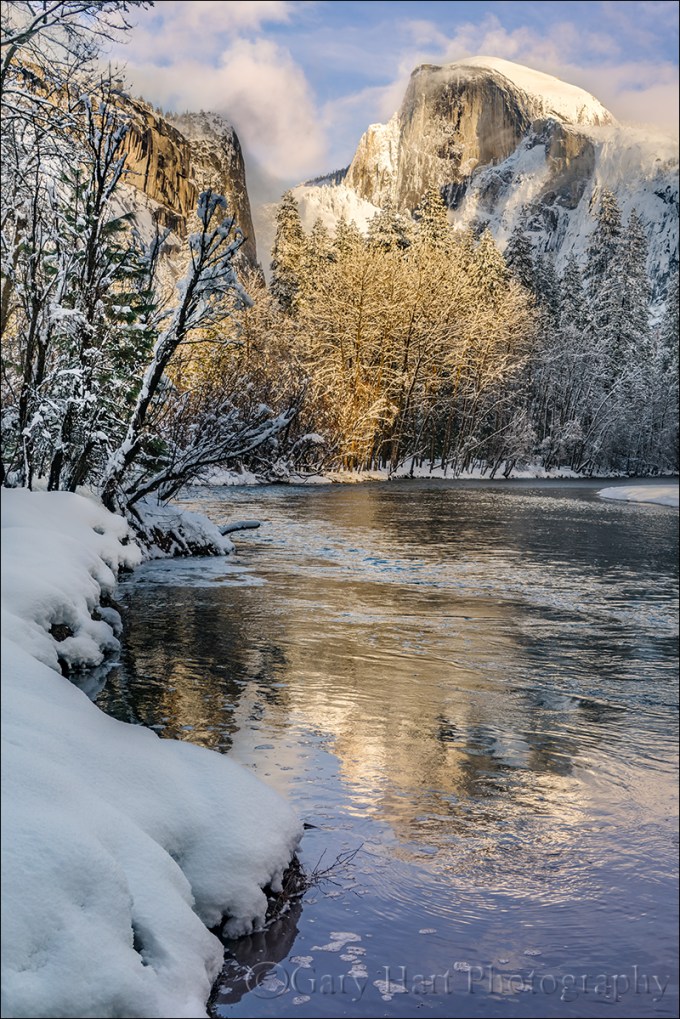
Frozen Reflection, Half Dome, Yosemite
Sony a7R II
Sony/Zeiss 24-70 f4
1/40 second
F/9
ISO 100
It seems too obvious to mention, but I’ll say it anyway: Photography is a futile attempt to render a three-dimensional world in a two-dimensional medium. Unfortunately, that reality doesn’t seem to keep people from putting their eye to their viewfinder and clicking without regard for their camera’s unique view of the world. But here’s a secret: Anyone with a camera can manage the lateral (left-to-right) aspect of a scene, but the photographers who distinguish themselves are those able to convey the illusion of depth by translating a scene’s actual depth to their camera’s virtual depth.
Creating the illusion of depth isn’t rocket science. It starts with seeking a foreground for your beautiful background, or a background for your beautiful foreground. Once you’ve figured out your foreground or background, do your best to ensure that the elements at varying depths don’t merge with each other—the more elements in your frame stand alone, the more you invite your viewers to move incrementally through the frame, hopping (subconsciously), front to back, from one visual point to the next. Getting elements to stand apart often requires some physical effort on your part (sorry): Moving left/right, up/down, foreword/backward changes the relationship between objects at varying depths, sometimes quite significantly.
With your foreground and background identified, decide whether you want the entire image in focus, or selective focus that guides your viewer to a particular point in the frame. With all your pieces in place, you’re ready to choose your f-stop and focus point. (Here’s some extra credit reading: hyperfocal focusing techniques.)
About this image
The primary subject here is Half Dome, but I had to work incorporate all the other wonderful things going on this afternoon: fresh snow, beautiful clouds, warm sunlight, and an abstract reflection.
With Half Dome as my centerpiece, my biggest concern was organizing the other visual elements into a coherent image. I started with the decision that a vertical orientation would make the most efficient use of the scene, allowing me to include the river at the bottom of my frame and Half Dome at the top without shrinking the scene and introducing less interesting elements on the left and right. I didn’t want too much sky, but I found a break in the clouds for the top of my frame.
I could have moved a little to the right and made the reflection my entire foreground, but I decided to use the snowy riverbank to convey an illusion of depth. Because there wasn’t too much visual interest in the snow, I included just enough snow to frame the left side of my scene. A focus point about 20 feet away gave me sharpness throughout my frame. Click.
Focus and depth of field simplified
Workshop Schedule || Purchase Prints
A Gallery of Depth
Click an image for a closer look and slide show. Refresh the window to reorder the display.


