Grand Canyon: The South Rim Strikes Back
Posted on September 5, 2021
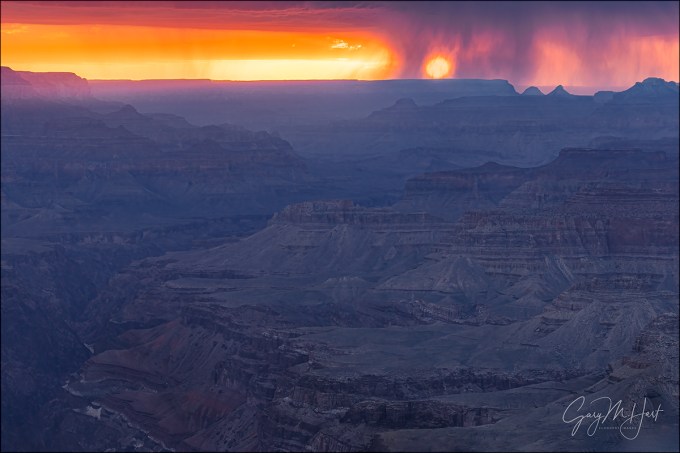
Veiled Sunset, Lipan Point, Grand Canyon
Sony a7RIV
Sony 24-105 G
1/2 second
F/8
ISO 50
Last week I expressed some pretty strong feelings for why I prefer the North Rim of the Grand Canyon to the South Rim. And while I’m not about to issue a retraction, let me just say that the relative merits of the canyon’s two sides are somewhat more nuanced. You might even say that last week’s post was authored by Gary Hart, Human Being. This week’s rebuttal will come from Gary Hart, Photographer.
Like so many arguments, the fulcrum of the Grand Canyon North/South debate is not actually the debate’s subjects, rather, it’s the definition of the argument. In this case, the difference really comes down to how you want to define “best.” If best refers to the overall experience of one rim over another—the “best” I argued for last week—then the North Rim’s simple serenity, alpine setting, and visual variety make it the clear winner. But if best only considers the actual vistas from which beautiful images can be made, then I’m afraid the nod goes to the South Rim and its supply of vast, open views of the world’s most magnificent canyon.
Many of the South Rim vistas offer at least 100 degrees of unobstructed canyon view, and some provide more than 180 degrees. (That’s pretty crazy when you consider that the horizontal field of view of my widest lens, the Sony 12-24 f/2.8 GM, is only around 112 degrees.) This sheer expansiveness is what makes Hopi Point a personal South Rim favorite, along with the three east-most vistas: Lipan Point, Navajo Point, and Desert View.
Hopi Point juts into the canyon farther north than any of the other South Rim vistas, giving it the broadest (easily accessible) canyon views possible from the rim. From here you can look at least 20 miles down-canyon; and up-canyon you can see all the way past Wotan’s Throne and Vishnu Temple to almost as far as the Little Colorado River confluence, more than 20 miles away. There’s even a nice downstream view of the Colorado River that’s responsible for all this beauty.
The three eastern vistas provide the only views upstream, past the Little Colorado River confluence, into the Grand Canyon’s north/south, Marble Canyon section. In this direction you’ll also find the best view of the Colorado River on the rim. Downstream the view is more than 40 miles of red ridges and towering monoliths. From Lipan Point there’s even a peek into the canyon’s Inner Gorge (well known to rafters as home to the Grand Canyon’s most thrilling rapids).
On the other hand, this abundance doesn’t come without its costs. A photographer’s job is to take all this jaw-dropping beauty and consolidate it into a coherent image, no small feat. I learned that the hard way on my very first morning trying to photograph the Grand Canyon, when I was gifted fresh snow on the South Rim, yet couldn’t manage to squeeze one usable image out of my camera (let’s blame the camera).
Fortunately, over the years, familiarity has made me more comfortable photographing the South Rim. I find myself particularly drawn to scenes that allow me to combine the Grand Canyon’s inherent beauty with ephemeral weather phenomena like snow, clouds, rainbows, and lightning. I’ve even learned to read the conditions enough to make calculated guesses at where the best opportunities will manifest. If you look at the gallery at the bottom of this post, you’ll see the product of many of those opportunities—some more calculated than others.
The images I share today came from the third (and final) of last month’s back-to-back-to-back Grand Canyon Monsoon photo workshops. We’d started the day with a sunrise shoot on the North Rim, then packed up and started the 4-hour drive to our hotel on the South Rim. As I mentioned in last week’s post, this is such a nice drive, I usually give everyone ample time for a leisurely trip to make a few stops and enjoy the scenery. But lightning was in the forecast for this afternoon, and since we’d been shut out on our two North Rim days, I arranged for us all to meet up again at Desert View, the first South Rim stop after reentering the park. You’ll need to read the aforementioned post for the details of that shoot, but needless to say, by the time we finished that rather lengthy lightning shoot and reconvened at our hotel, everyone was dragging a little.
When I announced that we’d be heading back out for sunset in an hour or so, the response was less than enthusiastic. The enthusiasm was further dampened by the horizon-to-horizon gray clouds that threatened rain and suggested a complete sunset washout was possible. I countered with the my mantra that the best photography often comes during the worst times to be outside, and while I couldn’t promise great images if they went, I could promise no images if they stayed at the hotel.
Everything in my workshops is optional, but my speech managed to convince all but four to join me (who else just flashed to John Belushi in “Animal House”? (language warning)). Including Curt and me, we ended up with seven hardy souls at Lipan Point (six, plus one hardy soul who stayed out there all afternoon).
Sometimes Mother Nature rewards effort and sacrifice. Almost immediately upon arrival, we started seeing lightning firing over the canyon, about 30 miles distant (this is where the Lightning Trigger’s range is appreciated). But the real story this evening was the sun dropping into the rain curtain that was still delivering intermittent lightning.
The sight was so spectacular, I didn’t even mind that no lightning happened in the few minutes the sun was visible. At one point, one of the women in the group uttered almost to herself, “This is the most incredible sunset I’ve ever seen.” I couldn’t argue.
(The toughest thing about this whole shoot was trying not to gush too much the next day in front of those who stayed at the hotel.)
Here’s a slightly wider version from a little earlier in the show
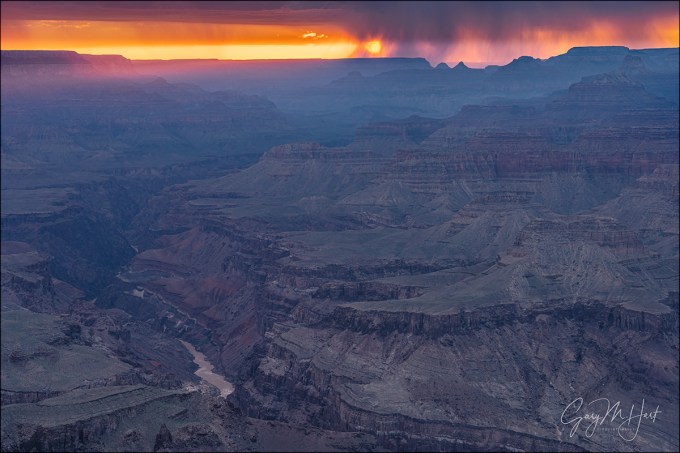
Grand Sunset, Lipan Point, Grand Canyon
Sony a7RIV
Sony 24-105 G
1/3 second
F/8
ISO 50
Grand Canyon Workshops
Workshop Schedule || Purchase Prints || Instagram
A South Rim Gallery


Grand Canyon: North vs. South
Posted on August 29, 2021

Last Light, Wotan’s Throne, Cape Royal, Grand Canyon
Sony a7RIV
Sony 12-24 f/2.8 GM
1/30 second
F/10
ISO 100
North vs. South
When people decide to cross the Grand Canyon off their bucket list, they usually look at a map and see that the South Rim is an easy one hour detour off Interstate 40, or just a little more than three (mostly interstate) hours from Sky Harbor Airport in Phoenix. The North Rim, on the other hand, is nearly five hours from the closest major airport, and isn’t really on the way to anywhere. Not only that, most of the Grand Canyon pictures we see came from the South Rim. Great views, minimal effort? The South Rim is the clear winner, right?
If you prefer experiencing your national parks in wham-bam-thank-you-ma’am visits to jaw dropping, expansive vistas, the South Rim is definitely for you. But here’s a little secret: If your outdoor tastes lean toward an actual relationship with nature, the North Rim is better, and it’s not even close.
I realize that “better” is subjective, and you’re welcome to disagree. But for each of the last 9 years (not including 2020), I’ve led at least two Grand Canyon photo workshops that split time evenly between the Grand Canyon’s North and South Rims—if the votes of hundreds workshop participants who spent equal time on both sides mean anything, the North Rim wins in a landslide.
So what gives?
For both workshop participants and myself, an oft-cited North Rim benefit is just plain peace and quiet. Its relative remoteness, limited accommodations and dining, combined with a dearth of luxury amenities that today’s travelers take for granted (like wifi and reliable cellular), work better than a border wall to keep the masses away. But these “hardships” are actually a feature for those of us who prefer communing with nature, rather than simply gawking at it.
Another bonus: As a photo workshop leader, it’s wonderful not having to stress over parking strategies for every shoot, or having to negotiate prime photography real estate with selfie-obsessed tourists (does a tripod possess some kind of cloaking magic that makes a photographer invisible to tourists?). When I’m with a group on the South Rim, I can’t wait to get over to the North Rim to recharge my psyche.
I do love the South Rim’s views—a lot—but I literally cannot think of a single thing on the South Rim that I’d consider scenic that isn’t a canyon view. On the other hand, the North Rim’s canyon views are surrounded by thousands of acres of dense evergreen forest that’s marbled with aspen, and green meadows sprinkled liberally with wildflowers. You could spend an entire North Rim visit surrounded by peaceful beauty without getting a single glimpse of the canyon. (And if you’re lucky, you might even enjoy a view of the bison herd that hangs out near the entrance station.)
And the North Rim’s views, while not as plentiful or expansive as those on the South Rim, are still world class. For lightning photography, there’s no better spot than Grand Canyon Lodge. Protected by an array of lightning rods, with the fully enclosed lodge Sun Room right there for immediate retreat, the Grand Canyon Lodge view faces south, across the canyon, in the direction from which most thunderstorms approach. Rather than chasing the lightning, we can just wait for it to come to us.
But for beautiful views, my two favorite North Rim vistas are Point Imperial and Cape Royal. At nearly 9000 feet above sea level, Point Imperial is the Grand Canyon’s highest scenic view point. It also provides the park’s best view of the Vermillion Cliffs and Grand Canyon’s Marble Canyon. And picturesque Mt. Hayden, a prominent spire that stands front and center against a host of ridges and towers that recede in the distance, makes a perfect visual anchor for Point Imperial scenes.
Cape Royal has the North Rim’s most expansive view, and is probably the best spot on the North Rim to photograph the setting sun. It also offers the closest view of Vishnu Temple, one of the Grand Canyon’s most recognized landmarks. But what really sets Cape Royal apart for me is that it is hands down the Grand Canyon’s best view of Wotan’s Throne, a massive sedimentary monolith rising nearly 3000 feet above the Colorado River.
Even though it stands out as a large, flat-top structure that’s clearly visible from most of the Grand Canyon’s South Rim vistas, when viewed from the South Rim Wotan’s Throne isn’t nearly as interesting as its neighbor, Vishnu Temple. Which probably explains why Wotan’s Throne doesn’t get the love I’ve always felt it deserves. But at Cape Royal, Wotan’s Throne looms just a mile away, and the close view from this side reveals it to be so much more than it appears to be from the South Rim.
About this image
Maybe the best thing about the Cape Royal Wotan’s Throne view is the way it seems positioned, as if by Devine hand, to catch the warm light of the setting sun. Which is exactly what I was thinking about when my third workshop group arrived for the final North Rim sunset shoot of this year’s trip.
The cloudy vestiges of the afternoon’s thunderstorms were scattered across the sky, broken by just a few blue patches. The clouds were beautiful, but what excited me most was the lack of clouds on the western horizon, which would (fingers crossed) provide a perfect path for the sun’s last rays to slip through to color the sky and canyon.
After making sure everyone else was settled, I set about trying to find something for myself. It was pretty clear that the scene both west and south was going to be spectacular at sunset, but I decided that finding a single composition in one direction and would allow me to park my tripod and move around and help people between shots.
I chose the view to the south, for the potential sunset light on Wotan’s Throne, over the view of the actual setting sun in the west. I was drawn to a dead tree precariously perched near a vertical drop of undetermined height (I wasn’t super motivated to find out), and worked hard to safely position myself to balance the tree between Vishnu Temple and Wotan’s Throne, and to get my camera high enough to prevent the tree from intersecting the horizon. While I ended up having to dig my shoes into a steep slope a few feet from the edge, I felt safe.
Being so close to the tree, I chose my Sony 12-24 GM lens. This would allow me to include lots of sky and canyon. Normally I try to avoid too much sky in my Grand Canyon images, but there was potential this night = for some very special color that would demand a lot of sky.
Waiting for the show to start, I just started composing and clicking to familiarize myself with all the composition possibilities. When the sun finally dropped beneath the clouds to light up Wotan’s Throne, I was ready. Many of my shots were wider, including Vishnu Temple and more sky, but for the few minutes the tree got beautiful light, I tightened my composition a little to better emphasize it.
Even though the tree was just a few feet away, I knew that at 20mm I could comfortably use f/10 (to avoid diffraction) if I focused just a little beyond the tree. Since there was nothing beyond the tree to focus on, I used one of the shrubs on the right that I estimated to be just a little farther away than the tree. Dynamic range was extreme, but well within the bounds of my Sony a7RIV. With my focal length, f-stop, and focus point set, I dialed my shutter speed with my eye on the histogram. Click.
This was probably the nicest sunset I’ve ever seen at Cape Royal. I have more colorful images from this evening, and many that include more clouds, and Vishnu Temple, but I chose this one because it’s the best example I’ve ever captured of the spectacular Wotan’s Throne sunset light I love so much.
Grand Canyon Workshops
Workshop Schedule || Purchase Prints || Instagram
A North Rim Gallery


(More) Lightning Lessons
Posted on August 22, 2021

Downpour and Lightning, Desert View, Grand Canyon
Sony a7RIV
Sony 24-105 G
1/8 second
F/8
ISO 50
This post is all about different aspects photographing lightning—some of the stuff I write about here is covered in much more detail in my Lightning Photo Tips article, so you might want to start there
I’ve been photographing lightning at the Grand Canyon (especially) and elsewhere for 10 years, but I’m happy to say that I’m still learning. While going through my images from this year’s recently completed Grand Canyon monsoon workshops, it occurred to me that now might be a good time to share a couple of this year’s insights.
Lightning Trigger (where it all begins)
You simply can’t photograph daylight lightning consistently without a lightning sensor that detects the lightning and triggers your shutter. And if you follow my lightning photography at all, you’ve no doubt heard me singing the praises of the Lightning Trigger from Stepping Stone Products in Colorado. (There are a lot of lightning sensors out there, but since Lightning Trigger is trademarked, this is the only one that can legally use “lightning trigger.”) I don’t get anything from Stepping Stone for my endorsement, I just know it’s in my best interests to give everyone in my groups the best chance to photograph lightning, and so far I haven’t found anything that comes close the the success of the Lightning Trigger.
But despite my strong advice to the contrary, every year one or two people will show up with a sensor that’s not a Lightning Trigger. And every year, these are the people who have the poorest lightning success. Sometimes the reason for failure is obvious—like a sensor that allowed the camera to go to sleep after 30 seconds of inactivity. But usually the reason isn’t quite so obvious—I just know that the people with the “other” sensors are much more likely to get shut out. This year was no exception.
The first workshop (of three) started with a bang, with an active storm building across the canyon, about 12 miles away, just before the workshop orientation. Because lightning trumps everything in these monsoon workshops, I cancelled the orientation and herded everyone to the view deck behind Grand Canyon Lodge (I’d advised them to show up with their gear for this very reason), frantically flying around from person to person to introduce myself, help them set up, and make sure their cameras were clicking with each lightning strike.
After about 15 minutes, all but one seemed comfortably settled in, excitedly reporting that their camera was responding to each bolt. In addition to my one participant who wasn’t having success, there was a woman who wasn’t in my group trying to photograph lightning with a sensor—she too was growing frustrate because her camera seemed be ignoring the lightning too. The one thing these two people had in common? Perhaps you already guessed: they were the only two not using a Lightning Trigger.
I actually tried to help both of them troubleshoot the problem, starting with confirming that everything was plugged in right, then quickly moving to lots of fiddling with camera settings, cables, and batteries. But since I could make their sensors respond with the TV remote I always have nearby when I photograph lightning (the easiest way to test a Lightning Trigger in the field), I wasn’t real optimistic—if the remote triggers the camera, the problem is unlikely to be the connection, power, or camera. That leaves the sensor itself as the most likely culprit.
When leading a workshop I don’t have lots of time to get too scientific with my troubleshooting, but think I solved the mystery the next day, when a similar storm started up at about the same time in more less the same place. For the second day in a row we all set up on the Grand Canyon Lodge view deck, and for the second day in a row, the only person in the group whose camera wasn’t responding was the person with the off-brand sensor. (The woman from the prior day wasn’t there.)
While the prior day’s storm moved laterally across the canyon, this storm moved in our direction, approaching to within a couple of miles (and eventually driving us all for cover in the lodge). When, as the storm got closer, the rogue sensor started triggering its camera, I realized that what sets the Lightning Trigger apart from its competition is most likely its range.
My superior range theory got more confirmation on the South Rim a couple of days later. Driving out toward the South Rim’s eastern-most views for our sunset shoot, my eyes were drawn to a massive thunderhead blooming in the distance. With the forecast offering no hope for lightning to chase, that evening’s plan was to make a couple of quick stops at Lipan and Navajo Points, before finishing with sunset at Desert View. But pulling into Lipan Point it was instantly apparent that the thunderhead was straight up the canyon—we weren’t there long before we could also see it was delivering lightning. (One reason I tell everyone to always carry their Trigger, regardless of the forecast.)
Because this turned out to be a spectacular show that lasted until sunset, we never left Lipan Point. Unlike the previous storms, where the lightning was front-and-center in every composition, the lightning this evening was much farther away—between 22 and 25 miles distant, according to the My Lightning Tracker app on my iPhone. While all the Lightning Triggers didn’t seem to miss a single bolt (“not missing” in this case just means firing when there’s a visible bolt—you’ll see below that this is by no means a guarantee that the bolt will be capture), our rogue sensor not seem to see the lightning at all.
Further confirmation of the Lightning Trigger’s range came in the third workshop, when we were photographing lightning more than 30 miles away. I’ve had success with the Lightning Trigger and distant lightning in the past, but this was the first time I’ve had an app (and cellular connectivity) to actually pinpoint the location and distance.
Slower than the speed of lightning (or, About this image)
One of the most frustrating things about photographing lightning is not capturing a spectacular strike. The first half of the capture equation is a sensor that sees the lightning and triggers the camera (see Lightning Trigger discussion above); the other half is having a camera that responds quickly enough to the click instruction from the sensor. And as I’ve said before, all the three major camera brands are fast enough, but where lightning is concerned, the faster the better—and it’s impossible to be too fast. FYI, according to Imagining Resource, Sony Alpha camera’s are the fastest, followed closely by Nikon, with Canon a fair amount slower (but usually not too slow).
I can confirm the Imaging Resource data. While I had good success while using Canon my first few years photographing lightning, my success rate has been noticeably higher since switching to Sony in 2014 (my first Sony lightning shoot was in 2015). But despite a faster camera, the frustration with missed lightning hasn’t disappeared completely. Usually it’s just one or two here and there—I just shrug my shoulders because I know I’ll probably get the next one. But in this year’s third workshop, one especially frustrating shoot got my attention.
The third group didn’t have any lightning luck on the North Rim for our first two days, but the forecast looked more promising for the South Rim half of the workshop. Unfortunately, the best chances were forecast for the day of our 4-hour rim-to-rim drive. Since it’s such a nice drive, I usually give everyone the whole day to make it, suggesting stops then setting them free after the sunrise shoot—we don’t gather as a group again until late afternoon on the other side. But with such a promising lightning forecast, this time I had everyone meet me at Desert View, the first South Rim vista when driving from the North Rim, at 1:00 p.m., hoping that we’d get the workshop’s first shot at lightning.
Setting up on the rim just west of the Desert View Watchtower, we just hung out for awhile, waiting for something to happen. Our patience was rewarded after about an hour, when a few people in the group saw lightning in the east. This was out toward the Painted Desert—not actually over the canyon, but close enough to get lightning and the canyon in one frame. Better yet, it soon became clear that the storm was moving, not just toward the canyon, but toward one of my favorite Grand Canyon views.
This whole shoot lasted at least a couple of hours. Standing there on the rim, we watched the lightning first migrate north, eventually intersecting the canyon just beyond the Little Colorado River confluence. It then started to shift westward, crossed the canyon, continued drifting west, and everyone was pretty excited. That is, until we realized that it was also getting closer. We were preparing to retreat when a bolt hit inside the canyon, less than two miles away, sending our sense of urgency into overdrive.
Since this was this group’s first lightning, everyone was especially excited when their camera clicked with each lightning bolt. Though I knew no one would get every single bolt, with several dozen visible strikes, I was pretty confident everyone’s success numbers would be in the double digits—mine included.
But checking my images in my room that night, I was disappointed to count only three frames with lightning. I was just going to write it off as one of those things—perhaps my LT battery was weak, or maybe I was too focused on working with others in the group (in other words, doing my job) to adjust my composition frequently enough to track the continuously shifting storm.
But when I mentioned my poor success to Curt, my assistant on this trip, he expressed similar results. And talking to the group the next day, we learned that no one else got more than a (very small) handful of strikes. How could a dozen people using a lightning sensor that years of experience proves works reliably, on a variety of cameras, have such similarly poor results on just one shoot? Adding to the mystery, it became clear by the images shared in the image review that the lightning everyone did capture, was all the same strikes. What’s going on?
One of the things I love most about working with Curt is that he’s as inquisitive and bulldog-tenacious tracking down these mysteries as I am. We got to work researching what could be going on, both on our own, and together on a one-hour conference call with Rich at Stepping Stone, the mastermind behind the Lightning Trigger.
Rich suggested that it could be that we encountered a storm that was mostly positive lightning. Positive lightning, which comprises about 5 percent of lightning strikes, usually spends all of its energy in a single stroke, making that one stroke very bright, but also much faster from start to finish. He thought that maybe the lighting was done before everyone’s cameras could react. That made sense.
But after a little research on positive lightning, I (tentatively) ruled it out as our culprit because: 1) I saw nothing that indicates that positive lightning is storm-specific (though I’m open to correction); 2) positive lightning originates near the top of the cloud, and I saw no sign of that in this storm; 3) positive lightning tends to come near the end of the storm, and we photographed this one from start to finish; and finally, 4) positive lightning typically strikes outside the main rain band, and we saw very little of this.
But that conversation with Rich convinced me that our problem this afternoon had to indeed be a caused by lightning that was too fast for our cameras. And after mulling that thought for awhile, then digging deeper into my lightning resources, I theorized that we’d probably just encountered a storm that didn’t have as much juice as the typical monsoon storms I’m accustomed to.
This makes sense if you understand that a typical negative lightning strike that looks like a single bolt to the eye (or camera), is actually a series of strokes following the same channel. The number of strokes in a single lightning bolt varies with the amount of energy the lightning needs to release—the more strokes, the longer the strike seems to last. (As an interesting aside, earlier in the trip Curt got accidental confirmation of lightning’s multiple stroke aspect when, with his camera set to Continuous rather than the Single Shot that I use, he got the same lightning bolt in two, and at least once, three contiguous frames.)
The jury is still out on this theory, but it makes sense. If I learn anything more, I promise to share it. Right now I’m in the process of updating the Lightning Photo Tips article with this and more insights gained since the last update, so that’s the best place to check for new information.
Oh, and the image I share here was one of my three successes that afternoon, so I’m not really complaining.
2021 Grand Canyon Monsoon Highlights (processed so far)
Spoiler Alert: It’s not just lightning
Click an image for a closer look, and to view a slide show.


Smoke on the Landscape (and Fire in the Sky)
Posted on August 15, 2021

Smoky Sunset, Desert View, Grand Canyon
Sony a7RIV
Sony 200-600 G
Sony 2x teleconverter
ISO 100
f/18
1/60 second
After 2 1/2 weeks at the Grand Canyon for three monsoon photo workshops, I’ve had very little time (and even less connectivity) for posting, but I wanted to share this image while the experience is still fresh in my mind. Here’s a new image and a short descriptive post, followed by a longer, but far more important, “refurbished” post.
Beauty comes in many forms. Usually it’s some version of thrilling or soothing, but last week I witnessed beauty that I can only label alarming.
My first week at the Grand Canyon (for three workshops) included the monsoon staples people sign up for: beautiful clouds, vivid sunrises and sunsets, rainbows, and lightning—lots and lots of lightning. But when Mother Nature flipped off the moisture switch at the end of the first week, all that monsoon magnificence was replaced by cloudless skies and smoke—smoke in the sky, and smoke in the canyon.
Without the cleansing monsoon showers, visibility into the canyon varied with the fickle winds, ranging from okay to opaque. And even when we could see across to the other side, a thick brown haze hugged the horizon in all directions.
Adopting my best lemonade-from-lemons stance, I encouraged everyone in the second group to appreciate the rare opportunity to include a red, orange, or yellow (depending on the smoke’s thickness) sun in their images. This wasn’t what everyone was hoping for, but I tried to make that point that as depressing as the smoke is, these images shouldn’t feel like a consolation prize because they really can be pretty cool.
Fortunately, the Grand Canyon is ideal for these shots that emphasize the seemingly infinite supply of ridges that disappear into the distance. Normally photographing these receding ridges by pointing toward sunrise or sunset results in a harsh white sky and hopelessly blown out sun. But smoke knocks down the sun’s brilliance, allowing its color to shine through. And, the smoke that robs the vistas of their glorious canyon views also helps simplify images down to basic color and shape. Wide or tight, the result is a relatively unique visual take on the Grand Canyon’s beauty.
I captured this image on the second group’s first sunset. I like starting the workshop at Desert View because we can all set up together along the rim, allowing me to work individually with the participants to identify who will need what assistance throughout the workshop. But once we got settled in, everyone started to work on their own version of the scene and I got a minute to think about my own shot.
I kicked myself for not lugging my Sony 200-600 lens out in the first place, and ended up jogging back to the car to grab it and my 2X teleconverter, hoping to enlarge the sun and apply extreme compression to the disappearing ridges. Adding this combo to my Sony a7RIV, I couldn’t resist starting by zooming all the way out to 1200mm to make the sun as large as possible. After that I played with a variety of focal lengths, ultimately choosing this one, around 600mm, because I could include more of the ridges. The sun slipping into a few wispy cloud fragments just before it disappeared was a bonus.
To avoid washing out the color in the sun, I had to seriously underexpose the foreground. On my LCD, the ridges you see in this image were black—so dark in fact that there was no way to distinguish one from the next. But I love my Sony bodies and knew that my a7RIV had indeed captured all the shadow detail I would need, a fact I easily confirmed upon opening this image in Lightroom.
I should add that despite all the smoke, all was not completely lost for the middle group. For our final sunset, the sky above Cape Royal cleared wonderfully, allowing the sun to paint Wotan’s Throne with beautiful warm light. (The view of Wotan’s Throne from Cape Royal is one of my favorite Grand Canyon views.) Great canyon views and relatively few cross-canyon lights makes Cape Royal my favorite Grand Canyon rim Milky Way location, so we stayed out and enjoyed the best Milky Way shoot of any monsoon workshop I’ve ever had—so great, in fact, that we voted to blow off sunrise to stay out later.
With the monsoon returning for the final week, the third workshop group enjoyed two spectacular lightning shoots and a couple of equally spectacular sunsets. Just as significant, the frequent showers banished the smoke and the visibility returned, at least temporarily. But with smoky summer skies becoming the norm here in the West—and this year most of the country is suffering from our smoke—I fear that we’ve all reached the point where summer outdoor plans will require a smoke contingency, much as we’ve always had to do with the potential for rain.
I’ll be back soon with more conventional Grand Canyon monsoon drama (something this trip didn’t lack), but in the meantime, I hope you take the time to read below and gain a little understand of climate warming and the undeniable truth of humans’ role.
Workshop Schedule || Purchase Prints || Instagram
Where There’s Smoke (2019)

Sun and Smoke, Sierra Foothills, California
Sony a6300
Sony 100-400 GM
Sony 2x teleconverter
ISO 100
f/16
1/8 second
Humans, we have a problem
Earth’s climate is changing, and the smoking gun belongs to us. Sadly, in the United States policy lags insight and reason, and the world is suffering.
Climate change science is complex, with many moving parts that make it difficult to communicate to the general public. Climate change also represents a significant reset for some of the world’s most profitable corporations. Those colliding realities created a perfect storm for fostering the doubt and confusion that persists among people who don’t understand climate science and the principles that underpin it.
I’m not a scientist, but I do have enough science background (majors in astronomy and geology, before ultimately earning my degree in economics) to trust the experts and respect the scientific method. I also spent 20 years doing technical communication in the tech industry (tech writing, training, and support) for companies large and small. So I know enough to know that the fundamentals of climate change don’t need to intimidate, and the more accessible they can be to the general public, the better off we’ll all be.
It’s personal
Recently it feels like I’ve been living on the climate change front lines. On each visit to Yosemite, more dead and dying trees stain forests that were green as recently as five years ago. And throughout the Sierra (among other places), thirsty evergreens, weakened by drought, are under siege by insects that now thrive in mountain winters that once froze them into submission. More dead trees means more fuel, making wildfires not just more frequent, but bigger and hotter.
Speaking of wildfires, for a week last month I couldn’t go outside without a mask thanks to smoke from the Camp Fire that annihilated Paradise (70 miles away). I have friends who evacuated from each of this November’s three major California wildfires (Camp, Hill, and Woolsey), and last December the Thomas Fire forced a two-week evacuation of Ojai, where my wife and I rent a small place (to be near the grandkids). Our cleanup from the Thomas fire took months, and we still find ash in the most unexpected places (and we were among the lucky who had a home to clean).
The debate is dead
Despite its inevitable (and long overdue) death, the climate change debate continues to stagger on like a mindless zombie. We used to have to listen to the global warming skeptics claim that our climate wasn’t changing at all, so I guess hearing them acknowledge that okay-well-maybe-the-climate-is-changing-but-humans-aren’t-responsible can be considered progress.
Climate change alternative “explanations” like “natural variability” and “solar energy fluctuations” popular on social media or fringe websites have been irrefutably debunked by rigorously gathered, thoroughly analyzed, and closely scrutinized data. (And don’t get me started on the ridiculous “scientists motivated by grant money” conspiracy theory.)
Science we all can agree on
One thing that everyone does agree on is the existence of the greenhouse effect, which has been used for centuries to grow plants in otherwise hostile environments.
As you may already know, a greenhouse’s transparent exterior allows sunlight to penetrate and warm its interior. The heated interior radiates at longer wavelengths (infrared) that don’t escape as easily through the greenhouse’s ceiling and walls. That means more heat is added to a greenhouse than exits it, so the interior is warmer than the environment outside.
There’s something in the air
Perhaps the most common misperception about human induced climate change is that it’s driven by all the heat we create when we burn stuff. But that’s not what’s going on, not even close.
Our atmosphere behaves like a greenhouse, albeit with far more complexity. The sun bathes Earth with continuous electromagnetic radiation that includes infrared, visible light, and ultraviolet that we’re all familiar with. Solar radiation not reflected back to space reaches Earth’s surface to heat water, land, and air. Some of this heat makes it back to space, but much is absorbed by molecules in Earth’s atmosphere, forming a virtual blanket that makes Earth warmer than it would be without an atmosphere. In a word, inhabitable.
Because a molecule’s ability to absorb heat depends on its structure, some molecules absorb heat better than others. The two most common molecules in Earth’s atmosphere, nitrogen (N2: two nitrogen atoms) and oxygen (O2: two oxygen atoms), are bound so tightly that they don’t absorb heat. Our atmospheric blanket relies on other molecules to absorb heat: the greenhouse gases.
Also not open for debate is that Earth warms when greenhouse gases in the atmosphere rise, and cools when they fall. The rise and fall of greenhouse gases has been happening for as long as Earth has had an atmosphere. So our climate problem isn’t that our atmosphere contains greenhouse gases, it’s that human activity changes our atmosphere’s natural balance of greenhouse gases.
Earth’s most prevalent greenhouse gas is water vapor. But water vapor responds quickly to temperature changes, leaving the atmosphere relatively fast as rain or snow, while other greenhouse gases hold their heat far longer.
The two most problematic greenhouse gases are carbon dioxide (CO2: one carbon atom bonded with two oxygen atoms) and methane (CH4: one carbon atom bonded with four hydrogen atoms). The common denominator in these “problem” gases is carbon. (There are other, non-carbon-based, greenhouse gases, but for simplicity I’m focusing on the most significant ones.)
Carbon exists in many forms: as a solo act like graphite and diamond, and in collaboration with other elements to form more complex molecules, like carbon dioxide and methane. When it’s not floating around the atmosphere as a greenhouse gas, carbon in its many forms is sequestered in a variety of natural reservoirs called a “carbon sink,” where it does nothing to warm the planet.
Oceans are Earth’s largest carbon sink. And since carbon is the fundamental building block of life on Earth, all living organisms, from plants to plankton to people, are carbon sinks as well. The carbon necessary to form greenhouse gases has always fluctuated naturally between the atmosphere and natural sinks like oceans and plants.
For example, a growing tree absorbs carbon dioxide from the atmosphere, keeping the carbon and expelling oxygen (another simplification of a very complex process)—a process that stops when the tree dies. As the dead tree decomposes, some of its carbon is returned to the atmosphere as methane, but much of it returns to the land where it is eventually buried beneath sediments. Over tens or hundreds of millions of years, some of that sequestered carbon is transformed by pressure and heat to become coal.
Another important example is oil. For billions of years, Earth’s oceans have been host to simple-but-nevertheless-carbon-based organisms like algae and plankton. When these organisms die they drop to the ocean floor, where they’re eventually buried beneath sediment and other dead organisms. Millions of years of pressure and heat transforms these ancient deposits into…: oil.
Coal and oil (hydrocarbons), as significant long-term carbon sinks, were quite content to lounge in comfortable anonymity as continents drifted, mountains lifted and eroded, and glaciers advanced and retreated. Through all this slow motion activity on its surface, Earth’s temperatures ebbed and flowed and life evolved accordingly.
Enter humans. We have evolved, migrated, and built civilizations based on a relatively stable climate. And since the discovery of fire we humans have burned plants for warmth and food preparation. Burning organic material creates carbon dioxide, thereby releasing sequestered carbon into the atmosphere. Who knew that such a significant advance was the first crack in the climate-change Pandora’s Box?
For thousands of years the demand for fuel was met simply by harvesting dead plants strewn about on the ground and the reintroduction of carbon to the atmosphere was minimal. But as populations expanded and technology advanced, so did humans’ thirst for fuel to burn.
We nearly killed off the whales for their oil before someone figured out that those ancient, subterranean metamorphosed dead plants burn really nicely. With an ample supply of coal and oil and a seemingly boundless opportunity for profit, coal and oil soon became the driving force in the world’s economy. Suddenly, hundreds of millions of years worth of sequestered carbon was being reintroduced to our atmosphere as fast as it could be produced—with a corresponding acceleration in greenhouse gases (remember, when we burn hydrocarbons, we create carbon dioxide).
Compounding the fossil-fuel-as-energy problem is the extreme deforestation taking place throughout the world. Not only does burning millions of forest and jungle acres each year instantly reintroduce sequestered carbon to the atmosphere, it destroys a significant sink for present and future carbon.
Scientists have many ways to confirm humans’ climate change culpability. The most direct is probably the undeniable data showing that for millennia carbon dioxide in Earth’s atmosphere hovered rather steadily around 280 parts per million (ppm). Then, corresponding to the onset of the Industrial Revolution in the late 18th century, atmospheric carbon dioxide has risen steadily and today sits somewhere north of 400 ppm, with a bullet.
Humans don’t get a pass on atmospheric methane either. While not nearly as abundant in Earth’s atmosphere as carbon dioxide, methane is an even more powerful greenhouse gas, trapping about 30 times more heat than its more plentiful cousin. Methane is liberated to the atmosphere by a variety of human activities, from the decomposition of waste (sewage and landfill) to agricultural practices that include rice cultivation and bovine digestive exhaust (yes, that would be cow farts).
While the methane cycle is less completely understood than the carbon dioxide cycle, the increase of atmospheric methane also correlates to fossil fuel consumption. Of particular concern (and debate) is the cause of the steeper methane increase since the mid-2000s. Stay tuned while scientists work on that….
Balancing act
For humans, the most essential component of Earth’s habitability is the precarious balance between water’s three primary states: gas (water vapor), ice, and liquid. Since the dawn of time, water’s varied states have engaged in a complex, self-correcting choreography of land, sea, and air inputs—tweak one climate variable here, and another one over there compensates.
Earth’s climate remains relatively stable until the equilibrium is upset by external input like solar energy change, volcanic eruption, or (heaven forbid) a visit from a rogue asteroid. Unfortunately, humans incremented the list of climate catalysts by one with the onset of the Industrial Revolution, and our thirst for fossil fuels.
As we’re learning firsthand in realtime, even the smallest geospheric tweak can initiate a self-reinforcing chain reaction with potentially catastrophic consequences for humanity’s long-term wellbeing. For example, a warmer planet means a warmer ocean and less ice, which means more liquid water and water vapor. Adding carbon dioxide to water vapor kicks off a feedback loop that magnifies atmospheric heat: More carbon dioxide raises the temperature of the air—>warmer air holds more water vapor—>more water vapor warms the air more—>and so on.
But that’s just the beginning. More liquid water swallows coastlines; increased water vapor means more clouds, precipitation, and warmer temperatures (remember, water vapor is a greenhouse gas). Wind patterns and ocean currents shift, changing global weather patterns. Oh yeah, and ice’s extreme albedo (reflectivity) bounces solar energy back to space, so shrinking our icecaps and glaciers means less solar energy returned to space even more solar energy to warm our atmosphere, which only compounds the problems.
Comparing direct measurements of current conditions to data inferred from tree rings, ice and sediment cores, and many other proven methods, makes it clear that human activity has indeed upset the climate balance: our planet is warming. What we’re still working on is how much we’ve upset it (so far), what’s coming, and where the tipping point is (or whether the tipping point is already in our rearview mirror).
We do know that we’re already experiencing the effects of these changes, though it’s impossible to pinpoint a single hurricane, fire, or flood and say this one wouldn’t have happened without climate change. And contrary to the belief of many, everyone will not be warmer. Some places are getting warmer, others are getting cooler; some are wetter, others are drier. The frequency and intensity of storms is changing, growing seasons are changing, animal habitats are shifting or shrinking, and the list goes on….
We won’t fix the problem by simply adjusting the thermostat, building dikes and levees, and raking forests. Until we actually reduce greenhouse gases in our atmosphere, things will get worse faster than we can adjust. But the first step to fixing a problem is acknowledging we have one.
About this image

Sun and Smoke, Sierra Foothills, California
The Camp Fire had been burning for ten days, devouring Paradise and filling the air in Sacramento with brown smoke so thick that at times not only could we not see the sun, we couldn’t see the end of the block. But on this afternoon, when an orange ball of sun burned through the smoke I donned a mask, grabbed my camera bag, and headed for the hills.
I have a collection of go-to foothill oak trees for sun and moonsets, but most of these trees are too close to my shooting position for the extreme telephoto image I had in mind. Too close because at this kind of focal length, the hyperfocal distance is over a mile. So I made my way to a quiet country road near Plymouth where I thought the trees might just be distant enough to work. But I’m less familiar with this location than many of my others, so I didn’t know exactly how the trees and sun would align. Turning onto the road, I drove slowly, glancing at the sun and trees until they lined up. Because there wasn’t a lot of room to park on either side, I was pleased that the shoulder at the location that worked best was just wide enough for my car.
Envisioning a maximum telephoto shot, I added my Sony 2X teleconverter to my Sony 100-400 GM lens. While my plan was to use my 1.5-crop Sony a6300, when I arrived the sun was high enough that that combination provided too much magnification, so I started with my full frame Sony a7RIII. But soon as the sun dropped to tree level I switched to the a6300 and zoomed as tight as possible.
When I started the sun was still bright enough that capturing its color made the trees complete silhouettes, with no detail or color in the foreground. But as the setting sun sank into increasingly thick smoke, it became redder and redder and my exposure became easier. It always surprises me how fast the sun and moon move relative to the nearby horizon, so found myself running around to different positions to get the right sun and tree juxtaposition as the sun fell. The smoke near the horizon was so thick that it swallowed the sun before it actually set.
Later I plotted my location and the sun’s position on a map and realized that I was pointing right at San Francisco, about 100 miles away, with a large swath of the Bay Area in between. Then I thought about this air that was thick enough to completely obscure the sun, and the millions of people who had been breathing that air for weeks.
I’d be lying if I said I don’t like this image—it’s exactly what I was going for. But I’d be very happy if I never got another opportunity to photograph something like this.
Learn more
- https://climate.nasa.gov/causes/
- https://grist.org/article/we-broke-down-what-climate-change-will-do-region-by-region/
- https://www.ncdc.noaa.gov/monitoring-references/faq/greenhouse-gases.php
Workshop Schedule || Purchase Prints
Where There’s Smoke…
Click an image for a closer look and slide show. Refresh the window to reorder the display.


The Reason I Do This: Redux
Posted on August 8, 2021
 Three Strikes, Lightning and Rainbow from Bright Angel Point, Grand Canyon
Canon EOS 5D Mark III
1/3 second
24-105L
ISO 100
f/11
August 2013
Nature photographers plan, and plan, and plan some more, but no amount of planning can overcome the fickle whims of Mother Nature. Few things are more disappointing than a long anticipated and perfectly executed shoot washed out by conditions beyond my control. But when all of nature’s variables click into place, the world becomes a happy place indeed. And when nature ups the ante by adding something unexpected, euphoria ensues.
Don Smith and I just returned from two weeks photographing the Grand Canyon. We did a little of our own photography on the trip, but the prime focus was our two four-plus day photo workshops, split evenly between the Grand Canyon’s North and South Rims. These workshops were scheduled to give our groups the opportunity to photograph the Grand Canyon, day and night, under the influence of the annual Southwest monsoon: billowing clouds, vivid rainbows, and (especially) lightning. But any workshop requiring specific weather conditions is fraught with uncertainty and anxiety—we were fairly certain the photography would be great (after all, it is the Grand Canyon), but few natural phenomena are more fickle than lightning.
When plotting a workshop schedule (or any landscape photo shoot), the best a photographer can do is maximize the odds: We try to schedule all the non-photography requirements (meals, sleep, travel, training) for the times least likely to conflict with the best photography. For example, we know that because the monsoon thunderstorms usually don’t develop before midday, Grand Canyon summer sunrises often lack the clouds and pristine air necessary for the vivid color photographer’s covet. Therefore our photography emphasis for this workshop is on getting our groups out from mid-morning through (and sometimes after) sunset. That doesn’t mean we blow off sunrise, it just means that the sunrises are generally better for exhausted, sleep-deprived photographers to skip than the sunsets are.
Nevertheless, we rallied the troops at 5 a.m. Friday for our second workshop’s final shoot, a ten minute walk from our rim-side cabins to Bright Angel Point. The forecast was for clear skies, but the workshop had already had so many wonderful shoots, I considered this final one just a little bonus, the cherry atop an already delicious sundae.
My mind was already on the long drive home—in fact, as Don and I exited our cabin in the pre-dawn darkness, I predicted that I wouldn’t even take my camera out of my bag that morning. My words as I turned the doorknob were, “But if I leave my bag here, we’ll probably get lightning and a rainbow.” Little did I know how grateful I’d be to have brought my gear….
What followed was what Don and I later agreed was probably the single most memorable workshop shoot either of us had ever experienced. Gathering in the lobby of Grand Canyon Lodge, we saw lightning flashes across the canyon, but it was impossible to tell in the darkness how far away it was. Hiking to the vista, we saw several distinct bolts stab the rim, and by the time our gear was set up, the show had intensified, delivering numerous violent strikes in multiple directions that illuminated the canyon several times per minute.
The morning’s pyrotechnics continued for over two hours, awing us first in the dark, then through twilight, and finally into and beyond a magenta sunrise. And as if that wasn’t enough, as the sun crested the horizon behind us, a small but vivid fragment of rainbow materialized on the canyon’s rim, hanging there like a target for the lightning to take potshots at it.
This was more than just good photography, this was a once-in-a-lifetime convergence of weather, location, and light that more than made up for the many times nature has disappointed. Rather than bore you with more words, here are a few images from that morning:
Lightning Before Dawn, Bright Angel Point, North Rim, Grand Canyon
Arriving on the rim about 45 minutes before sunrise, we found the South Rim under full attack. This 30 second exposure captured a pair of strikes near Mojave Point. Little did we know what was in store…

Three Strikes, Bright Angel Point, Grand Canyon
As the sun neared the eastern horizon, I couldn’t help sneaking an occasional peek behind me. Seeing clear skies in the rising sun’s direction, I crossed my fingers for the clouds to hold off long enough to allow the sunlight to illuminate the lightning show before us. As the sun topped the horizon, its rays caught the rain falling along the rim, balancing a nearly vertical section of rainbow atop Powell Point. In this single, 1/3 second exposure, I managed to capture the rainbow briefly sharing the rim with three simultaneous lighting strikes.

Color and Light, Grand Canyon Lightning, Bright Angel Point
Canon EOS 5D Mark III
1/3 second
F/11
ISO 100
24-105 f4L lens
The rainbow persisted as the lightning continued. Confident that I’d captured enough horizontal frames, I switched to a vertical composition in time to catch one more strike with the rainbow.

Approaching Storm, Grand Canyon North Rim
As the sun rose, the rocks reddened and the storm edged closer. Ridges visible earlier were slowly overtaken by the advancing rain, and long, rolling waves of thunder echoed overhead. Preceding the rain were billowing clouds; here I went with an extreme wide (17mm) vertical composition to capture the incoming storm skewering the rim with by a single bolt. I had to retreat to shelter shortly thereafter.
Grand Canyon Photo Workshops
Learn how to photograph lightning
A Lightning Gallery


More Monsoon Magic
Posted on August 2, 2021

Lightning V, Grand Canyon
Sony a7RIV
Sony 24-105 G
1/10 second
F/8
ISO 160
Greetings from the Grand Canyon. It’s pretty hard to post a blog in the middle of a workshop, and downright near impossible when the Internet is down and your cellular carrier has capped your roaming data at 200 megabytes (which I ripped through in 3 days, with only 12 days to go—thank you very much, T-Mobile). But here I am, a day late, with some thoughts on improving your lightning photography and an update on the Grand Canyon monsoon activity so far.
Subtracting one year lost to COVID, this is my eighth year doing at least two monsoon workshops at the Grand Canyon—this year it’s three. In previous years I’ve done these workshops in partnership with my friend and fellow Sony Artisan Don Smith; this year I’m flying solo, grateful for the assistance of my friend (photographer, sensor cleaning guru, and essential lightning tracker) Curt Fargo.
Being solely responsible for the success and wellbeing of a dozen photographers isn’t without its stress. Despite the always breathtaking beauty that comes with the Grand Canyon monsoon, make no mistake about it: people sign up for these workshops for the lightning. And while I make it very clear that enrollment comes with no guarantees, and do my absolute best to prepare everyone well in advance, I still stress until each person in my group has captured at least one bolt.
Many factors contribute to lightning success, but when you measure success by the results of a dozen other people, things get even more complicated. And since we’re in the midst of lightning season for most of the Northern Hemisphere, I thought I’d share my thoughts on maximizing lightning success. In no particular order, here are my essential lightning preparation tips:
- The right equipment
- Mirrorless or DSLR camera with minimal shutter lag: Sony is the fastest, followed closely by Nikon; Canon is fast enough. I don’t have enough experience with the other brands to know which work well and which don’t. And new cameras come out so fast, my information isn’t necessarily current, so the other manufacturers could have upped their shutter-lag game (or not). One more thing: it helps to have a camera that goes down to ISO 50 (this often needs to be turned on in the menu).
- 24-105 (ideal) or 24-70 lens: Since you don’t know exactly where the lighting will land, it’s best to compose a little loose and crop in post, making long telephotos of limited use. And if you find yourself needing to go wider than 24mm, you’re too close (trust me).
- Lightning sensor: No one is fast enough to consistently capture lighting without a device that detects lightning and triggers the shutter. Period. There are a lot of lightning sensor options, but the only one I’ve seen work reliably, at a range of up to 40 miles, is the Lightning Trigger. (FYI, this name is trademarked, so it’s the only lightning sensor that can legally be called Lightning Trigger.) I recommend Lightning Trigger to all of my workshop students, and always hold my breath when someone shows up with something different. (I get no kick-back or other benefit from this recommendation—it just makes my life much easier when workshop participants use something I know works.)
- Polarizer or (even better) a 3- to 6-stop neutral density filter: For lightning, sometimes you need a little help getting to a slow enough shutter speed. I use a 6-stop Dark Polarizer from Breakthrough Filters.
- Sturdy tripod: You’ll be shooting at shutter speeds no faster than 1/15 second. Not only that, there’s a lot of waiting in lightning photography, and your camera must be primed for action at all times, making hand-holding impractical (and downright uncomfortable).
- Wet weather gear: I rarely get wet photographing lightning because I try not to be in the storm I’m photographing (which is one thing that makes the Grand Canyon, with its distant views, such a great lighting location), but sometimes I get caught out in the rain.
- Waterproof hat, parka, pants, shoes
- Umbrella
- I haven’t found a rain cover for my camera gear that isn’t more trouble than it’s worth, a problem compounded by having my Lightning Trigger mounted atop my camera. In the rare situation that I decide to stay out in the rain and shoot, I just use my umbrella (AKA, portable lightning rod).
- Equipment knowledge: When photographing something as fickle and ephemeral as lightning, all the equipment in the world won’t do you much good if you don’t know how to use it without conscious thought.
- Exposure knowledge: Lightning photography requires very specific shutter speeds that vary with conditions. Not only do you need to get the exposure right, you have to know how to do it in a very specific shutter speed range.
- Weather/lightning knowledge
- Learn how to identify the cells will deliver lightning.
- Recognize the direction the lightning is moving.
- The faster you can recognize and respond to potential lightning, the better your results will be. If you wait until a strike hits before heading in that direction, you’re asking for disappointment.
- Weather/lightning resources
- National Weather Service: There may be other reliable sources, but most use the NWS data. The NWS is far from perfect (like all weather forecasting entities), but it’s more consistently reliable than any other source.
- Real-time lightning reporting app: This is a huge benefit that allows me to monitor storm and lightning activity, on a scale ranging from macro (national) to micro (local). Many apps offer this service, but the one I use and consider absolutely essential is My Lightning Tracker Pro. (I’m not a tester, so like all of my recommendations, this endorsement is based on personal experience and comparison to other apps I’ve used and observed, not any systematic tests.)
- Location knowledge
- Know when the lightning tends to start.
- Know where the lightning is most likely to strike.
- Know the best/safest vantage points and how to get to them quickly.
- Escape routes: Don’t photograph a location without knowing where to retreat when lightning gets too close.
I do my best to fill my groups with all this knowledge and more, before we start. Even though we’ve been been shut out a few times, I’ll take a little credit for the overall success rate—so far my workshop lightning batting average (everyone in the workshop gets at least one strike) is probably somewhere around .700, and in a few workshops some, or even most, had a success.
But really, regardless of the preparation, the biggest factor in capturing lightning in a workshop that was scheduled more than a year in advance, comes down to just plain luck, and like all weather phenomena, lighting is random. But preparation does give you the best possible chance of success if you’re lucky enough to get a chance. And honestly, it’s the unknown that makes chasing lightning so much fun.
Read my complete lightning photography how-to guide in my Photo Tips Lightning article.
Back to the present
So anyway…
This morning I wrapped up the first of three consecutive Grand Canyon monsoon workshops. To say that we started with a bang would be an understatement. For just the second time since I started doing this, we postponed our 1 p.m. orientation because the lightning started around noon. Fortunately, a couple of days before our start I’d sent an e-mail letting everyone know this was possible, and to show up at the orientation with gear and prepared to hit the ground running. And that’s what we did.
For the workshop’s first two hours, we photographed a very active electrical storm across the canyon from our North Rim perch at Grand Canyon Lodge. By the time we were done, I’d captured 35 frames with lightning, only one person in the group didn’t have at least one lightning strike (most had many more)—the person who showed up with a lightning sensor that wasn’t a Lightning Trigger.
The next day we got our morning shoot and training session in, but the afternoon training session was almost immediately preempted by another crazy lightning storm. This storm started fairly mild, then intensified as it moved much closer and eventually chased us inside. This time everyone captured multiple lightning strikes, which makes me think that one of the things that distinguishes the Lightning Trigger from the other brands is its range. But whatever the reason, I could finally relax.
Of course throughout the workshop we photographed a lot of nice stuff that wasn’t lightning, so by our last night I think everyone was pretty satisfied with their bounty. Which of course didn’t prevent us from being greedy. Departing for our final sunset with low expectations, we were instead treated to maybe the best show of the workshop. This storm wasn’t as prolific as the earlier two, and the lightning was more than 20 miles away, but it happened above some of my favorite Grand Canyon scenery, and was accompanied by a towering thunderhead, beautiful sunset color, and a massive rain curtain to catch the sunset color and light.
I wish I could tell you that I have photographic proof of all this drama to share right now, but I’ve been just a little busy. So I’m sharing the only image from the workshop that I’ve processed so far. This V-shaped pair came toward the end of the first afternoon’s storm, and while I’m always happy to get multiple lighting bolts in one frame, I’m pretty sure I ended up with captures I like even better. But we’ll just have to wait…
Workshop Schedule || Purchase Prints || Instagram
Grand Canyon Monsoon Lightning Success
Click an image for a closer look, and to view a slide show.


Everyone’s a Photographer Until…
Posted on July 25, 2021
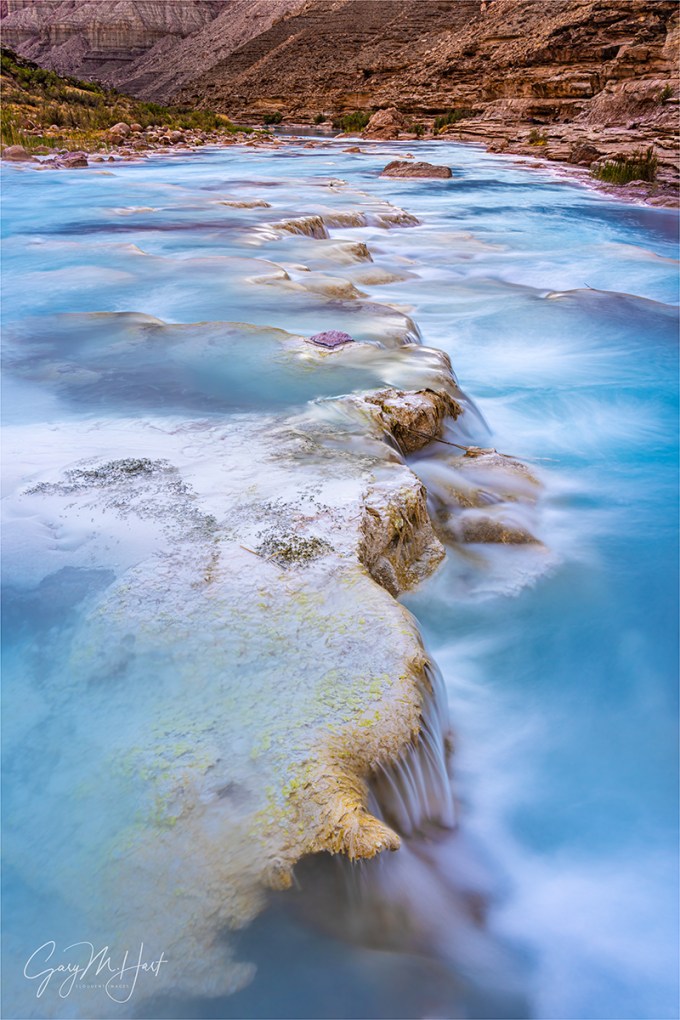
Limestone Cascades, Little Colorado River, Grand Canyon
Sony a7RIV
Sony 24-105 G
4 seconds
F/16
ISO 100
I have a T-shirt that says, “Everyone’s a photographer until…,” above a picture of a camera exposure-mode dial set to Manual. In my mind, this is one of those declarations that’s as true as it is funny (if you don’t see the humor, you’re probably not a photographer anyway).
 I write this with no very little judgement or condescension. Photography needs to make you happy, and if having to think about shutter speeds, f-stops, and ISO saps your joy, then set your camera’s dial to Auto and have a blast. And my goal isn’t to shame auto-shooters, it’s just to point out (again) that photography’s greatest opportunity for creativity comes with mastery of your scene’s “creative triad”: motion, light, and depth. And you can’t master the creative triad without mastering the exposure variables: shutter speed, ISO, and f/stop. Period.
Though it’s quite possible to get fantastic pictures in full automatic exposure mode by simply framing up a composition and clicking, composition is only one of the variables that combine to make a successful image (see “creative triad” above). And composition happens to be the variable that’s easiest to master competently. So I’m afraid if you want to distinguish yourself as a photographer, you really need to bite the bullet and master exposure.
What IS exposure mastery?
It’s important to understand that the correct exposure for most images requires some level of compromise—a shutter speed, f-stop, or ISO that’s less than ideal. (Especially true if you’re not using a tripod—fortunately landscape photography is particularly suited to tripod use.) For example, achieving a shutter speed fast enough to freeze flowing water might require a less than ideal f-stop or ISO.
Exposure mastery means being able to achieve your desired motion, light, and depth with the absolute minimum exposure compromise. It also means knowing when your creative goal isn’t possible—for example, when there’s no usable exposure combination that will get both a foreground and background subject sharp, or blur a water feature (while still getting the light right).
(For the record, even though I’m a fulltime Manual shooter, Aperture/Shutter Priority shooters who do it the right way qualify as Manual shooters in my book because they are making decisions about all of their exposure variables. What’s the “right way”? Setting the shutter speed or f-stop based on what their creative vision calls for, and knowing how to manage exposure compensation to get the exposure right.)
The good news is, you don’t need to use Manual metering (or Aperture/Shutter Priority) all the time. But you really should know how to use it, and be able to identify when it does and doesn’t matter. Fortunately, it isn’t as difficult as most people fear.
Rather than reinvent the wheel, here’s my Photo Tips article on Digital Metering.
About this image
Exploring the bank of the Little Colorado River during this year’s Grand Canyon raft trip, I hunted compositions and waited for the late afternoon shade to arrive. One feature I especially wanted to highlight was the linear limestone shelves that formed long, stair-step ledges. After a little searching, I found the cascade in this image just upstream from where most in the group had gathered to swim and photograph.
Lacking an obvious foreground anchor, I settled for a small, c-shaped cascade, and lowered my tripod to within a couple of feet to exaggerate the feature’s prominence. When the shade finally arrived, the dynamic range instantly became a non-factor for my Sony a7RIV, making the light part of my exposure decision pretty straightforward.
The motion and depth part of the equation, however, were a different story. The churning cascades created random splashes that I knew would distracting in a still image, so I chose to eliminate them with a long shutter speed to smooth the water. Even though I was now in full shade, there was too much light to achieve enough motion blur without the help of a neutral density filter, so I added my Breakthrough 6-stop dark polarizer to my Sony 24-105 f/4 G lens. This also allowed me to polarize distracting sheen on the rocks and water’s surface.
I also really wanted front-to-back sharpness, far from a sure thing with a foreground so close and background so distant (an f-stop decision I’d never trust to one of the auto exposure modes). After consulting my hyperfocal app, I stopped down to f/16, focused on the cascade just behind the nearby rock protrusion, pushed my shutter speed until my pre-capture histogram looked right (4 seconds), and clicked.
Managing Motion, Light, and Depth


, California")


")


Ion the Prize
Posted on July 18, 2021
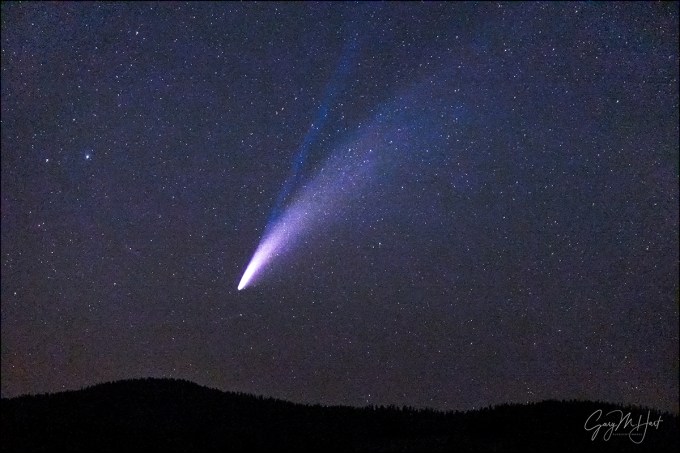
Comet NEOWISE With Ion Tail, Taft Point, Yosemite
Sony a7RIV
Sony 100-400 GM
6 seconds
F/5
ISO 12800
Comets were once harbingers of doom, so it’s likely that in times past the appearance of a bright comet coincident with a worldwide pandemic would have stoked great fear. Instead, (thanks to knowledge gained through centuries of scientific discovery) Comet NEOWISE infused a kernel of joy into an otherwise bleak year.
Spurred by the first NEOWISE anniversary earlier this month, over the previous week or two I revisited the images from last July’s four NEOWISE shoots (two in Yosemite, two at Grand Canyon) to see if I’d overlooked anything. It was great to mentally revisit those nights, which were each in their own way among the most memorable night sky experiences of my life:
- July 10, 2020: “I never dreamed it would be this bright”
- July 16, 2020: That ion tail!
- July 23, 2020: Hello Grand Canyon
- July 24, 2020: Farewell NEOWISE
On my search I found many process-worthy images, but most were fairly similar to what I already had. One exception is the image I share here. Rather than casting the magnificent comet in a costarring role with landscape and/or celestial icons (Half Dome, El Capitan, Grand Canyon, Big Dipper, Venus), NEOWISE is the one and only star of this image. And more than my other NEOWISE images, what sets this one apart is the spectacular ion tail.
Of my four NEOWISE shoots, the comet was probably at its most striking for my two in Yosemite—each for a different reason. My first NEOWISE experience came during a pre-sunrise visit to Glacier Point that coincided with the comet’s peak visibility.
While it had brightened to somewhere between magnitude 0 and 1 (the lower the magnitude, the brighter) shortly after its July 3 perihelion (closest approach to the sun), NEOWISE was too close to the sun to stand out in the against the brightening sky. But by the time of my Yosemite trip on July 10, NEOWISE had climbed out of the sun’s glow, while still shining in the magnitude 1 to 2 range—somewhere between the brightness of Spica and Polaris—making it easily the most prominent object in that part of the sky.
Six days later I returned to Yosemite, this time taking the one mile hike out to Taft Point to photograph NEOWISE above El Capitan after sunset. When the sky darkened, NEOWISE was clearly visible to the naked eye, but noticeably dimmer. But what made this night’s show special was the development of a spectacular ion tail. Faintly visible to the unaided eye, this new addition was a thing of beauty in my viewfinder and images.
I digress
I’m going to digress briefly to mention an important aspect of my photography that I’m not sure everyone shares. In the simplest possible terms, I can’t imagine photographing subjects—celestial, terrestrial, atmospheric—that I don’t understand. Rather than a personal “rule,” this need to understand my subjects is so ingrained in my personality that I didn’t fully appreciate its significance until recently.
My proclivity manifests in many ways, from obsessively buying geology books on every new location, to pouring over scientific articles explaining an obscure cloud formation, to mentally running orbital geometry in my head as I go to sleep (really). And sometimes understanding is the catalyst, inspiring me to pursue with my camera subjects that have fascinated me for years: lightning, solar eclipse, the aurora. (Still dreaming about that first tornado.)
My own internal connection between visual beauty and the natural phenomena that beauty represents probably explains why my blog is such an integral part of my photography. While I can capture nature’s visual gifts with my camera, I need my blog to connect it to the underlying processes. Another, no less important, component of blogging about my subjects is that researching and writing it often becomes as much of a learning experience for me as it is for my readers. (So thank you.)
But anyway…
If you follow me at all, you know my love of astronomy in general, and of comets in particular. So when I saw NEOWISE’s ion tail, I knew what it was, but wanted to more completely understand things like why a comet’s ion tail is always separated from its brighter dust tail, and why the ion tail appears blue in my images (is this real, a color temperature thing, or maybe some color artifact introduced in-camera?).
At risk of repeating myself, a comet is a lump of dust and ice in an extreme elliptical (it’ll be back) or parabolic (one-and-done) orbit of the sun. Most of the comet’s journey is pretty ordinary, but as it approaches the sun, things start to happen—its speed increases, and the sun’s heat starts melting the ice, freeing gas and dust molecules to form a fuzzy coma surrounding the frozen nucleus.
As the comet accelerates toward the sun, the temperature continues rising and the rate of liberated molecules increases. The mass and momentum of the comet’s nucleus allows it to continue on its orbital path, but the freed dust molecules, now under the influence of the solar wind, are nudged back, away from the sun: a tail is born.
Over time this dust tail grows and spreads, becoming the signature feature of most comets. Like most of the comet, the dust tail doesn’t create its own light, but rather is illuminated solely reflected sunlight. Varying somewhat with the composition of its molecules, the dust tail will appear yellow-white to our eyes.
But I’ve saved the best for last. Gas molecules shed by the comet’s nucleus, being lighter than dust molecules, are whisked straight back by the solar wind. Instead of fanning out like the dust tail, these gas molecules form a narrow ion tail that points directly away from the sun. Some of these gas molecules are ionized (stripped of an electron). Unlike the dust tail that shines by reflected light, the ion tail shines by fluorescence, taking on a blue color courtesy of the predominant CO (carbon monoxide) ion.
Of course there’s a time for pondering the marvels of nature, and a time for simply basking in its beauty. So as I was photographing this scene, I wasn’t thinking about all the physics and chemistry unfolding before me, I was focused on capturing the product of the underlying processes (the comet) and its relationship with the surrounding landscape. On this night most of my images were variations of NEOWISE with El Capitan and/or the nearby Big Dipper. But I’m glad I took the time to include a few frames that put this magnificent comet itself front-and-center.
Sign-up to receive my Image of the Month e-mail
Workshop Schedule || Purchase Prints || Instagram
A Comet NEOWISE Retrospective


It’s Not an Etch a Sketch
Posted on July 11, 2021
Grand Morning, Yavapai Point, Grand Canyon
Sony a6300
Sony/Zeiss 16-35 f4
.6 seconds
F/10
ISO 200
Who remembers the Etch A Sketch? For those who didn’t have a childhood, an Etch A Sketch is a mechanical drawing device that’s erased by turning it upside-down and shaking vigorously.
One of the great misconceptions among photographers (and who isn’t a photographer these days?) is that the tripod’s sole value is to eliminate camera shake. I bring this up because I frequently hear photographers brag that they rarely use a tripod anymore because image stabilization is so good—and anyway, even when stabilization won’t be enough to prevent camera shake, they can just increase the ISO.
But before you throw out your tripod, consider that digital capture has given it a new lease on life. Unlike film cameras, a digital camera gives lets us instantly review each image to check the composition, exposure, and sharpness. Photographing on a tripod, when I find something that requires fixing, rather than attempting to recreate the shot, I can refine the composition I just evaluated. Let me explain.
When I come across a scene that I deem photo-worthy, I treat my first click like a rough draft, the first step toward the final image. I stand back with my capture displayed on my LCD, critique my effort, refine it, then click again. I repeat this process until I’m satisfied. In other words, each frame becomes an improvement of the preceding frame.
Taking this approach without a tripod, I feel like I’m erasing an Etch A Sketch after each click. That’s because after each click, I have to drop the camera from my eye and extend it in front of me to review the image, essentially wiping clean my previous composition. Before I can make the inevitable adjustments to my most recent capture, I must return the camera to my eye and completely recreate the composition I just evaluated.
Before I continue, let me just acknowledge that there are indeed many valid reasons to not use a tripod. For example, you get a tripod pass if your subject is in motion (sports, wildlife, kids, etc.), you photograph events or in venues that don’t allow tripods, you have physical challenges prevent you from carrying a tripod, or even if you just plain don’t want to (first and foremost, photography has to make you happy!). But if you’re a landscape shooter who wants the best possible images, “Because now I can get a sharp enough image hand-holding” is not a valid reason for jettisoning the tripod.
For example
A few years ago I was at the Grand Canyon, looking for a scene to try out my new (just released) Sony a6300 camera. My first morning started at Mather Point about 45 minutes before sunrise, but as I often do at Mather, I took the trail along the rim to Yavapai Point (about a mile), ending up at a tree I’d been eyeing for years.
On all previous attempts at this tree, something had foiled me: either the light was wrong, the sky was boring, or there were too many people. One sunrise a few years prior, I found the tree and canyon bathed in beautiful warm light, and the sky filled with dramatic, billowing clouds—perfect, except for the young couple dangling their legs over the edge and making goo-goo eyes beneath “my” tree. They looked so content, I just didn’t have the heart to shove them over the edge (I know, I know, you don’t have to say it—I’m a saint).
But this morning, everything finally aligned for me: nice clouds, beautiful sunrise color, and not a soul in sight. I went to work immediately, trying compositions, evaluating, refining—well, you know the drill. As I worked, I started honing in on the proper balance of foreground and sky, alignment of the tree with the background, depth of field, focus point, framing—I was in the zone.
When I thought I had everything exactly right, I stood back for a final critique and realized I’d missed one thing: The tree intersected the horizon. While not a deal-breaker, it’s something I try to avoid whenever possible. To fix the problem, my camera needed to be about eight inches higher. I made the small refinement, so when the color reached its crescendo a few minutes later, my composition was ready.
Raising the camera would have been no simple task if I’d been hand-holding, but (since my Really Right Stuff TVC-24L tripod, with head and camera, elevates to about six inches above my head) it was no problem with my tripod. But the extra tripod height was just a bonus. The true moral of this story, the thing that so perfectly illustrates the tripod’s value, is that there is no way I’d have gotten all the moving parts just right with a hand-held point-and-click approach.
Of course your results may vary, and as I say, photography must must make you happy. So if using a tripod truly saps the joy from your photography, by all means leave it home (and enjoy your $3,000 Etch A Sketch). But if your photography pleasure comes from getting the absolute best possible images, the tripod is your friend.
A Grand Canyon Gallery


The Rest of the Story
Posted on July 5, 2021

Dark Night, Milky Way Reflection, Grand Canyon
Sony a7SIII
Sony 20mm f/1.8 G
ISO 12800
f/1.8
20 seconds
Last week I posted a Milky Way reflection image (and the story of its capture) from my recent Grand Canyon raft trip, and this week I’m sharing another one from the same night. What I didn’t share last week is the rather circuitous (and somewhat embarrassing) path to offering my images from that night. So here goes…
There’s a certain mystique that comes with being a professional photographer that I must say isn’t always completely deserved. I mean, sometimes it feels we’re viewed as creative savants who never make mistakes, when in reality we struggle to make things happen just like everyone else. Like you, I’ve checked my EXIF data and wondered what in the world I was thinking when I chose f/16 or ISO 800 (or whatever), left a shoot just a little early or arrived a little late, decided not to bring (or simply forgotten to pack) the right lens, not charged a battery (or brought a spare), clumsily dropped a valuable piece of precision electronics, deleted important images, or…, well, let’s just say I could go on.
Case in point: As I’ve said as recently as last week, the Milky Way may just be my favorite thing to photography on my Grand Canyon raft trip. So important in fact, that I always spend a significant amount of the trip’s precious (and strictly enforced) equipment-weight budget on a camera body and lens that will be used for nothing but the Milky Way. But one year unseasonal rain and clouds that provided spectacular photography also unfortunately completely wiped out the trip’s night shoots. Which is why I didn’t discover until returning home that instead of packing the 20mm f/1.4 dedicated night lens (at the time), I’d packed my 90mm macro (which was a similar size but didn’t really look anything like the 20mm).
In my defense, I try not to make the same mistake twice, and every subsequent trip I’ve double- and triple-checked my gear to make sure I have everything I’ll need. This year’s night setup was my brand new Sony a7SIII and relatively new Sony 20mm f/1.8 G lens, and I’m happy to report that both made it onboard and downstream, and were ready for action when we scored a prime Milky Way campsite on the trip’s third night. In fact, I managed to navigate the entire shoot that night with the right camera and lens, proper camera settings, everything in focus, plenty of space on the SD card, and without dropping a single thing. What could possibly go wrong?
The next day I was pretty excited about what I’d captured, and couldn’t wait to get home and look the images on my computer. That afternoon was hot, and we arrived at our campsite early. With the sun still quite high as we prepared to motor across the river for some quality photography, swimming, and hiking at Deer Creek Fall, out of an abundance of caution, I removed from my duffle the small case containing my a7SIII and 20mm, carefully setting it in the cool shade of a nearby rock. Do you see where this is going?
Like most mornings, the next morning was a blur of activity as we ate breakfast, packed up our campsite, and hit the river. At Havasu Creek, about 30 miles downstream, I had the sudden realization that I had no memory of returning the camera and lens to my duffle, a thought that I quickly attributed to what I call the “garage door axiom”: just because you don’t remember doing something, doesn’t mean you didn’t do it (how many times have you not remembered closing the garage door and u-turned home only to find it closed tight?). Which is why I wasn’t really that concerned at camp that night, but I figured I’d better check my duffle anyway, just in case.
I was instantly reminded that no matter how many times you check a spot for something that you know should be there but isn’t, doesn’t make it appear. My panic eventually turned to embarrassment as my mind processed the ramifications. Not only were my camera and lens gone, so were the SD cards containing the only copies of the previous night’s bounty. The Colorado River is a one-way juggernaut, so going back was not an option. And with no connectivity at the bottom of the Grand Canyon, there would be no getting the word out until we returned to civilization.
I tried consoling myself with the knowledge that the camera and lens were insured, but the rationalization the Milky Way images were the only irreplaceable loss was little comfort. And that certainly didn’t make me feel any less stupid. It gets worse…
The first thing I did upon returning to the land of connectivity was report the loss to Trent at Western River Expeditions, the director of operations who puts together my charter each year. The second thing I did was gather the information necessary to file an insurance claim. So imagine my surprise when I realized that I’d somehow forgotten to add my new a7SIII to my insurance policy. Oops.
At first Trent was hopeful that some Good Samaritan would find my gear and do the right thing, but when two weeks passed with no word, my faith in humankind started to wane. But just about the time I’d given up all hope, I got a text from Trent saying that someone had just exited the canyon and posted online that he’d found a camera across from Deer Creek Fall and was trying to find the rightful owner. The next few days were a blur of online searching, messaging, effusive gratitude, shipping, tracking, and finally more effusive gratitude when I actually had my camera, lens, and SD cards in my possession.
I don’t know if there’s a real moral to this story, other than it’s nice to be reminded that humans are generally good and most people will do the right thing when the opportunity presents itself. That, and I’m a pretty lucky guy.
Help Me Keep Track of my Gear on a Future Grand Canyon Trip
Workshop Schedule || Purchase Prints || Instagram
Grand Canyon from the Bottom Up
Click an image for a closer look, and to view a slide show.


