Eloquent Images by Gary Hart
Insight, information, and inspiration for the inquisitive nature photographer
Pandemic Lessons
Posted on November 21, 2022
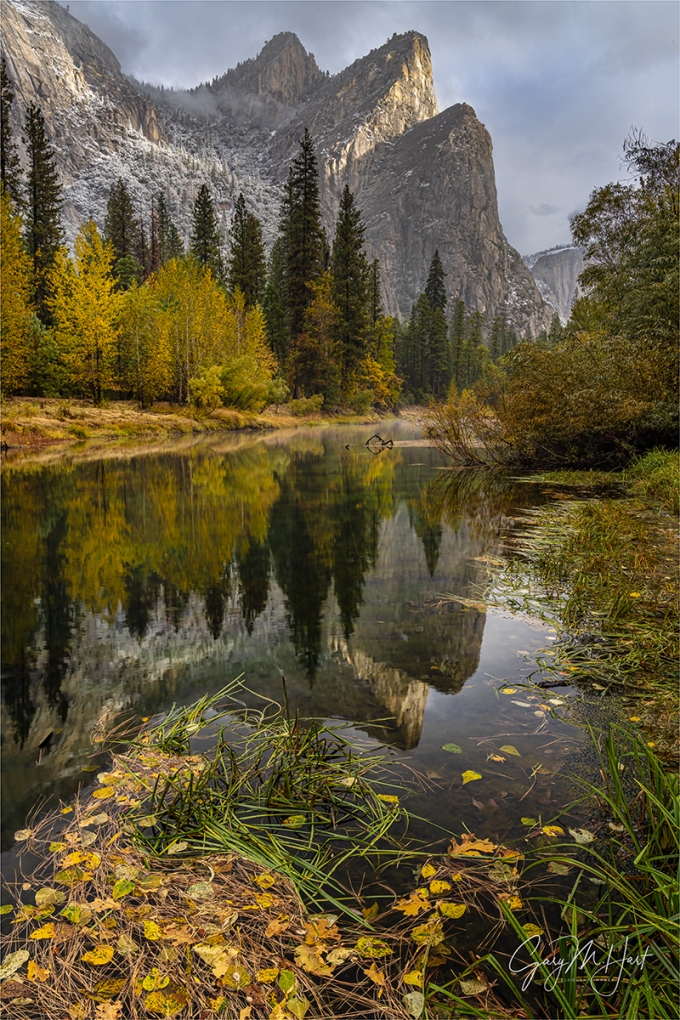
Autumn Reflection, Three Brothers, Yosemite
Sony a7RIV
Sony 24-105 G
1/13 second
F/11
ISO 100
It feels trite to wait until Thanksgiving week to detail blessings I feel year-round, but there’s nothing like a global pandemic and all its disruptions to refocus priorities. Pre-Covid Thanksgivings were an opportunity to remind myself to appreciate my life by concentrating on the big stuff like good health, a loving family, and a career that lets me travel and (almost) never feels like work. Since Covid, I’m simply grateful for the resumption of family gatherings (large and small), unrestricted travel, and (not insignificantly) the return of the bottom half of everyone’s face—things I swear I’ll never again take for granted.
Another thing I’ve grown to appreciate about my current life, also underscored by the pandemic, is the autonomy of self-employment. While losing workshops was incredibly stressful, once I convinced myself that the lost workshops were simply postponed and not cancelled, I was able to use the downtime productively—without flapping in the ever-changing breeze of government and employer workplace rules.
I do have to admit that sometimes the idea of a 9-to-5 job with weekends and paid vacations sounds mighty good (I’m speaking in very general terms and don’t mean to offend anyone pinned to a cubicle 10 hours per day just to pay the bills—I’ve been there), but the bottom line is that I do love the flexibility of having complete control of my schedule.
When I left the 9-to-5 world to pursue this crazy passion more than 15 years ago, the vanished safety net was a great motivator—I was only as successful as the next art show (which I no longer do) or photo workshop. Weekends? Holidays? Irrelevant. Back then, the closest I got to a vacation was when my wife and I traveled to scout for a new workshop. And alarm clocks? They’re for workshop sunrises only.
But as the years go by (is it me, or is time moving faster?), I’ve come to truly value my freedom—in no small part because I’ve learned how to manage it. Today I can look at my calendar and, if nothing’s there, do whatever I want. And while that might mean cramming the things that must be done into times when others might be in their recliner watching HBO, or sunbathing at the beach, it’s 100 percent my choice and I love it.
The pandemic restrictions also helped me realize that I may have even started to take for granted my home that’s close enough to Yosemite that I can drive there and back in a day. To prevent this in the past, each time I enter the park I’ve always tried to imagine I’m viewing it for the first time, but since the pandemic I’ve been doing this with renewed focus and appreciation and it feels good.
An under-the-radar revelation when my workshops resumed was how much I missed the people. I knew I missed my workshop students, but it surprised me how much I enjoyed their return. This month’s Yosemite Fall Color and Reflections group, a wonderful blend of humor and enthusiasm that made my job easy, did nothing to dispel my enthusiasm.
Since there was a little bit of weather during most of the workshop (nice clouds, a little rain and snow), I deviated from my typical schedule, one day delaying my normal midday break when the conditions were too good to stop, and throughout the workshop adjusting my visits to other locations to account for the special conditions.
The fall color and reflections were in fact spectacular as advertised, but with the waterfalls pretty much their normal autumn dry (Bridalveil Fall was a trickle, Yosemite Falls was just a wet stain with no visible water flowing), we turned to Yosemite’s monoliths for background and reflection subjects.
Perhaps Yosemite’s most underrated granite feature is the Three Brothers. While technically not a monolith (a triolith?), the Three Brothers—Lower Brother, Middle Brother, and… (go ahead, guess)…, wrong(!), it’s Eagle Peak—is to my eye one of Yosemite’s most striking features. Nevertheless, despite its towering presence above the heart of Yosemite Valley, many Yosemite visitors never see the Three Brothers. That’s because when viewed from the east, Three Brothers looks an ordinary granite wall that just kind of blends into the scenery, and from most west-side vantage points, it’s blocked by El Capitan. And nowhere in the valley is Three Brothers clearly visible without a small effort (you can’t just pull into a vista and hop out of the car to view it.)
So it’s always fun to walk my groups out to this spot on the Merced River for their first look at Three Brothers. Even here, with the view dominated by El Capitan, I sometimes need to point upstream to the Three Brothers and let them know this will be their only opportunity to photograph it.
On this chilly morning earlier this month we started at the spot with the best El Capitan view (least obstructed by trees) and a decent Three Brothers view. I told the group that about 100 yards downstream they’d get a better Three Brothers view and reflection, as well as a decent (partially tree-obstructed) El Capitan view. I gave them plenty of time for both spots and encouraged them to take advantage of it.
On the morning of our visit, golden cottonwoods colored the reflection that stretched from riverbank to riverbank and was fringed by a sprinkling of leaves. The sky was mostly cloudy, but every once in a while a shaft of sunlight would break through and spotlight part of El Capitan or the Three Brothers for a few seconds. Even though I come here a lot, I found these conditions were too nice to resist taking a few clicks of my own.
I was looking for leaves to put in my foreground when I found this view at the downstream vantage point. Getting out here required some serious mud sloshing (thank you waterproof boots!), but thanks to an encroaching shoreline and photobombing patch of grass, still struggled to get the entire reflection. I finally decided that by elevating my tripod to the max and planting it as far into the river as my arms could reach, I could separate Lower Brother’s reflection from the shoreline and get 2/3 of the brothers—the best I could do. My polarizer I oriented to remove the reflection from the leaves, but was still able to spare enough of the Three Brothers and trees reflection to recover it in Photoshop.
Have a great Thanksgiving! (I realize this is an America-only holiday, but I strongly encourage everyone, holiday or not, to pause from time to time to appreciate their good fortune, whatever it might be.)
Epilogue
I’m also thankful for heated seats and noise cancelling headphones.
Yosemite’s Monoliths
Click any image to scroll through the gallery LARGE


Variations on a Scene
Posted on November 14, 2022
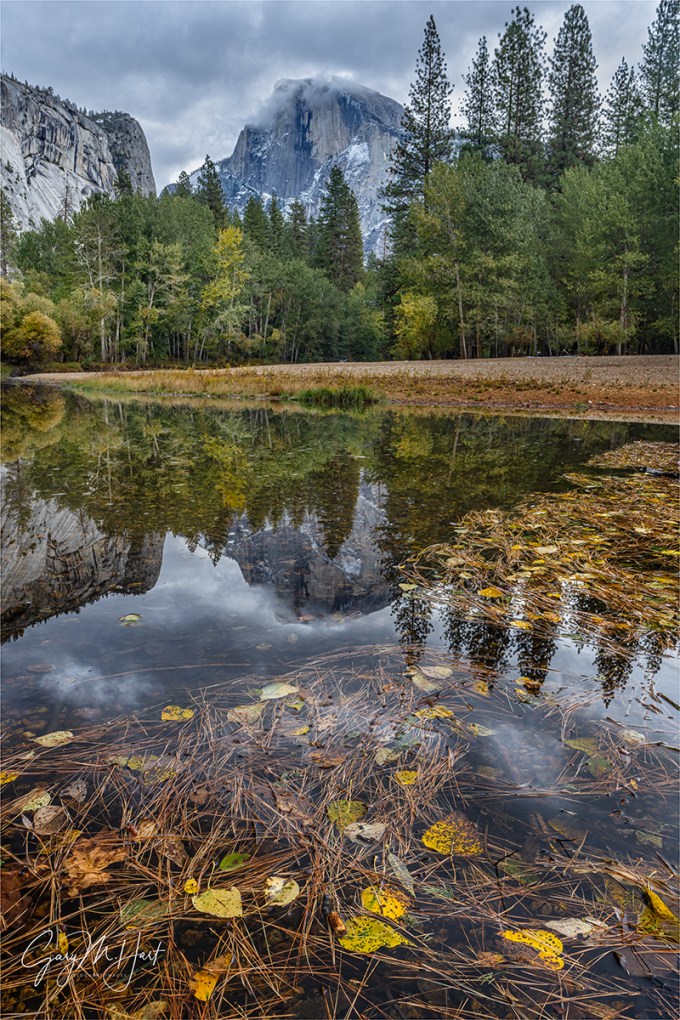
Autumn Leaves and Reflection, Half Dome, Yosemite
Sony α1
Sony 16-35 f/2.8 GM
1.3 seconds
F/11
ISO 100
One million words
January 2023 will mark the start of my (more or less weekly) Eloquent Nature blog’s 13th year. Not counting the 30 or so sporadically created Photo Tips articles, today’s post will be number 710. Doing the math, that actually turns out to be more than 1 blog post per week; at 1500 words per post (a conservative estimate), I’ve written more than 1 million words. Yikes.
According to WordPress, I have nearly 40,000 followers, but so far have resisted the urge to monetize my creation. I have nothing against money (I in fact kind of like it), but haven’t yet found a way to generate dollars from my blogging effort without detracting from the page or cheapening the visitors’ experience. (So, you’re welcome.)
But my motives aren’t entirely altruistic. Writing about creativity and inspiration each week encourages introspection that has given me a clearer understanding of myself and the creative process. And my (obsessive) desire to understand my subjects has cause me to research and ponder countless topics that might otherwise have been off my radar.
My drive to write just seemed to happen organically. I remember in first or second grade, each Monday we’d be assigned a list of spelling words (am I dating myself, or do they still do that?) to learn for the spelling test that always came on Friday. To help us learn that week’s words, the week’s homework assignment was to a create “spelling sentences,” one for each word. Instead of spelling sentences, I would write spelling stories that used every one of a the week’s words—I can’t explain why, except that I thought it was fun.
And ever since, whether it was in school or at work, I somehow became the designated writer—not necessarily because I was better at it, more because I was the most willing to do it. From there it wasn’t much of a leap for that willingness to write to become part of my job description. Eventually I became a tech writer for a large Silicon Valley tech company.
I’ve somehow managed to avoid the trap that befalls many creatives, where merely attempting to monetize their passion robs them of its joy. And I feel extremely lucky to have two creative pursuits, photography and writing, that give me great pleasure and synergistically combine to support me financially.
I’m thinking about this because I’ve decided to (slightly) change my blogging schedule, and I’ve found that a surprising number of people seem to notice when my weekly post is late, even by just a day. (Nothing abusive, more like occasional mild disappointment.) Of course it very much pleases (and surprises) me to hear that people actually look forward to my posts and actually read them.
So what’s this big change? For years my personal commitment was to post a new blog each Sunday. I’ve actually become pretty good at meeting this goal, but as my wife recently pointed out, this commitment pretty much blows up our weekend. Since we both work from home, on schedules entirely of our own making, weekends are really just a state of mind for both of us (there’s a reason we’ve each set our watches to display the day of the week)—I never considered our lost weekends a big deal. But I do have to admit that it would be nice to be a little more in sync with the rest of the world’s weekend state of mind, and have therefore made the radical decision to move my weekly blog day to, wait for it… Monday. Whoa.
(Only a writer would come up with 500 words explaining something that could have been said in 10 words: Effective this week, new blog posts will appear on Mondays.)

Autumn Leaves and Reflection, Half Dome, Yosemite
So anyway
If you’re still with me (thank you), you’ve probably already forgotten about the image at the top of this post. It’s another product of last week’s incredibly rewarding Yosemite Fall Color and Reflections photo workshop. Rewarding because it was a great group that very much deserved the wonderful photography we enjoyed: nice clouds throughout, a couple of clearing storms, a colorful sunrise (not as common in Yosemite as you’d think), (only) one morning of bright sunlight that came just as we were in the perfect spot for it (Cook’s Meadow elm tree, if you must know), and even a little snow.
And what’s a “fall color and reflections” workshop without actual fall color and reflections? This year’s Merced River was its usual low and slow reflective self, and the fall color was just starting to peak. So yeah, a pretty good week.
The workshop’s final shoot was at one of my favorite Yosemite Valley Half Dome views, just upriver from Sentinel Bridge. I photograph here a lot. A. Lot. So much that I rarely get out my camera when I’m with a group. But I made an exception this time because I liked the clouds hovering around Half Dome, the light was just so darn nice, and I found a foreground I could work with.
Finding unique images at frequently photographed locations is usually some combination of special conditions and/or a new foreground. The conditions this evening, while not spectacular, were definitely good, and I was able to combine that with a static pool in the Merced that had accumulated a colorful assortment of leaves and pine needles. Dropping my tripod/camera to about 2 feet above the ground, I eliminated a large empty gap between the leaves and Half Dome’s reflection to make my foreground about nothing but the best stuff.
Because the group was my priority, after finding my composition, I just left the tripod/camera in place while I worked with them, returning every 5 or 10 minutes to fire off a handful of frames. The clouds around Half Dome were changing rapidly, so even though my composition didn’t change (at all), each session gave me something a little different.
The only other thing that changed with each click was my polarizer orientation. This was one of those catch-22 conundrums where dialing up the reflection with my polarizer also dialed up the reflective (color robbing) sheen on the floating leaves, and brightened the water on which the leaves floated (reducing the contrast between the leaves and their background). Dialing the reflection down to maximize the color of the leaves and blacken the water also nearly erased the Half Dome and clouds reflection.
So with each visit to my camera, I fired at least one frame with the reflection maximized, another with it minimized, and a couple somewhere in between. I found that I could in fact hit a midway point with the polarizer that spared most of the reflection beyond the leaves (Half Dome and the clouds), and reduced most of the reflection on and around the leaves.
-

- Autumn Snow, Half Dome Reflection, Yosemite
-

- Autumn Snow and Reflection, Half Dome, Yosemite
-

- Autumn Reflection, Half Dome, Yosemite
I won’t pretend that I’ve created a brand new take on this frequently photographed view, but I am pretty pleased to have found a new variation on one of my favorite scenes.
See you next Monday…
Yosemite Fall Color and Reflections
Click any image to scroll through the gallery LARGE


Long Shot
Posted on October 24, 2022

Aspen, Lundy Canyon, Eastern Sierra
Sony 𝛂1
Sony 100-400 GM
ISO 400
f/5.6
1/30 second
Imagine you have a guitar and want to make music your career. Since Eric Clapton is your favorite artist, and “Let It Rain” is your favorite song, you you work hard until you can play it perfectly. But wait—before you move on to “Layla,” let me suggest that your best path to musical fame and fortune is not to replicate the works others, no matter how great they are. (Also, there’s a reason Duane Allman isn’t answering your calls.)
Using Eric Clapton as a model for your music is fine—the more you listen to Clapton, the more your guitar playing will be influenced by his creativity and craftsmanship. But at some point you need to choose between carving your own musical path, or languishing as a cover artist.
Make the world your own
The same applies to photography. In my photo workshops I encounter many people who have travelled great distances to duplicate a photo they’ve seen online, in a book, or in a print somewhere. I certainly understand the desire to create your own version of something beautiful, and I can’t say that my portfolio doesn’t contain its share of photography clichés—but, and I can’t emphasize this too strongly, if you must photograph something exactly as it’s been photographed before, make that recreation is your starting point, not your ultimate goal.
Once you’ve captured your “icon” (that word is a cliché itself) shot, take a breath and spend a little more time with your scene. Identify what draws your eye and ways to emphasize it. Look for alternate foreground and background possibilities (move around), seek unique perspectives (move around some more), tweak your exposure variables to experiment with depth and motion. If your first inclination was to shoot horizontal, try vertical, and vice versa.
It also helps to remove your camera from the tripod and pan slowly, zooming in and out as you go until something stops you (don’t forget to return to the tripod before clicking). Even if nothing immediately jumps out, I promise that the simple act of slowing down and spending time with a scene will reveal overlooked secrets that might spur further creativity.
Going long
One of the easiest ways to stretch your style is taking lens choice off autopilot. The expansiveness of most landscape scenes almost begs for a wide angle lens that includes it all, but if your goal is to create something rather than covering what’s already been done, consider a telephoto lens for your landscapes.
I sometimes catch myself automatically reaching for a wide lens, only going to a telephoto when I see a specific composition that requires one. But I’ve learned that those times when I’m struggling to find a shot, the easiest way to reset my creative instincts in the field is often to simply view the scene through a telephoto lens, just to see what my wide-angle bias might be missing.
If telephoto vision doesn’t come naturally to you in the field, you can train your eye in the comfort of your own home by opening any wide angle image in Photoshop (or your photo editor of choice), setting the crop tool to 2/3 aspect ratio (to match what you see in your viewfinder), and see how many new compositions you can find. (I’m not suggesting that you shoot everything wide and crop later—this crop tool suggestion is simply a method to train your eye.) But whether you do it in the field, or later in Photoshop, once your eye gets used to seeing in telephoto, you’ll find virtually every scene you photograph has telephoto possibilities you never imagined were there.
Still not convinced? In addition to providing a fresh perspective, telephoto lenses offer undeniable, tangible advantages in landscape photography:
- Bigger subject: Bigger isn’t always better, but there’s often no more effective way to emphasize your subject than to magnify it in your frame.
- Isolate: By zooming closer, you can banish distractions and unwanted objects to the world outside the frame, distilling the scene to its most essential elements.
- Highlight the less obvious: Sometimes a scene’s compelling, but more subtle, qualities are overwhelmed by the cacophony of dramatic qualities that drew you in the first place. By all means, shoot the grand drama that drew you, but take the time to discover the smaller stuff that’s there.
- Selective focus: The longer your focal length, the shallower your depth of field. One of my favorite ways to emphasize a subject that might otherwise be overlooked is to render it as the only sharp object surrounded by a sea of soft color and shape.
About this image
I love aspen. Not only are they beautiful trees, they’re fascinating subjects. For example, did you know that a stand of aspen is actually a single organism connected by one common, extensive root system? In other words, each trunk that we identify as an individual tree is in fact part of (and genetically identical to) every tree surrounding it.
A single aspen stand (known, appropriately enough, as a “clone” of aspen), can be tens of thousands of years old. The oldest and largest aspen clone, in Utah’s Fishlake National Forest, is the oldest, largest living organism on Earth (much older and larger than any of the far more heralded bristlecone or sequoia trees).

Aspen Carpet, Lundy Canyon, Eastern Sierra (2021)
On last year’s visit to Lundy Canyon, I went exploring the aspen clone on the trail to Lake Helen with my Sony 12-24 GM, seeking to capture the sturdy trunks emerging from a gold-carpeted forest floor (image on the right).
This year, looking for something different, I went at this same aspen clone with my Sony 100-400 GM lens (on my Sony α1), trying first to isolate a single leaf against the colorful background. After a few unsatisfying attempts, I turned my attention to the aspen trunks, looking for a way to emphasize their stark whiteness, papery texture, and protruding knots.
It took a while, but I finally found a tree that offered the combination of separation and background I was looking for. There was nothing especially distinctive about the tree I found, but it displayed a healthy white bark, a prominent knot to anchor my frame, and was separated enough from the surrounding trees that I could get it perfectly sharp, while significantly softening its neighbors.
I started with vertical compositions, but as soon as I switched to horizontal I knew that’s how I wanted to handle this scene. With that determined, I spent the rest of my time making micro-adjustments to my position and focal length, looking for the perspective and framing that gave me the absolute minimum merging of trunks. I also experimented with a variety of focal lengths and f-stops before deciding that I liked the absolute softest background best. I shot the image I share today at nearly 400mm and f/5.6 (wide open).
While I started this post writing about creating unique images, I know I’m not the first person to photograph aspen like this. (Nor do I mean to imply that I’m the Eric Clapton of landscape photography.) But I do feel it’s important for all photographers, myself included, to constantly seek fresh takes on old subjects by pursuing the qualities that move them, and experimenting with new ways to reveal them.
Workshop Schedule || Purchase Prints || Instagram
Long Shots
Click any image to scroll through the gallery LARGE


")


, California")
Shooting the Light Fantastic
Posted on December 5, 2021
Autumn Reflection, Cathedral Rocks, Yosemite
Sony a7RIV
Sony 24-105 G
2 seconds
F/11
ISO 100
Blue sky may be great for picnics and outdoor weddings, but it makes for lousy photography. To avoid boring blue skies, flat midday light, and extreme highlight/shadow contrast, landscape photographers usually go for the color of sunrise and sunset, and low-angle sunlight of early morning and late afternoon.
Of course the great light equalizer is clouds, which can soften harsh light and add enough texture and character to the sky, making almost any subject photographable—any time of day. Sadly, clouds are never guaranteed, especially here in California. Fortunately, all is not lost when the great clouds and light we hope for don’t manifest.
Spending a large part of my photography time in Yosemite, over the years I’ve created a mental list for when to find the “best” cloudless-sky light on Yosemite’s icons: for Half Dome, Bridalveil Fall, and Cathedral Rocks it’s late afternoon through sunset; El Capitan is good early morning, while Yosemite Falls is best a little later in the morning. And then there are seasonal considerations: Half Dome at the end of the day is good year-round, but Bridalveil Fall and Cathedral Rocks are much better from April through September; while El Capitan gets nice morning light year-round, it also gets good late light from October through February; and while the best light on Yosemite Falls happens in winter, that doesn’t usually coincide with the best water, which comes in spring (unless you’re lucky enough to get a lot of early rain, like we got this autumn).
But even when the sun’s up and the sky is blank, all is not lost. In those situations I head to locations I can photograph in full shade. Yosemite Valley’s steep walls help a lot, especially from November through February, when much of the valley never gets direct sun.
Following our sunrise shoot on the first morning of last month’s Yosemite Fall Color photo workshop, I took my group to El Capitan Bridge to photograph the first light on El Capitan. But as nice as that El Capitan first light was, on this morning I couldn’t help notice the downstream view of Cathedral Rocks across the bridge. With everything on that side in full shade, this downstream scene wasn’t as dramatic as the sun-warmed El Capitan, but the soft, shadowless light was ideal for the colorful trees reflecting in the Merced River.
After encouraging everyone in the group not to check out this downstream view, I went to work on the scene. If the sky had been more interesting, I’d have opted for my Sony 16-35 GM lens to include all of Cathedral Rocks, more trees, lots of reflection, and an ample slice of sky. But the sky this morning was both bright and blue (yuck), so I chose the Sony 24-105G lens for my Sony a7RIV to tighten the composition.
Before shooting, I actually walked up and down at the railing quite a bit, framing up both horizontal and vertical sample compositions, until I found the right balance of granite, trees, and reflection. Because the air was perfectly still, I didn’t need to worry about movement in the leaves, which enabled me to add my Breakthrough 6-stop Dark Circular Polarizer for a shutter speed long enough the smooth some of the ripples in the water.
I guess the lesson here is the importance of understanding and leveraging light. And all this talk about light inspired me to dust off my Light Photo Tips article—I’ve added the updated and clarified version below (with a gallery of images beneath it).
Light

Three Strikes, Lightning and Rainbow from Bright Angel Point, Grand Canyon
Good light, bad light
Photograph: “Photo” comes from phos, the Greek word for light; “graph” is from graphos, the Greek word for write. And that’s pretty much what photographers do: Write with light.
Because we have no control over the sun, nature photographers spend a lot of time hoping for “good” light and cursing “bad” light—despite the fact that there is no universal definition of “good” and “bad” light. Before embracing someone else’s good/bad light labels, let me offer that I (and most other serious photographers) could probably show you images that defy any good/bad label you’ve heard. The best definition of good light is light that allows us to do what we want to do; bad light is light that prevents us from doing what we want to do.
Studio photographers’ complete control of the light that illuminates their subjects, a true art, allows them to define and create their own “good” light. On the other hand, nature photographers, rely on sunlight and don’t have that kind of control. But knowledge is power: The better we understand light—what it is, what it does, and why/how it does it—the better we can anticipate and be present for the light we seek, and deal with the light we encounter.
The qualities of light
Energy generated by the sun bathes Earth in continuous electromagnetic radiation, its wavelengths ranging from extremely short to extremely long (how’s that for specific?). Among the broad spectrum of electromagnetic solar wavelengths we receive are ultraviolet rays that burn our skin (10-400 nanometers), infrared waves that warm our atmosphere (700 nanometers to 1 millimeter), and the visible spectrum that we (and our cameras) use to view the world—a narrow range of wavelengths between ultraviolet and infrared with wavelengths that range between 400 and 700 nanometers.
When all visible wavelengths are present, we perceive the light as white (colorless). But when light interacts with an object, the object absorbs or scatters some of the light’s wavelengths. The amount of scattering and absorption is determined by the interfering object’s properties. For example, when light strikes a tree, characteristics of the tree determine which of its wavelengths are absorbed, and the wavelengths not absorbed are scattered. Our eyes capture these scattered wavelengths and send that information to our brains, which translates it into a color.
When light strikes a mountain lake, some is absorbed by the water, allowing us to see the water. Some light bounces back to the atmosphere to create a reflection. The light that isn’t absorbed or reflected by the water light passes through to the lakebed and we see whatever is on the lake’s bottom.
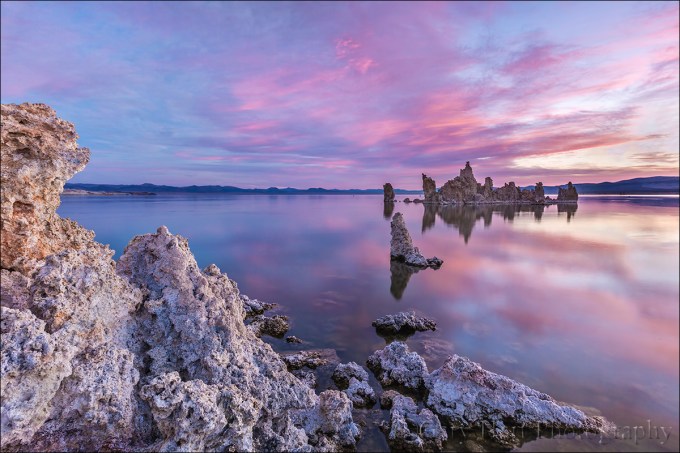
This vivid sunrise was reflected by the glassy surface of Mono Lake, but just enough light made it through to reveal the outline of submerged tufa fragments on the lake bed.
Let’s get specific
Rainbows
For evidence of light’s colors, look no farther than the rainbow. Because light slows when it passes through water, but shorter wavelengths slow more than longer wavelengths, water refracts (bends) light. A single beam of white light (light with an evenly distributed array of the entire visible spectrum) entering a raindrop separates and spreads into a full range of visible wavelengths that we perceive a range of colors. When this separated light strikes the back of the raindrop, some of it reflects: A rainbow!

Under the Rainbow, Colorado River, Grand Canyon
Blue sky
When sunlight reaches Earth, the relatively small nitrogen and oxygen molecules that are most prevalent in our atmosphere scatter its shorter wavelengths (violet and blue) first, turning the sky overhead (the most direct path to our eyes) blue. The longer wavelengths (orange and red) don’t scatter as easily continue traveling through more atmosphere—while our midday sky is blue, these long wavelengths are coloring the sunset sky of someone to the east.
In the mountains, sunlight has passed through even less atmosphere and the sky appears even more blue than it does at sea level. On the other hand, when relatively large pollution and dust molecules are present, all the wavelengths (colors) scatter, resulting in a murky, less colorful sky (picture what happens when your toddler mixes all the paints in her watercolor set).
Most photographers (myself included) don’t like blank blue sky. Clouds are interesting, and their absence is boring. Additionally, when the sun is overhead, bright highlights and deep shadows create contrast that cameras struggle to handle. That means even a sky completely obscured by a homogeneous gray stratus layer, while nearly as boring as blue sky, is generally preferred because it reduces contrast and softens the light (more below).
Sunrise, sunset
Remember the blue light that scattered to color our midday sky? The longer orange and red wavelengths that didn’t scatter overhead, continued on. As the Earth rotates, eventually our location reaches the point where the sun is low and the sunlight that reaches us has had to fight its way through so much atmosphere that it’s been stripped of all blueness, leaving only its longest wavelengths to paint our sunrise/sunset sky shades of orange and red.
When I evaluate a scene for vivid sunrise/sunset color potential, I look for an opening on the horizon for the sunlight to pass through, pristine air (such as the clean air immediately after a rain) that won’t muddy the color, and clouds overhead and opposite the sun, to catch the color.
Overcast and shade
Sunny days are generally no fun for nature photographers. In full sunlight, direct light mixed with dark shadows often forces nature photographers to choose between exposing for the highlights or the shadows (or to resort to multi-image blending). So when the sun is high, I generally hope for clouds or look for shade.
Clouds diffuse the omni-directional sunlight—instead of originating from a single point, overcast light is spread evenly across the sky, filling shadows and painting the entire landscape in diffuse light. Similarly, whether caused by a single tree or a towering mountain, all shadow light is indirect. While the entire scene may be darker, the range of tones in shade very easily handled by a camera.
Flat gray sky or deep shade may appear dull and boring, but it’s usually the best light for midday photography. When skies are overcast, I can photograph all day—rather than seeking sweeping landscapes, in this light I tend to look for more intimate scenes that minimize or completely exclude the sky. And when the midday sun shines bright, I look for subjects in full shade. Overcast and shade is also the best light for blurring water because it requires longer shutter speeds.
Another option for midday light is high-key photography that uses the overexposed sky as a brilliant background. Putting a backlit subject against the bright sky, I simply meter on my subject and blow out the sky.
Leveraging light
Whether I’m traveling to a photo shoot, or looking for something near home, my decisions are always based on getting myself to my locations when the conditions are best. For example, in Yosemite I generally prefer sunset because that’s when Yosemite Valley’s most photogenic features get late, warm light. Mt. Whitney, on the other side of the Sierra, gets its best light at sunrise, and I prefer photographing the lush redwood forests along the California coast in rain or fog. Though I plan obsessively to get myself in the right place, in the best light, sometimes Nature throws a curve, just to remind me (it seems) not to get so locked in on my subject and the general tendencies of its light that I fail to recognize the best light at that moment.
The Light Fantastic
Click an image for a closer look, and a slide show.


Stop the Car!
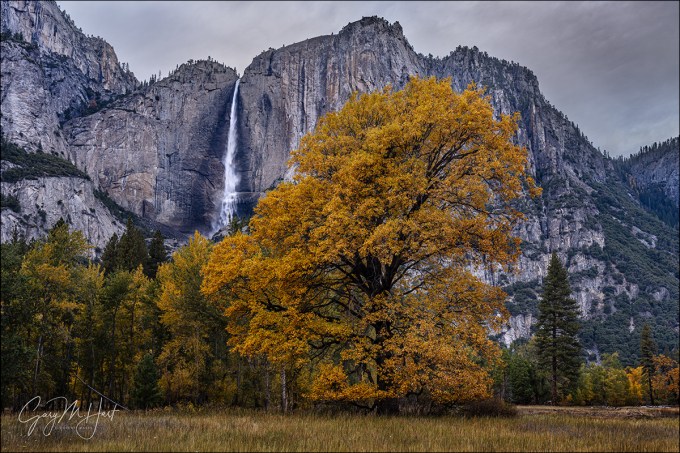
Posted on November 21, 2021
Autumn Surprise, Upper Yosemite Fall, Yosemite
Sony a7RIV
Sony 24-105 G
1/5 second
F/11
ISO 100
Nature photography is all about identifying and creating relationships—between subjects, or between subjects and their environment. The relationships in some of my images require meticulous planning to align a predetermined foreground subject with a celestial feature like the Milky Way or a rising/setting moon. Other relationships happen when I travel to combine a beloved location like Yosemite with natural phenomena like fresh snow or fall color. And then there are those fortuitous “stop the car!” moments, convergences of time and place that are the product of alert scrutiny and quick reaction.
This image falls into the third, “stop the car!”, category, with maybe a little of the second, location/natural-phenomena thing—because I did definitely schedule my Yosemite Fall Color and Reflections photo workshop to coincide with the moving target of Yosemite’s fall color peak, and this year it worked out perfectly. But what I couldn’t have anticipated was a historic storm dowsing Yosemite with over six inches of rain one week before the workshop, creating spring flow in the falls that just begged to be photographed with the ubiquitous autumn foliage.
My group found this scene on the workshop’s first evening. Driving toward our sunset destination, we popped out of the forest and were treated with our first views of Yosemite Falls. I’d timed our departure from our prior shoot at Tunnel View to allow sufficient time at our sunset destination, but when I saw this towering oak covered crown-to-base with golden leaves, I slowed instantly, driving slowly with one eye on the tree until it aligned with Upper Yosemite Fall. I told everyone this was a bonus stop, and every minute we spent here would be a minute we couldn’t spend at the sunset spot, but got no complaints. And a quick look at the thick clouds told me sunset color was unlikely this evening anyway.
There was also a stand of yellow cottonwoods just left of this tree, providing even more compositional possibilities. Feeling a little less rushed, I encouraged everyone to move around, reminding them that they had complete control of the trees relationship with the fall. A couple of people wandered up the boardwalk over the meadow to the river, but most of the group stayed right on the sidewalk and worked on some version of what you see here.
I grabbed my tripod and Sony a7RIV with the Sony 24-105 (I have two a7RIVs and keep each loaded with one of my two most frequently used lenses, the aforementioned 24-105 and the Sony 16-35 GM) and started with a wider composition that framed Upper Yosemite Fall with the colorful cottonwoods and oak. But going that wide meant more sky and meadow than I wanted, so I soon whittled my composition down to just the oak and waterfall. My first frames had the fall to the left of the tree, but later I moved a little bit up the road for some frames with their positions reversed. This is one of the earlier ones.
For this shot I was careful to position myself so the fall dropped into a notch in the tree’s crown, moving back enough to ensure separation between the two. I also made sure the tree didn’t jut into the sky—I find it jarring when a foreground subject is cut by the horizon and try to avoid it when possible. Other compositional considerations were how much sky and meadow to include. While I liked the brooding clouds, I decided that they didn’t offer enough character to merit a lot of frame real estate. Similarly, I thought the texture in the meadow was fine (it wasn’t a negative), but didn’t think it deserved any more of my frame than the sky. So I composed to minimize the sky and meadow, using them as more of a frame for the top and bottom of the scene. And finally, I took care to keep the brilliant yellow tree on the distant right away from the edge of my frame. With low contrast and an entire scene at infinity for my focal length and f-stop, exposure and focus were easy.
Relationships
Click an image for a closer look, and to view a slide show.


Every Picture Tells a Story
Posted on November 14, 2021

Autumn Evening, El Capitan, Yosemite
Sony a7RIV
Sony 24-105 G
1/15 seconds
F/10
ISO 100
Let’s have a show of hands: How many of you have been advised at some point in the course of your photographic journey to “tell a story with your images”? Okay, now how many of you actually know what that means? That’s what I thought. As good as the “tell a story” advice is (it is indeed), many photographers, with the best of intentions, parrot the advice simply because it sounded good when they heard it. But when pressed for details, are unable to elaborate.
Telling a story with a photo is probably easier when photographers can physically stage subjects and light to suit their objective (an art in itself), or in journalistic photography intended to distill the the essence of an instant by connecting it to an easily inferred chronology: a homeless man feeding his dog, dead fish floating in the shadow of belching smokestacks, or a wide-receiver spiking a football in the end zone.
This isn’t to say that we landscape photographers can’t tell stories with our images, or that we shouldn’t try. Nor does it mean that any one photographic form is inherently more or less creative than another. It just means that the rules, objectives, advantages, and limitations differ from form to form. Nevertheless, simply advising a landscape photographer to tell a story with her images is kind of like a baseball coach telling a pitcher to throw strikes, or a teacher instructing a student to spell better. Okay, fine—now what?
Finding the narrative
First, let’s agree on a definition of “story.” A quick dictionary check reveals that a story is “a narrative, either true or fictitious … designed to interest, amuse, or instruct….” Okay, that works.
The narrative part is motion. Your pictures need it. Narrative motion starts with a connection that grabs a viewers, pulling them into the frame, then compelling them to stay with visual motion that moves their eyes through the frame, providing a path to follow and/or a place to land. Put simply, the viewer needs to know what they’re supposed to do in the image.
While narrative motion happens organically in media consumed over time, such as a novel (in the mind’s eye), movie, or video, it can only be implied in a still photograph. And unlike the staged or journalistic photography mentioned above, landscape photographers are tasked with reproducing the world as we find it, in a static medium—another straitjacket on our narrative options. But without some form of narrative motion, we’re at a dead end story-wise. What’s a photographer to do?
Photography as art
Every art form succeeds more for what happens in its consumer’s mind than for what it delivers to the consumer’s senses. Again: Every art form succeeds more for what happens in its consumer’s mind than for what it delivers to the consumer’s senses. A song that doesn’t evoke emotion, or a novel that doesn’t paint mental pictures, may entertain but is soon forgotten.
Just as readers of fiction unconsciously fill-in the visual blanks with a mental visualization of a scene on the page, viewers of a landscape image will fill-in the narrative blanks with the personal stories the image inspires. In other words, an image should offer a place for the viewer’s own story to unfold.
Of course the story we’re creating isn’t a literal, “Once upon a time” or (with all due respect to Snoopy) “It was a dark and stormy night” story. Instead, the image we make must connect with our viewers’ stories to touch an aspect of their world: revive a fond memory, provide fresh insight into a familiar subject, inspire vicarious travel, to name just a few possible connections. If we offer images that tap these connections, we’ve given our image’s viewers a reason to enter, a reason to stay, and a reason to return. And most important, we’ve given them a catalyst for their internal narrative. Bingo.
Shoot what you love (not what you think your audience will love)
Think about your favorite novels. While they might be quite different, I suspect one common denominator is a protagonist with whom you relate. I’m not suggesting that immediately upon finishing that book you hopped on a raft down the Mississippi River, or ran downtown to have a dragon tattooed on your back, but in some way you likely found some personal connection to Huck Finn or Lisbeth Salander that kept you engaged. And the better that connection, the faster the pages turned.
And so it is with photography: Our viewers are looking for a connection, a sense that there’s a piece of the photographer in the frame. Because we can’t possibly know what personal strings our images might tug in others, and because those strings will vary from viewer to viewer, our best opportunity for igniting their story comes when we share our own relationship with a scene and let viewers find their own connection.
What? Didn’t I just say that it’s the viewer’s story we’re after? Well, yes—but really what needs to happen is the viewers’ sense of connection between our story and theirs. If you focus on photographing the scenes that most move you, those scenes (large or small) that might prompt you to nudge a loved-one and say, “Oooh, look at that!,” the more you’ll see and the greater your chance of establishing each viewer’s feeling of connection. Whether you’re moved by towering mountains, crashing surf, delicate wildflowers, or prickly cactus, that’s where you’ll find your best images.
Where did you get those shoes?
The cool thing is that your viewer doesn’t need to understand your story; she just needs to be confident that there is indeed a story. That’s usually accomplished by avoiding cliché and offering something fresh (I know, easier said than done).
For some reason this makes me think of Steely Dan lyrics, which rarely make sense to me, but were always fresh and I never for a second doubted that they did indeed (somehow) make sense to Donald Fagen. In other words, rather than becoming a distraction, Steely Dan’s lyrics were a source of intrigue that pulled me in and held me. So when I hear:
I stepped up on the platform
The man gave me the news
He said, You must be joking son
Where did you get those shoes?
I’m not bewildered, I’m intrigued.
These lyrics aren’t trying to tap my truth, they simply reflect Donald Fagen’s and Walter Becker’s truth (whatever that might be).
Even though I usually have no idea what Steely Dan is talking about, the vivid mental picture their lyrics conjure (which may be entirely different, though no more or less valid, than your or their mental picture) allows me to feel a connection. You, on the other hand, may feel absolutely nothing listening to “Pretzel Logic,” while “I Want To Put On My My My My My Boogie Shoes” gives you goosebumps for KC and the Sunshine Band. Different strokes….
Returning from the abstract to put all this into photographic terms, the more your images are true to the world as it resonates with you, and the less you pander to what you think others want to see, the greater the chance your viewer’s story will connect with yours.
About this image

Autumn Evening, El Capitan, Yosemite
One of the things I’ve tried to do during the pandemic is make my workshop groups a little smaller, dropping down from 12 participants plus me and the photographer assisting me, to more like 8-10 participants plus me and my second photographer. Not great for my bottom line, but safer and easier to manage in this time of social distancing.
In my Yosemite Fall Color and Reflections photo workshop that wrapped up a little more than a week ago, not only did I enroll fewer students, I also had a couple of last minute cancellations that I chose not to fill after my assistant photographer had to bail too. The result was a group of 6 photographers plus me, exactly half my normal group size.
One big advantage of this downsized group was that I was able to take them to some views that I think are too small for a normal-size group—I show them where these spots are so they can go on their own, but that means I don’t get to visit.
One of these locations is the view of El Capitan in today’s image. I’ve always liked this spot for the way the Merced River guides the eye right to El Capitan, and for the trees that frame the scene. The result is a clear path for the viewer’s eye to follow, and an obvious destination for they eye to land.
This scene is nice in any season, but I find it especially nice in autumn, when the nearby dogwood flashes its extreme red, and splashes of yellow accent the towering evergreens upstream. We hit the jackpot on this visit, with the dogwood at its crimson best, and the late afternoon light warming the granite and reflecting gold in the river.
The view here is elevated about 15 (very) vertical feet above the river. Armed with my Sony a7RIV and 24-105 G lens, I planted my tripod right on the edge to eliminate a few foreground distractions, and used the dogwood to frame the right side of my scene, moving as far to the right as I could with merging the red leaves with El Capitan. Though the rich blue sky nicely complemented the sunlit granite, and I was grateful for a few wisps of clouds, I wasn’t particularly excited about the sky and decided to put the top of my frame just a little above El Capitan.
With my composition set up, I shot several frames, some with my polarizer oriented for maximum reflection, some for minimum reflections. When it was time to review and process my images from this shoot, I chose this one with the reflection dialed down because the fall color is more vivid (less affected by glare), and the subdued El Capitan reflection was bright enough, and stood out better against the polarizer-blackened water.
Workshop Schedule || Purchase Prints || Instagram
Every Picture Tells a Story
Click an image for a closer look, and to view a slide show.


")


")


Motion in Nature
Posted on November 7, 2021

Autumn Swirl, Half Dome, Yosemite
Sony a7RIV
Sony 24-105 G
20 seconds
F/16
ISO 50
As a landscape photographer, I often joke that I don’t photograph anything that moves—no wildlife, no pets, no portraits, no sports. And don’t even think about asking me to do your wedding. I’ve always been a deliberate shooter who likes to anticipate and prepare my frame with the confidence my shot will still be there when I’m ready—landscape photography suits me just fine (thankyouverymuch).
But as much as I appreciate the comfortable pace of a static landscape, the reality is that nature is in constant motion. Earth’s rotation spins the moon and stars across our night sky, and continuously changes the direction, intensity, and color of the sunlight that rules our day. Rivers cascade toward sea level, clouds scoot and transform overhead, ocean waves curl and explode against sand and rock, then vanish and repeat. And even a moderate breeze can send the most firmly rooted plants into a dancing frenzy.
Photographing motion is frustrating because a still image can’t duplicate the human experience (not to mention the technical skill required to subdue it without compromising exposure and depth). But motion also presents a creative opportunity for the photographer who knows how to create a motion-implying illusion that conveys power, flow, pattern, and direction.
While a camera can’t do what the human eye/brain do, it can accumulate seconds, minutes, or hours of light, recording a scene’s complete history in a single image. Or, a camera can freeze an instant, an ephemeral splash of water or bolt of lightning that’s gone so fast it’s merely a memory by the time a viewer’s conscious mind processes it. This is powerful stuff—accumulating motion in a long frame reveals hidden patterns; freezing motion saves an instant for eternal scrutiny.
For example
-

- Starry Night, Lake Wanaka, New Zealand
-

- Bristlecone Star Trails, Schulman Grove, White Mountains, California
When I photograph the night sky, I have to decide how to handle the motion of the stars (yes, I know it’s not really the stars that are moving). Freezing celestial motion is a balancing act that combines a high ISO and large aperture with a shutter speed long enough to squeeze every possible photon from a dark sky, but that stops before discernible streaks form. Or, I can emphasize celestial motion by holding my shutter open for many minutes, stretching the stars into parallel arcs.
-

- Electric Night, Grand Canyon Lodge, North Rim, Grand Canyon
-

- Lightning Explosion, Oza Butte, Grand Canyon North Rim
Lightning comes and goes faster than human reflexes can respond. At night, a long exposure can be initiated when and where lighting might strike, recording any bolt that occurs during the exposure. But in daylight I need a lightning sensing device like a Lightning Trigger, that detects the lightning and fires the shutter faster than I can. If I succeed, I can reveal intricate filaments of electricity my eyes missed.
Moving water is probably the most frequently photographed example of motion in nature, with options that range from suspended water droplets to an ethereal gauze. I’m always amused when I hear someone say they don’t like blurred water images because they’re not “natural.”
Ignoring the fact that it’s usually impossible to achieve a shutter speed fast enough to freeze airborne water in the best light for photographing it (shade or overcast), I don’t find blurred water any less natural than a water drop suspended in midair (when was the last time you saw that in the real world). Blurred water isn’t unnatural, it’s different.
Sometimes a long exposure can smooth distracting ripples to enhance a reflection. I often add a neutral density filter and employ this technique when I arrived at a lake or river hoping for a reflection, only to find my plan thwarted by a waves or a wind-whipped surface.

Autumn Swirl, Half Dome, Yosemite
A long exposure can also reveal patterns of motion that are too slow to discern. Which brings me to today’s image from the penultimate night of last week’s Yosemite Fall Color photo workshop
I’d guided my group through the woods to bend in the Merced River that’s usually a glassy reflection in the still autumn flow. But just a week before the workshop, a 6-inch rainfall filled the waterfalls and accelerated the normally languid Merced into a more spring-like flow. Great conditions for most of our photography, but not so much for reflections.
This Half Dome view, known to photographers but just far enough off the beaten path to discourage most tourists, is always a highlight of my Yosemite workshops. I especially like it autumn, for the colorful cottonwood just upstream, and the (usually reliable) glassy surface. This year the cottonwood delivered, but the rapid flow disturbed the mirror reflection I’m accustomed to.
No problem. I suggested to my group that an ND filter would enable an exposure long enough to flatten the water—the result wouldn’t be a mirror reflection, but the gauzy effect would create an ethereal reflection that would be both striking and distinctive.
Working individually with photographers in my group, I soon noticed small patches of foam drifting by in the flow—not just occasionally, but pretty much continuously. I knew from experience that a long exposure would blur them into parallel streaks (like star trails), especially in the darker water, and got a few people started adding this effect to their images.
Then I noticed a collection of foam patches trapped in a small zone of sheltered, (apparently) static water just a few feet upstream. While helping one of the members of the group find a composition here, it soon became obvious that this water was in fact moving, albeit too slow to see.
Once I was confident that everyone was successfully engaged with the scene, I went upstream about 20 feet and looked downstream, searching for something different than the standard view here. I ended up having a blast photographing the slow motion swirl patterns in the foam (and occasional leaf) that clearly wasn’t static, using a few trees and their reflections downstream as my background.
Finally, after shooting that scene to within an inch of its life (each frame was completely different from the previous), I returned to the more conventional upstream composition to see if I could use these swirls to create something a little different.
This was probably 10 minutes after sunset, just possibly my favorite light for photography, and now dark enough to forego the ND filter. The biggest trick here was finding a position with a view of Half Dome, the fall color, the reflection, and with enough swirls to occupy a significant part of the frame.
First, I moved upstream as far as I could move without losing Half Dome and the golden cottonwood behind the nearby trees. Next, to maximize the foreground swirls, I dropped my tripod as near to the ground as I could.
But, from this new perspective, dialing my polarizer to maximize the reflection also enhanced the sky reflection enough to nearly obliterate the foam swirls. So, with my eye on the Half Dome reflection in my viewfinder, I dialed my polarizer just far enough for Half Dome to stand out, but not so much that the water with the swirling foam and leaves lost its blackness.
Setting my Sony a7RIV to ISO 50, and dialing my Sony 24-105 G lens to f/16, enable me to keep my shutter open for 20 seconds—plenty of time to reveal the patterns of motion. A bonus was the leaves and foam flowing much faster in the main river channel, creating linear streaks that I didn’t notice until I processed the image.
Read more about photographing motion
Workshop Schedule || Purchase Prints || Instagram
Motion in Nature
Click an image for a closer look, and to view a slide show.


I Love Trees
Posted on October 31, 2021

Redwood in Autumn, Tuolumne Grove, Yosemite
Sony a7RIV
Sony 24-105 G
1/5 second
F/16
ISO 400
I love trees, and try to feature them in my images as much as possible. When I say “feature,” I don’t mean simply including trees in an image (pretty hard to avoid as a landscape photographer with an affinity for California’s foothills and mountains), I mean actually using a tree or trees as the basis for my composition.
Given my love for trees, I’m blessed to live in California, where we have many beautiful arboreal specimens, in all shapes and sizes. Sadly, when most people think about California trees, their mind usually jumps to palm trees (one of my least favorite trees and not nearly as ubiquitous in most of the state as most people believe). But when I think about California trees, I go to our foothill oaks, gnarled bristlecones, and regal redwoods.
In fact, in a state with more than its share of unique natural features, California’s giant sequoia trees stand out—both figuratively and literally. It’s no exaggeration to say that the first sight of these massive giants will drop even the most immutable jaw.
Many outside the state don’t that we have two very distinct versions of redwood in California: there’s the coastal redwood, which is also quite massive and sometimes even slightly taller than its Sierra cousin. A coastal redwood can grow up 370 feet, while the giant redwoods top out at around 300 feet. And though a mature coastal redwood’s trunk might grow to more than 20 feet wide, that’s dwarfed by the 36-foot diameter of the General Sherman giant sequoia tree in Sequoia National Park. The giant redwoods also win the longevity battle, with some living more than 3000 years, while the coastal redwoods top out at around 2500 years.
Unfortunately, many people visit California with redwoods on their must-see check list, drive up or down the coast to the nearest redwood grove, check the been-there box, and return home without even realizing they missed the even larger trees farther east. (I won’t get into the debate of which redwood experience is “better,” except to say that in my mind, the coast redwood experience is more about the mystical stillness of the grove, while the giant redwood experience is more about the mind boggling mass of individual trees.)
In my previous blog post, I wrote about my recent visit to Tuolumne Grove in Yosemite. With clouds and occasional sprinkles, conditions for photography were ideal. But on my hike down, I was so struck by the electric fall color of the dogwood (also on my list of favorite trees) and other deciduous trees, I almost didn’t make it down to the redwoods.
Thankfully, I did make it. But getting there was only half the battle because redwoods’ size makes them really hard to photograph—capturing a redwood from top to bottom requires a combination of distance and wide angle that diminishes its unprecedented mass in a photo. And to me the most impressive part of a giant redwood is that massive girth.
On this visit I concentrated on finding large trees surrounded by fall color, meandering along the half-mile loop through the grove, enjoying the peaceful ambiance while keeping my eyes peeled for a suitable composition. Every once in a while I’d set up my tripod and click a frame, but whether it was a distracting trail or fence (nothing manmade in my images), or just a less than ideal vantage point (you can’t just wander haphazardly among these shallow-rooted giants), I started heading out of the grove without feeling like I had any real keepers.
Trudging back up the hill and about to exit the grove, I came across a striking redwood, one of the largest I’d seen that day. I realized that by standing in just the right spot and pressing tightly against the low wood fence, I could frame the broad trunk with an assortment of red and yellow dogwood, ferns, and other fall foliage. I stayed here for at least 20 minutes, trying a variety of perspectives and focal lengths before finally landing on this one. (This is also about the time I discovered an especially stupid and embarrassing mistake that I promise to share in a future “Photographers are Stupid” post.)
This shoot was gratifying for many reasons, but especially because, despite my love for trees and the relatively close proximity of the giant sequoias, I have none in my portfolio. Now I do.
Bonus tip
If you love trees (especially redwoods), or just think your world might be made a little better by improving your relationship with trees (spoiler alert: it will be), drop everything you’re reading and pick up The Overstory, by Richard Powers. You’re welcome.
Workshop Schedule || Purchase Prints || Instagram
Trees (including a palm tree!)


Yosemite’s Intimate (and Underrated) Beauty
Posted on October 24, 2021

Dogwood in Autumn, Tuolumne Grove, Yosemite
Sony a7RIV
Sony 24-105 G
1/6 second
F/16
ISO 400
Yesterday I got to spend a day in Yosemite. On my drive to Yosemite, In the back of my mind I was thinking that the day’s forecast of clouds with a chance of rain would be perfect for the intimate scenes I love so much. One of my go-to spots for this kind of photography is Bridalveil Creek, but it’s closed while NPS overhauls parking and access (how much longer will this take?!). As I started considering other options, it occurred to me that a long overdue visit to Tuolumne Grove might be in order.
In Yosemite, Mariposa Grove gets most of the attention from those who want to marvel at massive redwood, and with good reason—it’s by far the largest of Yosemite’s three sequoia groves, and has the largest trees. Mariposa Grove also has the most tourist-friendly infrastructure (a “feature” partially mitigated by a recent NPS overhaul designed to reduce human impact on the sequoias and their surroundings).
Of Yosemite’s two smaller sequoia groves, Merced and Tuolumne, I’ve always been partial to Tuolumne Grove—partly because of familiarity (it’s the grove I grew up visiting because it was closer to home), but also for its intimacy, and the abundance of photogenic dogwood lining the trail to-and-from and mingling among the big trees. In fact, I’ve had better luck photographing the grove’s dogwoods than its redwoods because, well, redwoods are hard (a topic for another day).
One “problem” with photographing Tuolumne Grove (and any other redwood grove) is that it requires clouds to prevent a distracting hodgepodge of highlights and shadows that test any camera’s comfort zone, and clouds in California are relatively rare. And the difficulty of doing justice to the size of a redwood tree in a still photo probably makes me guilty of not prioritizing Tuolumne Grove. With limited time and a surplus of more heralded subjects, most of my time in Yosemite is spent elsewhere.
With the clouds really starting to settle in, after lunch I decided to make the drive up to Tuolumne Grove. While I had no illusions of great success with the redwoods themselves (but who knows?), I looked forward to exploring the forest lit by nature’s softbox and dressed in fall color.
I knew the dogwood in Tuolumne Grove would be turning its autumn red, but I had no idea that I’d find entire hillsides saturated with a kaleidoscope of peak reds, oranges, and yellows, mixed with a few shades leftover green. In fact, the trail to the grove was so beautiful, it took me more than an hour to make the one mile hike down to the redwoods.
As much I love the grand views and dramatic skies that seem to attract a lot of attention, photographing intimate views of nature is probably my favorite kind of photography. Even in Yosemite, with its collection of iconic waterfalls and granite monoliths, I’m never happier than when I’m photographing the smaller scenes that aren’t recognizable as Yosemite.
But as beautiful as the surroundings on the were trail this afternoon, I really struggled to find a composition that did it justice. Instead of insisting on a composition with the elements I consider essential to a good image (a path for the eye to follow, strong visual anchor, no distracting elements), I just pointed in the direction of anything pretty (pretty much everywhere I looked) and started clicking.
Eventually this approach led me to a large dead tree in an area scarred by a recent fire. Scrutinizing my frame, I instantly realized I’d found my visual anchor. After that, my task became mostly a matter of moving around to eliminate all signs of the nearby trail, maximize the color behind the tree, juxtapose the foreground logs into something that wasn’t a disorganized (distracting) jumble, and eliminate the bright sky visible through the trees up the hill. (Even though it was cloudy, including sky that was much brighter than the forest would have pulled my viewers’ eye away from the colorful scene that was the whole point of the image, and reminded them of the world outside my frame.)
One more thing
In my previous post I sung praises of my (Breakthrough) polarizer, but I can’t emphasize too much what a difference removing the wet sheen from the leaves in this scene did for the color. If you think a polarizer is just to darken blue sky, please do yourself a favor and try it for your next fall color shoot.
Intimate Yosemite
Click an image for a closer look, and to view a slide show.


Reflecting on the Polarizer
Posted on October 17, 2021

Aspen Autumn Reflection, Bishop Creek Canyon, Eastern Sierra
Sony a7RIV
Sony 24-105 G
1/5 second
F/16
ISO 200
Who else loves reflections? I don’t know about you, but I love photographing them, and even without a camera, I just love staring at them. Part of a reflection’s power is its ability to engage the brain in different ways than we’re accustomed: Rather than processing the scene directly, we first must mentally reassemble the reverse world of a reflection, and in the process perhaps see the scene a little differently. And in a photo, a nice reflection simply introduces a soothing calmness.
So if reflections are so great, why do I spend almost my entire photography life with a filter designed to remove reflections? I’m talking about the polarizer, which I have on nearly all my lenses and rarely remove, except at night (and maybe a small handful of other situations). But truth be told, most reflections in nature aren’t the glassy water we picture when we think of reflections, they’re a distracting sheen that create distracting glare and wash out color on rocks, foliage, and water. And that’s where the polarizers comes in.
Polarizer 101
Put simply, a polarizer removes reflections.
As powerful as today’s image processing software is, one landscape-essential filter that can’t be added after the shot is the polarizer. Valued by inexperienced photographers only for darkening blue skies, more serious photographers value their polarizers more for their ability to remove the sheen that desaturates color, hides submerged objects, and flattens texture.
Even worse than not appreciating their polarizer’s power, some photographers screw on a polarizer without understanding how it works, mistakenly believing that merely having a polarizer on their lens is sufficient. The amount of polarization a composition calls for is a creative decision that can make or break an image. And unfortunately, a mis-oriented polarizer can be worse than no polarizer.
This won’t be on the test
So what does a polarizer do?
If you’re like me, it helps to understand that a wave of light oscillates (vibrates) perpendicular to its direction of motion. A real world example of this kind of motion is the way a wave in the middle of the ocean rises and falls as it advances: while the wave moves forward, the water moves up and down.
A wave of light is much more complex than an ocean wave, oscillating in every possible direction perpendicular to its direction of motion. For example, to represent the direction of motion, imagine a string connecting a light source to the subject it illuminates. To understand the wave’s oscillation, picture the string moving not only up/down, but also left/right and every other angle perpendicular to the direction the wave moves.
And still one more way to view this motion would be to visualize a beam of light (or our string) passing through the center of a spoked wheel, where the axle would be. Each of the spoke pairs (one on each side of the light beam) would represent a direction the wave would oscillate, and there could be an infinite number of spoke pairs.
In very simple terms, polarized light is light that has all but one of its planes of oscillation removed. So returning to our spoked wheel, we’d be left only with the light that oscillates in the direction of one of the spoke pairs.
Without getting too deep (or at least any deeper) into the weeds, a polarizing filter eliminates reflections by removing the light that carries reflections back to our eyes. Polarization (reflection reduction) is most effective when your lens points 90 degrees (perpendicular) to the direction of the sun or other light source; it is least effective when the lens points directly toward or away from the sun.
Polarizers come in two flavors, linear and circular (the designation has to do with the way the polarizer achieves its effect, not the shape of the filter). For today’s digital cameras, you want to use a circular polarizer (which is almost certainly what you’ll be sold if you ask for a polarizer). Most polarizers are comprised of two connected pieces: a circular threaded frame that screws onto your lens’s threads, and an attached piece of polarizing glass (in its own circular frame) that rotates independently of threaded frame. Rotating the polarizer’s glass element relative to the fixed lens varies the orientation, and therefore the amount of polarization. You can see the polarization effect (sometimes large, sometimes small) through your viewfinder or on your live-view LCD.
What a polarizer does for you
With reflections minimized by a polarizer, pale blue sky is transformed to a deeper blue, glare is removed from rocks and foliage to reveal underlying color and texture, reflections are removed from water to expose submerged features, and clouds that were barely visible suddenly snap into prominence. Or imagine mountains reflected in a still alpine lake: As you rotate your polarizer, the reflection is replaced by rocks and leaves dotting the lakebed; keep turning and the reflection returns.
So what’s the catch?
Lost light
A polarizer costs you one to two stops of exposure, depending on the polarizer and the amount of polarization you dial in. Since aperture manages depth and is often non-negotiable, landscape photographers usually compensate for the lost light with a longer shutter speed—one more reason to use a tripod. If motion is a concern, the next best way to compensate for lost light is to increase the ISO.
Differential polarization
Because a polarizer’s effect varies with the direction of the light, and wide lenses cover a broad field of view, light arrives at different parts of a wide scene from different angles. The result is “differential polarization”: parts of the scene that are more polarized than others.
Differential polarization is particularly troublesome in the sky, appearing as an unnatural transition from light to dark blue across a single frame. This effect can often be reduced, but rarely eliminated, with careful dodging and burning in Photoshop. Better yet, avoid images with lots of (boring) blue sky.
Vignetting
A standard polarizer is comprised of a circle of polarized glass mounted in a frame that screws into, and rotates relative to, the fixed lens beneath. Most also include an outer ring with threads for attaching other filters. The field of view of ultra-wide lenses can be so great that, at their wider focal lengths, they include the polarizer’s frame: vignetting. Polarizer vignetting manifests as dark edges on your images, particularly at the corners.
Most of the best polarizer manufacturers offer a low-profile version that mitigates vignetting. Low profile polarizers are more money (oh well), usually require a special lens cap (a minor annoyance), and don’t have external threads (not an issue for me).
Me and my polarizer(s)
Always on
Since I’m all about simplicity in the field, and determining whether or not I need a polarizer and then adding or removing it as needed is more trouble than it’s worth, each lens in my bag has its own polarizer that rarely comes off during daylight hours. I remove my polarizer only when I need more light, want to use a neutral density filter (I don’t like stacking filters), or if I’m concerned about differential polarization.
But. Shooting with no polarizer is better than using an incorrectly oriented polarizer. If you’re going to follow my “always on” polarizer approach, you must be diligent about rotating the polarizer and checking its effect on each composition, or risk doing more harm than good to your image. This is especially important if you change a composition’s orientation between horizontal and vertical.
Protection
Like many photographers, I always use a filter as protection for my front lens element; unlike many photographers, I don’t use UV or skylight filters. While it’s possible to stack a polarizer atop a UV or skylight filter, I don’t. Instead, because it never comes off, my polarizer doubles as protection for the front lens element.
Given that my polarizers are in the $200 range, this gets a little expensive when a filter “takes one for the team,” but it’s cheaper than replacing an entire lens, and more desirable than stacking superfluous glass between my subject and my sensor, not to mention the vignetting stacking causes. On the other hand, I will use a graduated neutral density filter with a polarizer, because GNDs serve a specific (not superfluous) need that doesn’t disappear when a polarizer is added.
The polarizer and lens hoods
To those photographers who complain that it’s a real pain to rotate a polarizer with a lens hood in the way, I have a simple solution: remove the lens hood. I never use a lens hood. Ever. This is blasphemy to many photographers, but I hate lens hoods, which always seem to be in the way (see my “simplicity in the field” comment above). But (there’s that word again), jettisoning the lens hood must come with the understanding that lens flare is real and usually impossible to entirely correct after the fact.
When there’s a chance direct sunlight will strike my front lens element, I check to see if shielding the lens helps. With my composition ready (on my tripod!), I peer through my viewfinder and shade my lens with my hand or hat (or whatever handheld shade is handy). If shading my lens makes the scene darker and more contrasty, and/or eliminates lens flare (random fragments of light), I know I must shield my lens while exposing. Of course if the sun is in my composition, no shading in the world (or lens hood) will eliminate the lens flare.
Polarizer techniques
Polarizer on a budget
All scenes don’t benefit equally from a polarizer, and photographers on a budget can’t always afford one for every lens. If you’re only going to go with one polarizer, buy one for your largest lens, and step-up rings for each lens thread size. Or you could simply hand-hold the larger polarizer in front of the smaller lens (as long as you’re on a tripod).
Does this scene call for a polarizer?
To determine the polarizer’s effect, rotate the outer element 360 degrees as you peer through your viewfinder (or view the LCD in live-view). Often just holding the polarizer to your eye while you look in the direction of your composition and rotating it slowly is enough to determine its benefit.
Unless I’m trying to maximize a reflection, I rotate the polarizer until the scene appears darkest. If there’s no apparent change, I watch specific objects that might have a slight sheen (water, a leaf, or a rock) as I rotate the polarizer—I can almost always find some change. Shooting with a mirrorless camera, I have the benefit of a histogram in my viewfinder. Sometimes when I can’t detect a difference with my eye, I slowly turn my polarizer as I watch the histogram, looking for the histogram to shift slightly to the left (or my highlight alert “zebras” shrink). If you can’t see any change as you rotate your polarizer, you probably don’t need to worry about orienting the polarizer.
It’s not just for the sky

Autumn Reflection, North Lake, Eastern Sierra
As nice as the the effect on the sky is, it’s the polarizer’s more subtle ability to reduce glare in overcast or shade that I find irreplaceable. Peering through your viewfinder, lock your eyes on a reflective surface and rotate the polarizer. The effect is most obvious on water, or wet rocks and leaves, but even when completely dry, most rocks and leaves have a discernible sheen. As you rotate the polarizer, harsh glare is replaced by natural color and texture; continue rotating and the glare reappears.
Usually my goal is to dial in maximum polarization, but if I’m photographing a reflection, I turn the polarizer until the reflection peaks. And there’s no rule that requires you to turn the polarizer to one extreme or anther (maximum or minimum reflection). Sometimes I want a little reflection plus a little submerged lake or river detail. In these situations I rotate the outer element slowly and watch the scene change, stopping when I achieve the desired effect. In my North Lake autumn reflection scene, I was able to find a midpoint in the polarization that kept the best part of the reflection (the mountains and trees), while still revealing the submerged granite rocks at my feet.
-

Floating Leaves, Merced River, Yosemite

In the image of autumn leaves floating in the Merced River, I used my polarizer to completely dial down the reflection, creating the illusion of leaves suspended in empty space. Polarizing away the reflection also helped the leaves’ color stand out by eliminating distracting glare.
-

Redbud, Merced River

An emergency neutral density filter
A polarizer can also be used as a two-stop neutral density filter by dialing it to maximum polarization (minimum light). In this image of a redbud above the surging Merced River, even at ISO 100 and f32, I couldn’t reach the 3/4 second shutter speed that would give me the motion blur I wanted. But the two stops of light I lost to my polarizer was just enough to snow my shutter speed enough to blur the water.
If you’re serious about your photography
Use only quality polarizers; you don’t need to spend a fortune, but neither should you skimp. Not only does the quality of the optics affect the quality of your results, I’ve also seen more than one poorly made polarizer simply fall apart for no apparent reason.
I advise buying polarizers that are commensurate with your lens quality—in other words, if you have top-of-the-line lenses, it makes no sense to use anything but top-of-the-line polarizers. I use Breakthrough filters because for their quality and emphasis on customer service.
My personal recipe for using a polarizer
- (Almost) always on
- No other filters except a graduated neutral density filter, when needed
- Compose my shot and lock it in place on my tripod
- Turn the polarizer to get the effect I want
- Check for lens flare and shield if necessary
- Meter the scene
- Click
About this image

Aspen Autumn Reflection, Bishop Creek Canyon
This image is from the second of my two Eastern Sierra workshops earlier this month. Processing it reminded me of the struggle I had deciding how orient my polarizer, because in addition to the glassy water mirroring the colorful aspen across the pond, this scene also contained a lot of reflective sheen that I try to polarize away. What’s a photographer to do?
After a nice sunrise at North Lake, followed by another fall color stop a little down down the road, I set my workshop group free near this small retaining pond just downstream from Lake Sabrina (pronounced “sa-BRI-na,” BTW). There was so much happening here we could have spent hours, but a scene like this needs to be in full shade and the sun was slowly encroaching.
I spent most of my time with a few others in the group, drawn to this mirror reflection of gold aspen with parallel white trunks. After playing with a few different compositions, I ended up concentrating on a pair of leaves clinging to protruding rock as a foreground anchor. I chose a vertical composition largely to eliminate an unsightly stump jutting into the middle of the pond. Sometimes features like that can be the anchor I look for, but everyone working the scene agreed that it was more of a bulky blob than a viable visual element. The top of the frame was limited by the encroaching sunlight—any higher and I’d have had an unwieldy mix of shade and sunlight. And I put the bottom of the frame just above the muddy shore.
As soon as I identified my composition, it became apparent that my biggest problem was going to be what to do with my polarizer. This scene was all about the spectacular reflection, but the rock, leaves, and (especially) blue sky were all washed out by reflections from the bright sky overhead. If I turned my polarizer to maximize the reflection, I also maximize the sheen; turning the polarizer to minimize the sheen also significantly dulled the tree reflection.
My solution was to turn the polarizer slowly, with my eye on my view finder, watching the reflection increase, and stopping just as it reached the rock. The result was a workable compromise—not quite as flat in the close foreground as it would have been had I gone all-in with the polarization, and not quite as vivid as the reflection would have been if I’d have dialed it all the way up (minimal polarization). But my compromise gave me enough to work with in post, dodging (brightening) the “good” reflection, and burning (darkening) the “bad” reflection.
Breakthrough Filters
More Reflections
Click an image for a closer look, and to view a slide show.


