Eloquent Images by Gary Hart
Insight, information, and inspiration for the inquisitive nature photographer
2015 Grand Canyon Raft Trip: Unexpected gems
Posted on June 14, 2015

Emerald Pool, Elves Chasm, Grand Canyon
Sony a7R
Sony/Zeiss 24-70
.4 seconds
F/11
ISO 50
Before my first raft trip last year, I couldn’t help wondering about the experience of being at the bottom of Grand Canyon. My mind’s eye visualized the canyon’s immensity, the experience of being dwarfed in the shadow of mile-high walls, a towering vertical tapestry of Earth’s history. I knew I’d be overwhelmed, but I also knew there’d be aspects I hadn’t expected, the surprises that make photography so rewarding—I just had no idea of the magnitude of those surprises.
I returned this year, and continued to be surprised by what we encountered. On both trips I most certainly got my share of the large scale, overwhelming awe I expected—the best comparable I can think of is the experience of reclining beneath a dark sky and trying to comprehend the age and distance traveled contained in each pinpoint of starlight. But as is usually the when we look more closely at something (or someone), I found complexity and intricacy far beyond what I’d imagined. And so it was inside the walls of Grand Canyon, a location known for its size, that I was most awed by the small stuff I found there.
Return to Grand Canyon over many years and from the rim you’ll see little change in the walls. From a distance it’s easy to perceive these walls as a permanent, impermeable fortress, and to picture the Colorado River as an uncut ribbon that starts in Marble Canyon and terminates in Lake Mead. Pretty simple.
But get down inside Grand Canyon and you’ll soon see that it’s all about change. Navigating around house-size rocks, rafters can look up to the scar where the rock separated from the wall above and plunged into the river (just picture that!). And it doesn’t take long to recognize that virtually every rapid is the river’s reaction to rocky debris washed down from a narrow side canyon—some of the rapids predating John Wesley Powell by unknown centuries, others forming or changing in our lifetime.
The majority of these side canyons are dry most of the year, coming to life only when monsoon rain falls faster than the rock can absorb it. But what happens to the rainfall that gets absorbed? It percolates downward into an immense aquifer, a natural underwater storage tank that slowly releases its contents as springs that contribute small tributary creeks that follow a circuitous path of least resistance to etch a route down to the Colorado River. Their moist path forms green oases that stand out in complementary contrast to the arid, red surroundings.
Elves Chasm, Matkamamiba Canyon, Deer Creek Fall, Blacktail Canyon, Stone Creek Fall: Each has its own look and feel depending on the amount of water, the distance and speed at which it traveled, and the underlying geology it must work around and through. Most of these features would have been easily overlooked by anyone floating downstream, but I soon came to realize that these little treats were just a sampler of the rewards to be bestowed on anyone taking the time to look more closely. I left the canyon with the distinct impression that for every exquisite location like these we explored, we left ten comparable locations untouched.
Elves Chasm, pictured here, requires a bit of rock scrambling to reach. There’s a trail of sorts, but in several places the trail is interrupted by an inconvenient rock or ledge. Fortunately, there’s plenty to photograph along the way (it’s only a couple of hundred yards from the river), so even those who can’t make it all the way to where the waterfall tumbles into an emerald pool will find plenty to see and photograph.
Inside out at Grand Canyon
Click an image for a closer look, and a slide show. Refresh the screen to reorder the display.


2015 Grand Canyon Raft Trip: The Little Colorado
Posted on June 8, 2015

Red, White, and Blue | Little Colorado River | Grand Canyon
Sony a7R
Sony/Zeiss 16-35
1/50 second
F/11
ISO 100
“Uh, we’re going to need more time here”
Before last year’s raft trip, my relationship with the Little Colorado River was limited to the view from the Cameron Suspension Bridge on US 89: Rarely more than a muddy trickle, the Little Colorado seemed better suited as an indicator of recent precipitation than a photo destination. So last year, when Wiley (my raft trip’s lead guide) said we’d be stopping at the Little Colorado River confluence, I shrugged.
The day had been a mix of clouds and sun, great for photography. The sun was behind the clouds when we tied up on the rocks at the confluence; as I hopped off the raft, camera bags in tow, Wiley told us to be back on the raft in 45 minutes. I remember thinking, Really? Surely we can find a better spot to take advantage of this great light, but I kept my mouth shut. Expectations low, I rounded the corner and stopped like I’d slammed into a brick wall. Unable at first to process what I was seeing, I finally turned and called back to Wiley, “Uh, we’re going to need more time here.” And it was so.
So what happened?
Clearly, somewhere between Cameron and the canyon, the Little Colorado had gotten an infusion. And not just an infusion of regular old greenish-brown river water, but an infusion of mineral-laced, other-worldly turquoise water. It turns out that, after leaving Cameron, the Little Colorado carves a deep (and quite scenic) canyon, a canyon so deep that it cuts into a travertine- and limestone-laced aquifer that recharges and colors its flow. The limestone also paints the river’s bed a reflective white, further enhancing the turquoise hue. (It’s the same color, for the same reason, as the more heralded Havasu Creek.)
Do-over
Unfortunately, on that first visit, the photogenic clouds and light that had been with us all day took our arrival as its cue to move on, forcing us photograph this beautiful scene in ordinary, harsh, mid-afternoon light. On that visit, despite the extra time, I wasn’t able to capture anything that would do this magnificent spot justice. But I made plans to return, and strategized with Wiley the best way to maximize our chances for good light the next time.
Our original plan for the Little Colorado this year was a late afternoon stop on day 2, but after a windy morning, Wiley suggested stopping early at a more sheltered campsite. Though that meant not getting to the Little Colorado until the morning of day 3, the weather forecast before we departed (to the land of no weather forecasts) had called for lots of clouds and a slight chance of showers for most of the week; the clouds had been with us so far, so I crossed my fingers that they’d hang in there for us.
And hang in they did. For the hour-and-half we had there, the sun made cameo appearances but largely remained offstage. In place of the typical horizon-to-horizon blue sky, we got patches of blue mixing with rapid changing cumulus. When the sun did appear, it spotlighted individual features rather than illuminate the entire scene.
The biggest problem I had was deciding where to point my camera. Usually I identify where the best shot is and concentrate my attention there. In this case, because I couldn’t decide, I shot both upstream and down, hedging my bets with wide and tight, horizontal and vertical compositions. I know I left a lot of shots farther upstream, so I guess I’ll just need to go back next year.
Inside out at Grand Canyon
Click an image for a closer look, and a slide show. Refresh the screen to reorder the display.


2015 Grand Canyon raft trip: Getting started
Posted on June 3, 2015

Marble Canyon Rapids, Grand Canyon
Sony a7R
Sony/Zeiss 16-35
1/6 second
F/11
ISO 50
Rafting Grand Canyon last year was a bucket list item, a one-time opportunity to do something I’d dreamed about my entire life. I came into that trip with ridiculously high expectations, all of which were exceeded enough that I scheduled another, then waited a year to find out whether the first one was just lightning in a bottle.
After departing our Las Vegas hotel at 4:45 a.m. and flying to a small airstrip near Lee’s Ferry, we met our guides, absorbed a thorough orientation from Wiley, our experienced, knowledgable, talented, hard working lead guide (this would describe all of our guides), and were on the water before 10:00. We were 2 rafts packed with 28 rafters, 4 guides, equipment, camera gear, and food to sustain the entire operation for six days.
Most in the group were first-timers, excited for sure, but also a little anxious about what lay ahead. Fortunately, starting from Lee’s Ferry, the first day on the river is relatively benign, a gentle float that allows neophyte rafters to ease into the experience and get to know each other. Bobbing downstream at a leisurely pace, we were sprinkled by a few riffles (mini-rapids, unworthy of a name), enjoyed a delicious lunch in the shadow of Navajo Bridge, listened to a couple more brief, on-raft orientation talks, before pulling onshore for the day at around 4:00 p.m.
Our first campsite was at Upper North Canyon in the Marble Canyon section of Grand Canyon (yes, that’s a lot of Canyons). We stumbled through our first “fire-line”—the raft trip equivalent of a bucket-brigade (you know, for when you’re barn’s on fire) that unloads pretty much the entire contents of the raft in about 5 minutes. (By the end of the trip we’d become a well oiled, fire line machine.) After claiming a campsite (picture a 19th century style land rush) and setting up my camp (basically picking a campsite, assembling a cot, and tossing out my sleeping bag), I grabbed my camera and went down to the river in search of an image that would do the view justice.
Though our campsite was chosen for its convenience (location, size, topography), its beauty was pretty representative of Grand Canyon’s entire length. Regrettably, pictures and words cannot display the relentless, humbling awe that engulfs all who venture between the Grand Canyon’s vertical walls. But of course that won’t prevent me from trying.
In this scene I was most struck by the color: the white-on-blue sky, red sandstone walls, and deep green of the Colorado River. Bisecting all this color was a set of white, rock-wrapping rapids. I dropped low and compose wide with my 16-35 to emphasize the foreground rocks and rapids; a vertical orientation included the sky and created the sense that the river was flowing into my frame (and eliminated our campsite, which was just out of the frame to the left).
In refreshing contrast to last year’s trip, the clouds cooperated wonderfully, defusing the late afternoon light to subdue the potentially extreme dynamic range. To convey the water’s motion, I experimented with different shutter speeds, ultimately dropping to ISO 50 to maximize the blur.
The clouds gracing this scene were a harbinger of exciting weather ahead. And while that weather made a good deal more discomfort than the previous year’s trip, it also gave us a corresponding increase in the number of photo opportunities. Stay tuned….
Looking up at Grand Canyon
Click an image for a closer look, and a slide show. Refresh the screen to reorder the display.


As far as the eye can see
Posted on March 25, 2015

Starry Night, Mather Point, Grand Canyon
Sony a7S
Zeiss 28mm
15 seconds
F/2.8
ISO 25,600
“As far as the eye can see.” How many times have we heard, and even uttered, those words without really considering their true meaning? Just how far can the eye see? Adults use the expression to convey wide open spaces, and as a kid I remember arguments on the playground about who had seen the farthest, trying to one-up each other with our ocular feats.
To me the words “as far as the eye can see” reveal a misconception that our eyesight somehow travels to a distant location and returns a real-time picture of a person, tree, building, mountain, or whatever for our brain to process. That perception might work for terrestrial scenes, where the time it takes a distant image to reach our eye is so imperceptible that for all intents and purposes, we are witnessing the scene in real time—what we see is happening as we see it.
Let’s take a tour of this night scene from the Grand Canyon to see how that real-time visual model works. Standing at Mather Point on the South Rim, our eyes start with nearby trees lining layered sedimentary cliffs, quickly plummeting to the river-scarred basalt of the inner canyon nearly a mile below. Beyond rise the similarly layered wall of the canyon’s North Rim. So far our eyes have traveled only ten miles or so—on a clear day they could continue another hundred miles or so before dropping off the horizon.
Scan any terrestrial scene this way and it’s easy to believe our eyes have done the work—when we see an object, we feel like we’re sharing its simultaneous reality. But this shared reality concept falls apart when you elevate your eyes above the Grand Canyon and beyond the horizon to the celestial sphere overhead, where everything we see (except the small meteor that’s burning up in Earth’s atmosphere, just a few miles away) was over and done years before it entered my lens.
That delay is the time it takes starlight to span the immense distances of interstellar space. Instead of a simultaneous reality, each star in our sky is on its own clock. In other words, we’re not seeing the stars in this image as they are today, we’re seeing them as they were tens, hundreds, or thousands of years ago.
But back to this distance thing. If starlight takes so long to get here, how far did it travel? Or more specifically, just how far can the eye see? Consider that light travels about 186,000 miles in one second. That’s more than 15 billion (twice the population of Earth, BTW) miles in a day, and nearly 6 trillion miles in a year. These numbers are beyond human comprehension, but suffice to say, a light year is a really long way.
So the next time someone says “As far as the eye can see,” remember this image. Ten miles to the opposite rim of the Grand Canyon, or 100 or so miles to the horizon, aren’t even a drop in the interstellar bucket. To comprehend the limits of our visual distance, individual stars are a good place to start, but they’re still in Earth’s general neighborhood. Beyond the pinpoint stars, this image captures the glow of our Milky Way Galaxy’s spiral arm in which our Sun is a very small player. This glow is a few thousand light years distant—now that’s more like it. But wait, there’s more. In Sagittarius, opposite the view in this frame, is our galaxy’s center. There the Milky Way’s glow reaches our eyes after traveling a mind boggling 25,000 light years. Surely that must be the limit of human vision.
But before you run out and brag to friends that you can see 145,000,000,000,000,000 miles (the distance light travels in 25,000 years), we’re still not done. See that roundish smudge of light on the left side of the frame? That’s the Andromeda Galaxy, the Milky Way’s nearest neighbor, 2.5 million light years away (not counting refueling and bathroom breaks). At 14,500,000,000,000,000,000 miles (count the zeros—moving from left to right, each zero increases the distance by 10 times), that truly is as far as the eye can see.
A few words about this image
Last week I helped Don Smith with his Northern Arizona workshop. After a 12 hour drive from California, Don and I had dinner near the South Rim before heading out to chilly Mather Point to try our new(ish) Sony a7S mirrorless cameras in what is the most difficult location I’ve every tried night photography.
Because I do everything with one click or not at all, I’ve never had any success photographing the stars on a moonless Grand Canyon night. Moonless night photography is difficult in any location, but at the Grand Canyon it’s like photographing a black pit. Honestly, I never imagined I’d be able to make it work.
A close look at this image will reveal that it’s not perfect—there’s a fair amount of noise, and a little motion in the stars (and every flaw is made worse by jpeg compression). Cleaning up the noise softened the image some, but eliminating it completely resulted in an noticeable plastic look, so I tried to find a balance. But flaws notwithstanding, given that the only thing illuminating my scene was the stars and a faint (imperceptible to the eye) ambient glow from the sky, to get this much detail in so much darkness is nothing short of amazing.
This is just my second night shoot with the a7S, so I’m still working out the best combination of f-stop/ISO/shutter-speed variations. I haven’t scrutinized all my images yet, but I have many variations to play with, both from this night at Mather Point, and from the next night as well, when Don and I took a hardy few from the workshop group out to Yavapai Point.
One thing that is an absolute game changer for me is the ease with which I can focus on the stars with the Sony a7S. With my Canon 5D Mark III and its (pretty great) LCD, I am able to live-view manual focus, but it takes some work. With the a7S, focusing is just a simple matter of putting my eye to the viewfinder and dialing the focus ring until the stars sharpen—a couple of seconds at most. Composition is also much easier with the a7S.
But clearly there’s room for more image quality, as the extremely limited light of a moonless night at the Grand Canyon forces many compromises. My Zeiss 28mm f2 lens is generally quite sharp, but it’s noticeably less sharp at its widest apertures. And there’s quite a bit of noise at 25,600 ISO (but the fact that I can shoot anywhere near that high is simply amazing). Of course I’d like to use an even higher ISO to allow a smaller (sharper) aperture and faster shutter speed (less star motion), but I won’t be greedy (yet). Right now I don’t know what excites me more about the a7S—that I’m able to capture night scenes I never dreamed possible, or what low-light technology Sony will deliver next. It’s a great time to be a photographer.
A Stellar Gallery
Click an image for a closer look, and a slide show. Refresh the screen to reorder the display.


Let’s all take a breath and step away from the ledge
Posted on September 26, 2014

Tree at Sunset, McGee Creek Canyon, Eastern Sierra
Canon EOS-1Ds Mark II
1/40 second
F/7.1
ISO 400
126 mm
National Forest Service commercial photography policy (it’s not as bad as you think)
I’ve received a number of inquiries (some quite panicked) in the last few days asking my opinion about the “new” National Forest Service policy regarding commercial photography. I’ve actually read some media accounts that imply that simply whipping out your iPhone and snapping a mountain lake risks a $1,000 fine. After doing a little research, I’ve confirmed that this is yet one more example of the media whipping the public into a frenzy by selecting a few facts and presenting them in the most sensational way. Here’s an example: http://www.esquire.com/blogs/news/1000-dollar-fine-for-pictures-in-the-forest.
Not being an expert on the subject, I can’t really say whether there are any factual errors in that article. But I can say that it’s a pretty self-serving (he’s certainly received a lot of attention) distortion of the actual policy I found posted on the National Forest Service website (http://www.fs.usda.gov/Internet/FSE_DOCUMENTS/stelprdb5355613.pdf). Here’s the excerpt from the NFS document that applies to me and my photography:
“Still Photography: A special use permit is required for activities on National Forest System lands when the purpose is to: (1) Promote or advertise a product or service using actors, models, sets, or props that are not part of the site’s natural or cultural resources or administrative facilities; or (2) Create an image for commercial sale by using sets or props. In addition, a permit may be required if no activities involving actors, models, sets, or props are proposed when: (1) The activity takes place in an area where the general public is not allowed; or (2) In situations in which the Forest Service would incur additional administrative costs to either permit or monitor the activity.“
As far as I’m concerned, this policy doesn’t sound unreasonable, nor does it sound like my livelihood is in imminent peril, and I’m pretty sure no one’s photographic life is jeopardized.
As someone who conducts 10-12 photo workshops each year, I’m a strong advocate for reasonable rules and restrictions that protect the natural resources that are the foundation of my business (and my mental health). I have no problem jumping through all the necessary hoops—liability insurance, first aid certification, group size, and so on—and paying the annual fees (usually in the $200-$250 range) that each workshop location’s permit process requires. I also find the people I deal with at these locations to generally be quite helpful, reasonable to deal with, not to mention downright flexible when a unique situation arise (like the time I overlooked an application deadline and didn’t discover my error until the last minute).
It’s interesting that this issue should arise right now, as I’m in Grand Tetons National Park helping Don Smith with his photo workshop here. The talk around town is about a moose that had to be put down a couple of days ago when she broke her leg after being spooked by a horde of overzealous wildlife photographers. It’s a rare trip that I don’t witness photographers do illegal or foolish things that imperil themselves (not to mention the lives of those who would need to rescue them), frighten or threaten wildlife, and damage the fragile ecosystem. It’s this very small minority of selfish and/or ignorant photographers who put all photographers in a bad light, leaving National Park and Forest authorities no choice but to implement tighter regulation. I’ve spoken up and intervened at times, but I often regret the times that I just shook my head and walked away after witnessing something I knew to be wrong.
So. Would I support the kind of heavy-handed National Forest Service regulations that the media implies is coming our way? Absolutely not. And while I don’t think something like that is imminent, I do wish photographers would do a better job of policing themselves, both by managing their own behavior, and by respectfully speaking up when another photographer behaves irresponsibly before we’re all affected by more restrictive policy and stricter enforcement.
About this image
What better way to demonstrate my lack of concern by posting this image from Inyo National forest. This tree on the dirt road to McGee Creek had been on my radar for several years, but I’d never found the conditions suitable to photograph it. But following an afternoon fall color shoot at the creek, the vestiges of sunset lit these tilde-shaped clouds. I knew exactly where I wanted to be but wasn’t sure I had time to get there. I raced down the road, pulled my truck to the side, and had time for just a couple of frames before the color faded.
A National Forest Gallery


Nuts and bolts at the Grand Canyon
Posted on September 4, 2014

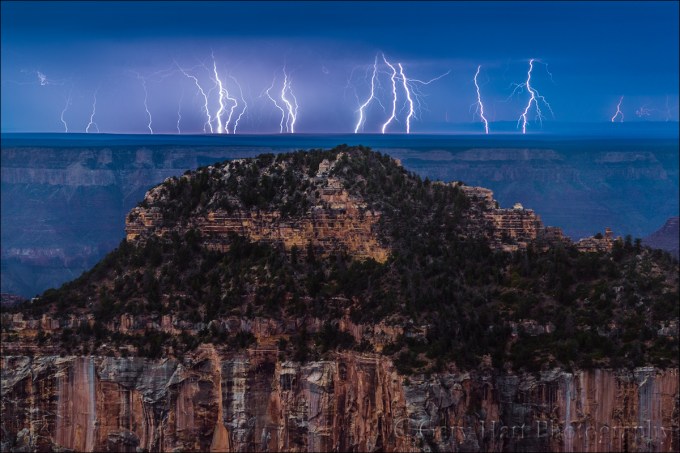
Too Close, Twin Lightning Bolts, North Rim, Grand Canyon
Canon EOS-5D Mark III
24-105L
1/8 second
F/18
ISO 100
The bolts started around 1:15; the nuts showed up about ten minutes later. There were 14 of us. We were stationed on the outside viewing deck of the Grand Canyon Lodge on the North Rim, tripods, cameras, and lightning triggers poised and ready for action. The “action” we were ready for was lightning, and more specifically, the opportunity to photograph it.
The storm had started fairly benignly, poking at South Rim a comfortable distance away, far enough in fact that we heard no thunder. But as often happens, we became so caught up in the intensifying pyrotechnics that we failed to appreciate how much our sky was darkening and that the bolts were in fact landing closer. We continued in exhilarated ignorance until a tripod-rattling thunderclap and simultaneous white flash returned us to the reality of the moment. Hmmm.
By the time the raindrops started plopping, the lightning show had reached such a crescendo that we found all kinds of rationalizations for persistence in the face of potential death: “I think it’s moving west of us,” or, “The lodge’s lightning rods will protect us,” or, “If it were really that dangerous, the hotel staff would make us leave.” (Ummm: When the strikes are that close, it doesn’t matter where the storm is heading; lightning rods are to protect the (smart) people inside the lodge; the hotel staff isn’t paid enough to go outside for anything that risky.) I wish I could say it was common sense that eventually drove us all inside, but the reality is that when the heavy rain finally arrived, it became impossible to keep the front of our lenses dry.
So what is it about danger that brings out the stupid in photographers? I used to be able to use the “I’m from California and we don’t get lightning so I don’t know any better,” defense, but that won’t fly anymore because I do know better: I know a lightning strike can be fatal, and those who survive are often left with a life-long disability; I know that lightning can hit 10 miles from its last strike; I know that if you can hear the thunder, you’re too close.
And it’s not just lightning that brings out the stupid. While chasing potential shots, I know of a photographer who scaled a cliff far beyond my his skill level, drove without hesitation into (but not out of) a raging creek, and became hopelessly mired in mud on a narrow jungle track. And we’ve all read news reports about the photographer plummeting to her death while angling for a better view, or of the partial remains of a photographer discovered in the stomach of an unfortunate grizzly?
We each have our own safety threshold, a comfort zone beyond which we won’t venture. I have a really tough time getting within three feet of any vertical drop greater than 50 feet, but I know photographers who can spit into the Colorado River from the 1,000 foot vertical rim at Horseshoe Bend. On the other hand, I’ve lived in California my entire life and am always disappointed when I miss an earthquake, but I’ve had people tell me they’ll never set foot in the Golden State for fear of a fault slipping.
But back to this lightning thing. It’s not as if I stand on a peak shaking my fist at the sky and dodging bolts like Bowfinger crossing the highway. I will go inside when lightning gets too close—I just think I probably don’t do it quite as soon as I should, and who knows, maybe someday I’ll be sorry (or worse). But I’m happy to report that the score on this particular afternoon was: Photographers—250-ish (the number of images with lightning), Lightning—0 (the number of photographers lost). Next year? Tornados.

A Grand Canyon lightning gallery


The right stuff at the Grand Canyon
Posted on August 28, 2014

After Sunset, Point Imperial, Grand Canyon
Canon EOS-5D Mark III
47mm
8 seconds
F/16
ISO 100
I’ve been to the mountaintop
Personal growth should be a lifelong journey. But as a longtime tripod evangelist, I considered many truths carved in stone. Granted, like everyone else, my tripod use (and selection) evolved through my formative photography years. On my path to (perceived) enlightenment, I made the same mistakes most photographers make, mistakes like settling for the tripod I could afford rather than tripod I needed, which only meant spending more money than I would have when I eventually (inevitably) broke down and bought the tripod I needed. And there were those dark years when I believed that in most cases a hand-held shot was just as good as one captured on a tripod. But since my “the center post is more trouble than it’s worth” epiphany about ten years ago, I pretty much believed I knew it all where tripods were concerned.
But last month at the Grand Canyon, I realized that over the last couple of years, some of my tripod truths weren’t immutable as I’d imagined. This was underscored for me during a shoot at Point Imperial, the canyon’s highest vista, when I was able to use my Really Right Stuff tripod and live-view to get shots that wouldn’t have been possible a few years ago.
My (original) tripod commandments
For years my tripod sermon was delivered something like this:
- A tripod for every shot—no exceptions
- Sturdy trumps everything
- Forego the center post—it’s destabilizing, adds extra weight, and makes it impossible to drop your camera to the ground (without a shovel)
- Size does matter—you need a tripod that’s tall enough for you to see through your viewfinder without stooping (without extending the center post)
- Ball-head all the way for landscape shooters (no pan/tilt, no exceptions)
- An L-plate will change your life
Those are the basics; the other tripod variables—cheap vs. light (you can’t have both, no matter what the salesperson or marketing brochure says), three vs. four leg sections, leg-lock design, and collapsed length (for transport in a suitcase or camera bag)—come down to personal preference and budget.
And what’s the big deal about an L-plate?
And L-plate is an L-shaped plate (duh) that attaches at the bottom of your camera and wrapping 90 degrees up one side. It’s really just a two-sided quick-release plate—instead of the standard quick-release that only mounts to the bottom of your camera (forcing you to rotate the head 90 degrees to orient the camera vertically), to orient an L-plate-equiped body vertically, you pop the camera off the head, rotate the camera 90 degrees, and reattach it to the head using the plate’s other side, keeping the head upright (unchanged). Not only does this keep your camera at the same height regardless of its orientation, it’s just much more stable.
Lacking an L-plate, photographers whose tripod is tall enough when the camera is oriented horizontally are sometimes force to stoop or contort when they switch to vertical. Without realizing it, they often compensate for this awkwardness by simply avoiding vertical compositions. I know this because I was one of those photographers—when I switched to an L-plate, my percentage of vertical compositions increased markedly (I actually verified this using Lightroom filters to count the number of horizontal and vertical frames in my library), to the point where my vertical/horizontal images are about 50/50.
What’s your MTH?
By the time they’re serious enough to sign up for a photo workshop, most (but not all) photographers have a sturdy tripod. Still, things aren’t necessarily completely rosy. In addition to a deficient head—either a pan/tilt, or a ball head that’s not strong enough for the camera/lens it’s trying to support (both problems easily solved by going to reallyrightstuff.com and picking the head that best suits your needs, but that’s a discussion for a different day)—a too-short tripod is where I see most novice photographers struggle. Stooping, even just a few inches, may not seem like a big deal at first, but it gets old really fast.
Your minimum tripod height (MTH) is the shortest tripod you can use without stooping or raising the center post. Here are the steps for determining if a trip is tall enough for you:
1. Start with the tripod’s fully extended height (legs extended, center post down), easy to find in the manufacturer’s specifications 2. Add the height of your ball-head (if you have a pan/tilt you need a new head and will be doing this calculation all over again when you get it) 3. Add the distance from the base of your camera to the viewfinderThis gives you the tripod’s maximum usable height. Wait a minute, you say, that’s still not tall enough. To get your MTH, there’s one more step:
4. Subtract 4 inches from your height to account for the distance from the top of your head to your eyes.Old dog, new trick
But in the last year I’ve experienced a minor conversion, opening my mind enough to modify my rigid tripod height recommendations (I used to believe that a tripod that extended above my standing height was unnecessary weight and length)—not only should your tripod be tall enough to use while you stand upright, the ideal tripod is even taller than that, at least 4 inches taller than your viewing height when the legs are planted on flat ground. Extra tripod height allows me to comfortably stand on the uphill side of my camera when the tripod on uneven ground. (If you’re a landscape shooter, how often do you photograph on flat ground?)
Of no less significance is the way a tall tripod allows me to shoot over obstacles. In “ancient” times, photographers needed to to see through their viewfinder to compose and (sometimes) meter, but with the genesis of live-view came the ability to compose and meter without the eyepiece. So while a tall tripod has always been helpful for shooting on level ground, to me this ability to shoot over obstacles is the real game changer.
Going straight to the source
My conversion started with a pilgrimage to Really Right Stuff in San Luis Obispo, about a year-and-a-half ago. I was ready for a new tripod and wanted the best. I’d been quite happy with my Gitzo tripods, but they were purchased before RRS offered tripods—given my long-time experience with RRS heads and L-plates, and what I’d observed in my workshops, I thought I should see whether RRS tripods had supplanted Gitzo at the tripod summit.
RRS doesn’t actually have a retail store, but their beautiful new facility has a nice reception area with many products on display—you might even find the lobby empty when you walk in, but it won’t be long before a door from the back opens and you’ll be greeted by someone who knows more about tripods than you do. My expert was Erik—he spent close to an hour, first patiently demonstrating why the RRS tripods are the best tripods in the world (the comparison was to Gitzo, but his emphasis was on what makes RRS tripods great, rather than what makes Gitzo tripods bad, an approach I appreciated), and then helping me determine which model would best suit me.
I’d arrived with the RRS TVC 33 in mind, but on Erik’s suggestion ended up switching to the RRS TVC 24L Series 2, even though it has four leg sections (extra work extending and collapsing, but more compact when collapsed) and is quite a bit taller than I (believed I) needed. So tall, in fact, that I can almost (but not quite) use it by extending only three leg sections. I’m not going to go into all the reasons I love this tripod (but trust me, I do), but I will say that the extra 8 or so inches above my MTH (I’m about 5’9″) has enabled me to photograph in ways I wouldn’t have been able to do without it.
The paradigm shifting “revelations” I share here (extra-tall is important; Gitzo is no longer the Holy Grail of tripods) apply to photography, but one of the things I love about being forced to reconsider long-held “truths” is the reminder that the instant we believe we have all the answers is the instant we stop growing.
Case in point
All this (finally) brings me to the above image from Point Imperial on my recent Grand Canyon trip. Point Imperial is probably my favorite spot on the North Rim. The railed viewing area isn’t quite large enough for an entire workshop group to work comfortably, but there are enough spots nearby that nobody is disappointed. My favorite location here is on the rocks, just below the railed vista, that jut about 1,000 vertical feet above the canyon. There isn’t a lot of room out here either, and very little margin for error, so after guiding the brave photographers who aren’t afraid of heights out to the edge, I found an out of the way spot a few feet behind them.
It turned out this location was no less precarious than everyone else’s, but being behind the others and a couple of large rocks and shrubs made composing a challenge. Looking around, I decided the best view was on an uneven slope right on the edge, the closer the better. Yikes.
This is where I really appreciated the extra inches my tripod offers. Extending each leg fully, I pushed two legs right up to the edge, keeping myself a safe distance back. With the front (closest to the edge) legs’ planted, to elevate further and get the camera even nearer the edge, pushed the leg closest to me toward the cliff until the other two legs were nearly perpendicular to the ground (directly on the edge). Finally, I leveled the tripod with minor adjustments in the height and placement of the leg closest to me. Once the camera was positioned (about five inches above my eyes), I switched on live-view, composed, metered, and clicked.
As evidenced by the long shutter speed, it was fairly dark when I clicked the image above. Often the best light for photography is opposite the sun after sunset (or before sunrise). The smooth quality of this shadowless light, and the gradual deepening of the rich hues on the horizon, are often missed by the casual observer who is mesmerized by the view toward the setting or rising sun (not possible at Point Imperial at sunset), or unable to appreciate the camera’s ability to bring out more light than the eye can see. But then, you already knew that (right?)….
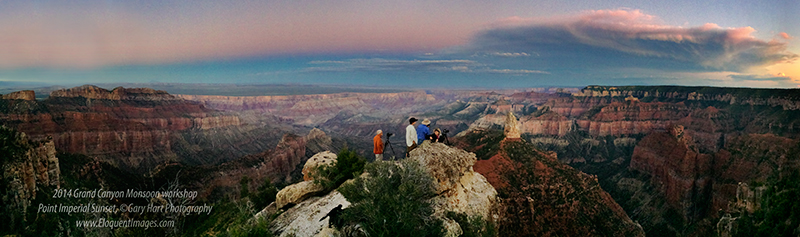
The view from just below the Point Imperial vista (iPhone panorama)
Extra credit
- Read The tripod difference (why I think every landscape shot should be on a tripod)
- Here’s Thom Hogan’s excellent article on buying a tripod
- Visit the Really Right Stuff website: in addition to the best camera support money can buy, there’s great information here
Roll over Ansel
Posted on August 25, 2014
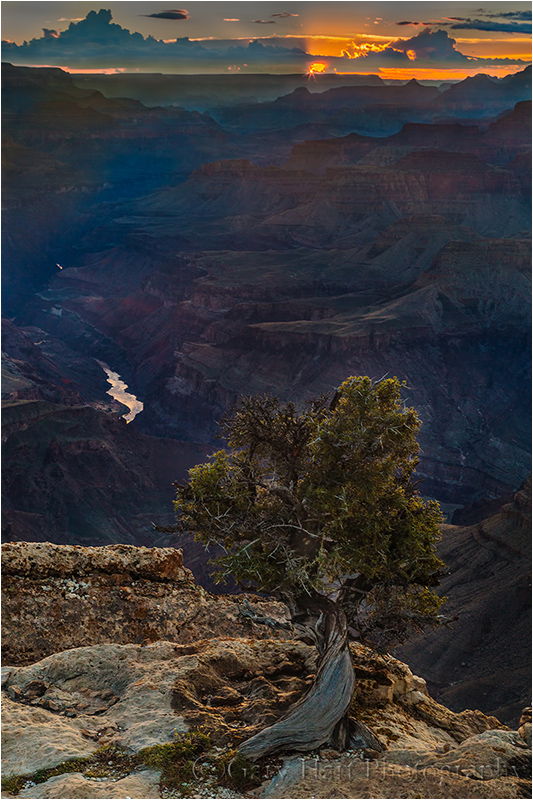
Solitude at Sunset, Lipan Point, Grand Canyon
Canon EOS-5D Mark III
65mm
1.3 seconds
F/20
ISO 100
A few days ago I was thumbing through an old issue of “Outdoor Photographer” magazine and came across an article on Lightroom processing. It started with the words:
“Being able to affect one part of the image compared to another, such as balancing the brightness of a photograph so the scene looks more like the way we saw it rather than being restricted by the artificial limitations of the camera and film is the major reason why photographers like Ansel Adams and LIFE photographer W. Eugene Smith spent so much time in the darkroom.” (The underscores are mine.) Wow, this statement is so far off base that I hardly know where to begin. But because I imagine the perpetuation of this myth must send Ansel Adams rolling over in his grave, I’ll start by quoting the Master himself:
- “When I’m ready to make a photograph, I think I quite obviously see in my minds eye something that is not literally there in the true meaning of the word.”
- “Photography is more than a medium for factual communication of ideas. It is a creative art.”
- “Dodging and burning are steps to take care of mistakes God made in establishing tonal relationships!”
Do those sound like the thoughts of someone lamenting the camera’s “artificial limitations” and its inability to duplicate the world the “way we saw it”? Take a look at just a few of Ansel Adams’ images and ask yourself how many duplicate the world as we see it: nearly black skies, exaggerated shadows and/or highlights, and skewed perspectives. And no color! (Not to mention the fact that an image is a two-dimensional approximation of a three-dimensional world.) Ansel Adams wasn’t trying to replicate scenes more like he saw them, he was trying to use his camera’s unique (not “artificial”) vision to show us aspects of the world we miss or fail to appreciate.
You’ve heard me say this before
The rest of the OP article contained solid, practical information for anyone wanting to come closer to replicating Ansel Adams’ traditional darkroom techniques in the contemporary digital darkroom. But it’s the perpetuation of the idea that photographers are obligated to photograph the world like they saw it that continues to baffle me.
The camera’s vision isn’t artificial, it’s different. To try to force images to be more human-like is to deny the camera’s ability to expand viewers’ perception of the world. Limited dynamic range allows us to emphasize shapes that get lost in the clutter of human vision; a narrow range of focus can guide the eye and draw attention to particular elements of interest and away from distractions; the ability to accumulate light in a single frame exposes color and detail hidden by darkness, and conveys motion in a static medium.
No, this isn’t the way it looked when I was there
While this sunset scene from Lipan Point at the Grand Canyon is more literal than many of my images, it’s not what my eyes saw. To emphasize the solitude of the lone tree, I allowed the shaded canyon to go darker than my eyes saw it. This was possible because a camera couldn’t capture enough light to reveal the shadows without completely obliterating the bright sky (rather than blending multiple images, I stacked Singh-Ray three- and two-stop hard transition graduated neutral density filters to subdue the bright sky).
To convey a mood more consistent with the feeling of precarious isolation of this weather-worn tree, I exposed the scene a little darker than my experience of the moment. The sunstar, which isn’t seen by the human eye but was indeed my camera/lens’ “reality” (given the settings I chose), was another creative choice. Not only does it introduce a ray of hope to an otherwise brooding scene, without the sunstar the top half of the scene would have been too bland for me to include as much of the shadowed canyon as I wanted to.
I’m not trying to pass this image off as a masterpiece (nor am I comparing myself to Ansel Adams), I’m simply trying to illustrate the importance of deviating from human reality when the goal is an evocative, artistic image. Much as music sets the mood in a movie without being an actual part of the scene, a photographer’s handling of light, focus, and other qualities that deviate from human vision play a significant role in the image’s impact.
A Gallery of My Camera’s World
(Stuff my camera saw that I didn’t)


The right stuff with the left brain
Posted on August 17, 2014
Electric Night, Grand Canyon Lodge, North Rim, Grand Canyon
Canon EOS-5D Mark III
Canon 24-105L
15 1/2 minutes
F/4
ISO 200
Left versus right
Writing about “The yin and yang of nature photography” a couple of weeks ago, I suggested that most photographers are limited by a tendency to strongly favor the intuitive or logical side of their brain (the so-called right-brain/left-brain bias). Today I want to address those intuitive (right brain) thinkers who feel it’s sufficient to simply trust their compositional instincts and let their camera do the thinking.
It was a dark and stormy night
There is absolutely nothing creative about this lightning image from last Monday night at the Grand Canyon. This single click image (one frame—no blending) was captured from the viewing deck of the Grand Canyon Lodge on the North Rim during a nighttime thunderstorm across the canyon. Compounding the darkness of night and the Grand Canyon’s dark pit were dense clouds that obscured a waning gibbous moon—the canyon so dark that I couldn’t see well enough to create anything. To compose, I simply aimed my camera in the general direction the lightning was most active, clicked, and hoped. The original raw file needed cropping for balance, to remove a few lights from the South Rim Village, and to correct a severely tilted horizon.
Don Smith and I had just brought our workshop group back from a sunset shoot at Point Imperial. Some headed back to their cabins to recover from a day that had started at 4:30 a.m., while a few veered to the “saloon” (it’s not quite as raucous as it sounds) for a beer or glass of wine. Lugging my gear back to my cabin, flashes in the clouds above the lodge indicated lightning was firing somewhere in the distant south and I detoured down to the lodge’s viewing deck to check it out. Through the two-story windows of the inside viewing room and before I even stopped walking I saw bolts landing due south across the canyon, and along the rim down the canyon to the west—violent, multi-stroke bolts that illuminated the clouds and canyon walls with their jagged brilliance.
I set up on the west viewing deck with just enough twilight remaining to compose, starting with a composition I liked—it wasn’t in the direction of the most activity, but I’d already seen a couple of strikes in that direction and was hoping I’d catch a bolt or two. But as the sky darkened and my exposures failed to capture anything, it became clear the activity was shifting west and I’d need to adjust my composition. By then the darkness was nearly complete and I simply centered my frame on the black outline of Oza Butte in front of me, going wide enough to ensure maximum lightning bolt captures.
While finding focus for my earlier compositions had been a little tricky, there had been enough light to make focus manageable. But now the absence of any canyon detail made getting a sharp frame extremely problematic using the conventional focus methods. (Contrary to a misconception that lingers from the old film days, when everyone used prime lenses, you can’t simply dial a zoom lens to infinity and assume you’ll be sharp.)
Once I decided on my composition (and focal length), I pointed my camera (still on the tripod) in the direction of the Grand Canyon Village lights on the South Rim centered the brightest light in my viewfinder. I engaged live-view, magnified the scene 5X, re-centered the target light, magnified 10X (5X and 10X are the two magnification options on my 5DIII), and slowly turned my focus ring until the cross-canyon light shrunk from a soft blur to a distinct point. I then swung my camera back toward my the butte and recreated my composition (without changing my focal length).
Because my earlier exposures had been 30 seconds at ISO 1600 ISO, designed to capture just one or two strikes in a composition I liked, but short enough to adjust things relatively frequently. But since my new strategy was to fire directly into the mouth of the beast, and lacking a composition in which I had any confidence, I decided on a long exposure that would capture enough lightning to overcome the unknown but likely relatively bland composition. Instead of 30 seconds, I wanted at least 12-15 minutes of exposure in Bulb mode (instead of a shutter speed that’s fixed at the moment of the click, in Bulb mode the shutter remains open until I decide it’s time to close it).
“You didn’t tell me there’d be math…”
Doing the math: Because each doubling of the shutter speed adds one stop, a 15 minute exposure would add about (close enough to) 5 stops of light to my original 30 seconds:
- 30 seconds x 2 = 1 minute—1 stop
- 1 minute x 2 = 2 minutes—2 stops
- 2 minutes x 2 = 4 minutes—3 stops
- 4 minutes x 2 = 8 minutes—4 stops
- 8 minutes x 2 = 16 minutes—5 stops
Adding five stops of exposure time meant that keeping the amount of light in my next image unchanged, I’d need to subtract a corresponding 5 stops of light in ISO and/or aperture. But since I thought that my previous exposure was at least a stop too dark, and I guessed that the sky would be darkening even more, I decided to drop only 3 stops, from ISO 1600 to ISO 200 (halving the ISO reduces the light by 1 stop). I made my ISO adjustment, clicked my shutter and locked it open on my remote, checked my watch, then sat back and enjoyed the show.
The 12-15 minute plan was just a guideline—since the difference between 10 minutes and 20 minutes would only be 1 stop, my decision for when to close my shutter had quite a bit of wiggle room. In this case after about 15 minutes I noticed the lightning was slowing down and shifting further west, so I wrapped my exposure and recomposed for my next shot. As it turns out, the next frame only captured a third of the number of strikes this one got because the most intense part of the show was winding down.
The worst is over
If you’re one of those “I have a good eye for composition, but…” folks, congratulations for sticking with me this long. I hope this illustrates for you how important understanding metering and exposure basics, and managing them with your camera, is to maximizing your capture opportunities. This technical aspect of photography isn’t something that should intimidate you—if you can multiply and divide by 2, you have all the math skills you need to figure things out on the fly.
I suspect, and in fact have observed, that most “intuitive” photographers are limited more by their belief that they can’t do the technical stuff than they are by an actual inability to it. What seems to have happened is that they’ve been buried by an avalanche of well-intended but less significant technical minutia covering everything from exposure (e.g., “RGB histograms” and “exposing to the right”), to focus (e.g., “circles of confusion” and “hyperfocal distance”), to printing (e.g., “colorspace” and “monitor calibration”). Many of these things are indeed quite important, but nobody should be expected to tackle them until they have a firm grasp on the basics of metering and exposure, and managing the complementary relationships connecting shutter speed, aperture (measured by f-stops), and ISO. I recommend that you ignore all the other technical buzz until this basic stuff makes sense—not only will you be a better photographer for it, you’ll find that the more “complex” stuff isn’t nearly as complex as it sounds.
Want to learn more?
Try these links:
Then go out in your backyard and practice!
But let’s not forget why we go out with our cameras in the first place
You can’t imagine how thrilling it was to watch these bolts firing several times per minute. Not only were they landing in the direction of my composition, they were also going all along the rim to the west. Witnessing this display was an experience I’ll never forget, and photographing it was a highlight of my photography life.
An Electric Gallery


Release the brocken!
Posted on August 14, 2014

Solar Glory, Lipan Point, Grand Canyon
Canon EOS-5D Mark III
100 mm
1/30 second
F/16
ISO 200
So how cool is this? The shadow is me. It’s called a brocken (named for a mountain in Germany), and the rainbow is a solar glory. This extremely rare phenomenon requires the perfect alignment of sunlight, moisture, and observer, and I just happened to find myself at the fortunate convergence of these conditions.
Yesterday evening Don Smith and I photographed the vestiges of a summer storm at Lipan Point on the Grand Canyon’s South Rim. We were there because Zeus had washed out the overnight trip to Toroweap that Don and I had been planning for many months.
Toroweap is a many-thousand foot vertical drop to the Colorado River on the Grand Canyon’s North Rim, at the end of a 60-mile unpaved road. We’d rented a 4-wheel-drive Jeep for the adventure, but after talking to several Grand Canyon rangers who strongly advised against going out there in the rain. So we jettisoned Plan A and quickly improvised Plan B: leave the relative peace and quiet of the North Rim and jet back to the South Rim (where our next workshop is scheduled to start Friday).
The storm broke during our four-plus hour drive from the North Rim to the South Rim, and we were greeted with the kind of river-hugging, monolith-draping clouds I’m accustomed to seeing after a Yosemite storm. Our first stop was Navajo Point, but after some great shooting there we saw that the cloud making machine was working overtime below Lipan Point, just a short drive down the road.
Arriving at Lipan Point about an hour before sunset, we grabbed our gear and scrambled out to the point beneath the railed (tourist) vista, a rocky, knife-like ridge jutting into the canyon with sheer drops on both sides. I was happily photographing a scene up-canyon when Don called out, “Hey, do you see that?!” I looked up and saw a cloud drifting up from the chasm on our ridge’s east side, no more than 100 feet from us. The cloud was fully lit by the low sun, and right in the middle was my shadow encircled by a full rainbow. I know enough about rainbows to understand what’s going on: a rainbow makes a full circle around the anti-solar point, but terrestrial viewers usually find the bottom half interrupted by the horizon. But understanding a phenomenon doesn’t make me any less awestruck by its manifestation. I’d seen this once before, on a plane taking off through a rainstorm—I looked out the window and saw a rainbow encircling the plane’s shadow, but by the time I retrieved my iPhone the plane banked and I lost it.
But this time I had my camera ready for action—I shifted a few feet up the ridge to juxtapose the rainbow against a snag and clicked away. For my first few frames I stood off to the side and the shadow my camera captured was of my camera on the tripod, so I moved behind my camera and squared my shoulders. Those frames included my outline, but it wasn’t until I spread my arms and legs that I got the shadow you see here.
Read more about rainbows in my Rainbows article in the Photo Tips section.

