Eloquent Images by Gary Hart
Insight, information, and inspiration for the inquisitive nature photographer
Storm Chasing Diary: “Large Cloud in the Sky”
Posted on June 18, 2025
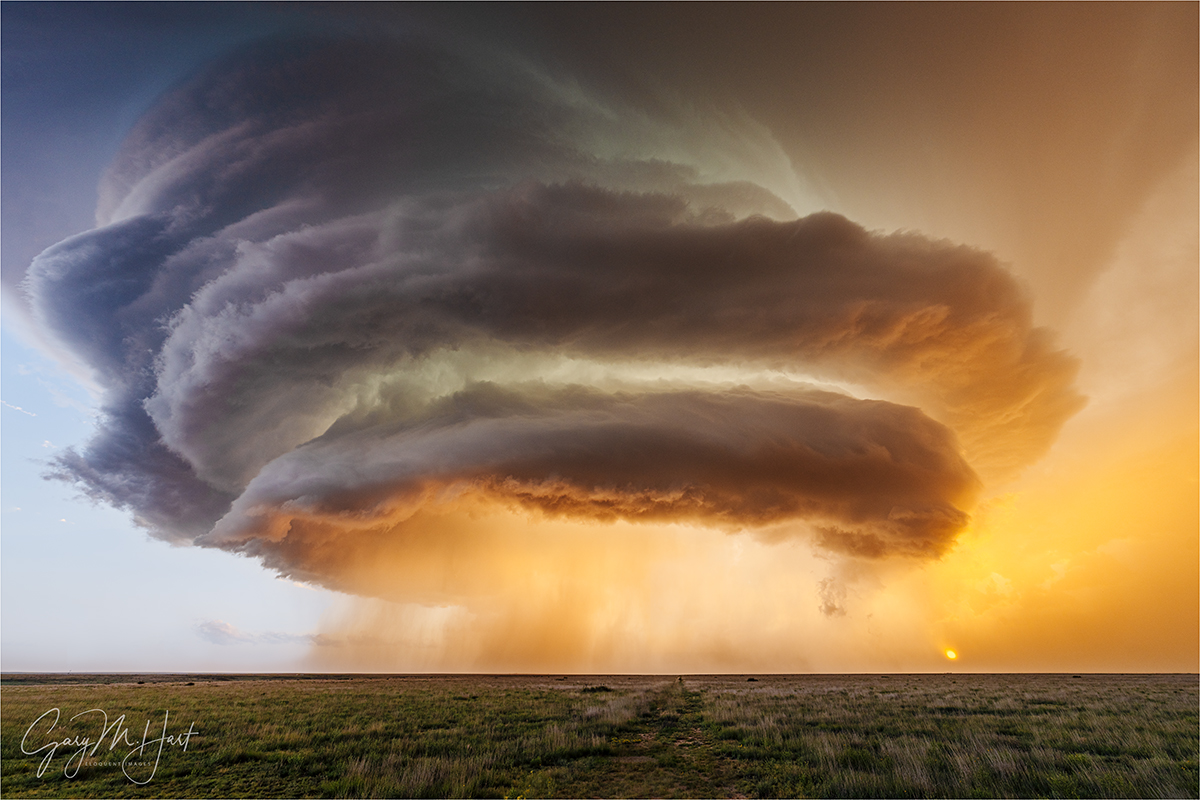
Alien Spaceship, Supercell Near Amistad, New Mexico
Sony α1
Sony 12-24 GM
1/25 seconds
F/9
ISO 100
Because I was traveling and had unreliable connectivity, I started writing this blog in Microsoft Word rather than use the WordPress interface. When I inserted the post’s image at the top of the document, Microsoft’s unsolicited AI description simply said, “Large cloud in the sky.” And while no truer words were ever written, I think a little more context might prove enlightening. So here goes…
You’d think that someone who spends as much time photographing Nature as I do, would at some point cease being surprised by it. I’m here today to disabuse you of that notion.
My primary reason for arranging a Midwest storm chasing trip was to see and photograph a tornado. I simply knew that nothing would be able to top that experience. But just several hours into the trip, I was introduced to my first supercell, literally one of the most beautiful natural sights I’ve ever witnessed. Okay—clearly these trips aren’t just about the tornadoes.
Then, on the third day, after (finally) checking the tornado box (several times), I figured everything after that would be gravy. Wrong again. Because even though we saw no more tornadoes, the magic had only just begun.
While gawking at that day-1 supercell, I distinctly remember telling myself to take a breath and appreciate was I was looking at because I might not see anything this beautiful for the rest of my life. That prediction survived all the way until day-6.
If nothing else, this trip taught me that a supercell is so much more than a very large thunderstorm, it’s a living, breathing entity with a personality and a distinctive lifespan that runs from adolescence to maturity, before inevitably aging out. Achieving supercell status requires a specific combination of atmospheric conditions that cause a conventional cumulous cloud to ascend unchecked into the highest regions of Earth’s troposphere. More than that, a supercell is distinguished from a conventional towering thunderhead, and actually powered by, a rotating convective updraft: a mesocyclone. No mesocyclone, no supercell.
The key atmospheric ingredients necessary to create a mesocyclone are*:
- Atmospheric moisture (humidity): Moisture in the atmosphere provides the latent energy that sustains a thunderstorm’s updrafts.
- Unstable (buoyant) air: The warmer a “package” of air (picture a cube of air of any size), the more water vapor (moisture in gas form) it can hold. Air temperature is the measure of molecular energy; since air becomes less dense as it rises, it naturally cools because it has fewer molecules. Cooler air can hold less water vapor than warmer air, so a package of air that’s heated by the sun (the reason most thunderstorms form in the afternoon, when the sun is highest and warmest) rises and cools. Eventually the rising air cools to a temperature that can no longer hold its contained water vapor, forcing it to condense into liquid, and a cloud forms. Condensation creates heat, so as long as the condensation creates enough heat to keep the rising air warmer than the surrounding air, the updraft will continue.
- Wind shear: Wind shear is wind that travels in different directions at different elevations. When rising, unstable air encounters wind shear, it starts rotating. This rotation tilts the updrafts and downdrafts at the mesocyclone’s core, allowing them to persist independently, without interfering with each other.
* This is not me pretending to be an expert, this is me trying to learn something by researching and writing about it. (No AI was used, so any error is mine alone.)
The sensory manifestations of all the atmospheric machinations necessary to form a mesocyclone are truly (cliché alert) breathtaking: Massive, towering, symmetrical cloud layers; explosive (often seemingly ubiquitous) lightning, some of it intra-cloud, some of it cloud-to-ground (CTG), and its associated thunder; torrential rain (or no rain at all, depending on your position beneath the storm); vivid blue or blue-green regions in the clouds that reveal the supercell’s hail core; a distinct roar as the hail approaches; winds that range from nonexistent potentially hurricane force—airflow feeding the storm’s updraft rushes toward its center, while the storm’s downdraft “exhaust” flows away; rapidly rotating clouds at different elevations, sometimes, but not always, dropping to the ground in the form of a tornado. Experienced storm chasers (i.e., not me), read all of these features, combine combine their observations with the virtually realtime radar and atmospheric data provided by NOAA, and somehow determine the best location to safely view and photograph with storm-whisperer sagacity.
The story of this image
Basking in our day-4 tornado success, our day-5 chase brought another nice supercell and some lightning, but nothing that rivaled our prior sights (admittedly, our standards had been raised significantly). Shortly after noon on day-6, we departed our prior night’s hotel in Lubbock and motored northward through a collection of tiny Texas Panhandle “towns” (often not much more than a church, gas station, and cafe surrounded by a sprinkling of small houses). As with every other chase day, our tour director and meteorologist Chris Gullikson rode shotgun in the lead van, constantly monitoring the (rapidly improving) atmospheric conditions, giving us in the trailing van a play-by-play over the CB. Somewhere west of Amarillo, he identified our target storm and strategized a plan of attack.
In Dalhart, Texas we bent west, toward New Mexico. Chris’s CB updates to our trailing van became more frequent and excitement-tinged: “Tops at 52 (thousand feet)”; “3-inch hail marker”; “Tops at 55,” and so on. We’d learned early in the trip that clouds that stretched above 50,000 feet were especially promising—the higher the better. Similarly, we learned that the larger the hail (determined, it seems, by radar information), while a great indicator of an active supercell, also factored into our route choice—hail much larger than golf-ball-sized risks damaging the van, as well as any chaser who might be outside.
At this point in our tour, Chris’s late afternoon chase-declarations had become fairly routine, so while we were excited by a cell’s potential, we knew that data alone doesn’t ensure success. But soon we were in the thick of the storm, battling rain and hail, and dodging lightning to get in position. At one point we navigated hail that deposited a 2-inch layer on the road.
We’d get out front of the storm, pull the vans over, and everyone would pile out—if Chris’s first command was, “No tripods,” we knew this would be a quick stop—then hustle back when a sudden wind signaled the imminent arrival of rain or hail. Relatively close lightning became fairly routine, but at no point did I ever feel unsafe. (I asked Chris about this later, and learned that he has a pretty good idea of where in the storm the lightning will strike—but he did add that those estimations are far from certain.)
I knew we were on a pretty cool supercell, but had no idea what was in store until the lead van braked without the usual advance CB notice and Chris hustled everyone out with far more urgency that usual. He said, “We really don’t have time to stop here, but you just have to see this! No tripods!”
To this point, virtually every field we passed on this trip was completely fenced, forcing us to stop at the barbed wire just a few feet from the road, and often contend with drainage ditches and power lines in our foreground. But this time we found ourselves at an opening in the fence that allowed us to walk about 100 feet into the field, providing a clear view at the spectacle unfolding in the sky.
Even the experienced storm chasers, including Chris, admitted that this was one of the most magnificent supercells they’ve ever witnessed. But as if that wasn’t enough, the setting sun’s golden disk had burned through the low clouds on the horizon, sending shafts of sunlight skyward to illuminate the clouds’s underside.
With my 12-24 lens as wide as it would go (and still barely able to fit this massive beast), I had time to click 10 frames in fairly rapid succession before I a heard a faint roar coming from just down the road, in the direction from which we’d just come. The roar intensified and while I puzzled about what it could be, Chris yelled with the most urgency I’d heard all trip, “HAIL! Back in the vans now!” Everyone bolted for the opening in the fence, bottlenecking there as the first pellets pelted us. Supercell hail is nothing to mess with, and even these relatively small (grape-size) samples stung. Once through the fence, we loaded in record time and screeched away before the larger stuff reached us, everyone still in complete awe of the beauty we’d just witnessed.
You’d think that this beautiful supercell would be the (non-tornado) highlight of the trip, but it wasn’t even the highlight of the day. But that’s a story for another day…
Join me in a future storm chasing workshop
Workshop Schedule || Purchase Prints || Instagram
Nature’s Best Moments
Click any image to scroll through the gallery LARGE


")


")


")


Storm Chasing Diary: My First Tornado
Posted on June 9, 2025

First Tornado, Lingo, New Mexico
Sony a7R V
Sony 24-105 f/4 G
ISO 200
f/16
1/40 second
Everyone remembers their first time. For me, the experience was as thrilling as I’d imagined, but only lasted about a minute. (I’m talking about my first tornado—what did you think I meant?)
For as long as I can remember, I’ve wanted to see a tornado. Over the years this desire has intensified to the point where a tornado is quite probably my most frequent dream subject. When the NWS suggests just the slightest possibility of rotating thunderstorms in Northern California, I scan the skies and sometimes have even been known to hop in my car to go tornado hunting. (California averages one tornado per year.)
Gary’s Bucket List:
- See a tornado
Raft Grand CanyonRainbow over Yosemite ValleyNaked-eye cometNorthern Lights
Even though a tornado sighting has been number one on my list as all the items below it have fallen away, the opportunity has always eluded me. I suspect it has something to do with an approach based on simply waiting for the tornado to come to me—probably not a winning strategy in California. This year, I decided to change that.
On the recommendation of one of my frequent workshop students, I connected with Jeremy Woodhouse, a fellow photographer and photo workshop leader, who for the last several years has assembled storm chasing tours for photographers. Partnering with Tempest Tours out of Arlington, Texas, Jeremy has put his groups on the scene of some of the Midwest’s most extreme weather. I reached out to Jeremy and told him, if he assembled a storm chasing trip, I’d fill it, and a storm chasing collaboration was born.
In my previous post, I wrote about our first day and the incredible supercell we witnessed. No tornado, but no complaints. But still…
Day-two was quiet—a welcome respite after the initial day’s intensity and miles. We drove from Kansas, through Oklahoma, before finally settling down in Amarillo—without changing plans once. The highlight of that day was dinner at The Big Texan (home of the “free” 72 ounce steak)—trust me, you have to experience this place firsthand to appreciate it. Though there wasn’t much weather happening on day-two, the decision to be in Amarillo wasn’t random—it was to position ourselves for the next day’s chase, which looked far more promising.
In our day-three morning weather briefing (we start each day with a detailed discussion of the day’s weather from our tour-leader/meteorologist, Chris), we learned that the atmosphere was setting up beautifully for supercell development, not just that day, but also over the next three days (at least). We spent most of that afternoon bouncing around New Mexico and West Texas, where we saw lots of rain, hail, beautiful clouds, and (spectacular) lightning, but no tornado. We spent that night back in Amarillo.
Each day Chris identifies a general region to target, based on the morning’s forecast—not the general weather forecast we all get from our weather apps, websites, and TV weatherman, this is extremely detailed atmospheric data from NOAA, with technical analysis that can only be evaluated and subjectively interpreted by an expert. In the day-four briefing, Chris told us conditions were even better than the prior day’s. But despite the promising prospects, the rest of the morning unfolded with little sense of urgency. That’s because the big storms develop from mid-afternoon into the evening, so we generally don’t need to head out on a chase until late morning or early afternoon.
Once we do get on the road, there’s usually a lot of driving around, looping, and backtracking. While Jeremy drives the lead van, Chris rides shotgun and keeps a constant eye on his computer, phone, and ceiling-mounted real-time radar monitor. With every weather update, he further refines our target zone. I ride shotgun in the trailing van; in addition to answering whatever photo question might come up in our van, I provide an essential DJ service (classic rock, anyone?). Our two vans use CBs to stay in touch, and Chris frequently updates Tom, the driver of the trailing van and an experienced storm chaser himself, on all weather changes and other pertinent information.
Words cannot express how fast these supercells explode from a run-of-the-mill thunderstorm into a violent, roiling tower. So, in addition to interpreting weather data, experienced storm chasers must read, on the fly, dynamic features in these building cells (rotation, outflow and inflow, updrafts and downdrafts, to name a few) to determine the supercell’s next move. Once the cell’s direction of motion, speed, growth is established, Chris positions the group as close as possible to the action without subjecting everyone to the inevitable lightning and large hail, not to mention any tornado that might form. No small feat by itself, but factor in the swarm of other chasers seeking similar advantages, and it’s no wonder mayhem ensues whenever a supercell develops.
Once you establish which cell has the best potential to develop into a supercell, merely getting close is not enough. Each supercell has a mind of its own, a unique personality that seems to relish defying expectations. Some have the potential to drop tornadoes, while others might be better lightning producers, or possess spectacular (photogenic) structure (don’t forget your 12mm). Which of these traits you want to go for will determine where to set up to view and photograph.
Ideally we can get out in front of the storm and let it come to us, or better still, watch it move laterally across our view. But a couple of times we’ve had to “punch through the core,” an absolutely thrilling E-ticket ride that includes buckets of rain, punishing hail (and potentially car damaging or even life threatening), and a barrage of simultaneous lightning and thunder.
As you might imagine, the trip leader’s navigation skills are key (the rest of us just follow blindly), as is his ability to think quickly and decisively, and an ability to change plans mid-execution. Terrain is relatively flat in the rural areas we’ve concentrated on so far, with few trees, and lots of agriculture. The network of roads is pretty good, though many are rough and narrow, and often transition to dirt with little notice. Agriculture rules out here, but we also see a lot of livestock (no flying cows so far), and pass numerous oil rigs and wind turbines, vestiges of energy’s past and harbingers of energy’s future, often in very close proximity.
Despite possessing all the elements necessary to spark malevolent competition (crowds, passion, and urgency), the storm chasing community seems to be quite collegial. And despite the challenging roads, everyone seems work well together (creative parking skills help).
Even though the sky was completely overcast as we motored south from Amarillo toward Lubbock—not a good sign, as you need sun to kick-off the all important convection—this was apparently expected, and Chris seemed pretty excited by the atmospheric data he was seeing.
After a few feints and dodges, we ended up tracking south and east toward the most promising region near the Texas, New Mexico border. Apparently we weren’t the only ones who could interpret this cryptic atmospheric data, because it wasn’t long before we started encountering other chasers. Soon it felt like a storm chasing convention—they just kept coming.
By the time we reached ground-zero in eastern New Mexico, our target cell was well into adolescence and on its way to adulthood. We poked around its perimeter a bit, and at one point tried to get closer, then executed a hasty retreat when Chris (somehow) sensed the potential for damaging hail just down the road.
We were no longer on a casual drive, we were in full-on chase mode. We pivoted back the way we came and, looking for anything to put in the foreground of our images, returned to a field of hay bales we’d passed ten minutes earlier.
This gave us a great view of the developing wall cloud (lowering cumulus base from which a tornado usually forms) from a relatively safe distance (maybe a mile or so?). We were close enough to see that it was rotating, and Chris started shouting that a tornado could be imminent.
And then, there it was—a black funnel descending from the cloud base, stretching Earthward. Someone shouted, “It’s on the ground!”, and we were in business.
My first tornado. I just clicked like crazy, and even managed to catch a brief video with my iPhone. Within a minute or so, the funnel was already ascending back where it came from; it vanished shortly thereafter. This was not the last tornado we saw this day, nor was it the most impressive—not even close. But it was my first, and I’ll never forget it.
Gary’s Revised Bucket List:
See a tornadoRaft Grand CanyonRainbow over Yosemite ValleyNaked-eye cometNorthern Lights
Workshop Schedule || Purchase Prints || Instagram
More Wild Weather


, Yosemite")


Storm Chasing Diary: Hit the Ground Running
Posted on June 6, 2025
 Supercell and Lightning, Northeast Colorado
Sony α1
Sony 12-24 GM
.4 seconds
F/14
ISO 50
What would you think if I told you that, on my 12-day storm chasing trip in the Midwest, we drove from Colorado, to Wyoming, to Nebraska, back to Colorado, back to Nebraska, and finally to Kansas? Pretty nuts, right?
Please don’t judge me when I tell you all that was just our first day. But when crazy weather is your subject, lots of miles and crazy hours are not negotiable. Fortunately, our storm chasing leaders did give us a small break on day-two, when we started in Kansas and finished the day in Texas, via Oklahoma. As I write this, it’s day-three and I’m sitting in one of our two vans in Vaughn, New Mexico, waiting with my group for our trip-leader/meteorologist to decide whether to stay put with the current storm, head northwest toward an active storm near Albuquerque, or motor east to Fort Sumner to take advantage of increasingly favorable conditions there. (Note: We ended up with, “None of the above.”)
Day-one (Monday) was my first-ever storm chasing experience, and saying we hit the ground running would be an understatement. After a morning orientation at our Denver hotel that included introductions and a lecture that seemed designed specifically to satisfy my inner weather geek, all 16 of us (me, our tour-guide/meteorologist, my co-leader and driver Jeremy Woodhouse, our other driver, and the 12 photographers/chasers comprising the workshop group) piled into our two 12-passenger vans and pointed northeast. Within a couple of hours we were on a storm in southeastern Wyoming, where I got to photograph my first-ever supercell. But spectacular as that was, we didn’t stay long, because (apparently) a better storm was blooming back in Colorado.
After leaving Wyoming, the rest of our day was filled with so much, I don’t have the memory or time to provide blow-by-blow specifics. We’d be racing to get in position for a brewing storm, then see something too good to pass and make an unscheduled brake-slam/hop-out/click/retreat stop, before continuing on our way. Plan changes were routine and came faster than I could keep up.
The weather only intensified as the afternoon progressed. Near Merino, Colorado, we finally got out in front of a storm, enabling us to settle down long enough for the tripods to come out. I set up up with my Sony a1 and 12-24 f/2.8 lens—the only lens wide enough to capture the entire cell as it bore down on us. When I realized how much lightning was firing (mostly to the right of the cell), I quickly attached my Lightning Trigger and went all the way out to 12mm to maximize my lightning chances.
The plan to follow my standard compose/click/evaluate/refine/click workflow went right out the window when I saw how quickly the storm was moving (right-to-left and approaching). Since I needed to be at 12mm, horizontal, with the supercell centered to include all of it, there wasn’t much opportunity to add variety to my compositions. My Lightning Trigger was clicking my camera so rapidly, at bolts seen and unseen, I adopted a new strategy: just let the Lightning Trigger handle the clicking, while I stood back and absorbed the spectacle. My only job was to monitor my exposure and occasionally reframe to account for the storm’s movement. I even had time to capture some video with my iPhone while my grown-up camera did the real work.
This storm actually displayed enough rotation that we thought it might dispense a tornado, and at one point we even heard a tornado siren, but no such luck. Most of its lightning was intra-cloud and out of my frame, but rather than recompose for lightning shots, I kept my composition on the star of the show: the supercell. Though the scene that afternoon was really about this truly magnificent storm, I was thrilled to find a few frames accented with squiggles of lightning.
That night we finished shooting in Nebraska (I think) with a different cell that generated several tornado alerts on our phones (picture a van with 8 people receiving slightly out of synch tornado warnings), but we never saw one. We finally rolled into our hotel in Goodland, Kansas at around 11 p.m., too late for dinner—a not uncommon experience, I’ve learned.
It’s now day-5 and soooooo much has happened since then. And we still have a week to go. No guarantees, but I’ll try to post occasional updates as time permits. Stay tuned….
Join Me On An Upcoming Storm Chasing Adventure
Workshop Schedule || Purchase Prints || Instagram
Cloud Collection
Click any image to scroll through the gallery LARGE


, Death Valley")


What Would Tom Cruise Do?
Posted on May 31, 2025

Rising Crescent, Grand Canyon
Sony a7R V
Sony 24-105 f/4 G
ISO 400
f/11
.6 second
As you might imagine, at the bottom of Grand Canyon the sleep schedule syncs with the sun. In May, that means flopping into our cots to await the stars around 8:00 p.m., then rising around 5:00 a.m. On a typical day, the morning pace is fairly leisurely, providing time for packing up our campsites, coffee, relaxed chat, breakfast, and even a little photography. While all this happens, the guides clean up breakfast and pack up the kitchen and toilets, then let us know when it’s time to queue up for the 5-minute fire-line that loads the boat. By 8:00 a.m. we’re on the water.
But this was not a typical day. The plan this morning, my annual Grand Canyon raft trip’s final full day, was to compress all that morning activity into one hour so we could beat the crowds to Havasu Creek, and catch the best light there. Photographers love clouds, but when clouds aren’t in the forecast, we go for the next best thing: shade. We formulated the Havasu shade strategy the prior afternoon, then sold it to the group at dinner that night. Though some were dubious of our seemingly impossible mission, the guides assured us it was doable if everyone bought in and worked together. And it didn’t hurt that, unlike the trip’s prior nights, this campsite wasn’t positioned with the view toward the southern horizon necessary for a sleep-interrupting Milky Way shoot.
Turns out I actually had a pretty good sleep that night, waking about 4:45 and instantly springing fully rested from bed, very much geared up for the morning’s tight schedule. The first thing I did was pack my cot and walk it down to the staging area in front of the rafts, greeting a few still groggy fellow rafters on the way. But after depositing my cot, I glanced up upstream and did an actual double-take….
Before continuing, I should probably let you know, or at least remind you, that I’m something of a moon fanatic—which I guess would make me quite literally, a “lunatic,” given that the word derives from the Latin word for moonstruck. I’ve always believed that the moon’s presence enhances pretty much any scene, and work hard to include it whenever possible.
Which is why, more than 20 years ago, I started plotting the moon’s potential arrival upon, or departure from, every scene I hoped to photograph, going to great lengths to capture this arrival or departure whenever possible. In fact, many photo trips and workshops are scheduled specifically for a landscape/lunar confluence. And even when the moon isn’t a prime objective, it’s a rare photo trip that I don’t at least know the moon’s status before departing, its phase and daily rise/set positions and times, just in case.
But since the primary celestial goal of my Grand Canyon raft trip is the Milky Way, and it requires moonless nights for the absolute darkest skies possible, I always schedule this trip for the moonless nights around a new moon. Not only that, given that we spend the entire trip in the shadow of vertical walls soaring up to a mile above us, including the moon in my Grand Canyon raft trip images is never a consideration—I simply don’t think about it.
So imagine my surprise when that casual upstream glance revealed a thin slice of moon suspended in the pre-sunrise gloaming, perfectly framed by the canyon’s towering limestone layers. Overcoming my disbelief, I reflexively shouted, “Look at the moon!,” then ran like Tom Cruise to grab my camera gear and race back to the best view. (I also do all my own stunts.)
For about 10 minutes I photographed in rapturous frenzy, completely forgetting our compressed morning. I composed horizontal and vertical, recording many versions of the ever-changing moon, clouds, color, and light. Given the weight restrictions on this trip, my longest lens was a 24-105, but I didn’t stress and (correctly) reasoned that I have more than enough resolution to crop my images down to the tighter compositions the scene called for.
By the time the crescent ascended behind the south wall and I put my camera away (and remembered the departure deadline I’d lobbied the group so hard for), my adrenaline was ramped so high that I had no problem packing the rest of my stuff and catching the last raft out of camp. (Okay, there are only two rafts and we depart together—I’m reasonably confident they wouldn’t have left without me, though I imagine I’d have had to endure a fair amount of good natured abuse.)
I’m fully willing to acknowledge that my passion for moon photography is extreme, a fact confirmed by the fact that most of the group didn’t join me photographing the moon this morning. But that’s okay—we each have our own relationship with the natural world, and my own deep interest in all things celestial predates my interest in photography by more than a decade. The fact that today’s technology (finally) enables me to combine these loves is a true blessing I will never take for granted.
One more truth was with me as I photographed that morning. All week I’d been fully aware that this was my final Grand Canyon raft trip. Drifting downstream, bouncing over rapids, and hiking to so many familiar spots, I’d spent the week silently saying goodbye to all the scenes that had moved me so profoundly on my ten visits. As I composed and clicked, I couldn’t help feel overwhelmed by the realization that this magic place had bestowed a divine parting gift.
I Still Do My Grand Canyon Monsoon Workshop
Workshop Schedule || Purchase Prints || Instagram
Grand Canyon Raft Trip Collection
Click any image to scroll through the gallery LARGE


Navigating the Path to Exceptional
Posted on May 20, 2025
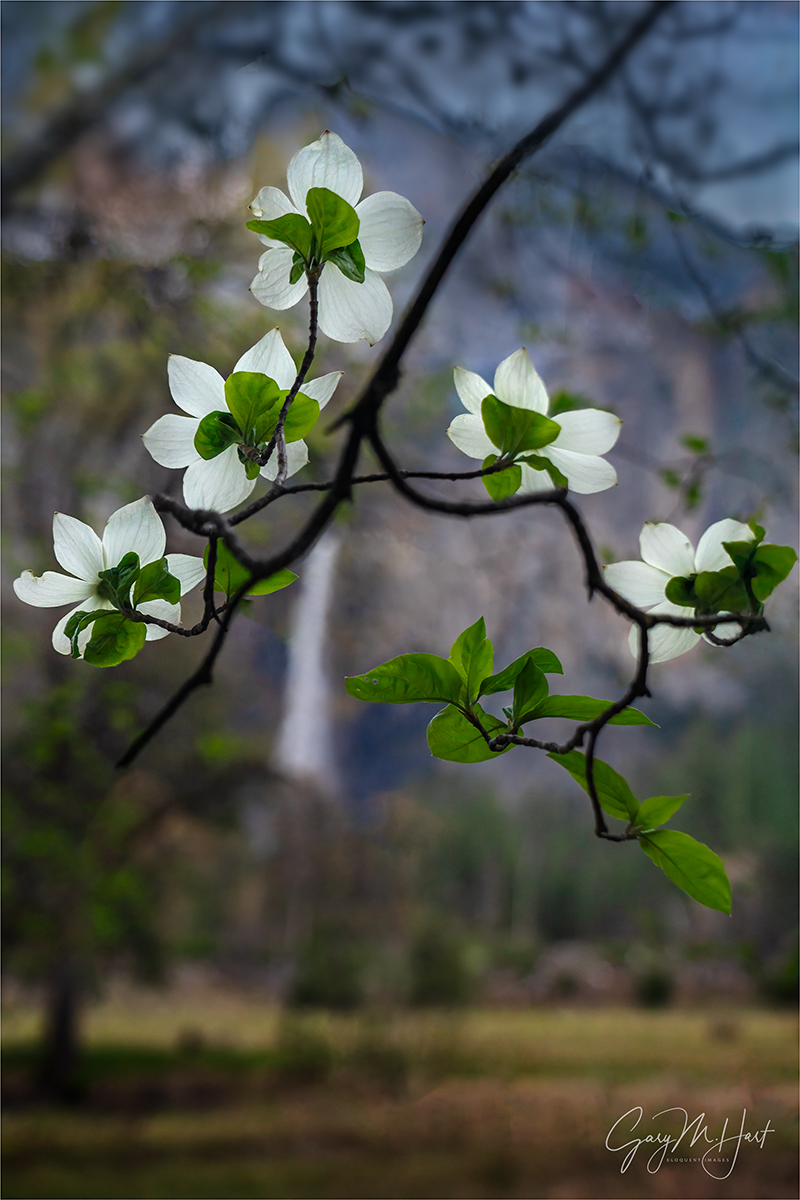
Bridalveil Fall and Dogwood, Valley View, Yosemite
Sony a7R V
Sony 24-105 f/4 G
ISO 800
f/4
1/250 second
Who doesn’t love being exceptional? Exceptional among your friends, or in your camera club, among your peers, or even in the world. Though I suspect the happiest photographers are simply content with being the best possible photographer they can be without measuring themselves against others, what fun is that?
Once upon a time, capturing exceptional images required little more than being at the most beautiful spots during the most spectacular conditions, and having a general sense for composition and metering. Today? Not so much. While there’s nothing wrong with chasing beautiful locations and conditions, these days when you work hard to get someplace special at just the right time, there’s a pretty good chance you won’t be the only one there. (But that doesn’t mean you should stop chasing beauty for beauty’s sake.)
In a world where pretty much everyone carries a camera 24/7, universal access to information makes “expert” guidance just a click away, and there’s virtually no such thing as a “secret” location, I’m afraid the “exceptional” bar just keeps rising. So, instead of settling for beautiful scenes in beautiful conditions (not that there’s anything wrong with that), how can we create images that truly stand out?
Laying the foundation
The key to capturing images that are more creative than cliché starts with understanding the vast difference between your camera’s view of the world and your own. Rather than forcing your camera to see the world as you do, lean into those differences and reveal the world in ways the eye can’t.
Fortunately, the biggest differences between camera and human vision have a corresponding exposure variable to manage them: for depth there’s aperture (f-stop); for motion we have shutter-speed; and ISO gives us control over light sensitivity. Even though you can get a perfect exposure with many combinations of these three exposure variables, there’s often only one combination where all the tumblers fall into place for the perfect combination of depth, motion, and light.
For example, photographing a crashing wave at the beach, (depending on the decisions I make with my exposure variables) the water in a perfectly exposed image could range from individual water droplets frozen in midair, to a homogenous froth of hazy white—or any degree of blur in between. Or, when I photograph a poppy that stands out in a field of wildflowers, my perfectly exposed image could range from every flower sharply defined, to only my subject-poppy sharp and the rest of the flowers some degree of soft—so soft, some are simply shapeless blobs of color.
One more factor to consider before making your depth of field choice, is the difference between humans’ naturally stereoscopic, 3-dimensional view of the world, and the camera’s single lens, 2-dimensional perspective. Even though our cameras can’t render our 3-dimensional world in their 2-dimensional medium, our perspective choices are essential to creating the illusion of depth that elevate an image.
Putting it all together
All of these factors should inform the decisions you make in the field. Instead of settling for the obvious, the path to “exceptional” requires conscious awareness of front-to-back relationships in your frame, and careful, deliberate exposure variable choices to manage the scene’s depth, motion, and light.
Which brings me to this image from last month’s Yosemite Waterfalls and Dogwood photo workshop. For good reason, Valley View (aka, Gates of the Valley for Yosemite purists) is almost certainly second only to Tunnel View on the list of most popular Yosemite photo spots. Which of course is somewhat problematic for those of us seeking to be exceptional.
Pulling into the parking lot here, before you’re even out of the car your eyes are slammed with a view of El Capitan, Cathedral Rocks, and Bridalveil Fall, with the Merced River in the very near foreground. And because the most obvious beauty is very first thing you see at Valley View, many photographers head straight down to the river to claim their version of this classic shot without first considering the other great options here.
For starters, there are three primary places to photograph Valley View: the first, and most obvious, is the view directly in front of the parking area that I just described; next, is the view slightly downstream where, instead of photographing across the river, you can photograph upstream and make El Capitan your prime subject with more foreground options; finally, there’s the view of Bridalveil Fall and its reflection, found just upstream from the parking area.
Each time I arrive at Valley View, I survey the conditions before deciding where to set up. Sometimes the whole scene is fantastic and I stay in front of the parking lot for my version of the shot that’s been taken a million times. But when El Capitan is getting the best light, I usually head strait downstream and try to build a foreground from the rocks, rapids, logs, and grass mounds. And when I want to feature Bridalveil Fall and Cathedral Rocks, I go (just a little) upstream for reflections and maybe a few protruding or submerged rocks. Regardless of my choice, I’m rarely more than 100 feet from my car, but my results are completely different.
Wherever I am, every time I compose a scene, I try to find a foreground that complements my background, or vice versa. At Valley View, my primary subject is almost always in the background (some combination of El Capitan, Cathedral Rocks, and Bridalveil Fall), so I’m usually trying to find a complementary foreground. Looking at the gallery below, you can see that sometimes I succeed, and sometimes I simply settle for a beautiful scene.
Bridalveil Dogwood, Yosemite
What sets today’s image apart in my mind is that my primary subject is in the foreground. I have the dogwood to thank for that. In fact, even though the results are entirely different, this is the very same tree I used for one of my oldest (and still favorite) images.
When I took my original Bridalveil Dogwood image, I visualized the concept (close dogwood subject, soft Yosemite icon background) on my drive to the park, then spent the day driving around until I found this scene.
Since then, that experience has made me very aware of the relationship between this dogwood tree and Bridalveil Fall, and I can’t help checking it out when the dogwood are in bloom. But, aside from the fact that I wasn’t interested in repeating myself, I couldn’t have duplicated that image even if I wanted to, because so much has changed in the last 20+ years.
First, the conditions were completely different. In the original scene, I benefited from clouds that provided softbox light, and a gentle rain and sprinkled water droplets everywhere. This time I was working with a mostly clear sky that, while less than ideal in many ways, made the backlit flowers (technically bracts, but I’m sticking with flower) and leaves light up as if illuminated from within.
The other significant difference was the tree itself, which had grown so much that my once clear line of sight from the flowers to Bridalveil was now clogged with branches, leaves, and other flowers. So instead of getting super-close to one flower, I identified an inverted v-shaped branch sporting a collection of backlit flowers.
Moving back, I shifted until Bridalveil Fall was framed by the flowers. Then I zoomed my 24-105 lens tight and open the aperture wide for maximum background softness. The flowers swaying in a slight breeze, I bumped my ISO to 800 to ensure a fast enough shutter speed. I took a half-dozen or so image, each with micro-adjustments to the composition, until I was satisfied.
Disclaimer
Is this picture “exceptional”? I have no idea. That really isn’t even my call. In fact, many of my images that feel exceptional to me barely register a reaction from others; then I’ll share an image that feels pretty ordinary to me, and people will rave about it. So who knows? But since chasing other people’s definition of exceptional can make you crazy, I just think I’ll call any image that makes me happy exceptional (in my own personal Universe) and leave it at that.
Lots of Yosemite Photo Workshops Here
Valley View: Variations on a Scene
Click any image to scroll through the gallery LARGE


Yosemite and the Joys of Spring
Posted on May 15, 2025
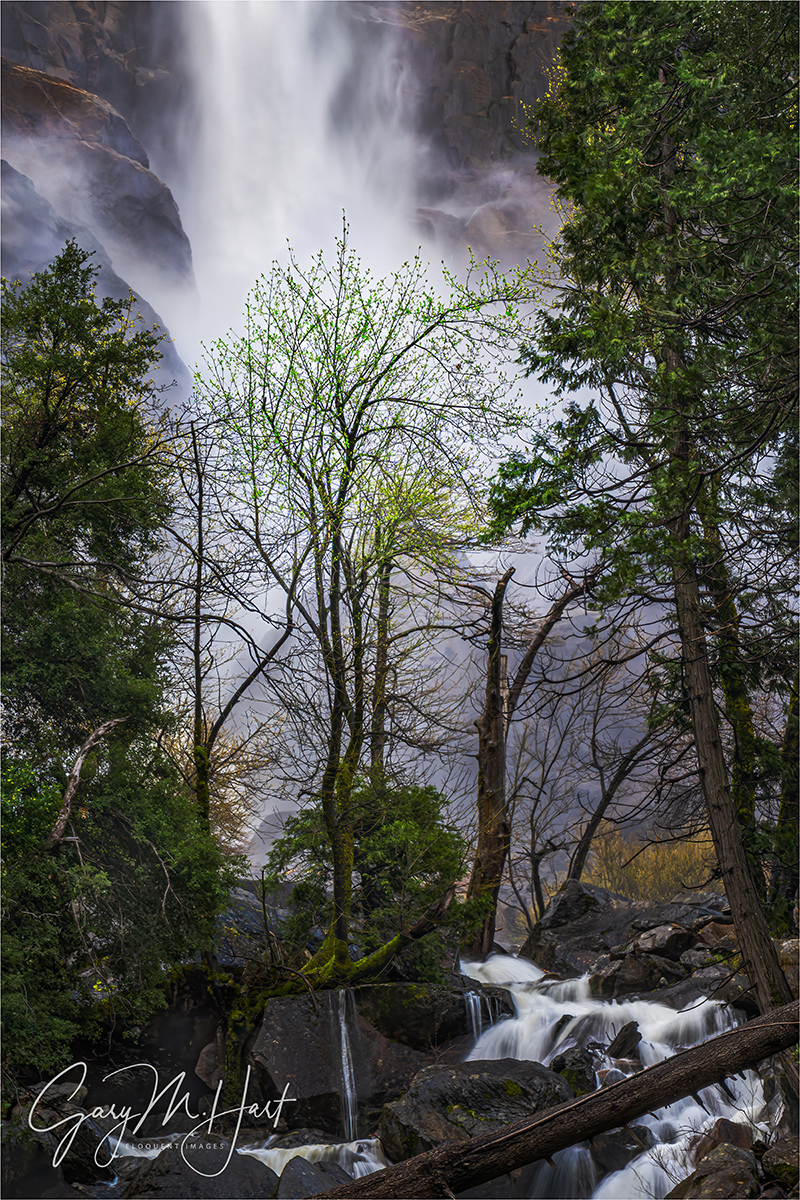
Tree and Bridalveil Fall, Bridalveil Creek, Yosemite
Sony a7R V
Sony 24-105 f/4 G
ISO 200
f/16
1/5 second
Probably the number one question I’m asked about Yosemite is, “What’s the best season for photography?” My response always sounds as if crafted by a waffling politician, but I swear I just don’t have the absolute answer everyone wants. And since I get to photograph Yosemite far more than the average photographer, and have for many years, my priorities are quite likely different than those of the average photographer.
I can say that my least favorite season is summer, because that’s when the waterfalls dry, the sky suffers from a chronic case of the blues (great for tourists, not so much for photography), and tourists swarm the park like ants to ice cream on pavement. But even summer offers beauty not possible any other season, mostly in the form of High Sierra splendor. Closed by snow most of the year, (usually) by late spring the high country roads to Glacier Point and Tuolumne Meadows have opened vehicular access to the exposed granite, wildflower-sprinkled meadows, gem-like lakes, and all the other pristine joys of Yosemite’s incomparable backcountry. And while Yosemite’s high country isn’t quite the respite from crowds it once was, its wide open spaces make solitude still much easier to find.
My own personal favorite season for creative photography is autumn. Though the waterfalls have dried completely or (at best) dwindled to a trickle, in autumn Yosemite Valley’s abundant assortment of deciduous trees throb with yellow and red. Adding to this varied color are mirror reflections in the Merced River, which has been slowed to a crawl along the length of the valley. As an added bonus, by the time the color arrives (mid/late October), dry waterfalls also mean most of the crowds have disappeared.
Winter is probably Yosemite’s most photographically variable season. Show up on a blue sky day in the midst of an (not uncommon) extended dry spell, and you’ll likely find brown meadows, trickling waterfalls, and dirt instead of snow. But arrive during or shortly after a snowstorm, and you’ll enjoy Yosemite Valley at its hands-down most beautiful—arguably one of the most beautiful sights anywhere on Earth. And since winter is the heart of California’s rainy season, the swirling clouds of a clearing storms are never more likely—even when the temperatures aren’t cold enough in Yosemite Valley to turn the rain to snow. Winter (specifically, mid/late February) is also when Horsetail Fall might turn molten red at sunset. Then there’s the rising full moon, which aligns most perfectly with Half Dome only in the winter months.
Yosemite in spring is all about the water—the season when the vertical granite can’t seem to shed the winter snowpack fast enough. Not only are the spring views dominated by well known Yosemite, Bridalveil, Vernal, and Nevada Falls, a seemingly infinite supply of ephemeral falls appear as well for a few weeks or months each spring. Rainbows on the waterfalls, dogwood everywhere, and reflective vernal pools decorating the meadows offer enough beauty to thrill tourists and photographers alike. All that water, paired with fresh green foliage, make spring the time I recommend for first-time visitors—it’s simply the season most likely to live up to expectations, and the least likely season to disappoint.
I stress about the conditions for my students before every workshop, but spring is the least stressful season for me because in Yosemite, there’s just no such thing as a bad spring day. Even though this is a relatively down year for the snowmelt that feeds the falls, last month’s Yosemite Waterfalls and Dogwood got a firsthand taste of all the joys of a Yosemite spring: plenty of water in all the falls, still pools dotting the meadows, and dogwood approaching peak bloom. And despite more clouds than usual, we had enough sunlight to photograph waterfall rainbows from four locations: three from different views of Bridalveil Fall, and one at the base of Lower Yosemite Fall.
One spot I never miss in spring is Bridalveil Creek, which offers an infinite number one-0f-a-kind scenes despite being in the heart of one of the most photographed locations in the world. Autumn is my favorite time to photograph Bridalveil Creek because I can add colorful leaves to the chain of cascades and pools beneath the fall, spring is a close second. While the creek in autumn seems to linger between each cascade, in spring it’s in far too much of a hurry to dally among the rocks.
Because of the intimate setting, its lack of a single obvious subject, and the sheer number of compositional elements begging to be composed into an image, I usually wait until the final day to bring my groups here. By then, everyone has refamiliarized themselves with their cameras, benefited from several days of training and image reviews, and had ample opportunity to get their creative juices flowing.
As usual, I started this group’s final morning at Bridalveil Creek, arriving just as the sky brightened ahead of the rising sun. Because this is an area to wander rather than stick together and photograph as a group, I began with a pretty thorough orientation, then set everyone free. I spent nearly an hour without my camera bag, just walking around trying to reach everyone to answer questions and make sure they were happy. Satisfied that all was well, I walked back to my car and grabbed my camera bag to see what I could find in the nearly one hour remaining.
I often head to the third bridge and work my way to some larger cascades (or small waterfalls) upstream; other times, especially when the group seems to require more help, I just shoot from one of the bridges. But this time I took advantage of a new gap in the trees that opened a new view of the fall just upstream from the third bridge. I’d been especially drawn to a young tree with brand new leaves, and envisioned juxtaposing it against the explosive white mist at the base of the fall. Three or four others in the group were working this scene, so I worked around them and finally ended up with the composition I’d visualized earlier.
With my 24-105 lens I started quite a bit wider, and gradually tightened my compositions as familiarity with the scene’s nuances enabled me to eliminate things. The patterns at the base of the wall changed continuously, so once I found a composition I liked, (true to form) I photographed it more than a dozen times, at several shutter speeds, to give myself a variety of water patterns and blur effects.
Join Me In Yosemite
The Joy of a Yosemite Spring
Click any image to scroll through the gallery LARGE


Ruminating on my Workflow—Both Digital and Analog
Posted on May 10, 2025

Spring Sunset, Half Dome, Yosemite
Sony a7R V
Sony 24-105 f/4 G
ISO 50
f/16
2 1/2 seconds
In one of the training sessions during last week’s Yosemite Spring Waterfalls and Dogwood photo workshop, someone asked about my digital workflow. During my (riveting) file management summary, I mentioned off-handedly that I never delete a raw file, regardless of its content. The amount of push-back I got surprised me, but it caused me to consider more closely my reasons for doing something I never imagined could be so controversial.
For starters, in addition to my primary reason for never deleting my raw files which I’ll get to shortly, I can cite several valid secondary reasons:
- Processing improvements might someday render a previously unusable image salvageable. For example, once considered a pipe dream, the ability to sharpen previously soft images has arrived, and capability continues improving. And today’s noise reduction software has allowed me to process images I once deemed so unprocessable that I would never have considered keeping them.
- I often use images from past shoots for information. Keeping each camera’s timestamp accurate (by adjusting it before each shoot) enables me to return virtually to prior locations and determine things like the time sunlight strikes a particular feature, or (by checking against past moon/sun rise/set image) the number of degrees a peak or mountain range rise above a hypothetical flat horizon.
- Applying my click-evaluate-refine-click… approach to arrive the final (“perfect”) image, it’s helpful to me to be able to reference the steps that got me to any given image.
- Knowing that I never delete anything saves me from the inevitable panic that would ensue when I can’t locate image where I expected to find it.
Each of these is a valid reason that, to me, by itself might be enough to justify a no-delete policy. But honestly, the biggest reason I don’t delete images is time. Going through each image one-by-one wastes minutes or hours that could have been spent on more productive endeavors; accelerating the image purge process by deleting large groups of images in one fell swoop, risks inadvertently expunging something important.
The most common arguments I hear in favor of culling images are organization and storage space. To which I say, locating any image isn’t a problem if you have an organized import procedure—mine is quite simple, involving a folder for each year, embedded with folders for each of that year’s shoots, then letting my Lightroom import rename each file to something descriptive. And storage space? Consider that on my desk is an 18 TB hard drive that cost me around $300. Not only does it contain every digital original (jpeg for a year or two, then raw ever since) I’ve captured since I transitioned to digital more than 20 years ago (2003), it’s still is only a half full. In other words, storage is cheap—really cheap.
I’m not advocating for my approach as much as I’m explaining it. As with pretty much everything else in photography, and despite what you might hear from self-proclaimed experts, there is no universal “best” way to do something: choose the workflow that’s best for you.
Awkward segue
“Workflow” has become something of a buzzword in the photography world, generally apply to image management. But really, it can describe the processes that guide any task from start to finish. Thinking about last week’s Yosemite dogwood workshop, it occurs to me that I also have an analog workflow for running my workshops, developed over the past 20 or so years (has it really been that long?).
A workflow is only as good as its ability to handle the unexpected or uncommon: flexibility. In my image management workflow, flexibility includes (among other things) multiple and redundant backups, including at least one offsite backup, to safeguard against any imaginable threat to my images. But that flexibility should also factor in the ability to quickly locate and access any image quickly, and in multiple ways, whether I’m at home or the road.
In my Yosemite workshops, flexibility starts with my lifetime of accumulated Yosemite knowledge that enables me to structure each workshop on the fly, based on the conditions. (FYI, I’m not trying to portray myself as the only photographer with this kind of intimate knowledge.) I start with a (mental) A-list of locations I want to get my group to no matter what, and a B-List of locations that I tap based on the conditions. And whether a photo spot is the A- or B-list, the when of each location visit is always determined by the conditions.
Last week’s workshop was a perfect example of why I never want to get too locked into a plan. We enjoyed conditions that were equal parts beautiful and challenging, requiring a lot of quick thinking and abrupt shifts to take full advantage. The fickle weather included low clouds (we didn’t even see all of Half Dome until the third day), high clouds, blue skies, light drizzle, torrential downpours, lightning and thunder, and a short-lived but generous dose of hail. Compounding the complications for me were especially unreliable weather reports that at some points felt downright random.
In a blue-sky Yosemite workshop, we may only get to Tunnel View once or twice, but when we enjoy actual weather, each visit to Tunnel View provides a completely different look. In this workshop, we made it to Tunnel View at least a half dozen times. And in a typical (more benign weather) dogwood workshop, I try to give my group time to get themselves in their creative zone by holding off on the serious dogwood shoots until day three (of four). But this time, the conditions on days one and two were so perfect for photographing dogwood (peak bloom, dense clouds, no wind), we started photographing dogwood on our first afternoon, saving the larger views for later in the workshop when the weather forecast promised that there would be fewer clouds obscuring Yosemite’s monoliths.
But photographing El Capitan and Half Dome requires El Capitan and Half Dome to actually be visible (not my first Yosemite rodeo)—since they usually disappear into the clouds when it rains, I grew increasingly concerned when the forecast for our final day started trending toward rain. One week before the workshop, our last day was “Mostly sunny, with a 10% chance of showers”; by the time the workshop started, the final day forecast was “Party sunny, with a 30% chance of showers.”
Forecasts are important because I plan locations based on conditions—not just conditions now, but my expectations of conditions later in the workshop (an inexact science at best). For my A-list locations especially, I don’t want to risk missing one entirely because I delayed until later in the workshop, only to find conditions deteriorated more than I’d expected.
For several reasons, I like finishing my Yosemite workshops with a sunset view of Half Dome from a peaceful bend in the Merced River on Yosemite Valley’s the east side. Though it’s a personal favorite that I visit a lot on my own, I also love sharing this spot with my groups. But when the workshop’s penultimate day presented a nice mix of clouds and blue sky, and the rain forecast for the final day had increased to 60%, I upended my preferred workshop workflow one more time and bumped my planned last-day Half Dome shoot to that evening.
I can’t say that my decisions always work out this well, but the personal validation is sure nice when they do. We arrived about an hour before sunset and found beautiful conditions from top to bottom. I love the fresh green of Yosemite’s brand new leaves each spring—I’d been to this spot with my moonbow group earlier in April, but the green was just starting then. This time the trees had completely leafed out and the difference was glorious. In autumn we can get mirror reflections here, but with peak spring flow swelling the Merced River, the reflection was a nice abstract of color and shape instead. And to top it all off, the clouds above Half Dome changed by the minute, making the sky much more interesting than the boring blue that’s so common in Yosemite.
Still, despite all this, my camera bag stayed on the ground nearby as I worked with my group, pointing out composition opportunities and encouraging them to find foregrounds and maybe try a neutral density filter to enable a long exposure that might reveal hidden (to the naked eye) patterns in the flowing water. As sunset approached and the light faded, some started packing up their gear. I told them not so fast: Half Dome can get light up to five minutes after sunset, and we have no way of knowing whether there’s an opening on the horizon for the sun to slip through. In other words, we’ll just sit tight for a few more minutes.
As if on queue, almost immediately I saw some of the highest clouds start to brighten and warm, so I opened my camera bag and extended my tripod, just in case. Within a minute or two the clouds above Half Dome started to pinken and I had my camera out and mounted within seconds.
There’s no time for creativity and experimentation when I’m with a group, but I’m extremely familiar with the many composition options here and went straight for my go-to good sky and reflection framing: vertical, Half Dome slightly right of center, just wide enough to include all of the best parts of the clouds (more specifically in this case, the color) and their reflection. You could call this compositional workflow (there’s that word again) that enabled me to get a nice image as quickly as possible.
Focus was easy since everything was at infinity. I wanted to emphasize the water’s motion with a long exposure, but didn’t have time to retrieve and screw on a neutral density filter. Fortunately, it was late enough that I was able to get a 2 1/2 second shutter speed using ISO 50 and f/16.
The pink only lasted a minute or two, and the direct light never reached Half Dome, but no one complained. As it turned out, our final sunset the next day was completely washed out by an electrical storm that swallowed Half Dome and El Capitan, and included some of the heaviest rain I’ve ever seen in California (and at one point chased me into the Wawona Tunnel to escape marble-sized hail).
One more thing
Going back to this compositional workflow I idea, in general I’m opposed to formulaic composition because it stifles creativity, but every image doesn’t need to break new ground, and like I said, nothing in photography is absolute…
More Yosemite Photo Workshops
Workshop Schedule || Purchase Prints || Instagram
Variations on a Scene: Images From This Location Through the Years
Click any image to scroll through the gallery LARGE


Speaking of Highlights…
Posted on April 12, 2025
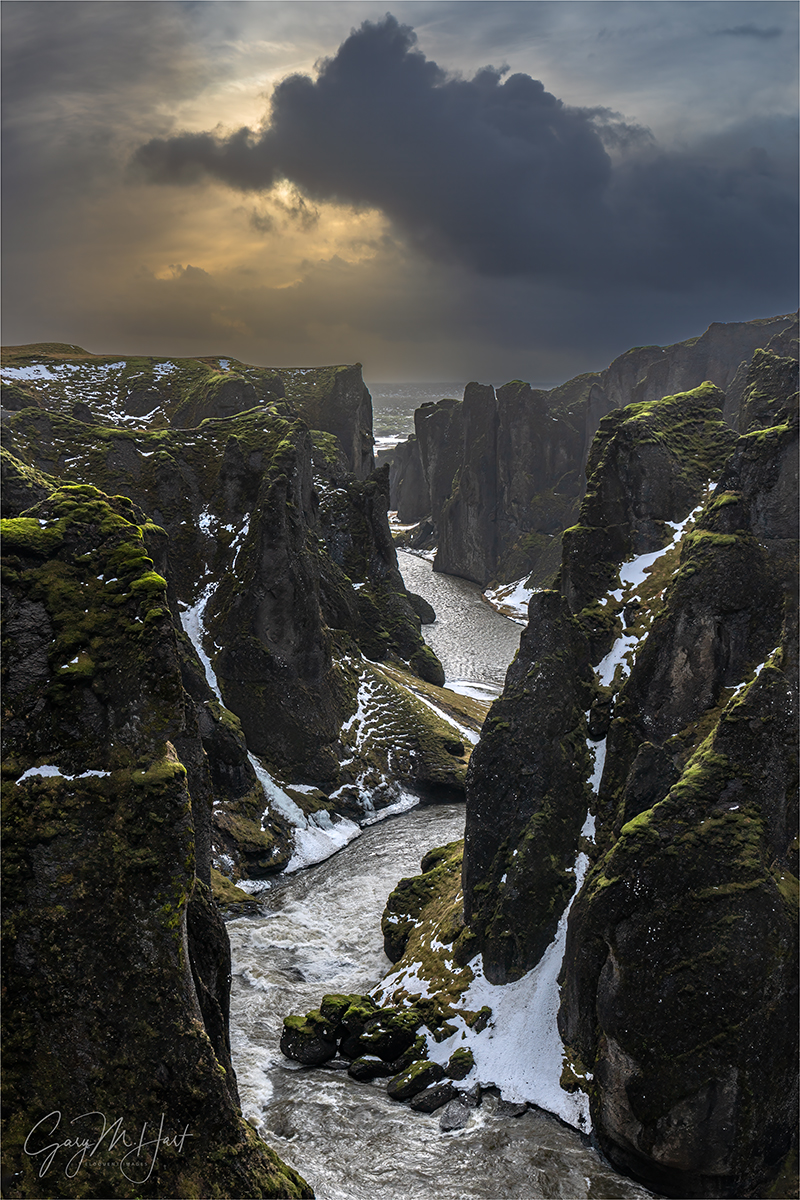
Frozen Canyon, Fjadrargljufur, Iceland
Sony a7R V
Sony 24-105 f/4 G
ISO 100
f/11
1/50 second
Fjadrargljufur, Iceland
In our annual Iceland photo workshop, Don Smith and I start with an assortment of must-see locations we’d be remiss to pass on: Kirkjufell, Glacier Lagoon, Diamond Beach, and Vestrahorn, to name a few. These Iceland highlights are well-known and photographed enough that they probably had much to do with the workshop students decision to sign-up for the workshop in the first place. But Iceland’s winter conditions, though not as cold as you might expect, can be quite harsh and unpredictable. So each, using the insights of our local guides, Don and I work to identify “new” (to us) highlights that enable us to pivot our original plan when conditions dictate. With several new waterfalls explored, this year had already been especially productive in the new options department when we explored Fjadrargljufur.
Fjadrargljufur is a short, narrow canyon carved into ancient lava flows by the Fjaðrá River. Just inland from Iceland’s rugged South Coast, access to Fjadrargljufur is via a steep (-ish), but well maintained, trail that offers several vantage points to catch your breath as you gaze up or down the canyon. After hiking a little less than a mile, you reach the trail’s end and are rewarded for your effort by two waterfalls and multiple vantage points from which to photograph them.
While not as well known as many Iceland natural icons, Fjadrargljufur is far from anonymous, so we weren’t the only ones there. But instead of the crowds that can clog some locations, the other visitors here were a complete non-factor. Last year, on our first visit to Fjadrargljufur, dense fog, snow flurries, and an icy trail prevented us from venturing far enough up the canyon to view the waterfalls. Nevertheless, we saw enough to know that this was a spot worth returning to and we were happy to make that happen this year.
On this visit we found a little snow and ice on the ground, but the trail was in much better condition. In locations like this, with well-defined trails and no forks to cause confusion (and especially when a lot physical exertion is required), we usually give everyone a be-back time and set them free to explore at their own pace. So, following a brief orientation, the group spread quickly—some didn’t venture beyond the closer (and less physically demanding) vistas, but about half of the group made it all the way to the waterfall reward at trail’s end.
I spent most of my time at Fjadrargljufur photographing the waterfalls, but as I started the walk back, I was stopped by the down-canyon view. The dense clouds that had been with us all morning had thinned, pouring sunlight into the canyon and illuminating rich green moss hugging the rocks. And the clouds that earlier had spread a homogenous, gray blanket overhead, were suddenly suffused with personality that shifted by the minute.
Surveying the scene for a composition, I knew that any camera would struggle to capture the extreme difference between the darkest shadows in the canyon and bright clouds. I also knew that my camera (Sony a7R V) would be up to the task, but only if I took extreme care with my exposure.
I digress…
In difficult exposure scenes, the single most important concern is sparing the highlights. First, since the human eye is always drawn to the brighter areas of an image (the brighter it is, the greater the attraction), blown highlights will be the first thing viewers see. If your subject is in shade surrounded by sunlight, you’re there at the wrong time. (Yes, I know that, like everything else in photography, there are exceptions, but they’re few and far between.) And second, dark shadows are usually easier to recover than bright highlights in post-processing.
This seems like a good time to mention the single biggest mistake I see workshop students make: Using the LCD preview image to make exposure decisions, instead of using the histogram. The LCD image is for composition; for exposure, you have to use the histogram. In fact, in a high dynamic range scene (a scene with dark shadows and bright highlights), if the image looks good on the back of your camera (the LCD image preview), you have almost certainly overexposed the highlights or underexposed the shadows beyond recovery.
Most common are already-bright sky scenes made impossibly bright by an inexperienced photographer exposing to make the shadows look good—the consequence is a completely white sky, or (at best) a sky with most of its color washed out. Another common rookie mistake is underexposing the sky to 0ver-saturate sunset color—the resulting sunset might look beautiful, but pulling up the shadows later will reveal mushy, detail-robbing noise.
In a properly exposed high dynamic range scene, on the camera the shadows will look a little too dark, and the highlights will look a little to bright, but neither will be too extreme to recover in post-processing (Lightroom/Photoshop for me). The best way to ensure the best possible exposure is to monitor and trust the histogram, regardless of what you see on your LCD. Want to learn more?
So anyway…

Fjadrargljufur Preview and Histogram: This is my original, unedited capture
As I always do in high dynamic range scenes like this, I started by working out my composition, taking extreme care to avoid cutting off the dark cloud that was soaring farther skyward by the second. Since motion and depth of field weren’t a factor in my composition, I just went with ISO 100 and f/11, and focused at infinity (somewhere down the canyon). That left my shutter speed to control my exposure.
With an eye on my live-view (pre-capture) histogram, I slowly lengthened the shutter time (slower shutter speed) until the histogram graph bumped up against the right side. My primary exposure concern was sparing the far more important, and more difficult to recover, highlights—even though the histogram showed my shadows were still slightly clipped, I knew my camera well enough to be confident that I could recover them later.
To illustrate why exposure decisions should never be based on the camera’s LCD preview image, I’ve shared the jpeg preview of the original raw file that appeared on my LCD, with the Lightroom version of the histogram. While the canyon looked quite dark, and the sky looked much too bright, my histogram told me everything was recoverable. Had I tried to make an image shadows or highlights that looked good, the other side of the exposure continuum would have been unusable.
Believe it or not, this file was extremely easy to process. With just two moves in Lightroom—pulling the Shadows slider to the right (+100), and the Highlights slider to the left (-100)—the scene instantly looked very close to finished result. After that, most of my processing work was minor refinements and some dodging and burning.
Speaking of Highlights…
When a workshop group spreads as far and wide as we did on this visit, it’s always fun to hear everyone’s report once we’re back on the bus. Even though people were photographing different things on our Fjadrargljufur visit, the enthusiasm seemed pretty unanimous. Of course we keep finding new locations (this year was especially productive), so it’s impossible to say we’ll be able to make it to all of the “keepers” every year, but given Iceland’s changeable and potentially extreme winter conditions, it’s always nice to be armed with more highlights than we can use.
Trusting My Histogram


Breaking My Own Rules
Posted on April 3, 2025

Follow the Lights, Snaefellsnes Peninsula, Iceland
Sony α1
Sony 14mm f/1.8 GM
ISO 3200
f/1.8
6 seconds
My goal is to create images that celebrate Nature, images that allow viewers to imagine a world untouched by humankind. So it makes sense that I avoid including anything manmade in my images. But I also rail against (most) camera clubs for their rule-bound creative constipation, and those strong feelings collided earlier this year on a chilly January night Iceland. I resolved the conflict by reminding myself that any time I’m following rules (even my own rules), I’m not being creative.
Earlier in my photographic life I was somewhat less discriminating with my subject choices. In fact, I’d actively seek any outdoor subject that I found beautiful, regardless of its origins. Though many of my bridge and skyline images from those days were on (or atop) my personal bestseller list ($$$), as my career evolved, I found myself resenting humankind’s intrusion on the natural world and became less inclined to validate that intrusion with a photograph. These subject choices eventually, and pretty organically (not consciously), evolved into my present style: photograph the world untouched by humans, which made the mere presence of a building, fence, path, or human being reason enough to put my camera down.
I don’t think it’s wrong to photograph manmade objects—in fact I enjoy others’ photos of a wide variety of subjects outside my wheelhouse—it’s just that I’m not personally drawn to photograph them. But since I am still a photographer at heart, it’s difficult to pass beauty of any sort. In recent years, I’ve scratched the itch to preserve “unnatural” beauty with my iPhone. Though I rarely do anything with these images spontaneous snaps, somehow knowing I’ve saved the scene makes me feel better.
Since becoming so hardcore about avoiding manmade objects, I have encountered a handful of scenes that tested my resolve. For example, there was that frigid night beneath the Milky Way atop Mauna Kea in Hawaii, when a giant telescope made too perfect a foreground to ignore. And the night, also beneath the Milky Way, at Cape Royal on the North Rim of the Grand Canyon, when a SpaceX Falcon 9 rocket photobombed my scene—that time I almost resisted photographing it, and am so glad I didn’t.


But whether it’s a streaking rocket, dilapidated fence, or photogenic bridge, some things are too beautiful not to preserve just because of some self-imposed rule. Most recently, on this January night in Iceland the northern lights outperformed our most unrealistic expectations, but for a little while the best display included a road and our hotel. (I already described that night in my recent Shock and Awe blog post, so I won’t bore you again with the story.)
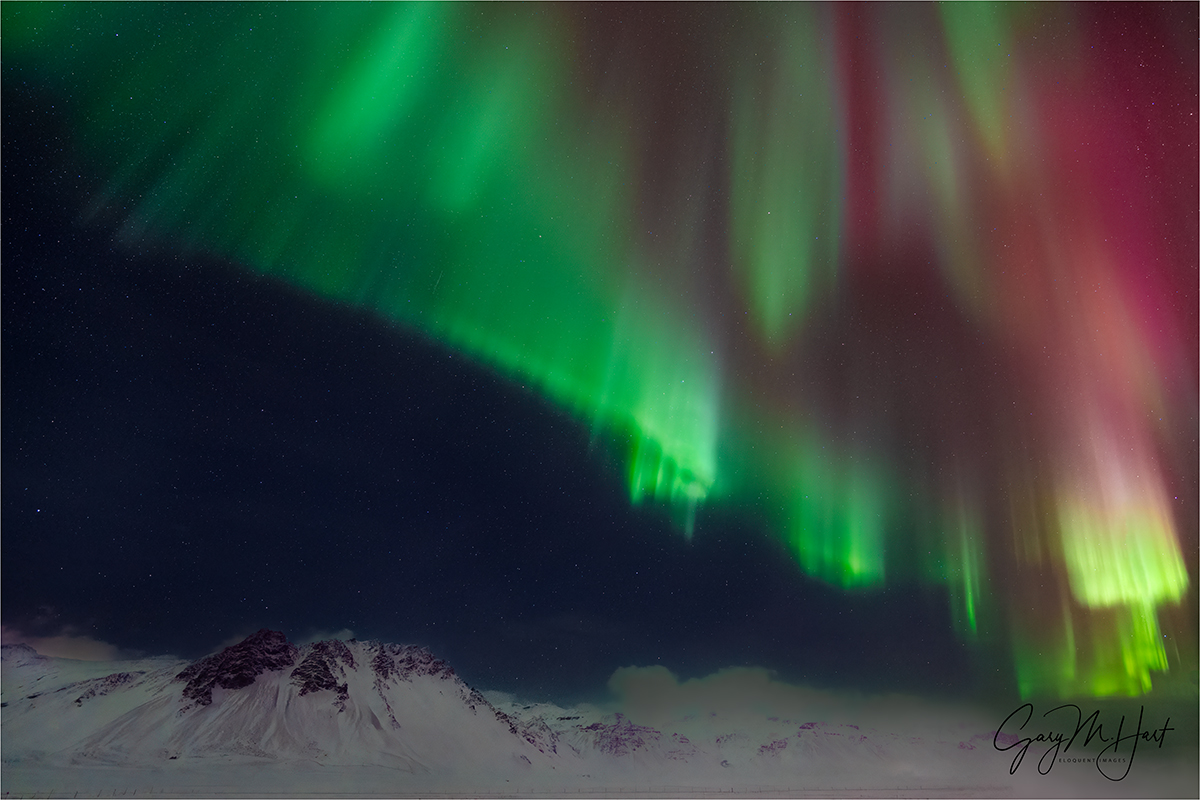
Night Lights, Snaefellsnes Peninsula, Iceland
For most this night’s kaleidoscope display, the aurora danced beautifully above snowy peaks and pristine snowfields—dark sky and no human intrusion involved. But as usually happens in the most intense aurora shows, the lights weren’t limited to the northern sky, and this evening they seemed to be especially drawn westward, where the “highway” (in the sense that it’s the main route encircling Snaefellsnes—we didn’t see a single car while we were out there) and the lights of our small hotel intruded on any scene I could imagine.
Nevertheless, I regularly checked-in on the rest of the sky and at one point just couldn’t ignore what was happening in the west. Grabbing my tripod/camera, I hustled to the road to look for any composition that might work. It was immediately obvious that the road would be unavoidable, but I saw that by moving farther west, I could at least eliminate the hotel and a few other minor distractions.
Given that the road was a non-negotiable condition of photographing in this direction, I just decided to lean into it and make the gently curving blacktop into an actual subject that guided the eye skyward. Orienting my camera vertically maximized the aurora and highway, and minimized potential distractions on the periphery. I only took a couple of frames in this direction, and it wasn’t until I saw the results on my camera that I realized how much I like this “unnatural,” rule-breaking image.
Don Smith and I just added a 2026 Iceland Northern Lights workshop
Workshop Schedule || Purchase Prints || Instagram
Human Interference
Click any image to scroll through the gallery LARGE


If You Can’t Join Them, Beat Them
Posted on March 27, 2025

Frozen Sunset, Vatnajökull Glacier Ice Cave, Iceland
Sony a7R V
Sony 12-24 GM
1/20 second
F/5.6
ISO 100
If you’ve ever photographed the slot canyons of Northern Arizona, you have some idea of the Iceland ice cave experience. Beautiful for sure, but mixing herds of gawking tourists with tripod wielding photographers, in a confined space, is also a recipe for frustration. While I’d say that Upper and Lower Antelope Canyons (the most popular of the Arizona slots) are probably more crowded than the Iceland ice caves I’ve visited (but not by a lot), slot canyons are rarely dark enough to compel visitors to don headlamps in the middle of the day. And as most photographers would agree, the only thing more frustrating than waiting for someone to douse their headlamp so you can start your exposure, is being in the middle of an exposure when someone activates their headlamp.
With larger “rooms” connected by twisting passages that can be small enough to require squeezing through or ducking your head (sometimes both), slot canyons and ice caves have much in common. While these similar features are a big part of the appeal that draws tens of thousands of visitors each year, the similarities don’t translate to the light. In a slot canyon, sunlight pouring through one narrow overhead opening creates bouncing light and dramatic contrast. Conversely, an ice cave is evenly illuminated by translucent ceilings and walls that steep its narrow confines in soft, shadowless light.
The big attraction at the slot canyons (though in my opinion, a little overrated), is the shafts of light that spotlight the red sandstone on sunny days. The fact that these shafts are only possible midday is no secret, which means photographers have to choose between battling nearly incomprehensible crowds, or missing the main event (while enduring simply moderate crowds).
That’s different from the ice cave experience, where consistent light spreads the crowds more evenly across the day. Early in our Iceland experience, Don Smith and I learned that the best way to avoid joining the ice cave crowds is to beat them—no, (tempting as it may be) not with a tripod, with the clock. Since most of the non-photography public has an aversion to going out before the sun (even, experience has shown, when sun doesn’t appear until 10 a.m.), departing for the ice cave early enough to arrive on the front-end of Iceland’s long, gray dawn can provide up to an hour of relative peace before the large vans start unloading. Of course this strategy means sacrificing a sunrise shoot (since we’ll be in the ice cave when the sun comes up), but the trade-off is usually worth it.
We learned this year that beating the crowd doesn’t necessarily mean getting out there before them—it can also mean outlasting them. Turns out another thing tourists hate is being late for dinner. So this year (as I wrote in last week’s blog), when extreme wind threatened our planned Vestrahorn sunset shoot, Don and I flipped our usual beat-the-crowd strategy upside-down and did the ice cave at the end of the day, hopeful for quality time in the ice cave after the tourists cleared out.
As soon as we arrived, we were jolted by all the frustrations inherent in mixing tourists and photographers in a confined space—each time we were lucky enough to encounter an empty space, before the group could set up and start shooting, the next herd of bobbing headlamps would approach from one direction or the other to shuffle through our scene like a slow moving freight.
While deep shadows and brilliant walls make dynamic range the greatest photographic challenge in a slot canyon, in the darkest parts of an ice cave (deep in the glacier, or smothered beneath several feet of snow on the surface), the biggest obstacle is having enough light to compose and focus, as well as the extreme ISO and long exposures an ice cave’s darkness requires. That’s why many photographers augment their ice cave images with artificial light, which of course leaks into each nearby photographer’s frame whether they want it or not. Fortunately, most ice caves have enough bright areas to satisfy those of us who only use natural light.
Much of this year’s ice cave (the location and layout can vary from year-to-year) was large enough, and bright enough, that, while waiting for the crowds to clear, I had no problem identifying lots of natural light scenes to photograph later. In the meantime, I turned my camera and 24-105 lens toward scallops and ridges etched in the cerulean ice overhead. As I worked, groups ambled by in both directions, but after a while I noticed that all of the intruders were moving toward the exit—a very good sign. Before long, we had the entire place to ourselves, with nearly an hour of useable light remaining.
Remembering similar experiences, both in slot canyons and previous ice caves, I relished another opportunity to worship in the cathedral surroundings. By this time, most everyone in the group had dispersed to their own happy places, and I felt free to explore on my own, or with one or two others. At one point I found myself in a large chamber illuminated by a battery powered LED installed by the guides. When I asked our guide to extinguish the light, the room instantly became so dark that even 30-second exposures at 12800 ISO barely registered on my LCD.
With the clock ticking, I quickly returned to the relative brightness of the cave’s main halls and chambers, spending the rest of my time working the scenes I’d identified earlier. Time flew—when the cave started to darken and I saw fewer and fewer people from the group, I started backtracking to the exit (which had also been the entrance).
On my way back, suspecting everyone (myself included!) had memory cards brimming with beautiful images, I started congratulating our decision to forego sunset in favor of the ice cave’s calm confines—who needs a sunset anyway? But when I turned the final corner and saw sunset-gold framed by blue ice, I stopped in my tracks—all this, plus a sunset? It hardly seemed fair.
With the light fading and most of the group already outside, I had to work fast. (I wanted as much time as possible, but it’s never a good look when the leader is the person everyone is waiting for.) So I set up quickly, opting for my 12-24 lens to include as much of the sculpted blue chamber as possible. I dropped as low I could, dialed the lens all the way out to 12mm, and angled up to emphasize the icy blue ceiling over the rocky brown floor (duh).
The exposure was quite tricky, because the light outside was so much brighter than inside the cave. Once my scene was composed and focused, I adjusted my shutter speed with an eye on the histogram, pushing the highlights all the way to the right border. The LCD preview showed a bright (but not blown) sky and nearly black ice cave, but my confidence in my Sony sensor was validated when I processed the image in Lightroom/Photoshop. (As with all my images, this was a single click—no blending exposures.) On my LCD, the only thing visible inside the cave was the sunset reflection on the ceiling, a bonus I hadn’t counted on.
I only had time for a half-dozen or so frames before I heard the approaching voices of the group’s final stragglers and quickly collapsed my tripod to beat them out of cave.
Join Don and Me in Iceland
Workshop Schedule || Purchase Prints || Instagram
Ice Caves and Slot Canyons


