Eloquent Images by Gary Hart
Insight, information, and inspiration for the inquisitive nature photographer
Cliché for a reason
Posted on October 29, 2013

Autumn Snow, Valley View, Yosemite
Canon EOS 5D Mark III
1/15 second
F/16
ISO 100
24 mm
It’s actually even a cliché just to say it, but some things really are “cliché for a reason.” And as much as I try to avoid the cliché shots in Yosemite, sometimes they just can’t be helped.
My Yosemite Fall Color workshop began yesterday, and even though I’d spent all day Saturday in the park, yesterday morning a storm filled Saturday’s blue skies with rain and I felt like I should go check on the conditions before we started. The wet weather had slowed me enough that I didn’t really have time to take pictures, but when I found not only the red and yellow leaves I’d seen on Saturday, and the swirling clouds I’d hoped for, but also Yosemite Valley’s colorful trees and meadows etched with snow, I was tempted at every turn to reach for my camera. Nevertheless, with the exception of a brief breakdown at Cook’s Meadow, I managed to resist temptation.
Unfortunately, the Cook’s Meadow stop had put me even more behind schedule, so I told myself while approaching Valley View that any stop here would be just reconnaissance. And anyway, Valley View images are a dime a dozen, clichés that I’d done more than my share to perpetuate over the years. Then I got there….
I mean seriously, cliché or not (deadline or not), how does a photographer pass up a scene like this? With my group meeting me in just an hour, I really, really didn’t have time for pictures, which is exactly what I kept reminding myself as I leaped from my car, snatched my camera and tripod, and sprinted down to the river. I only snapped four frames, two vertical and two horizontal, before racing back to the car and toward my impending rendezvous.
It’s images like this that remind me that nature’s beauty transcends any human judgement of “cliché.” Pro photographers, myself included, can get a little snobbish about frequently photographed scenes. And while I think it’s important to take the time to find a unique perspective, sometimes it’s best to let Mother Nature speak for herself.
Happy ending
I made it to my workshop with minutes to spare, conducted a lightning-fast orientation, and hustled everyone back outside as quickly as possible. We ended up circling Yosemite Valley several times, photographing without a break until dark. I heard no complaints.
A gallery of clichés


Shocking truths about lightning
Posted on October 23, 2013

Color and Light, Bright Angel Point, North Rim, Grand Canyon
Canon EOS 5D Mark III
1/3 second
F/11
ISO 100
24-105 f4L lens
While working on an upcoming “Outdoor Photographer” magazine article on photographing lightning at the Grand Canyon, I’ve been revisiting the images from my August workshop with Don Smith. While I still feel like I’ve only scratched the surface with the trip’s lighting images, it’s clear that at least half of my captures came on that amazing final morning, when we witness two hours of virtually nonstop lightning punctuated by a vivid section of rainbow balanced atop Powell Point. The first image I posted from that morning included the rainbow sharing the rim a trio of simultaneous, parallel strikes. The difficulty I’m having now is choosing which of the other pretty spectacular images to feature (FYI, this is a great problem to have).
Fortunately, I varied my compositions enough that many of my favorite captures are different from each other. Here, a single strike lands just east of the rainbow, close enough that they somehow seem related. This image is an example of why I’m constantly preaching to my workshop participants to switch between horizontal and vertical, even (especially) when one orientation seems more obvious than the other. Fortunately, I practiced what I preached (not always a sure thing) throughout the morning—instead of having one great capture of lighting with that morning’s rainbow, I now have two (and counting) that are different enough from each other to share.
Another byproduct of my magazine article is the research I’ve been doing on lightning. I’ve always been something of a weather geek, but it seems each time I revisit a topic, I learn something new. So, while I doubt you’ll find this stuff quite as fascinating as I do, here are some cool lightning facts I just can’t resist sharing:
- Earth is struck by lightning eight million times each day.
- While lightning is still not completely understood, scientists know that the rapid upward and downward motion of raindrops in a thunderstorm creates extreme electrical polarity—a negative/positive imbalance within a cloud, between clouds, or between a cloud and the ground. Nature abhors any imbalance and will remedy the problem as efficiently as possible: Lightning.
- The visible portion of a lightning strike originates on the ground and travels up to the cloud.
- In a lifespan measured milliseconds, a lightning bolt can release 200 million volts and heat the surrounding air to 50,000 degrees. More than enough to fry a photographer.
- Most of us know that lightning and thunder occur simultaneously. What many don’t know is that you can’t have one without the other—it’s the lightning that causes the thunder, and if you see lightning but hear no thunder, you’re just too far away. This even applies to what is often called “heat lightning,” which still generates thunder you’d hear if you were close enough.
- The fact that lightning and thunder occur simultaneously, but light travels much faster than sound, allows us to roughly establish the distance of the lightning. For all intents and purposes, we see the lightning the instant it happens, while the thunder pokes along at the speed of sound, a pedestrian 1,100 feet per second. That works out to about five seconds to travel one mile. So, if you start counting as soon as you see lightning (one-thousand-one, one-thousand-two, …), dividing by five the number you’re at when the thunder arrives gives you the approximate distance in miles.
- Let’s say you get all the way to fifty before the thunder arrives—that would be ten miles. You’re safe, right? Wrong. Lightning bolts exceeding one hundred miles in length have been documented, as have bolts with no rain and even with blue skies overhead. That’s why we’re warned to stay inside whenever you can see lightning or hear thunder. (It’s also why I say do as I say, not as I do.)
- A car is not a magic lightning sanctuary, and the safety a car does offer is because of its metal frame, not its rubber tires. (Don’t believe me? Go stand on a couple of rubber tires in the next lightning storm and have your next of kin report back to me.) Even when you’re inside a car, you need to keep the windows up and don’t touch anything metal. And stay away from convertibles.
Here are a couple of lightning safety websites:
Are you interested in risking your life to photograph lightning? Join me in a Grand Canyon photo workshop.
A Lightning Gallery
Click an image for a closer look and slide show. Refresh the window to reorder the display.


Night and Day
Posted on October 9, 2013

Night and Day, Crescent Moon Rising Above Mono Lake
Canon EOS 5D Mark III
3.2 seconds
F/5.6
ISO 800
40 mm
October 2013
It’s dark. It’s cold. It’s early—so early that some would still consider it late. But you drag yourself out of bed anyway, for the promise of something most people never experience. And experience is the operative word here, because it’s much more than just the view. Or the photography. It’s the opportunity to witness the transition from night to day, to bask in a quiet that’s impossible in our metropolitan mayhem, to inhale clean, chilled air, and to watch the rising sun’s warm hues push back Earth’s indigo shadow to devour the twinkling vestiges of night. Of course you can watch this happen in reverse after sunset, but it’s just not the same in a world has been lived in for a dozen or so hours.
I’d scheduled this year’s Eastern Sierra workshop to conclude on the one day each month when a sliver of moon floats in the transition between night and day. To photograph the moon this small and close to the sun, I try to be in place an hour before “official” sunrise (the posted sunrise time, when the sun would crest a flat horizon), when darkness still predominates. With a five mile drive on a rugged, unpaved road, and a half mile (or so) trail-less walk through sand and mud, I got the group on the road at 5:15 for our 7:00 a.m. sunrise. Despite some blurry eyes, there was no grumbling; and by the time we were ready to trek to the lake, everyone was in great spirits.
On this morning Mother Nature rewarded us by chasing away the clouds that had dogged the horizon the last couple of days. These clouds had given us brilliant color, but had also preempted our night photography shoot just ten hours earlier; I was concerned that they’d obscure the moon I’d been so looking forward to. No problem—in the clouds’ place we found this two-percent slice of old moon, one day removed from new, just as I’d ordered. Phew.
Because this was the last day of the workshop, everyone had pretty much mastered the difficulty of exposing for a dark foreground beneath a bright horizon—some blended multiple exposures, others reached for their graduated neutral density filters—allowing them to concentrate on creativity. I tried a variety of compositions, horizontal and vertical orientations from wide to tight, and encouraged the rest of the group to do the same (though I suspect that by now they’d all learned to tune me out).
This is one of the first images I captured that morning. It was still dark enough that the amount of light required to bring out any detail in the foreground also revealed lots of lunar detail in the earth-shadow, and stars still pierced much of the sky. Nice. To ensure that I didn’t get motion blur in the moon, I made some compromises: I dropped to f5.6 (depth of field wasn’t a concern, but lenses are slightly slightly less sharp as the approach their extreme apertures) and bumped to ISO 800 (with my 5D Mark III and today’s noise reduction software, noise at ISO 800 is no longer much of a concern). For most of my images that morning I used a two-stop hard-transition graduated neutral density filter to subdue the bright horizon, but this was one of my earliest images, captured before that was necessary.
The group was pretty quiet for most of this sunrise, usually a sign that they’re pretty happy with what they see and the images they’re capturing. Every once in a while I’d answer a question, or offer suggestions, but it seemed like people were pretty much “in the zone.” Nevertheless, I did pause couple of times to remind everyone not to get so caught up in their photography that they forget to appreciate what we’re witnessing.
These ephemeral moments in nature change subtly but quickly—soon the stars disappeared and moon faded into the advancing daylight. By the time the sun crested the horizon, our attention had turned to the warmly lit peaks behind us. And then it was over.
Favorite: Sunrise Mirror
Posted on September 24, 2013

Sunrise Mirror, Mono Lake
Canon EOS-1Ds Mark II
1/60 second
F/10.0
ISO 200
32 mm
This is the second installment in my semi-regular “Favorites” series
* * *
Some things you just can’t plan. But if you have experienced the disappointment that comes when preparation, sacrifice, and extreme discomfort end in complete failure, yet have still gone back out the next time and the next time and the next time, Mother Nature will sometimes reward you with gifts of exquisite beauty. More than the successful shot that was planned and executed to perfection, it’s these gifts that keep me going back out with my camera when I’d so much rather be at the dinner table, curled in bed, or reading by the fire.
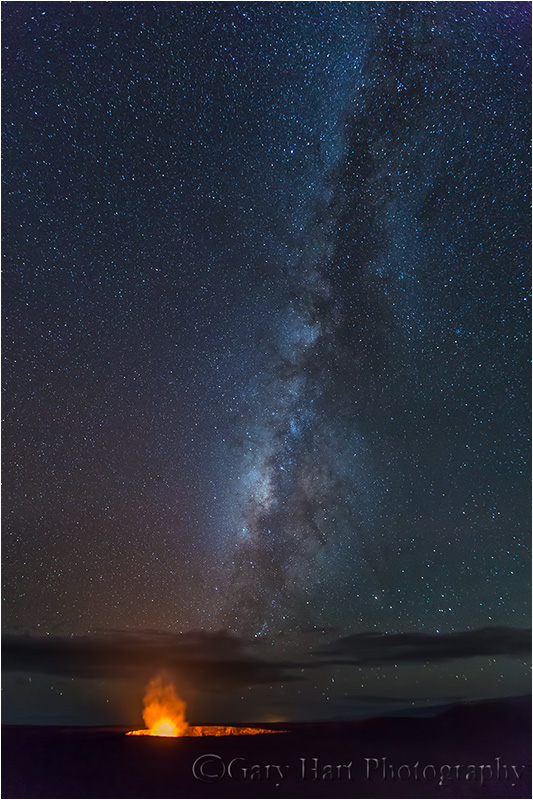
I’ve had a few of these unexpected blessings in my photographic career: Half Dome emerging from a churning caldron of clouds, barely visible in the very last light of day; a persistent double rainbow arcing above the full breadth of Yosemite Valley; the Milky Way, framed by glowing clouds, pouring into Kilauea Caldera; and most recently, a magic morning at the Grand Canyon, when the lightning wouldn’t stop and the first rays of sunrise balanced a vivid rainbow on the canyon’s rim. Another of those moments was this sunrise at Mono Lake. It was the final day of a trip with my brother to photograph fall color in the Eastern Sierra. Facing a long drive home, and despite a weather report promising clear skies, we rose in the dark and went out in the October chill anyway.
That I’ve been able photograph these moments with my camera is my great fortune. But with or without my camera, every detail of being there is permanently etched in my memory—not just the visual, but who I was with, where I might have been instead, and the joy of feeling like I’m witnessing the most beautiful thing happening on Earth at this moment. It’s these permanent, visceral memories that drive me from bed, warm my flesh, and calm my angry stomach when thoughts of comfort try to keep me home.
A star is born
Posted on September 17, 2013

New Day, Bright Angel Point, North Rim, Grand Canyon
Canon EOS 5D Mark III
3.2 seconds
F/20
ISO 200
16 mm
Truth be told, I’m not a huge fan of sunstars (a.k.a. starbursts). Cool as they are, sunstars have become ubiquitous to the point of cliché. So why do I shoot them? Because sometimes there’s little else you can do when the sun intrudes on the scene you came to photograph. In other words, they’re often more of a lemonade-from-lemons kind of thing.
Despite their ubiquity, sunstars work because there’s universal resonance to witnessing the sun kiss the horizon—I mean, who doesn’t have a warm memory of watching from a special location as the sun begins or completes its daily journey? These moments touch us on a literal, visual level (they’re beautiful), but I think more significantly they serve as a metaphor for the hope or closure we all long for.
Unfortunately, doing justice to these moments in a photograph is difficult: Including the sun in your frame introduces lens flare, extreme (often unmanageable) contrast, and an unattractive eye magnet that overpowers the rest of the scene. And while a sunstar doesn’t capture the literal experience, it does do a pretty good job of conveying the metaphor.
The good news is, despite the difficulties, creating a sunstar is relatively straightforward. Here’s a quick recipe:
- Start with a brilliant, fine point of light: The sun is the most logical candidate, but you can do it with the moon, stars, and pretty much any bright artificial light (lighthouse, headlights, and so on). The finer the light source the more precise the star effect will be, and the less lens flare and blown highlights you’ll have. If it’s the sun you’re using, virtually all of it needs to be hidden to get the delicate, symmetrical distribution of beams that generally work best. In this image the horizon hides most of the sun, but you can use a cloud, tree, rock, or whatever.
- The smaller your aperture, the finer your sunstar will appear: I generally use f16 or smaller (larger f-number).
- Do something to control the highlights: When the sun is entering your frame, you’re invariably dealing with a sky that’s much brighter than your foreground and will need to take steps to avoid the foreground of murky shadows. If you have a foreground shape or shapes against the sky, you could turn the foreground into a silhouette. But when I want to capture foreground detail, I use graduated neutral density filters to hold back the brilliant sky. My 3-stop reverse is my go-to GND in these situations; in particularly difficult light I’ll stack it with a 2-stop hard GND. Whenever I use a GND, I find Lightroom or Photoshop dodging/burning is a great way to disguise the telltale GND transition. HDR blending of multiple images is another way to mitigate extreme sky/foreground contrast (but I don’t do HDR, so you’ll need to Google this).
- Different lenses will yield different results: Experiment with your lenses to see which one gives the most pleasing sunstar effect. For example, I recently replaced my faithful 17-40L lens with a 16-35L Series II lens, and while I was satisfied with the sunstars from my 17-40, the 16-35 results are clearly better.
- Practice: You can practice sunstars any time the sun’s out. Just go outside with your camera, dial in a small aperture, and hide the sun behind whatever object is convenient (a tree, your house, etc.).
On the morning of this image from last month at the Grand Canyon, I had no plan to photograph. But I was working with a workshop student and we found this nice little scene off the trail to Bright Angel Point. The clouds had assembled into an organized formation that seemed to emanate from just beyond the horizon, and when they started to vibrate with sunrise color, I couldn’t resist. I quickly composed my scene, dialed down to f20, metered on the foreground, and stacked my 3-stop reverse and 2-stop hard graduated neutral density filters. The sun appeared a few seconds later and I fired off several frames before its brilliance overcame my filters’ ability to hold it back.
The calm above the storm
Posted on September 12, 2013

The Calm Above the Storm, Grand Canyon and Lightning by Moonlight, Mather Point
Canon EOS 5D Mark III
30 seconds
F/4
ISO 200
73 mm
If you’ve ever taken off in a violent storm, watched the exploding sky just beyond your window, felt the plane buck until you verged on panic, then suddenly broken through the clouds into utter peace, you might appreciate the dichotomy depicted in this scene.
* * * *
Overwhelmed by the euphoria the Grand Canyon workshop’s final sunrise was this moonlight experience on the South Rim a couple of nights earlier, the highlight of the workshop until that unforgettable morning. Don Smith and I had planned all along for this to be the group’s moonlight night, always a workshop highlight, but we got much more than we bargained for when we found the North Rim under a full scale assault from multiple electrical cells. The moonlit tranquility of our South Rim vantage point was a striking contrast to what was happening across the canyon. Several times per minute the clouds would strobe with lightning hidden by the clouds, and once or twice each minute a bolt would land near the rim for all to see. Above all this activity, the stars twinkled peacefully, clearly indifferent to the violence below.
Unlike the moonless experience at Kilauea a couple of weeks later, photographing with a full moon is pretty straightforward. Not only does the moon make a great focus point (just don’t forget to turn off autofocus before clicking your shutter), you can actually see your camera, its controls, the scene itself, and all potential obstacles (photographers, tripods, camera bags). And because exposures are generally short, do-overs are easy. So my job was easy, pretty much reduced to wandering around reminding everyone to vary their compositions, and making sure they’d all had a success.
Everybody got something that excited them that night, and the variety of images was amazing. I saw vertical and horizontal frames, wide and tight, most aimed north like this one, but there were also some great lightning captures to the east, up the canyon. My own favorite was this one that captured a bolt’s origin through a window high in the clouds, and its forked impact with the rim. While a wide composition would have increased the likelihood of capturing a strike somewhere in my frame, it would have also further shrunk the already distant lightning. My 73mm focal length in this case reflects my desire to make the lightning more prominent, and my confidence in the frequency of strikes in this direction (the more disperse the strikes, the wider I compose). Usually my night exposure decisions are designed to minimize star motion, but in this case I opted for 30 seconds to maximize the chance for capturing a strike (or more) during the exposure—a close look at the stars here clearly shows the onset of motion blur despite the fact that I was aimed north, where star motion is minimal.
This image reminds me why video is no substitute for still photography. Video’s benefits are undeniable, but the ability spend forever in a single instant like this is priceless.
Heaven and Hell
Posted on September 8, 2013

Gates of Hell, Halemaʻumaʻu Crater, Kilauea, Hawaii
Canon EOS 5D Mark III
4 seconds
F/2.8
ISO 3200
27 mm
Caving to demand, I took my Hawaii workshop group back up to Kilauea last Thursday night. While we didn’t get stars this time (not even close), we found something that was equal parts different and cool. If the first night’s display was Heavenly, the reprise was Hellish. We finished Tuesday with a new appreciation for our small place in this magnificent Universe; Thursday we were left awestruck by the power of nature’s creative force churning beneath us.
Everyone was thrilled to have the dark, clear skies we saw Tuesday night, but given that this was the first time doing night photography for most of the group, everyone wanted another opportunity apply their new-found skill. Before departing, I reminded them of Mother Nature’s fickle inclinations, and warned them that repeating Tuesday’s clear skies was far from a sure thing. However, I told them, clouds can be pretty cool too. They were dubious, and somewhat disappointed upon arrival—until the first images popped up on their LCDs.
Believe it or not, these images from our two volcano nights are pretty much what we all saw on our camera LCDs (very little processing necessary). They’re a good reminder of our camera’s ability to show aspects of the natural world that are missed in the human experience. A frequent photographer’s lament is the camera’s limited dynamic range (the range of tones between the darkest shadows and brightest highlights), but one advantage a camera does have over human vision is its ability to accumulate light over time. On Tuesday night, our sensors pulled from the darkness stars that were invisible to the naked eye (and also nicely brightened the Milky Way); on Thursday night, a long exposure revealed unseen cloud detail illuminated by Halemaʻumaʻu’s orange glow. Also, on Tuesday night so much of Kilauea’s glow escaped into space that the caldera floor (beyond the inner crater) remained nearly black despite a lengthy, high ISO, large aperture exposure. But on Thursday night the clouds reflected the volcano’s light back to Earth, bathing the caldera floor in an orange glow that our cameras captured beautifully.
Our cameras also allowed us to infer one more difference between the two nights: The crater glowed significantly brighter on Thursday night. I learned from a rim-side chat with a naturalist on Tuesday that Halemaʻumaʻu’s luminosity varies with the composition of its output—the higher the ratio of sulfur gas to water vapor, the brighter it glows. While this difference is sometimes difficult to detect with the naked eye from one night to the next, it became obvious when I realized that in Tuesday’s images the highlights in the crater’s burning core were recoverable in Lightroom, while the same bright region in Thursday’s images was hopelessly blown at the same exposure. Fortunately, on Thursday night I opted for a shorter shutter speed to better “freeze” Halemaʻumaʻu’s gas plume—this left the caldera a little dark (but still brighter than Tuesday), but really reveals the plume’s character.

Halemaʻumaʻu Crater, Kilauea, Hawaii
Canon EOS 5D Mark III
15 seconds
F/2.8
ISO 3200
16 mm
Last night, at the volcano…
Posted on September 4, 2013
Milky Way Above Halemaʻumaʻu Crater, Kilauea, Hawaii
Canon EOS 5D Mark III
15 seconds
F/2.8
ISO 3200
16 mm
Sitting here on my balcony above Hilo Bay, it’s hard to believe that 10 days ago I was photographing sunrise lightning on a chilly morning at the Grand Canyon. But there’s Mauna Kea, and over there is Mauna Loa. And it’s 6 a.m. and I’m in shorts and flip-flops, so this really must be Hawaii. Ahhhh.
Oh yeah, it’s all coming back to me…. Last night I took my Hawaii workshop group up to Kilauea to photograph the volcano beneath the stars. I always stress about this shoot in particular because the opportunity to photograph the glow of Halemaumau Crater beneath the Milky Way is what brought many of the workshop participants to Hawaii in the first place. My stress is due to factors largely beyond my control: clouds, inadequate equipment (“The guy at Best Buy said this tripod should be fine”), technical problems (“Oh, I thought a five percent battery charge would be enough”), and just plain user error (“It looked sharp in the LCD”). Each year I do my best to mitigate as many problems as I can: I send copious reminders (“Don’t forget to bring…”) and how-to documents (starting months in advance), give a night photography training session the afternoon of the shoot, do a group equipment set-up and checklist in the parking lot before we walk out to the view point, and frequently check on participants during the shoot. But while all that preparation seems to help, so far I haven’t been able to do anything about the weather. The best I’ve been able to do is time my primary volcano shoot early enough in the workshop to allow us the option of returning in the event of a mass fail.
So yesterday afternoon we drove up to Kilauea, stopping first at the Visitor Center (I’m something of a souvenir T-shirt addict), then walking through the lava tube (always a hit), before wrapping up the daylight portion of the day with a really nice sunset at the Jaggar Museum (the closest point from which to view the caldera). Then we headed to dinner beneath a tantalizing (traumatizing) mix of clouds and sky—were the clouds incoming or outgoing? Dinner was great, but I’d have surely enjoyed it far more if I’d have known we’d leave the restaurant and see starry skies. And stars there were, millions and millions (or so it seemed). Phew.
Once the stars did their part, the rest of the night was up to me—despite all the preparation, I know from experience that basic photography skills such as composition, camera adjustments (even though I’d given everyone starting exposure values in the parking lot, most people usually need to tweak something), and (especially) finding focus, become completely foreign in the near absolute darkness of a moonless night. These problems are compounded by the fact that a flashlight, while necessary to light the path to the location, is absolutely taboo once we’re there (their light can leak into others’ frames, and flashlights make it almost impossible to adjust to the darkness)—instead we rely on the soft glow of our cell phone screen to see our controls.
I started with a test exposure to verify the exposure values I’d had everyone set earlier. So far, so good. Then the real fun began—for the next 45 minutes I bounced from pleading shape to pleading shape (faces are unrecognizable): “My camera won’t focus” (Try auto-focusing on the caldera—if that doesn’t work, we try creative solutions such as auto-focusing on a flashlight 100 feet up the trail or a best-guess manual focus on the caldera rim); “My camera won’t shoot” (Turn off autofocus);“ Is this image sharp?” (Magnify the LCD and zoom in on the stars or caldera wall); “My picture is black” (The correct exposure is 30 seconds, not 1/30 second). And so on. (I should make clear that these problems were more an indication of the disorientation caused by the darkness than a reflection of the photographer’s skill.)
But slowly the cries for help turned to exclamations of joy as successful images started popping up on LCDs. Pretty soon I was wandering around looking for someone who needed help, anyone…. When it finally became clear that my offers to help were more of a distraction, I returned to my camera (no small feat in the dark) and tried a few frames of my own. While I had no illusions of getting anything new (or even anything much different than what others had), I tried several variations. Most of my images were oriented vertically to maximize the length of the serpentine Milky Way, and to minimize the black void surrounding the glowing crater. I also varied my focal length a bit, and played with my ISO and shutter speed settings so I could choose later (with the benefit of a larger screen) between more noise, less star motion and vice versa.
In addition to the photography, I always make a point to stop everyone and remind them to simply appreciate what we’re viewing. The orange glow is molten rock, the newest material on the Earth’s surface; overhead are pinpoints of starlight that originated tens, hundreds, even thousands of years ago. It’s both humbling and empowering.
We finally wrapped up a little before 11. Everyone seemed quite happy (okay, downright giddy) with what they’d gotten. At breakfast this morning a few people said they’d checked their images after returning to the hotel, but most said they just collapsed into bed. Nevertheless, I’m already starting to receive whispered requests to return to Kilauea one more time. I won’t take a lot of convincing.
* * * *
:: Join me next year as we do this all over again in the 2014 Hawaii Big Island Volcanoes and Waterfalls photo workshop ::
It’s more than a hole with red rocks
Posted on September 1, 2013

Wildflowers and Aspen, North Rim, Grand Canyon
Canon EOS 5D Mark III
1/80 second
F/4
ISO 200
32 mm
Still charged with energy from the Grand Canyon lightning/rainbow Three Strikes morning, I decided to change things up and visit some of the trip’s more intimate, albeit less spectacular, images, scenes that portray the underrated diversity of the Grand Canyon’s beauty. Despite a wealth of options, I knew immediately that I wanted to start with a wildflower discovery the second group made at East Rim View. (Actually, credit for the discovery goes to workshop co-leader Don Smith.) Don and I had been at this spot on a scouting trip a few days before the workshops began, immediately recognizing it as the best location to combine the North Rim’s beautiful wildflower display with a more expansive view of the Grand Canyon and (especially) the Vermillion Cliffs. While we liked the view enough to stage both workshop group-photos here, we nevertheless tried to time our visits for the overcast skies and calm winds that make for the best wildflower photography.
As the group slowly trickled back to the the cars around the prescribed departure time, Don and a couple of participants returned with word of a wildflower discovery in the woods just a few hundred yards up the trail. The description sounded too good to be true, but when Don shared a few LCD previews of what he’d found, I was sold. So, after a quick consultation, Don and I jettisoned Plan A and added another hour to our East Rim View stay. Good call.
What we found was everything promised: a mature, sprawling aspen grove, carpeted with a dense array of yellow, daisy-like wildflowers (I don’t know what these flowers are, but I’m sure some reader will illuminate me). Virtually untouched by wind and evenly illuminated beneath a heavy, gray sky, this was macro photography heaven. But rather than do the obvious and pull out my macro lens and extension tubes, I decided to do the entire shoot with my 70-200 and 16-35 lenses, playing with compression, perspective, and depth. Using my 70-200, I compressed the background (made it appear closer to my subject than it really was); getting up-close with my 16-35, I emphasized the foreground and expanded the background. I also had tons of fun playing with depth of field—when I found a composition I liked, I ran entire range of f-stops, from f2.8 to f22, in one-stop increments. After reviewing these images on a big screen, I decided I prefer the narrow DOF frames for the way they guide the eye where I want it to go, rather than distract with the extraneous background detail the small aperture frames displayed.
I find it a bit ironic that, while intimate images like those in here are usually far more reflective of a photographer’s skill and creativity than the spectacular moments captured in scenes like the Three Strikes image, it’s the spectacular that commands the most attention (just count the number of Facebook “Likes”). In most of my lightning images, the most challenging aspect was being there; on the other hand, these wildflower scenes not only required discovery, most involved contorting while flat on the ground, and each required careful management of every aspect of the scene, from relationships, depth, light, and motion.
The entire group got similar stuff on our lightning morning (while so far I haven’t seen any others who were fortunate enough to get three parallel strikes, that’s exactly what my image was: the good fortune to click at just the right instant). On the other hand, I’m pretty sure nobody else got anything like these wildflower images (nor did I get wildflower images like the others got). So does that mean I like these wildflower images more my “Three Strikes” image? Uh…, no. That was a once-in-a-lifetime capture that every landscape photographer dreams of. But I think ultimately I take more pride in the skill and effort required to craft something like these.
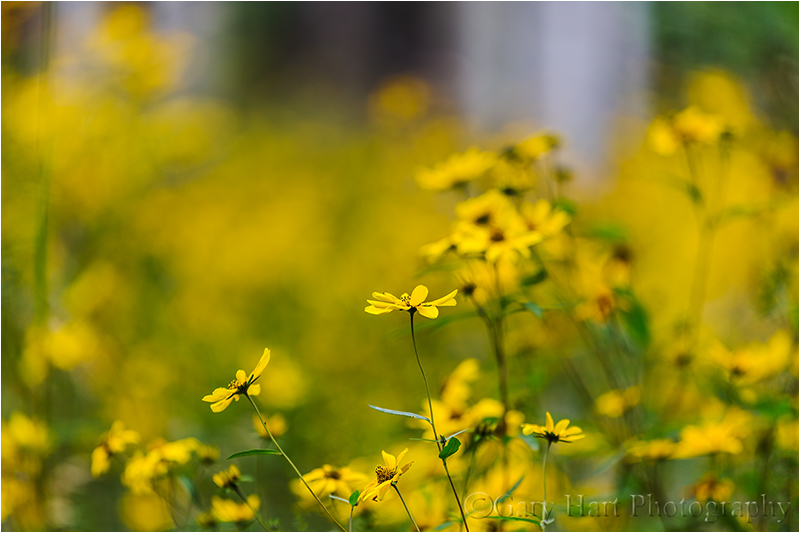
Forest Wildflowers, North Rim, Grand Canyon
Canon EOS 5D Mark III
1/100 second
F/4
ISO 200
200 mm
The reason I do this
Posted on August 27, 2013

Three Strikes, Bright Angel Point, North Rim, Grand Canyon
Canon EOS 5D Mark III
1/3 second
24-105L
ISO 100
F11
August 2013
Nature photographers plan, and plan, and plan some more, but no amount of planning can overcome the fickle whims of Mother Nature. Few things are more disappointing than a long anticipated and perfectly executed shoot washed out by conditions beyond my control. But when all of nature’s variables click into place, the world becomes a happy place indeed. And when nature ups the ante by adding something unexpected, euphoria ensues.
Don Smith and I just returned from two weeks photographing the Grand Canyon. We did a little of our own photography on the trip, but the prime focus was our two four-plus day photo workshops, split evenly between the Grand Canyon’s North and South Rims. These workshops were scheduled to give our groups the opportunity to photograph the Grand Canyon, day and night, under the influence of the annual Southwest monsoon: billowing clouds, vivid rainbows, and (especially) lightning. But any workshop requiring specific weather conditions is fraught with uncertainty and anxiety—we were fairly certain the photography would be great (after all, it is the Grand Canyon), but few natural phenomena are more fickle than lightning.
When plotting a workshop schedule (or any landscape photo shoot), the best a photographer can do is maximize the odds: We try to schedule all the non-photography requirements (meals, sleep, travel, training) for the times least likely to conflict with the best photography. For example, we know that because the monsoon thunderstorms usually don’t develop before midday, Grand Canyon summer sunrises often lack the clouds and pristine air necessary for the vivid color photographer’s covet. Therefore our photography emphasis for this workshop is on getting our groups out from mid-morning through (and sometimes after) sunset. That doesn’t mean we blow off sunrise, it just means that the sunrises are generally better for exhausted, sleep-deprived photographers to skip than the sunsets are.
Nevertheless, we rallied the troops at 5 a.m. Friday for our second workshop’s final shoot, a ten minute walk from our rim-side cabins to Bright Angel Point. The forecast was for clear skies, but the workshop had already had so many wonderful shoots, I considered this final one just a little bonus, the cherry atop an already delicious sundae.
My mind was already on the long drive home—in fact, as Don and I exited our cabin in the pre-dawn darkness, I predicted that I wouldn’t even take my camera out of my bag that morning. My words as I turned the doorknob were, “But if I leave my bag here, we’ll probably get lightning and a rainbow.” Little did I know how grateful I’d be to have brought my gear….
What followed was what Don and I later agreed was probably the single most memorable workshop shoot either of us had ever experienced. Gathering in the lobby of Grand Canyon Lodge, we saw lightning flashes across the canyon, but it was impossible to tell in the darkness how far away it was. Hiking to the vista, we saw several distinct bolts stab the rim, and by the time our gear was set up, the show had intensified, delivering numerous violent strikes in multiple directions that illuminated the canyon several times per minute.
The morning’s pyrotechnics continued for over two hours, awing us first in the dark, then through twilight, and finally into and beyond a magenta sunrise. And as if that wasn’t enough, as the sun crested the horizon behind us, a small but vivid fragment of rainbow materialized on the canyon’s rim, hanging there like a target for the lightning to take potshots at it.
This was more than just good photography, this was a once-in-a-lifetime convergence of weather, location, and light that more than made up for the many times nature has disappointed. Rather than bore you with more words, here are a few images from that morning:

Lightning Before Dawn, Bright Angel Point, North Rim, Grand Canyon
Arriving on the rim about 45 minutes before sunrise, we found the South Rim under full attack. This 30 second exposure captured a pair of strikes near Mojave Point.

Three Strikes, Bright Angel Point, Grand Canyon
As the sun neared the eastern horizon, I couldn’t help sneaking an occasional peek behind me. Seeing clear skies in the rising sun’s direction, I crossed my fingers for the clouds to hold off long enough to allow the sunlight to illuminate the lightning show before us. As the sun topped the horizon, its rays caught the rain falling along the rim, balancing a nearly vertical section of rainbow atop Powell Point. In this single, 1/3 second exposure, I managed to capture the rainbow briefly sharing the rim with three simultaneous lighting strikes.

Color and Light, Bright Angel Point, North Rim, Grand Canyon
The rainbow persisted as the lightning continued. Confident that I’d captured enough horizontal frames, I switched to a vertical composition in time to catch one more strike with the rainbow.

Storm’s Approach, Bright Angel Point, North Rim, Grand Canyon
As the sun rose, the rocks reddened and the storm edged closer. Ridges visible earlier were slowly overtaken by the advancing rain, and long, rolling waves of thunder echoed overhead. Preceding the rain were billowing clouds; here I went with an extreme wide (17mm) vertical composition to capture the incoming storm skewering the rim with by a single bolt. I had to retreat to shelter shortly thereafter.
Grand Canyon Photo Workshops
Read about photographing lightning
A Lightning Gallery


