Eloquent Images by Gary Hart
Insight, information, and inspiration for the inquisitive nature photographer
2021 In Review: Pedal to the Metal, While Tapping the Brakes…
Posted on December 26, 2021

Massive Moonrise, El Capitan, Yosemite
Sony a7RIV
Sony 200-600 G
Sony 2x teleconverter
ISO 400
f/16
1/80 second
As COVID started ravaging my workshop schedule way back in March 2020, my private mantra was, “Just hang on until August.” As we approach our third pandemic year with the Omicron variant raging, how misguided that dream feels today. While 2020 was pretty much lost to COVID, 2021 was the year things seemed poised to return to normal. And while not the Disney happy ending I’d envisioned, in many ways that proved true.
Even though I had to postpone my 2021 January workshops—one in Death Valley, as well as the Iceland workshop I do with Don Smith—it seemed things were improving. And improve they did: In quick succession I did two Yosemite workshops in February, followed by three more Yosemite workshops, one each in March, April, and May. Another 2021 spring highlight came in May, when I returned to the Grand Canyon for my beloved raft trip. Amidst all this, Don Smith and I managed to get in our April Oregon Coast and Columbia River Gorge workshops. So far, so good.
Despite missing most of 2020 and a few COVID-related inconveniences, these resurrected workshops felt surprisingly normal—not only was I thrilled to get back to my locations, spending time with the groups reminded me how much I missed having people to share the beauty with. And it seemed the people in my groups were just as happy to return to nature, and to interact with others in the relative safety of the great outdoors, as I was.
Approaching mid-year, Don and I did lose our spectacular New Zealand workshop for the second year in a row, but we’d been resigned to that for many months and had a solid plan in place. I was actually philosophical about the New Zealand loss, rationalizing that I was ready for a breather following my brutal spring schedule, and the similarly ambitious schedule coming in the second half of the year (trying to make up for my 2020 losses).
The second half of the summer was back to pedal-to-the-metal mode, with three Grand Canyon workshops (back-to-back-to-back) in July and August, followed by a return to the Big Island of Hawaii in September. Autumn didn’t get any easier, with back-to-back Eastern Sierra workshops in September and October, and another Yosemite workshop in November.
If all this seems like a lot, let me assure you, it was. But, in the midst of this breakneck pace, October brought a real tap-the-brakes moment: Despite COVID precautions and all 11 participants/leaders fully vaccinated, following my second Eastern Sierra workshop, 7 people (including me) tested positive for COVID. Fortunately, no one became seriously ill (I felt like I had a moderate cold for less than a week—no fever, headache, or fatigue, but 4 days with absolutely no sense of smell). I know it would have been far worse had we not been vaccinated—a blessing for which I’ll be eternally grateful—but it was a reminder to stay vigilant.
The grand finale
Fully recovered, I wrapped up my busy year in December with a spectacular Yosemite workshop. This “Winter Moon” workshop delivered ample portions of both winter and moon—lots of snowfall that gave way to clear sky just in time for the full moon on our final shoot.
Fellow Yosemite (among other places) photographer Michael Frye was doing a workshop at the same time, but we communicated regularly and adjusted our plans to prevent our groups from ending up at the same spots at the same time. After learning that we both planned to be at Tunnel View for Friday’s sunset moonrise (we agreed there’d be enough room to make it work), an event that was no secret to the photography community in general, I knew it would be crowded.
While there’s quite a bit of room at Tunnel View, it’s not infinite, and parking can sometimes be a problem, so I got my group up there about 90 minutes before sunset (and about 75 minutes before the moon would appear). While we waited, I made sure everyone knew when and where the moon would appear, and encouraged them to work on compositions before the moon appeared.
Though I had two tripods with me, I didn’t think it would be fair for one person to take two spots and instead just set up one tripod and readied two bodies and lenses: a Sony a7RIV with my Sony 200-600 G and Sony 2X Teleconverter (1200mm), and a Sony a7RIV with my Sony 24-105 G. My plan was to start with the telephoto body as the moon appeared, then switch to the wider body as the moon climbed and moved away from El Capitan.
As you can see, the workshop grand finale was a spectacular success. The moon appeared near the (barely visible) frozen trickle that will become Horsetail Fall just a few minutes before sunset, just as the day’s last light kissed El Capitan. I shared one of the wider images in last week’s post; this week I’m sharing a 1200mm image from shortly after the moon’s arrival.


Note the size of the moon in these two images that were taken on the same night, from the same location. While it would be spectacular to have the large moon in the scene with both El Capitan and Half Dome, that would be impossible from any earthbound vantage point. From Tunnel View, magnifying the moon with a 1200mm focal length only gives me a small fraction of El Capitan, while widening the scene enough to include both of Yosemite’s granite icons shrinks the moon to small disk. The results are so different, I won’t even try to suggest that one is “better” than the other.
Epilogue
So, in case you weren’t keeping score, in 2021 I had 3 workshops rescheduled, while adding 16 workshops notches to my belt—a personal record. Yet despite this very productive year, 2021 didn’t usher in the Disney happy ending I’d hoped for. It seems very possible that Don and I will lose New Zealand again in 2022, and Omicron has forces to reschedule one of the two Iceland workshops scheduled for January.
My other 2022 workshops are still on schedule, but I’m monitoring Omicron closely and hoping it fades as quickly as it started (monitoring positive signs from South Africa and other countries ahead of us—with fingers crossed).
Workshop Schedule || Purchase Prints || Instagram
2021 Highlights


These Are Two of My Favorite Things
Posted on December 19, 2021

Winter Twilight Moonrise, El Capitan and Half Dome, Yosemite
Sony a7RIV
Sony 24-105 G
1/25 second
F/8
ISO 100
Camera or not, two of my very favorite things in nature are a rising moon, and the rich pink and blue twilight sky opposite the sun after sunset*. Once a month, in the days around the full moon, these phenomena converge, and I get an opportunity to photograph the moon actually in the best part of the sky. I spend a lot of time trying to identify the scenes above which to photograph these celestial displays, and the best time to be there.
As a one-click photographer, for years the primary obstacle to photographing these scenes has been capturing (in a single frame) detail in the daylight-bright moon and a rapidly darkening landscape. In my early digital years, I found that the window of exposure opportunity—the time from sunset until the foreground became too dark to capture with one click—ended about 5-10 minutes after sunset (this can vary somewhat with several factors, such as longitude and terrain), just as the best color was ramping up. I could extend that window by 5 minutes or so by using a graduated neutral density filter to subdue the moon’s brightness by 2 or 3 stops, but GNDs come with their own set of problems—especially when the scene doesn’t have a homogenous, horizontal space near the horizon to disguise the GND boundary.
Technology to the rescue
One of the main reasons I switched to Sony in 2014 was the dynamic range of the Sony Alpha sensors, and few situations underscore that advantage better than these twilight moonrises. With my new cameras, suddenly my post-sunset threshold jumped by at least 50%—an advantage that continued progressing with each Sony sensor iteration.
Along with improved sensor technology, advances in processing software enabled me to get even more out of each image. Probably biggest processing improvement is in the noise reduction software that reduces blotchy, image softening, detail robbing noise that’s the prime limiting factor when you pull up the shadows of a twilight moonrise. Noise reduction software doesn’t restore lost image data, but it can bring out the best of what you did capture, allowing you to push back the twilight moonrise window just a little more. (I use and recommend Topaz DeNoise AI.)
Time for an Ansel Adams quote
Ansel Adams famously said, “The single most important component of a camera is the twelve inches behind it.” Put in today’s terms (and far more prosaically), all the technology in the world doesn’t do much good if you don’t know how to use it. For example, me: I know now that I probably packed up too early, mistakenly thinking the twilight moonrise photography window had closed—simply because I didn’t know how to get the most from my camera.
In fact, proper exposure is probably the single biggest struggle most photographers have when photographing a twilight moon. The most frequent mistake is trying to make the picture look good on their LCD, which invariably results in a preview image with gorgeous foreground beneath a brilliant white lunar disk—a disk that, on closer scrutiny, is hopelessly stripped of detail.
Photographing both a full moon and the landscape, with detail, starts by understanding that, in a high dynamic range scene, an ideal exposure rarely looks good on the LCD. I repeat: In a high dynamic range scene, an ideal exposure rarely looks good on the LCD. The key is making the image as bright as possible without blowing the highlights, providing the best opportunity to restore the highlights and shadows in post-processing.
While it’s usually best to trust the image’s histogram in extreme dynamic range situations, since the moon is such a small part of most images, it rarely registers on the histogram. This small but important detail makes it possible to capture a histogram that looks great, while ending up with a moon that’s hopelessly blown (detail-less white).
So if you can’t trust the image or the histogram, what can you trust? I thought you’d never ask. While the histogram is helpful for the landscape part of the scene, when I photograph a full moon, I monitor the moon’s exposure with my camera’s highlight alert feature—on my Sony Alpha mirrorless bodies that the “zebras” (pre-capture highlight warning stripes on all mirrorless and some DSLR cameras), but DSLR shooters can use the post-capture blinking highlights.
My twilight moonrise recipe
My process for a post-sunset moon starts with metering in manual mode (because I want complete control of my exposure). I set the ISO to 100 (my Sony a7RIV’s native/best ISO), and the f-stop to whatever I think will give me the sharpest image. The exposure is controlled with the shutter speed.
While the moon’s brightness doesn’t change, with a rising full moon, the landscape will continue to darken, making a foreground exposure that was perfect a minute or two ago not quite so perfect now. As the scene darkens, I add light by deliberately increasing my shutter speed in 1/3 stop increments (that is, one click at a time), with my eye on the moon.
When the zebras appear, I use my knowledge of my a7RIV to squeeze the most possible light from the scene. Raw shooters almost always have more detail than their histogram or highlight alerts indicate (different cameras’ highlight alerts engage at different points). This means you can add still light after the first alerts appear in the moon. When I first detect the zebras on my a7RIV, I know I can push my highlights 2/3 to 1 full stop brighter and still recover detail later.
If you’re shooting with a DSLR that doesn’t offer pre-capture zebras in your viewfinder, you may still be able to get them on the live-view LCD (some DSLRs offer them, some don’t). If not, you’ll need to check the post-capture blinking highlights after you click. Camera familiarity is no less essential when reading the blinking highlights of post-capture DSLR image preview highlight alerts than it is with the pre-capture zebras on a mirrorless camera.
Another thing I’ve started doing to get the most light out of the scene is pushing my highlights beyond the point where I’m certain I haven’t blown them out, then magnifying the moon in the preview image—if I see detail, I know not only am I still good to go, I may even be able to squeeze another 1/ or 2/3 of a stop more light out.
Still learning

Straight from the camera, the shadows in this image were nearly black. But I’m constantly amazed by the amount of usable data I can pull from the darkest shadows of my Sony a7RIV.

Winter Twilight Moonrise, El Capitan and Half Dome, Yosemite
What I’m starting to realize now is how much usable detail I have in the shadows of my a7RIV. This image was captured just Friday night, on the final night of my Yosemite Winter Moon workshop. It was more than 20 minutes after sunset and my foreground looked so black on the LCD that I figured it was unusable. But the scene was so beautiful, I just couldn’t make myself stop shooting. (A friend who happened to be standing next to me for most of the evening had left about 10 minutes earlier, despite my protests that he was leaving too soon.)
So imagine my surprise when I opened it in Lightroom, pulled up the Blacks (to about 30), Shadows (all the way), and Exposure (about two stops) sliders and saw plenty of detail and very fixable noise. A quick treatment from Topaz DeNoise AI confirmed what what I’d just seen—my twilight moon window is now open until at 20 minutes after sunset. Amazing.
(I’ll have more on this fantastic finale to a fantastic workshop in a future post. Spoiler alert: This isn’t the only image from this shoot.)
* When I say sunset, you can infer that I mean sunrise as well, with everything happening in reverse, on the other side of the sky.
Workshop Schedule || Purchase Prints || Instagram
Twilight Moon
Click an image for a closer look, and to view a slide show.


The Shots (Almost) Not Taken
Posted on December 12, 2021

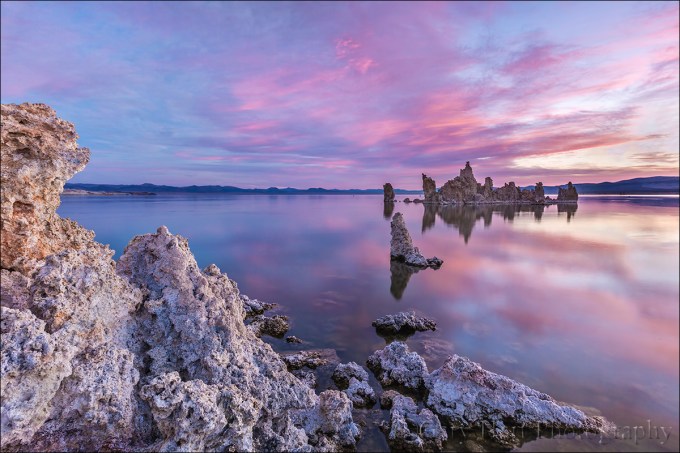
Milky Way Reflection, South Tufa, Mono Lake
Sony a7SIII
Sony 14mm f/1.8 G
ISO 6400
f/1.8
20 seconds
Between a lot of travel last week and preparing for a workshop that starts this week, I somehow managed to process an image yesterday. And today I’m going to attempt to squeeze out a quick blog post around a gathering that’s a 5-hour roundtrip away. Let’s see what happens…
This image makes me think about other memorable shoots that might not have happened had I stuck with the original plan, or succumbed to the easy (more comfortable) exit. These experiences are a testament to the Wayne Gretzky (or was it Michael Scott?) wisdom that you miss 100% of the shots you don’t take.
I’m thinking about the rainbow above Yosemite Valley that I wouldn’t have gotten had I stuck with my plan to meet a private workshop student for dinner—instead, I met him and his girlfriend at the restaurant and insisted that we forego dinner to go sit in the rain, because I thought a rainbow might be possible. Or a very cold morning at Lake Wanaka, New Zealand, when I woke to fog so thick that I could barely see 100 yards. Or setting my alarm for 4:30 a.m. to photograph sunrise, even though I had a 12-hour drive home and the forecast promised a zero-percent chance of rain—only to be gifted a 2-hour electrical storm that ended with a rainbow.


Normally I do the Milky Way shoot in the bristlecones on my Eastern Sierra workshop’s second night, but new permit restrictions thwarted that plan (turns out clouds and wildfire smoke would have stopped us anyway). So I resorted to Plan B, promising that we’d give the Milky Way a try after the Olmsted Point sunset shoot on the workshop’s final night.
But ascending Tioga Pass, we encountered smoke from one of the many wildfires scorching California. The smoke thickened as we headed west, and by the time we arrived at Olmsted Point, we could barely make out the outline of Half Dome in the smoky distance. We stayed long enough to enjoy a red-rubber-ball sunset, then blew off our “wait for the Milky Way” plan and drove back down to Lee Vining for dinner.
Though we were all a little disappointed to be missing the Milky Way shoot, as we queued up at the Whoa Nellie Deli (look it up), I sensed that many in the group looked forward to a warm and restful evening. Still, at one point I snuck out into the cold to check the sky. Seeing that clouds, smoke, or some combination of both had snuffed them, I confirmed to the group that the Milky Way shoot was off.
Walking outside after dinner, I was already mentally back in my room, but nevertheless glanced skyward and was surprised to see stars. Lots and lots of stars. Without the smoke/cloud blanket to hold in what little warmth remained, the temperature felt like it had dropped another 10 degrees. Part of me really, really wanted to pretend I hadn’t seen the stars and just herd everyone to the cars before they noticed them too, but I knew the Milky Way was a priority for many, and this opportunity was too good to pass. When I suggested that we give it a shot, almost the entire group was onboard (I can’t remember whether anyone opted out, but most didn’t). So we drove out to South Tufa, bundled up, and traipsed down to the lake.
I’ve photographed here more times than I can count (it’s possible there aren’t even numbers that go that high anyway), but only once or twice at night, many years ago. I didn’t have a specific spot in mind, but since South Tufa is on the south side of the lake, and the Milky Way is in the southern sky, I figured we’d likely be shooting in a tufa garden, with the lake at our back and the calcium carbonate towers in the foreground.
But walking east along the lake shore in the dark, we came upon a small peninsula jutting into the lake. Despite having walked by this spot countless times, I suddenly realized it might protrude far enough to allow us to shoot southward and back cross the water, toward a few tufa towers, with the Milky Way in the background.
We used flashlights to walk out and set up, but then photographed by the light of nothing but the stars. Working with an entire group out here in the dark, with no more than three very craggy feet of space between the lake at our feet and a wall of tufa behind us, was a real challenge. Each time someone called for help I had to navigate a treacherous route in near total darkness, taking care not to bump anyone, and being very mindful that the slightest misstep could send me sprawling into the frigid, salty lake (not to mention what that would do to the reflection).
Each time I passed my camera, I checked my previous image, made quick adjustments, and clicked a new frame before moving on to the next person who needed help. I only managed a handful of shots, and while they all looked pretty similar to this, that was just fine. We stayed here for 30 minutes or so, then moved on to the tufa garden I’d originally considered. That was nice too, though many of those images were spoiled by someone light painting the tufa nearby.
Looking over the images from that night, I’m reminded not just of the great photography we enjoyed, but also of how much fun we had out there in the dark, doing something we never imagined we’d be able to do. It would have been very easy after dinner to return with our full stomachs to our warm rooms, and turn in early to be rested for our early start the next morning. But I’ve been doing this long enough to know that the best memories often come from the most challenging conditions. If we’d have followed the strong urge to return to the hotel right after dinner, we almost certainly would have been quite comfortable, content, and completely oblivious to what we’d missed. And what a sad thing that would have been.
Almost Not Taken
Click an image for a closer look, and to view a slide show.


Shooting the Light Fantastic
Posted on December 5, 2021
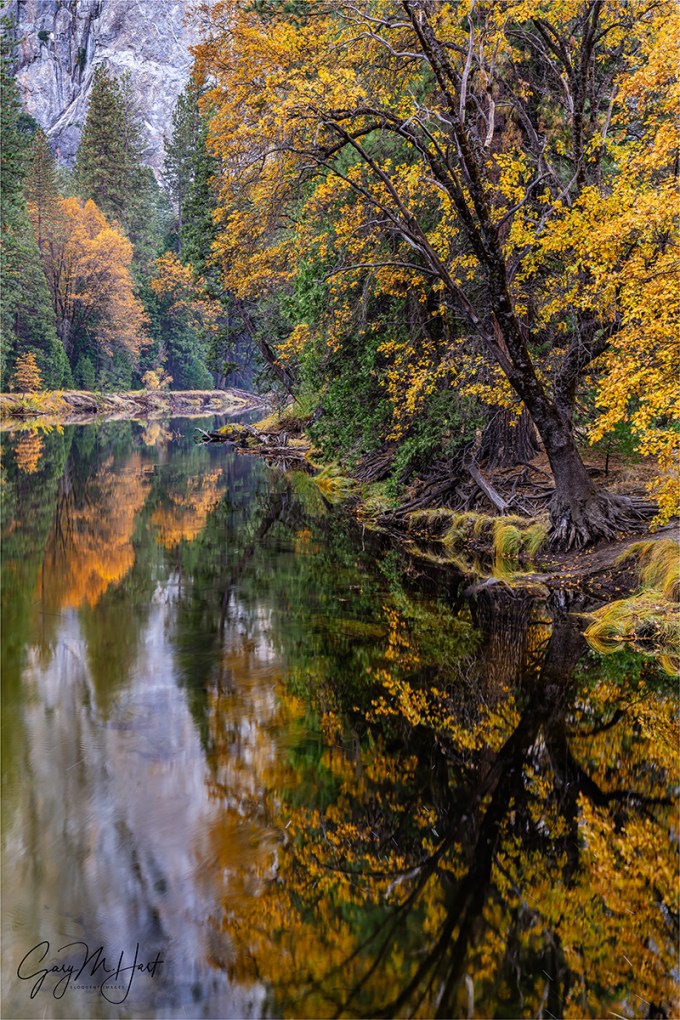
Autumn Reflection, Cathedral Rocks, Yosemite
Sony a7RIV
Sony 24-105 G
2 seconds
F/11
ISO 100
Blue sky may be great for picnics and outdoor weddings, but it makes for lousy photography. To avoid boring blue skies, flat midday light, and extreme highlight/shadow contrast, landscape photographers usually go for the color of sunrise and sunset, and low-angle sunlight of early morning and late afternoon.
Of course the great light equalizer is clouds, which can soften harsh light and add enough texture and character to the sky, making almost any subject photographable—any time of day. Sadly, clouds are never guaranteed, especially here in California. Fortunately, all is not lost when the great clouds and light we hope for don’t manifest.
Spending a large part of my photography time in Yosemite, over the years I’ve created a mental list for when to find the “best” cloudless-sky light on Yosemite’s icons: for Half Dome, Bridalveil Fall, and Cathedral Rocks it’s late afternoon through sunset; El Capitan is good early morning, while Yosemite Falls is best a little later in the morning. And then there are seasonal considerations: Half Dome at the end of the day is good year-round, but Bridalveil Fall and Cathedral Rocks are much better from April through September; while El Capitan gets nice morning light year-round, it also gets good late light from October through February; and while the best light on Yosemite Falls happens in winter, that doesn’t usually coincide with the best water, which comes in spring (unless you’re lucky enough to get a lot of early rain, like we got this autumn).
But even when the sun’s up and the sky is blank, all is not lost. In those situations I head to locations I can photograph in full shade. Yosemite Valley’s steep walls help a lot, especially from November through February, when much of the valley never gets direct sun.
Following our sunrise shoot on the first morning of last month’s Yosemite Fall Color photo workshop, I took my group to El Capitan Bridge to photograph the first light on El Capitan. But as nice as that El Capitan first light was, on this morning I couldn’t help notice the downstream view of Cathedral Rocks across the bridge. With everything on that side in full shade, this downstream scene wasn’t as dramatic as the sun-warmed El Capitan, but the soft, shadowless light was ideal for the colorful trees reflecting in the Merced River.
After encouraging everyone in the group not to check out this downstream view, I went to work on the scene. If the sky had been more interesting, I’d have opted for my Sony 16-35 GM lens to include all of Cathedral Rocks, more trees, lots of reflection, and an ample slice of sky. But the sky this morning was both bright and blue (yuck), so I chose the Sony 24-105G lens for my Sony a7RIV to tighten the composition.
Before shooting, I actually walked up and down at the railing quite a bit, framing up both horizontal and vertical sample compositions, until I found the right balance of granite, trees, and reflection. Because the air was perfectly still, I didn’t need to worry about movement in the leaves, which enabled me to add my Breakthrough 6-stop Dark Circular Polarizer for a shutter speed long enough the smooth some of the ripples in the water.
I guess the lesson here is the importance of understanding and leveraging light. And all this talk about light inspired me to dust off my Light Photo Tips article—I’ve added the updated and clarified version below (with a gallery of images beneath it).
Light

Three Strikes, Lightning and Rainbow from Bright Angel Point, Grand Canyon
Good light, bad light
Photograph: “Photo” comes from phos, the Greek word for light; “graph” is from graphos, the Greek word for write. And that’s pretty much what photographers do: Write with light.
Because we have no control over the sun, nature photographers spend a lot of time hoping for “good” light and cursing “bad” light—despite the fact that there is no universal definition of “good” and “bad” light. Before embracing someone else’s good/bad light labels, let me offer that I (and most other serious photographers) could probably show you images that defy any good/bad label you’ve heard. The best definition of good light is light that allows us to do what we want to do; bad light is light that prevents us from doing what we want to do.
Studio photographers’ complete control of the light that illuminates their subjects, a true art, allows them to define and create their own “good” light. On the other hand, nature photographers, rely on sunlight and don’t have that kind of control. But knowledge is power: The better we understand light—what it is, what it does, and why/how it does it—the better we can anticipate and be present for the light we seek, and deal with the light we encounter.
The qualities of light
Energy generated by the sun bathes Earth in continuous electromagnetic radiation, its wavelengths ranging from extremely short to extremely long (how’s that for specific?). Among the broad spectrum of electromagnetic solar wavelengths we receive are ultraviolet rays that burn our skin (10-400 nanometers), infrared waves that warm our atmosphere (700 nanometers to 1 millimeter), and the visible spectrum that we (and our cameras) use to view the world—a narrow range of wavelengths between ultraviolet and infrared with wavelengths that range between 400 and 700 nanometers.
When all visible wavelengths are present, we perceive the light as white (colorless). But when light interacts with an object, the object absorbs or scatters some of the light’s wavelengths. The amount of scattering and absorption is determined by the interfering object’s properties. For example, when light strikes a tree, characteristics of the tree determine which of its wavelengths are absorbed, and the wavelengths not absorbed are scattered. Our eyes capture these scattered wavelengths and send that information to our brains, which translates it into a color.
When light strikes a mountain lake, some is absorbed by the water, allowing us to see the water. Some light bounces back to the atmosphere to create a reflection. The light that isn’t absorbed or reflected by the water light passes through to the lakebed and we see whatever is on the lake’s bottom.
This vivid sunrise was reflected by the glassy surface of Mono Lake, but just enough light made it through to reveal the outline of submerged tufa fragments on the lake bed.
Let’s get specific
Rainbows
For evidence of light’s colors, look no farther than the rainbow. Because light slows when it passes through water, but shorter wavelengths slow more than longer wavelengths, water refracts (bends) light. A single beam of white light (light with an evenly distributed array of the entire visible spectrum) entering a raindrop separates and spreads into a full range of visible wavelengths that we perceive a range of colors. When this separated light strikes the back of the raindrop, some of it reflects: A rainbow!

Under the Rainbow, Colorado River, Grand Canyon
Blue sky
When sunlight reaches Earth, the relatively small nitrogen and oxygen molecules that are most prevalent in our atmosphere scatter its shorter wavelengths (violet and blue) first, turning the sky overhead (the most direct path to our eyes) blue. The longer wavelengths (orange and red) don’t scatter as easily continue traveling through more atmosphere—while our midday sky is blue, these long wavelengths are coloring the sunset sky of someone to the east.
In the mountains, sunlight has passed through even less atmosphere and the sky appears even more blue than it does at sea level. On the other hand, when relatively large pollution and dust molecules are present, all the wavelengths (colors) scatter, resulting in a murky, less colorful sky (picture what happens when your toddler mixes all the paints in her watercolor set).
Most photographers (myself included) don’t like blank blue sky. Clouds are interesting, and their absence is boring. Additionally, when the sun is overhead, bright highlights and deep shadows create contrast that cameras struggle to handle. That means even a sky completely obscured by a homogeneous gray stratus layer, while nearly as boring as blue sky, is generally preferred because it reduces contrast and softens the light (more below).
Sunrise, sunset
Remember the blue light that scattered to color our midday sky? The longer orange and red wavelengths that didn’t scatter overhead, continued on. As the Earth rotates, eventually our location reaches the point where the sun is low and the sunlight that reaches us has had to fight its way through so much atmosphere that it’s been stripped of all blueness, leaving only its longest wavelengths to paint our sunrise/sunset sky shades of orange and red.
When I evaluate a scene for vivid sunrise/sunset color potential, I look for an opening on the horizon for the sunlight to pass through, pristine air (such as the clean air immediately after a rain) that won’t muddy the color, and clouds overhead and opposite the sun, to catch the color.
Overcast and shade
Sunny days are generally no fun for nature photographers. In full sunlight, direct light mixed with dark shadows often forces nature photographers to choose between exposing for the highlights or the shadows (or to resort to multi-image blending). So when the sun is high, I generally hope for clouds or look for shade.
Clouds diffuse the omni-directional sunlight—instead of originating from a single point, overcast light is spread evenly across the sky, filling shadows and painting the entire landscape in diffuse light. Similarly, whether caused by a single tree or a towering mountain, all shadow light is indirect. While the entire scene may be darker, the range of tones in shade very easily handled by a camera.
Flat gray sky or deep shade may appear dull and boring, but it’s usually the best light for midday photography. When skies are overcast, I can photograph all day—rather than seeking sweeping landscapes, in this light I tend to look for more intimate scenes that minimize or completely exclude the sky. And when the midday sun shines bright, I look for subjects in full shade. Overcast and shade is also the best light for blurring water because it requires longer shutter speeds.
Another option for midday light is high-key photography that uses the overexposed sky as a brilliant background. Putting a backlit subject against the bright sky, I simply meter on my subject and blow out the sky.
Leveraging light
Whether I’m traveling to a photo shoot, or looking for something near home, my decisions are always based on getting myself to my locations when the conditions are best. For example, in Yosemite I generally prefer sunset because that’s when Yosemite Valley’s most photogenic features get late, warm light. Mt. Whitney, on the other side of the Sierra, gets its best light at sunrise, and I prefer photographing the lush redwood forests along the California coast in rain or fog. Though I plan obsessively to get myself in the right place, in the best light, sometimes Nature throws a curve, just to remind me (it seems) not to get so locked in on my subject and the general tendencies of its light that I fail to recognize the best light at that moment.
The Light Fantastic
Click an image for a closer look, and a slide show.


