Yosemite and me
Posted on January 19, 2016

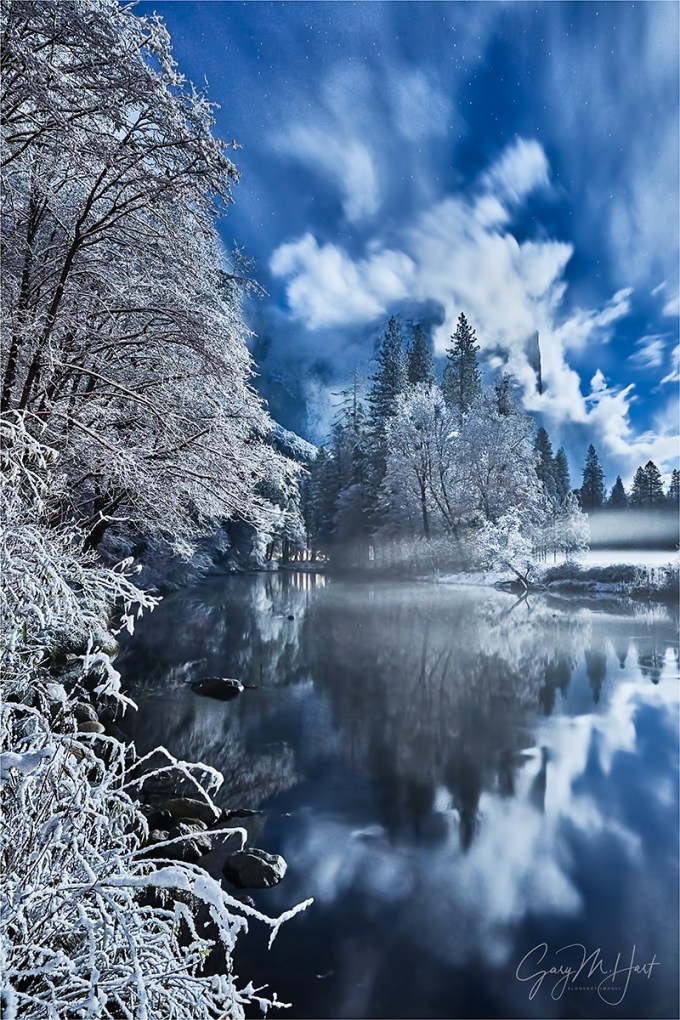
Double Rainbow, Yosemite Valley
Canon EOS-1Ds Mark III
1/5 second
F/16.0
ISO 100
38 mm
My relationship with Yosemite doesn’t have a beginning or end. Rather, it’s a collection of asynchronous memories that are still forming. In fact, some of my Yosemite experience actually predates my memory. The earliest memories, like following bobbing flashlights to Camp Curry to watch the Firefall spring from Glacier Point, or warm evenings in lawn chairs at the garbage dump, waiting for the bears to come to dinner, are part of the glue that bonds my family.
My father was a serious amateur photographer who shared his own relationship with Yosemite. One of my most vivid Yosemite memories is (foolishly) standing atop Sentinel Dome in an electrical storm, extending an umbrella to shield his camera while he tried to photograph lightning.

Lecturing my first workshop group on the virtues of tripod use
As I grew older, I started creating my own memories. While exploring Yosemite’s backcountry I reclined beside gem-like lakes cradled in granite basins, sipped from streams that started the day as snow, and slept beneath an infinite canopy of stars—all to a continuous soundtrack of wind and water.
Given this history, it’s no surprise that I became a nature photographer, using my camera to try to convey the essence of this magic world. In the last 35 years my camera and I have returned more times than I can count, sometimes leaving home in the morning and returning that night, eight hours of driving for a six hour fix. Other trips span multiple days, each one starting before sunrise and lasting through sunset, and sometimes well into the night. But despite the fact this is my livelihood, it’s never work.
About ten years ago I started guiding photographers through Yosemite. Now I get to live vicariously through others’ excitement as they experience firsthand the beauty they’ve previously seen only in pictures. Many of these people return many times themselves, sometimes in other workshops, sometimes on their own. Either way, I’m proud to be a catalyst for their nascent relationship with this special place, and know that they’ll spread the love to others in their lives.
Of course I’ve seen lots of change while accumulating my Yosemite memories. Gridlock is a summer staple, the bears have been separated (with moderate success), the Firefall has been extinguished, and backpacking requires permits, water purifiers, and bear canisters. And now there are rumblings that some of the park’s cherished names—The Ahwahnee, Curry Village, the Wawona Hotel, Yosemite Lodge—will be lost to corporate greed. But despite human interference, Yosemite’s soaring granite and plummeting waterfalls are magnificent constants, a vertical canvas for Nature’s infinite cycle of season, weather, and light.
(An earlier version of this essay appears on my website)
Join me in Yosemite
My Yosemite
Click an image for a closer look, and a slide show. Refresh the screen to reorder the display.


Doing the math
Posted on January 13, 2016

Autumn Snow, El Capitan, Yosemite
Sony a7R II
Sony/Zeiss 16-35 f4
1/160 second
F/11
ISO 800
A few days ago Sony asked me to write a couple of small pieces on “my favorite landscape lenses.” Hmmm. My answer?
My favorite lens is the lens that allows me to do what I need to do at that moment. In fact, to avoid biasing my creativity, I consciously avoid approaching a scene with a preconceived notion of the lens to use.
What I mean is, when I charge into a scene too committed to a lens, I miss things. And “favorite” tends to become a self-fulfilling label that inhibits creativity and growth. Rather than picking a favorite, I’m all about keeping my mind open and maximizing options.
I went on to say:
Because the focal range I want to cover whenever I’m photographing landscapes is 20-200mm, the three lenses I never leave home without are my Sony/Zeiss 16-35 f4, Sony/Zeiss 24-70 f4, and Sony 70-200 f4.
I have other, “specialty” lenses that I bring out when I have a particular objective in mind. For example, my Tamron 150-600 when I’m after a moonrise or moonset, or my Rokinon 24mm f1.4 when the Milky Way is my target. And even though I have a bag that will handle all of these (plus three bodies, thank you very much Sony mirrorless), I need to weigh the value of lugging lenses I probably won’t use against inhibited mobility in the field.
Ruminating on this favorite lens thing kindled my curiosity about which lenses I really do favor—so I did the math. (Okay, I let Lightroom Filters do the math.) Of the 10,395 times I clicked my shutter in 2015, here’s the breakdown:
Primary lenses (always in my bag)
- Sony/Zeiss 16-35mm f4: 3064
- Sony/Zeiss 24-70mm f4: 3529
- Sony 70-200mm f4: 1566
Specialty lenses
- Rokinon 24mm f1.4 (night only): 189
- Zeiss Distagon 28mm f2* (night only): 161
- Tamron 150-600mm* (mostly moon and extreme close focus): 1886
*Canon Mount with Metabones IV adapter
There are a lot of qualifiers for these numbers—for example, the total may be skewed a bit for the 24-70 as it is the lens I use most for lightning photography, and when my Lightning Trigger is attached and an active storm is nearby, it can go through hundreds of fames in a relatively short time (even when I’m not seeing lightning). Also, since getting the Tamron 150-600, I sometimes used that lens as a substitute for the 70-200, something I virtually never did with Canon and my 100-400 (which I didn’t particularly like). And I haven’t used the Zeiss since getting the Rokinon, so I really could lump those two together.
What does all this mean? I don’t know, except that I have a fairly even distribution between wide, midrange, and telephoto. That’s encouraging, because I never want to feel like I’m too locked into a single lens. But two things in particular stand out for me: the high number of 16-35 images, and the low number of 70-200 images.
The 16-35 number is significant only in comparison to my Canon 17-40 and 16-35 numbers from previous years, which were much lower (especially for the 17-40). Wide angle clicks went up quite a bit when I replaced my Canon 17-40 (which I was never thrilled with) with the Canon 16-35 f2.8 (which I liked a lot more). But I don’t think they were as high as they are with my Sony/Zeiss 16-35, which is probably a reflection of how pleased I am with the quality of those images, combined with that lens’s compactness. The jury is out on whether it signals a transition in my style, but it’ll be worth monitoring.
The most telling statistic to me is how few 70-200 images I took. I really like the lens, so it’s not a quality thing. And as I said earlier, some of that is an indication of how much I enjoyed shooting with the big Tamron, but that’s not the entire answer. My Canon 70-200 f4 was one of my favorite lenses, and I always enjoyed using it to isolate aspects of a scene, and maybe I’m not doing that so much since my switch to Sony. So here’s a goal for 2016: Don’t forget the 70-200. Stay tuned….
About this image
This is another image from my recent Yosemite snow day. It’s just another example of how much I enjoy photographing Yosemite when its seasons are changing—either snow with autumn leaves, or snow with spring dogwood and waterfalls.
On this chilly, wet morning, during one of the breaks when the clouds lifted enough to expose Yosemite’s icons, I was at a spot above the Merced River with a nice view of El Capitan. I like this spot for the dogwood tree I can align with El Capitan, and because it’s not particularly well known. I found it about ten years ago while wandering the bank of the Merced River looking for views (something I encourage anyone who wants to get serious about photographing Yosemite to do).
I tried a few different things here, starting with closer compositions using my 70-200 and 24-70 to highlight the snow on the leaves with El Capitan in the background. I eventually landed on this wide angle view that used the snow-dusted dogwood tree to balance a more prominent El Capitan. Because the opening is narrow here, I struggled with how to handle the tree on the left. I eventually decided, rather than featuring it or eliminating it, to just let its textured trunk frame the scene’s left side.
Sharpness throughout the frame was essential. With the trunk less than three feet away, the depth of field benefit of shooting at 16mm was a life-saver, giving me front-to-back sharpness at my preferred f11 (the best balance of DOF, lens sharpness, and minimimal diffraction)—as long as I focused about five feet away. Focus handled, my next concern was the breeze jiggling the leaves. At ISO 100, my shutter speed in the overcast, shaded light was 1/20 second; increasing my ISO to 800 allowed a much more manageable 1/160 second. Click.
Workshop schedule
Yosemite in transition
Click an image for a closer look, and a slide show. Refresh the screen to reorder the display.


Think before you shoot
Posted on January 5, 2016

Winter Arrives, El Capitan, Yosemite
Sony a7R II
Sony/Zeiss 16-35 f4
1/8 second
F/11
ISO 125
True story: I once had a woman in a workshop who put her camera in Continuous mode and every time she clicked her shutter, she held it down and waved her camera in the general direction of a scene until the buffer was full. When I asked what she was doing, she said, “There’s bound to be a good one in there somewhere.” We were in Yosemite, so I couldn’t really disagree with her. But I’m guessing she wasn’t seeing a lot of growth as a photographer.
I tend to fall on the other end of the photography spectrum. Rather than a high volume of low-effort images, much of my photography style carries over from my film days—back then, a photographer who wasn’t careful might return from Europe to find that the photographs cost more than the trip. With our wallets forcing us to be more calculated and discriminating with our captures, we took our time, checked and double-checked our compositions and settings, and relied much more on our tripods.
Times have changed. While every film click costs money, every digital click increases the return on our investment. So far, so good: Combined with a histogram and instant review, digital shooters can click liberally, secure in the knowledge that each shot can be better than the one preceding. But I fear that this great benefit digital has bestowed, combined with powerful processing capabilities, has engendered a “shoot now, think later” mentality among many photographers. Rather than taking advantage of digital’s instant feedback to ensure that everything’s perfect at capture, these photographer adopt a high volume approach that sometimes hits a bullseye, but does nothing to improve their aim.
While there’s nothing wrong with lots of clicks, to advance your photography, each click needs a purpose. That purpose doesn’t even need to be a great image, it can simply be an I-wonder-what-happens-if-I-do-this experiment. Or it can be an incremental approach that begins with a “draft” and works toward perfection.
For example
On my recent snow day in Yosemite, I tried to highlight locations a little off the beaten path (as much as that’s possible in Yosemite). One of my stops was along Southside Drive, a little west of the crossover (to Northside Drive). Traipsing through wet snow, I made my way through the trees down to the Merced River. Bounding El Capitan Meadow, here the river widens and slows, as if gathering strength for its headlong charge down the Merced River Canyon.
The relatively open views and leisurely pace of the Merced River at this spot makes this one of my favorite place for full reflections of El Capitan. Ever on the lookout for juxtaposed disparate elements, I didn’t have to venture too far upstream before the collision of autumn leaves and winter snow stopped me. Parallel yellow and white, El Capitan reflection, towering evergreens, snow-etched oaks, swirling clouds, all against a granite background: I knew there was a shot in here somewhere, and I was going to work these elements until I found it.
To identify the shot, I started with an initial, “rough draft” click, then stood back and critiqued my result. With that frame as a foundation, I made incremental refinements, adjusting individual aspects rather than trying to fix everything at once: My horizontal orientation became vertical to highlight the (more or less) parallel snow and leaves; I determined the lowest f-stop that would ensure front-to-back sharpness and carefully refined my focus point, selecting leaves about a quarter of the way into the frame; I shifted slightly left to avoid merging the snowy log with El Capitan’s reflection; and finally, I tweaked the borders slightly (micro-zooming and -widening) to ensure that no significant visual elements were cut off. With everything set, I watched the shifting clouds and clicked when they did something interesting.
I was satisfied after about a dozen frames—far more than I could have afforded in my film days, but a far cry from my workshop student’s machine gun approach. No doubt she’d have gotten something I didn’t get, but I like this one. I bet I had more fun, too.
Join my
Yosemite Winter Moon photo workshop

An El Capitan gallery
Click an image for a closer look, and a slide show. Refresh the screen to reorder the display.


Who needs vacations?
Posted on January 1, 2016
Moonlight Magic, El Capitan and Clearing Storm, Yosemite
Sony a7R II
Sony/Zeiss 16-35 f4
30 seconds
F/11
ISO 3200
I was hungry, wet, and cold. With the blacktop obscured by a slippery white veneer, I carefully followed my headlights and a faint set of parallel tire tracks through the Northside Drive tree tunnel. Though the storm that had lured me to Yosemite was finally clearing, that show was lost to the night and dense forest canopy. But even without another clearing storm to add to my Yosemite portfolio, I was quite content with what I’d photographed that day.
Just as my heated seats started to work their magic and visions of dinner filled my head, I rounded a curve and reflexively hit the brakes, sliding not so gracefully into the empty Valley View parking lot. With no forethought I bolted from the car, then had to grab the door to keep from losing my footing on the icy pavement.
Always a beautiful place for photography, Valley View this time was quite literally one of the most beautiful sights I’d ever witnessed. I inhaled cold air and held it. Instead of racing for my gear, I exhaled slowly and gaped through my vaporized breath at ice-coated trees and granite, moonlight infused clouds draping El Capitan, and the glassy Merced River spreading before me like a luminous carpet. The scene’s centerpiece, the element that really took the experience over the top for me, was a full moon embedded in the night sky like a blazing gem, illuminating every exposed surface.
Gathering my wits along with my gear, I started to think about photographing the scene. Because the moon was too bright to photograph (and I have the pictures to prove it), I started with a composition my favorite aspects of the rest of the scene: the clouds, the reflection, and the frozen moonlight magic—the moon would remain out of the frame, to the right.
In most moonlight images, my foreground is distant enough that everything in my frame is at infinity, regardless of my f-stop. But the nearby glazed trees and rocks meant this scene needed to be sharp from just a few feet away all the way to the stars, requiring a small aperture and very precise focus point selection. A quick check of my hyperfocal app told me that focusing 5 feet away at f/11 would give me the depth of field I needed. Once my eyes adjusted, the moonlit branches were just bright enough to manually focus on by magnifying the scene in my Sony a7R II’s viewfinder (I love mirrorless).
But at f/11, even with the brilliant moonlight, getting enough light to reveal the scene required other compromises. Pushing my shutter speed to 30 seconds—the after-dark threshold that the risk of star motion prevents me from crossing—I had to bump my ISO to 3200 to capture enough light. Fortunately, the a7R II was up to the task—while I did get some noise in the shadows, it cleaned up nicely in processing.
Leaving Valley View that night, the chill and hunger I’d felt earlier had disappeared. Photography is funny that way—we put ourselves in the most miserable conditions, then completely forget how miserable we are when Nature delivers. The key is to remember this capacity when we’re debating whether to set the alarm for zero-dark-thirty, skip a meal, or brave extreme conditions.
This El Capitan moonlight moment turned out to be my final 2015 photo shoot, a fitting conclusion to a year filled with highlights. Breaking in a new camera while learning a completely new system and way of shooting (Sony mirrorless), I visited the dunes of Death Valley, the rain forests of Hawaii, Yosemite’s glacier-carved granite (many times), Grand Canyon top and bottom—among many. I photographed lightning, rainbows, snow and ice, an active volcano, spring wildflowers and fall color, the moon in many phases, and the Milky Way above some of the world’s most spectacular scenery. How fortunate I am to have a job that I don’t need a vacation from!
At the end of 2014, while reflecting on the beauty I’d witnessed that year, the new friends I’d made, not to mention countless new memories with old friends, I wondered what 2015 would bring. And now I know. In one year I’ll do a similar retrospective on 2016, and while I have no idea what’s in store, I’m confident my good fortune will continue.
So let’s go….
Workshop Schedule || Purchase Prints || Instagram
Here’s what my 2015 looked like
Click any image to scroll through the gallery LARGE


Dinner is overrated (and I have the pictures to prove it)
Posted on December 22, 2015
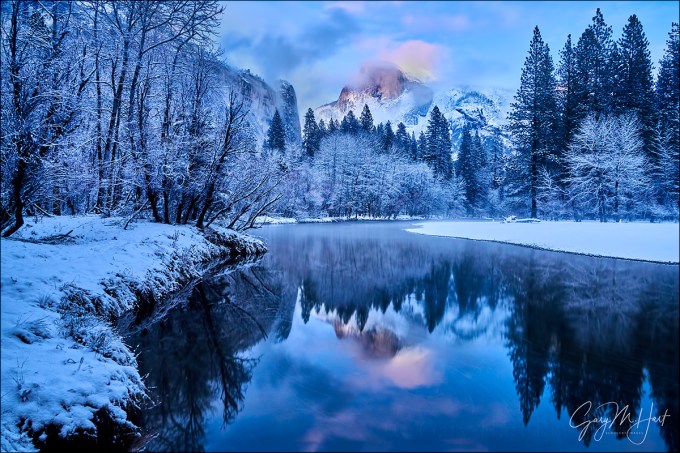
Winter Blue Hour Reflection, Half Dome, Yosemite
Sony a7R II
Sony/Zeiss 24-70 f4
30 seconds
F/8
ISO 1600
In my Snow day post a few days ago, I shared the story of an overnight dash to Yosemite to photograph snow. I wrapped up that long day photographing various Yosemite Valley views in the frigid damp, bundled at Tunnel View, waiting in vain for the storm to clear. The sky was darkening quickly, and when a dense cloud engulfed my view I decided my (pretty sweet) day was probably done.
Hungry, tired, and cold to the core, I still faced a nearly 4-hour drive home. But descending into the valley El Capitan popped out, and as I approached the crossover that would loop me back to the park exit, all I needed was a single bright star to abort my exit plan and take one last look at a favorite Half Dome reflection. If nothing was happening, I rationalized, the detour would add only 20 minutes to my night—but if the storm had indeed finally cleared, the view would be worth whatever extra time it cost. Dinner would just have to wait.
I arrived at my reflection to find that in the short time it took me to span Yosemite Valley, clearing around Half Dome was well underway. With just a few minutes of late twilight photography, when my straining eyes could still make out snow-etched features in the fading light, I ran to the river and set up fast. Though a little light remained, already my camera was pulling out exquisite detail far better than my eyes could, and I worked fast to take full advantage of this perfect, shadowless light before it darkened into full-on night photography.
The image I share here was one of the last I captured before the darkness behind Half Dome was replaced by the glow of the rising, nearly full moon. By this time nightfall was almost complete to my eyes, but my camera still picked up sunset’s waning vestiges in a cloud capping Half Dome.
This scene is just one more illustration of something I preach to all who will listen—the camera sees the world differently than you and I do. Going home too soon after sunset is one of the most frequent mistakes made by inexperienced photographers.
Instead of heading straight to dinner, hang around for silhouettes and reflections using the fiery hues that follow the sun below the western horizon. Then turn and bask in the pink and blue pastels coloring sky opposite the sun, when the entire scene is illuminated by faint but sweet blue-gray skylight. By now it will be pretty dark to your eyes, but your camera is up to the task, I promise.
Of course you’ll need a DSLR and sturdy tripod to make the most of the low light. Remove your polarizer, bump your ISO, and stretch your shutter speed until the histogram is fairly centered—you’ll see that the image on your LCD is much brighter than the scene your eyes see. You’ll also see that dynamic range is not a concern, and the detail the camera pulls out in the shadowless light is impossible at any other time of day (except in the same light that precedes sunrise).
This evening I stayed well past twilight, not leaving until the stars popped out and the moon-glow washed out the sky behind Half Dome. And believe it or not, my day wasn’t finished….
Schedule of upcoming photo workshops
The rewards of a late dinner
Click an image for a closer look, and a slide show. Refresh the screen to reorder the display.


Snow day
Posted on December 17, 2015

Winter Storm Reflection, El Capitan, Yosemite
Sony a7R II
Sony/Zeiss 16-35 f4
1/8 second
F/10
ISO 100
From my front door I can be in Yosemite Valley in less than four hours (including a stop for gas and another for Starbucks). I enjoy the drive and am not averse to doing a one day up-and-back when I think something special is in store. And nothing is more special than a chance to photograph Yosemite with fresh snow.
My most recent Yosemite snow-dash was last month. Given the fickle nature of Yosemite’s weather, and four years of drought that have made Yosemite snow a rare commodity, I made this trip an overnighter to maximize my odds.
Though I arrived well ahead of the storm, dense clouds and a damp chill ruled the afternoon. Instead of rushing into photography mode, I used the relative calm to scout the conditions, and was pleased to find water in the falls and a few traces of autumn color lingering in some of the more sheltered spots.
The rain started just as night fell. Descending the hill to my hotel that evening, I monitored the outside temperature and was cautiously optimistic about the next day. I enjoyed a warm, quiet evening in my room, cleaning sensors and filters, organizing my wet-weather gear, and visualizing scenes of snow and granite.
Yosemite Valley is at 4,000 feet, but my room was in El Portal, less than 15 minutes away but 2,000 feet lower. Staying in El Portal means I often wake to rain and hold my breath as I ascend to the valley because, regardless of the forecast, snow in Yosemite Valley is never a sure thing.
As expected, that morning I left El Portal in a steady rain, but the drops on my windshield turned to flakes at about 3,000 feet—exhale. By the time I reached Cascade Fall at 3,500 feet, snow was sticking to the trees, and it only got better from there.
This was not a particularly heavy snowfall, but I stayed all day and the clouds never completely cleared. Instead, the storm ebbed and flowed, lifting its stratus cap enough to reveal all of Yosemite’s iconic landmarks, then dropping the lid to obscure everything beyond a few hundred yards.
I concentrated most of my attention on the assortment of El Capitan reflections on the west end of Yosemite Valley. For this image I parked at the El Capitan Bridge and walked upstream along the riverbank a short distance. From here I was close enough to El Capitan that I was unable to get all of El Capitan and all of its reflection in one frame, even at 16mm. I decided to bias my composition to the reflection, and as I worked the sky peaked through just long enough for me to include it in a handful of frames.
The ultimate clearing finally came shortly after sunset. With a nearly full moon illuminating snow-covered Yosemite Valley, I couldn’t resist photographing for a couple hours longer than planned. Stay tuned….

Schedule of upcoming photo workshops
Yosemite in the snow
Click an image for a closer look, and a slide show. Refresh the screen to reorder the display.


What lens should I use?
Posted on December 11, 2015
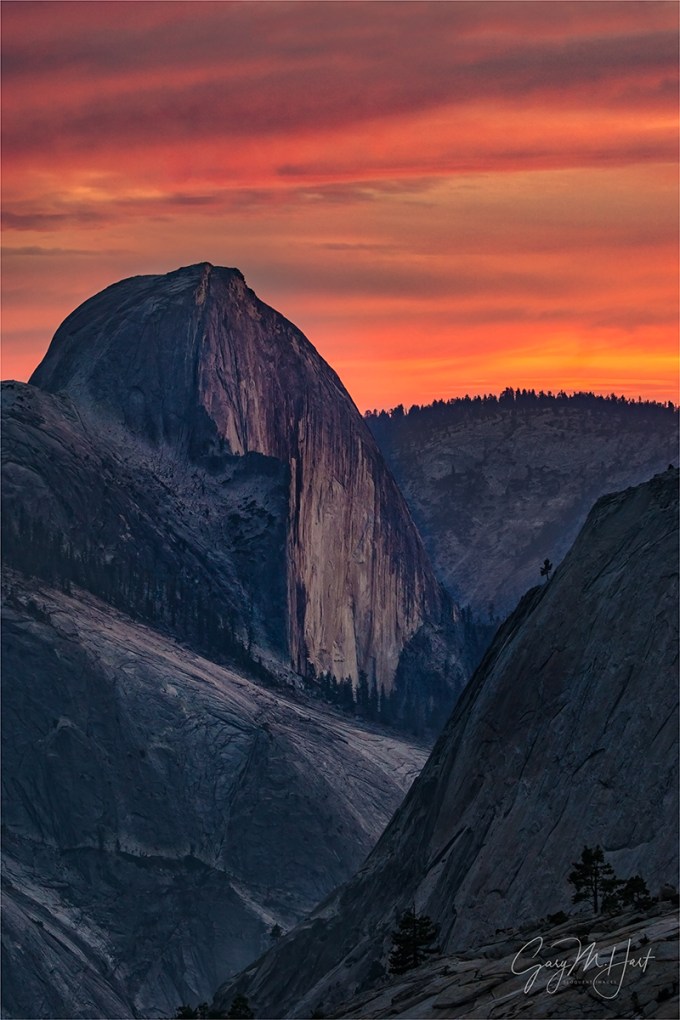
Half Dome at Sunset, Olmsted Point, Yosemite
Sony a6000
Tamron 150-600 (Canon-mount with Metabones IV adapter)
4 seconds
F/9
ISO 400
Inexperienced photographers tend to approach every scene with the idea that there’s one “best” shot, and that other photographers already know what that shot is. This might explain why there’s no better way to meet other photographers than to set up a tripod (I’ve learned that this even works on the shoulder of a busy highway with no obvious view). It might also explain why the most frequent question asked in my workshops is probably, “What lens should I use?”
The question usually comes as we’re unloading from the cars and assembling our gear for the walk to our shooting site. I don’t mind the question (I swear), but my answer rarely satisfies. That’s because I’ve done this long enough to know that their real question is, “What lenses can I leave in the car?” If only photography were that easy.
Your lens choice is part of your composition process. In other words, by limiting the lenses you carry, you’re also limiting your creative options. If adding an extra lens or two is the difference between going out or staying put, by all means, jettison the extra lenses and get out there. But here’s a photographic truth: The surest way to ensure that you’ll want a lens is to leave it behind.
I will acknowledge the most landscapes have an “obvious” shot—the first thing people see when they walk up—that everyone shoots. While many photographers are satisfied with the obvious shot, I wouldn’t be much of a workshop leader if I allowed my students to settle for the shot that everyone else takes.
While there’s nothing wrong with taking the obvious shot, it should be your starting point, never your goal. Your goal should be to find something unique, and the greater the focal range at your disposal, the greater your opportunity for a unique capture.
All this is to explain why, regardless of the scene, at the very least I carry lenses to cover the focal range spanning 20-200mm (full frame). For me that’s three lenses: the Sony/Zeiss 16-35 f4, the Sony/Zeiss 24-70 f4, and the Sony 70-200 f4. For practical reasons (to minimize bulk and weight and enhance my range and mobility), I might leave behind my specialty lenses (an ultra-telephoto, macro, and fast prime). But it’s a rare scene that, given enough time, I can’t find something for each of my three primary lenses.

Sunset Fire, Olmsted Point, Yosemite
Generally (and incorrectly) labeled a “wide angle location,” Yosemite has lots of spectacular views that can overwhelm the first time visitor. It’s natural to want to capture everything with one click, and these wide Yosemite images don’t disappoint. But with familiarity comes recognition and appreciation of details easily overlooked in the big picture. The longer you spend looking at Half Dome or El Capitan (or Yosemite Falls, or Bridalveil Fall, or …), the more work you can find for your telephoto lens.
At Olmsted Point, the obvious subject is Half Dome, but the composition possibilities here, from wide to tight, are endless.
In my October Eastern Sierra workshop I got my group to Olmsted Point with plenty of time for everyone to familiarize themselves with the scene. Moving around to check on the group, I reminded each person not to get so committed to one lens that they ignore the other options. (I find that merely carrying a variety of lenses often isn’t enough—using the full assortment is a habit to be cultivated.)
I don’t think there’s a better illustration of why it’s important carry a range of lenses than that evening’s shoot. I found myself switching not only between lenses, but between bodies, with my wide lenses on the full frame Sony a7R II, and my Tamron 150-600 on the Sony a6000 (with its 1.5 crop sensor) .
I started with the wider scene, because the composition had so many variables that required a lot more work to get just right. But once the color overhead started to fade, I switched to the a6000 and 150-600 team and zoomed tight on Half Dome, working through a number of long and ultra-long compositions.
Sunset hues, especially in the direction of the sun, usually outlast photographers. As the sky darkened beyond my eyes’ ability to register the color, all I needed to do was dial up the exposure to see that the color was still there. I finally stopped not because I’d run out of shots, but because the light was leaving and I don’t like the group scrambling down Olmsted’s granite in the dark.
In retrospect, I can’t help marvel at the difference between these two images of Half Dome captured just a few minutes apart, and the opportunities I’d have missed if I’d have lightened my bag.
Workshop Schedule || Purchase Prints || Instagram
A gallery of Yosemite close-ups
Click any image to scroll through the gallery LARGE


Is a tripod really necessary?
Posted on December 6, 2015

Sunset Fire, Olmsted Point, Yosemite
Sony a7R II
Sony/Zeiss 16-35 f4
1.3 seconds
F/11
ISO 100
If you’re content with derivative snaps of pretty scenes, a tripod may not be for you. But for those who agree that, rather than regurgitating a rough representation of the world as we know it, landscape photography should reveal deeper, less obvious natural truths—things like relationships between diverse elements, an intimate exploration of larger scenes, detail and pattern lost in the blur of motion—there is no substitute for a tripod.
The case against the tripod
Once upon a time, the tripod’s sole purpose was stability—preventing blur caused by camera shake during the exposure. And while stability remains important, clean high ISO and stabilized bodies and lenses make possible shooting hand-held in light we’d never dreamed of just a few years ago.
The anti-tripod argument says that tripods are expensive, add weight and bulk, are awkward to set up, get in people’s way, and slow the composition process. Given that the exposure compromises (higher ISO, larger than ideal aperture, longer shutter speed) forced by hand-holding are usually minor and more easily corrected today than what we faced with our film cameras, why bother with a tripod at all?
I’d argue that you never know when even a minor, hand-held compromise—such as shooting at ISO 400 instead of ISO 100, opening to f5.6 when f11 would have been better, or stretching your exposure duration out to 1/4 second and holding your breath—will be a deal-breaker for that law firm downtown who ordered a 10-foot print for their lobby. Why spend all this money on state-of-the art equipment only to compromise your image quality even just a little?
Nevertheless, I’ll (grudgingly) acknowledge that for many current landscape photographers, the convenience of tripod-free shooting outweighs these compromises—clean, printable images are possible without a tripod most of the time.
But….
Inconveniences notwithstanding, serious landscape photography is improved by a tripod. In fact, despite the advantages digital capture has brought to tripod-free shooting, digital photography has enhanced the tripod’s value to landscape photographers.
There’s a draft in here
The odds of the perfect landscape image happening on the first click are about the same as crafting a perfect poem, novel, or essay on the first pass. When we write something important, we don’t sit down and spin it out without stop or correction, we start with an idea, write a draft, review, rewrite, review, rewrite, until we’re satisfied.
A photograph should be no different—no matter how much you like the first click, it’s pretty unlikely that frame is so perfect that further scrutiny and adjustment won’t improve it further. Much like the drafts I create when I write, my workflow in the field is a click/review/adjust, click/review/adjust cycle that continues until I’m either satisfied with my image, or convinced there’s no image to be had. I can’t imagine doing this without a tripod.
To review a hand-held image, you must completely remove the camera from its shooting position (your eye) and extend it down and in front of you, essentially erasing your camera’s view of composition the way vigorous shaking erases and Etch A Sketch—fine if you’re done, but to fix problems and add improvements, you must return the camera to your eye and completely recreate the composition you just reviewed. Standing at a vista snapping a scene that’s been snapped a million times before? No big deal. But what about an image with layers of detail at varying distances, trying to include all of that rock on the left while without including any of that tree-branch on the right, all while trying to maintain front-to-back sharpness?
When I shot film (always on a tripod thank-you-very-much), my personal image reviews involved alternating between studying the scene and peering through the viewfinder. The most I could hope for was a good guess that I had everything right. Enter digital, with its instantaneous display, including a graph and flashing pixels that tell me if I messed up the exposure. Suddenly, I can critique the image itself, right on the spot.
With digital, composing on a tripod gives me the freedom to stand back and take time to scrutinize my creation. I can study the frame for balance, scan the borders for distractions, check the histogram to ensure proper exposure, magnify the LCD for sharpness and depth of field—doing all this comfortable in the knowledge that when I’m ready, the exact image I just critiqued is waiting right there atop my tripod, ready for my improvements. In other words, my adjustments are applied to an existing creation, rather than an approximate (fingers crossed) recreation.
Revisiting the writing analogy, hand-holding reminds me of the typewriter days, when a major revision required retyping everything I just wrote; using a tripod is more like a word-processor that allows me to edit the existing document.
For example
A trip to Olmsted Point in Yosemite has become a tradition for the final sunset of my Eastern Sierra Fall Color photo workshop. Olmsted Point offers a distant, less common view of Half Dome and an assortment of photogenic trees and boulders for the foreground.
On this year’s visit we parked and made the short hike to the “point” (more of a granite dome than an actual point) for the best view down Tenaya Canyon to Half Dome and beyond. I pointed out that the sky was setting up for something special; following my encouragement to anticipate the colorful sunset and find a foreground to complement the obvious background, the group quickly scattered.
I tried to stay fairly centrally located, eventually choosing a nearby triangle of glacial erratics (granite boulders carried by glaciers and deposited in place when the retreating glaciers melted) anchored by a weathered pine. With time to spare, I set about finding a composition. I decided vertical orientation would be the best way to exclude peripheral distractions, emphasize my primary subjects (rocks, tree, Half Dome), while including enough of the sky feature what had the potential to be dramatic color.
Working methodically, I started wide and gradually tightened, refining the focal length, focus point, and borders. I’m kind of obsessive about no distractions on the edge of my frame, and try as I might, it always seems that widening or tightening to eliminate one distraction introduces a new distraction over there.
In this case I was dealing with a couple of large boulders carrying too much visual weight to be on the edge of my frame, plus the leg of a nearby tripod, and an overhanging tree branch. I was able to tighten enough to eliminate these distractions without going so tight that I cut off the boulder on the right, or crowded Half Dome on the left. Of course, since I was on a tripod, each click was an improvement of the one that preceded it—in this case it took only about a half dozen images until I was satisfied.
The foreground was static, but the sky seemed to change with each second. While I had the general framework of my composition ready, as the color overhead intensified I decided I wanted a little more sky. Fortunately, by now I was so familiar with my composition that adjustments were easy. This image came as the color reached a crescendo, intensifying until the entire landscape throbbed with color.
My primary tripod is a Really Right Stuff TVC-24L with a RRS BH-55
My travel/hiking tripod is a Really Right Stuff TQC-14 with a RRS BH-30
Each of my cameras has a RRS L-plate
A gallery of tripod-crafted images
(All of my images were captured using a tripod, but my favorites tend to be the images that require the click/review/refine/repeat process that’s greatly enhanced by a tripod)
Click an image for a closer look, and a slide show. Refresh the screen to reorder the display.


")

Getting ahead of the shot
Posted on November 28, 2015
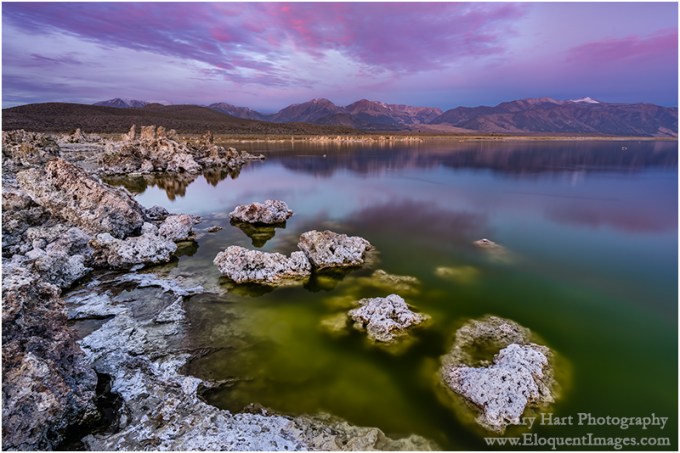
Dawn, Mono Lake and the Sierra Crest
Sony a7R II
Sony/Zeiss 16-35 f4
8 seconds
F/10
ISO 100
I hate arriving at a photo destination for the first time and having to immediately hit the ground running. Over the years I’ve come to appreciate the value of advance knowledge of landscape and light, and always try to factor in ample scouting time before getting down to serious shooting.
On the other hand, a prime reason people sign up for a photo workshop is to shortcut the scouting process, and for the most part this works pretty well. I (like any other experienced workshop leader) can share my knowledge of a location’s terrain and light to put my groups in the right place at the right time, and to provide insights into what’s in store and how they might want to approach it.
But sometimes there’s no substitute for firsthand exposure to a location before the good stuff happens. This is particularly true for sunrise spots, because the good shooting usually starts before it’s light enough to see the landscape. Unfortunately, a photo workshop’s tight schedule doesn’t always provide the luxury of exposing my groups to a location before it’s time to photograph it, but I do my best.
Mono Lake is a perfect example. The serpentine shoreline of South Tufa, the lake’s most photographed location, is a series of points and coves that offer lake views to the east, north, and west, depending on where you stand. Often nice at sunset, sunrise at South Tufa can be downright world class in any one of these compass directions. The best sunrise photography frequently cycles through (and sometimes overlaps) all three directions as the sunrise progresses. Overlaying South Tufa’s directional light are the vivid sunrise hues that can paint the sky in any direction at any time, and glassy reflections that double the visual overload.
After many years photographing South Tufa, I’ve established a fairly reliable sunrise workflow that helps me deal with these shifting factors. I usually start with tufa tower silhouettes facing east, into the early twilight glow in the east, then do a 180 to capture the magenta alpenglow on the Sierra crest in the west, and finally pivot northward as sidelight warms the tufa towers once the sun’s first rays skim the lake.
But just knowing the direction to point the camera is only part of the Mono Lake equation. In fact, with so many composition possibilities, South Tufa can overwhelm the first time visitor. Not only is there a lot going on here, on most mornings you need to contend with photographers that swarm the shore like the lake’s ubiquitous black flies.
Because of these difficulties, I make a point of getting my Eastern Sierra workshop group out to South Tufa for the sunset preceding the sunrise shoot. In my pre-shoot orientation, I strongly encourage my students to walk around before setting up their cameras, to identify compositions in each direction, and to envision the sunrise light.
It turns out, this year’s South Tufa sunset shoot was beneficial to me as well. With the lake level lower than I’ve ever seen it, the shoreline was virtually unrecognizable—many familiar lake features were now high and dry, and a number of new features had materialized. As alarming as it was to see the lake this low, the photographer in me couldn’t help but feel excited about the fresh compositions the new shoreline offered.
While showing the group around South Tufa’s various nooks and crannies, I spotted a stepping stone set of newly exposed tufa mounds on a north- and west-facing section. I pointed out to those still with me the way tufa could lead the eye through the bottom of the frame to the distant Sierra peaks, and made a mental bookmark of the spot. Sunset that night, with nice color a glassy reflection that’s more typical of sunrise than sunset, that everyone was a little dubious when I told them sunrise could be even better.
The next morning, all the conditions were in place for something special: a mix of clouds and sky, an opening on the eastern horizon to let the light through, calm winds to quiet the lake. Armed with knowledge from the night before, the group quickly dispersed to their pre-planned spots and I found myself mostly alone.
I’ve photographed Mono Lake so many times that I had no plans to shoot that morning, so I wandered around checking on everyone. As often happens when the photography is good (especially late in the workshop, when people have become pretty comfortable handling difficult light and extreme depth of field), I felt like my presence was more distraction than benefit, so I headed over to the spot I’d spied the previous evening (it had the added benefit of being pretty centrally located and well within earshot of my distributed students).
By the time I got there the show was well underway in the east and quickly moving west. It would have been easy to slip into panic-shooting mode and try to find something where things were good right now, but I’ve learned (for me at least) that it’s best to anticipate than react. Instead, because I’d already mentally worked this scene, I knew the composition I wanted and was ready for the color when it arrived.
The extra sixty seconds this bought me was enough to refine my composition, find the f-stop and focus point that would maximize sharpness throughout the scene, meter the scene and set my exposure, and orient my polarizer for the best balance between reflection and lakebed. It turns out that this anticipation was a difference-maker, as the vivid color peaked and faded in about 30 seconds.
Join my next Eastern Sierra Fall Color photo workshop
A Mono Lake Gallery
Click an image for a closer look, and a slide show. Refresh the screen to reorder the display.


I love you, goodbye…
Posted on November 18, 2015

Fire and Mist, Halemaumau Crater, Kilauea, Hawaii
Sony a7S
Sony/Zeiss 16-35 f4
10 seconds
F/4
ISO 3200
Last week I said goodbye to my Sony a7S. More than any camera I’ve owned, this is the camera that overcame photography’s physical boundaries that most frustrated me.
I’ve been interested in astronomy since I was ten, ten years longer than I’ve a been photographer. But until recently I’ve been thwarted in my attempts to fully convey the majesty of the night sky above a grand landscape.
What was missing was light. Or more accurately, the camera’s ability to capture light. Light is what enables cameras to “see,” and while there’s still a little light after the sun goes down, cameras struggle mightily to find a usable amount.
When faced with limited light, photographers’ solutions are limited, and each solution is a compromise. In no particular order, we can increase:
- Shutter speed: We can increase the time the light strikes the sensor. While we can usually keep our shutter open for as long as the battery lasts, the longer it’s open, the more motion we capture.
- Aperture (a ratio measure in f-stops): Larger apertures (the f-stop number shrinks as the aperture opens) allow more light, with a loss of depth of field. While the DOF loss is usually insignificant in most night photography scenes (because all subjects are usually at infinity), the laws of optics limit the size of of a lens’s aperture.
- ISO: We can increase the sensor’s sensitivity to light by increasing the ISO, but not without significant image quality degradation (noise).
Most night photography attempts bump into the limits of each solution before complete success is achieved. For me, the first barrier is usually the f-stop, which is soon maxed. With my f-stop maxed, I’m left with a dance between ISO and shutter speed as I attempt to balance acceptable amounts of motion and noise.
So why not just add more light? Duh. But, while adding light solves some problems, it introduces others. Anything bright enough to illuminate a large landscape (sunlight or moonlight) washes out the stars, and artificial local light (such as light painting or a flash) violates my own natural-light-only objective. Another option some resort to is image blending (one frame for the foreground, one for the sky), but that too violates my personal single-frame-only goal.
My first shot at the night photography conundrum came about ten years ago, when I started doing moonlight photography. I immediately found that the reflected sunlight cast by a full moon beautifully illuminated my landscapes, while preserving enough celestial darkness that the brighter, most recognizable constellations still shined through. But walking outside on a clear, moonless night far from city lights was all the reminder I needed that my favorite qualities of the night sky—the Milky Way and the the seemingly infinite quantity of stars—remained beyond my photographic reach.
To photograph a moonless sky brimming with stars, my next step was star trail photography—long exposures that accumulated enough light to reveal my terrestrial subjects at manageable ISO (not too much noise). Star trails have the added benefit of stretching stellar pinpoints into concentric arcs of light that beautifully depict Earth’s rotation.
While both enjoyable and beautiful, moonlight and star trail photography were not completely satisfying. But the laws of physics dictated that lenses weren’t going to get any faster, and Earth wasn’t going to rotate any slower, so the solution would need to be in sensor efficiency.
Unfortunately, camera manufactures remained resolute in their belief that megapixels sold cameras. So as sensor technology evolved, and photographers saw slow but steady high ISO improvement, we were force-fed a mind-boggling increase in megapixel count.
But cramming more megapixels onto a 35mm sensor requires: 1) smaller photosites that are less efficient at capturing light, and 2) more tightly packed photosites that increase (noise inducing) heat.
The megapixel race changed overnight when Sony, in a risky, game-changing move, decided to offer a high-end, full-frame camera with “only” a 12 megapixel sensor. What were they thinking!?
Acknowledging what serious photographers have known for years, that 12 megapixels is enough for most uses (just 12 years ago, pros paid $8,000 for a Canon 1Ds with only 11 megapixels), Sony bucked the megapixel trend to embrace the benefits of fewer, larger, less densely packed photosites. The result was a light-sucking monster that can see in the dark: the Sony a7S.
Since purchasing my a7S less than a year ago, I’m able to photograph the dark night sky above the landscapes I love. Additionally, I found that its fast shutter lag (since matched by the a7R II) made the a7S ideal for lightning photography. It was love at first click.
And now it’s gone. Last month Sony released the a7S II, and given my satisfaction with the upgrade from the a7R to the a7R II, it was only a matter of time before I upgraded to the a7S II. I’m happy to say that I found a good home for my a7S and in fact may even get to visit it in future workshops.
I haven’t had a chance to use the a7S II, but I assure you it won’t be long, and you’ll be the first to know.
About this image
The image at the top of this post was captured in September (2015) during my Hawaii Big Island Volcanos and Waterfalls photo workshop. Each time I visit here I hold my breath until I see what the sky is doing. I’ve encountered everything from completely cloudless to pea soup fog. I’ve come to hope for a mix of clouds and sky—enough sky for the Milky Way to shine through clearly, but enough clouds to reflect the orange light of the churning volcano.
On this evening we got a combination I hadn’t seen before—clear sky overhead, a few low clouds, and a heavy mist hanging in the caldera. Not only did the mist frame the scene with a translucent orange glow, it subdued the volcano’s fire enough for me to use a long exposure to bring out the Milky Way without blowing my highlights.
We’ll do it again in my next Hawaii Volcanos and Waterfalls workshop
An a7S homage
Click an image for a closer look, and a slide show. Refresh the screen to reorder the display.


