Favorite: El Capitan Reflection
Posted on April 26, 2014

El Capitan Reflection, Yosemite
Canon EOS 10D
1/4 second
F22
ISO 100
27 mm
I can’t believe this image is over ten years old. It represents a significant milestone for me, because I captured it about the time I made the decision to turn a 25+ year serious hobby into my profession. With that decision came the realization that simply taking pretty pictures, or being a very good photographer, wouldn’t be enough—there are plenty of those out there. I made a very conscious decision to start seeing the world differently, to stop repeating the images that I, and other photographers, had been doing for years—no matter how successful they were. I won’t pretend to be the first person to photograph a reflection and ignore the primary subject, but seeing my scene this way represented a breakthrough moment for me.
I’d arrived in Yosemite mid-morning on a chilly November day. A few showers had fallen the night before, scouring all impurities from the air. The air was perfectly still, and the Merced River was about as low (and slow) as it can get. This set of conditions—clean, still air and water—is ideal for for reflections. The final piece of the reflection puzzle, the thing that causes people to doubt at first glance that this is indeed a reflection, was simply lucky timing. I arrived at Valley View that morning in the small window of time when El Capitan was fully lit while the Merced remained in shade, creating a dark surface to reflect my brightly lit subject.
A couple of other things to note, not because I remember my thought process, but because I know how I shoot and like to think that they were conscious choices: First is the way the rock in the foreground is framed by El Capitan’s curved outline—merging the two would have sacrificed depth. That rock, along with the thin strip of misty meadow along the top of the frame, serve as subtle clues that this is a reflection. And second is my f22 choice—believe it or not, even though the entire foreground is just a few feet from my lens, the depth of field is huge. That’s because the focus point of a reflection is the focus point of the reflective subject, not the reflective surface. So, while the El Capitan reflection is at infinity, the closest rock is no more than four feet away. In other words, to be sharp from about four feet all the way out to infinity required a very small aperture and very careful focus point selection. I’m guessing that I focused on the second foreground rock, which was about 7 feet away, to ensure sharpness from about 3 1/2 feet to infinity.
Since this image, reflections have been a personal favorite of mine. I blogged about their power in my “Reflecting on reflections” blog post, and included a sampling of my favorites below.
Photo Workshop Schedule
A Reflection Gallery
Click an image for a closer look and slide show. Refresh the window to reorder the display.


A camera’s reality
Posted on April 24, 2014

Spring, Dogwood and Bridalveil Fall, Yosemite
Canon EOS 5D Mark III
1/250 second
260mm
ISO 400
F5.6
I knew the dogwood bloom in Yosemite had really kicked in this week (quite early), so when the forecast called for rain in Yosemite on Tuesday, I cleared my schedule and headed up there for the day. It turns out I only got an hour or so of rain and solid cloud cover before the sun came out and started making things difficult, but it was still worth the drive.
On my way out of the park that afternoon I stopped at the Bridalveil Fall view turnout on Northside Drive, spending about an hour lying in the dirt with my 100-400 lens, trying to align dogwood blossoms with Bridalveil Fall (about 1/3 mile away). I found the more impressive aggregation of blooms were about ten feet too far downstream to align perfectly, but as I headed back to my car I took a closer look at a single, precocious little flower in a much more favorable position. I’d overlooked it earlier because, in my haste to get to the more impressive flowers, I wasn’t seeing like my camera. To my human eye, this flower was imprisoned by a jumble of disorganized, distracting stems. But this time I decided to give it a try, knowing that the narrow depth of field of my 100-400 lens would render the scene entirely differently from what my eyes saw.
While the flower is clearly the only point of focus, the way the out-of-focus branches and buds blurred to shapes and accents that actually enhance the image was a pleasant surprise. While Bridalveil softens beyond recognition, I was pretty sure most viewers would still recognize it as a waterfall; even if they don’t, I didn’t think it was a distraction.
Words can’t express how much fun I had playing with this little scene. I’ve been photographing things like this for a long time, but I still find myself caught off guard sometimes by the difference between my vision and my camera’s vision. I love these reminders. I guess if there’s a lesson here, it’s to emphasize how important it is to comprehend and master your camera’s very unique view of the world. Images that achieve that, while nothing like the human experience, are no less “true.” Rather than confirming what we already know, they expand our world by providing a fresh perspective of the familiar.
More rain in the forecast tomorrow—guess where I’ll be….

Raindrops, Dogwood Leaf, Yosemite
When I arrived in Yosemite that morning a light rain was falling. Used my 100mm macro and 20 mm of extension to focus extremely close to this backlit dogwood leaf. It’s difficult to see, but these droplets are actually on the opposite side of the leaf. There is one way to tell—can you see it?
Canon EOS 5D Mark III
1/200 second
100 mm
ISO 800
F7.1
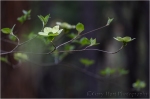
Going for bokeh
Posted on April 17, 2014

Forest Dogwood, Yosemite Valley
Canon EOS 5D Mark III
1/80 second
159 mm
ISO 800
F4
In this day of ubiquitous cameras, automatic exposure, and free information, a creative photographer’s surest path to unique images is achieved by managing a scene’s depth. Anyone with a camera can compose the left/right/up/down aspect of a scene. But the front/back plane, a scene’s depth, that we human’s take for granted, is missing from a two-dimensional image. Managing depth requires abstract vision and camera control beyond the skill of most casual photographers.
While skilled photographers frequently go to great lengths to maximize depth of field (DOF), many forget the ability of limited DOF to:
- Guide the viewer’s eye to a particular subject
- Provide the primary subject a complementary background
- Provide background context for a subject (such as its location or the time of day or season)
- Smooth a busy, potentially distracting background
- Create something nobody will ever be able to duplicate
They call it “bokeh”
We call an image’s out of focus area its “bokeh.” While it’s true that bokeh generally improves with the quality of the lens, as with most things in photography, more important than the lens is the photographer behind it. More than anything, achieving compelling bokeh starts with understanding how your camera sees the world, and how to translate that vision. The image’s focus point, its depth of field (a function of the f-stop, sensor size, focal length, and subject distance), and the characteristics of the blurred background (color, shapes, lines) are all under the photographer’s control.
No special equipment required
Compelling bokeh doesn’t require special or expensive equipment—chances are you have everything you need in your bag already. Most macro lenses are fast enough to limit DOF, have excellent optics (that provide pleasing bokeh), and allow for extremely close focus (which shrinks DOF). A telephoto lens near its longest focal length has a very shallow DOF when focused close.
Another great way to limit your DOF without breaking the bank is with an extension tube (or tubes). Extension tubes are hollow (no optics) cylinders that attach between your camera and lens. The best ones communicate with the camera so you can still meter and autofocus. Not only are extension tubes relatively inexpensive, with them I can focus just about as close as I could have with a macro. They can also be stacked—the more extension, the closer you can focus (and the shallower your DOF). And with no optics, there’s nothing compromise the quality of my lens (unlike a teleconverter or diopter). But there’s no such thing as a free lunch in photography—the downside of extension tubes is that they reduce the amount of amount light reaching the sensor—the more extension, the less light. On the other hand, since I’m using them to reduce my DOF, I’m always shooting wide open. And the high ISO capability of today’s cameras more than makes up for the loss of light.
Many of my selective focus images are accomplished without a macro or even a particularly fast lens. Instead, preferring the compositional flexibility of a zoom, I opt for my 70-200 f4 (especially) and 100-400 lenses. While my 100 macro is an amazingly sharp lens with beautiful bokeh, I often prefer the ability to isolate my subject, in a narrow focus range, without having to get right on top of it. On the other hand, if I have a subject I want to get incredibly close to, there’s no better way than my macro and an extension tube (or two, or three).
Managing depth of field
When using creative soft focus, it’s important that your background be soft enough that it doesn’t simply look like a focus error. In other words, you usually want your background really soft. On the other hand, the amount of softness you choose creates a continuum that starts with an indistinguishable blur of color, includes unrecognizable but complementary shapes, and ends with easily recognizable objects. Where your background falls on this continuum is up to you.
Your DOF will be shallower (and your background softer):
- The closer your focus point
- The longer your focal length
- The larger your aperture (small f-stop number)
A macro lens and/or extension tube is the best way to get extremely close to your subject for the absolute shallowest DOF. But sometimes you don’t want to be that close. Perhaps you can’t get to your subject, or maybe you want just enough DOF to reveal a little (but still soft) background detail. In this case, a telephoto zoom may be your best bet. And even at the closest focus distances, the f-stop you choose will make a difference in the range of sharpness and the quality of your background blur. All of these choices are somewhat interchangeable and overlapping—you’ll often need to try a variety of focus-point/focal-length/f-stop combinations to achieve your desired effect. Experiment!
Foreground/background
Composing a shallow DOF image usually starts with finding a foreground subject on which to focus, then positioning yourself in a way that places your subject against a complementary background. (You can do this in reverse too—if you see a background you think would look great out of focus, find a foreground subject that would look good against that background and go to work.)
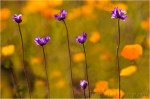
Primary subjects are whatever moves you: a single flower, a group of flowers, colorful leaves, textured bark, a clinging water drop—the sky’s the limit. A backlit leaf or flower has a glow that appears to originate from within, creating the illusion it has its own source of illumination—even in shade or overcast, most of a scene’s light comes from the sky and your subject will indeed have a backlit side. And an extremely close focus on a water droplet will reveal a world that’s normally invisible to the unaided eye—both the world within the drop and a reflection of the surrounding world.
My favorite backgrounds include parallel tree trunks, splashes of lit leaves and flowers in a mostly shaded forest, pinpoint jewels of daylight shining through the trees, flowers that blur to color and soft shapes, sunlight sparkling on water. I also like including recognizable landscape features that reveal the location—nothing says Yosemite like a waterfall or Half Dome; nothing says the ocean like crashing surf.
The final piece of the composition puzzle is your focus point. This creative decision can make or break an image because the point of maximum sharpness is where your viewer’s eyes will land. In one case you might want to emphasize a leaf’s serrated edge; or maybe its the leaf’s intricate vein pattern you want to feature. Or maybe you’ll need to decide between the pollen clinging to a poppy’s stamen, or the sensual curve of the poppy’s petals. When I’m not sure, I take multiple frames with different focus points.
Exposure
Exposing selective focus scenes is primarily a matter of spot-metering on the brightest element, almost always your primary subject, and dialing in an exposure that ensures that it won’t be blown out. Often this approach turns shaded areas quite dark, making your primary subject stand out more if you can align the two. Sometimes I’ll underexpose my subject slightly to saturate its color and further darken the background.
Tripod
And let’s not overlook the importance of a good tripod. In general, the thinner the area of sharpness in an image, the more essential it is to nail the focus point. Even the unavoidable micro-millimeter shifts possible with hand-holding can make the difference between a brilliant success and an absolute failure.
Virtually all of my blurred background images are achieved in incremental steps. They start with a general concept that includes a subject and background, and evolve in repeating click, evaluate, refine, click, … cycles. In this approach, the only way to ensure consistent evolution from original concept to finished product is a tripod, which holds in place the scene I just clicked and am now evaluating—when I decide what my image needs, I have the scene sitting there atop my tripod, just waiting for my adjustments.
Forest Dogwood, Yosemite Valley
I worked this scene for about a half hour before I was satisfied. I started with this dogwood branch and moved around a bit until the background was right. Then I tried a variety of focal lengths to simplify and balance the composition. Once I was satisfied with my composition, I used live-view to focus toward the front of the center cluster. Finally, I ran the entire range of f-stops from f4 to f16, in one-stop increments, to ensure a variety of bokeh effects to choose from.

Bridalveil Dogwood, Yosemite
This raindrop-laden dogwood image uses Yosemite’s Bridalveil Fall as a soft background to establish the location. An extension tube allowed me to focus so close that the nearest petal brushed my lens.

Champagne Glass Poppies, Merced River Canyon, California
The background color you see here is simply a hillside covered with poppies. To achieve this extremely limited DOF, I used an extension tube on my 100mm macro, lying flat on the ground as close as my lens would allow me to focus. Since my tripod (at the time) wouldn’t go that low, I detached my camera, rested the tripod on the ground in front of the poppy, propped my lens on a leg, composed, focused on the leading edge, and clicked my remote release.

Autumn Light, Yosemite
I had a lot of fun playing with the sunlight sneaking through the dense evergreen canopy here, experimenting with different f-stops to get the effect I liked best.
Sparkling Poppies, Merced River Canyon
The background jewels of light are sunlight reflecting on the rippling surface of a creek. I had a blast controlling their size by varying my f-stop.

Dogwood, Merced River, Yosemite
Looking down from the Pohono Bridge, finding the composition was the simple part. But as soon as I started clicking I realized that the sparkling surface of the rapidly Merced River was completely different with each frame. So I just clicked and clicked and clicked until I had over 30 frames to choose between.

Forest Dogwood, Tenaya Creek, Yosemite
Here, rather than background bokeh, I framed my dogwood flower with leaves in front of my focus point.
Bokeh Gallery
-

- Floating Dogwood, Yosemite
-

- Poppy Lanterns, Merced River Canyon
-

- Champagne Glass Poppies, Merced River Canyon, California
-

- Bridalveil Dogwood, Yosemite
-

- Poppy Pastel, Sierra Foothills, California
-

- Forest Autumn, Yosemite
-

- Wildflowers and Aspen, North Rim, Grand Canyon
-

- Poppies, Hite Cove Trail, Merced River Canyon
-

- Backlit Poppies, Folsom, California
-
- Aspen, Bishop Creek Canyon, Eastern Sierra
-

- Dogwood and Bridalveil Fall, Yosemite
-
- Raindrops, Orchid in Lava Tree State Park, Hawaii
-

- Forest Dogwood, Tenaya Creek, Yosemite
-

- Solitude, Dogwood Bloom Above the Merced River, Yosemite
-
- Intimate Poppy, Point Reyes National Seashore
-
- Forest Dogwood, Yosemite Valley
-

- Wildflower Collage, Sierra Foothills, California
-

- Autumn Light, Yosemite
-

- Dogwood Branch, Pohono Bridge, Yosemite
-

- Autumn Bouquet, Zion National Park
-

- Poppy With a View, Point Reyes National Seashore
Customize your camera
Posted on April 6, 2014
Sparkling Poppies, Merced River Canyon
Canon EOS-1Ds Mark III
1/200 second
F/8
ISO 200
200 mm
A recent mishap forced me to replace my Canon 5D Mark III (a story for a different day). A quality backup and good equipment insurance made my accident no more than a minor inconvenience, but setting up my new camera this morning reminded me of a few camera settings I consider equal parts essential and obscure (or taken for granted). So essential that I set them once and they simply become part of my in-the-field workflow; so obscure that I have to hunt to find many of them in the menu system. What I share here is specific to Canon in general, and the 5DIII in particular, but much of it will apply to Nikon and other DSLR cameras as well. Some of my suggestions may seem obvious, but you may find some surprises too.
For everyone
- Set Date/Time and keep it accurate: Okay, maybe this one isn’t too obscure, but I think the time and date are important to get and keep right, rather than something set once and forget. In fact, when Daylight Saving Time starts/ends, I (try to) make a point of going in and making the appropriate adjustment. The same applies to travel through time zones. Why is all this important? Because often I like to know what time the Rainbow starts on Bridalveil fall in April, or when the light leaves Delicate Arch in October—when my calendar and clock is right, all I need to do is return to a past image and check its capture date/time. I can also figure the altitude (angle above the horizon) of any location by checking the time of an image of the sun or moon rising/setting at that location on a given date, then refer to an app or website for the sun’s/moon’s altitude at that time.
- Enable Highlight Alert (“blinking highlights” that flash when blown): I can think of no reason to not turn Highlight Alert on, but remarkably, on many cameras it’s off by default. Blown highlights are death to an image, but sometimes we overlook them until it’s too late. And sometimes whatever’s blown is too small to even register on the histogram—not a big deal if it’s a patch of snow on a distant peak, but a huge deal if blown highlights are in the rising full moon that’s the focal point of your entire scene. Not sure your whether your Highlight Alert is turned on? Take an extremely overexposed image and replay it on your camera’s LCD (don’t forget to cycle through all possible views)—if you don’t see any flashing, Highlight Alert is off.
- Disable Release shutter without card (or whatever it’s called on your camera): This is another no-brainer that comes set backward on all the Canon cameras I’ve owned (your results may vary). All it took for me to learn this lesson was losing an entire shoot with a new camera because I forgot to put a card in (true story). Maybe you have a reason to click your shutter with no card, but for most of us those times are few and far between.
- Reduce LCD brightness (and turn off auto-brightness): We all like our LCDs to be super bright because it makes our images easier to see in full sunlight, and images just look better when they’re brighter. The problem with a max-bright LCD is, no matter how well we understand histograms and tell ourselves to check it with every shot, there’s a natural tendency to base exposure decisions on the way the image looks on the LCD. A bright LCD fools us into thinking a too-dark image is just right. Not only do I see workshop participants doing this (all the time), I catch myself making this unconscious mistake too. So, if you’re frequently frustrated by images that look much darker on your monitor than they did on your LCD (don’t increase your monitor brightness!), it’s probably because your camera’s LCD is too bright. I actually believe that a too-bright LCD is the source of many “My prints are too dark” complaints—the LCD tells you an image is bright enough (because you didn’t check the histogram), but when you put it on the computer at home, it’s too dark. Rather than fixing the real problem by giving your images more light at capture (something the histogram would tell you, BTW), you simply make your monitor brighter. Of course the best solution is to always check and trust your histogram—if you train yourself to do this, your LCD can be whatever brightness you like.
- Turn image rotation on for the monitor, off for the camera LCD: I like to use my camera’s entire LCD to view my images (long side of the image, whether horizontal or vertical, matches the long side of the LCD), but Canon (and maybe Nikon and the rest) must think nobody ever turns their camera vertically, because my camera’s default behavior is to rotate a vertical image so its top aligns with the top of the camera (where view-finder is). While Canon’s default rotation is great for my always horizontal monitor, I can and do flip my camera quite easily. Turning off rotation for the camera’s LCD ensures that the long side of horizontal and vertical images always aligns with the LCD’s long side.
- Download the manual’s PDF and put in on your smartphone: Okay, not a camera menu option, but definitely one of the first things you should do when you get a new camera. For years I’ve loaded my camera’s manual onto my computer, but with my Dropbox app I can also access it on my iPhone. Because manuals are big, and often the times I most need it I’m in an area with poor or no wifi or cell service, I use the Dropbox Favorites selection to ensure that the manual is always with me.
- Save your custom settings: On the Canon cameras I’ve used there’s an option to save and restore all of your menu settings to/from a media card. Do it (you can use one of those old, small capacity cards rattling around in the bottom of your camera bag), then mark the card containing the settings and set the card aside. Not only will this make recovery easier the next time you drop your camera in a creek on Maui (for example), it’ll save lots of frustration when you get your camera back from a repair and find everything back to factory default.
For the serious landscape shooter
- Set back-button autofocus (and remove autofocus from the shutter button): For stationary subjects, there’s little reason to connect focus and the shutter click (if your subjects are in motion, for example if you shoot sports or wildlife shooting, you can make a strong case for keeping the autofocus connected to the shutter button). By removing autofocus from my shutter button and moving it to a different button on the back of my camera, I can completely separate the act of focus from the act of clicking a frame. When I want to autofocus, I simply point my camera’s focus point at the place in the scene on which I want to focus, press my focus button, compose, and click. (Setting this up is less than intuitive on Canon bodies—each time I get a new camera I have to figure it out again.) Here’s a primer on back-button focus, including instructions for the 1D and 5D bodies.
- Turn on Mirror Lock-up (to reduce vibration induced by the mirror snapping out of the way when you click your shutter): I suspect that modern damping mechanisms make mirror lock-up much less essential than it once was, and mirror vibration really is a problem only in the 1/10 to 1 second shutter speed range. But since Canon makes it a pain to turn mirror lock-up on and off, and I’m always on a tripod (if you’re hand-holding mirror lock-up is a total pain), I see no reason not to just leave it on and get used to clicking my shutter button twice (once to lock-up the mirror, and again to trip the shutter). Of course when you’re in Live-View mode, the mirror is already locked up, so this setting doesn’t matter if you always use Live-View.
- Write to two cards simultaneously (if your camera is among the majority without two card slots, you can skip this one): I’m kind of obsessive about backups, so when I got my 1DSIII, rather than use the second media card slot to store more images, I opted to write each image to both cards. And when I learned that the 5DIII would come with two slots, I was pleased that I wouldn’t have to compromise my peace of mind to save $3500. Has this feature saved me? I don’t use cheap media cards, so I’ve never had a complete card failure (it does happen), but I have lost a few images on one card due to localized corruption. The solution? Just pop in the second card with duplicates of all the day’s captures. My capture workflow goes something like this: In camera, write each image to a 32 GB CF and a 32 GB SD card. At the end of the day (this assumes on the road), I upload the day’s images from my SD card to my laptop hard disk and a to a portable external drive. I don’t delete anything until I run out of space; since I’m not a high volume shooter (on my nine-day trip to Maui, I filled less than half of a 32 GB card), an entire trip’s images usually stay on both media cards in my camera. In the rare event that I do fill a card, I clear the SD and replace the CF with a fresh one.
- Turn on ISO expansion: By default my camera’s ISO range is 100-12800. ISO 100 is my camera’s “native” (best) ISO, but when I want to slow my shutter, I like the option of dropping to ISO 50 before using a smaller (less than optimal) aperture. Unlike the film days, when ISO 50 gave you less noise, a DSLR’s ISO 50 is emulated and therefore not quite as good as its native ISO. I find that I lose about 1/3 stop of dynamic range at ISO 50. Expanding my ISO above 12800 is of little general value to me, but there are times when I find an extremely high ISO invaluable. For example, when photographing in the near absolute darkness of a moonless night, the meter, Live-View LCD, and viewfinder are of little value. Even though maxing my ISO gives me unsellable images, I can take sample frames that are clear enough to aid my exposure, focus, and composition choices.
- Turn on the RGB Histogram: Since the RGB (the three-color) histogram gives you three times as much info as the standard (luminosity) histogram, it’s the histogram you should be looking at. Fortunately, if you know how to read a luminosity histogram, you can read an RGB histogram (trust me). A luminosity histogram tells you whether or not you’ve lost detail in your image; the RGB histogram also tells you whether you’ve lost a color channel. For example, a luminosity histogram will tell you everything’s fine even if you’ve blown (clipped) two of the three color channels, leaving you to wonder later why your lovely blue sky or yellow poppy looks washed out.
- Set up the Custom Menu: My 5DIII has a custom menu screen that will hold all of the most commonly used menu selections so you don’t have to go hunting for them. When I press my menu button, this is always the first menu that appears. On my custom menu I have Battery Status, Format Card, Sensor Clean, VF grid display, Date/Time/Zone (see my very first point), and LCD brightness (to override my default setting when I want to check an image in bright sunlight). Many other cameras offer something similar. Since setting up my Custom Menu, I find that I do/check things I should be doing/checking much more frequently than I did when they required a hunt through my camera’s menu maze.
These are my settings, but I think they’ll benefit most landscape shooters. Do they make me a better photographer? Perhaps not, but they do reduce distractions that might make me a worse photographer. There are lots of other settings in your menus that might surprise you and benefit the way you shoot—the next time you have an hour or so, grab your camera and manual and go through the menus.
* * *
About this image
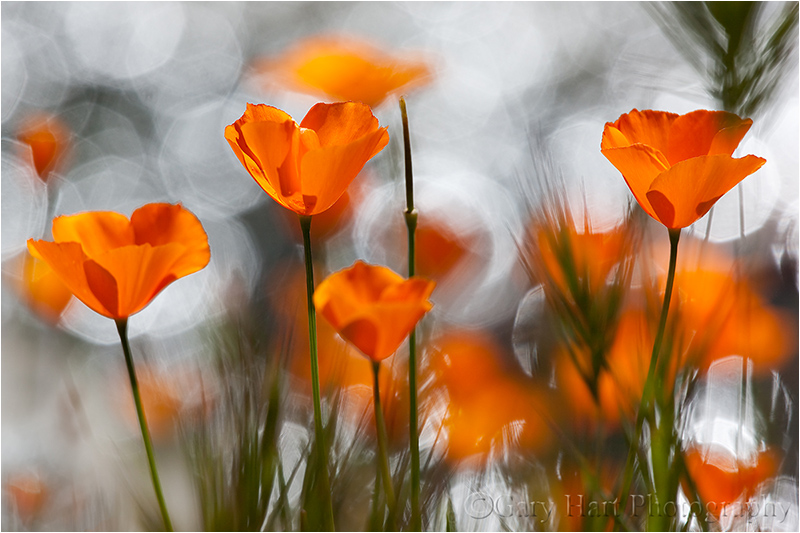
Over the years I’ve accumulated a number of go-to poppy spots scattered about the Sierra foothills. This location in the Merced River Canyon west of Yosemite, where a small creek drains into the river, I don’t get to as often as I’d like. But a couple of years ago I happened to hit it right at the peak of the poppy bloom and took full advantage of the opportunity. Bright sunlight and a breeze made exposure and composition tricky, but I soon became comfortable with my surroundings and started concentrating on tight compositions using my 70-200 with extension tubes.
As I generally do with poppies, my goal was extremely narrow depth of field that highlights a prominent poppy (or two or three) and blurs background poppies and other wildflowers to smudges of color. But, noticing reflecting sunlight creating ephemeral reflections on the creek’s rippling surface, I wondered how my camera would capture sparkling water.
Dropping to poppy level, I used a trio of poppies on about the same focal plane as my foreground and experimented with different f-stops to change the size of each glistening facet. The larger my aperture, the larger and less defined the sparkle. I loved the effect on my LCD, but it wasn’t until I processed my images at home that I decided on this f8 frame that more or less split the size/definition continuum in the middle.
Blinded by the light
Posted on March 29, 2014

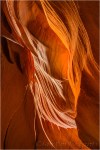
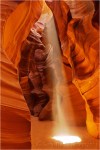
Inner Glow, Upper Antelope Canyon, Arizona
Canon EOS 5D Mark III
2.5 seconds
67 mm
ISO 400
F16
Sometimes we’re so focused on the spectacular, we overlook the sublime
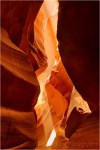
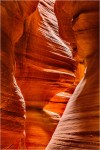
Upper Antelope Canyon near Page, Arizona, is known for its brilliant light shafts that seem to originate from heaven and streak laser-like through open air to spotlight the canyon’s red sandstone walls and dusty floor. Sometimes multiple shafts are visible, ranging from pencil thin to tree-trunk thick. The rare combination of conditions the shafts require include clear skies and the high sun angle only possible midday on the long side of the equinoxes. The shafts also require airborne dust—easily stirred by wind or footfall, but often augmented by the Navajo guides who carry plastic scoops to toss the powdery particles skyward.

Beam, Upper Antelope Canyon, Arizona
Canon EOS 5D Mark III
1 second
70 mm
ISO 400
F11
Photographers from around the world flock to Page each spring and summer, packing Upper Antelope Canyon like Manhattan subway commuters in hopes of capturing their version of this breathtaking phenomenon. Given the crowds, it would be an understatement to say that the experience isn’t as inspiring or peaceful as the photos make it appear. But it is mesmerizing, so much so that when the beams fire, it’s difficult to concentrate on anything else. And therein lies the rub—the color, curves, and lines that are Antelope Canyon’s essence are overpowered its most famous quality.
The only way to get access to Upper Antelope Canyon is to join a tour led by a Navajo guide (I’ve never had a bad guide). The photo tour (as opposed to the standard, shorter “tourist” tour) of Upper Antelope gets you two hours in the canyon—one hour to photograph the beams in the company hundreds of oblivious tourists and competing, desperate photographers, and a second hour once the canyon has emptied, when it’s possible to walk its one hundred or so yards in relative peace and appreciate the qualities that make Antelope Canyon special.
As cool as the light shafts are, it’s this quiet hour that I’ve come to enjoy most, both as a photographer and as a lover of all things natural. Without the shafts hypnotic pull, I’m free to appreciate light’s interaction with Mother Nature’s handiwork. Layered sandstone carved by centuries of sudden, violent flash floods separated by months of arid heat. The floods have scoured the hard walls smooth, crafted narrow twists and broad rooms, and finished the walls with multifaceted curves and lines that reflect sunlight in all angles like a house of mirrors. Each ray of light entering from the extremely narrow opening at the ceiling is reflected at least once, and usually many times before reaching its viewer’s eyes (or camera). Shaded sections create dark frames for the illuminated sections that seem to glow with their own light source. As the light shifts or the viewer moves, shapes appear—a face, a bear, a heart—and disappear to replaced by new shapes limited only by the viewer’s imagination.
The bifurcated Antelope Canyon experience exposes an important reality: Dramatic light and color can blind viewers to a scene’s true beauty. While brilliant light and vivid sunsets grab your eyes in much the same way a rich dessert immediately satisfies your taste buds, we can’t live forever on this visual dessert. The images that sustain, the ones that draw us back and hold our attention once we’re there, are more often the subtle explorations of indirect light that allow us to make our own discoveries.
* * *
Read more about photographing Antelope Canyon
* * *
Antelope Canyon Gallery
-
- Glow, Upper Antelope Canyon, Arizona
-
- Twin Beams, Upper Antelope Canyon, Arizona
-

- Nature’s Cathedral, Upper Antelope Canyon, Arizona
-

- Beam, Upper Antelope Canyon, Arizona
-

- Focused Beam, Upper Antelope Canyon, Arizona
-
- Rock Face, Upper Antelope Canyon, Arizona
-
- Divine Spotlight, Upper Antelope Canyon, Arizona
-

- Inner Glow, Upper Antelope Canyon, Arizona
My photography essentials, part 3
Posted on March 23, 2014

Dawn, Puna Coast, Hawaii
Canon EOS-1Ds Mark III
10 seconds
F/11
ISO 100
19 mm
A couple of weeks ago the editors at “Outdoor Photographer” magazine asked me (and a few other pros) to contribute to an upcoming article on photography essentials, and it occurs to me that my blog readers might be interested to read my answers. Here’s how I answered the third of their three questions:
What three things contribute to keeping you inspired, energized and creative on your shoots and why does each keep you inspired, energized and creative?
- When I’m photographing a particularly beautiful moment—such as a moonrise over Yosemite, lightning and a rainbow at the Grand Canyon, or the Milky Way I force myself to turn off my photographer brain and for a few minutes just become a regular human who might be witnessing the most beautiful thing happening on Earth at that moment. The sense of appreciation and marvel is a vital connection to my subjects that fuels my photography.
- Throughout the year I plan excursions that keep me motivated: Each spring I’m recharged by drives through the Sierra foothills and its rolling green hills, studded with poppies and oak trees and cut by brimming creeks and rivers, that just beg to be photographed. My calendar is loaded with the days I’ll find a crescent moon dangling in the amber/blue transition separating night and day. And nothing exhilarates me more than a dark sky dotted with stars. Since so much of my photography time is spent guiding others to my favorite locations (at my favorite times), these personal trips establish an essential balance in my life.
- And most of all, I’m inspired by viewing the work of other photographers:
- Ansel Adams is an obvious inspiration—not only was he a great photographer, Adams navigated uncharted territory to pave the way for all who followed. I chuckle when other photographers defend their captures with, “That’s the way it really looked,” because Adams’ absolute connection with his camera’s reality, and the synergy between his capture and processing, proved that duplicating human (visual) reality is absolutely not a nature photographer’s goal.
- Galen Rowell is another inspiration, for his understanding of light, his obsessive inquisitiveness, and his willingness to explore photography’s physical and mental boundaries. Rowell possessed a synergy between his brain’s creative and logical capabilities—an ability to understand, anticipate, and calculate, combined with an instinctive ability to turn all that off and simply create. From him I learned to follow the light to the exclusion of all distractions, no matter how tempting.
- David Muench, was an influence long before I entertained thoughts of becoming a photographer. I have memories dating back to my childhood of paging through Muench’s massive coffee-table books and being awed by the beautiful scenes he’d witnessed. At the time I had no idea of how much skill those images required—I just thought he was incredibly lucky to have been there to see it. Of course now I appreciate Muench’s unique ability to see and manage the front-to-back aspect of a scene to create the illusion of depth, an approach I’m now convinced was made easier for me by a lifetime of exposure to those images.
- Charles Cramer’s meticulous compositions extract beauty from simple scenes and subtle light and can transfix me for hours. Each of Cramer’s images feel to me like personal discoveries, as if he’s uncovered nature’s true beauty while everyone else’s camera was pointed in the other direction. Browse his galleries and note how many images use indirect light and no sky. More than any other photographer, Charles Cramer’s images inspire me to grab my camera and run outside.
About this image
On every visit to Hawaii’s Big Island I visit this unnamed beach on the Puna coast south of Hilo. I’ve photographed it in a variety of dramatic conditions: colorful sunrises and sunsets, crashing surf, rainbows, but this nearly monochrome image beneath heavy gray clouds is my favorite.
In addition to the color and light, the scene varies greatly with the tide and surf. This morning, finding pillows of basalt cradling still pools that reflected the morning sky, I dropped low and moved close with a wide lens to fill my foreground. Working in shadowless, pre-sunrise light, I used a long exposure to smooth the water and create a serenity to more closely matched my state of mind.
My photography essentials, part 2
Posted on March 17, 2014

Spring Potpourri, Sierra Foothills, California
Canon EOS-1Ds Mark III
1/125 second
F/7.1
ISO 200
340 mm
A couple of weeks ago the editors at “Outdoor Photographer” magazine asked me (and a few other pros) to contribute to an upcoming article on photography essentials, and it occurs to me that my blog readers might be interested to read my answers.Here’s my answer to the second of their three questions:
What are your three most important non-photo pieces of gear that you rely on for making your photographs and why do you rely on each of the three?
- How did I ever get by without a smartphone? Among other things, and in no particular order, it keeps me company on long trips (that are often far off the grid), informs, entertains, guides, provides essential sun and moon rise/set time and location, helps me choose the best f-stop, allows me to manage by business from any location, and even gives me traffic and weather warning. My iPhone (there are many similarly great Android and Windows phones) is 64GB (the largest available) to allows plenty of room to store maps, more podcasts than I can listen to on a single trip, and a lifetime worth of music. Of course a smartphone is be of little value without its apps. When choosing apps, a primary requirement is usability without Internet connectivity. My favorite connection-independent apps are: Focalware, for sun/moon info for any location on Earth; Depth of Field Calculator by Essence Computing, for hyperfocal info; and Theodolite, for general horizon and direction angles (among other things). I also make frequent use of the Dropbox Favorites option, which allows me to pre-download any file for review when I’m not connected.
- My dash-top GPS is compact enough to slip into any suitcase (there are many viable options; while I use Garmin, interface frustrations stop me short of endorsing it). Because I visit many distant locations that I’m not able to return to as frequently as I’d like, I save every potential photo spot in my dash-top GPS. For example, there are usually many months between my Hawaii visits. Over the years I’ve found far more incredible spots to photograph than my feeble brain can retain. But traveling with a GPS, I don’t have to re-familiarize myself with anything—I just pop it on my dash before driving away from the airport and instantly navigate to my locations like a native. (Or to the nearest Starbucks.)
- Here’s a just-discovered non-photo essential that didn’t get passed on to “Outdoor Photographer”: After many, many years of trying to find a hands-free way to communicate on my long drives in the middle of nowhere, my new Plantronics Voyager Legend bluetooth earpiece feels like a godsend. Wired earbuds get tangled and have lousy noise cancellation; sound quality makes bluetooth radio connections virtually unusable. And I’ve lost track of the number of earpieces I’ve discarded for some combination of discomfort, poor receiving sound quality, poor sending sound quality, and lousy battery life. I can wear my Voyager Legend for hours and forget it’s there; I can answer calls without taking my eyes off the road; and most importantly, I can hear and be heard as if I’m sitting in a quiet room.
About this image
My GPS guided me to this remote, wildflower-dotted hillside, discovered the previous spring and now a regular destination on my annual spring foothill forays. The wildflower bloom varies greatly each year, so without the GPS sometimes it’s impossible to know whether I’ve found a spot that thrilled me the year before. In this case I found the bloom everything I dared to hope.
Rather than pull out my macro lens, I twisted an extension tube onto my 100-400 lens and went to work. Since there were virtually no shadows, the dynamic range wasn’t a problem, despite the bright, direct sunlight. Metering on the brightest part of the scene and underexposing by about one stop (about 2/3 stop above a middle tone) prevented the brightest highlights from washing out and saturated the color.
Most of my attention that afternoon went to the poppies, but here I concentrated on a group of small, purple wild onions and let the limited depth of field blur the poppies into the background. Clicking the same composition at a half dozen or so f-stops from f5.6 to f16 allowed me to defer my depth of field selection until I could view my images on my large monitor.
My photography essentials, part 1
Posted on March 11, 2014

Morning Light, Yosemite Falls from Sentinel Dome, Yosemite
Canon EOS-1Ds Mark II
1/50 second
F/16
ISO 400
105 mm
A couple of weeks ago the editors at “Outdoor Photographer” magazine asked me (and a few other pros) to contribute to an upcoming article on photography essentials, and it occurs to me that my blog readers might be interested to read my answers. Here’s my answer to the first of their three questions:
1. What are the top three most important pieces of photo gear for you to create your particular style of landscape photography and why is each important?
(Since we all need cameras and lenses, I stuck to optional items.)
- At the top of my list, and it’s not even close, is a tripod/ball-head combo that’s easy to use: sturdy, light, and tall enough to use without a (destabilizing) center post. More than just a platform to reduce vibration, my tripod is a compositional aid that allows me to click a frame, evaluate my image, refine my composition and exposure settings, and click again. I often repeat this process several times until I’m satisfied. Using a tripod, the composition I’m evaluating is sitting right there, waiting for my adjustments; without a tripod, I need to recreate my composition each time. Another unsung benefit of the tripod is the ability to make exposure decisions without compromising f-stop or ISO to minimize hand-held camera shake. I’m a huge fan of Really Right Stuff tripods and heads.
- Adding an L-plate to my bodies was a game-changer—not only does it make vertical compositions more stable, they’re closer to eye level and just plain easier. In my workshops I often observe photographers without an L-plate resist vertical oriented shots, either consciously or unconsciously, simply because it’s a hassle to crank their head sideways, and when they do they need to stoop more. And some heads are not strong enough to hold a heavy, vertically oriented camera/lens combo. But since switching to the L-plate, my decision between a horizontal or vertical composition is based entirely on the composition that works best.
- Given the amount of travel I do, not to mention the hiking once I get there, I need a camera bag that handles all my gear (including my tripod and 15” laptop), has room for extra stuff like a jacket, water, and food, is comfortable for long hikes, durable, easy to access, and (this is huge) fits all airline overhead bins. I’ve tried many, and the F-stop Tilopa is the only one I’ve found that meets all my criteria.
* * *
Because people always seem interested in the equipment I use
For what it’s worth, I have relationships with a few photo equipment vendors that allows them to use my name, and in return I get a price break on their equipment. But I’ve never been one to play the endorsement card to great benefit, or too allow the whole freebie/discount thing affect my recommendations. For example, I’d never heard of F-Stop Gear when they asked if I’d like to be one of their staff pros. When they offered to send me a bag to try, I made it very clear that I’d only use or endorse it if I liked it better than anything else I’ve tried, but they sent it anyway, no strings attached. I’m happy to say that I absolutely fell in love with my F-Stop Tilopa, and haven’t used another bag in over three years (before that I used different bags for different needs).
Likewise, I used (and sung the praises of) Really Right Stuff heads and L-plates long before RRS had ever heard of me. I own four Gitzo tripods, and while I think they’re great, I have to say that my new Really Right Stuff tripod (TVC-24L) is demonstrably better—lighter, sturdier, and easier to use—than my Gitzo 3530LS. And I’ve always found RRS customer service second to none.
Now if I could only get Apple to notice me….
About this image
Follow the light. Here atop Sentinel Dome it would have been easy to concentrate on one or more of a variety of dramatic subjects, including El Capitan, Yosemite Falls, Half Dome, and Cathedral Rocks. But the best light this morning was the warm sunrise glow on an anonymous tree and a clump of wildflowers.
I’d spent the night in the back of my truck a few miles down the road from the Sentinel Dome trailhead. The hike is only about a mile—it’s relatively easy in daylight, but I wanted to be atop the dome about 45 minutes before sunrise, so I did the whole thing in the dark (not something I’d recommend unless you’re extremely familiar with the trail, as I was). Since this was late June, sunrise was around 5:30, which meant an extremely early morning. As it turned out, the sunrise, while magnificent to experience, wasn’t terribly noteworthy photographically.
As I started my walk back to my truck, the light on this tree stopped me. I positioned myself to align the wildflowers, tree, and Yosemite Fall, moving as far back as I could to allow a telephoto that would compress these three primary elements. I dropped low and focused to emphasize the wildflowers and weathered tree in the warm light, relegating unlit Yosemite Falls to background status by allowing it to go slightly soft.
It’s Greek to me
Posted on March 3, 2014

Double Rainbow, Tunnel View, Yosemite
Canon EOS-1Ds Mark III
1/5 second
F/16.0
ISO 100
38 mm
Photograph: “Photo” comes from phos, the Greek word for light; “graph” is from graphos, the Greek word for write. And that’s pretty much what we photographers do: Write with light.
Because we have no control over the sun, nature photographers spend a lot of time hoping for “good” light and cursing “bad” light. There’s no universal definition of good and bad light; it’s usually more a function of whatever it is we want to do at the moment. Just as portrait photographers have complete understanding of the artificial light they use to illuminate their subjects, nature photographers should understand the sunlight they photograph: what it is, what it does, and why it does it.
It’s this understanding of light that allows me to be in the right place for vivid sunrises and sunset, to know the best time and location for blurring water, and that helped me anticipate this amazing rainbow. To learn more about light, read the Light article in my Photo Tips section.
About this image
May 26, 2009
On my drive to Yosemite the sky above the San Joaquin Valley was clear, but I was encouraged to see dark cumulus clouds billowing above the Sierra to my east. Sierra thunderstorms in May are rare, but not unprecedented. At the very least I knew the clouds would make for interesting photography. As I entered the park via Big Oak Flat Road, a few large drops dotted my windshield. The afternoon sun was now obscured by clouds, but the sky to the west remained virtually cloudless, a good sign, but nothing I hadn’t seen before.
By the time I reached Yosemite Valley the rain had increased enough to require me to engage my wipers and get my mental wheels turning. I was in the park for a one day, private photo tour with a couple from Dallas. The arrangement was to meet at Yosemite Lodge for dinner to plan the next day’s activities, then to go shoot sunset. As I continued toward my appointment I allowed myself to consider the possibility of a rainbow. Going for it would require rushing to meet my customers, delaying dinner, and possibly sitting in the rain with no guarantee of success.
Still undecided but with about 20 minutes to spare, I dashed up to Tunnel View to survey Yosemite Valley. I liked the way things were shaping up; if I’d have been by myself I’d have skipped dinner. Leaving Tunnel View I continued surveying the sky—by the time I reached the lodge I knew I could be sued for malpractice if I didn’t at least suggest the possibility of a rainbow.
We completed our introductions in front of the cafeteria, but before entering I suggested that maybe we should forget dinner for now. Robert and Kristy were as excited about the conditions as I was (phew) but had just completed a long hike and were famished, so we rushed in and grabbed pre-made pizzas to eat on the road.
Twenty minutes later we were sitting on my favorite granite slope above Tunnel View. We were immediately greeted by a flash of lightning, followed not too many seconds later by a blast of thunder. As a lifelong Californian, I’m not particularly experienced with lightning, so I deferred to the Texans and found comfort in their lack of concern (knowing what I know now, I probably should have been more concerned).
Rainbow photography is equal parts preparation and providence. The preparation comes from understanding the optics of a rainbow, knowing the conditions necessary, where to look, then putting yourself in the best position to capture it; the providence is a gift from the heavens, when all the conditions align exactly as you envisioned. Robert, Kristy, and I had been admiring the view and photographing intermittently in a light, warm rain for about thirty minutes when a rainbow appeared. It started slowly, as a faint band in front of El Capitan, and quickly developed into a vivid stripe of color. For the next seven minutes we shot like crazy people—I varied my compositions with almost every shot and called to them to do the same. When it ended we were giddy with excitement—never let it be said that a professional nature photographer can’t get excited about his subjects—and even though the rainbow never quite achieved a complete arc across the valley, it had been everything I dared hope for.
Little did we know that this first rainbow was just a prelude—less than ten minutes later a second rainbow appeared, becoming more vivid than the first, growing into a full double rainbow that arced all the way across Yosemite Valley, from the Merced River to Silver Strand Fall. It lasted over twenty minutes, long enough for me to set up a second camera and do multiple lens changes on each. We actually reached the point where we simply ran out of compositions and could only laugh as we continued clicking anyway.
One more thing: This is the third time I’ve processed this image. I’ve never been completely happy with some of the color tones and overly bright highlights, so I decided to give it one more shot. Using Lightroom 5 and Photoshop CS 6, I was finally able to come up with something that more accurately represents the experience of this unforgettable moment.
Workshop Schedule
A Gallery of Rainbows


A rite of spring
Posted on February 26, 2014

Backlit Poppies, Folsom, California
Canon EOS 10D
1/30 second
F/3.5
ISO 100
100 mm
Today it’s gray and wet in Sacramento, a refreshing break from our ridiculously warm and dry winter (sorry, pretty-much-everywhere-else-in-the-U.S.). Usually by the end of February my thoughts have turned to spring, but this year I find myself feeling a cheated of winter (and wishing the rest of you would have shared). As miserable as it can be, I’ve always loved winter photography—not just snow (which I have to travel to see), but rain, clouds, bare trees, and the low angle of the sunlight.
Another aspect of winter I like is the precipitation that rejuvenates our creeks and rivers and nourishes the wildflowers. It’s hard to know what combination of winter conditions will make a good wildflower spring, but I do know that ample rainfall is an important component. Which makes me a little nervous about the wildflowers’ prospects this spring. But that won’t stop me from what has become an annual ritual, meandering through the foothills east of town, Spring Training baseball on the radio (go Giants!), photographing poppies. I have several go-to poppy spots, but I’m easily distracted and often never make it to my original destination.
The image here is from one of my earliest spring excursions, nearly ten years ago. On my way home, I detoured at the last minute to a spot I knew I’d find a few nice poppies—(believe it or not) the Intel parking lot in Folsom. The poppies were in an elevated bed atop a retaining wall, allowing me to easily drop low and capture them backlit by the setting sun. The sun, distorted and dulled by horizon haze, was a throbbing orange ball that I blurred beyond recognition with an extension tube and a large aperture on my 100mm macro lens. Without wind, focus through my viewfinder on the center poppy’s leading edge was pretty easy (today I’d have used live-view focus). The translucent petals caught the fading sunlight, igniting the flowers like orange lanterns. I underexposed slightly to save the highlights and color, and to turn the shaded background into a black canvas.
One other thing I remember about this shoot was my brief brush with the law. Apparently my activity aroused the interest of Intel Security—after just a few minutes of shooting I was visited by an officer who clearly took his job quite seriously. It took me a few minutes, but I was finally able to convince him that, despite my sinister appearance, I was in possession of no explosive device, nor was I an AMD (Advanced Micro Devices, Intel’s leading competitor) spy seeking the secrets of Intel’s fertile flower bed. After making a theatrical display of checking of my license plate (that clearly communicated, “We know who you are”), and in a tone that made let me know he wasn’t quite convinced and would be watching me, he allowed me to finish.
-

- Poppies and Oak, Big Sur
-
- Poppy Lanterns, Merced River Canyon
-
- Spring, California Gold Country, Sierra Foothills
-
- Poppy Pastel, Sierra Foothills, California
-

- Sparkling Poppies, Merced River Canyon
-
- Raindrops on Poppy, California Gold Country
-

- Brilliant Poppy, American River Parkway, Sacramento
-
- Backlit Poppies, Folsom, California
-
- Poppy and Surf, Point Reyes National Seashore
-

- Poppy Hillside, Sierra Foothills
-
- Champagne Glass Poppies, Merced River Canyon, California
-
- Poppies, Hite Cove Trail, Merced River Canyon

