Eloquent Images by Gary Hart
Insight, information, and inspiration for the inquisitive nature photographer
Focus Magic
Posted on September 30, 2018

Autumn Aspen, Grand Tetons National Park
Sony a7RIII
Sony 100-400 GM
Sony 2x teleconverter
15mm extension tube
ISO 1600
f/11
1/60 second
As we enter the fall color photography season, I’m revisiting and revising previous articles. This is the third in the series.
In this day of ubiquitous cameras, automatic exposure, and free information, a creative photographer’s surest path to unique images is achieved by managing a scene’s depth. While anyone with a camera can compose the left/right/up/down aspect of a scene, the front/back plane, a scene’s depth (that we human’s take for granted) is missing from a two-dimensional image. Managing depth requires abstract vision and camera control beyond the skill of most casual photographers. But it’s not hard.
While skilled photographers frequently go to great lengths to maximize depth of field (DOF), many forget the ability of limited DOF to:
- Guide the viewer’s eye to a particular subject
- Provide the primary subject a complementary background
- Provide background context for a subject (such as its location or the time of day or season)
- Smooth a busy, potentially distracting background
- Create something nobody will ever be able to duplicate
They call it “bokeh”
We call an image’s out of focus area its “bokeh.” While it’s true that bokeh generally improves with the quality of the lens, as with most things in photography, more important than the lens is the photographer behind it. More than anything, achieving compelling bokeh starts with understanding how your camera sees the world, and how to translate that vision. The image’s focus point, its depth of field (a function of the f-stop, sensor size, focal length, and subject distance), and the characteristics of the blurred background (color, shapes, lines) are all under the photographer’s control.
No special equipment required
Compelling bokeh doesn’t require special or expensive equipment—chances are you have everything you need in your bag already. Most macro lenses are fast enough to limit DOF, have excellent optics (that provide pleasing bokeh), and allow for extremely close focus (which shrinks DOF). A telephoto lens near its longest focal length has a very shallow DOF when focused close.
Another great way to limit your DOF without breaking the bank is with an extension tube (or tubes). Extension tubes are hollow (no optics) cylinders that attach between your camera and lens. The best ones communicate with the camera so you can still meter and autofocus. Not only are extension tubes relatively inexpensive, with them I can focus just about as close as I could have with a macro. They can also be stacked—the more extension, the closer you can focus (and the shallower your DOF). And with no optics, there’s nothing compromise the quality of my lens (unlike a teleconverter or diopter). But there’s no such thing as a free lunch in photography—the downside of extension tubes is that they reduce the amount of amount light reaching the sensor—the more extension, the less light. On the other hand, since I’m using them to reduce my DOF, I’m always shooting wide open. And the high ISO capability of today’s cameras more than makes up for the loss of light.
Many of my selective focus images are accomplished without a macro or even a particularly fast lens. Instead, preferring the compositional flexibility of a zoom, I opt for my 70-200 f4 (especially) and 100-400 lenses. While my 100 macro is an amazingly sharp lens with beautiful bokeh, I often prefer the ability to isolate my subject, in a narrow focus range, without having to get right on top of it. On the other hand, if I have a subject I want to get incredibly close to, there’s no better way than my macro and an extension tube (or two, or three).
Managing depth of field
When using creative soft focus, it’s important that your background be soft enough that it doesn’t simply look like a focus error. In other words, you usually want your background really soft. On the other hand, the amount of softness you choose creates a continuum that starts with an indistinguishable blur of color, includes unrecognizable but complementary shapes, and ends with easily recognizable objects. Where your background falls on this continuum is up to you.
Your DOF will be shallower (and your background softer):
- The closer your focus point
- The longer your focal length
- The larger your aperture (small f-stop number)
A macro lens and/or extension tube is the best way to get extremely close to your subject for the absolute shallowest DOF. But sometimes you don’t want to be that close. Perhaps you can’t get to your subject, or maybe you want just enough DOF to reveal a little (but still soft) background detail. In this case, a telephoto zoom may be your best bet. And even at the closest focus distances, the f-stop you choose will make a difference in the range of sharpness and the quality of your background blur. All of these choices are somewhat interchangeable and overlapping—you’ll often need to try a variety of focus-point/focal-length/f-stop combinations to achieve your desired effect. Experiment!
Foreground/background
Composing a shallow DOF image usually starts with finding a foreground subject on which to focus, then positioning yourself in a way that places your subject against a complementary background. (You can do this in reverse too—if you see a background you think would look great out of focus, find a foreground subject that would look good against that background and go to work.)
Primary subjects are whatever moves you: a single flower, a group of flowers, colorful leaves, textured bark, a clinging water drop—the sky’s the limit. A backlit leaf or flower has a glow that appears to originate from within, creating the illusion it has its own source of illumination—even in shade or overcast, most of a scene’s light comes from the sky and your subject will indeed have a backlit side. And an extremely close focus on a water droplet will reveal a world that’s normally invisible to the unaided eye—both the world within the drop and a reflection of the surrounding world.
My favorite backgrounds include parallel tree trunks, splashes of lit leaves and flowers in a mostly shaded forest, pinpoint jewels of daylight shining through the trees, flowers that blur to color and soft shapes, sunlight sparkling on water. I also like including recognizable landscape features that reveal the location—nothing says Yosemite like a waterfall or Half Dome; nothing says the ocean like crashing surf.
The final piece of the composition puzzle is your focus point. This creative decision can make or break an image because the point of maximum sharpness is where your viewer’s eyes will land. In one case you might want to emphasize a leaf’s serrated edge; or maybe its the leaf’s intricate vein pattern you want to feature. Or maybe you’ll need to decide between the pollen clinging to a poppy’s stamen, or the sensual curve of the poppy’s petals. When I’m not sure, I take multiple frames with different focus points.
Exposure
Exposing selective focus scenes is primarily a matter of spot-metering on the brightest element, almost always your primary subject, and dialing in an exposure that ensures that it won’t be blown out. Often this approach turns shaded areas quite dark, making your primary subject stand out more if you can align the two. Sometimes I’ll underexpose my subject slightly to saturate its color and further darken the background.
Tripod
And let’s not overlook the importance of a good tripod. In general, the thinner the area of sharpness in an image, the more essential it is to nail the focus point. Even the unavoidable micro-millimeter shifts possible with hand-holding can make the difference between a brilliant success and an absolute failure.
Virtually all of my blurred background images are achieved in incremental steps. They start with a general concept that includes a subject and background, and evolve in repeating click, evaluate, refine, click, … cycles. In this approach, the only way to ensure consistent evolution from original concept to finished product is a tripod, which holds in place the scene I just clicked and am now evaluating—when I decide what my image needs, I have the scene sitting there atop my tripod, just waiting for my adjustments.
September 2018

Autumn Aspen, Grand Tetons National Park
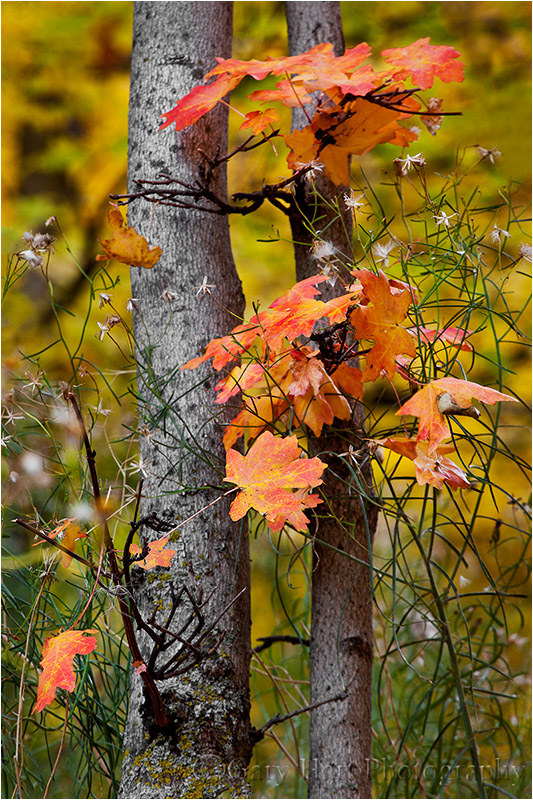
Quivering, translucent leaves of yellow, orange, and (sometimes) red make aspen trees the perfect accent for any autumn mountain vista. But it’s the aspen’s knotted white trunks that really draw me, so when I get the opportunity to photograph aspen up close, I usually try to find ways to emphasize the trunks.
Last week I was in the Tetons helping my friend Don Smith with his workshop there. While Grand Tetons have some of the most spectacular grand vistas in America, I think I my favorite part of the week was the time we spent among the aspen.
One afternoon mid-workshop we stopped along Moose-Wilson Road. Moose-Wilson Road is a narrow, mostly paved track that winds through aspen groves broken by soggy meadows. Unfortunately, the preponderance of wildlife here makes Moose-Wilson a mecca for wildlife shooters hoping to catch a glimpse of some of the park’s numerous bear, elk, and moose. The mere act of exiting the care here draws wildlife shooters like mosquitos to bare skin, and I spent half of my time with this scene swatting them away.
For this shoot I’d taken the “go big or go home” approach, carrying only my tripod (RRS 24L and RRS BH-40 ball head) and Sony a7RIII with the Sony 100-400 GM attached. The longer the focal length, the shallower the depth of field, but I wasn’t satisfied with just 400mm, so I added my Sony 2X teleconverter to get out to 800mm. But I wasn’t finished—to focus even closer and further shrink my depth of field, I also added a 15mm extension tube. Because both the teleconverter and extension tube reduces the light reaching my sensor, I shot this scene at ISO 1600.
Between interruptions (“What do you see?”; “Is there a bear?”) I made my way to an isolated aspen, then circumnavigated the trunk until I could juxtapose it against a distant grouping of orange-red leaves. For the next 20 minutes I played with variations of the composition you see here, making small refinements after each click to get the right separation between the three aspen in the scene, the best arrangement of knots, and a depth of field that emphasized my foreground aspen with sufficient background blur. And because my depth of field was so shallow, after each adjustment I very carefully chose my focus point on the tree by magnifying it in my viewfinder, then focused manually.
More Examples

Bridalveil Dogwood, Yosemite
This raindrop-laden dogwood image uses Yosemite’s Bridalveil Fall as a soft background to establish the location. An extension tube allowed me to focus so close that the nearest petal brushed my lens.

Poppy With a View, Point Reyes National Seashore
My goal this gray spring afternoon was to juxtapose a poppy against the distant surf, a relationship made possible by Point Reyes’ Chimney Rock precipitous edge. Once I found the right poppy, I dropped to the ground to frame the flower with the arcing coastline, experimenting with several apertures before finding the ideal balance of foreground sharpness and background softness.

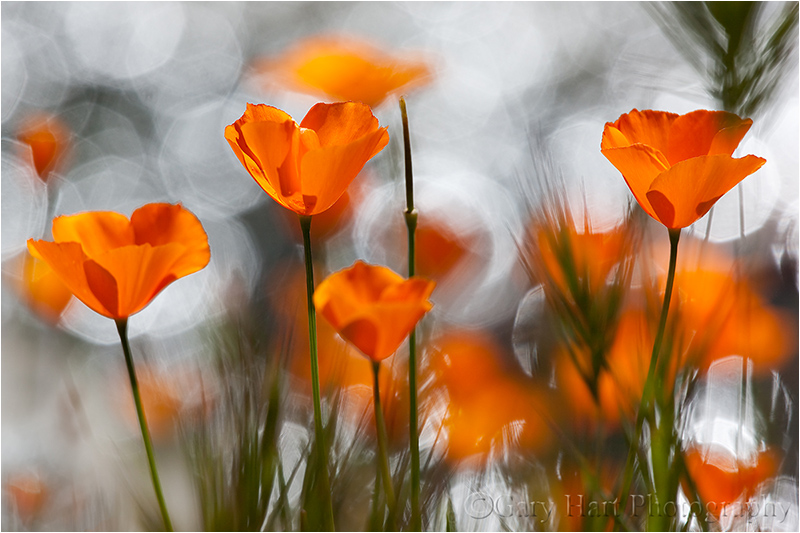
Champagne Glass Poppies, Merced River Canyon, California
The background color you see here is simply a hillside covered with poppies. To achieve this extremely limited DOF, I used an extension tube on my 100mm macro, lying flat on the ground as close as my lens would allow me to focus. Since my tripod (at the time) wouldn’t go that low, I detached my camera, rested the tripod on the ground in front of the poppy, propped my lens on a leg, composed, focused on the leading edge, and clicked my remote release.

Autumn Light, Yosemite
I had a lot of fun playing with the sunlight sneaking through the dense evergreen canopy here, experimenting with different f-stops to get the effect I liked best.
Sparkling Poppies, Merced River Canyon
The background jewels of light are sunlight reflecting on the rippling surface of a creek. I had a blast controlling their size by varying my f-stop.

Dogwood, Merced River, Yosemite
Looking down from the Pohono Bridge, finding the composition was the simple part. But as soon as I started clicking I realized that the sparkling surface of the rapidly Merced River was completely different with each frame. So I just clicked and clicked and clicked until I had over 30 frames to choose between.

Forest Dogwood, Tenaya Creek, Yosemite
Here, rather than background bokeh, I framed my dogwood flower with leaves in front of my focus point.
Bokeh Gallery
Click an image for a closer look and slide show. Refresh the window to reorder the display.


Improve Your Fall Color Photography
Posted on September 27, 2018

Autumn Snow, El Capitan, Yosemite
Canon EOS-5D Mark III
24-105L
1/15 second
F/16
ISO 100
As we enter the fall color photography season, I’m revisiting and revising previous articles. This is the second in the series.
Improve Your Fall Color Photography
Vivid color and crisp reflections make autumn my favorite season for creative photography. While most landscape scenes require showing up at the right time and hoping for the sun and clouds to cooperate, photographing fall color is often a simple matter of circling the scene until the light’s right. For the photographers who understand this, and know how to control exposure, depth, and motion with their cameras, great fall color images are possible any time of day, in any light.
Backlight, backlight, backlight
The difference between the front-lit and backlit sides of fall foliage is the difference between dull and vivid color. When illuminated by direct sunlight, the side of a leaf opposite the sun throbs with color, as if it has its own source of illumination, while the same leaf’s lit side appears flat—if you ever find yourself thinking that the fall color seems washed out, check the other side of the tree.
While the backlight glow isn’t as pronounced in shade/overcast, when the leaves are illuminated by light that’s spread evenly across the sky, even diffuse sunlight is far more pronounced one side of the leaves than the other, giving the side of a leaf that’s opposite the sky (the side getting less light) a subtle but distinct glow when compared to its skyward side.

Forest Autumn, Yosemite
Isolate elements with a telephoto for a more intimate fall color image
Big fall color scenes are great, but a telephoto or macro enables you to highlight and emphasize elements and relationships. Train your eye to find leaves, groups of leaves, or branches that stand out from the rest of the scene. Zoom close, using the edges of the frame to eliminate distractions and frame subjects. And don’t concentrate so much on your primary subject that you miss complementary background or foreground elements to balance the frame and provide an appealing canvas for your subject.

Solitary Leaf, Bridalveil Creek, Yosemite
Selective depth of field is a great way to emphasize/deemphasize elements in a scene
Limiting depth of field with a large aperture on a telephoto lens can soften a potentially distracting background into a complementary canvas of color and shape. Parallel tree trunks, other colorful leaves, and reflective water make particularly effective soft background subjects. For an extremely soft background, reduce your depth of field further by adding an extension tube to focus closer.
Autumn Bouquet, Zion National Park
Underexpose sunlit leaves to maximize color
Contrary to what many believe, fall foliage in bright sunlight is still photographable if you isolate backlit leaves against a darker background and slightly underexpose them. The key here is making sure the foliage is the brightest thing in the frame, and to avoid including any sky in the frame. Photographing sunlit leaves, especially with a large aperture to limit DOF, has the added advantage of an extremely fast shutter speed that will freeze wind-blown foliage.

Leaves and Reflection, Convict Lake, Eastern Sierra
Slightly underexposing brightly lit leaves not only emphasizes their color, it turns everything that’s in shade to a dark background. And if your depth of field is narrow enough, points of light sneaking between the leaves and branches to reach your camera will blur to glowing jewels.
Autumn Light, Yosemite
A sunstar is a great way to liven up an image in extreme light
If you’re going to be shooting backlit leaves, you’ll often find yourself fighting the sun. Rather than trying to overcome it, turn the sun into an ally by hiding it behind a tree. A small aperture (f16 or smaller is my general rule) with a small sliver of the sun’s disk visible creates a brilliant sunstar that becomes the focal-point of your scene. Unlike photographing a sunstar on the horizon, hiding the sun behind a terrestrial object like a tree or rock enables you to move with the sun.
When you get a composition you like, try several frames, varying the amount of sun visible in each. The smaller the sliver of sun, the more delicate the sunstar; the more sun you include, the more bold the sunstar. You’ll also find that different lenses render sunstars differently, so experiment to see which lenses and apertures work best for you.

Autumn Light, North Rim, Grand Canyon

Autumn Glow, Cook’s Meadow, Yosemite
Polarize away the foliage’s natural sheen
Fall foliage has a reflective sheen that dulls its natural color. A properly oriented polarizer can erase that sheen and bring the underlying natural color into prominence. To minimize the scene’s reflection, slowly turn the polarizer until the scene is darkest (the more you try this, the easier it will be to see). If you have a hard time seeing the difference, concentrate your gaze on a single leaf, rock, or wet surface.

Fallen Color, Rock Creek Canyon, Eastern Sierra
A polarizer isn’t an all-on or all-off proposition. Slowly dial the polarizer’s ring and watch the reflection change until you achieve the effect you desire. This is particularly effective when you want your reflection to share the frame with submerged feature such as rocks, leaves, and grass.

Morning Reflection, North Lake, Eastern Sierra
Blur water with a long exposure
When photographing in overcast or shade, it’s virtually impossible to freeze the motion of rapid water at any kind of reasonable ISO. Rather than fight it, use this opportunity to add silky water to your fall color scenes. There’s no magic shutter speed for blurring water—in addition to the shutter speed, the amount of blur will depend on the speed of the water, your distance from the water, your focal length, and your angle of view relative to the water’s motion. When you find a composition you like, don’t stop with one click. Experiment with different shutter speeds by varying the ISO (or aperture as long as you don’t compromise the desired depth of field).

Autumn Leaf, Bridalveil Creek, Yosemite
Reflections make fantastic complements to any fall color scene
By autumn, rivers and streams that rushed over rocks in spring and summer, meander at a leisurely, reflective pace. Adding a reflection to your autumn scene can double the color, and also add a sense of tranquility. The recipe for a reflection is still water, sunlit reflection subjects, and shaded reflective surface.
When photographing leaves floating atop a reflection, it’s important to know that the focus point for the reflection is the focus point of the reflective subject, not the reflective surface. This is seems counterintuitive, but try it yourself—focus on the leaves with a wide aperture and watch the reflection go soft. Achieving sharpness in your floating leaves and the reflection requires an extremely small aperture and careful focus point selection. Often the necessary depth of field exceeds the lens’s ability to capture it—in this case, I almost always bias my focus toward the leaves and let the reflection go soft.

Autumn Reflection, El Capitan, Yosemite

Fallen Leaves, Valley View, Yosemite
Nothing communicates impending winter like fall color with snow
Don’t think the first snow means your fall photography is finished for the year. Hardy autumn leaves often cling to branches, and even retain their color on the ground through the first few storms of winter. An early snowfall is an opportunity to catch fall leaves etched in white, an opportunity not to be missed. And even after the snow has been falling for a while, it’s possible to find a colorful rogue leaf to accent an otherwise stark winter scene.

Fall into Winter, Bridalveil Fall, Yosemite

First Snow, El Capitan, Yosemite
Workshop Schedule || Purchase Prints
To better understand the science and timing of fall color, read
“A simple how and when of fall color“
A Gallery of Fall Color


, Yosemite")


:: More photography tips ::
A Fall Color Primer
Posted on September 23, 2018
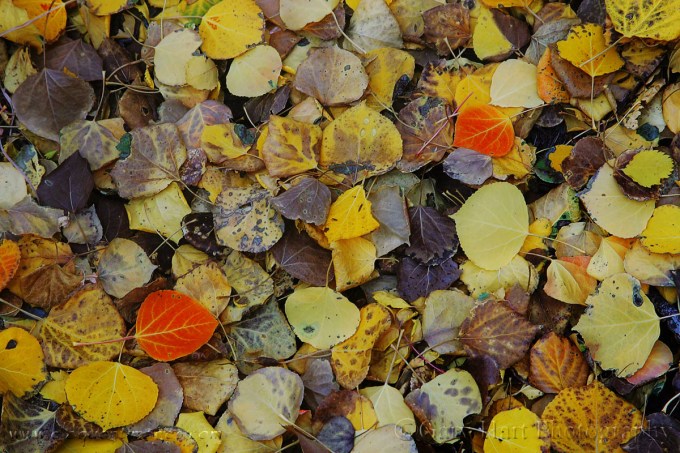
Fallen Color, Rock Creek Canyon, Eastern Sierra
Canon EOS-1D Mark II
1/3 second
F/9.0
ISO 100
85 mm
Autumn has arrived, my favorite season for creative photography. To kick off the festivities, I’m sharing an updated version of a post I wrote a few years ago explaining the often misunderstood process responsible for it all.
Few things get a photographer’s heart racing more than the vivid yellows, oranges, and reds of autumn. And the excitement isn’t limited to photographers—to appreciate that reality, just try navigating the Smoky Mountains backroads on a Sunday afternoon in October.
Innkeeper logic
But despite all the attention, the annual autumn extravaganza is fraught with mystery and misconception. Showing up at the spot that guy in your camera club told you was peaking at this time last year, you might find the very same trees displaying lime green mixed with just hints of yellow and orange, and hear the old guy behind the counter at the inn shake his head and tell you, “It hasn’t gotten cold enough yet—the color’s late this year.” Then, the next year, when you check into the same inn on the same weekend, you find just a handful of leaves clinging to exposed branches—this time as the old guy hands you the key he utters, “That freeze a few weeks ago got the color started early this year—you should have been here last week.”
While these explanations may sound reasonable, they’re not quite accurate. Because the why and when of fall color is complicated, observers resort to memory, anecdote, and lore to fill knowledge voids with partial truth and downright myth. Fortunately, science has given us a pretty good understanding of the fall color process.
It’s all about the sunlight
The leaves of deciduous trees contain a mix of green, yellow, and orange pigments. During the spring and summer growing season, the green chlorophyl pigment overpowers the orange and yellow pigments and the tree stays green. Even though this chlorophyl is quickly broken down by sunlight, it is continuously replaced in the process of photosynthesis that sustains the tree during the long days of summer.
As the days shrink toward autumn, things begin to change. Cells at the abscission layer at the base of the leaves’ stem (the knot where the leaf connects to the branch) start to thicken, blocking the transfer of carbohydrates from the leaves to the branches, and the movement of minerals to the leaves, that had kept the tree thriving all summer. Without these minerals, the leaves’ production of chlorophyl dwindles and finally stops, leaving just the yellow and orange pigments. Voila—color!
Sunlight and weather
Contrary to popular belief, the timing of the onset of this fall color chain reaction is much more daylight-dependent than temperature- and weather-dependent—triggered by a genetically programmed day/night-duration threshold, and contrary to innkeeper-logic, the trees in any given region will commence their transition from green to color at about the same time each year (when the day length drops to a certain point).
Nevertheless, though it doesn’t trigger the process, weather does play a significant part in the intensity, duration, and demise of the color season. Because sunlight breaks down the green chlorophyl, cloudy days after the suspension of chlorophyl creation will slow the coloring process. And while the yellow and orange pigments are present and pretty much just hanging out, waiting all summer for the chlorophyl to relinquish control of the tree’s color, the red and purple pigments are manufactured from sugar stored in the leaves—the more sugar, the more vivid the red. Ample moisture, warm days, and cool (but not freezing) nights after the chlorophyl replacement has stopped are most conducive to the creation and retention of the sugars that form the red and purple pigments.
On the other hand, freezing temperatures destroy the color pigments, bringing a premature end to the color display. Drought can stress trees so much that they drop their leaves before the color has a chance to manifest. And wind and rain can wreak havoc with the fall display—go to bed one night beneath a canopy of red and gold, wake the next morning to find the trees bare and the ground blanketed with color. And of course all these weather factors come in an infinite number of variations, which makes each year’s color timing and intensity a little different from the last.
Despite our understanding of the fall color process, Mother Nature still holds some secrets pretty close to her vest—just when we think we’ve got it all figured out, she’ll surprise us. For example, last year’s Eastern Sierra fall color featured lots of black leaves that I attributed to California’s extreme drought conditions. With the drought persisting, and in fact intensifying, this year, I feared this fall would be even worse. So I was quite pleased to find everything going along right on schedule, with lots of yellow, more red than usual, and hardly a black leaf to be seen. Go figure.
About this image
Driving Rock Creek Canyon north and east of Bishop, I pulled my car over at a random spot and wandered over to the creek. I found trees beyond peak and the creek bank blanketed with yellow aspen leaves, by far the predominant color in the Eastern Sierra. As I turned to return to my car my eyes caught a rare flash of orange. Moving in that direction, I found matching red-orange leaf less than a foot away.
I’m sometimes accused of placing or arranging leaves in my scenes, something I never do, but I understand why people might think that. I very consciously look for leaves that stand out from their surroundings that I can isolate in my frame.
Circling this scene, I didn’t have to work to hard to decide that a symmetrical diagonal arrangement was the way to go. A thin overcast made exposure easy.
Workshop Schedule || Purchase Prints
A Fall Color Gallery


Photography’s Creativity Triad: Light
Posted on November 11, 2017
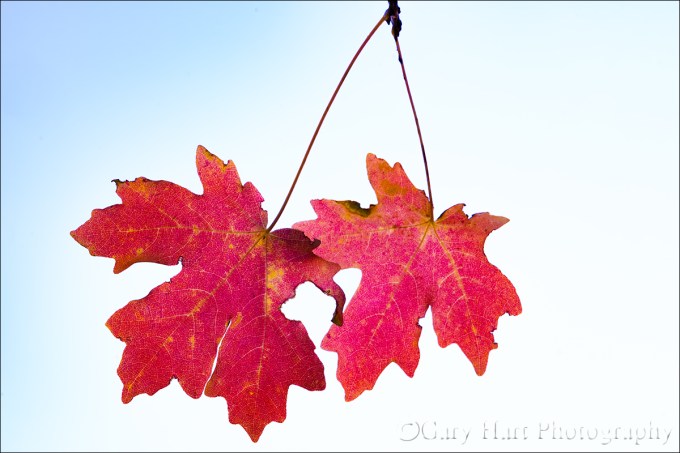
Red Maple Twins, Zion National Park
Sony a7RII
Sony 100-400 GM
ISO 1600
f/16
1/10 second
Photography’s Creativity Triad
Enduring photographs don’t duplicate human reality, they reveal unseen aspects of our world. Capturing this hidden world requires mastery of photography’s “creativity triad” that distinguishes the camera’s vision from human vision: motion, light, and depth.
Light is arguably the single most important element in an image. And the way a camera handles light may very well be photographers’ single biggest frustration—while our eyes can pluck detail from the deepest shadows to the brightest highlights, with a camera we can have shadows, or we can have highlights, but we can’t have both. Photographers go to great lengths to mitigate the shortcomings of their camera’s dynamic range (range of light a camera can pull detail from in a single frame, from shadows to highlights): Artificial light, blending of multiple exposures, and graduated neutral density filters absolutely have their place, but we often overlook the opportunity limited dynamic range provides.
In my previous post I wrote about how the camera’s ability to accumulate light over the duration of a single frame can reveal motion that’s invisible to the naked eye. Where light is concerned, while many see it as a limitation, I see my camera’s “limited” dynamic range as an opportunity to hide distractions and emphasize features. Whether it’s a Yosemite silhouette that emphasizes shape, or a high-key autumn image that highlights color, narrow dynamic range doesn’t need to be a handicap.
Red Maple Twins, Zion National Park
Last week I was in Zion National Park, co-teaching Don Smith’s workshop there. Zion’s yellows were peaking while we were there, but most of its red maples were about a week past prime. Nevertheless, I was able to find enough crimson leaves to keep me happy.
One morning I found a group of leaves dangling away from most of the tree. Seeking the best way to isolate the leaves from their surroundings, I experimented with different positions and focal lengths, starting with a half dozen or so leaves against a background of soft-focus branches and leaves. I love my new Sony 100-400 GM lens for isolation shots like this and had fun composing these leaves with a variety of focal lengths. The longer I worked on the scene, the more my eye was drawn to the shape, crimson translucence, and vein pattern of one pair of leaves in particular.
Suddenly, simplicity was the operative word. Strategizing the best way to separate these two leaves from their surroundings, I quickly realized a background of more leaves and branches, no matter how soft, was too distracting. But most angles that eliminated background foliage blended my my leaves into Zion’s towering red sandstone walls. Eventually I found a position far enough beneath the tree to put the backlit leaves against the cloudy sky.
Though my Sony a7RII has enough dynamic range to capture the entire range of light from shadows to highlights (with a little help from Lightroom/Photoshop, pulling up the shadows and down the highlights), I found the texture in the clouds almost as distracting as the branches. Instead, I metered on the leaves, which, though nicely backlit, were nowhere near as bright as the sky. My histogram showed that I’d clipped the sky, which I knew would put my leaves against a white background.
With no background detail to blur, I was able to stop down to f/16 and expand my depth of field to get more of both leaves in focus. The downside of this stop-down decision was significantly less light on my sensor, necessitating a longer shutter speed to achieve my desired exposure. For a shutter speed that overcame a breeze wiggling the leaves, I bumped to 1600 ISO. While my plan at capture was to put the backlit leaves against an entirely white background, when I started processing the image, I realized I’d captured a patch of blue sky (revealed by pulling the Lightroom Highlights slider to the left). I decided to keep blue sky while still hiding the texture in the clouds in the “blown” highlights.
Playing with Light
Click an image for a closer look and slide show. Refresh the window to reorder the display.


Photography’s Creativity Triad: Motion
Posted on November 5, 2017
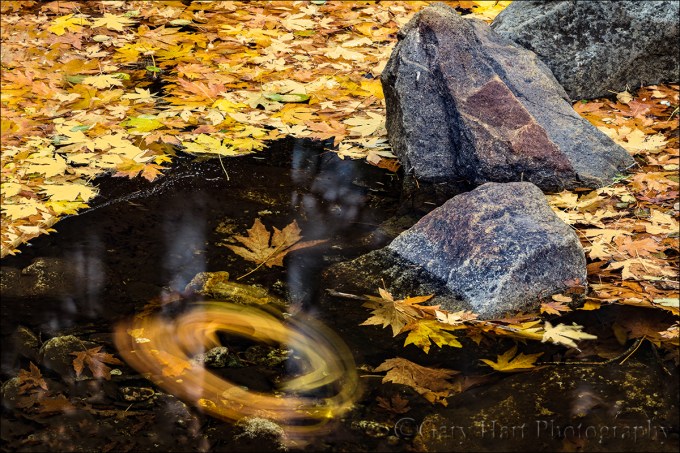
Autumn Spiral, Bridalveil Creek, Yosemite
Sony a7RII
Sony 100-400 GM
ISO 50
f/16
20 seconds
Photography’s Creativity Triad
Enduring photographs don’t duplicate human reality, they reveal unseen aspects of our world. Capturing this hidden world requires mastery of photography’s “creativity triad” that distinguishes the camera’s vision from human vision: motion, light, and depth.
Motion: Autumn Spiral
The human experience of the world unfolds like a seamless movie of continuous instants, while a camera accumulates light throughout its exposure to conflates those instants into a single frame.
Last week in Yosemite I got an opportunity to play with motion while photographing autumn leaves blanketing nearly every exposed surface below Bridalveil Fall. Beneath the fall Bridalveil Creek splits into three branches I love to explore—up- or down-stream, it doesn’t matter—searching for more intimate scenes. Last week I stayed close to the trail—not by design, but because I found enough to occupy every available minute.
Most of the fallen leaves had come to rest on granite, but those that had landed on the creek had been instantly swept downstream until they came to rest in sheltered pools, pushing up against and accumulating the rocks that bounded the pool. I found some pools that were entirely covered with leaves of varying shades of yellow and (just a little) green.
This little scene was downstream from the third bridge. The leaves here had been accumulating in this pool for a few days, leaving it more than half covered on this my final day in Yosemite. More than the golden pool, what really drew my attention from the bridge was a small collection of leaves, soon to become part of the pool’s autumn mosaic, swirling in a slowly spiraling current.
I set up my tripod right on the bridge, pulled out my new Sony 100-400 GM lens, dialed my polarizer to minimize reflections, and went to work. Because so much was happening in the scene, I started toward the lens’s wide end, but quickly found myself tightening each composition until I got down to a version of what you see here.
Once I had my composition, it became all about the motion in the leaves. When photographing landscape subjects in motion, each click can render a completely different image, so I’ve learned to never stop at one (or two, or three…). Whether it’s ocean waves, churning whitewater, or spinning leaves, I always make sure I have a variety of motion effects from which to choose. In this case, while the leaves were spiraling in a fairly consistent current, it seemed that with each rotation at least one leaf would go rogue, either slowing, accelerating, or making a break for the perimeter. The result was a distinctly different spiral with each capture.
I experimented with shutter speeds between ten and thirty seconds. Sometimes I’ll use a neutral density filter to stretch my shutter speed, but for this scene I was using a polarizer (minus two stops), it was quite early (shortly after sunrise) in an always densely shaded location, and darkened even further by the dense clouds of an approaching storm. In other words, the scene was dark enough that I could get the shutter speed all the way out to thirty seconds with my f-stop and ISO settings. When I was done, I had about 20 frames to choose from (one more argument for the tripod), identical except for a little different swirl.
While a still camera can’t capture motion as humans view it, in the right hands the camera absolutely does capture motion in ways that I’d argue can be even more appealing than being there. In this case, the spiral nature of this pool’s motion is much more apparent in this image than it was witnessing it firsthand.
Because there always has to be a moral…
The moral of this story is the importance of being able to manage your exposure variables: You can’t control motion, depth, and light without knowing how to achieve the shutter speed, f-stop, and ISO that serves your creative objective with minimal image quality compromise. That means retaining full control of your exposure settings by shooting in manual, aperture priority, or shutter priority modes. (And if you choose aperture or shutter priority, you must be able to manage your camera’s exposure compensation dial.)
Learn About Photographing Motion
World in Motion
Click an image for a closer look and slide show. Refresh the window to reorder the display.


How a polarizer works
Posted on October 5, 2017

Autumn Reflection, North Lake, Eastern Sierra
Canon EOS-1Ds Mark III
Canon 17-40L
1/5 second
F/16
ISO 200
Some people couldn’t care less how a polarizer works—they’re satisfied knowing what a polarizer does, and how to make it happen. But if you’re like me, you also need to understand why things behave the way they do.
Put simply…
A polarizer cuts reflections. On the surface that not might seem so desirable for someone who likes photographing reflections as much as I do, but reflections are a much bigger part of our visual experience than most people realize. Virtually every object reflects at least a little, and many things reflect a lot more than we’re aware. Worse still, these reflections often hide the very surface features and color we most love to photograph.
When reflections hide an object’s underlying beauty, a polarizer can restore some of that beauty. I use a polarizer when I want to capture the submerged rocks or sand hidden by the reflection atop a river or lake, the rich color overwhelmed by glare reflecting from foliage, or the sky’s deep blue washed out by light scattered by atmospheric molecules.
Put a little less simply…
In reality, reflections are merely collateral damage to your polarizer. What a polarizer really does is eliminate light that’s already been polarized. To understand what’s really going on with a polarizer, read on….
Essential terminology
- Oscillation is motion relative to a fixed point. For example, when you snap a whip, the whip “oscillates” along its length. Without external interference (e.g., friction from the atmosphere or other objects), motion in one direction along the whip will have an identical motion in the opposite direction (e.g., up=down, left right, and so on), and that motion will move forward along the whip.
- A wave is oscillation along or through a medium (such as air, water, or space). The bulge that moves up and down (oscillates) along a cracked whip is a wave. For the liberal arts folks, (in this context) wave is a noun, oscillate is a verb. A wave is measured by its wavelength and frequency—the higher the frequency, the shorter the wavelength.
- Frequency is the number of times a wave peak passes a discrete point in a given unit of time (usually one second: “per second”).
- Wavelength is the distance from one wave peak to the next at any instant frozen in time.
- A transverse wave oscillates perpendicular (90°) to its direction of motion. To imagine the motion of a transverse wave, picture an ocean wave, which oscillates up and down as it advances through the water. Now think about a bottle floating in the open ocean—bobbing up and down with each wave, its up/down motion is perpendicular to the wave’s forward motion, but when that wave has passed, the bottle is in the same place it was before the wave arrived. (Waves don’t move bobbing bottles across the ocean, wind and currents do.)
- Visible light is electromagnetic radiation that reaches our eyes as a transverse wave somewhere in the wavelength range the human eye can register, about 380 to 740 nanometers (really small).
- Sunlight (or more accurately, solar energy) reaches earth as a transverse wave with a very broad and continuous spectrum of wavelengths that include, among others, the visible spectrum (lucky for photographers), infrared (lucky for everyone), and ultraviolet (lucky for sunscreen vendors). The oscillation of solar energy’s transverse wave is infinitely more complicated than an ocean wave because light oscillates in an infinite number of directions perpendicular to its direction of motion. Huh? Think about the blades of a propeller—each is perpendicular to the shaft upon which the propeller rotates, so in theory you can have an infinite number of propeller blades pointing in an infinite number of directions, each perpendicular to the shaft. So a light wave oscillates not just up/down, but also left/right, and every other (perpendicular) angle in between.
Polarization
While an unpolarized light wave oscillates on every plane perpendicular to the wave’s motion, polarized light only oscillates on one perpendicular plane (up/down or left/right or 45°/225° and so on).
Polarization can be induced many ways, but photographers are most interested in light that has already been polarized by reflection from a nonmetallic surface (such as water or foliage), or light that has been scattered by molecules in our atmosphere. Light scattered by a reflective surface is polarized parallel to the reflective surface; light scattered by molecules in the atmosphere is polarized perpendicular to the direction of the light.
Polarization can also be induced artificially with a polarizing filter (“polarizer”), a filter coated with a material whose molecular structure allows most light to pass, but blocks light waves oscillating in a specific direction. When unpolarized light (most of the light that illuminates our lives) passes through a polarizer, the light that enters the lens to which it’s attached has been stripped of the waves oscillating in a certain direction and we (through the viewfinder) see a uniform darkening of the entire scene (usually one to two stops).
But that uniform darkening is not usually what we use a polarizer for. (I say usually because sometimes we use a polarizer to reduce light and stretch the shutter speed in lieu of a neutral density filter.) Photographers are most interested in their polarizers’ ability to eliminate reflective glare and darken the sky, which occurs when their polarizer’s rotating glass element matches the oscillation direction of light that has already been polarized by reflection or scattering, cancelling that light. By watching the scene as we rotate the polarizing element on the filter, photographers know that we’ve achieved maximum polarization (reflection reduction) when we rotate the polarizer until maximum darkening is achieved—voila!
The exception that proves the rule
Most photographers know that a polarizer has its greatest effect on the sky when it’s at right angles (90°) to the sun, and least effective when pointed directly into or away from the sun (0º or 180°). We also know that a rainbow, which is always centered on the “anti-solar point” (a line drawn from the sun through the back of your head and out between your eyes points to the anti-solar point) exactly 180° from the sun, can be erased by a polarizer. But how can it be that a polarizer is most effective at 90° to the sun, and a rainbow is 180° from the sun? To test your understanding of polarization, try to reason out why a rainbow is eliminated by a polarizer.
Did you figure it out? I won’t keep you in suspense: light entering a raindrop is split into its component colors by refraction; that light is reflected off the back of the raindrop and back to your eyes (there’s a little more bouncing around going on inside the raindrop, but this is the end result). Because a rainbow is reflected light, it’s polarized, which means that it can be eliminated by a properly oriented polarizer.
About this image
Long before achieving international fame as the background scene for Apple OS X High Sierra, North Lake near the top of Bishop Canyon in the Eastern Sierra has been beloved by photographers. Each autumn this little gem of a lake teams with photographers longing for even one of the following conditions: peak gold and red in the aspen, a glassy reflection, or a dusting of snow.
I visit North Lake multiple times each autumn, sometimes with my workshop groups, sometimes by myself. I’ve found pretty much every possible combination of conditions: snow/no-snow; early, peak, or late fall color; and a lake surface ranging from mirror smooth to churning whitecaps.
One sunrise early October of 2010 I hit the North Lake trifecta. Crossing my freezing fingers that the reflection would hold until I was ready, I lowered my tripod on the rocky shore and framed the aspen-draped peak and its vivid reflection. I used a couple of protruding rocks to anchor my foreground, slowly dialed my polarizer until the entire lake surface became a reflection, and clicked. But rather than settle for that shot, I reoriented my polarizer until the reflection virtually disappeared and a world of submerged granite rocks appeared. I clicked another frame and stood back to study the image on my LCD.
As much as I liked the rocky lakebed version, I knew there was no way I could pass on the best reflection I’d ever seen at North Lake. So I returned my eye to my viewfinder and very slowly dialed the polarizer again, watching the reflection reappear across the lake and advance toward me until the entire mountain unfolded in reverse atop the lake. Stopping just at that midway polarization point, I had the best of both worlds: my pristine reflection and an assortment of submerge rocks.
I Use Breakthrough Filters
Dialing In My Polarizer
Click an image for a closer look and slide show. Refresh the window to reorder the display.


, California")


Aspen abstract
Posted on February 25, 2017
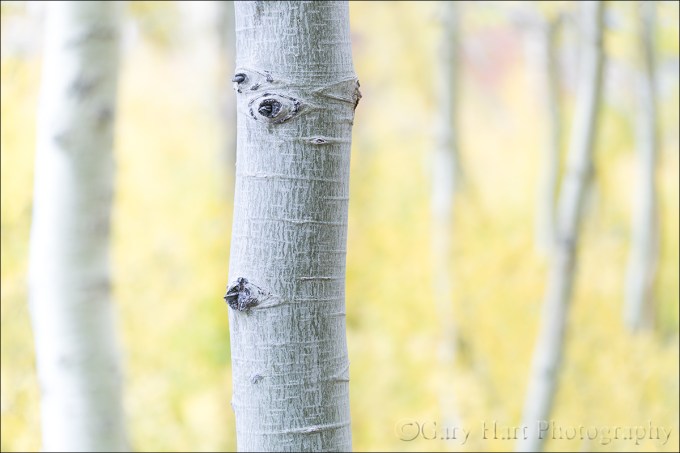
Aspen Abstract, Lundy Canyon, Eastern Sierra
Sony a7R II
Sony 70-200 f/4
1/25 second
F/4
ISO 400
I recently started rereading Ansel Adams’ “Examples: The Making of 40 Photographs,” a book I’d recommend to anyone interested in the thinking side of photography. Though much of the book covers equipment and techniques that are irrelevant to today’s digital photographer, Adams’ words reveal a vision and mastery of craft that transcends technology. Like him or not (I do!), you can’t deny that Ansel Adams possessed an artist’s vision and an ability to convey that vision in ways the world had never seen.

©Ansel Adams
Aspen, New Mexico, 1958
“The majority of the viewers (of this image) think it was a sunlit scene. When I explain that it was diffused lighting from the sky and also reflected light from distant clouds, some rejoin, ‘Then why does it look the way it does?’ Such questions remind me that many viewers expect a photograph to be a literal simulation of reality.”
Ansel Adams in “Examples: The Making of 40 Photographs”
Another takeaway from the book is Adams’ clear disdain for pictorialism, a more abstract approach to photography that (among other things) uses the camera’s unique vision to interpret the world in ways that are vastly and intentionally different from the human experience. Preferring instead the more literal front-to-back sharpness of the f/64 group that became his hallmark, Adams had little room for pictorialists’ soft focus and abstract images.
I, on the other hand, love using limited depth of field to emphasize my primary subject and disguise potential distractions. When we explore the world in person, our ability to pivot our head, move closer or farther, and change perspective allows us to enables us to lock in on a compelling subject and experience the scene in the way we find most meaningful. But an image is a constrained, two-dimensional approximation of the real world as seen by someone else. The photographer shares his or her experience of the scene by guiding our eyes with visual clues about what’s important and how to find it.
This reality wasn’t lost on Ansel Adams. Despite his distaste for soft focus techniques, Adams guided viewers of his images with in other ways, particularly his use of light. He knew that the camera and human eye handle light differently, and used every trick at his disposal, both at capture and in the darkroom, to leverage that difference.
At the risk of initiating a debate about the relative merits of the two techniques, I’ll just say that I’m a fan of both and am not afraid to apply whichever approach best suits my objective. And I suspect that if Ansel Adams were photographing today, he would be taking full advantage of the creative possibilities created by today’s technology.
Last October I was exploring the aspen grove at the end of the Lundy Canyon road near Mono Lake. With fall color peaking I put extension tubes on my Sony 70-200 f/4 looking for subjects that I could get close to, but with a distant enough background to maximize focus contrast (sharp/soft). I’ve always felt that soft focus aspen make a great background, but they need to be soft enough that individual leaves and trunk detail don’t distract.
I started looking for dangling leaves, either individual or bunches, but soon turned my attention to stark white aspen trunks that stood out in striking contrast against the distant wall of yellow leaves. I soon zeroed in on this trunk for its well-spaced knots, gentle curve, and clean, textured bark, plus the nice assortment of parallel trunks at varying distances in the background.
This frame I shot wide open at the closest possible focus distance to get the softest background focus. To emphasize the white trunks, I exposed the scene as bright as I could without clipping the highlights in the primary trunk. On my camera’s LCD at capture this image looked pretty much as you see it here, and required minimal processing.
Workshop Schedule || Purchase Prints
A Selective Focus Gallery
Click an image for a closer look and slide show. Refresh the window to reorder the display.


Seeing double
Posted on January 22, 2017
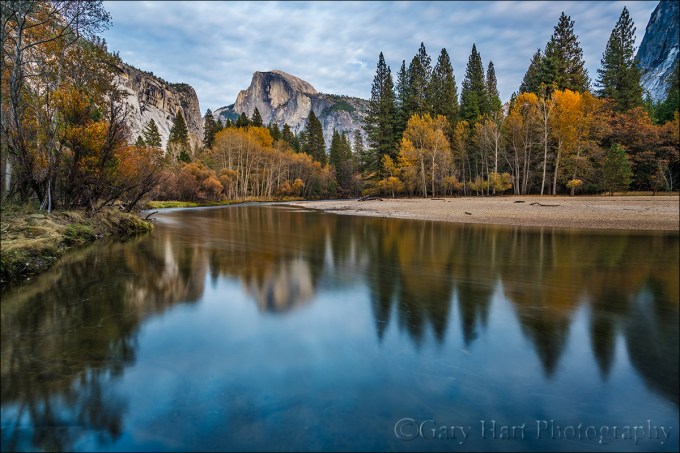
Autumn Mirror, Half Dome, Yosemite
Sony a7R II
Sony/Zeiss 16-35 f4
30 seconds
F/8
ISO 50
People stay away from Yosemite in autumn because that’s when the waterfalls are at their lowest. But believe it or not, Yosemite isn’t all about waterfalls. El Capitan, Half Dome, Cathedral Rocks, the Three Brothers (I could go on) are great subjects in their own right. Subtract the waterfalls but add the yellows, oranges, and reds of Yosemite Valley’s many deciduous trees and you have what I think is a pretty a fair trade. And when the water is low, the usually turbulent Merced River smooths to a reflecting ribbon of glass; suddenly, pretty much any scene can be doubled at your feet.
These reflections add layers of creative possibilities impossible the rest of the year. I usually try to photograph each reflection scene several ways—splitting it in the middle for a 50/50 mirror effect, isolating the reflection only, emphasizing the reflection with just enough of the primary scene to establish context, and using a partial reflection to accent to the primary scene—then decide later which I like best.

In this image I split the frame 50/50, but dialed down the reflection with my polarizer. Even polarized, the bright sky’s glare washed out much of the river surface, painting the outline of El Capitan like a negative that uses the trees with a jigsaw of submerged river rocks.

This one is all about the reflection, with the snow-covered forest used to frame El Capitan’s image in the Merced River. Here I dialed my polarizer to a mid-point, holding the reflection of El Capitan but dialing down the homogenous gray sky.

Here I used a more conventional composition, emphasizing El Capitan’s bulk against clouds that were spitting small, wet snowflakes.
About this image

I took another favorite approach for the featured image at the top of this post, using a long exposure in low light to smooth moving water and enhance the reflection. My workshop group had already had a nice shoot that evening—it started with warm, late light on Half Dome, some nice color at sunset, and rapping up with textured clouds above Half Dome as darkness fell.
By the time I captured this frame the scene was much darker than what you see here. With the reflection disturbed by slight ripples and floating bubbles, the darkness of post-sunset twilight enabled me to extend my shutter speed to 30 seconds, which smoothed the reflection and turned the bubbles into soft white streaks.
Workshop Schedule || Purchase Prints
A Gallery of Yosemite Reflections
Click an image for a closer look and slide show. Refresh the window to reorder the display.


Photographic matchmaking
Posted on December 7, 2016

Autumn Pool and Cascade, Bridalveil Creek, Yosemite
Sony a7R II
Sony/Zeiss 16-35 f4
6 seconds
F/16
ISO 200
While everyone loves a pretty scene, I’m afraid our aesthetic sense has been numbed by the continuous assault of “stunning” images online. A picture grabs our eyes on Instagram or Facebook and we reflexively click Like and move on to the next (similarly) stunning image. The photography equivalent of pop music, formula fiction, or (most) network television, these images exit our conscious about as fast as they entered because they fail to make a personal connection.
But every once in awhile an image surprises us and we pause, float our eyes around the scene, examine detail, bask in its mood. Who knows the trigger for such a response? Maybe is as simple as aspect of the scene that spurs a memory or taps a longing. Or maybe the connection reaches deeper than that.
Pictures succeed not just by virtue of their visual elements, but also by how those elements are connected. I used to believe that the sole purpose of including visual elements throughout my frame was to create the illusion of depth in photography’s two-dimensional medium. While I still strongly agree, I think the value of multiple points of visual interest goes deeper than that. Just as humans seek interpersonal connections in our daily lives, I think we’re programmed to favor images with relationships between heterogeneous elements in the nature. Not just Grand Canyon, but Grand Canyon speared by lightning; not just Half Dome, but Half Dome beneath a rising full moon; not just glowing Kilauea Caldera, but glowing Kilauea Caldera beneath the Milky Way.
Creating relationships between elements work on a smaller scale as well (albeit, usually without the opportunity for planning that celestial or meteorological phenomena provide)—small forest scenes and intimate macros benefit from inclusion of multiple elements as well. Of course an image with a disorganized arrangement of elements, no matter how beautiful each is individually, probably won’t get a second look. But find a way to organize a scene’s elements in a way that allows the eye to flow effortlessly through the frame and you have the potential for visual synergy—an image that’s greater than the sum of its visual parts.
The opportunity to connect disparate elements is everywhere if you look, from the broadest panorama to the most intimate macro. Whatever the scale, the key is not locking onto your subject until you find something to pair it with. In other words, finding a photo-worthy subject should never be your goal, it should be your starting point.
Without diving too deeply into the concept of visual weight (a subject in and of itself), I try to create a frame with balance between visual elements (not loaded too much in on of the scene’s quadrants: upper left, upper right, lower left, lower right). I also try to keep objects with a strong visual tug away from the edges of my frame. And finally, I look to position my elements so they’re connected by virtual diagonal lines.
About this image
On the final morning of last month’s Yosemite Autumn Moon photo workshop, I set the group loose in the forest beneath Bridalveil Fall to scour the possibilities in and around Bridalveil Creek. Always a workshop favorite, I usually save the Bridalveil Creek until the workshop’s final day, when my students have found their creative zone after three days of shooting and training. This approach seems to pay off, because no matter how much time I give them in there, it never seems to be enough.
When I found this accumulation of just-fallen autumn leaves floating in a glassy pool, I knew I had the start of a nice scene. Scanning my surroundings, I didn’t have to look hard to find a small cascade to connect with my colorful leaves. But with the pool tucked beneath a fallen log, accessing the best angle was tricky. Sprawling nearly flat on my back beneath the overhanging log, with one tripod leg in the water, turned out to be the best way to maximize the virtual diagonal connecting the leaves and cascade.
The other consideration here was depth of field—the leaves started no more than three feet from my lens, while the cascade was about 12 feet away. To ensure maximum sharpness throughout with getting too far into the diffraction zone, I stopped down to f/16 and focused on the back of the leaves. I wasn’t too concerned about shutter speed and the cascade’s blur because the difference between one and six seconds was insignificant, and freezing the water would have required a ridiculously high ISO, while the pool was so still that I could discern no motion at all.
Purchase Prints
Workshop schedule
A Gallery of Relationships


On the rocks
Posted on November 14, 2015

Reflection On the Rocks, El Capitan and the Merced River, Yosemite
Sony a7R II
Sony/Zeiss 24-70 f4
25 seconds
F/11
ISO 100
Yosemite is known for its waterfalls, but I gotta say, I think I’m happiest photographing Yosemite when the falls are dry. Not that I don’t love Yosemite’s waterfalls (I do!), but when the falls are dry, the Merced River has slowed to a reflective crawl that paints reflections everywhere. And as an added bonus, when the falls dry up, so do the crowds.
Last month I spent a day guiding a couple from Sweden through Yosemite when the Merced River was at its drought-starved nadir. I’d been looking forward to this day for a while, but two days earlier I’d cracked ribs and my collarbone in a cycling accident—I could walk, I could talk, but I couldn’t do both, and simply getting in and out of the car was an achievement. The seatbelt? Torture. So my camera and tripod stayed in the car all day.
But when we pulled up to Valley View for sunset, I just couldn’t resist the mix of light, clouds, sky, and reflection. By the time I extracted my camera and tripod and made my way down to the river (no more than 20 feet from the car), the sun was about done with El Capitan. There were a few hot spots in the clouds, but my Singh-Ray two-stop hard GND held back the highlights enough to enable enough exposure to bring out the shadows. The resulting 25 second exposure added a gauzy texture to the reflection.
The trickiest thing about photographing a reflection with embedded features is achieving depth of field throughout. Though it seems counter-intuitive, the focus point for a reflection is the focus point of the reflective subject, not the reflective surface. In this case I wasn’t too worried about the reflection because I knew the long exposure would soften it anyway. But I did want to be sharp from embedded rocks all the way back to El Capitan. A quick check of my hyperfocal app told me that at f11 and 28mm, focusing on the closest rock (about ten feet away), would ensure sharpness all the way to infinity.
A public service announcement
I don’t always wear a helmet when I bike. I’m fortunate to live adjacent to a bike trail that can keep me off city streets for virtually all of my bike trips, so (my rationalization went), why mess with a helmet?
My accident last month happened on the bike trail, with no cars in sight, when I clipped a portable barricade with my handlebar and my bike went right while I continued forward. In addition to cracked ribs and collarbone, some nasty road-rash, and a torn-up shirt, my helmet was totaled. I shudder to think what would have happened had I decided not to wear a helmet that day (about a 50/50 chance), and will never, ever ride a bike again without one. I encourage you to make the same promise to yourself.
I return you now to your regular programming.
A gallery of Yosemite reflections
Click an image for a closer look, and a slide show. Refresh the screen to reorder the display.


