Eloquent Images by Gary Hart
Insight, information, and inspiration for the inquisitive nature photographer
Weather or not
Posted on February 18, 2018
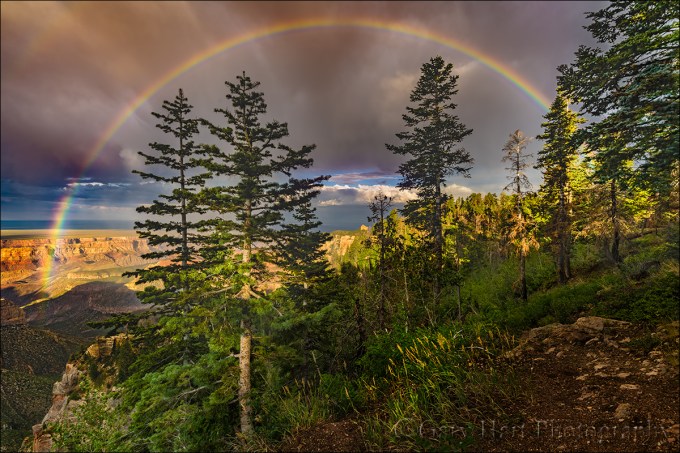
Heaven Sent, Vista Encantada Rainbow, Grand Canyon
Sony a7R II
Sony 12-24 f/4 G
1/60 second
F/11
ISO 100
When the weather gets crazy, do you sprint for cover or reach for your camera? Your answer may be a pretty good indicator of your success as a landscape photographer. It’s an unfortunate fact that the light, color, and drama that make the most memorable landscape photos all come when most sane people would rather be inside: at sunrise, when the rest of the world is asleep; at sunset, when everyone else is at dinner; and during wild weather, when anyone with sense is on the sofa in front of the fire.
Not only do clouds keep tourists at bay, they’re usually a prerequisite for the best nature photography. Whether they simply diffuse sunlight to subdue extreme contrast into something much more camera-friendly, or contort themselves into diaphanous curtains and towering pillars that are subjects themselves, clouds are a photographer’s friend.
And with clouds, often comes rain. But the photographer willing to go out in the rain is also the photographer who captures lightning, rainbows, and vivid sunsets and sunrises. The key to photographing in rain is preparation. Regardless of the forecast, I never travel without my rain gear duffel that contains everything necessary to keep me dry and focused on photography: waterproof hat, gloves, parka, rain pants, and boots for me, and an umbrella for my camera. My go-to rain cover is a plastic garbage bag that keeps my camera and lens dry when I’m searching or waiting for a shot. The final essential wet weather accessory is a towel or chamois to dry any gear (especially the front of my lens) that gets wet.
Covered head-to-toe with my waterproof wardrobe, I’m ready to photograph whatever Mother Nature delivers. When I’m ready to shoot, my umbrella always comes out first, then off comes the bag and into a pocket. With one hand managing the umbrella, I have one hand free to compose, expose, focus, and click.
When the wind blows it’s often difficult to manage an umbrella and keep my lens free of water droplets. Since my Sony bodies are sufficiently sealed (as are many other mirrorless and DSLR bodies and lenses), I don’t worry about raindrops (but make sure you have the hot-shoe cap in place). Sometimes, when the wind is too extreme, I even briefly set the umbrella aside (but not too far). Once my composition, exposure, and focus are set, I point the umbrella’s convex side into the wind and lower it until it’s right on top of the camera (for maximum rain protection), pull out my towel and dry the front of the lens (and the rest of the camera and lens too if it’s raining hard), then lift the umbrella and click simultaneously (before more droplets land on my lens).
Learn more
- How to photograph rainbows
- How to photograph lightning
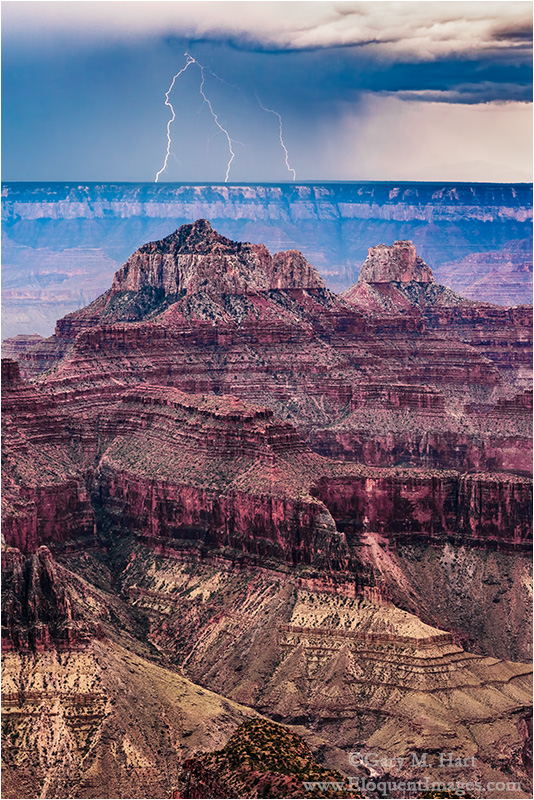
About this image
Last summer’s Grand Canyon Monsoon workshop group had already had a great day. Following a nice sunrise at the always beautiful Point Imperial, we spent two hours on the Grand Canyon Lodge view deck photographing a spectacular electrical storm that delivered multiple lightning captures to everyone in the group. Here’s a sample of the day’s bounty to this point:
When the storm moved too close and drove us inside to safety (we’re resilient and adventuresome, not stupid), it would have been easy to rest on our laurels and call it a day. I mean, who likes getting rained on?
Photographers, that’s who. Don Smith and I herded the group into the cars and headed to Cape Royal Road, where we could follow the Grand Canyon’s East Rim above Marble Canyon all the way to Cape Royal. Knowing that monsoon showers are fairly localized, the plan was to drive out of the cell that was dumping on us at the lodge and either shoot back at it, or (more likely) find another cell firing out over the canyon. In the back of my mind though was the hope for a rainbow above the canyon—dropping in west, the sun was perfectly positioned for rainbows in the east.
The rainbow appeared just after we passed the Point Imperial Road junction, arcing above the forest. Climbing through the trees toward the rim and its views of Marble Canyon, my urgency intensified with the rainbow’s vivid color, but we were stuck behind a meandering tourist who clearly had different priorities. As tempted as I was to pass him, I knew with three more cars following me, that would be a mistake. So we poked along at a glacial pace. After what seemed like hours, the rainbow was hanging in there as we pulled into the Vista Encantada parking area and screeched to a halt—I swear everyone was out of the car and scrambling for their gear before I’d come to a complete stop.
With a full rainbow above an expansive view, I opted for my Sony 12-24 lens on my a7RII, but immediately began to question that choice. While Vista Encantada offers a very pretty view, it’s not my favorite view to photograph because of all the less-than-photogenic shrubbery in the foreground—a telephoto lens would have worked better to eliminate the foreground. But I wanted more rainbow. So after a few failed attempts to find a composition at the conventional vista, I sprinted into the woods in search of something better. This turned out to be a wise choice, as the shrubs here were replaced with (much more appealing) mature evergreens.
In a perfect world I’d have had an unobstructed view into the Grand Canyon, but the world is rarely perfect. I decided to use the nearby trees as my foreground, moving back from the trees just far enough for the rainbow to clear their crowns, then left as far as the terrain permitted, separating the two left-most trees. Composing wide enough to include the trees top-to-bottom also allowed me to include all of the rainbow—suddenly my 12-24 lens choice was genius!
After finishing at Vista Encantada we continued down the road and photographed another rainbow from Roosevelt Point, before wrapping up the day with a sunset for the ages at Cape Royal. A great day indeed, all thanks to weather that would have kept most tourists indoors.
Grand Canyon Photo Workshops
Rainbows, Lightning, and So Much More
A Grand Canyon Monsoon Gallery
Click an image for a closer look and slide show. Refresh the window to reorder the display.


(Another) Grand Canyon Lightning Show
Posted on September 1, 2017

Direct Hit, South Rim Lightning Strike, Grand Canyon Lodge (North Rim)
Sony a7R II
Sony/Zeiss 24-70 f4
1/8 second
F/16
ISO 50
Earlier this month Don Smith and I traveled to the Grand Canyon for our annual Grand Canyon Monsoon photo workshops. I enjoy every workshop, but as a true weather nerd, these monsoon workshops are particular highlights in my year, and in Northern California we just don’t get that much weather—that is, unless you consider homogenous blue (summer) or gray (winter) skies weather.
For this trip, I started monitoring the Grand Canyon forecast about a week before the first workshop (okay, maybe a little earlier than that), and ramped up my queries as the workshop approached. If hoping and handwringing could make lightning, I’d never have a bad day at the Grand Canyon, but after three days of fairly benign conditions, workshop group number one was still waiting for their lightning. Then, like a walk-off grand slam, on our final full day Mother Nature gifted us with a spectacular, two-hour lightning show. Phew. In fact, that afternoon we got an entire workshop worth of dramatic weather in about five very intense hours. The day’s highlights included lightning and two rainbows, and wrapped up a mammatus (google it) sunset at Cape Royal. All’s well that ends well.
Contrast group one’s eleventh hour salvation with workshop group two, which hit the ground running (quite literally) before we could even have an orientation. The second workshop was scheduled to start with a 1 p.m. orientation at Grand Canyon Lodge on the North Rim. As go most mornings in monsoon season, the day started quietly, but a little after noon lightning started up across the canyon and Don and I set up our tripods, cameras, and Lightning Triggers. With the designated gathering place in front of the lodge, but the viewing deck and lightning show in the back, Don and I took turns running up front and dragging folks down to our location. Those who had arrived with camera gear were put right to work, while the ones who had left their gear in their car or cabin and had to race back up the hill to fetch it.
By 1:15 we were seeing one or two strikes per minute, sometimes more, spread across a fairly broad area of the South Rim. Soon Don and I had a dozen photographers spread across two outside decks separated by an enclosed viewing room. Most of them had never used a Lightning Trigger, or even photographed lightning, so once we got everyone assembled, most of the next hour was spent running around setting up and testing Lightning Triggers, helping people achieve the right exposure, and suggesting compositions.
During that first hour our cameras, set up and primed for action, enthusiastically fired away unattended. When I’m with my camera during a storm, I’m constantly tweaking my composition, exposure, and Lightning Trigger sensitivity. Left to its own devices, my camera ended up with over 400 frames of the very same scene, most of which had no lightning (because the trigger was detecting lightning too faint to register). Fortunately, by the time everyone had settled into a comfort zone with their cameras and Lightning Triggers, not only was the lightning display still going strong, it had moved closer (but remained at a relatively safe distance) and was isolated to the most photogenic part of the view. Our second hour was pure joy, as each dramatic strike seemed designed to outdo the one that preceded it.
The image I share at the top of this post came when the storm was at its most intense, moving southwest to northeast across (right to left) the canyon, just a little east of our location. The brightest bolt you see is striking just below the South Rim, between Yaki and Shoshone Points, but ten miles away.
When all was said and done, I got about 50 strikes that afternoon, and everyone in the group got multiple strikes as well. We had another productive lightning day the next day, but this is the day I’ll remember.
Lightning Photography Revisited
This is an excerpted and updated section from the Lightning article in my Photo Tips section
Photographing lightning at night is mostly a matter of pointing your camera in the right direction with a multi-second shutter speed and hoping the lightning fires while your shutter’s open—pretty straightforward. Photographing daylight lightning is a little more problematic. It’s usually over before you can react, so without a lightning sensor to recognize lightning and click your shutter, success is largely dumb luck (few people are quick enough see it and click).
Lightning Trigger: The best tool for the job
A lightning sensor attaches to your camera’s hot shoe and connects via a special cable to the camera’s remote-release port. When engaged, the sensor fires the shutter (virtually) immediately upon detecting lightning—whether or not the lightning is visible to the eye or camera. With many lightning sensors from which to choose, before I bought my first one I did lots of research. I ended up choosing the sensor that was the consensus choice among photographers I know and trust: Lightning Trigger from Stepping Stone Products in Dolores, CO. At a little less than $400 (including the cable), the Lightning Trigger is not the cheapest option, but after leading lightning-oriented workshops for five years, I can say with lots of confidence that lightning sensors are not generic products, and the internal technology matters a lot. The Lightning Trigger is the only one I’d use and recommend (I get no kickback for this).
I won’t get into lots of specifics about how to set up the Lightning Trigger because it’s simple and covered fairly well in the included documentation. But you should know that connecting the Trigger will disable your LCD replay, which means you won’t be able to review your captures without disconnecting (a simple but sometimes inconvenient task). You also won’t be able to adjust your exposure with the Lightning Trigger operational.
The Lightning Trigger documentation promises at least a 20 mile range, and I’ve seen nothing that causes me to question that. It also says you can expect the sensor to fire at lightning that’s not necessarily in front of you, or lightning you can’t see at all. For every click with lightning in my camera’s field of view, I get many clicks caused by lightning I didn’t see, or that were outside my camera’s field of view. But when visible lightning does fire somewhere in my composition, I estimate that the Lightning Trigger clicked the shutter at least 95 percent of the time (that is, even though I got lots of false positives, the Lightning Trigger missed very few bolts it should have detected). Of these successful clicks, I actually captured lightning in about 2/3 of the frames.
The misses are a function of the timing between lightning and camera—sometimes the lightning is just too fast for the camera. In general, the more violent the storm, the greater the likelihood of bolts of longer duration, multiple strokes that are easier to capture. And my success rate has increased significantly beyond 2/3 since switching from a Canon 5DIII to a Sony a7RII (more on this in the Shutter Lag section).
The Lightning Trigger documentation recommends shutter speeds between 1/4 and 1/20 second—shutter speeds faster than 1/20 second risk completing the exposure before some or all of the secondary strokes fire; slower shutter speeds tend to wash out the lightning. To achieve daylight shutter speeds between 1/4 and 1/20 second, I use a polarizer, with my camera at ISO 50 and aperture at f/16 (and sometimes smaller). Of course exposure values will vary with the amount of light available, and you may not need such extreme settings when shooting into an extremely dark sky. The two stops of light lost to a polarizer helps a lot, and 4- or 6-stop neutral density filter is even better.
Shutter lag
Lightning is fast, really, really fast, so the faster your camera clicks the shutter after getting the command, the more success you’ll have. The delay between the click instruction (whether from your finger pressing the shutter button, a remote release, or a lightning sensor) and the shutter firing is called “shutter lag.” The less shutter lag you have, the better your results will be. The two most important shutter lag factors are:
- Camera model: It’s surprising how much shutter lag can vary from manufacturer to manufacturer and model to model. In a perfect world, for lightning photography your camera’s shutter lag will be 60 milliseconds (.06 seconds) or faster (the lower the number the better), but 120 milliseconds (.o12 seconds) or faster can give you some success. The top cameras from Sony, Nikon, and Canon are all fast enough, but the latest Sonys are the definite shutter lag winner (fastest), with Nikon second, and Canon third (slowest). And shutter lag can vary with the manufacturer’s model: While my Sony a7RII is one of the fastest cameras out there, my a7R was unusably slow, so you need to check your model. Unfortunately, shutter lag isn’t usually in the manufacturers specification, so it’s hard to find. The best source I’ve found is the “Pre-focused” time in the Performance tab of the camera reviews at Imaging Resource.
- Camera settings: Basically, to minimize the “thinking” the camera needs to before firing, you want to be in manual everything mode—metering and focus. If your camera offers an electronic front curtain option (as my Sonys do), use it. If you must autofocus, go ahead and do it each time you recompose, then turn autofocus off as soon as you’re focused. Though the Lightning Trigger documentation suggests Aperture Priority metering, I use and recommend Manual metering mode to eliminate any camera-slowing metering. And, also despite what the Lightning Trigger documentation suggests, noise reduction is a post-capture function that might slightly delay continuous frames, but it won’t increase shutter lag.
Other equipment
In addition to a lightning sensor and fast camera, you’ll need:
- A solid tripod and head: Don’t even think about trying to photograph lightning hand-held
- Rain gear that keeps you dry from head-to-toe
- Umbrella (a.k.a., Wile E. Coyote Lightning Rod) to shield your camera and lightning sensor (many sensors, including the Lightning Trigger, aren’t waterproof) while you compose and wait in the rain. (And obviously, when the lightning gets close, put the umbrella down and run for cover.)
- Lens hood to shield some of the raindrops that could mar the front element of your lenses
- Neutral density filter and/or polarizer to slow shutter speed into the ideal range (1/4 – 1/20 second)
- A garbage bag (my choice) or rainproof camera jacket (haven’t found one I like) to keep your camera and sensor dry during a downpour
- Extra lightning sensor batteries (better safe than sorry)
- Extra memory cards: When a storm is very close or active, your camera could click 20 or 30 frames per minute (even when no lightning is visible)
- Infrared remote to test your Lightning Trigger; I sometimes borrow the remote from my hotel room, but the Apple TV remote works great and is extremely compact (fits nicely into the Lightning Trigger pouch)
- A towel
Getting the shot
Lightning is most likely to strike in or near the gray curtains (clearly recognizable as distant rain) that hang beneath dark clouds. In addition to visible rain curtains, the darkest and tallest clouds are usually the most likely to fire lightning. Here are a few more points to consider:
- The wider your composition, the greater your odds of capturing lightning, but the smaller the lightning will appear in your image.
- Identify the most likely lightning cell and find the best composition that includes it. I tend to start with wider compositions to ensure success, then tighten my composition once I’m fairly confident I captured something.
- Note the height from which the lightning originates and be sure to include enough cloud to get all of the stroke. On the other hand, don’t include too much room above the lightning—one of the most frequent rookie mistakes I see is too much sky/clouds in the frame. Unless the storm is too close for safety, most lightning will originate from about the same height above the ground.
- The best is usually a midrange zoom such as a 24-70 or 24-105—if you find yourself reaching for the 16-35 (or wider), you’re too close.
- On the other hand, once you’re sure you’ve captured some good strikes, try putting on a 70-200. The narrow field of view can significantly reduce the number of frames with lightning, but the ones you get will be much larger in the frame and therefore more spectacular.
- Lightning stands out better in a slightly underexposed image. My target shutter speed is usually 1/8 second (slow enough to include multiple pulses, but not so slow that I risk washing out the lightning). When the sky is relatively bright, dropping to 1/15 or even 1/20 second can make the lightning stand out better than 1/8. Conversely, when the sky is extremely dark and the lightning is firing like crazy, extending to 1/4 second might increase your chances for multiple pulses.
- Just because you’re standing around waiting for things to happen, doesn’t mean there’s nothing to do. Keep your eyes glued to the sky and adjust your composition as the lightning shifts, or as new activity starts elsewhere. If you wait until you hear your shutter click or someone else exclaim before looking up, you won’t see the lightning. And monitor the light—your exposure can change by several stops as the storm moves, intensifies, or winds down.
- Try not to check your captures on your LCD until you’re done (or better yet, until you upload your images to your computer). Viewing the LCD requires turning off the sensor, which risks missing a shot (I’m pretty sure lightning waits for me to turn off my sensor), and you’ll also find that many successful captures, especially wide compositions, just aren’t that visible on an LCD viewed in daylight anyway.
Do as I say (not as I do)
Be aware that electrical storms can move quite quickly, so you need to monitor them closely. Sometimes this simply means adjusting your composition to account for shifting lightning; other times it means retreating to the car if the cell threatens your location.

Two Bolts, Grand Canyon
Join Don Smith and me in our next Grand Canyon Monsoon Photo Workshop
Read my article in Outdoor Photographer magazine, Shooting the Monsoon
Workshop Schedule || Purchase Prints
A Lightning Gallery
Click an image for a closer look and slide show. Refresh the window to reorder the display.


Eclipse 2017: Savor the Moment
Posted on August 18, 2017

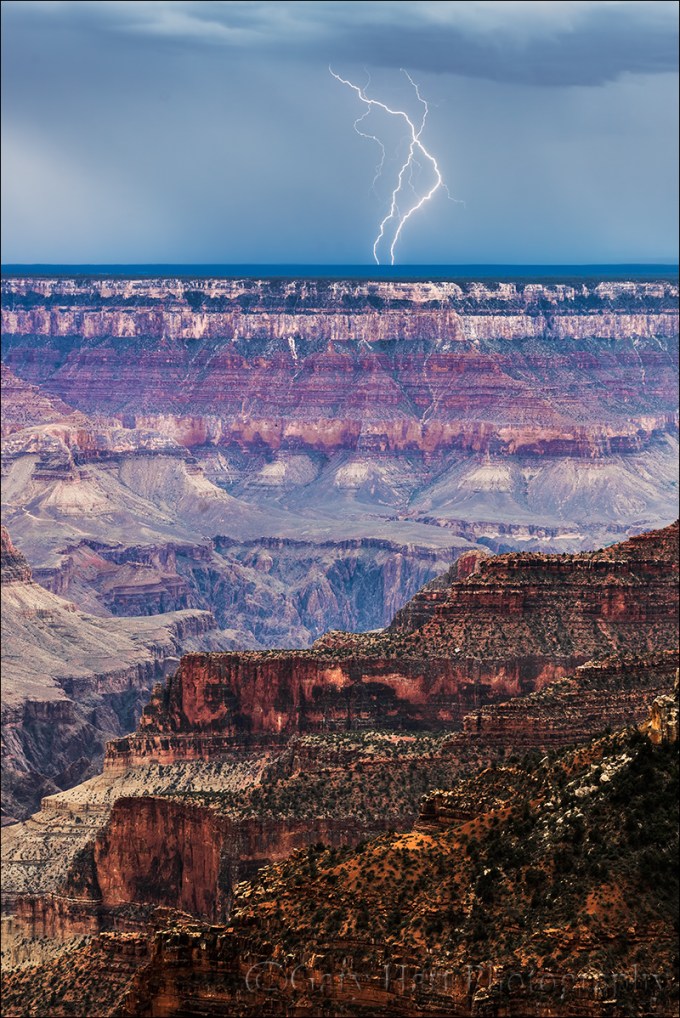
Three Strikes, Bright Angel Point, North Rim, Grand Canyon (2013)
Canon EOS 5D Mark III
1/3 second
24-105L
ISO 100
F11
Today I drive to the mountains of Idaho to photograph Monday’s total solar eclipse. Having never photographed an eclipse, total or otherwise, I have no eclipse images to share. And I won’t pretend to be an expert, or attempt to tell you how to photograph it. But I do have one piece of experienced-based advice that I want to share with photographers planning to capture the eclipse: Don’t forget to savor the moment.
For most, the eclipse will be a once-in-a-lifetime experience, a memory of a lifetime. Totality will be over in minutes. I’ve had more than my share of these special opportunities, some as simple as a fortuitous confluence of breathtaking landscape and spectacular light; some as predictable as the moon hovering above a favorite subject; and some as unexpected as a sudden rainbow above an iconic landscape.
One such moment for me was the August morning in 2013 on the North Rim of the Grand Canyon, when the weather forecast called for clear (boring) skies, and instead we got a two hour lightning display that started in the dark and climaxed with a rainbow and three simultaneous lightning strikes. For the first ten minutes of this show, my camera was misbehaving and I was unable to photograph anything. Nevertheless, my awe for what I was witnessing transcended my frustration, and today my memories are so much greater than a few favorite images. More important than the pictures I captured that morning are the vivid images etched in my memory, the people I shared the morning with, the emotion that came with each lightning bolt, and our giddy laughter at our good fortune. Truly one of the highlights of my life that would have been reduced to a few favorite captures if I’d have allowed myself to be too caught up in the photography. (And I still got my pictures.)
I honestly don’t know what to expect on Monday, but I expect it to be similarly thrilling, and I plan to drink in every second of it. I’ll do my scouting and planning to be as prepared as possible in advance, but I refused to be so focused on getting “the shot” that I fail to appreciate this experience of a lifetime. I’ll take a great memory over a great photo any day.
Read more about this unforgettable morning
A Few of My Own “Moments of a Lifetime”
Click an image for a closer look and slide show. Refresh the window to reorder the display.


A National Park Secret
Posted on August 10, 2017
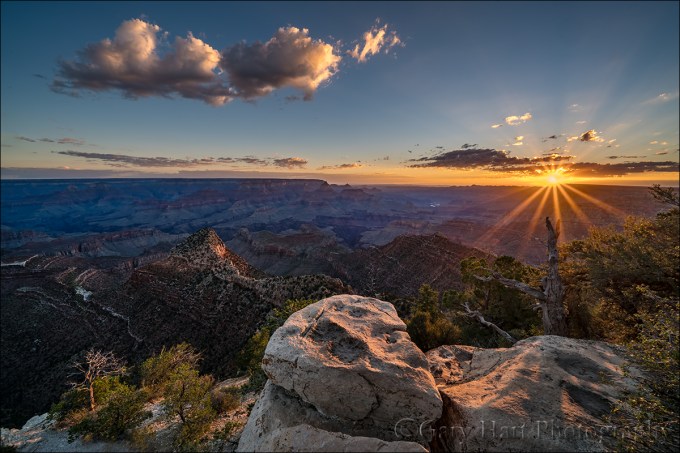
New Day, Grandview Point Sunstar, Grand Canyon
Sony a7R II
Sony 12-24 f4 G
12mm
1/8 second
F/18
ISO 100
America’s National Parks have always been busy in the summer, but in recent years the summer crowds have virtually overwhelmed many of our parks. Between gridlock on the roads, more cars than parking places, and hip-to-hip tourists at the vista rails, what was once an opportunity to commune with nature has become a survival of the fittest endurance test.
My solution has been to avoid the national parks in summer, but for many summer is the only time to visit the special locations they’ve longed to see for their entire lives. And the only thing worse than visiting Yosemite or Grand Canyon in summer, is never visiting them at all.
Though I can’t make the crowds go away, let me offer an experience-based suggestion that is guaranteed to enhance your national park experience: Sunrise. Or more accurately, the morning hours from about thirty minutes before sunrise until around two hours after sunrise.
For most people the idea of rising before the sun on a vacation is laughable, but therein lies the genius. If you can overcome the urge to be most people, you can enjoy America’s most crowded national parks, at the height of the summer rush, in glorious peace. You won’t be alone, but you’ll be savoring the day’s first rays with a microscopic subset of the park’s total visitors, kindred spirits who relish nature and solitude as much as you do, who speak softly, stroll slowly, and respect personal space.
About this image
As much as I try to leave the national parks to the tourists in summer, my desire to photograph the lightning and rainbows of the Grand Canyon’s summer monsoon leaves me no choice. A couple of days ago, Don Smith and I guided our photo workshop group out to photograph sunrise at Grandview Point on the always crowded South Rim. Grandview is one of Grand Canyon’s most popular spots, but leaving our hotel about 45 minutes before sunrise got us out there about a half hour before the sun, and long before the tourists had even hit their snooze button the first time.
There were just a couple of other cars in the parking lot, the same lot that in just a few hours people will be circling in vain for five, ten, even fifteen minutes. Having Grandview virtually to ourselves, the group was able to spread out and find their own view of the canyon without competing with the teaming midday hordes that most people experience there.
Along with a few other people in the group, I set up in front a concave sandstone rock with a view across the canyon to where the sun would soon appear. Because this is my first trip with my new Sony 12-24 f/4 G lens, I’ve been making a point to familiarize myself with it, so I twisted it on and went wide. With a clear horizon and relative dearth of clouds, I dialed my f-stop to f/18 to ensure a good sunstar when the sun crested the horizon, and composed a frame.
When photographing a sunrise, the advancing light makes it impossible to set the exposure very far in advance. In these rapidly changing conditions, I love my mirrorless Sony a7RII’s pre-capture histogram in my viewfinder—I just kept my eye on the histogram, dropped the shutter speed in 1/3-stop increments as the horizon brightened, and was ready to hit the ground clicking the second the sun appeared.
Grand Canyon Monsoon Photo Workshops
Workshop Schedule || Purchase Prints
A Grand Canyon Gallery
Click an image for a closer look and slide show. Refresh the window to reorder the display.


Starry, starry night
Posted on June 9, 2017

Starry Night, Colorado River and Evans Butte, Grand Canyon
Sony a7S II
Rokinon 24mm f1.4
20 seconds
F/2
ISO 12800
Few experiences in nature surpass a dark sky brimming with an impossible number of stars. The darker the sky the better, and the sky doesn’t get much darker, or more impossible, than a moonless night at the bottom of the Grand Canyon. I schedule my annual Grand Canyon raft trip for the week of the new moon to ensure the darkest skies and the most stars; I prefer May because canyon temperatures are comfortably warm but not yet hot, and the Colorado River runs clear, unmuddied by sediment stirred by the summer monsoon.
As darkness seeps into the mile-deep gorge, the first pinpoints overhead are the planets, some combination of Venus, Jupiter, Mars, Mercury, and Saturn. Soon the darkness is as complete as we ever see it at home, and the planets are joined by the brightest stars in recognizable constellations. But unlike home, the darkening continues, and with every passing minute comes more stars, until it seems the sky can’t possibly hold any more.
Pausing to take it all in, the first thing to catch your eye in the unprecedented dark might be the Big Dipper—in May it’s high overhead as darkness falls, a comforting sight to disoriented observers still not convinced that this sky is real. Perhaps you’ll be temporarily distracted by the blinking lights of a distant jetliner, a silent reminder of the world left behind. A keen eye may discern a faint “star” moving among its neighbors—a satellite, possibly monitoring the weather, or sending GPS coordinates, or maybe even a foreign country secretly observing (smile!). And if you’re patient you might see a streaking meteor (or two, or three…), as if a hidden star has sprinted across the darkness and into a new hiding place.
But this visual feast is only the appetizer, because the main course, the Milky Way’s glowing band, isn’t served until close to midnight (or later, depending on the part of the sky that’s visible from the chosen vantage point). The Milky Way rises in the east, a band of light running north and south, ascending until it eventually spans the sky. Fainter in the north, the Milky Way brightens as your eyes follow it south, toward the glowing galactic core. The photogenic galactic core rises highest in the southern sky, so we hope for campsites with an open view in that direction. Since the Grand Canyon sky is crowded by tight, towering walls, the best views of the sky are usually up- or down-canyon.
Our best south-sky opportunities come on the trip’s first two nights, when we’re in Marble Canyon, the north/south trending section of the Grand Canyon that ends at the Little Colorado River confluence. At the confluence the canyon walls open to offer the trip’s best view of the sky, but just downriver the Colorado turns westward and the walls rise and squeeze closer. Fortunately, rather than beeline to Lake Mead, the Colorado River meanders a bit, bending north here and south there, providing an occasional view of the southern sky throughout the Grand Canyon.
Pulling into camp after a long day on the river, the first thing I do is find a spot for my cot that will ensure the best possible view of the night sky as I fall asleep. With my claim staked, I survey the surroundings for potential night photography scenes. Campsites on the Colorado River are first-come, first-served, and we have to hope we find one that’s oriented properly and has photogenic vantage points. Usually that means down by the river, but sometimes it’s an elevated location with the river in the distance. But if the campsite doesn’t have a photogenic vantage point, I’m not disappointed because nothing can take away my bedtime canopy.
If I find a scene I like, I compose, dial in my night exposure settings, and focus my camera well before dark. Sometimes I’ll compose and leave the camera poised on the tripod, ready for my return in the wee hours of the morning. If I’m afraid someone might stumble on my tripod in the dark, I leave it beside my cot, camera loaded and ready for action when I wake later.
On the trip’s third evening we pulled into camp exhausted but exhilarated after the trip’s most intense day of rapids. I found a view I liked near camp—getting there required a little rock scrambling that was no big deal with the sun out, but would require a bit more care. The Milky Way in May reaches its zenith in the south at around 3 a.m., but since we didn’t have a good view of the southern sky from this site, I decided the best views of the Milky Way would come earlier, when I could photograph it downstream, in the eastern sky. I woke at 1 a.m., grabbed my camera, and stumbled by the screen of my iPhone (the less artificial light my eyes are exposed to, the better they function when I try to photograph in the dark) to the spot I’d chosen. I could tell by a handful of glowing LCDs scattered downstream that I wasn’t the only one shooting. (On the first night I’d given the group instruction and guidance on photographing the Milky Way, but after that everyone was free to pick their spot and time, or stay in bed.)
I shot exclusively with my Sony a7SII and Rokinon 24mm f/1.4 lens. Once I’d perfected the composition and verified the sharpness, sticking with a 20 second shutter speed, I varied my ISO and aperture for more processing options later: ISO 3200, 6400, and 12,800; f1.4 and f2. At these settings I capture more light than my eyes take in—not only does this reveal more of the canyon than I can see, it also reveals even more stars.
I only photographed for about 20 minutes, but was so wired when I returned to my cot that I lay awake for another hour, mesmerized by my glittering ceiling.
Workshop Schedule || Purchase Prints
A Starry, Starry Gallery
Click an image for a closer look and slide show. Refresh the window to reorder the display.


The nature of time
Posted on October 2, 2016
Electric Dance, Grand Canyon
Sony a7R II
Sony/Zeiss 24-70 f4
1/8 second
F/13
ISO 50
Lightning Trigger LT-IV
A few years ago I listened to an NPR show about Time and the arbitrary ways we earthlings measure it. The guest’s thesis was that the hours, days, and years we measure and monitor so closely are an invention established (with increasing precision) by science and technology to serve society’s specific needs. The question posed to listeners was, “What is the most significant measure of time in your life?”
Most callers responded with anecdotes about bus schedules, school years, and work hours that revealed how conventional time measurement tools, the arbitrary units of clocks and calendars, rule our existence. Listening while on my morning run, I was unable to call in to share my own (significantly different) relationship with time, so you’re stuck with reading about it here instead.
Landscape photographers are governed by far more primitive time constructs than the bustling majority. We follow the fundamental laws of nature that inspire but ultimately transcend clocks and calendars: the earth’s rotation on its axis, the earth’s revolution about the sun, and the moon’s motion relative to the earth and sun. The clocks and calendars that have little to do with the picture taking aspect of my life are useful only when I need to interact with the rest of the world on its terms (that is, run the business).
While my days are inexorably tied to the sun’s and moon’s arrival, and my years are ruled by the changing angle of the sun’s rays, I can’t help long for the ability to mark my calendar for the rainbow that arcs above Yosemite Valley at 4:29 p.m. every May 26, or the lightning bolt that strikes the Grand Canyon’s South Rim at 2:45 p.m. each August 18. But Nature, despite human attempts to measure and manipulate it, is its own boss. The best I can do is schedule my personal photo trips and photo workshops to maximize my odds for the good stuff, then show up and hope for the best.
The insignificance of clocks and calendars is never more clear than the first morning following a time change. On the second Sunday of March, when “normal” people moan about rising an hour earlier, the sun thumbs its nose at Daylight Saving Time and rises a mere minute (or so) earlier than it did the day before. So do I. And on the first Sunday of November, as others luxuriate in their extra hour of sleep, I get to sleep an entire minute longer. Yippee.
There’s irony in the immutability of the natural laws responsible for the (perceived) randomness of the very events we landscape photographers covet: Earth’s revolution and rotation, our orbiting Moon, each predictable down to microseconds, set in motion the atmospheric and tidal dynamics that are the catalysts for the unpredictable seasons, weather, and waves we photograph. Ironic or not, I love nature’s mixture of precision and randomness. Though I try to maximize my odds for photographically special natural phenomena, understanding that “it” might not (probably won’t) happen only enhances the thrill when something special does happen.
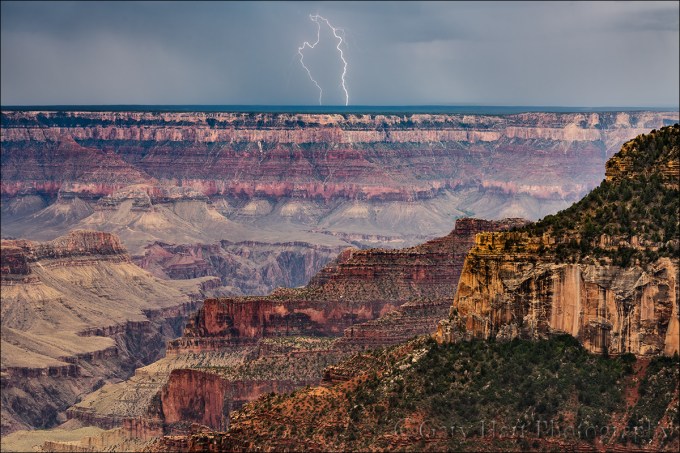
The lightning in today’s image was certainly not on anyone’s calendar, but knowledge of the Grand Canyon’s August monsoon enabled Don Smith and me to schedule our annual Grand Canyon Monsoon workshops for the best time to be there. And despite the uncertainty, it was no fluke that we had our group on the North Rim and within sprinting distance of the Grand Canyon Lodge viewing deck (with Lightning Triggers primed and ready) when the clouds started building and darkening across the canyon.
This turned out to be a special day. After several fruitless afternoons of ticking seconds that stretched to minutes and hours, our group was treated to a two-hour electric show that left us all giddy and breathless. This strike came and went in milliseconds, so fast that I had no idea that it was actually a pair of intertwined bolts, a secret revealed only by my camera’s ability to freeze time.
Workshop Schedule || Purchase Prints || Instagram
Right place, right time
Click any image to scroll through the gallery LARGE


, Yosemite")


")


Here comes the sun
Posted on September 12, 2016

Here Comes the Sun, Mather Point, Grand Canyon
Sony a7R II
Sony/Zeiss 16-35 f4
1/8 second
F/18
ISO 100
I rarely shoot at Mather Point because I’m usually working with workshop students struggling to corral the extreme dynamic range of a summer sunrise there. But on this morning a couple of weeks ago, about half the group had congregated at the rail in near the Mather Point amphitheater, allowing me to set up my tripod and occasionally visit my camera. When it became clear that the clouds were setting up for something special, I prepared my composition, set my f-stop to f/18 (in the sunstar zone), and ready my graduated neutral density filter in anticipation of the sun’s first rays peeking out from behind Wotan’s Throne.
Knowledge is power
As with many of my images, I can trace this image’s creation to long before the shutter clicked. That’s because, whenever possible, I avoid arriving at a location without knowing at the very least when and where the sun will appear or disappear. In this case I was familiar enough with the Mather Point in August to know that the sun would rise between Wotan’s Throne and Vishnu Temple. But I needed to be more precise than that.
We’re living in an era of ubiquitous information, carrying mini computers with the potential to make virtually everyone an instant astronomical genius. Though my own workflow for computing sun/moon arrival/departure information was established long before smartphones, it amazes me both how easy the internet and smartphones have made preparation, and how few photographers do it.
I got a little head start because I studied astronomy in college for a few semesters (long enough to learn that the essential math would would wring the marvel from my mind), enough to have good mental picture of the celestial rotations and revolutions that determine what we see overhead and when we see it.
While I’m just geeky enough to prefer plotting all this stuff manually, for most people I recommend starting with one of the excellent apps that automate most of the process. Of the two apps I recommend, PhotoPills and The Photographer’s Ephemeris, I prefer PhotoPills because it seems more complete, but they’re both excellent.
If you’ve tried either of these apps and found them too complicated, don’t be discouraged—neither is so intuitive that you should expect to simply pick it up and use it. But each is logical and well designed, and I promise that the more you use it, the easier it will become. In other words, practice!
Practice
As with most things in photography, it’s best not to be trying to learn to predict the timing and position of the sun or moon when the results matter. Rather, I suggest that you plot tonight’s sunset from the park down the street, or tomorrow’s sunrise from your backyard. Figure out where and when the sun will set or rise, be there to check your results, and then figure out why it didn’t happen exactly as expected. You’ll be surprised by how quickly your predictions improve after repeating this process a few times. Once you feel comfortable with your ability to anticipate a sun or moon rise or set from home, it’s time to take the show on the road—pick a spot you know fairly well and apply your new knowledge there.
Working it out on the fly
For me, celestial preparation from the comfort of my recliner is only half the job. It’s great when I know exactly where I’ll be and when I’ll be there, but the reality of nature photography isn’t quite so simple. On a first visit to a new location, I often end up places I never imagined I’d be—Hmmm, I wonder where that road goes…, or, Gee, I bet the view from the top of that hill would be great…—often with no connectivity.
On location with no connectivity, I need to be able to figure out the celestial details with only the resources at hand. The two iPhone apps I’ve come to rely on most are Focalware (I couldn’t live without this app) and MotionX-GPS.
- Focalware provides sun and moon rise/set times, the moon phase, and the altitude and azimuth of the sun and moon—all for any any time and date, and any location on earth. It uses my phone’s GPS to determine my current location, but doesn’t require cell or wifi connectivity.
- MotionX-GPS gives me topo maps and the ability to plot point-to-point linear distance as well as azimuth. While its maps do require connectivity to download, I can pre-download them to my phone so they’ll be available when I’m offline.
Using these two apps, plus my basic understanding of astronomical dynamics, I’m able to figure out everything necessary to plan a shoot. On this morning at Mather Point, I pulled out my iPhone and opened Focalware to determine the sunrise time and azimuth. I used the MotionX-GPS Measure tool to drop a pin at my current location, then stretch a line, at the angle of the sunrise azimuth, across the canyon until it intersected the horizon. That was all I needed—seeing that this sunrise line passed just to the right of Wotan’s Throne, I was able to set up the composition I wanted.
Workshop Schedule
A gallery of celestial timing


Concise guide to tripod selection for the serious landscape photographer
Posted on September 5, 2016

Electric Scribble, Grand Canyon Lodge, North Rim
Sony a7R II
Sony/Zeiss 24-70 f4
1/6 second
F/9
ISO 200
Lightning Trigger LT-IV
Tripod axiom
There’s an axiom in photography (popularized by Thom Hogan): Photographers purchase three tripods: the first tripod is a flimsy, cheap aluminum/plastic monstrosity; next comes a sturdy but heavy “value” tripod; and finally, they spring for the tripod they should have purchased in the first place—a sturdy, light, expensive tripod that will serve them for decades. You’ll save yourself tons of money by biting the bullet and just starting with the tripod that you covet (and probably already know you’ll eventually end up with).
How tall?
Stooping, even just a few inches, may not seem like a big deal at first, but it gets old really fast. Your primary tripod should be tall enough to elevate your camera to eye level without extending the centerpost—it’s okay if the tripod has a centerpost, and to use it as a last resort when wind or long exposures aren’t a factor, but a centerpost adds weight and makes it impossible to lower your camera all the way to the ground. While not essential, even taller than eye level is better because extra height adds compositional flexibility, the ability to elevate above obstacles, and makes it easier to handle uneven terrain.
Your minimum tripod height (MTH) determines the shortest tripod you can use without stooping or raising the center post. But you don’t need a tripod that’s as tall as you are because you’ll be mounting a camera and head atop the tripod, and your eyes are probably not on top of your head.
Here are the steps for determining if a trip is tall enough for you:
1. Start with the tripod’s fully extended height (legs extended, center post down), easy to find in the manufacturer’s specifications 2. Add the height of your ball-head 3. Add the distance from the base of your camera to the viewfinder 4. Subtract 4 (or so) inches from your height, including shoes (unless you photograph barefoot), to account for the distance from the top of your head to your eyes.Variables dictated by need and preference
- Carbon fiber is lighter and and less prone to vibration than aluminum, but more expensive (see Tripod axiom above). Carbon fiber also doesn’t get as cold on those frigid winter mornings.
- Three leg-section tripods are less work to set up and take down; four leg-section tripods collapse smaller. In theory, the more leg sections a tripod has, the more it’s prone to vibration (each junction is a point of weakness), but this isn’t a big factor with a good tripod.
- And speaking of leg sections, you’ll need to choose between twist locks and flip locks. I find the flip locks a little easier when I’m fully extending and collapsing the tripod at the beginning and end of a shoot, but the twist locks easier for partial adjustments of the legs while I’m shooting. The flip locks can be noisy, and can catch on things.
Tripod head
For landscape photography, I strongly recommend a ball head (pivoting ball that can be controlled by loosening and tightening a single knob) rather than a pan/tilt (a lever for each axis of motion). And stay away from the pistol-grip ball heads—they don’t handle weight well.
Quick-release system
You’ll definitely want some kind of quick-release mechanism that allows you to quickly attach/detach the camera to/from the head. The simplest kind is a metal plate (don’t even consider anything with plastic parts) that mounts to the camera’s tripod screw and matches a corresponding clamp on the head. The clamp might engage/disengage with a lever or twist-knob—get the lever kind.
The flat plates are okay, but the easiest, sturdiest quick-release system is the Arca-Swiss L-plate (the Arca-Swiss style is a standard offered by many quick-release manufacturers). An L-plate is a 90-degree (L-shaped) piece of machined aluminum; one axis mounts flush with the bottom of the camera body, attaching via the tripod mount screw, and the perpendicular axis hugs one side of the camera body (providing a quick-release plate on the bottom and side of the camera). The entire length of both plate axes are quick-mount rails that attach (with a lever or knob) to the corresponding mounting clamp on the tripod head. This rail setup is more secure and easier to mount/unmount than a conventional quick-release plate, making switching between horizontal and vertical orientation a simple mater of releasing the clamp, rotating the body, and re-securing the clamp (it takes longer to read the description than to execute it).
If you’re really serious about your photography, you’ll invest in an L-plate system—once you do, it’ll be hard to imagine how you lived without it. Because every camera model has its own dimensions and unique cable, control, memory card, and battery access points, the best L-plates (like Really Right Stuff) are custom-machined for the body (when you get a new camera, you’ll need a new L-plate).
My tripods
I use two Really Right Stuff tripods: the larger RRS TVC-24L is my primary tripod; I also use a smaller, lighter RRS TQC-14 when I fly or hike. My TVC-24L has a RRS BH-55 (purchased when I was a DSLR shooter but overkill for my Sony mirrorless system— I’d probably get a BH-40 if I had to do it now); my TQC-14 has a BH-30. I’m about 5’ 9” and without the centerpost extended the TQC-14 is just a little shorter than ideal (I need to extend my centerpost a few inches to get my camera to eye level), but it’s a justifiable compromise when weight and/or storage length is a factor. All of my camera bodies and tripod heads are outfitted with RRS Arca Swiss type L-plates and corresponding clamps.
Links
Making the case for using a tripod
Really Right Stuff

Electric Scribble, Grand Canyon Lodge, North Rim
About this image
Electric Scribble, Grand Canyon Lodge, North Rim
The best nature images reveal aspects of the world that the human eye misses. For example, though lightning strikes so fast that it’s already a memory before the brain can process them, the camera’s ability to freeze an instant in time preserves magic moments like this that otherwise would be lost forever.
Lightning’s speed makes photographing it without a tripod virtually impossible: in daylight, it requires a lightning sensor that mounts atop the pre-composed camera and waits for lightning to fire; at night it can be captured with a manual shutter press, but at exposures far too long for hand-holding.
On this afternoon on the North Rim last month, Don Smith and I had our workshop group set up to photograph a series of active thunderstorms skirting the South Rim about 15 miles away from our vantage point on the Grand Canyon Lodge viewing deck. The deck was packed with people enjoying the show. In crowded locations like this I particularly appreciate the height of the RRS 24L, which gave me the flexibility to elevate above heads and other obstacles. The 24L’s sturdiness gave me peace of mind that my camera would remain stable despite all the heavy footsteps nearby.
Virtually all of the strikes were vertical, cloud-to-ground strokes directly across the canyon. But already having a pretty good selection of images like that, my camera was set up (on my tripod, Lightning Trigger ready for action) to favor the composition I wanted rather than in the direction of the most lightning activity.
Most of my lightning captures this afternoon were recorded relatively close to my memory, albeit with much more intricate detail than my eyes saw. This cloud-to-cloud strike, the only lightning I captured with this composition, followed a far too circuitous path for my eye/brain to register, but it was etched forever in pixels by my sensor. Better still, the resulting 42 megapixel raw file gives me the luxury of much closer scrutiny than you get with this 800 pixel jpeg. Magnifying the full file to 100 percent, I’m able to infer that what I have here is only a portion of a rather tangled mess of electricity that skipped in and out of clouds, appearing, disappearing, and doubling back on itself like a tangled thread—all in the blink of an eye.
Photo Workshop Schedule
A gallery of frozen moments in nature


Lightning lessons
Posted on August 31, 2016
Hand of God, Grand Canyon
Sony a7R II
Sony/Zeiss 24-70 f4
1/13 second
F/13
ISO 50
Lightning Trigger LT-IV
Let’s start with the given that lightning is dangerous, but if “safety first” is a criterion for intelligence, photographers are stupid. It’s impossible to be 100 percent safe photographing lightning, but the more you understand lightning, how to avoid it and maximize your safety in its midst, the greater your odds of surviving to take more pictures. And not only does a healthy respect for lightning’s fickle power make you safer, understanding lightning will also help you anticipate and photograph lightning.
The shocking truth about lightning
Lightning is an electrostatic discharge that equalizes the negative/positive polarization between two objects (when you get shocked touching a doorknob, you’ve been struck by lightning). The convective air motion (convection is up/down circular flow caused when warm, less-dense air rises, cools and becomes more dense, and finally falls and repeats the process; convection is also what causes bubbling in boiling water) in a thunderstorm transports positively charged molecules upward and negatively charged molecules downward. Because opposite charges attract each other, the extreme polarization (positive charge at the top of the cloud, negative charge near the ground) is quickly (and violently) equalized: Lightning.
With lightning comes thunder, the sound of air expanding rapidly (exploding) when heated by a 50,000 degree lightning bolt. The visual component of the lightning—the flash or bolt that you see—travels to you at the speed of light, over 186,000 miles per second (virtually instantaneous regardless of distance). But lightning’s aural component, thunder, only travels at the speed of sound (a little more than 750 miles per hour—a million times slower than light).
Knowing that the thunder occurred simultaneous with the lightning flash, and that they travel at different speeds, we can infer that the farther we are from the lightning, the greater the time elapsed between the arrival of the lightning and thunder. And since we know how fast both travel, we can compute the approximate distance the lightning struck from our location
At 750 miles per hour, thunder will travel about a mile in about five seconds, so dividing by five the number of seconds between the lightning’s flash and the thunder’s crash give you the lightning’s distance in miles (divide the interval by three for the distance in kilometers). If five seconds pass between the lightning and the thunder, the lightning struck about one mile away; fifteen seconds elapsed means the lightning struck about three miles away.
Lightning safety
The 30 people killed by lightning in the United States each year had one thing in common: each didn’t believe he or she would be struck by lightning when they started whatever it was they were doing when they were struck. The surest way to be safe in an electrical storm is to be in a fully enclosed structure or metal vehicle, away from open windows, plumbing, wiring, and electronic devices (ideally, 100 miles away). But since that would preclude our ability to photograph lightning, we need to find a middle ground.
While there’s no completely safe way to photograph lightning, there steps to improve your odds of surviving to enjoy the fruits of your labor. This is where more knowledge comes to the rescue. Most lightning strikes within a six mile radius of the previous strike. So, if less than thirty seconds elapses between the flash and bang, you’re too close. And since “most” doesn’t mean “all,” it’s even better to allow a little margin for error. Thunder isn’t usually audible beyond ten miles, so if you can hear the thunder, it’s safe to assume that you’re within the range of the next strike.
But if you do find yourself caught outside in an electrical storm, with no available shelter, try to do as many of the following steps:
- Avoid water
- Avoid high ground
- Avoid exposed areas
- Avoid metal or electronic objects
- Avoid tall objects such as trees and open structures (and tripods)
- Stay at least fifteen feet from other people
- If you’re surrounded by trees, position yourself near shorter trees, as far from trunks as possible
- Do not lie down
- Crouch with your feet together and your hands covering your ears
- A lightning strike is often preceded by static electricity that makes your hair stand on end and an ozone smell (best described as the smell of electricity—I think of bumper cars at the amusement park or the smell of my electric slot cars when I was a kid)—if your hair starts to stand up and/or you notice a distinct odor that could be ozone, follow as many of the above steps as you can, as quickly as possible (often you’ll only have time to crouch).
Night lightning
Photographing lightning at night is fairly straightforward, following most of the rules and difficulties that apply to any other night photography shoot: metering, composition, and finding focus in low light. My exposure settings are usually a function of the lightning’s frequency—if it’s only firing every five or ten minutes, I need stretch out my exposure time with a lower ISO and/or smaller aperture.
Rather than try to meter a night scene conventionally, I find the easiest way to get a proper night exposure is to start with a 30-second, large aperture, extreme ISO (ISO 6400 or higher) test exposure. When I get an exposure that works, I determine the shutter speed that suits the lightning frequency, and the lightning density I want in my frame, figure out how many stops more than my 30-second test exposure that is, and subtract the same number of stops from my ISO and f-stop. This test exposure is a good way to check my composition and focus in extreme low light situations.
Daylight lightning
Until recently, most lightning photography was either at night, when a long exposure will capture as many strokes that occur while the shutter’s open, or the product of pure luck—the shutter just happened to be open when the lightning fired. Daylight lightning is difficult because if you’re relying on your reaction time, the strike will almost certainly come and go before you can react (people who claim success with this technique have usually captured a secondary or tertiary bolt). But now we have lightning sensors, which can detect and respond much faster than any human can react.
A lightning sensor attaches to your camera’s hot shoe and connects via a special cable to the camera’s remote-release port. When engaged, it fires the shutter immediately upon detecting lightning.
There are many lightning sensors from which to choose. I went with the one that was the consensus choice among photographers I know and trust: Lightning Trigger from Stepping Stone Products in Dolores, CO. At slightly less than $400, including a cable to match your DSLR, the LT-IV is far from the cheapest option, but from all I’ve read, heard, observed, and (especially) experienced first hand, lightning sensors are not generic products, and the internal technology matters a lot. The Lightning Trigger is the only one I’d use (I get no kickback for this).
A good lightning sensor should detect lightning at least 20 miles away. And you can count on a lot of extra clicks—for every click with lightning in my camera’s field of view, I get many clicks caused by lightning not visible to me, or outside my camera’s field of view (better too sensitive than not sensitive enough). But when lightning does fire somewhere in my composition, I estimate that my Lightning Trigger clicked the shutter at least 95 percent of the time.
But even firing in response to a visible bolt doesn’t ensure a successful image—sometimes the bolts are so short that the camera can’t click fast enough. This is a limitation of your camera, not your sensor—some cameras are significantly faster than others (more on this later). In general, the more violent the storm, the greater the likelihood of bolts with long duration and/or multiple strokes that significantly increase your odds.
Exposure settings
The daylight lightning shutter speed sweet spot is between 1/15 and 1/4 second—faster shutter speeds risk completing the exposure before some or all of the secondary strokes fire; slower shutter speeds will wash out the lightning (which is why you can’t just put on a neutral density filter and dial in a long exposure to capture daylight lightning).
Achieving daylight shutter speeds around 1/8 second isn’t always easy. I shoot in Manual mode, use a polarizer, often at ISO 50 and f16 or smaller. Of course exposure will vary with the amount of light, and you may not need to go to such extremes if you’re shooting into an extremely dark sky. You can also use a neutral density filter to slow the shutter speed, but take care not to slow the shutter speed beyond 1/4 second and risk washing out the lightning entirely. And if you’re in manual mode (as I am), be aware of the rapidly changing light in a thunderstorm—an exposure that worked five minutes ago might be all wrong now.
After doing this for many years, I’ve developed an exposure approach that seems to work fairly well for me. When the scene is fairly bright, I tend to go with faster shutter speeds like 1/10 to 1/15 second. I find that longer shutter speeds in these situations tends to was out the lightning I capture, making it less dramatic or even virtually invisible. But when dense, saturated clouds block the sunlight and darken the clouds significantly, I usually extend my shutter speeds into the 1/4 to 1/8 second range. The lightning still stands out quite nicely against the dark clouds, and the longer shutter speeds allow me to capture more multiple strokes.
Shutter lag
Because shutter lag (the time elapsed between the press of the shutter button and the shutter opening) is death to lightning photography, you’ll want a camera with as little as possible shutter lag. Too much delay, and the bolt will be gone before the camera clicks. (Using shutter speeds in the 1/15 to 1/4 second range, there’s no concern that your shutter will be too fast.)
Shutter lag is one area where the Sony mirrorless cameras shine—after years of shooting Canon, and working with Nikon and other camera brands in my workshops, I’m pretty confident that the Sony mirrorless bodies are the fastest, often by a large amount.
Ideally, you’ll want a camera with shutter lag faster than 60 milliseconds. Somewhat slower shutter lag won’t shut you out completely, but the slower your camera, the lower your success rate will be.
The best resource I’ve found for camera shutter lag times is http://www.imaging-resource.com. In the Camera Review section, look for the Pre-focused time on the Performance tab (though I can’t guarantee that any sensor but the Lightning Trigger is able to pre-focus).
Regardless of the camera you’re using, there are a couple of things you should do to do to minimize shutter lag:
- Turn off autofocus. Even with back-button focus (focus not tied to the shutter button), on some cameras autofocus will initiate a brief communication between the lens and camera that will slightly delay response. If you must autofocus, go ahead and do it each time you recompose, then turn autofocus off as soon as you’re focused.
- Though the Lightning Trigger documentation suggests Aperture Priority, I recommend manual exposure mode to eliminate any metering when the shutter trips (again, this could vary with the camera).
- Turn off any pre-click detection, such as face-recognition. (Noise reduction settings shouldn’t matter, since that’s a post-click function.)
It may very well be that your camera isn’t slowed with these features enabled, but since it’s virtually impossible to get camera manufacturers to commit to a camera’s performance at this level (and despite the wealth of self-proclaimed experts who claim to know), I think it’s wise to minimize your chance for problems by simplifying your camera’s capture process as much as possible.
Other equipment
Other essential or recommended equipment*:
- A sturdy tripod (and despite what you might have heard, you’re no safer with carbon fiber than you are with aluminum)
- Rain gear that will keep you dry from head-to-toe
- An umbrella for shielding your camera and lightning sensor (many sensors, including the Lightning Trigger, aren’t waterproof) while composing and shooting in the rain
- Lens hoods to reduce the raindrops that might mar the front element of your lenses
- Neutral density filter and/or polarizer to slow shutter speed
- A garbage bag (my choice) or rainproof camera jacket (haven’t found one I like) to protect your camera
- Extra lightning sensor batteries (better safe than sorry)
- An infrared remote to make sure the sensor is functioning (I sometimes borrow the remote from the hotel)
- A towel (also borrowed from the hotel)
* While I don’t recommend risking staying out when the thunderstorm is on top of you, there will be times when the rain sneaks up on you (I’ve had to leave my camera out in a downpour when a too-close bolt chased me to shelter).
Getting the shot
My goal is to photograph lightning that’s happening somewhere else. In other words, if I’m in the storm, I’m too close. For example, places like the rim of the Grand Canyon and Yosemite offer vantage points with expansive views that allow me to photograph thunderstorms from many miles away (which of course still doesn’t absolutely guarantee safety).
Do your homework
Before attempting a lightning shoot, research potential vantage points and familiarize yourself with the weather patterns in the area you’d like to photograph. It’s possible that most storms in your area will tend to form at around the same time of day, and move in the same direction—this knowledge will definitely improve your chances. It’s also a good idea scout escape routes and have a plan if you’re caught off-guard by an advancing or developing cell.
Because you can’t be everywhere at once, I strongly recommend using a smartphone app that reports current lightning activity. For example, when I’m at the Grand Canyon’s South Rim, I usually stay in Tusayan, about 15 minutes from the rim, and often don’t know exactly when the lightning has started, or whether it’s west or east. I can also get a pretty good idea of where the storms are building and the direction they’re moving to get myself out to the rim before the show starts.
The app I use on my iPhone is Lightning Finder, which reports (with a minimal annual subscription), virtually real-time, every lightning strike in North America. Another subscription-based (for real-time lightning) app that I’ve heard good things about but haven’t tried is RadarScope. This is by no means a comprehensive list, so you might want to do some research to see what’s out there.
Maximize your odds
Choosing a conventional landscape scene usually involves some planning to ensure the best light for my planned subject, and that the weather will cooperate. But lightning photography is far more opportunistic—we may know that a chance for lightning exists, but we rarely know exactly where it will appear. So while I may have an idea of a landscape to put with my lightning, but if the lightning’s not happening there, my lightning shoot won’t be terribly productive unless I adjust.
The greater the vertical distance raindrops rise and fall in the clouds, the greater the potential for the extreme polarization that’s conducive to electrical activity. So look for towering thunderheads, the higher the better. I also look for gray curtains of rain hanging beneath dark clouds, which is usually an indication of where the cell is most active. The darker the rain curtains, the heavier the rain and the more likely there will be lightning. But be aware that the lightning doesn’t necessarily fire in the darkest part of the clouds—sometimes you can see lightning in the thinner gray areas out front of the main rain band.
My general approach is to identify the most likely lightning source (rain curtain) and find the best composition that includes it. The wider your composition, the greater your odds of capturing lightning somewhere in your frame, but the smaller the lightning will appear. I tend to start wider to ensure success, then tighten my composition once I’m fairly confident I captured something.
Sometimes I encounter a situation where the best lightning is firing above a boring scene, but I see potential (but so far no lightning) above a much better scene. That’s a classic risk/reward dilemma without an absolute best solution. Because I have so many lightning images, I tend to go with the better composition rather than the best chance for lightning. On the other hand, I advise those who have few or no lightning captures to opt for the sure thing until they know they’ve had some success.
A frequent composition problem I see in the initial images of my workshop students is too much sky. Monitor the storm until you know the height of the lightning’s origin, then put the top of the frame a little above that—more sky if there’s something interesting above, less if it’s homogenous gray clouds. But it’s better to have a little too much sky than to have the lightning coming out of the top of your frame.
With a lightning sensor engaged and firing, it’s easy to feel like there’s not much to do. But lightning storms move, so in addition to the obvious safety implications (which should be your primary concern), it benefits you to monitor and anticipate the lightning activity’s path. Armed with this knowledge, I’ll frequently shift, tighten, or widen my composition as the situation dictates.
Since my Lightning Trigger is so sensitive, picking up lightning well out of my frame and (most frequently) in inter- and intra-cloud lightning that’s invisible to the naked eye in daylight, I get far more frames than I get lightning. This going through hundreds of frames on my computer to find the ones with lightning a very tedious task. That job becomes much easier if, when my Lightning Trigger is armed and ready, I lock my eye on the horizon. When I see lightning and hear my shutter click, I mark that frame by quickly clicking another with my hand in front of the lens. (If I don’t hear my shutter click, I check to make sure everything is working and set up properly.)
Be aware that electrical storms can move quite quickly, so monitor the storm you’re photographing, and the sky around you in all directions, closely and continuously. Not only will this enable you to adjust your composition to account for a cell’s movement, it can save your life when an active cell threatens your location.
Grand Canyon Monsoon Photo Workshops
A Lightning Gallery
Click an image for a closer look and slide show. Refresh the window to reorder the display.


Less sky, more canyon
Posted on August 26, 2016
Forked Lightning, North Rim, Grand Canyon
Sony a7R II
Sony/Zeiss 24-70 f4
1/6 second
F/14
ISO 50
Lightning Trigger LT-IV
Don Smith and I just wrapped up 13 days and two workshops at Grand Canyon. Bookending the trip with 12+ hour drives, each day we had 4:30 a.m. wake-ups, lots of waiting for something to happen punctuated by bursts of extremely intense activity, and very late dinners. Both groups enjoyed the full complement of monsoon thrills, including thunder and lightning, rainbows, dramatic clouds, and vivid sunrises and sunsets that made the difficult schedule more than tolerable.
Most workshops have a theme that develops organically and takes on a life of its own throughout the workshop. At some point I realized that second workshop’s theme had somehow become me peering at an LCD, or projecting an image onto the screen during image review, and advising (with emphasis), “Less sky, more canyon.”
I won’t belabor a point I’ve made many times (most recently here) that the most frame space should go to the part of the scene with the most visual interest, except to say that few locations illustrate this better than Grand Canyon. It’s a rare sky that compete with the canyon’s majesty, but what I saw frequently in this workshop was photographers giving half or more of their frame to a sky that didn’t match the canyon below.
I suspect this was happening for a few reasons. Sometimes people just reflexively split their frame with the horizon, or automatically break their scene with the horizon 1/3 of the way down from the top, or up from the bottom, because a misguided judge at their camera club enforces the rule of thirds with Biblical conviction. Other times they simply were composing for lightning firing across the canyon and just weren’t sure how high the lightning originated. But for the distant lightning we usually shoot, that’s invariably fairly near the horizon, and it only takes one strike to get a pretty good idea of where that will be.
This doesn’t mean Grand Canyon images should never include lots of sky, it means that the sky you give your Grand Canyon image should be earned. A towering rainbow? Horizon-to-horizon sunrise or sunset color? By all means, widen your lens and tilt the camera up. But don’t forget that even when the sky is spectacular, it’s the canyon that makes your image special.
No sky, minimal sky, lots of sky—I came away from this workshop with lots of new images I’ll be sharing over the next few weeks. The image here was from the first of two spectacular lightning shows, one for each workshop, our groups enjoyed. We were about halfway into the image review at Grand Canyon Lodge on the North Rim when the lightning started up across the canyon. We instantly jumped into an unrehearsed Keystone Cops scene, scrambling for our gear, racing for the door, and setting up on the viewing deck outside.
Don and I had prepped the group on Lightning Trigger setup on the first evening, and made sure everyone’s Trigger was functioning, so we didn’t have too many problems that afternoon.
The show lasted over two hours, and by the time it was over, everyone in the group had multiple lightning images.
Join next year’s Grand Canyon Monsoon photo workshop
Less sky, more canyon


