Eloquent Images by Gary Hart
Insight, information, and inspiration for the inquisitive nature photographer
Chance and the prepared mind
Posted on June 3, 2016

Under the Rainbow, Colorado River, Grand Canyon
Sony a7R II
Sony/Zeiss 16-35 f4
1/60 second
F/11
ISO 100
“Chance favors only the prepared mind.” ~ Louis Pasteur
A few days ago someone on Facebook commented on my previous Grand Canyon rainbow image that getting “the” shot is more about luck than anything else. I had a good chuckle, but once I fully comprehended that this person was in fact serious, I actually felt a little sad for him. Since we tend to make choices that validate our version of reality, imagine going through life with that philosophy.
No one can deny that photography involves a great deal of luck, but each of us chooses our relationship with the fickle whims of chance, and I choose to embrace Louis Pasteur’s belief that chance favors the prepared mind. Ansel Adams was quite fond of repeating Pasteur’s quote; later Galen Rowell, and I’m sure many other photographers, embraced it to great success.

Double Rainbow, Yosemite Valley
As nature photographers, we must acknowledge the tremendous role chance plays in the conditions that rule the scenes we photograph, then do our best to maximize our odds for witnessing, in the best possible circumstances, whatever special something Mother Nature might toss in our direction. A rainbow over Safeway or the sewage treatment plant is still beautiful, but a rainbow above Yosemite Valley or the Grand Canyon is a lifetime memory (not to mention a beautiful photograph).
A few years ago, on a drive to Yosemite to meet clients for dinner (and to plan the next day’s tour), I saw conditions that told me a rainbow was possible. When I met the clients at the cafeteria, I suggested that we forget dinner and take a shot at a rainbow instead. With no guarantee, we raced our empty stomachs across Yosemite Valley, scaled some rocks behind Tunnel View, and sat in a downpour for about twenty minutes. Our reward? A double rainbow arcing across Yosemite Valley. Were we lucky? Absolutely. But it was no fluke that my clients and I were the only “lucky” ones out there that evening.
Before sunrise on a chilly May morning in 2011, my workshop group and I had the good fortune photograph a crescent moon splitting El Capitan and Half Dome from an often overlooked vista on the north side of the Merced River. Luck? What do you think? Well, I guess you could say that we were lucky that our alarms went off, and that the clouds stayed away that morning. But I knew at least a year in advance that a crescent moon would be rising in this part of the sky on this very morning, scheduled my spring workshop to include this date, then spent hours plotting all the location and timing options to determine where we should be for the moonrise.

Rising Crescent, El Capitan and Half Dome, Yosemite
I’d love to say that I sensed the potential for a rainbow over the Grand Canyon when I scheduled last month’s raft trip over a year ago, then hustled my group down the river for three days to be in this very position for the event. But I’m not quite that prescient. On the other hand, I did anticipate the potential for a rainbow a few hours earlier, scouted and planned my composition as soon as we arrived at camp, then called the rainbow’s arrival far enough in advance to allow people to get their gear, find a scene of their own, and set up before it arrived.
As I tried to make it clear in my previous post, anticipating these special moments in nature doesn’t require any real gifts—just a basic understanding of the natural phenomena you’d like to photograph, and a little effort to match your anticipated natural event (a rainbow, a moonrise, the Milky Way, or whatever) with your location of choice.
But to decide that photographing nature’s most special moments is mostly about luck is to pretty much limit your rainbows to the Safeways and sewage treatment plants of your everyday world. I’ve lost track of the number of times I’ve prepared for a special moment in nature, changed plans, lost sleep, driven many miles, skipped meals, and suffered in miserable conditions, all with nothing to show for my sacrifice. But just one success like a rainbow above the Grand Canyon is more than enough compensation for a thousand miserable failures. And here’s another secret: no matter how miserable I am getting to and waiting for my goal event, whether it happens or not, I absolutely love the anticipation, the just sitting out there fueled by the thought that it just might happen.
I do photo workshops
When chance meets preparation
(When the planning payed off)


The illusion of genius
Posted on May 30, 2016

Rainbow Bridge, Colorado River, Grand Canyon
Sony a7R II
Sony/Zeiss 16-35 f4
1/80 second
F/11
ISO 100
Perhaps you’ve noticed that many popular nature photographers have a “hook,” a persona they’ve created to distinguish themselves from the competition (it saddens me to think that photography can be viewed as a competition, but that’s a thought for another day). This hook can be as simple (and annoying) as flamboyant self-promotion, or an inherent gift that enables the photographer to get the shot no one else would have gotten, something like superhuman courage or endurance. Some photographers actually credit a divine connection or disembodied voices that guide them to the shot.
Clearly I’m going to need to come up with a hook of my own if I’m to succeed. Flamboyant self-promotion just isn’t my style, and my marathon days are in the distant past. Courage? I think my poor relationship with heights would rule that out. And the only disembodied voice I hear is my GPS telling me she’s “recalculating.”
Just when I thought I’d reached an impasse that threatened to keep me mired in photographic anonymity, a little word percolated up from my memory, a word that I’d heard uttered behind my back a few times after I’d successfully called a rainbow or moonrise: “Genius.” That’s it! I could position myself as the Sherlock of shutter speed, the Franklin of f-stop, the Einstein of ISO. That’s…, well, genius!
And just as the fact that none of these other photographers are quite as special as their press clippings imply, the fact that I’m not actually a genius would not be a limiting factor.
But seriously
Okay, the truth is that photography is not rocket science, and nature photographers are rarely called to pave the road to scientific or spiritual truth. Not only is genius not a requirement for great photography, for the photographer who thinks too much, genius can be a hindrance. On the other hand, a little bit of thought doesn’t hurt.
It’s true that I’ve photographed more than my share of vivid rainbows and breathtaking celestial phenomena—moonrises and moonsets, moonbows, the Milky Way, and even a comet—from many iconic locations, but that’s mostly due to just a little research and planning combined with a basic understanding of the natural world. An understanding basic enough for most people who apply themselves.
For example, this rainbow. It was clearly the highlight of this year’s Grand Canyon raft trip, and while I did call it about fifteen minutes in advance, I can’t claim genius. Like most aspects of nature photography, photographing a rainbow is mostly a matter of being in the right place at the right time. Of course there are thing you can do to increase your chances of being in the right place at the right time. Whether it’s an understanding of rainbows that enables me to position myself and wait, or simply knowing when and where to look, when I do get it right, I can appear more prescient than I really am.
The essentials for a rainbow are simple: sunlight (or moonlight, or any other source of bright, white light) at 42 degrees or lower, and airborne water droplets. Combine these two elements with the correct angle of view and you’ll get a rainbow. The lower the sun, the higher (and more full) the rainbow. And the center of the rainbow will always be exactly opposite the sun—in other words, your shadow will always point toward the rainbow’s center. There are a few other complicating factors, but this is really all you need to know to be a rainbow “genius.”
In this case it had been raining on and off all day, and while rain is indeed half of the ingredients in our rainbow recipe, as is often the case, this afternoon the sunlight half was blocked by the clouds delivering the rain. Not only do rain clouds block sunlight, so do towering canyon walls. Complicating things further, the window when the sun is low enough to create a rainbow is much smaller in the longer daylight months near the summer solstice (because the sun spends much of its day above 42 degrees). So, there at the bottom of the Grand Canyon on this May afternoon, the rainbow odds weren’t in our favor.
But despite the poor odds, because this afternoon’s rain fell from clouds ventilated by lots of blue gaps, I gave my group a brief rainbow alert, telling them when (according to my Focalware iPhone app, the sun would drop below 42 degrees at 3:45) and where to look (follow your shadow), and encouraging them to be ready. Being ready means figuring out where the rainbow will appear and finding a composition in that direction, then regularly checking the heavens—not just for what’s happening now, but especially for what might happen soon.
We arrived at our campsite with a light rain falling. The sun was completely obscured by clouds, but knowing that the sun would eventually drop into a large patch of blue on the western horizon, I went scouting for possible rainbow views as soon as my camp was set up. When the rain intensified an hour or so later, I reflexively looked skyward and realized that the sun was about to pop out. I quickly sounded the alarm (“The rainbow is coming! The rainbow is coming!”), grabbed my gear, and beelined to the spot I’d found earlier.
A few followed my lead and set up with me, but the skeptics (who couldn’t see beyond the heavy rain and no sunlight at that moment) continued with whatever they were doing. After about fifteen minutes standing in the rain, a few splashes of sunlight lit the ridge above us on our side of the river; less than a minute later, a small fragment of rainbow appeared upstream above the right bank, then before our eyes spread across the river to connect with the other side. Soon we had a double rainbow, as vivid as any I’ve ever seen.
Fortunate for the skeptics, this rainbow lasted so long, everyone had a chance to photograph it. Our four guides (with an average of 15 years Grand Canyon guiding experience), said it was the most vivid and longest (duration) rainbow they’d ever seen. (I actually toned it down a little in Photoshop.)
Genius? Hardly. Just a little knowledge and preparation mixed with a large dose of good fortune.
One more thing (May 31, 2016)
The vast majority of photographers whose work I enjoy viewing achieved their success the old fashioned way, by simply taking pictures and sharing them (rather than blatant self-promotion or exaggerated stories of personal sacrifice). In no particular order, here’s a short, incomplete list of photographers I admire for doing things the right way: Charles Cramer, Galen Rowell, David Muench, William Neill, and Michael Frye. In addition to great images, one thing these photographers have in common is an emphasis on sharing their wisdom and experience instead of hyperbolic tales of their photographic exploits.
Grand Canyon Workshops || Upcoming Workshops
A gallery of rainbows


Grand Canyon drive-by shooting
Posted on May 25, 2016
River Rock, Colorado River, Grand Canyon
Sony a7R II
Sony/Zeiss 24-70 f4
1/80 second
F/9
ISO 200
A couple of weeks ago I blogged about shooting sans tripod on my recent Grand Canyon raft trip. My rationale for this sacrilege was that any shot without a tripod is better than no shot at all. I have no regrets, partly because I ended up with Grand Canyon perspectives I’d have never captured otherwise, but also because shooting hand-held reinforced for me all the reasons I’m so committed to tripod shooting.
Much of my tripod-centric approach is simply a product of the way I’m wired—I’m pretty deliberate in my approach to most things, relying on anticipation and careful consideration rather than cat-like reflexes as my path to action. That would probably explain why my sport of choice is baseball, I actually enjoy golf on TV, and would take chess or Scrabble over any video game (I’m pretty sure the last video game I played was Pong). It also explains, despite being an avid sports fan, my preference for photographing stationary landscapes.
Despite this preference, for the last three years my camera and I have embarked on a one week raft trip through Grand Canyon, where the scenery is almost always in motion (relatively speaking, of course). And after three years, I’ve grown to appreciate how much floating Grand Canyon is like reading a great novel, with every bend a new page that offers potential for sublime reflection or heart pounding action. And just as I prefer savoring a novel, lingering on or returning to passages that resonate with me, I’d love to navigate Grand Canyon at my own pace. But alas….
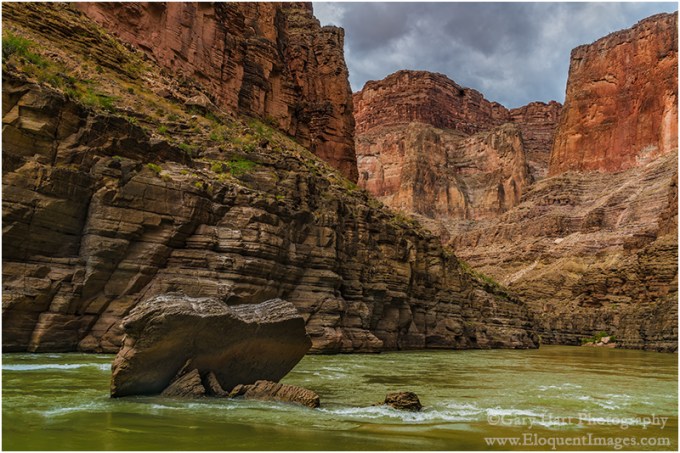
The rock in this image was a random obstacle separated from the surrounding cliffs at some time in the distant past, falling victim to millennia of dogged assault by rain, wind, heat, cold, and ultimately, gravity. Understanding that the river is about 50 feet deep here makes it easier to appreciate the size of this rock, and the magnitude of the explosion its demise must have set off.
Unfortunately, viewing my subject at eight miles per hour precludes the realtime analysis and consideration its story merits, and I was forced to act now and think later. In this case I barely had time to rise, wobble toward the front of the raft, balance, brace, meter, compose, focus, and click. One click. Then the rock was behind me and it was time to turn the page.
Grand Canyon Photo Workshops
Rivers Front and Center


Grand Canyon garden spot
Posted on May 23, 2016

Nature’s Garden, Deer Creek Fall, Grand Canyon
Sony a7R II
Sony/Zeiss 24-70 f4
1/3 second
F/20
ISO 400
Who knew there could be so much intimate beauty in a location known for its horizon stretching panoramas? In fact, there are so many of these little gems that I run out of unique adjectives to describe them. Springing from a narrow slot in the red sandstone to plummet 180 feet to river level, Deer Creek Fall is probably the most dramatic of the many waterfalls we see on the raft trip.
Last year we stayed at Deer Creek Fall long enough to photograph it, but not long enough to explore. The prior year, on my first trip, we spent a couple of hours here; with temperatures in the 90s, most of the group photographed from the bottom, then cooled off in the emerald pool at its base. But a few of us took the relatively short, fairly grueling, completely unnerving trail to the top. Grueling because the route is carved into the sun-exposed sheer wall just downstream from the fall; unnerving because just as you’re catching your breath atop the slot canyon feeding the fall, you realize that continuing requires navigating about 20 feet of 18 inch wide ledge in the otherwise vertical sandstone. With no handhold and a 75 foot drop to the creek that may as well be 750 or 7500 feet (the outcome would be the same), I studied it for about five minutes. Watching the guides stride boldly across without hesitation, in flip-flops, did little to quell my anxiety. I finally sucked it up and made it to the other side, but once was enough.
This year, thanks to some deft planning by our lead guide, we scored the campsite directly across the river from the fall. He deposited the group at the fall, then motored across the river with another guide to get the camp started. The two other guides led a hearty group up the trail to the top, while the rest of us explored with our cameras at river level.
Already familiar with scenes down there, I scaled a boulder-strewn notch in the rocks just upstream to an elevated platform with great top-to-bottom view of the fall. Up here I found enough foreground options to keep me happy for the duration of our stay, and was so engrossed that I was completely unfazed by the verticality of my surroundings.
As I worked the scene, I eventually honed in on a vivid green shrub that stood out against the red sandstone, ultimately landing on variations of the composition you see here. Working this scene I dealt with intermittent showers, a fickle wind that ranged from nearly calm to frustratingly persistent, and a real desire for depth of field throughout my frame. After a number of frames at f16, I magnified an image on my LCD enough to see that the shrub was sharp, but the background was just nearly sharp. As much as I try to avoid anything smaller than f16, I stopped down to f20 and refocused a little farther back, about three feet behind my shrub. Another check of my LCD confirmed that everything from the nearby rocks to the background plants was sharp.
Our campsite that night was less than spacious (think compact condo living as opposed to sprawling suburban subdivisions), but definitely worth the close confines for the view alone. This stay across from Deer Creek Fall turned out to be memorable for one other event that happened later that evening, but that’s a story for another day….
Grand Canyon Photo Workshops
A Gallery of Waterfalls


, California")


")


Rapid day
Posted on May 19, 2016

Nightfall, Colorado River, Grand Canyon
Sony a7R II
Sony/Zeiss 16-35 f4
1.3 seconds
F/11
ISO 200
Every once in a while an image so perfectly captures my emotions at the moment of capture that I just can’t stop looking at it. This is one of those images.
After two relatively benign days of peaceful floating punctuated with occasional mild riffles and only a small handful of moderate-at-best rapids, the group was feeling pretty comfortable on the river. But our guides had made it pretty clear that we hadn’t really encountered anything serious yet, and most in the group were a little anxious about what was in store for day-three—”rapid day.”
Our second night’s camp was a few miles downstream from the Little Colorado River, just ten minutes upstream from Unkar, our first major rapid. I could tell people were getting a little anxious because, as the only person on the trip to have done it before (this was my third trip in three years), I spent much of the evening reassuring people that while the rapids were indeed an E Ticket ride (on that scale, we’d so far navigated no more than two C Tickets), they were more thrilling than threatening. Of course I had to qualify my reassurance with the disclaimer that last year Unkar, tomorrow’s very first rapid, had tossed me from the raft and into the Colorado.

My 2016 Grand Canyon raft trip group perched atop our two J-Rig rafts. Each raft is comprised of five rubber tubes strapped together and attached to a frame that secures an amazing amount of storage space. (That’s Deer Creek Fall in the background.)
With 28 rafters and 4 guides, my group filled two J-Rig rafts— massive, motorize floating beasts with room for 15+ people and more than a week’s worth of supplies and equipment. When we’re just floating with the current, J-rig rafters can stand and stretch, and even wander around the rafts with relative ease. But when a rapid approaches, we have to hunker down and lock onto the designated hand-holds in one of the raft’s three three riding zones:
- The “chicken coup” is nestled in the middle of the raft, between storage areas. Here rafters can survive even the wildest rapids in relative peace and dryness. A few rafters make a permanent home in the chicken coup, but most ride back here for a breather, or to dry off, before returning to the more exposed positions.
- Farther toward the front are the boxes, elevated storage cabinets doubling as benches that provide rafters a great view, a thrilling ride, and a pretty good drenching. I was sitting on the boxes last year when I got launched into the river.
- Up front are the tubes, which flex and contort as they bear the brunt of each rapid. Riding a rapid on the tubes is akin to straddling a bucking bronco, complete with the front and back hand-holds and random g-force. The two most important things to remember up here to hold on for dear life, and to lean into the tube and “suck rubber!” when a rapid hinges the tubes back into your face. This is the wettest and wildest ride—definitely not for the faint of heart.
The next morning we pushed off a little before 8:00. I’d decided before the trip that, given our history, I wanted to be up front for Unkar. I was joined on the tubes by only one other rafter, while everyone else, uncertain about what was in store, crammed into the two back areas. (We called our other raft the “party raft”—their tubes were packed with rafters throughout the trip.)
Approaching Unkar, the guides’ moods changed: Wiley cut the engine, and we drifted toward the downstream roar while Lindsay delivered a serious lecture about rapid survival. Adding to the tension, on her way back to her seat, for the first time Lindsay checked everyone’s lifejacket and hand holds. Then, before we had a chance panic, the engine fired, the river quickened, and the raft shot forward and plunged into the whitewater.
A major rapid assaults many senses at once. The larger rapids pummel you with a series of waves that toss you in multiple directions at once and barely give a chance to recover before the next rapid tosses you in directions you didn’t know existed. The largest rapids, like Unkar, have multiple stomach-swallowing drops and ascents; you soon learn that the largest are nearly vertical, horizon-swallowing, down/up cavities that run green and smooth with a garnish of churning whitewater dancing on top. Depending on how the raft hits a wave, we could ride over with barely a splash, or crash through in a full emersion baptismal experience.
The soundtrack to the rapid’s visual, tactile, and equilibrium experience is a locomotive roar mixed with screams. You know the ride’s over and you’ve survived when the screams turn to shouts, and finally laughter as everyone dares to take their eyes from the river to make eye contact with the other survivors.
Unkar turned out to be one of the bigger—but definitely not the biggest—rides of this year’s trip. When it spit our boat out the other end, I uncurled my fingers from the ropes and shook the water free, checked all my parts to ensure they were as they were when we entered, then scanned my fellow rafters for their reaction to their first major rapid. The euphoria was clear, and I think if it had been possible, the vote to do it all over would have been unanimous.
As I suspected might happen, surviving Unkar emboldened the group; by the end of the day and for the rest of the trip, we had far more people riding on the tubes, with the limiting factor not so much fear as it was the 47 degree river water with an uncanny ability to penetrate even the most robust “waterproof” rainwear.
That evening, thirty-plus major rapids (and at least as many lesser rapids) farther downstream, we pulled into camp soggy and sore, but far from beaten. The afternoon had turned showery, and the showers persisted as we set up camp, slowing our drying more than adding to our wetness. While the guides prepared dinner in a light drizzle, I wandered down to the river to survey the photo opportunities. I found pictures everywhere—upstream, downstream, across the river—but rather than dive right into my camera bag, I first took the time to savor my surroundings.
The canyon’s pulse, the river’s ubiquitous thrum echoing from rocks that predate the dinosaurs, is simultaneously exhilarating and meditative. Unable to bottle this exquisite balance to take back with me, I turned to my camera, hoping for the next best thing—an image that will bring me back.
Shortly before sunset the rain stopped and sunlight fringed openings in the thinning clouds. By this time several others in the group had joined me at the river’s edge, each camera pointing at a different scene. I’d found mine, I soon tired of the limited foreground options and set out across a field of river-rounded boulders, hopping in my flip-flops toward a promising formation of rocks protruding from the river about a hundred yards away.
It wasn’t until I was all the way there that I realized that the solitary plant I could see protruding from the river wasn’t going to be a distraction to deal with, it was going to be my subject. As the sky colored and darkened, I kept working on this one little plant, positioning and repositioning until the plant, surrounding rocks, and looming peak felt balanced. The final touch that tied the scene up came when I moved a little closer and raised my tripod to its apex so my plant was isolated entirely against the river.
After spending a little more time with this image, I better appreciate why the scene resonated with me then, and why I feel so drawn to it now. The river is rushing here, flaunting the power that tossed and drenched me and my fellow rafters all day, yet this small plant stands motionless for the duration of an exposure that exceeds one second. I admire its calm, the way it towers unfazed above the force that carved this magnificent chasm.
Join me in Grand Canyon
A Grand Canyon Gallery


Your camera is not an Etch A Sketch
Posted on April 11, 2016
(In defense of the tripod)

Grand Morning, Yavapai Point, Grand Canyon
Sony a6300
Sony/Zeiss 16-35 f4
.6 seconds
F/10
ISO 200
Who remembers the Etch A Sketch? For those who didn’t have a childhood, an Etch A Sketch is a mechanical drawing device that’s erased by turning it upside-down and shaking vigorously.
When I come across a scene I deem photo-worthy, my first click is a rough draft, a starting point upon which to build the final image. After each click I stand back with the latest frame on my LCD and scrutinize my effort, refine it, click again, evaluate, refine, and so on. On a tripod, each frame is an improvement of the preceding frame.
Taking this approach without a tripod, I feel like I’m erasing an Etch A Sketch after each click. That’s because every time I click, I have to drop the camera from my eye and extend it in front of me to review the image, essentially wiping clean my previous composition. Before I can make the inevitable adjustments to my most recent capture, I must return the camera to my eye and completely recreate the composition I want to refine.
I bring this up because a week or so ago, on another landscape photographer’s blog I read that she rarely uses a tripod anymore because image stabilization is so good—and anyway, even when stabilization won’t be enough to prevent camera shake, she can just increase her ISO. Reading comments like this reminds me how many landscape photographers don’t get that the tripod’s greatest value isn’t its ability to prevent hand-held camera shake, its the ability the tripod provides for making incremental improvements to a static scene (such as a landscape).
Before I continue, let me just acknowledge that there are indeed many valid reasons to not use a tripod. For example, you get a tripod pass if your subject is in motion (sports, wildlife, kids, etc.), you photograph events or in venues that don’t allow tripods, you have physical challenges prevent you from carrying a tripod, or even if you just plain don’t want to (after all, photography must ultimately be a source of pleasure). But if you’re a landscape shooter who wants the best possible images, “Because now I can get a sharp enough image hand-holding” is not a valid reason for jettisoning the tripod.
Technology certainly has changed the tripod equation. There was a time—way back in the film days, when ISO was ASA and anything above 400 was really pushing the limit, before instant LCD review and image stabilization—when the tripod’s prime function was preventing hand-held camera shake. But today, probably 80 percent of my images could be acceptably free of camera shake without a tripod. Yet the tripod survives….
For example
Last month I was at the Grand Canyon to help my friend Don Smith with his Northern Arizona workshop. A week earlier I’d added the brand new Sony a6300 to my camera bag, but a ridiculously busy schedule had kept it there. Sony had requested a sample image for their Sony Alpha Universe page, and I was down to just one day to deliver.
Our first morning on the rim was my only chance to meet Sony’s deadline before the workshop started. Landing at Mather Point about 45 minutes before sunrise, I beelined along the rim to Yavapai Point (about a mile), straight to a tree I’d been eyeing for years. On all previous attempts, something had foiled me: either the light was wrong, the sky was boring, or there were too many people. One sunrise a few years ago, I found the tree and canyon bathed in beautiful warm light, and the sky filled with dramatic, billowing clouds—perfect, except for the young couple dangling their legs over the edge and making goo-goo eyes beneath “my” tree. They looked so content, I just didn’t have the heart to nudge them over the edge (I know, you don’t have to say it, I’m a saint).
But this morning, everything finally aligned for me: nice clouds, beautiful sunrise color, and not a soul in sight. I went to work immediately, trying compositions, evaluating, refining—well, you know the drill. As I worked, I started honing in on the proper balance of foreground and sky, alignment of the tree with the background, depth of field, focus point, framing—I was in the zone.
When I thought I had everything exactly right, I stood back for a final critique and realized I’d missed one thing: The tree intersected the horizon. While not a deal-breaker, it’s something I try to avoid whenever possible. To rectify the problem, my camera needed to be about eight inches higher. I made the adjustment, and when the color reached its crescendo about two minutes later, I was ready.
Raising the camera would have been no simple task if I’d been hand-holding, but (since my Really Right Stuff TVC-24L tripod, with head and camera, elevates to about six inches above my head) it was no problem with my tripod (though I wish the a6300 LCD articulated for vertical compositions). But the extra tripod height was just a bonus. The true moral of this story, the thing that so perfectly illustrates the tripod’s value, is that there is no way I’d have gotten all the moving parts just right with a hand-held point and click approach.
Of course your results may vary, and as I say, photography must ultimately be a source of pleasure. So if using a tripod truly saps pleasure from your photography, by all means leave it home (and enjoy your $3,000 Etch A Sketch). But if your pleasure from photography derives from getting the absolute best possible images, the tripod is your friend.
Grand Canyon Photo Workshops
A Grand Canyon Gallery


Grad School
Posted on October 12, 2015

Sunset, Hopi Point, Grand Canyon
Sony a7R II
Sony/Zeiss 24-70 f4
2.5 seconds
F/18
Breakthrough 3-stop hard GND
Since the first photon struck a photographic plate, photographers have struggled to stuff the broad range of light their eyes see, into the relatively narrow range their camera can capture. When we shot film, the time waiting for the film to return from the lab was filled with self-doubt and second guessing, punctuated by ecstasy or despair. Then came digital capture, with its immediate image review, histograms, and a host of processing tricks that made one-click exposure-angst a thing of the past—we still had to be careful, but there was a safety net.
Despite digital’s advantages and advances, photographers are still faced with a world illuminated by a much greater range of light than our cameras can handle. Of course this creates opportunities to use our cameras’ limited dynamic range creatively, for example to create a silhouette or a high-key background that helps our subject stand out, but more often than not we’re looking for ways to squeeze all of a scene’s dynamic range into a single frame.
HDR software and layer masks are great post-capture solutions, but I prefer minimizing processing time by getting as much right as possible at capture and am never far from my graduated neutral density (GND) filters. Portable, simple, and effective, I can’t imagine photography without GNDs. And rather than being rendered irrelevant by digital’s ever-improving dynamic range and advanced blending techniques, digital processing enhances GND use.
GNDs explained
A standard (not graduated) neutral density (ND) filter is a uniform, neutral (doesn’t affect color) piece of glass (usually) that darkens a scene (the “density” part) without affecting the scene’s color (the “neutral” part). Its prime purpose is to slow shutter speed, usually to blur motion. While an ND (photographers usually shorten the name by just pronouncing its initials) filter can be rectangular, most are circular, with threads that screw onto the front of a lens. The amount of darkness an ND filter adds is measured in stops of light.
A graduated neutral density filter is half dark, with its density (dark) part on top and the bottom half completely transparent (alters nothing). Like its ND filter cousin, a GND filter’s density is measured in stops. The “graduated” part of the name refers to the transition between the dark and clear halves of the filter.
Despite their similar names, a graduated ND serves an entirely different purpose than a neutral density filter. Rather than a tool for increasing shutter speed, a GND is used to reduce contrast in opposite halves of a scene, usually by darkening a bright sky enough to pull detail from a shaded foreground.
Most GNDs are glass or (more commonly) acrylic rectangles that you move up and down in front of the lens until it’s situated on the best place to disguise the transition. While you can purchase a circular GND that screws onto your lens, a circular GND is nearly worthless because it forces you to place the horizon transition zone in the center of your frame. In other words, don’t buy any GND that’s not rectangular.
It might be natural to assume that glass GNDs are better than plastic, but that hasn’t been my experience: Quality acrylic (sometimes called optical acrylic or optical resin) can be more visually pure than glass. And while glass doesn’t scratch as easily as acrylic, it’s heavier and breaks more easily if stressed or dropped.
GNDs come in three primary flavors that describe their all-important transition from light to dark—hard, soft, and reverse—each with its own purpose, advantages, and disadvantages:

Hard GND: Most of the filter’s dark half is its maximum darkness, with a very abrupt transition across the middle separating maximum darkness and completely clear. With this abrupt transition, a hard GND will darken a greater percentage of the upper half of your scene (usually the sky). The disadvantage of this abrupt (“hard”) transition is that the transition is more difficult to hide. A hard GND is most effective when there’s a distinct break between the bright sky and dark foreground, such as at the beach or flat landscape. In this image, a 3-stop hard GND allowed me to reveal shadow detail beneath a bright Grand Canyon sky. The hard transition blended easily into the flat horizon.

Reverse GND: A reverse GND’s darkest region is just above the center, with a hard transition to clear below, and a gradual transition lighter above. While the dark portion gradually lightens toward the top of the filter, it never becomes completely clear. A reverse GND is best for sunrises and sunsets, when the brightest part of the sky is directly on the horizon. In this Mono Lake sunrise image, a 3-stop reverse GND put the darkest part of the filter on the horizon, right where I needed it, without darkening the sky too much.

Soft GND: A soft transition GND only delivers its maximum density (darkness) near the top of the scene, and transitions very gradually to a completely clear bottom half. While this gradual transition makes a soft GND less effective for most of the scene, its subtle effect is much easier to disguise. A soft GND is best suited when there’s no an obvious place to hide the transition, such as a scene with an uneven horizon line. Above, a 3-stop soft GND held back just enough of the Yosemite sky to prevent the beautiful sunset pastels from washing out. The gradual transition blended smoothly into the uneven horizon beneath Half Dome.
Buying a GND
As I said earlier, while you can purchase a circular GND that screws onto your lens, these are pretty much useless, so my comments assume you’re using a rectangular GND. And I’m going to give you my own GND preferences—if you’re happy doing things differently, more power to you.
Hand-hold vs. filter holder
Given the large combination of options (size, density, transition), buying your first GND can be somewhat daunting. And size really does matter. But before you commit to a size, you need to decide whether you want to insert your GNDs into a filter holder that attaches to your lens, or simply hand-hold your GNDs.
The advantage to using a holder is that it frees a hand, which can occasionally be handy but is rarely something I can’t work around. And if you think you might be using a GND without a tripod (shame on you), you must use a holder and can skip the next paragraph.
At the risk of offending those photographers who use a holder, let me say that I find using a holder for my GNDs far more trouble than it’s worth: a holder can cause vignetting; a holder doesn’t play well with other things mounted to the lens, such as a lens hood (which I don’t use either) or polarizer; a holder makes it difficult to impossible to move the GND during exposure (more on this later); extracting (not to mention locating in my bag!) and attaching a holder is just one more step before I can start shooting; a holder only handles one width filter, so if you decide you never want to hand-hold, your holder choice locks in the filter size you’ll be purchasing. (If you hand-hold your filters, you can purchase a variety of filter sizes to suit various lens-opening widths.)
GND size
Holder or not, the filter you purchase must be wide enough to cover the front of your lens. I used to automatically purchase a larger size (100mm x 150mm, or about 4″ x 6″) believing that it would be easier to hand-hold without getting fingers in the frame, but I’ve slowly transitioned to a smaller size (66mm x 100mm, or about 2.6″ x 4″), keeping a couple of 4×6 filters for my largest lenses.
I prefer the smaller size not just because they’re cheaper, but because I found the bigger filter’s transition from dark to clear spans an area that’s too large to be completely effective on most of my lenses—to get maximum density with a large filter, I need to pull the transition zone down much farther into the darker part of my scene than I want to. This is especially a problem for the large soft transition and reverse GNDs.
Which GNDs to purchase
Because I don’t think one GND will give you enough flexibility for every situation, I recommend at least two. If you’re only getting two, a 2-stop hard and a 3-stop soft should handle most of your GND needs, albeit with somewhat limited flexibility. But because I prefer flexibility, and GNDs are small and light, in addition to the 2-hard and 3-soft filters, I also have a 3-stop hard and a 3-stop reverse.
I know photographers who carry far more GNDs than I do, and certainly the more filters to choose between, the more flexibility you’ll have. I try to balance flexibility with convenience, and too many GNDs can be difficult to carry and organize—four to six GNDs is my sweet spot on the flexibility/convenience continuum.
A big part of flexibility for me is the ability to carry my filters in small slotted, padded filter pouch that attaches to my tripod. With my GND filters always within reach, I’m much more likely to use them. If I care any more than six, not only do they start getting disorganized, I have less room in the pouch for spare batteries, a lens cloth, and the lens cap for my current lens.
Which brand to purchase
You don’t need to purchase the most expensive filters, but if you’ve invested in quality lenses, you’ll defeat their value by putting a cheap filter in front of them—in other words, price shouldn’t be an important factor in your brand choice (it’s better to buy one or two good filters than four or five cheap filters). Poor quality filters scratch and break easily, are often imperfectly calibrated (may be darker or lighter than advertised), and worst of all, are often not truly neutral (add a color cast).
There are two quality GND brands that I can recommend (there may be more, but I have no direct experience with them): Singh-Ray and Lee. Because of their quality, service, and variety, I’ve always used Singh-Ray (without having specific numbers, I’d guess that Singh-Ray is the most popular GND brand among pros). The only other brand with which I’ve had direct experience is Cokin, which I can’ t recommend because they add an unnatural color cast (they’re not truly neutral).
Using a GND
A typical GND scene is a landscape with a broad tonal range, from bright sky to dark foreground, that exceeds your camera’s ability to capture. While this is often addressable in processing, the more manageable you can make the scene’s dynamic range at capture, the more flexibility you’ll have when processing.
Choosing the right filter for the scene
Effective GND use starts with using the correct filter (or filters). Hard? Soft? Reverse? And how many stops? Your goal is always to defeat the scene’s dynamic range with minimal evidence a filter was used. Too much density, not enough density, improperly placed transition will be ineffective and/or betray the filter’s use.

Stacking a 3-stop reverse and 2-stop hard GND darkened the bright sky enough for me to bring out foreground detail. In post-processing I dodged (brightened) the darker parts of the sky a bit.
When shooting toward the sun, I prefer a hard or reverse GND with as much density as I can get away with. A hard-transition filter’s effect is much more pronounced than a soft-transition’s because a greater percentage of the filter is maximum density (a smaller transition zone), but its abrupt transition is also much harder to disguise in the scene.
A hard GND is especially effective for a scene with a flat horizon that spans the frame, such as the ocean or the rim of Grand Canyon. A darker, low-detail region spanning the frame between a bright sky and shaded foreground, such as a line of trees at the base of a mountain, is also a good place to hide a hard GND’s transition.
In the most extreme light conditions, for example when the sun is on the horizon and I want to pull lots of detail from the foreground shadows, I’ll stack two GNDs (pancake, one filter in front of the other). For example, combining a 2-hard and 3-reverse GND gives me up to 5 stops of density spread fairly evenly across the top half of the frame. Every scene is different, so experiment.

A 3-stop soft GND allowed me to capture detail in the trees without washing out the blue in the sky. Its gradual transition was subtle enough to be completely imperceptible.
A soft GND is easier to disguise when there’s no obvious place to hide the transition. I usually use a soft GND when I want to hold back the sky opposite the sun (e.g., the eastern horizon at sunset) enough to prevent sunset/sunrise color from washing out. For example, in Yosemite Valley, where both El Capitan and Half Dome jut into the brightest part of the sky, a hard-transition filter darkens them right along with the sky, while a soft-transition filter’s subtle transition blends much better.
Disguising your GND use
The better you are at disguising your GND use, the more effective your GND will be. Here are some common problems that betray a GND’s use:
Visible dark/light transition: Disguising the transition between the dark top and clear bottom of the filter is an art that improves with practice. Getting it right starts by choosing the right filter for the scene.
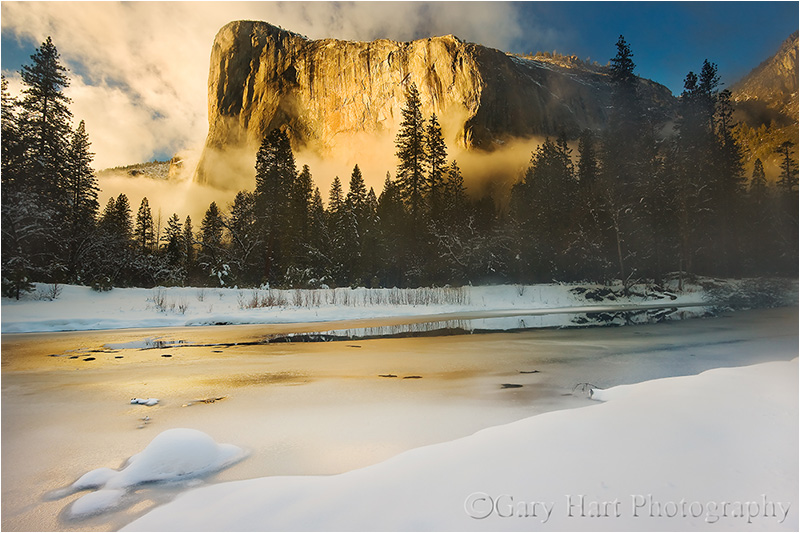
The band of trees enabled me to hide the transition of the 2-stop hard GND that held back the brilliant sunlight on El Capitan’s granite.
Most visible transitions are caused by a hard filter with too much density for the scene, and or misplacement of the GND transition. A soft GND, while usually not strong enough in extreme dynamic range conditions, is much easier to disguise.
If extreme dynamic range demands a hard or reverse GND, you need to train your eye to identify the best place for the transition. Placing the transition directly upon a flat, uniform horizon is usually best. When I don’t have a flat horizon, I look for an area of uniform darkness that spans the frame, such as a line of trees at the base of a mountain.
Often I can fix a visible transition by dodging/burning in post-processing. And some scenes just aren’t suited for a GND, in which case you’ll need to blend multiple exposures, look for a creative alternative like a silhouette, or simply move on to a different scene.
Too much density (a sky that’s too dark): Too much density causes the sky to appear too dark for the foreground. Often the problem is as simple as a sky that’s unnaturally dark, but sometimes its more subtle. I see this most frequently in reflections, when the reflection is brighter than the reflective subject—since that’s impossible, it’s a dead giveaway that a GND (and/or poor processing) was used.
Here’s one big advantage of GND use in the digital age—correcting a too much density problem can be as simple as dodging the too-dark sky and burning the too-bright foreground. The less extreme the difference, the easier it will be to correct, so an easy processing solution isn’t an excuse to be sloppy with your GND selection.
Vignetting from the filter holder: When the lens’s angle of view is too wide for the holder, vignetting (darkening on the edges) will be visible. While increasing your focal length will eventually eliminate the vignetting, that renders the lens unusable with a GND at its wider focal lengths. The better solution is to get a wider holder (and the filters to go with it). Better still, start by purchasing a holder/filter ensemble that will handle your widest lens and its widest focal length without vignetting. Or best—toss the holder and hand-hold your filters.
Visible fingertips: As someone who hand-holds every time, I have a vast assortment of images of my fingertips enjoying beautiful landscapes. Fortunately, this only happens when I’m sloppy, do-overs are no problems, and keeping your fingers out of the frame is easy if you’re careful. With the larger filters it’s usually pretty easy to simply pinch a corner that’s outside the frame.
The smaller filters I prefer often don’t have enough real estate outside the lens’s field of view, requiring a different technique. Instead of pinching a corner, I hold the smaller filters on the outside, by their edges with my thumb and middle or index finger (one on each vertical side), so my fingertips never touch the front or back of the filter. (When someone asks how much three inches is, you hold your fingers three inches apart—now, just slip a filter between those fingers and you’re ready to go.) Holding the filter like this, the rest of my hand is out of the way, either above or below the filter. It’s actually pretty simple, but I suggest practicing at home first.
Metering
In my film days (when exposure failure was not an option), when a GND was called for, I carefully spot-metered first on the highlights and and again on the shadows—the difference between the two gave me the scene’s dynamic range in stops. With this information, I knew how much light to give my shadows, and how many stops to subtract with a GND (but I still bracketed to hedge my bet).
Then came digital with its post-capture histogram that enabled me to streamline my metering—I soon found myself (after setting my ISO and f-stop) spot-metering once on the shadows, dialing the shutter speed to a value that ensured sufficient foreground light, and selecting the least extreme GND necessary to subdue the highlights. After my first shutter click, I’d check the histogram and adjust the shadows and/or GND as needed. What could be simpler?
I thought you’d never ask….
Since switching to mirrorless, I pull out the GND I think the scene calls for and with my eye on my pre-capture histogram, dial up the shutter speed until the highlights start to clip, then click. Reviewing the post-capture histogram, I determine what, if any, adjustments are needed—for example, if my shadows are still too dark, I might pull out a stronger GND and add more light. (This approach also works with a DSLR that displays the histogram in live-view mode.)
GNDs with a polarizer
I get asked so much if it’s okay to use a GND with a polarizer so much that I’ve created a whole section for my answer:
Yes.
Technique
Proper placement of the GND transition happens through the viewfinder (or live-view LCD). Compose the scene, place your

In this Mono Lake sunrise image, the brightest part of the scene was on the right, and the fine detail I wanted to pull out was on the bottom-left. By angling my 3-stop soft GND about 45 degrees across the right half of the frame (maximum density on the top-right), I was able to give the foreground tufa enough light without overexposing the sky and reflection.
GND in front of the lens, and position it where the transition will be least visible. If you can’t see the GND transition, it often helps to move the filter up and down and watch the scene slide between light and dark—just a few up/down strokes should be enough to locate and position the transition.
To prevent reflections, gently rest the filter flush against the lens when you click. But to minimize scratches, and to avoid moving the camera during exposure, it’s also important that you don’t apply too much pressure against the lens. (And there’s nothing wrong with holding the filter a couple of millimeters away while you position it.)
Sometimes we get scenes with the region of greatest brightness not distributed horizontally across the frame. Fortunately, there’s no law that mandates a GND to be oriented horizontally. I guess that in at least a quarter of my GND images the filter isn’t oriented perfectly horizontally.
A 3-stop hard GND allowed me to avoid a glowing white lunar disk in this extremely dark twilight scene.
When I have shutter speeds approaching a second or longer, I often further disguise my GND transition by moving the filter up and down slightly during the exposure. This is especially effective for hard-transition filters. You don’t need to move it much, and the amount of movement will vary with the size of the brightness you’re trying to hold back (sometimes it’s the entire sky, other times it’s just a bright stripe on the horizon) and the size of the transition zone. If you’re not sure how much motion to use, practice a bit first by watching the motion in your viewfinder.
A GND can stretch by ten to fifteen minutes the twilight window when I can get detail in the darkening foreground and the daylight-bright moon. Since I do a lot of moonrise/moonset photography, and consider a full moon image a failure if I don’t get detail in both the foreground and the moon, the extra time a GND buys me is a huge advantage.
GNDs in the digital age
The advent of digital capture has brought a photography renaissance. Image quality improves steadily, as does our post-capture control of our images. It’s easy to forget (if you’ve been around long enough to have ever known), or believe obsolete, the basic tools that were once a landscape photography staple.
But not so fast….
Missing link
Digital processing provides the missing link for GND use. The late Galen Rowell, GND-filter pioneer and its strongest advocate, was a film shooter who was stuck with imperfect in-camera GND results—no matter how much he tried to disguise his GND’s use, there were situations where the transition or over-darkening was impossible to eliminate at capture. Google Rowell’s images, or better yet, stop by his beautiful Mountain Light Gallery in Bishop, to see a number of images with visible signs of GND use.
Even the best photographer, film or digital, will have visible GND transitions at capture. Rowell’s GND technique was impeccable, he just lacked the ability touch things up after capture. But today, with careful dodging and burning in Photoshop, digital shooters can virtually eliminate all signs that a GND was used.
As digital sensor dynamic range improves, some photographers argue that GNDs are becoming obsolete. For example, my Sony a7R II give me 2 to 3 stops more dynamic range than my Canon 5D III did. That means without filters I now get the same dynamic range I could only get by using my 5D III with a 2 or 3 stop GND. This significant improvement allows me to keep my GNDs in my bag for many shots that, in my Canon days, I would never have attempted without a GND.
But this doesn’t mean that I use GND filters any less, or that other digital shooters can use improved dynamic range as a reason to leave their GNDs home. Because for every shot improved dynamic range allows me to capture without a GND, I can find a new shot with so much dynamic range that I wouldn’t have considered attempting it even with a GND.
For example, the Grand Canyon sunset image at the top of the page wouldn’t have been possible in one click without the ridiculous dynamic range of my a7R II, a 3-stop reverse GND and the dodge/burn capabilities of Photoshop. Thanks to digital tools and my good old fashioned GNDs, I’m now closer than I ever dreamed possible to capturing natural images with the dynamic range my eyes see.
I use Breakthrough Filters
Workshop Schedule || Purchase Prints
A GND gallery
Click an image for a closer look, and a slide show. Refresh the screen to reorder the display.


The dark night
Posted on August 20, 2015

Angel’s View, Milky Way from Angel’s Window, Grand Canyon
Sony a7S
Rokinon 24 f1.4
20 seconds
F/1.4
ISO 6400
How to offend a photographer
Gallery browser: “Did you take that picture?”
Photographer: “Yes.”
Gallery browser: “Wow, you must have a good camera.”
Few things irritate a photographer more than the implication that it’s the equipment that makes the image, not the photographer. We work very hard honing our craft, have spent years refining our vision, and endure extreme discomfort to get the shot. So while the observer usually means no offense, comments discounting a photographer’s skill and effort are seldom appreciated.
But…
As much as we’d like to believe that our great images are 100 percent photographic skill, artistic vision, and hard work, a good camera sure does allow us to squeeze the most out of our skill, vision, and effort.
As a one-click shooter (no HDR or image blending of any kind), I’m constantly longing for more dynamic range and high ISO capability. So, after hearing raves about Sony sensors for several years, late last year (October 2014) I switched to Sony. My plan was a gradual transition, shooting Sony for some uses and Canon for others, but given the dynamic range and overall image quality I saw from my Sony a7R starting day one, I haven’t touched my Canon bodies since picking up the Sony.
While I don’t think my Sony cameras have made me a better photographer, I do think ten months is long enough to appreciate that I’ve captured images that would have been impossible in my Canon days. I instantly fell in love with the resolution and 2- to 3-stop dynamic range improvement of my Sony a7R (and now the a7R II) over the Canon 5D III, the compactness and extra reach of my 1.5-crop a6000 (with little loss of image quality), and my a7S’s ability to pretty much see in the dark.
But what will Sony do for my night photography?
I need more light
I visit Grand Canyon two or three times each year, and it’s a rare trip that I don’t attempt to photograph its inky dark skies. But when the sun goes down and the stars come out, Grand Canyon’s breathtaking beauty disappears into a deep, black hole. Simply put, I needed more light.
Moonlight was my first Grand Canyon night solution—I’ve enjoyed many nice moonlight shoots here, and will surely enjoy many more. But photographing Grand Canyon by the light of a full moon is a compromise that sacrifices all but the brightest stars to achieve a night scene with enough light to reveal the canyon’s towering spires, receding ridges, and layered red walls.
What about the truly dark skies? For years (with my Canon bodies) the only way to satisfactorily reveal Grand Canyon’s dark depths with one click was to leave my shutter open for 30 minutes or longer. But the cost of a long exposure is the way Earth’s rotation stretches those sparkling pinpoints into parallel arcs.
As with moonlight, I’m sure I’ll continue to enjoy star trail photography. But my ultimate goal was to cut through the opaque stillness of a clear, moonless Grand Canyon night to reveal the contents of the black abyss at my feet, the multitude of stars overhead, and the glowing heart the Milky Way.
So, ever the optimist, on each moonless visit to Grand Canyon, I’d shiver in the dark on the canyon’s rim trying to extract detail from the obscure depths without excessive digital noise or streaking stars. And each time I’d come away disappointed, thinking, I need more light.
The dynamic duo
Early this year, with night photography in mind, I added a 12 megapixel Sony a7S to my bag. Twelve megapixels is downright pedestrian in this day of 50+ megapixel sensors, but despite popular belief to the contrary, image quality has very little to do with megapixel count (in fact, for any given technology, the lower the megapixel count, the better the image quality). By subtracting photosites, Sony was able to enlarge the remaining a7S photosites into light-capturing monsters, and to give each photosite enough space that it’s not warmed by the (noise-generating) heat of its neighbors.
With the a7S, I was suddenly able to shoot at ridiculously high ISOs, extracting light from the darkest shadows with very manageable noise. Stars popped, the Milky Way throbbed, and the landscape glowed with exquisite detail. I couldn’t wait to try it at Grand Canyon.
My first attempt was from river level during this year’s Grand Canyon raft trip in May. Using my a7S and Canon-mount Zeiss 28mm f2 (after switching to Sony, I was able to continue using my Zeiss lens with the help of a Metabones IV adapter), I was immediately blown away by what I saw on my LCD, and just as excited when I viewed my captures on my monitor at home.
But I wasn’t done. Though I’d been quite pleased with my go-to dark night Zeiss lens, I wanted more. So, in my never-ending quest for more light, just before departing for the August Grand Canyon monsoon workshop, I purchased a Rokinon 24mm f1.4 to suck one more stop’s worth of photons from the opaque sky. The new lens debuted last Friday night, and I share the results here.
About this image
Don Smith and I were at Grand Canyon for our annual back-to-back monsoon workshops. On the night between workshops, Don and I photographed sunset at Cape Royal, then walked over to Angel’s Window where we ate sandwiches and waited for the Milky Way to emerge. The sky was about 80 percent clouds when the sun went down and we debated packing it in, but knowing these monsoon clouds often wane when the sun drops, we decided to stick it out.
Trying to familiarize myself with the capabilities of my new dark night lens, I photographed a handful of compositions at varying settings. To maximize the amount of Milky Way in my frame, everything oriented vertically. As with all my images, the image I share here is a single click.
Despite the moonless darkness, exposing the a7S at ISO 6400 for 20 seconds at f1.4 enabled me to fill my entire histogram from left to right (shadows through highlights) without clipping. Bringing the shadows up a little more in Lightroom revealed lots of detail with just a moderate amount of very manageable noise.
This is an exciting time indeed for photographers, as technology advances continue to push the boundaries of possibilities. Just a few years ago an image like this would have been unthinkable in a single click—I can’t wait to see what Sony comes up with yet.
Some comments on processing night images
Processing these dark sky images underscores the quandary of photography beyond the threshold of human vision—no one is really sure how it’s supposed to look. We’re starting to see lots of night sky images from other photographers, including many featuring the Milky Way, and the color is all over the map. Our eyes simply can’t see color with such little light, but a long exposure and/or fast lens and high ISO shows that it’s still there—it’s up to the photographer to infer a hue.
So what color should a night scene be? It’s important to understand that an object’s color is more than just a fixed function of an inherent characteristic of that object, it varies with the light illuminating it. I can’t speak for other photographers, but I try to imagine how the scene would look if my eyes could capture as much light as my camera does.
To me a scene with blue cast is more night-like than the warmer tones I see in many night images (they look like daylight with stars), so I start by cooling the color temperature below 4,000 degrees in Lightroom. The purplish canyon and blue sky in this image is simply the result of the amount of light I captured, Grand Canyon’s naturally red walls, and me cooling the image’s overall color temperature in Lightroom. For credibility, I actually decided to desaturate the result slightly. (The yellow glow on the horizon is the lights of Flagstaff and Williams, burned and desaturated in Photoshop.)
Learn more about starlight photography
A dark night gallery
Click an image for a closer look, and a slide show. Refresh the screen to reorder the display.


Hurry up and wait
Posted on August 14, 2015

Diagonal Lightning Strike, Lipan Point, Grand Canyon
Sony a7R II
Sony/Zeiss 24-70
1/13 second
F/11
ISO 50
Photographing lightning is about 5 percent pandemonium, and 95 percent arms folded, toe-tapping, just plain standing around. A typical lightning shoot starts with a lot of waiting for the storm to develop and trying to anticipate the best (and safest) vantage point. But with the first bolt often comes the insight that you anticipated wrong and: 1) The lightning is way over there; or 2) The lightning is right here (!). What generally ensues is a Keystone Cops frenzy of camera bag flinging, tire screeching, gear tossing, tripod expanding, camera cursing, Lightning Trigger fumbling bedlam. Then it’s more waiting. And waiting. And waiting….
In many ways the waiting part is a lot like fishing—except these fish have the ability to strike you dead without warning. And a strike is no guarantee that you’ve landed something—that assurance won’t come until you review your images. Unfortunately, when a Lightning Trigger is attached, LCD reviews are disabled. But to avoid missing the next one, I’ve learned to resist the temptation to turn off my Lightning Trigger and check after every bolt (like pulling the line from the water every few minutes to see if the worm’s still there).
About this image
With clear skies in the forecast, Don Smith and I started last Sunday with plans to recover from the preceding day’s 12 hour drive to the Grand Canyon, and to recharge for our Grand Canyon Monsoon workshop that started Monday. But walking outside after lunch, dark clouds building overhead sent us racing up to the rim (a 15 minute drive) to see what was going on (see Keystone Cops frenzy reference above).
Starting at Grand View, we quickly set up our tripods, cameras, and Lightning Triggers and aimed toward promising clouds up the canyon. But within 10 minutes the clouds overhead darkened; when they started pelting us with hail, we retreated to the car. Since the storm appeared to be moving east-to-west, we drove east to get on the back side of it, eventually ending up at Lipan Point (one of our favorite spots).
We set up west of the Lipan vista, enjoying relative peace and quiet away from the summer swarm. The cell that had chased us from Grand View was diminishing, so much so that we needed sunscreen when we started, but we could see an even more impressive cell was moving up from the south. Meanwhile, the clouds in the canyon were spectacular, but all the lightning was firing above the flat, scrub pine plain to the south. Our hope was that it would reach the canyon in our viewfinders before reaching us.
Of course I wanted lightning firing into the canyon, but at first I hedged my bets and composed wide enough to include the less aesthetically pleasing evergreen forest. As the rain moved across the canyon to our west, our blue sky had started to give way to darkening clouds, and distant thunder rolled through the afternoon stillness.
This was my first lighting shoot (and just my second overall) with my brand new Sony a7R II, so I was quite anxious to test its lightning capture capability. Speed is of the essence with lightning, and the faster the shutter responds to a click command, the better the chances of capturing it. My Canon 5D III had done the job in the past, but I knew I missed a number of strikes due to its only mediocre shutter lag.
The a7R II, like the a7S and a6000 (but not the a7R), has an electronic front curtain shutter that drastically shrinks shutter lag, so in theory its performance would rival the a7S and a6000, both of which I’d already succeeded with. That morning I’d tested the a7R II against the a7S and found its response identical, but you never know for sure until you try. (The other part of this equation is a good lightning sensor, and the only one I’ve seen work to my satisfaction is the Lightning Trigger from Stepping Stone Products.)
That afternoon we enjoyed about a half hour of quality shooting before the storm moved too close for comfort. In that span I saw at least a half dozen canyon strikes; the new camera captured most (all?) of them. The one you see here was from early in the show—subsequent strikes were further north (right) before petering out.
Read more about lightning photography, and see a gallery of lightning captures, on my Lightning Photography photo tips page.
2015 Grand Canyon Raft Trip: Mishaps
Posted on June 22, 2015
Blue Ribbon, Havasu Creek, Inner Grand Canyon
Sony a7S
Sony/Zeiss 24-70
1/20 second
F/11
ISO 50
May 2014
After a short but strenuous hike in 90-plus degree heat, I wasn’t thinking about much more than cooling off. And what better way to cool off than a plunge into the cerulean chill of Havasu Creek? Rushing toward its imminent liaison with the Colorado River, Havasu Creek’s disorientingly blue water plunges through gaps in the red sandstone, pauses and widens into inviting pools, then departs rapidly downstream.
Beckoning me forward was one of a series of these glistening pools, connected like sapphires on a necklace by the creek’s cascading strand. Wading in to my knees, I watched my feet disappear in mineralized water that obscured everything in an azure haze. A few steps later I was submerged to my shoulders, feet planted firmly to brace against a deceptively strong current, basking in the coolness. Refreshed from the neck down, I took a deep breath and completed my immersion.
Coinciding with my sudden dunking came the insight that I was still wearing my (new) glasses. Oops. Unfortunately, my cat-like reflexes were no match for the light-speed enthusiasm the brisk current demonstrated for my glasses and just like that they were whisked away to who knows where.
Given the water’s speed and opacity, I knew chances of recovery were remote. Nevertheless, I quickly drafted a handful of nearby rafters to scan the shallow water near the pool’s outlet; meanwhile, I plunged the nearby depths. After ten minutes of fruitless diving and blindly groping the creek bed, I was ready to give up the glasses as lost when a passing hiker offered to give it a try with his diving mask. And try he did, with relish. Disappearing beneath the surface for extended periods, bobbing up just long enough to refill his lungs, then disappearing again, the hiker must have repeated his dive a dozen or more times before emerging fist-first, glasses in hand.
I was surprised, ecstatic, and appropriately effusive. To say I was lucky to be spared the consequences of my own stupidity would be an understatement. I mean, seriously, who swims wearing $500 glasses? Grateful for the reprieve, I vowed I’d never do that again. (Duh.)
May 2015
The first evening of this year’s Grand Canyon raft trip was markedly different from anything we experienced last year. Gone were the warm temperatures and relentless sunshine, replaced by a cool breeze and heavy clouds. Last year the 50-degree water of the Colorado River was a bracing relief; this year it was a bone-chilling nemesis.
Which of course explains why, while rallying the willpower for my first full-immersion bath in the chilly river (a required raft trip ritual that’s always as satisfying in retrospect as it is daunting in anticipation), I was thinking about nothing more than getting the ordeal over with. And not at all about the (very same) glasses perched on my face.
To my credit, I immediately realized my mistake, but the river gods frown on stupidity. This year I was unable to rally an army of hardy rafters willing to brave the chill (and neither was Yours Truly brave enough to do any more than peer into the frigid depths from the relative warmth of the riverbank), nor did a magic diving hiker materialize to save the day.
After surviving last year’s trip relatively unscathed, it turns out that the lost glasses were just the first of a series of mishaps that made this trip memorable. For example (in no particular order):
- At 4 a.m. on our second morning, the group was wakened by large raindrops that quickly turned into a thunder and lightning infused downpour that sent 28 rafters scurrying to assemble, in the dark, tents they’d never assembled before (insert Keystone Cops music here).
- Cold and rain dogged us all week. Air temperatures never climbed above the mid-70s, not too bad until you factor in the rain, persistent wind, and continual drenchings by 50-degree river water. There was one day in particular when it just seemed that we couldn’t get dry, and several times I felt like we were navigating a gale on a North Sea fishing trawler. (That was also the day when I made the mistake of asking one shivering rafter if she’d do this again, and she replied, “That’s like asking a mother in labor if she’d like to have another baby.” Point taken.)
- Pushing off from camp on our final morning, I realized that in the confusion of organizing 28 rafters and 4 guides for the group photo, I’d left my insulated rain pants and camping pillow back at the campsite.
- Midway through the trip I dropped my primary camera (Sony a7R) on a slab of sandstone and damaged its electronic viewfinder. I then compounded the problem by using the still functioning LCD to go into the menu system and manually turn on the viewfinder (reasoning that maybe that would correct the problem). Not only did that not fix the viewfinder, it turned off the LCD, which of course left me with no more access to the menu system necessary to turn the LCD back on. (I never claimed to be smart—refer to glasses story above.)
- Last year we managed to keep all 28 rafters on the rafts through every one of 60-plus rapids. This year we did almost as well, keeping 27 of 28 rafters out of the river. The one mishap occurred when a rafter was launched mid-rapid and sent cartwheeling into the Colorado River with one hand still fused by a death grip to his safety rope. He was quickly pulled back in, soaking wet but otherwise unscathed. Said rafter learned later that, while he was indeed hanging on with both hands as instructed, his handholds were reversed from the prescribed arrangement, thereby creating a hinge effect that swung him right into the water when one hand was torn free. The rapid: Unkar. The rafter: uh, Anonymous.
Did all this difficulty ruin my trip? Not even close. I had an extra pair of glasses and a backup camera body, so those losses were barely an inconvenience. And while the cost of a new pair of glasses and camera repair are quickly forgotten, the stories surrounding those losses will always bring a smile. The misery of a river soaking fades as soon the clothing dries (or so I’ve been told), but the story will last forever. The chilly weather? I’ll gladly trade a few days of discomfort for the incredible photography our rainy weather brought.
More than anything, I cite this litany of mishaps to underscore a truth I’ve learned in ten years of leading photo workshops: the greater the hardship, the better the memories. And true to form, this year’s raft trip group bonded with a wonderful spirit of cooperation and humor, largely because of our mishaps and shared discomfort. I’m already looking forward to next year.
Inside Out at Grand Canyon
Click an image for a closer look, and a slide show. Refresh the screen to reorder the display.


