Eloquent Images by Gary Hart
Insight, information, and inspiration for the inquisitive nature photographer
Four sunsets, part three: A marvelous night for a moondance
Posted on February 19, 2014
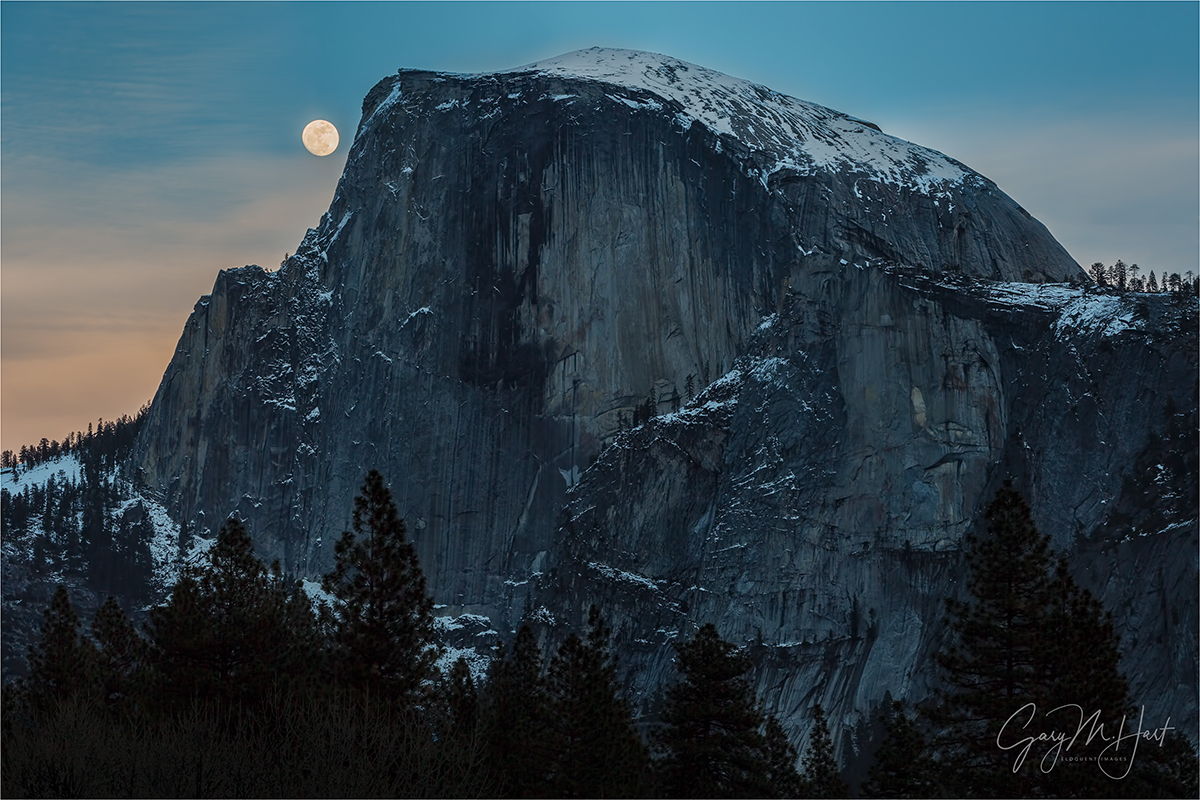
Moondance, Half Dome, Yosemite
Canon EOS 5D Mark III
1/5 second
125 mm
ISO 100
F11
How many Yosemite moonrise images are too many? I have no idea, but I’ll let you know as soon as I find out.
- Read the first in the series here: Four sunsets, part one: A Horsetail of a different color
- Read the second in the series here: Four sunsets, part two: Classic Horsetail
5:10 p.m.
I stand on the bank of the Merced River, eyes locked on the angled intersection of Half Dome’s sharp northeast edge and its adjacent, tree-lined ridge. If the clouds cooperate, and I’ve done my homework right, a nearly full moon (96%) will be poking above this intersection any minute. We’d been fortunate the first two sunsets of my workshop; dare I hope for one more?
If the moonrise happens as I plan (hoped), the sight could rival what we’d gotten from Horsetail Fall on the first two nights of our workshop. But right now the sky behind Half Dome is smeared with thin-ish clouds—how thin I won’t know until the moon appears (or doesn’t). Gazing heavenward, I find it odd that a moonrise, something that can be predicted with such absolute precision, is so subject to weather’s fickle whim. And the clouds aren’t my only concern—just a half-degree error in my plotting would put the moon behind Half Dome and out of sight.
Few things in nature thrill me more than a moonrise. Camera or not, crescent or full, I love everything about a it: the obsessive plotting and re-plotting that gets me out there in the first place; the hand-wringing anticipation while I await the moon’s appearance; the first white pinprick of moonlight on the horizon (Is that it? There it is!); the ridge-top evergreens silhouetted against the rising disk; the glowing sphere hovering above the darkening landscape; and finally, the moonlit landscape beneath a star-studded sky. Everything.
So it shouldn’t surprise that virtually all of my photo trips—workshops and personal—are scheduled around the moon’s phase and some condition of the night sky. Sometimes I target a full moon, sometimes a crescent, and sometimes I want no moon at all (for dark skies that reveal the most stars)—the choice depends on the kind of moonrise and/or night photography I think best suits the landscape I’m traveling to photograph. But because this workshop is timed to coincide with the few February days that Horsetail Fall might turn a molten red at sunset, a calendar window I shrink even further to avoid the crowds that flock a little later in February, the moon is rarely a priority when I schedule the Horsetail Fall workshop. But I still check. And when I started planning my 2013 Yosemite Horsetail Fall workshop a couple of years ago, I was thrilled to discover that not only could I could time this trip for a full moon, I’d also be able to align that moon with Half Dome at sunset. Twice.
5:13 p.m.
I check my watch: 5:13. Sunset is 5:35; the moon should appear almost adjacent to Half Dome at about 5:15, then slowly rise, like a ball rolling uphill along Half Dome’s left side. By 5:30 the disk will have almost reached Half Dome’s summit, less than its own width with from the granite face. That is, if I’ve done my homework right. 5:14.
Any minute now….
I’d done all my figuring months in advance, which of course didn’t stop me from double-, triple-, quadruple-, and so-on-checking my results in the days leading up to my waiting beside the Merced River with a dozen or so other photographers. Part of my anxiety is the particularly fortuitous alignment of location, moon, and time that put the moon appearance above Half Dome right in my “ideal” sunset window as viewed from one of my favorite Yosemite locations. Not only does this spot provide a clear, relatively close view of Half Dome, it also is at a nice, reflective bend in the Merced River. Even without the moon this is a nice spot, end everyone in the group seems to be finding things to photograph. But I want the moon tonight. Really, really want the moon.
(You really don’t need to read this section)
My moonrise/set workflow was in place long before smartphones apps and computer software laid it all out for any photographer willing to look it up. But those tools are new tricks and I’m an old dog. So here’s how I’ve done it for years:
- Use my topo map software to determine the latitude and longitude of the location I want to photograph.
- Give my location’s latitude and longitude to my Focalware app (or, if I need the data to be a little more granular, the US Naval Observatory website), which returns the moon and sun rise/set altitude (degrees above a flat horizon) and azimuth (the angular distance relative to due north, from 0 to 360 degrees—imagine a clock: 12 is 0 degrees; 3 is 90 degrees; 6 is 180 degrees and so on).
- Next I plug the moon’s altitude/azimuth for my location into the plotting tool of my computer’s mapping software. This draws a line from my location (where I’ll be with my camera) to the location of the moonrise (or set). Most importantly, the line shows the moon’s alignment with whatever landscape feature I’m interested in (such as Half Dome). It also gives me both the distance and the elevation change between my location and the point above which it will rise.
- Finally, I use the elevation and distance data with the trig functions of a scientific calculator to get the altitude to which the moon must rise before it’s visible from my vantage point.
If this all sounds convoluted, that’s probably because it is. I suggest that you try something like The Photographer’s Ephemeris or Photo Pills, which does all this for you. But like I say, that’s a new trick….
5:15 p.m.
I squint, hoping to engage my x-ray vision enough to make out the moon’s outline through the clouds. Nothing. With conditions fairly static, the group has gotten their shots and is chatting more than clicking. Moon or not, the photography will improve as the light warms toward sunset. I walk uphill, away from the river and slightly upstream to improve my angle of view. Still nothing. (Did Ansel Adams experience this angst?)
We’ve reached the time that I expect the moon to appear. I’ve been plotting the moon long enough to be fairly confident within about one moon’s width (a half degree in either direction) of where it will rise, and within plus/minus two minutes of when it will rise. But the whether of seeing a moonrise depends on, well, the weather. Will rain, snow, or even just a rouge cloud shut us out? There’s really no way to know until the day arrives. And sometimes, for example this very instant, I can’t tell whether the sky will cooperate until I actually see the moon.
I’ve learned that the best time to photograph a full moon (when I say “full,” I often mean almost full, generally between 95 and 100 percent of the complete disk illuminated) is during a ten minute window straddling sunset. Much earlier and the light isn’t particularly interesting, and there isn’t enough contrast between the moon and the sky for the moon to stand out dramatically; much later and there’s too much contrast between the moon and everything else in the scene for the camera to handle.
Choosing this location introduces another unknown. Remember when I said that I can pinpoint the moonrise within about its width? Well, in this case that margin of error is just enough to give me pause, because rising slightly to the right of where I think it will rise puts the moon behind Half Dome until about five minutes after sunset. Sentinel Bridge, just a short distance downstream, would have been safer, but the Sentinel Bridge Half Dome shot is far more common, the bridge is usually teaming with people at sunset, and the moon would have been a little higher in the sky during “prime time.” So here we stand.
5:17 p.m.
What’s that faint white blob in the clouds? Without saying anything I squint and look closer. Sure enough, there it is, barely visible, less than one degree above the ridge (its rise above the ridge a couple of minutes ago must have been obscured by the clouds), pretty much where I expect it. Phew. I announce the moon’s arrival to the rest the group, but need to guide their eyes to it. As everyone’s attention returns to their cameras, I cross my fingers for the clear sky in its path to hang in there until at least sunset.
5:25-5:45 p.m.
The moon finally climbs above the clouds and I exhale. Still daylight bright, it now makes a striking contrast against the darkening sky. For the next fifteen minutes we shoot continuously, pausing only to recompose and monitor the highlights. Compositions, which I’d had everyone practice before the moon arrived, range from wide reflections that reduce the moon to a tiny accent, to tight isolations of the moon and Half Dome’s face.
As sunset approaches, the biggest concern becomes those lunar highlights—too small to register on the camera’s histogram, the moon’s face is easily blown out as we try to give the darkening foreground more light. Before we started I made certain everyone has engaged their camera’s Highlight Alert (“blinking highlights”) feature. They all know that when the moon starts flashing, they’ve reached the exposure threshold and must back off on their exposure and lock it in (a few “blinkies” are recoverable in Lightroom or Photoshop, but if the entire disk is flashing, the moon’s detail is probably lost for good)—while the moon will remain the same brightness (can’t take any more exposure), from that point on the foreground will continue darkening until it becomes too dark to photograph. Then we go to dinner.
Like everyone else, I used a variety of compositions. I already have a wide reflection image from a prior shoot, so the image I share here is a moderate telephoto—any tighter (to enlarge the moon further) would have truncated some of Half Dome’s face, something I just cant bring myself to do.
We finally wrapped up at about 5:45, when long exposures to bring out detail in the dark landscape made capturing detail in the bright moon impossible. Everyone was pretty thrilled at dinner, and even though the clouds thickened and washed out our planned moonlight shoot, there were no complaints. And little did we know, Mother Nature had concocted a grand finale for our final sunset.
Join me in Yosemite
PURCHASE PRINTS || PHOTO WORKSHOPS
A Gallery of Yosemite Moons


Oops
Posted on December 17, 2013

Winter Moonrise, Merced River, Yosemite
Canon EOS 5D Mark III
1/10 second
40mm
ISO 800
F16
Last Friday evening, this professional photographer I know spent several hours photographing an assortment of beautiful Yosemite winter scenes at ISO 800. Apparently, he had increased his ISO earlier in the day while photographing a macro scene with three extension tubes—needing a faster shutter speed to freeze his subject in a light breeze, he’d bumped his ISO to 800. Wise decision. But, rushing to escape to the warmth of his car, rather than reset the camera to his default ISO 100 the instant he finished shooting, he packed up his camera with a personal promise to adjust it later, when his fingers were warmer—surely, he rationalized, removing the extension tubes and macro lens would remind him to reset the ISO too. (You’d think.) But, despite shutter speeds nowhere near what they should have been given the light and f-stop, he just kept shooting beautiful scene after beautiful scene, as happy as if he had a brain.
I happen to know for a fact that this very same photographer has done other stupid things. Let’s see…. There was that time, while chasing a sunset at Mono Lake, that he drove his truck into a creek and had to be towed out. And the two (two!) times he left his $8,000 camera beside the road as he motored off to the next spot. And you should see his collection of out-of-focus finger and thumb close-ups (a side effect of hand-holding his graduated neutral density filters). Of course this photographer’s identity isn’t important—what is important is dispelling the myth that professional photographers aren’t immune to amateur mistakes.
And on a completely unrelated note…
Let’s take a look at this image from, coincidentally, last Friday evening. Also completely coincidentally, it too was photographed at ISO 800 (go figure)—not because I made a mistake (after all, I am a trained professional), but, uhhh, but because I think there are just too many low noise Yosemite images. So anyway….
This was night-two of what was originally my Yosemite ISON workshop—but, after the unfortunate demise of Comet ISON and a week of frigid temperatures in Yosemite, became my Yosemite ice-on workshop. That’s because, to the delight of the workshop students (and the immense relief of their leader), much of the one foot of snow that had fallen the Saturday before the workshop’s Thursday start had been frozen into a state of suspended animation by a week of temperatures in the teens and low-twenties.
Each day we rose to find nearly every shaded surface in Yosemite sheathed in a white veneer of snow and ice. (Valley locations that received any sunlight were largely brown and bare.) And the Merced River, particularly low and slow following two years of drought, was covered in ice in an assortment of textures and shapes from frosted glass to blooming flowers. Adding to all this terrestrial beauty was a waxing moon, nearly full, ascending our otherwise boring blue skies and illuminating our nightscapes.
On Friday night I guided my group to this spot just downstream from Leidig Meadow. There we found the moon, still several days from full, glowing high above the valley floor, and Half Dome reflected by a watery window in the ice. I captured many versions of this scene, from tight isolations of the reflections to wide renderings of the entire display. It’s too soon to say which I like best, but I’m starting with this one because it most clearly conveys what we saw that evening.
I chose a vertical composition because including the moon in a horizontal frame would have shrunk Half Dome and the moon, and introduced elements on the right and left that weren’t as strong as Half Dome, its reflection, and the snowy Merced River. (Sentinel Rock is just out of the frame on the right—as striking as it is, I wanted to make this image all about Half Dome.)
My f16 choice was to ensure sharpness throughout the frame, from the ice flowers blooming in the foreground, to Half Dome and its reflection. As you may or may not know, the focus point for a reflection is the focus point of the reflective subject, not the reflective surface. That means when photographing a reflection surrounded by leaves, ice, rocks, or whatever, you need to ensure adequate DOF or risk having either the reflection or its surrounding elements out of focus. Here I probably could have gotten away with f11, but my iPhone and its DOF app were buried beneath several layers of clothes, and using it would have require removing two pair of gloves.
I’d love to say that I chose ISO 800 to freeze the rapids, but I’m not sure you’d buy it. So I’m sticking with my too many low noise Yosemite images story and moving on. (A few cameras ago, ISO 800 would have meant death to this image, but today, thankfully, it’s mostly just a lesson in humility.)
A Yosemite Winter Gallery
Click an image for a closer look, and a slide show. Refresh the screen to reorder the display.


Dashing to the snow
Posted on December 9, 2013

Winter Reflection, Half Dome and the Merced River, Yosemite
Canon EOS 5D Mark III
1/13 second
16mm
ISO 100
F16
If there’s anything on Earth more magical than Yosemite with fresh snow, I haven’t seen it. The problem is, Yosemite Valley doesn’t get tons of snow—its relatively low elevation (about 4,000 feet) means the valley often gets rain when most of the Sierra gets snow. And when snow does fall here, it doesn’t stay on the trees for more than a few hours (if you’re lucky). Which is why I’ve always said the secret to photographing snow in Yosemite is to monitor the weather reports and time your visit to arrive before the storm. This strategy gives photographers within relatively easy driving distance, especially those of us without day job, a distinct advantage—from my home in Sacramento I can be in Yosemite Valley in less than four hours (that’s factoring a Starbucks stop in Merced and a fill-up in Mariposa), and I have no problem using darkness to make the roundtrip on the same day.
So last week, when the National Weather Service promised lots of snow in Yosemite for the weekend, I quickly freed up my Saturday. I usually stay just outside the park in El Portal, but because I didn’t want to risk being turned away by a (rare but not unprecedented) weather related park closure, I booked Friday and Saturday nights at Yosemite Lodge, right in the heart of Yosemite Valley—even if the roads shut down, from there I’d be able to walk to enough views to keep me happy all day.
I arrived in the dark to find lots of ice and patches of crusty old snow; I woke dark-and-early Saturday morning to about ten inches of fresh snow. Yippie! The snow fell intermittently throughout the day, with conditions ranging from nearly opaque to classic Yosemite clearing storm drama. Since I was by myself, I was able to deemphasize many of the most frequently photographed spots my workshop expect to photograph and explore random scenes along the Merced. In the morning I concentrated on El Capitan scenes; the afternoon was more about Half Dome.
Of course the classic views are that way for a reason, so, as you can see in this image, I gave them some attention to. Despite not being much of a tourist location, many photographers know about this scene just upstream from Sentinel Bridge. It’s a little hard to find, but usually fairly accessible. But this time getting there forced me to employ a creative parking strategy and to soil about one hundred yards of virgin powder. At this spot a couple of weeks ago I used a telephoto to isolate a single tree clinging to its fall color and reflecting in the river; this visit was my widest lens that got all the work.
The January issue of Outdoor Photographer will include my Yosemite El Capitan Winter Reflection image and a paragraph explaining how to photograph snow in Yosemite Valley. Here’s pretty much what I say there, with a little elaboration:
- Arrive in Yosemite Valley before the storm and plan to stay until it’s over. Getting there before the snow starts makes your life so much simpler; staying until the storm passes not only gets you the coveted “clearing storm” images, it also allows you to photograph all of Yosemite’s iconic features above a snow-covered landscape.
- Despite what Google Maps, your GPS, or your brother-in-law tell you, don’t even think about any route that doesn’t take you through Mariposa and up the Merced River Canyon on Highway 140. The highest point on 140 is Yosemite Valley; all other routes into the park go over 6,000 feet and are much more likely to be icy, closed, or require chains. For people coming from the north that means 99 to Merced and east on 140. Coming from the south, you can either take 99 to Merced (easier) and 140, or 41 to Oakhurst and 49 to Mariposa (faster).
- Carry chains. While you’re rarely asked unless weather threatens, every car entering Yosemite in winter is required to carry them, even 4WD. While 4WD is usually enough to avoid putting chains on, that’s not a sure thing. And if you get caught in a chain check without them, you’re parked right there until the requirement is lifted. If you’re driving your own car to Yosemite, bite the bullet and purchase chains. If you’re flying into California and renting a car, try to get 4WD and keep your fingers crossed that you don’t get asked. Some people will purchase chains and try to return them if they didn’t use them, but that can be risky so check the store’s chain return policy.
- Don’t hole-up in your room while it’s snowing. I generally circle the valley looking for scenes (about a 30 minute roundtrip). If the low ceiling has obscured all the views and you tire of photographing close scenes, park at Tunnel View and wait. Not only is Tunnel View the location of some of Yosemite’s most spectacular clearing storm images, it’s also the first place storms clear. And because you’ll be stunned by how fast conditions in Yosemite can change, waiting at Tunnel View is the best way to avoid missing anything. Another advantage Tunnel View offers is its panoramic view of the entire valley that helps you to decide where to go next. For example, from Tunnel View you can see if Half Dome is emerging from the clouds and there are probably nice images to be had on the east side, or if your best bet will be to stay on the west side and concentrate on El Capitan, Bridalveil Fall, and Cathedral Rocks.
- No matter how spectacular the view is where you are now, force yourself to move on after a while because it’s just as spectacular somewhere else. Trust me.
Moon chasing: The rest of the story
Posted on November 19, 2013
Moon!, Half Dome, Yosemite
Canon EOS 5D Mark III
1/13 second
F/11
ISO 200
400 mm (slightly cropped)
Wow, it seems like only yesterday that the moon was just tiny dot hovering above Half Dome.

Moonrise Reflection, Half Dome and the Merced River, Yosemite
What happened?
No, the moon didn’t magically expand, nor did I enlarge it digitally and plop it into this image. What happened is that I waited two days and moved back; what happened is the difference between 40mm and 400mm; what happened is a perfect illustration of the photographer’s power to influence viewers’ reaction to a scene through understanding and execution of the camera’s unique view of the world.
The rest of the story
My workshop group captured the “small” moon at sunset on Thursday, when it was 93% full and the “official” (assumes a flat, unobstructed horizon) moonrise was 3:09 p.m (an hour and 40 minutes before sunset). That night the moon didn’t rise to 16 degrees above the horizon, the angle to Half Dome’s summit as viewed from our location beside the Merced River, until almost exactly sunset. Because it’s so much higher than anything to the west, Half Dome gets light pretty much right up until sunset—look closely and you can see the day’s last rays kissing Half Dome’s summit.
Flat horizon moonrise on Saturday, when the moon was 100% full, was at 4:24 p.m., only about twenty minutes before sunset. But Tunnel View is nearly 500 feet above Yosemite Valley; it’s also 5 1/2 miles farther than Half Dome than Thursday’s location—this increased elevation and distance reduces the angle to the top of Half Dome to just 6 degrees. So, despite rising over an hour later, when viewed from Tunnel View, the moon peeked above the ridge behind Half Dome just a couple of minutes after sunset (if we’d stayed at Thursday night’s location, in addition to being hungry and cold, by Saturday we’ have had to wait until after 6:00 for the moon to appear).
Exposure
My objective for full moon photography is always to get the detail in the moon and the foreground. As I mentioned in yesterday’s post, these were workshop shoots, and experience has shown me that the most frequent failure when photographing a rising moon in fading twilight is getting the exposure right—the tendency is to perfectly expose the foreground, which overexposes the daylight-bright moon (leaving a pure white disk). This problem is magnified when the moon catches everyone unprepared.
So, both evenings I had my group on location about 30 minutes before the moon. While we waited I made sure everyone had their blinking highlights (highlight alert) turned on, and understood that their top priority would be capturing detail in the moon. I warned them that an exposure without a blinking (overexposed) moon would slightly underexpose the foreground. And I told them that once they had the moon properly exposed (as bright as possible without significant blinking highlights), they shouldn’t adjust their exposure because the moon’s brightness wouldn’t change and they’d already made it as bright as they could. This meant that as we shot, the foreground would get continually darker until it just became too dark to photograph.
(A graduated neutral density filter would have extended the time we could have photographed the scene, but the vertical component of Yosemite’s horizon made a GND pretty useless. A composite of two frames, one exposed for the moon and one exposed for the landscape would have been a better way to overcome the scene’s increasing dynamic range.)
Compare and contrast
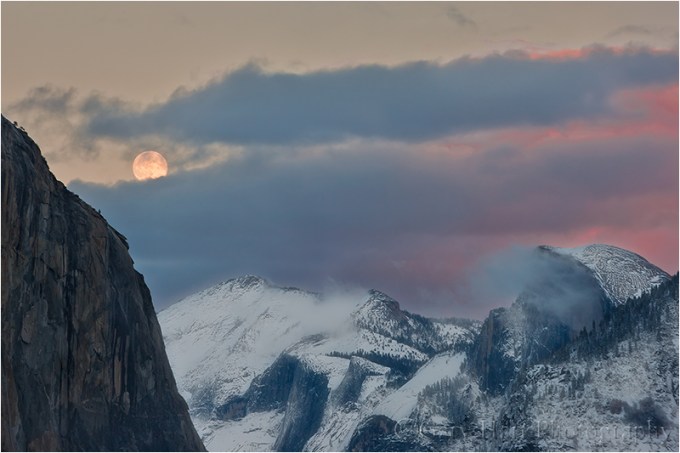
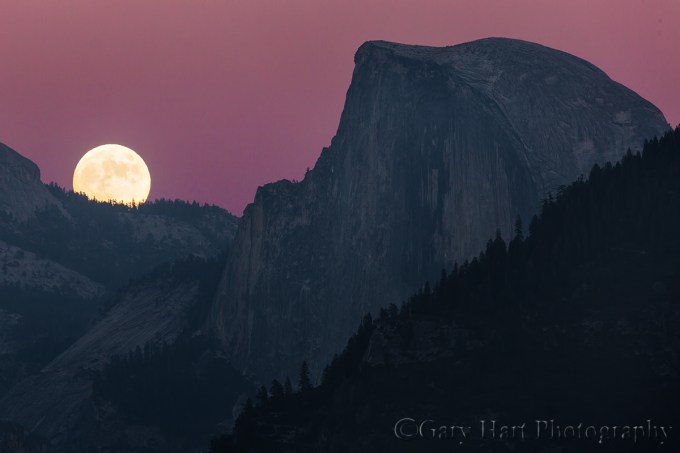
Winter Moonrise, Half Dome, Yosemite
Thursday night’s scene, which would have been beautiful by itself, was simply accented by the (nearly) full moon. Contrast that with my visit a few years ago, when I photographed a full moon rising slightly to the left of its position last Saturday’s night. But more significant than the moon’s position that evening was the rest of the scene, which was so spectacular that it called for a somewhat wider composition that included the pink sky and fresh snow. And then there’s the above image, from last Saturday night—because the sky was cloudless (boring), and snow was nowhere to be seen, I opted for a maximum telephoto composition that was all about the moon and Half Dome.
The wide angle perspective I chose Thursday night emphasized the foreground by exaggerating the distance separating me, Half Dome, and the moon; the snowy moonrise image found a middle ground that went as tight as possible while still conveying the rest of the scene’s beauty. Saturday night’s telephoto perspective compressed that distance, bringing the moon front and center. Same moon, same primary subject: If Thursday night’s moon was a garnish, Saturday’s was the main course.
Learn more about photographing a full moon
Join me next fall as we do this all over again
A gallery of Yosemite moons
Click an image for a closer look and slide show. Refresh the window to reorder the display.


Chasing the moon in Yosemite
Posted on November 18, 2013
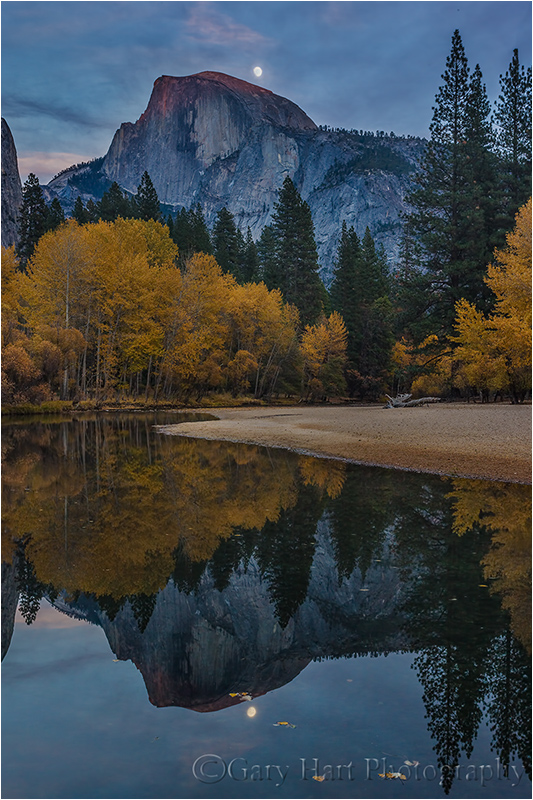
Moonrise Reflection, Half Dome and the Merced River, Yosemite
Canon EOS-1Ds Mark III
1.3 seconds
F/16.0
ISO 200
40 mm
The highlight of my just completed Yosemite Autumn Moon photo workshop was a full moon rising above Half Dome at sunset. But rather than settle for just one Half Dome sunset moonrise, I’d “arranged for” three. Clouds shut us out on sunset-moonrise number two, but sunset-moonrise number one was a huge success. (And sunset-moonrise number three, from Tunnel View, was so special that I’ll dedicate a whole blog post to it.)
Any location’s “official” sun and moon rise/set times assume a flat horizon—if you read that today’s moonrise is at 5:00 p.m., you need to account for the time it takes for the moon to rise above whatever obstacles (mountains, hills, trees) are between you and the flat horizon. And due to the same motion around Earth that causes the moon’s phases, anyone planted in the same location night after night would see the moon rise about fifty minutes later each day (this is an average—the nightly lag varies with many factors). For example, a moon that hovered right on the horizon at sunset last night will rise too late to photograph tonight.
While you can’t do anything about the moon’s absolute position in the sky, you can control the elevation of your horizon simply by changing your location. In other words, careful positioning makes it possible to photograph a moonrise at sunset on multiple nights—move lower and/or closer to the horizon to delay the moon’s appearance, higher and/or farther to view the moon sooner.
The earlier the moon will rise, the closer to your subject (for example, Half Dome) you should be to increase the angle of view; the later the moonrise, the farther back and higher you should be. So, positioning ourselves on the valley floor, close to Half Dome, provided a steep angle of view that delayed the moon’s appearance on Thursday night, when it rose (above a flat horizon) several hours before sunset. Conversely, standing at elevated Tunnel View a couple of nights later decreased our angle of view, enabling us to see the moon sooner when official moonrise is closer to sunset.
Last Saturday night, from Tunnel View on Yosemite Valley’s west side (farthest from Half Dome) the moon was “scheduled” to appear about five minutes after sunset—that would put it in the magenta, post-sunset band with just enough light for about ten minutes of shooting before the dynamic range (the brightness difference between the sunlit moon and darkening foreground) shut us down. While that was the shoot we were most looking forward to, for Friday night I’d picked a mid-valley spot by the Merced River that would put the moon above Half Dome just about sunset. And for our initial sunset on Thursday evening, I took the group to a riverside spot on Yosemite Valley’s east side, much closer to Half Dome.
Clouds obscured the moon Friday night, but Thursday night was a real treat. Not only did we find the fall color in the cottonwood trees upriver still hanging in there (despite a fairly early autumn in most of Yosemite Valley), the clouds parted just in time for the moon’s arrival. In addition to Half Dome, the trees, and the moon in the distance, we were able to get a mirror image of the scene reflected on the glassy surface of the Merced River at our feet.
While the downside of moving closer to Half Dome (or whatever your subject is) is that the wider focal length necessary to include the entire scene also shrinks the moon, I’ve always believed a small moon adds a powerful accent that makes an already beautiful scene even more special. But what if you prefer your moon big? Simple: just wait a day or two, and move back as far as possible. Stay tuned….
Join me next fall as we do this all over again.
* * *
One final point: Notice the cool (blue) color cast of this scene. This is an indication of not just the rapidly advancing twilight, but also the depth of the shade there in the shadow of the steep valley walls and dense evergreens. An image’s color temperature is a creative choice made during processing by photographers capturing in raw (unprocessed) mode. While warming the light would have made the trees more yellow, I decided that the coolness adds a soothing calmness that is lost in the warmth of a daylight scene.
A Yosemite Autumn Moon Gallery


Favorite: Sunset Palette
Posted on October 17, 2013

Sunset Palette, Half Dome from Sentinel Dome, Yosemite
Canon EOS-1Ds Mark II
Canon 24-105
2 seconds
F/20.0
ISO 100
Usually an image comes together on the spot, an organic blend of location and light unique to the moment. But some images I carry around in my brain for years, fully aware of the elements and how I want them assembled, and hopeful to be present when that happens. I have a number of these “dream” images rattling around between my ears, and every once in a while the stars align and I actually get to capture one. For example, on every visit to Sentinel Dome I would eye the granite indentations on the southeast flank and picture them as pools of rainwater reflecting the sunset sky, framing Half Dome in the distance. Wouldn’t it be great if….
One showery October afternoon a few years ago I made the hike to Sentinel Dome with these indentations in mind. I knew that the recent rain would quite likely have filled them, allowing at least part of my dream to come true. After summiting the dome I beelined to the other side and found “my” pools exactly as I’d hoped. The sky was a promising mix of blue and gray, but the sun was still at least an hour above the horizon. Nevertheless, the air was clean and western horizon was clear, essential ingredients for the colorful sunset I so wanted. Dare I hope?
I walked around a bit and mentally refined my composition—rather than set up close and use an ultra wide-angle, I moved back as far as the terrain would permit. This allowed me to fit the pools in the frame at a longer a focal length, which would compress the distance separating Half Dome and the pools. To reduce the expanse of granite behind the pools, I flattened my tripod as far as it would go and framed my shot. With closest pool about six feet in front of me, stopping down to f20 and focusing on a point about twelve feet away gave me sharpness throughout the frame. With my composition set and waiting on my tripod, I readied my two-stop hard graduated neutral density filter and adjusted my polarizer, then sat down on the (hard) granite, and waited.
The sunset color that finally came was more than I dared hope for. The sun was at my back, but with clouds overhead and the western horizon wide open, the crimson glow stretched all the way to the eastern horizon. I clicked this frame when the color was at its most intense, so brilliant in fact that every exposed surface seemed to throb with its glow.
Workshop Schedule || Purchase Prints || Instagram
A Few Images On or Including Sentinel Dome


Moon over wherever
Posted on July 26, 2013
Winter Moonrise, Half Dome, Yosemite
Canon EOS-1Ds Mark III
1/6 second
F/11.0
ISO 100
188 mm
Often, including a rising or setting moon will turn an ordinary landscape into something special. Of course, like most things worth doing, moon photography adds a couple of layers of complication: First, there’s the matter of getting there at the right time, with the moon in the right place (it does little good to arrive as the moon rises if it’s skewed 90 degrees from the scene you came to photograph); and once you have everything lined up, you still have to contend with the almost always tricky exposure issues.
A little lunar geometry (you can skip this section of you’re more interested in “how” than “why”)
Many factors, some within our control, some completely beyond our control, determine the time, location, and phase of the moon at any time. The factors beyond our control are things like the earth’s rotation and the moon’s orbit, which determine the moon’s phase and its absolute position in the sky. On the other hand, we can control our location, and take the steps necessary to get us in the right place at the right time.
A full moon always rises and sets directly opposite the sun, rising in the east at sunset and setting in the west at sunrise. This actually makes perfect sense when you take a little time to understand the monthly choreography of the earth, moon, and sun. Just as the earth revolves around the sun, the moon revolves around the earth; at any point in this dance, half of the earth is lit (daytime) and half of the earth is dark (nighttime), half of the moon is lit and half of the moon is dark.
What we on earth see as a full moon is simply that one day each month that the moon’s entire lit side faces the earth’s dark side—that is, when the earth is directly between the sun and the moon (picture a beam of light that follows a straight line that starts at the sun, passes through earth, and ends on the moon). On that day only, as the point of your location on earth rotates from day to night, you’ll see the sun disappear in the west and the moon rise in the east. As the earth keeps rotating away from daylight and into night, the full moon rises higher and higher, reaching its highest point around midnight, then dropping as your location rotates back toward the sunlit side (and sunrise).
So then why do we rarely see a full moon rising exactly as the sun sets? That’s because: 1) the point of maximum fullness (when the sun, earth, and moon align perfectly) only happens at one instant each month—at every other instant of each month’s full moon day, the moon is only almost full (but still full enough to appear completely full); and 2) sun/moon rise/set times we see published always assume a flat horizon—if you have mountains between you and the horizon, your view of the actual sun/moon rise/set will be blocked.
Due to its monthly orbit about the earth, each day (or night) the moon rises a little later and gains or loses a little bit of its disk (the farther it has revolved from that sun->earth->moon line, the less of the moon’s lit side we see). So the night after the moon is full, it rises after sunset and is a little less full. The next night it rises a little later still, and is even less full, and so on. Eventually (in a little more than two weeks after it was full) the moon has revolved all the way around the earth until it lies between the earth and sun (now our imaginary line goes sun->moon->earth); all of its sunlit side faces away from the earth and we have a new (invisible) moon.
We call the moon “new” because the night before it disappears into the sun, all that was left of the shrinking moon (that was completely full about two weeks ago) was a small sliver that shined briefly on the eastern horizon just before sunrise, then disappeared as soon as the sky brightened (it’s still up there, but completely overpowered by the sun’s brightness). The next day the moon won’t appear at all because seeing it would require looking directly into the sun; but the following day, there it is, this time as a thin sliver on the western horizon immediately after sunset (again, it was up there most of the day, we just can’t see it until the sun sets and the sky darkens). This brand new crescent slips below the horizon shortly after it appears. And for the next two-plus weeks it will rise a little later, and grow a little larger, each night, until it’s full again and rising at sunset. Cycle complete.
If we do the math (this won’t be on the test), we can infer that if the moon takes 29.5 days to complete its cycle (from full to new and back to full), and there are 24 hours in a day, the moon must be rising about 50 minutes later each day (29.5/24=48.8). This rough approximation varies with many factors; for simplicity I usually round it to an hour when I do rough calculations in my head. And I always rely on much more precise software or astronomical charts for my critical calculations.
Locating the moon
Those who don’t do a lot of moon photography are amazed at how much the moon shifts above the landscape throughout the year—you can sight a full moon rising between Half Dome and El Capitan one month, and a few months later it’ll be rising above Leaning Tower (far to the south). Fortunately, like many things in nature that appear random to the uninformed, there is actually nothing random about the moon’s location once you take the time to figure it out.
If the idea of figuring anything saps the pleasure from your photography (or sends you into a panic), you’ll be happy to know that sometimes it’s enough to simply know that the moon will be rising in the east a little before sunset (this info is available in many places, in many forms, but the most complete source I’ve found is the US Naval Observatory website). Armed with that knowledge, you can go out to a location with a view of the western horizon, wait for the moon to appear, and start shooting.
On the other hand, juxtaposing the moon with a specific landmark requires more planning. And because its position is so not random, many others have done the heavy lifting for the rest of us. There are far too many moon phase/position resources to name even a small percentage of them, so rather than even try, I’ll just give you a couple of techniques, and the tools that enable them:
- My old fashioned way (old trick for an old dog): I figured out my technique for locating the moon long before computer software and smartphone apps took away most of the effort. Nevertheless, I continue to do it this way because I’ve already done all the hard work (figuring out how to do it), and I can do it in the field, with zero connectivity (no wifi or cell signal required). After relying for years on a the US Naval Observatory website for the info I need (moon phase and moon/sun rise, set, altitude, and azimuth), I now get all the pertinent data from my Focalware iPhone app (I never said I’m opposed to new technology), plugging it into my National Geographic Topo! (that’s NG’s exclamation point, not mine) mapping software (discontinued) to plot the direction of the moon’s rise/set. To determine when the moon will appear above (or disappear behind) the surrounding terrain, I plug distance and elevation information from Topo! into the trigonometric functions of my HP 11C scientific calculator (originally an actual calculator, but now also an iPhone 11C emulation app) to compute the elevation in of my horizon.
- Software (the better way for 99.999 percent of you): The Photographer’s Ephemeris (a free computer download or fairly inexpensive smartphone app) is the most complete solution that I know of (though I’m sure there are others I don’t know of)—I probably would have never taken the time to figure out my technique if TPE had been available. Not only does TPE give you the sun and moon’s location and elevation above the flat horizon, it also figures out the the actual (terrain included) horizon. The downside is that because it uses Google Maps, TPE requires connectivity and is better used in advance of your shoot (usually not a problem). Recent TPE versions also allow you to download the maps to your device for offline access—if I were a TPE user, I’d be doing this before every trip.
Exposure
My rule for photographing a rising/setting full moon is that I must capture detail in the landscape and the moon. If my landscape is black (or just too dark), or my moon is a white disk (or blob), my image has failed. But since the post-sunset landscape is in full shade, and the moon is as bright as a sunlit landscape (because it is a sunlit landscape), the dynamic range of a full moon scene is pretty extreme, often too extreme for a camera to handle with a single click (always my goal).
But here’s the great part—if you figure that the moon rises about an hour later each day, and the full moon rises at sunset, then it stands to reason that the day before it’s full the moon will rise about an hour before the sun sets. Factoring in the terrain on the horizon (and assuming you’re not at the base of a mountain), that means that the day before the moon is full is the best opportunity to photograph a nearly full (say 97%, give or take a percent or two) moon rising in the east above a landscape painted with the warm sunlight of the golden hour. Conversely, if your view is to the west, you can photograph a nearly full moon setting in warm sunrise light the day after it’s full. Either way, the day before or after the full moon gives you everything you need to capture your scene in nice, photographable light that’s still sufficient to hold the moon’s highlights at bay.
I’ve found that if I’m really careful with my exposure, I can usually capture enough foreground and lunar detail until five or ten minutes after sunset. Shooting after sunset usually requires raw capture, then massaging the dark foreground brighter, and bright moon darker, in the raw processor. A graduated neutral density filter can increase this threshold to maybe fifteen or twenty minutes after sunset—after that my foreground is unusably dark (or my moon is recoverably bright).
Another technique that works when the light gets too extreme is a composite—two images, one exposed for the landscape and the other exposed for the moon, combined in Photoshop. In the “Rules According to Gary,” this isn’t cheating if you don’t change the size or position of the moon. (Though it doesn’t break my rules, I no longer do composites because I have this weird compulsion to get everything with one click.)
The final piece of exposure advice I’ll add is to make sure your camera’s blinking highlights (also called highlight alert) are set (as far as I’m concerned, they should be set anyway because I see no downside to highlight alert). The moon is usually so small in your frame that it won’t register in the histogram, which means blinking highlights are usually the only way to know that you’re blowing out the moon. I monitor my highlights closely after each exposure and have found that, when shooting raw (jpeg shooters don’t have as much margin for error), I can usually recover enough detail with an exposure 2/3 to 1 stop brighter than the exposure that first showed blinking.
Just do it
Like most things photographic, don’t expect resounding success the first time you try adding a full moon to your landscape. But each time you go out, not only will you improve, you’ll probably come away with ideas for how to do it differently the next time.
Read more about moon photography


Encore!
Posted on November 11, 2012
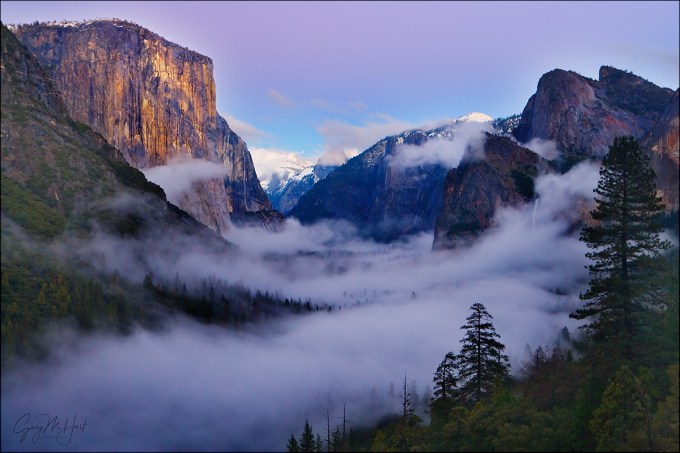
Twilight Fog, Tunnel View, Yosemite
Canon EOS-1Ds Mark II
1.6 seconds
F/7.1
ISO 200
48 mm
Yesterday I spent an incredible day in Yosemite, guiding a group of photographers from the Sacramento area. When I schedule these trips, I do my best to time them for nice conditions, but of course there’s no guarantee things will work out. Yesterday they worked out. Big time. Not only did we catch Yosemite Valley at its fall color peak (it’s late this year), we found everything blanketed with fresh snow that continued to fall lightly, and intermittently, throughout the day. I have lots of images I can’t wait to get to, but until then I offer this one from a few years ago, chosen because it’s quite similar to the scene with which we wrapped up the day yesterday.
Much like last night, the view on this 2005 evening was a classic Yosemite clearing storm. My brother Jay and I arrived at Tunnel View to find El Capitan and Half Dome, partially obscured by swirling clouds, teasing the audience like exotic fan dancers; a carpet of plush fog cushioned the valley floor. With sunlit clouds and granite above a shaded valley, the light was tricky, but as the sun dropped, so did the contrast, making metering simpler. Eventually the direct sunlight left Half Dome entirely, but small, shifting patches spotlighted El Capitan right up until sunset. While the clouds never achieved brilliant sunset pinks and reds, they radiated an ethereal gold that intensified over several minutes before fading.
When the sunlight left entirely, as if on cue, the fog hugging the valley floor expanded, slowly obscuring the scene like a curtain signaling the show’s end. With the view gone, the crowd packed up and headed to wherever they needed to be; suddenly we were alone. But I’ve photographed Yosemite enough to know that it’s a mistake to try to predict the conditions in five minutes based on the conditions now, so I stayed, hoping for an encore.
As quickly as the scene had closed, the foggy curtain pulled back, unveiling Yosemite Valley once more, this time illuminated by the magnificent pink and blue pastels of the Earth’s shadow and belt of Venus. By now the sky was fairly dark, but the remaining faint, shadowless light was enough to reveal the most beautiful view on Earth.
Though this image adds to the seemingly infinite number of Yosemite Tunnel View pictures in my portfolio it remains one of my personal favorites. It’s one of the images I think about every time I consider leaving a scene, and it’s what I showed the group last night when some suggested leaving. So we stayed and were among the very few rewarded with memories of Yosemite Valley’s sweet encore for the drive home.
Workshop Schedule|| Purchase Prints || Instagram
A Gallery of Yosemite Weather
Click any image to scroll through the gallery LARGE


, Yosemite")


I love it when things work out
Posted on October 29, 2012

Autumn Moon, El Capitan and Half Dome, Yosemite
Canon EOS-5D Mark III
190mm
.8 seconds
F/11
ISO 100
October 29, 2012
My Yosemite autumn workshop wrapped up last night with a spectacular moonrise above Half Dome at sunset. That my group was there to photograph it was both a source of pride, and great personal satisfaction—I doubt few things on Earth are more beautiful than a full moon rising above Half Dome at sunset, and I love being able to share it.
Some lunar perspective
Imagine a line connecting the sun and moon—the half of the moon skewered by that line is always fully lit. Because the moon orbits Earth, our position relative to that line changes daily. Once every 29 days Earth is on that line too, aligned with (and between) the sun and the moon, perfectly positioned to see all of the moon’s sunlit side during our night (in other words, the side of Earth facing the moon is the side facing away from the sun). Because this alignment is the only time the moon’s fully lit face is visible all night, a full moon always rises at sunset and sets at sunrise.
Why do we rarely see the moon rise exactly as the sun sets? There are a couple of reasons: First, local terrain usually gets in the way—if the moon has to rise above mountains, or the sun sets behind mountains, their rise and set times will be skewed. And second, the moon, sun, and Earth are only perfectly aligned for an instant—we see the moon as full on the day it’s most closely aligned with the sun and Earth, but we’ll only see the rising full moon precisely at sunset when sunset for our location coincides with the instant of perfect alignment, and no mountains are in the way. (There are other orbital and positioning factors, but sometimes technical minutia can clutter understanding, so I’ll just leave it here.)
Targeting Yosemite’s autumn moon
For most Yosemite visitors, viewing a glowing lunar disk above Yosemite Valley doesn’t require much more than being outside and looking up at the right time. But photographers have to be much more precise than that—the camera’s constrained view means anything but a tight composition reduces the moon to small accent (albeit a very beautiful one) to a very large scene. And the camera’s relatively limited ability to simultaneously capture shadows and highlights makes for an extremely narrow time window to photograph a full moon—too early and the moon is lost in still-bright sky (not enough contrast); too late and the dynamic range separating the rising (daylight bright) moon and (rapidly dimming) shadowed foreground terrain is to great for a camera to capture (too much contrast).
So what we want is a moon that rises in very close proximity to Half Dome, at just the right time. When I started planning my 2012 workshops more than a year in advance, I circled October 28 as the date for my favorite Yosemite full moon rise of the year. That was when the moon, 99 percent full, would rise above the steep granite walls of Yosemite Valley, in the general direction of Half Dome as viewed from the valley, at just the right time. I usually choose the famous Tunnel View vista, just east of the Wawona Tunnel, for the autumn moonrise, but my calculations told me that from Tunnel View the moon would rise a little farther to the right of Half Dome than I like, and just a little later than ideal (difficult to expose for anyone without rock-solid understanding of metering and exposure)—still a nice shot, and doable if you’re careful, but I thought there might be something better.
Wanting to be at a higher elevation than, and a little farther north of, my Tunnel View vantage point, I soon realized that the less heralded vista just west of the Wawona Tunnel would be just about right. Not only would this perspective better align the moon with Half Dome, it’s about a mile farther back and over 400 feet higher than Tunnel View (for a slightly earlier moonrise). And being farther back also meant we could use a longer focal length to maximize the distant moon’s size relative to the closer Half Dome. This vantage point doesn’t offer a view of Bridalveil Fall (it wouldn’t be in a telephoto image that includes Half Dome anyway), but that late in the afternoon in autumn Bridalveil is in full shade, and an extremely dry year had reduced it to a mere trickle anyway.
There are lots of apps and software that plot moonrise relative to terrain (Photographer’s Ephemeris being the most popular among photographers), but my moonrise (and set) workflow was in place long before they were available, so I still do it my “old fashioned” way. My technique involves getting the phase, rise/set time, altitude, and azimuth from a website or app (Focalware gives me everything I need), then plotting the moon’s direction with my (now obsolete) National Geographic Topo! software. Topo! gives me the horizontal and vertical distance separating my location and target feature (Half Dome). Plugging that info into my HP11C (scientific calculator) app, I compute the horizon’s altitude in degrees. I plot this altitude and the moon’s azimuth on my Topo! map to pinpoint when and where the moon will appear (or disappear) from any location I choose. I like my approach because I can do everything I need to without Internet or cell service, but for most people it’s probably just simpler to use Photographer’s Ephemeris or PhotoPills before leaving home.
So anyway, I was able to determine that on October 28, from the vista west of the Wawona Tunnel, the moon would rise behind Half Dome’s Ahwiyah Point at around 5:45, and would be directly above (basically, appearing to sit on top of) Half Dome at around 5:50. With a 6:05 sunset, this was just about as perfect as could be.
The moon arrives
I got my group in position at around 5:30 and we just watched and waited. By the end of any workshop everybody has gotten to know each other quite well and idle time is an excuse for fun. This group was no exception. Though I’ve done this enough to be pretty confident the moon would deliver as promised, I couldn’t help feeling secretly anxious that a miscalculation would somehow render my promised workshop grand finale a flop (despite the fact that I’d checked, double-checked, triple-checked, and then checked some more). But a little after 5:40, just as the joviality peaked, a white arc started to glow behind Ahwiyah Point (below) and we were instantly down to business. With foreground for perspective you can really get a sense for how quickly the moon rises—fortunately, everyone was ready with their exposure and composition, so the clicking was pretty much instantaneous and I don’t think anyone missed anything.
As we shot, I encouraged the group to vary their compositions—while it was mostly a telephoto scene, there were wider and tighter versions, as well as horizontal and vertical orientations. I also frequently reminded everyone to monitor the moon’s highlights—as the moon rises, the foreground darkens but the moon remains daylight bright, making exposure increasingly difficult.
My favorite time of evening is the ten or fifteen minutes after sunset, when the shadows have left the landscape and the east horizon is layered with pink and blue pastels. As Earth’s shadow rises from the eastern horizon, the sky’s glow deepens to a rich magenta that and paints entire landscape. The image at the top of the post was one of the last of the evening, several minutes after sunset. If you look closely, you can see the sky’s pink glow bathing Half Dome’s reflective granite (my camera actually picked more of this color than you see here, but I desaturated it slightly in Photoshop).
(I’d love to say that this was the highlight of my day, but as beautiful as the moonrise was, it was trumped by listening to my Giants World Series victory on the drive home.)

This is the moon when it first appeared, about 20 minutes before sunset. As you can see, the contrast is pretty good, but the light isn’t nearly as nice as it was shortly after sunset.
A Yosemite Autumn Moon Gallery


It’s my pleasure
Posted on June 7, 2012

New Day, Half Dome and Crescent Moon, Yosemite
Have you noticed a pattern here? Every spring I post an image or two (or three) of a delicate crescent moon rising above Yosemite Valley at sunrise. This spring is no exception, nor will next year’s be. Or the next. Or the next….
I certainly can’t justify this lunar obsession from a business perspective. While the moon rises in a slightly different spot each year, I have more than enough pictures of Half Dome and/or El Capitan silhouetted beneath a sliver of moon, in every possible variation—horizontal, vertical, wide, tight, and everything in between—to last until the next Venus transit.
But here’s the deal. Photography needs to be a source of pleasure. Otherwise what’s the point? So when I decided to make my living taking pictures, I promised myself that I’d photograph only what I want to photograph, without concern for what will or will not sell. For me that’s natural light landscapes. Only. Nothing that moves, nothing that breathes. No people, no wildlife, and nothing manmade. No flash, light painting, or any other artificial light. I don’t blend images or do any fancy Photoshop stuff. And I don’t shoot stock images. (Not that I have a problem with others doing all this other stuff–doing it just doesn’t give me pleasure.)
In other words, if I don’t want to shoot it, I don’t. I joke that if I were photographing a field of poppies and a mountain lion were to leap into my frame, I’d shoo it away. (Okay, so I might have other impulses, but you get the idea.) It also means that when something’s going to happen in nature that I really want to see, you can bet I’ll do my best to be there with my camera. Fresh snow forecast for Yosemite? I’m on the road early enough to be there before the snow starts falling. Moonlight on Badwater in Death Valley (a recent discovery)? Gotta do it. Milky Way above Kilauea Caldera? What do you think?
And of course a crescent moon rising above Yosemite Valley at sunrise. In my world it just doesn’t get any more special than this. And as nice as the images are, nothing compares to the experience of witnessing it. Take one of the most beautiful vistas in the world, add the purity of sunrise, and garnish it with a delicate crescent moon—can’t get enough of it.
Last year I scheduled a workshop to coincide with this event; next year I’ll do the same. But this year I kept it to myself. While the time and position of the moon is never a secret—the information is available all over the Internet, not to mention software and smartphone apps—I never cease to be amazed at how many times I’m the only person present. Maybe that just means a crescent moon above Yosemite Valley doesn’t move others the way it moves me, but that’s fine with me.
Depending on the moon’s azimuth (the number of degrees south of due north) as it crests the horizon behind Yosemite Valley, I have several go-to locations. This year I decided the best spot was Tunnel View, Yosemite’s most popular vista. Each year I fear everyone has figured it out and I’ll be joined by a Horsetail Fall-style riot of photographers. So I held my breath as I approached the parking area a little after 4:30 a.m., and immediately exhaled when I found the lot empty. I set quickly set up two tripods, one with my 1dsIII and my 100-400 lens, the other supporting my new 5dIII and 24-105 lens. While waiting for the moon I composed, exposed, focused each camera, and fired a couple of test frames. Then I waited some more.
The moon appeared right on schedule, a few minutes before 5:00, a fine spear of light peeking above Half Dome. Flanked by my two cameras, a remote release in each hand, I started clicking, pausing every few clicks to adjust the exposure and recompose. I continued like this for about 25 minutes, capturing the moon’s ascent through pre-dawn twilight that transitioned from indigo to blue and finally gold right before my eyes.
As the brightening sky swallowed the moon another car pulled into the parking area and a trio of photographers rolled out, the first people I’d seen all morning. I was detaching cameras and collapsing tripods when they ambled over and casually began setting up, clearly confident that they’d arrived in plenty of time for sunrise. The moon was a faint sliver by then and I heard one of the newcomers comment that maybe they could include it their first few frames. I resisted the urge to show them what they’d missed, but couldn’t help feeling a degree of smug pleasure in what I knew was on my media cards.
Does that make me a bad person?

