Eloquent Images by Gary Hart
Insight, information, and inspiration for the inquisitive nature photographer
Sanity check
Posted on January 7, 2017

Nightfall, Half Dome and Sentinel Fall, Yosemite
Sony a7R II
Sony/Zeiss 24-70 f4
1/2 second
F/9
ISO 100
Are you insane?
Albert Einstein defined insanity as doing the same thing over and over again and expecting different results. Hmmm. For some reason this makes me think of the thousands of aspiring landscape photographers with portfolios brimming with beautiful images that they can’t sell.
Despite a great eye for composition, all the latest gear, insider knowledge of the best locations, and virtual guru status with Photoshop, somehow they haven’t managed to separate themselves from the large pack of other really good photographers. Their solution to anonymity is more: more locations, more equipment, more software. (Perhaps you even know such a photographer.) Compounding the problem, many photographers have become so mesmerized by technology that they turn over control of the most important aspects of their craft to their camera, completely discounting the most powerful tool at their disposal, the one on top of their shoulders.
Knowledge vs. understanding
Just as a new camera won’t make you a better photographer, neither will simply upgrading your knowledge of the latest gear, or accumulating . Knowledge is nothing more than information ingested and regurgitated. On the other hand, understanding is fundamental insight into the workings of a process. While knowledge might enable you to impress table-mates at a dinner party, understanding gives you the ability to use information to create new knowledge—solve problems.
Many photographers invest far too much energy accumulating knowledge, and far too little energy understanding what they just learned. For example, I see many photographers relying on a formula for determining the shutter speed that freezes star motion at a given focal length, oblivious to the fact that this formula doesn’t consider other equally important variables such as display size and the direction the camera is pointing (yes, that’s important). Similarly, simply knowing that a longer shutter speed, bigger aperture, or higher ISO means more light is of limited value if that knowledge doesn’t translate into an understanding of how to manage light, motion, and depth with your camera.
Take control
Pretty much anyone can pick up a camera, put it in auto exposure mode, and compose a nice image. While the automatic modes in most cameras “properly” (conventionally) expose most scenes, they struggle in the limited light, extreme dynamic range, and harsh conditions that artistic nature photographers seek. Worse than that, relying on the automatic exposure modes eliminates a photographer’s best opportunity for creativity—the ability to control a an image’s depth, motion, and light.
Too many aspiring photographers are stuck creatively because their unwavering faith in technology leaves them with a critical deficiency in two fundamental, related photographic principles:
- How a light meter determines the exposure information it gives you. This seems so basic, but auto-exposure and histograms have fooled many into thinking they understand metering and exposure. (Don’t get me wrong—the histogram is a wonderful tool for the photographer who truly understands it.)
- How to use the reciprocal relationship between aperture, shutter speed, and ISO to manage photography’s three variables: light, depth, and motion. This is the universal tool that enables photographers to handle the limiting factors of every scene.
Books and internet resources are a great place to start acquiring these principles, but the knowledge you gain there won’t turn to understanding until you get out with your camera and apply them. When these principles become second nature, you’ll be amazed at what you’ll be able to accomplish with your photography.
Insanity is in the mind of the beholder
If landscape photography already gives you everything you want, by all means continue doing what you’re doing. But if you’re having a hard time achieving a creative goal, I suggest that the solution is likely not doing more of what you’re already doing. Instead, start by reevaluating your comprehension of fundamental photographic principles that you might not have thought about for years. You’ll know you’re there when you have complete control of the light, motion, and depth for every scene you encounter, know how to get the result you want, or understand why it’s simply not possible.
Do I really think you’re insane for doing otherwise? Of course not. But I do think you’ll feel a little more sane if you learn to take more control of your camera.
About this image
The image at the top of the post is from a visit to Yosemite this past December. I’d guided my workshop group here for the rise of a nearly full moon, crossing my fingers that clouds wouldn’t obscure our view. The clouds exited just in the nick of time for us to enjoy a beautiful moonrise into the indigo twilight. I started with fairly tight compositions when the moon was close to Half Dome, but in the still, chilled air shortly after sunset, a thin radiation fog formed above Leidig Meadow and I started looking for a wider composition that would add the meadow to the moon and Half Dome.
Before thinking about the scene’s light, depth, and motion variables, I spent a lot of time just assembling the elements of my composition. I decided to frame the scene with Half Dome on the left and Sentinel Fall on the right, positioning myself so a group of tall foreground evergreens, mirrored by towering Sentinel Rock in the background, anchored the center of my frame. I knew that would require a wide composition that would render the moon very small, but I moved back as far as I could to allow the longest possible focal length to avoid shrinking the moon to pinhole size.
By far my biggest exposure concern was dynamic range—the moon is daylight bright, while the rest of my scene was deeply shaded. Normally I trust my histogram in these high dynamic range situations, but in this case the moon was so small that I knew it wouldn’t register. Instead I used my Sony a7RII’s pre-capture “zebra” highlight alert that indicates the parts of my scene that are overexposed.
At just a little wider than 24mm, with no significant detail in my immediate foreground, I stopped down to a fairly diffraction safe f/9. I’m always at ISO 100 unless I can’t achieve the amount of light I want at my ideal aperture and shutter speed, and in this case ISO 100 worked just fine. With my f-stop and ISO set, I increased my shutter speed slowly, checking the moon after each 1/3-stop click for the zebras (if you don’t shoot mirrorless, you can set blinking highlights and check the moon for “blinkies” when you review the image on your LCD). Since I know my camera well enough to know that I could push my exposure at least a full stop beyond the point where the zebras appeared, then recover the highlights in the Lightroom raw processor.
This image looked quite dark on my LCD, and the histogram was way to the left, but after loading it onto my computer and pulling the Lightroom Shadows slider to the right, I recovered an unbelievable amount of clean (low noise) detail, even in the darkest shadows. I just continue to be blown away by the dynamic range of this a7R Mark 2 sensor that enables me to capture scenes I’d never imagined possible in my previous (Canon) life. In this case I probably could have brightened the image further in processing, but I wanted a more moody, twilight feel.
Workshop Schedule || Purchase Prints
Yosemite Less Traveled


Supermoon
Posted on November 14, 2016

Supermoon, Half Dome and El Capitan, Yosemite
Sony a7RII
Tamron 150-600 (Canon-mount with Metabones IV adapter)
1/3 second
F/9
ISO 100
The media tends to distort facts and blow events out of proportion. Perhaps you’ve noticed. The latest example is this week’s “supermoon,” an event heralded on TV, in print, and online like the Second Coming. Okay, now for a little perspective. Despite hype to the contrary, a supermoon occurs at least twice, and up to five times, in a year. In fact, our last supermoon was all the way back in October, and the next one isn’t until December.
But, as I’m sure you’ve heard, this month’s supermoon was special, an event the likes of which we haven’t seen since 1946, and won’t see again until 2034. True enough. But exactly how special was it? Not nearly as special as you might have heard: the diameter of the “epic” November supermoon was only one-half of one percent (.57) larger than the October full moon, and four-fifths of one percent (.84) larger than the December full moon—differences that are impossible to discern with the naked eye. Next year we’ll get two moons that are more than 99 percent the size of this month’s supermoon, and last year we had four.
So why was I out taking pictures of the full moon Sunday night? Because I think every full moon is beautiful, regardless of its size, and I take any opportunity to photograph it over my favorite landscapes. Which is also why each fall I schedule a workshop in Yosemite to coincide with the full moon.
Thursday night my Yosemite Autumn Moon workshop group photographed an 82% (of full) waxing gibbous (on its way to full) moon above Valley View at sunset. For Friday night’s sunset, from a quiet beach beside the Merced River we glimpsed through clouds an 87% moon rising just right of Half Dome. Saturday’s sunset found us beneath a magenta sky at Tunnel View to witness the 96% moon ascend between Sentinel Dome and Cathedral Rocks.
The workshop’s grand finale came Sunday night, when we gathered at the Half Dome vista on Big Oak Flat Road. Though I rarely encounter other photographers for any of my moon rise/set shoots, limited parking and tripod space here prompted me to arrive an hour before sunset. That turned out to be a fortunate decision, as within 30 minutes of our arrival the parking lot was brimming beyond full and photographers swarmed the nearby rocks like ants at a picnic.
With an hour to kill, I made sure everyone in my group was ready (but by now, this being our fourth moonrise, they were experienced veterans) and chatted with other photographers nearby. Comparing notes, it seemed that most (all?) of the other photographers had relied on apps like The Photographer’s Ephemeris and Photo Pills to plot the moon’s arrival location and time, while I was the only one clinging to my old fashioned topo map, scientific calculator, trigonometry plotting approach. (I do it this way because I’ve been plotting the moon since long before the apps were available, I feel like I can be more precise, and I enjoy it—not necessarily in that order.)
In the viewfinder of my Sony a7R Mark II, atop my tripod and armed with my Tamron 150-600 lens to enlarge the moon as much as possible, was the composition I wanted—assuming the accuracy of my calculations. The consensus among others seemed to be that the moon would appear from behind Half Dome’s right flank, anytime between 5:00 and 5:10 p.m. I stuck to my guns that the moon would show up at about 5:05, and that it would be straight over the top of Half Dome. While I saw this more as an opportunity to check my plotting method’s accuracy than a competition between methods, it was pretty thrilling when the moon popped into view right on schedule and on target. Take that, technology!
Since the moon didn’t appear until a full fifteen minutes after sunset, the extreme dynamic range (very dark landscape beneath a daylight-bright moon) made this an extremely tricky exposure for anyone (like me) not interested in compositing two images (one with the moon properly exposed, another with the scene properly exposed). To capture this scene with a single click, I closely monitored the pre-capture “zebra stripes” highlight alert in my a7RII and pushed my exposure 2/3 stop after the first hint of the alert appeared. To hedge my bets and give myself processing options, I varied my exposure 1/3 to 2/3 of a stop in either direction (an exception to my standard workflow because the moon is too small to register on the histogram).
The result was a scene that looked quite dark on my LCD, and a moon with no detail. No problem, I reassured myself, for my a7RII’s ridiculous dynamic range. This morning in Lightroom I adjusted the white balance, pulled up the shadows, and pulled down the highlights. In Photoshop I applied a moderate dose of Topaz DeNoise and did a few minor dodge/burn moves to get the image you see here.
One more thing
The size of the moon in this image has virtually nothing to do with the fact that this was a “supermoon,” and virtually everything to do with the fact that I was far enough away to be able to use a 600mm lens. Click below to read about how to capture your own big moon:

Photo Workshop Schedule
The Moon in all Shapes and Sizes
Click an image for a closer look and slide show. Refresh the window to reorder the display.


The cure for the summertime blues
Posted on August 15, 2016

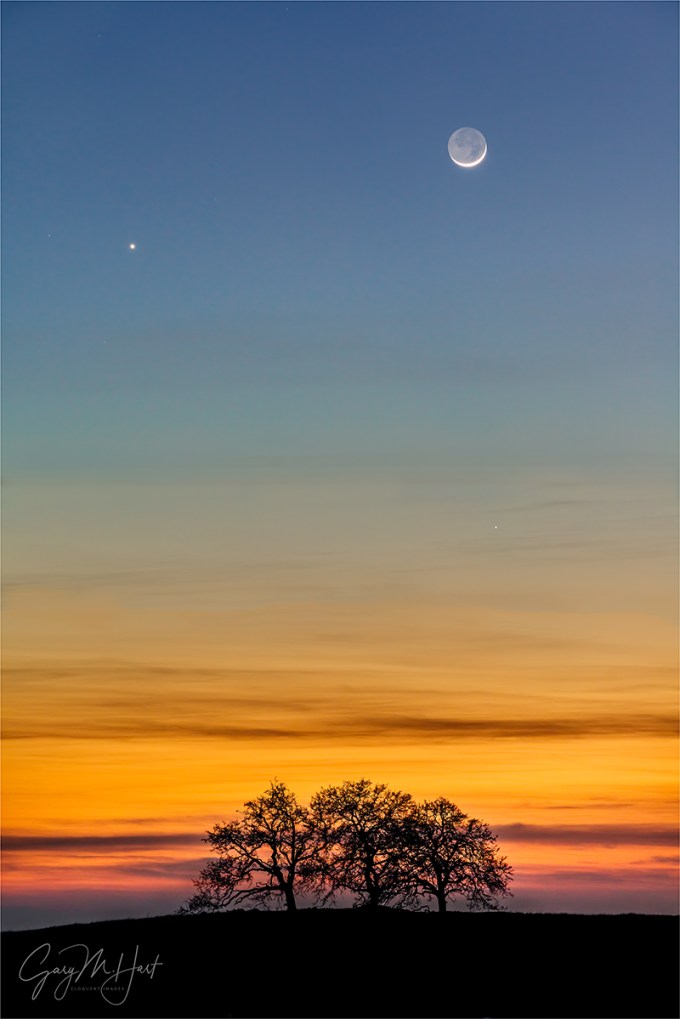
New Moon, Sierra Foothills, California
Sony a6300
Tamron 150-600 (Canon-mount with Metabones IV adapter)
1/8 second
F/8
ISO 100
There are many great reasons to be a landscape photographer in California. Summer isn’t one of them. Most people find California’s benign whether appealing—our mild winters and dry summers are one of the Golden State’s prime attractions. But to photographers, blue skies are boring, and California’s summer skies are nothing if not blue.
We say goodbye to our clouds in May, and I go stir crazy waiting for their return in October. One summertime solution is night photography, which requires clear skies. As an added bonus, summer’s warm temperatures make fumbling with camera gear and standing around in the dark much more tolerable, and the Milky Way’s bright center is very much a summer feature. California’s dense population means extreme light pollution through much of the state, but our proximity to mountains make escaping the light relatively easy in summer.
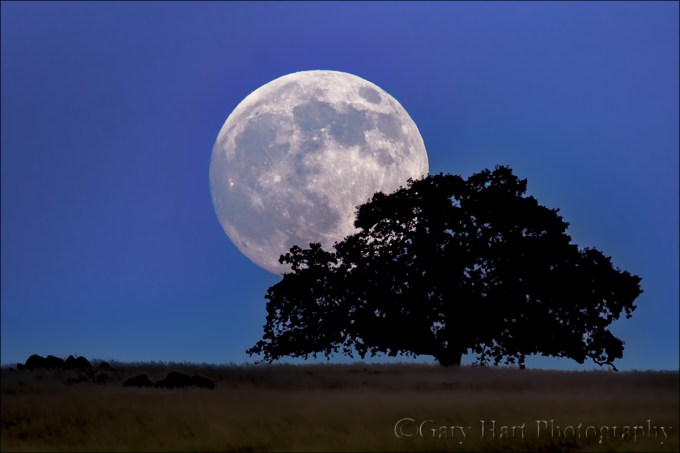
Because I can’t always make it to the mountains, I’ve found other photo opportunities in the foothills closer to home. The wildflowers of spring are gone, and the sun has burned the once green grass a golden brown, but the foothill’s oak trees are reliable silhouettes against the colorful twilight sky. Once upon a time I was satisfied with simple silhouettes, but in recent years I’ve made an effort to include a crescent moon in my foothill oak silhouette scenes.
A crescent moon only appears in close proximity to the sun, hanging in the brightest part of the post-sunset/pre-sunrise sky, above a (relatively) dark landscape. The more of the moon that’s illuminated, the farther in the sky from the sun it will hover (a full moon is exactly opposite the sun, rising at sunset and setting at sunrise). Since a crescent rises and sets just before or after the sun, there’s not a lot of time when it’s above the horizon and the sky is dark enough for its thin outline to stand out.
Getting a crescent moon to align with my foreground subjects is all about timing—for example, some months a new moon follows the sun too closely, dropping below the horizon before the sky has darkened enough to reveal it. The next night the moon lags so far behind the sun that that getting it in the frame with my subject before the sky darkens too much requires a moon-shrinking wide angle lens. As much as I enjoy accenting a scene with a small crescent, I truly love photographing the moon large.
My most recent attempt came last Thursday, a day I’d circled in my calendar several months ago after calculating that the moon would be in the perfect twilight window—not too low or too high—for my favorite trees. My brother and I started the evening at a location with a lower horizon so we could photograph the sun setting into the trees (I blogged about that shoot last week), then zipped up the road to a spot that I’ve been photographing for years.
Sometimes I can photograph this scene from the road, but in summer the new moon sets so far north that we had to angle a little south and climb one small hill and circle another to align it with the trees in the distance. Aligning the trees and moon enabled me to shoot the entire scene with my Tamron 150-600 and Sony a6300 for maximum magnification.
There are actually two trees side-by-side atop this distant hill, but I had so much magnification, I could only photograph one at a time. I gave both trees equal time—today’s image came early in the shoot, when the moon aligned better with the left-most tree. As the moon descended to the right, I eventually turned my attention to the other tree.
Regardless of the tree I was working on, I moved around a lot, left/right and up/back, dodging cow pies, to balance the moon and tree in the frame and find a relationship that worked. By ascending a small hill behind me, I was even able to extend the shoot a few minutes before the moon finally disappeared.
It would have been very easy to stay home and do something else that night. I know these simple images aren’t big money makers, and summer moon and oak silhouettes may not be as spectacular as Yosemite Valley covered with snow, or a rainbow above the Grand Canyon, but I find photographing them no less personally rewarding. (I already can’t wait until next month.)
One more thing: See the small dot of light on the right, at about the same level as the moon? That’s Mercury, another sun-hugging visitor only visible in the dawn or dusk twilight glow.
Read more about photographing a crescent moon
A crescent moon gallery


How do you do that?: Big Moon
Posted on July 26, 2016
The Secret for Supersizing the Moon
Foothill Full Moon, Sierra Foothills, California
Sony a6000
Tamron 150-600 (Canon-mount with Metabones IV adapter)
1/100 second
F/8
ISO 400
(One click—not a composite)
A few days ago I saw a picture of an oversize moon above the Golden Gate Bridge; beneath the picture someone had commented that the image was obviously was faked because the moon isn’t that big. Though I didn’t scrutinize the picture, I suspect that the commenter’s accusation was right, but for the wrong reason.
While some photographers take the easy (and deceptive) approach and just plop a huge moon into their beautiful scene, the mere presence of a large moon doesn’t mean that the image is a fake. In fact with the right equipment and a little preparation, any photographer can photograph the moon large in their images (without cheating).
Size matters
Most people understand that the longer the focal length, the larger the moon will appear in an image. But focal length is only half the equation, a fact that becomes clear when you take the extreme telephoto approach to the limit and attach a camera to a telescope. True, with a telescope you’ll achieve the maximum enlargement possible, but you’ll also end up with the moon and nothing else—you could capture the very same image whether you’re standing on a tropical beach, atop a towering peak, or in the comfort of your own backyard.
Size isn’t everything
Rather than simply photographing a large moon, what we landscape photographers really want is a moon that appears large relative to the rest of the image. And while the size of the moon in your frame is determined by the focal length, its size relative to the landscape has nothing to do with the focal length.
The moon’s extreme distance means that it will appear the same size to our eye (or lens) regardless of our location on earth. We can enlarge the moon with optics (a lens or telescope), but not by moving closer (without a rocket). On the other hand, the perceived size of earthbound objects changes dramatically with distance—move closer and things get bigger, move back and they get smaller.
So, if the perceived size of the moon from earth is constant, but earthbound subjects shrink with distance, you can make the moon look larger compared to earthbound subjects foreground by moving back and shrinking the foreground—then, once you’re farther back, you can use a telephoto to enlarge everything.
Understanding this makes it easier to see why the moon looks so small in most images because the photographer was too close to the subject: The closer we are to the scene we’re photographing, the shorter (wider) the focal length required to include all of the scene in the frame, and the wider our field of view, the smaller the moon will appear in the scene.
The two images above were taken from the same location (at different times). The size of the moon relative to Half Dome is the same, but in one image I shrank the scene and enlarged the moon with a telephoto; in the other, I widened the scene and shrank the moon with a wide angle lens. To get the wide scene and the large moon, I’d need a vantage point with the same angle of view, only much farther back (sadly, that vantage point doesn’t exist).

Foothill Moonrise, Sierra Foothills, California
The story of this image
Armed with this knowledge, I’m on constant lookout for distant subjects that stand out against the east or west horizon. This oak tree in the foothills west of Sacramento has been on my radar for awhile—for years I’ve noted it from the road, but was always on my way somewhere else and never had time to hunt for a vantage point that would work for the moon.
One evening I found myself with a little extra time when conditions changed and a planned foothills shoot didn’t materialize as hoped. Instead of heading straight home, I spent the hour or so of remaining daylight searching west of this tree for a vantage point that would align it with the upcoming moonrise. (Not only do I need a distant enough view that puts the tree against the sky, that view needs to align with the rising moon.)
Back home I did a little more plotting with my topographic software and came up with a tentative plan, and on the evening of the full moon I made my way back up to the foothills. I knew about where the moon would rise, but because I don’t know the exact altitude (in degrees) of the hillside from my planned location, I couldn’t be sure exactly when the moon would appear. (That’s not a problem once I’ve photographed a moonrise from a location, like Yosemite.)
Unfortunately, I got hung up by traffic that sapped all the extra time I’d factored into my plan, and ended up arriving at my location right at the beginning of the window when I thought the moon might appear. I started extracting and assembling my camera, lens, and tripod with one eye on the east horizon and did a double-take when I realized that the moon was indeed coming up. It was just slightly downhill from (west of) the tree, so I grabbed my gear and sprinted east a couple of hundred yards until they were aligned.
I used my Sony a6000 with my Tamron 150-600 lens (Canon-mount with a Metabones adapter). I maxed the focal length to 600mm, but since the a6000 is a 1.5 crop sensor, my effective focal length was 900mm. I quickly focused on the moon, metered, and started clicking. I used ISO 400 to speed my shutter and mitigate micro-vibrations that can be easily magnified at such a long focal length.
The tree was about a mile-and-a-half away. If I hadn’t been so rushed I’d have probably stopped down to f/11 or f/16 to ensure more depth of field (the hyperfocal distance was over 7,000 feet), but fortunately, focusing on the moon at f8 did the job. In Lightroom I cropped the image slightly (less than 15 percent) for framing and to enlarge the tree and moon a little more.
Workshop Schedule
The Moon, Big and Small


Yosemite Moon
Posted on July 21, 2016
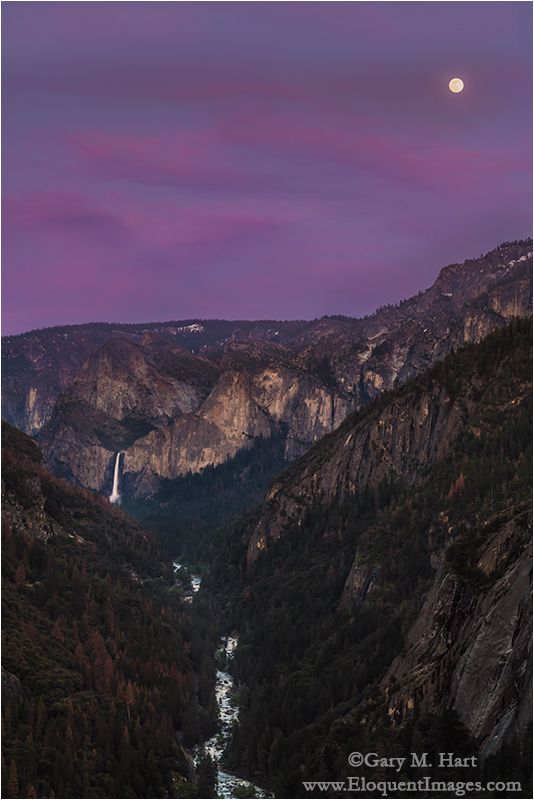
Spring Moonrise, Bridalveil Fall and the Merced River Canyon, Yosemite
Sony a7R II
Sony 70-200 f4
1/2 second
F/8
ISO 100
I’m a relationship photographer. By that I mean I’ve never been one of those photographers who expands his portfolio by adding new locations. Rather, I like to get a feel for a place, not just the where and when of its photo opportunities, but its history, geology, flora, and fauna. I much prefer digging deeply into one scenic area to visiting a large variety of scenic areas. This is a personal style thing, and I know my more deliberate approach would drive many photographers crazy, but I’ve learned that I’m rarely very productive on my first visit anywhere, and often not until I’m several visits in.
I’m probably several hundred (thousand?) visits into my Yosemite relationship, with no end in sight. But despite this extensive history, any moonrise above Yosemite Valley, regardless of the phase, still takes my breath away. Orbital geometry aligns Yosemite’s moon with different features as the seasons change, and I try to be there for as many moonrises as possible. Whether it’s the late fall and winter full moon hovering above Yosemite Valley, the summer crescent moon appearing from behind Half Dome, or the spring full moon rising above Bridalveil Fall, I just can’t get enough of it.
As with most of my Yosemite workshops, a planned highlight for this year’s April Yosemite Moonbow and Wildflowers workshop was a moonrise, this time the Bridalveil Fall full moon. Throughout the workshop we’d enjoyed a Yosemite Valley bursting with more water than I’d seen in several years, a dogwood bloom that was just about at peak, and a sky enhanced by an assortment of beautiful clouds.
When the moonrise day came and the clouds stayed, there were a few concerns for our moonrise. But knowing Yosemite well enough to understand that you can’t predict the conditions five minutes from now based on the conditions right now, I made sure we were in position with cameras ready (and fingers crossed).
Moon or not, the view up the Merced River Canyon that evening was beautiful, but when the moonrise time arrived and the moon didn’t, I scanned the clouds for hints of the moon’s glow. Though there was no sign of it, a little higher, and directly in the moon’s path, the clouds appeared thinner; higher still, actual stripes of blue sky gave me hope.
By the time the moon emerged, nearly ten minutes after sunset, the entire sky had taken on a rich magenta hue. The Merced River Canyon below had become quite dark, but my Singh-Ray two-stop hard-transition graduated neutral density filter held back the (daylight-bright) moon enough for me to give the canyon the light it needed. The final step for this image came in Lightroom and Photoshop, which enabled me to add a little more light to both the canyon and the clouds (which had been darkened along with the moon by the GND), and pull back the highlights in the moon.
One more thing
People ask me if I ever tire of Yosemite, and I can honestly answer, no. Part of keeping it fresh is the infectious excitement when the people I’m with witness something like this moonrise. (I don’t think this makes me unusual—most people get vicarious pleasure from the joy of others’ first experience of something that’s special to us.) This night the moonless pink sky was enough to thrill everyone, but when the moon poozed out, it became one of those once-in-a-lifetime moments for everyone in the group. That just never gets old.
Join me in a Yosemite photo workshop
Yosemite Moons
Click an image for a closer look and slide show. Refresh the screen to reorder the display.


Eye on the sky
Posted on April 27, 2016

High Sierra Moonrise, Glacier Point, Yosemite
Sony a7R II
Sony/Zeiss 24-70 f4
2.5 seconds
F/10
ISO 200
I spend much of my photography time chasing the moon. Most of my trips factor in the moon’s phase and location—usually to catch a full or crescent moon rising or setting above a particular landmark, and often to photograph a landscape by moonlight (full moon) or starlight (no moon). But sometimes the moon catches me less than fully prepared, and I need to improvise.
For example
I enjoyed the January full moon with my workshop group in Death Valley and the Alabama Hills; in February my Horsetail Fall workshop group photographed a full moon rising above Yosemite Valley; in March I was in Sedona with Don Smith to photograph the full moon as it rose above Cathedral Rock and Oak Creek; and last week my Yosemite Moonbow and Wildflowers workshop group photographed the April full moon above Bridalveil Fall and the Merced River Canyon, then headed off to catch a moonbow in the mist at the base of Lower Yosemite Fall. And chasing the moon isn’t all about the full moon—already this year I’ve photographed several thin crescents in the Sierra foothills, and next week I raft Grand Canyon, where my group will (fingers crossed) witness a waning crescent moon just after sunset, and later that night photograph the canyon illuminated by nothing but the Milky Way and thousands of stars only visible in a moonless sky.
All this planning around the moon does indeed get me to many beautiful locations at just the right time, but sometimes the moon catches me in situations where, without the necessary knowledge at hand, I’m forced to think on my feet (and smartphone). Most recently was the unplanned moonrise added to last week’s Yosemite workshop. When the National Park Service opened Glacier Point about a month earlier than expected, I quickly inserted a Glacier Point sunset into the workshop but didn’t have time for anything more than a cursory moonrise check.
Beautiful clouds and light made our Glacier Point sunset a success, but as we were about ready to return to the warmth of the cars, the moon’s imminent arrival crept into the back of my mind. What I knew was that this night, from Glacier point the moon would be rising far to the right of Half Dome (out of the primary view), and probably just slightly too late to photograph effectively (not enough light to capture both landscape and lunar detail). Nevertheless, before packing up my gear I pulled out my iPhone to be certain we weren’t making the classic photographer’s mistake of leaving too early.
This won’t be on the test
Without a strong cell signal, I had to resort to apps that function offline. I started with Focalware, my go-to app for the sun’s and moon’s altitude and azimuth from any location on Earth. Next, now armed with the moon’s azimuth, I opened MotionX-GPS (with the map pre-downloaded) to plot its location relative to the current landscape, determining that it would emerge from behind Mt. Clark.
The final (and most difficult) piece of the puzzle was determining when the moon would appear. This is tricky because published moonrise times always assume a flat horizon—great if you’re on a ship at sea, but not so much anywhere else, and especially not in the mountains.
Using the topo info in the MotionX app, I determined that Mt. Clark’s elevation was around 11,500 feet. Knowing the Glacier Point is at 7,200 feet, I subtracted 7,200 from 11,500 and got 4,300 feet, the vertical distance between my location and the point where the moon would appear. Because the MotionX app also gave me the horizontal (as the crow flies) distance between me and Mt. Clark (about 8.2 miles, or around 43,300 feet), I had everything I needed to plug into my HP-11C (scientific calculator) app and compute the altitude, in degrees, that the moon would need to achieve before cresting the peak (thank God I stayed awake in trigonometry). With that information, it was a simple matter of returning to Focalware to see what time the moon would ascend to that altitude (appear above Mt. Clark).
There are apps that will do all this for me (PhotoPills and The Photographer’s Ephemeris are the ones I recommend), but they require connectivity, and the foresight to do the work when my signal is strong enough to download the maps. (Plus, I just like doing it my way.)
I never tire of this stuff
So, after less than five minutes of figuring, I was confident enough to tell everyone the moon would appear from behind Mt. Clark at 7:57 p.m., plus or minus two minutes. That gave us a couple of minutes to prepare a composition, and sure enough, right around 7:55, the clouds behind Mt. Clark started to glow; at 7:58, there it was and we were in business. In this case the thin clouds on the horizon subdued the moon’s brilliance just enough that I could give the foreground enough light without turning the moon to a white disk.
As often as I do this (sometimes I plot the moon just for fun, even though I know I can’t be there to enjoy it), few things thrill me more than my eyes on the exact point on the horizon at the moment the moon first nudges into view.
Understanding vs. knowledge
I know my process sounds complicated, but it really isn’t—in fact, plotting the moon this way doesn’t require any special insight beyond what most of us learned in high school. But it does illustrate something I constantly stress: the advantage of understanding over knowledge. When we know something, we can respond to a finite set of circumstances; when we understand something, we can reason our way to knowledge beyond our training.
One more quick example: A couple of days ago, I was scouting a potential sunrise location in the Columbia River Gorge. Because I’m reluctant to trust compass apps that point an arrow (or whatever) in a general direction, I pulled out Focalware and saw that tomorrow’s sunrise azimuth would be 70 degrees. Focalware also told me that the sun’s current azimuth was 253 degrees. Since I know that a (solar) shadow always points exactly 180 degrees from the sun’s current azimuth, I knew that my shadow was pointing directly at the 73 degree azimuth (253 minus 180), more than close enough to figure out where the sun would appear (in this case, farther north than ideal).
Whether it’s lunar geometry, exposure settings, depth of field, or whatever, understanding (and visualizing) a system’s underlying principles is always superior to memorizing its facts. And amazingly, it’s almost always simpler than we imagine. Since the position of the sun, moon, and stars are important to me, I try to visualize the celestial choreography.
Likewise, the more you can understand what’s happening when you adjust your shutter speed, f-stop, and ISO, the better prepared you’ll be to reason your way through difficult exposure puzzles, such as, I really need a lot of depth of field to get this tree and that mountain sharp, but the breeze is really blowing the leaves?, or, The exposure is perfect for this 20-second pinpoint stars image, but how can I do a 30-minute star trail shot of the same scene without changing the exposure?.
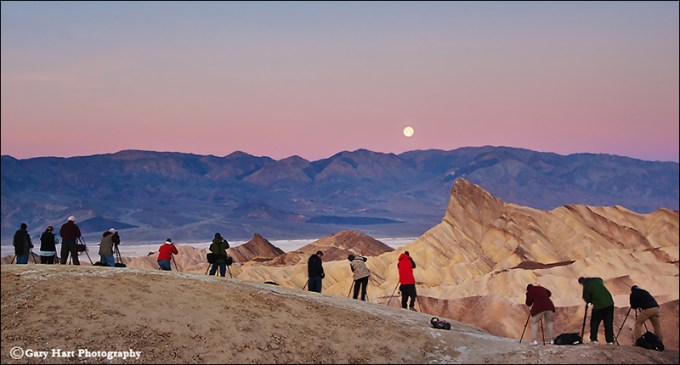
Photo Workshop Schedule
A gallery of celestial wonders


Tips to improve your full moon photography
Posted on March 24, 2016

Winter Moon, Zabriskie Point, Death Valley
Sony a7R II
Sony/Zeiss 24-70 f4
1/6 second
F/8
ISO 100
Have you ever seen a glowing full moon suspended above a beautiful landscape and been moved enough to grab your camera? And how many times have those pictures actually matched your memory of the moment? Not too many, I’d guess. Either your landscape was completely black, or (more likely) the moon was an ugly white blob. You’ve just experienced an example of the human eye’s vastly superior dynamic range—while you could see detail in the landscape and the moon, your camera could only see one or the other.
Lot’s of scouting and plotting goes into aligning a full moon with a terrestrial subject, as close to the horizon as possible, when the light’s just right. For me, just right means a sky dark enough for the moon to stand out (the darker the better), but not so dark that I lose foreground detail in the twilight shadow. Since I don’t blend images, I need to get the landscape and lunar detail with a single click.
I’ve found that the “right-time” sweet spot for single-click full moon photography is a window about 10 minutes on either side of sunrise/sunset. Since the published sun/moon rise/set times assume a flat-horizon—unless you’re on a boat at sea, the sun and moon will probably be below the horizon when they’re advertised to be rising and setting.
It helps to know that as the moon goes through its 29-day cycle from new to full and back, it rises a little less than an hour later each day (that’s an average that varies with several factors, but it’s a good rule-of-thumb). This generally makes the moon visible in my 20-minute exposure sweet spot the day before it’s full for a sunset moonrise, and the day after it’s full for a sunrise moonset, because there’s more foreground light to work with. But even then the landscape will be bathed in shadow, while the moon remains daylight bright, so getting myself on location in this 20 minute window is only half the battle.
In general, digital cameras have made exposure easier. Shooting film, difficult exposures meant a lot of guessing, bracketing, and (especially) hoping. Shooting digitally, not only can we instantly eyeball each image, the histogram shows us exactly how our exposure worked. Unfortunately, the histogram isn’t much help when the moon’s involved, because the moon doesn’t usually occupy enough image real estate to register on the histogram. If you’re not careful, you might find yourself reveiwing an evening’s worth of images with beautiful histograms and a hopelessly blown moon. What’s a photographer to do?
The key to exposing any high dynamic range scene is pushing the highlights as far as you can without blowning them out. For most scenes the histogram is sufficient, but exposing for the moon requires help from your camera’s Highlight Alert (blinking highlights) feature. And since most cameras allow you to view images in multiple modes (e.g., with the luminosity histogram, RGB histogram, no histogram, full capture information, no capture information, and so on), it’s also important to determine which view or views actually show the blinking highlights (not all do)—if you’re not sure, I suggest intentionally overexposing a scene and reviewing the image in the camera’s various display modes.
Moonrise
When photographing a rising full moon at sunset, simply metering for the landscape works at the outset because there’s still plenty of light to capture foreground detail without overexposing the moon. At this point the histogram tells me everything I need to know. But as the sky darkens, so does the foreground, while the moon remains unchanged.
To keep my histogram in the ideal range as twilight deepens, I add light to my image by bumping the shutter speed in 1/3 stop increments. Each time I increase the shutter speed, I check the image to ensure that the moon’s not blinking. As soon as my exposure causes the moon to blink, I know I’ve reached my highlight threshold and I’m pretty much done adding light.
Once I’ve pushed the moon to my camera’s highlight threshold, I continue shooting until the shadows are so dark that no useable data can be recovered. Because highlight and shadow recovery varies with the camera, I strongly encourage you to familiarize yourself with your camera’s shadow and highlight threshold (how far to the left and right can push the histogram and still get usable detail).
If you’re shooting raw, you can probably push your exposure until part of the moon is blinking, but if the entire lunar disk blinks, you almost certainly will need to back down your exposure. Adding a graduated neutral density filter will hold back the moon enough to buy you five or ten minutes of shooting before the moon blows out.
Moonset (an example)
Photographing a setting full moon at sunrise is the sunset process in reverse—we start with the moon glowing above a landscape much too dark to get detail without hopelessly blowing out the moon, and finish when the moon sets, or when the sky brightens to the point that the moon starts to wash out.
In January, I got my Death Valley Winter Moon workshop group out to Zabriskie Point about 45 minutes before sunrise. The moon was indeed beautiful, but far too bright to photograph with the dark foreground. But it was high enough that I was able to do long exposures without the moon while I waited for the scene to brighten.
About 20 minutes before sunrise I pulled out a 3-stop hard-transition graduated neutral density filter and started including the moon, dialing my exposure down until the moon stopped blinking—the most light I could give the scene without losing the moon. At first the foreground was still far too dark to contain usable detail, but within 5 minutes I started to feel like the scene had brightened enough to allow usable detail (albeit with a fair amount of Lightroom Shadow/Highlight work later).
From that point on, I just worked on a variety of compositions that included the moon. Monitoring my histogram, I shortened my shutter speed to reduce the exposure as the foreground brightened. Eventually the foreground brightened enough that I didn’t need the GND filter.
In a perfect world the moon reaches the horizon while it’s in the sunrise/sunset 20(-ish) minute exposure sweet-spot (sky dark enough that the moon stands out, but not so dark that I can’t get landscape and lunar detail), but this morning the moon was high enough that the contrast flattened before it set.
The above image I captured early in the sweet spot—the foreground looked quite dark on my LCD, while the moon was mostly intact, with a couple of blinking specks. But I knew my Sony a7R II well enough to be confident that simple highlight and shadow adjustments in Lightroom would recover all the necessary detail.
Photo Workshop Schedule
A Full Moon Gallery (Large and Small)


The Secret Weapon for Overcoming Unsung Landscapes
Posted on July 24, 2015

Crescent at Sunset, Sierra Foothills, California
Sony a7R
Tamron 150-600 (Canon-mount with Metabones IV adapter)
1/6 second
F/9
ISO 800
I travel a lot. A lot. Don’t get me wrong—I know I’m incredibly fortunate to see and photograph the things I do, but sometimes it’s nice to be home. Despite the world-class locations I get to visit, I don’t cease being a photographer just because I’m home. I spend a lot of time exploring and photographing the unsung landscapes near home, landscapes that few would cross borders to photograph, but landscapes that I feel a particular connection to by virtue of a lifetime in California.
Look to the sky
The landscape is only half of an image. Since the best photography is usually more than simply a picture of a pretty thing, I always try to juxtapose my terrestrial subjects with an interesting sky. And unlike stationary terrestrial subjects, you can stand in one place and without moving, watch the sky do some pretty spectacular stuff: moon, stars, clouds, rainbows, whatever.
Sadly, as nice as California’s landscapes are, compared to most places, California has relatively boring skies. If I lived somewhere that gets summer thunderstorms (pretty much anywhere in the United States except the West Coast), I’d find a photogenic tree or creek, then make sure I was there the next time the sky did something special. But in California, I end up doing a lot of moon and star photography (not that there’s anything wrong with that).
Local favorites
My foreground options near Sacramento are rivers and oaks (and wildflowers in spring), and I particularly love our oaks (the rivers near town are often overrun with people). The criteria I use when searching for oaks to put with my sky images are a striking shape (with an oak, that’s usually a given), a distant vantage point that allows me to use a telephoto (to magnify to moon without losing most of the tree), and elevation that puts the tree against the sky instead of other hills and trees. Over the years I’ve collected a number of these spots, and will never tire of looking for more.
Chasing the moon
Last week I drove to the foothills east of Sacramento to photograph a thin slice of moon on the western horizon just after sunset. This wasn’t an exploration mission, it was specifically planned to take advantage of a spot I’d found earlier this year.
Unfortunately, (as I feared) the developers had found my spot too, and I arrived to find “my” trees surrounded by new homes in varying stages of completion—lucky for a handful of homebuyers, but not so much for all the rest of us who enjoy the foothills’ solitude and pristine views.

Tequila Sunset, Sierra Foothills, California

New Moon and Oaks, Sierra Foothills, California
Plan B
Just down the hill from this recently found-and-lost spot was the subject of my very first planned moon shoot, an oak-topped hillside that I’d photographed at sunset many years ago, decided that it would look really nice with a crescent moon, then figured out when to return.
But this time I found the moon far north (to the right) of its position all those years ago (the closer to the summer solstice, the farther north a crescent moon sets), and it soon became clear that only spot that would work was on a shoulderless, blind curve of a busy, two-land road. Compounding the difficulty, the moon this night was also closer to new (thinner and nearer the horizon), significantly shrinking my window of shooting opportunity, which limited the distance I could hike to get there in time. I made several passes in both directions before finding a safe(ish) place to park, then crammed my car all the way up against a tilting fence, two tires in a drainage ditch, and put on my hazard blinkers.
Why did the photographer cross the road?
Getting the alignment I wanted required crossing the road, scaling a barbed-wire fence, and traipsing through knee-high weeds. The knowledge that rattlesnakes pretty much rule these foothills made me acutely aware that the weeds were so thick that I couldn’t really see the landing spot for each step.
I photographed the entire scene with my Tamron 150-600 on my Sony a7R. As the moon dropped, sliding left to right, I moved forward along the fence line to control the relationship between the descending moon and the trees, starting with wider focal lengths that included some or all of the eight to ten trees capping the hill. Because my route dropped as I moved forward, the moon quickly fell into the trees from my perspective, allowing me to include the moon and trees increasingly tighter compositions.
For the night’s grand finale I found an alignment that cradled the moon in the silhouetted branches of a single tree, zooming to 600mm to magnify the moon and eliminate all but one tree. Because a 600mm focal length will catch even the slightest vibration, I went to 800 ISO to maximize my shutter speed in the deepening twilight. Once I shot this I actually rescaled the fence and darted back across the highway attempting to get the moon on the other side of the tree, but by the time I got everything aligned, the trees had been swallowed by the too-dark sky.
Your assignment…
Every location has features that set its landscape apart. Trees, rivers, lakes, mountains, hills, farmland—I could go on, but you get the point. Your local subject doesn’t need to be spectacular, because when the sky is spectacular, all you need is an interesting terrestrial anchor for your image.
The next time you find yourself with time to kill, explore your outskirts and identify unique subjects that you can add to a striking sky. Now, get to work!
Photo workshop schedule
A gallery of unsung landscapes
Click an image for a closer look, and a slide show. Refresh the screen to reorder the display.


Half Dome moonrise
Posted on April 4, 2015
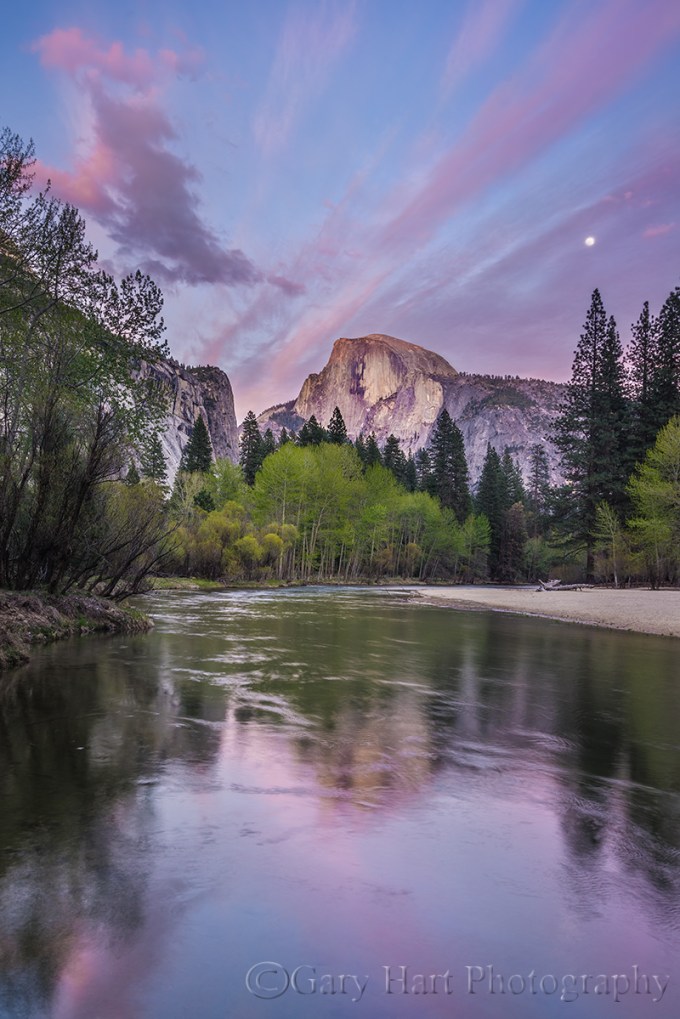
Spring Moon, Half Dome, Yosemite
Sony a7R
Sony/Zeiss 16-35
1.3 seconds
F/11
ISO 80
Last week I was in Arizona (Grand Canyon, Page, Sedona); next week it’ll be Oregon (Columbia River Gorge). But this week my focus is little closer to home, as I enjoy the familiar confines of Yosemite Valley.
The big news here is the water, or rather, the lack thereof. In a lifetime of visits to Yosemite, I’ve never seen the water lower in spring than it is this week, not even close. Most years, the water in Yosemite’s falls peaks in May; this year the flow peaked in February. On my visit to the bridge beneath Lower Yosemite Fall, always a guaranteed drenching in spring, I didn’t feel a single drop. The reflective vernal pool in Cooks meadow is a dirt hole, and the Merced River, which normally roars through Yosemite Valley in spring, is drifting near its leisurely autumn pace.
While these dry conditions might force Yosemite photographers to alter some plans, there is a silver lining to this week’s metaphorical cloud. Thursday night my Yosemite Moonbow and Dogwood workshop group was able to photograph sunset from Glacier Point, which opened last week, the earliest opening on record. And Friday morning we photographed dogwood blooms that already starting to pop out everywhere, a month early.
A particular highlight came Wednesday night. I’d taken my group to a favorite location beside the Merced River, a location I visit so frequently that I usually leave my camera in the car here. But this night, with spring-green cottonwoods framing the upstream riverbank and mix of clouds, sky, and sunlight above Half Dome, it was clear that the conditions were primed for something special. My ace in the hole was the nearly full moon, obscured by clouds when we arrived, that emerged right on cue, just as the sunset pink sky reflected in the Merced River, to provide a perfect accent to an already beautiful scene.
The operative word is accent. As I explained to my group, the moon doesn’t need to be large to be effective. Glowing disk or thin crescent, the moon carries so much emotional weight that, over the right scene and properly placed in the frame, it creates a simple accent that turns a conventionally beautiful scene into something special.
Yosemite, with its host of east-facing vistas, is my favorite spot to photograph a moonrise. Whether it’s a full moon at sunset, or a crescent at sunrise, I do my best to find the Yosemite view that best aligns with the rising moon, scheduling as many workshops and personal visits to coincide with this marvel. When possible the view I choose includes Half Dome, Yosemite’s monolithic centerpiece.
When I can position myself at one of Yosemite’s more distant western vistas, on the opposite side of Yosemite Valley from Half Dome (such as Tunnel View), I have the option of using a telephoto lens to isolate Half Dome in the frame with a magnified moon. When the moon rises too early at one of these distant vantage points, I set up on the east side of Yosemite Valley and closer to Half Dome (raising the horizon so the moon appears later), usually near the Merced River, and use a wide lens that includes the entire scene that uses the moon as an accent.
Of course you don’t need to travel to Yosemite to include the moon in your images. With a little bit of homework, you can find a rising moon in any east-facing scene, or a setting moon in any west-facing scene. To read more about photographing the moon, read the Full Moon and Crescent Moon Photo Tips articles.
Photo workshop schedule
A Half Dome Moonrise Gallery
Click an image for a closer look, and a slide show. Refresh the screen to reorder the display.


Exceeding the sum of the parts
Posted on February 1, 2015
Heaven and Earth, New Moon and Venus, Sierra Foothills
Sony a7R
Sony 70-200 f4 G
2 seconds
F/8
ISO 400
When I decided to make photography my career, I promised myself I’d only photograph what I love. Not because I believed that’s where I’d find my best images (I wasn’t that calculating), but simply because the only good reason I could come up with for leaving an excellent job with a great company was to do something that made me truly happy. And lucky me—today most of my time behind a camera is spent pursuing subjects that touch a special place in my heart, subjects I’m naturally drawn to, camera or not.
For example…
There’s Yosemite, for sure. And pretty much anything celestial. Dramatic weather, dogwood, poppies, oak trees, reflections all thrill me. I could go on…. And as much as I enjoy these subjects individually, I love combining more than one to create (what at least feels to me like) a natural synergy. I mean, photographing Yosemite Valley is always great. And who doesn’t like to see a rainbow? But finding a rainbow arcing above Yosemite Valley? Well, you get the point….
While Yosemite Valley is a bit of a drive, and rainbows are unpredictable, ephemeral phenomena, the oak trees I love so much are deeply rooted less than an hour from home. And the moon is nothing if not predictable. So combining these favorites simply requires mixing a small amount of effort with a little cooperation from the weather.
Over the years, I’ve accumulated a number of candidate views in both directions: east for a full moon at sunset, west for a new moon at sunset; the other way around for sunrise. The east views will work for late afternoon rainbows too, but I’ve yet to capture one of those (it’ll happen).
Marking my calendar
Anxious for something to photograph between my Death Valley and Yosemite winter workshops, I made a point of highlighting the evening of this January’s full moon in my calendar. And rather than return to one of my tried-and-true foothill oak views, I left early enough to explore. After a great afternoon and many discoveries, I finally landed at the end of a new, graded but unbuilt cul-de-sac with a clear view of a distant trio of hilltop oaks.

While waiting for the moon to appear, I fired a few frames, silhouetting the trees against the sun descending through the orange sky, an unplanned and special juxtaposition in its own right. When the moon finally emerged above the darkening horizon, it was flanked by Venus. And when Mercury appeared a few minutes later (center-right, beneath the moon), I had a celestial triangle balanced above the terrestrial oaks. Synergy.
Workshop Schedule || Purchase Prints || Instagram
A gallery of natural synergy
Click any image to scroll through the gallery LARGE


