Eloquent Images by Gary Hart
Insight, information, and inspiration for the inquisitive nature photographer
Don’t settle for the trophy shot
Posted on February 14, 2016
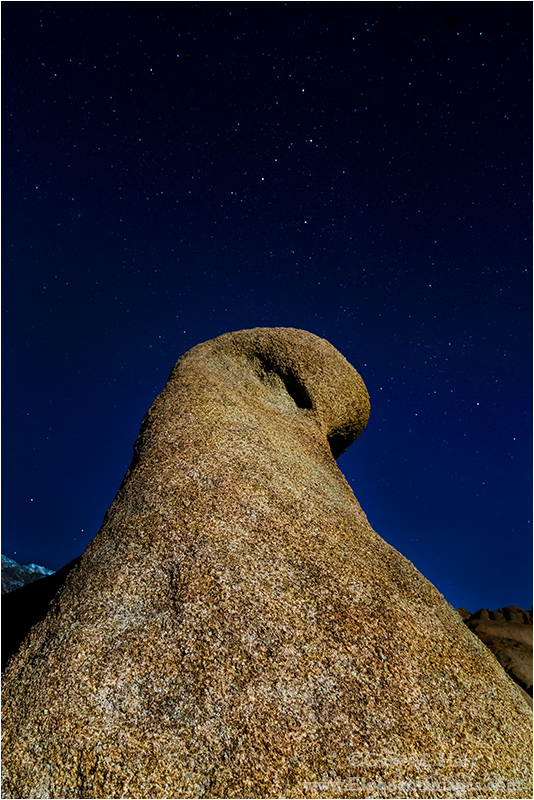
Cassiopeia Above Mobius Arch, Alabama Hills, California
Sony a7R II
Sony/Zeiss 24-70 f4
20 seconds
F/8
ISO 3200
Trophy shot: A beautifully executed capture of a frequently photographed scene.
In Monday’s post I wrote about relationships in nature. They really are everywhere, these juxtapositions of landscape, light, and sky that we photograph by virtue of our timing, position, and creative vision. In their pursuit, photographers label photo spots a “sunrise location” or “sunset location,” research the best time to photograph pretty much every popular landmark, plot the when and where of the moonrise, and…, well, you get the idea.
Unfortunately, in this age of ubiquitous cameras and limitless information, these easy relationship images have become cliché, a “trophy” to display in what seems to be a never-ending “top-this” cycle. While putting a beautiful scene with good light or a vivid sky makes a great foundation for a nice image, elevating an image above trophy status requires a serious infusion of creativity. In other words, rather than settle for an image that’s merely a flawlessly executed version of the same scene we’ve all seen hundreds of times, photographers should be seeking unique relationships between the scene’s varied elements, relationships that look deeper than the conventional treatment.
For example
(Like many other photographers) I’ve photographed California’s Alabama Hills a lot. Here stacked, weathered granite boulders provide a dramatic foreground for Mt. Whitney and the precipitous eastern escarpment of the Sierra Nevada range.
Despite an almost infinite variety of potential foreground subjects, the Alabama Hills trophy shot is Mobius Arch (aka, Whitney Arch), which makes a striking frame for Mt. Whitney. Some version of this composition has been a prime goal for many photographers, but like most easy captures these days, there’s rarely anything special about Mobius Arch images.
As with any location, it helps to start with a nice sky and good light. The natural relationships I try to add to the Alabama Hills’ beauty include sunrise alpenglow on Mt. Whitney, warm light on the granite boulders, and the moon’s disappearance behind the serrated, snow-capped peaks. But as beautiful as these phenomena are, they’re still not enough to set one Mobius Arch image apart from the other.

Moonset, Mt. Whitney and Mobius Arch, Alabama Hills, California
As a workshop leader I have to take my groups to the arch because if they’ve never been here before, it’s probably what they came to see. But my job doesn’t end there—it’s also incumbent on me to help my students find alternate compositions that use the arch in a unique way, or don’t use the arch at all.
I encourage Alabama Hills first-timers to seek relationships that combine the foreground rocks, distant peaks, and whatever is happening in the sky in ways they haven’t seen before. It can take a while, but the longer they work on a scene, the more the hidden relationships start to appear. Eventually most tire of the arch and start wandering off to explore the countless other opportunities nearby.
About this image
Arch or not, a particular Alabama Hills favorite of mine is moonlight, especially in winter, when the snowy crest glows with reflected moonlight. Last month, after three wonderfully cloudy days in Death Valley, my Death Valley workshop group traveled to Lone Pine to wrap up the workshop with a sunset and sunrise in the Alabama Hills. Since our Death Valley moonlight shoot had been preempted, after dinner in Lone Pine I took everyone up to the Mobius Arch area to give moonlight one more try.
The sky that night cooperated wonderfully. I started by bouncing between photographers making sure they’d mastered the exposure and focus challenges of moonlight photography. It wasn’t long before everyone was up to speed (it’s not hard) and scattering in search of their own moonlight boulder, mountain, and sky relationships.
Leading a group doesn’t allow me to do creative photography and natural relationship hunting, but that night I did find a couple of minutes to photograph some favorite compositions in the moonlight. It’s amazing how easily the eyes adjust to moonlight, and soon found myself composing as if we were shooting in daylight. It was also quite cold on this January night, but it’s amazing how easily the cold is ignored when the photography’s good.
When the cold started to trump the photography, I walked out to the arch to round up the people who had ended up there. As I said, I don’t get to hunt for the creative relationships when I’m with a group, but as I was exiting the arch I glanced skyward and saw Cassiopeia hanging in the northern sky. What stopped me was the way the arch’s angled profile seemed to lead directly to the constellation. Since I’ve always found this side of the arch interesting without ever finding something to put with it, I quickly extended my tripod and attached my camera and 24-70 lens.
Lowering the camera to about three feet above the ground emphasized the steep slope and compressed a large chunk of mostly empty sky separating Cassiopeia and the arch’s top. In most of my moonlight compositions, even wide open the focus point for the entire scene is infinity, so I simply autofocus on the moon. But with the arch’s textured granite starting just a couple of feet from my lens, I knew I needed to be careful with my depth of field and focus point.
To increase my depth of field I stopped down to f8, compensating for the lost light by cranking my ISO to 3200 (love the high ISO of the a7RII). I tried a couple frames using nothing but moonlight to manually focus, but after magnifying the images in my LCD, it was clear that I’d need focus help. I asked one of the guys in my group to shine his flashlight about a third of the way up the arch, focused, and clicked. After a quick check of the LCD confirmed that I’d nailed the focus, I packed up my gear and headed back to the cars. This was my only sharp frame.
Photo workshop schedule
The View from the Alabama Hills
Click an image for a closer look, and a slide show. Refresh the screen to reorder the display.


Who needs vacations?
Posted on January 1, 2016
Moonlight Magic, El Capitan and Clearing Storm, Yosemite
Sony a7R II
Sony/Zeiss 16-35 f4
30 seconds
F/11
ISO 3200
I was hungry, wet, and cold. With the blacktop obscured by a slippery white veneer, I carefully followed my headlights and a faint set of parallel tire tracks through the Northside Drive tree tunnel. Though the storm that had lured me to Yosemite was finally clearing, that show was lost to the night and dense forest canopy. But even without another clearing storm to add to my Yosemite portfolio, I was quite content with what I’d photographed that day.
Just as my heated seats started to work their magic and visions of dinner filled my head, I rounded a curve and reflexively hit the brakes, sliding not so gracefully into the empty Valley View parking lot. With no forethought I bolted from the car, then had to grab the door to keep from losing my footing on the icy pavement.
Always a beautiful place for photography, Valley View this time was quite literally one of the most beautiful sights I’d ever witnessed. I inhaled cold air and held it. Instead of racing for my gear, I exhaled slowly and gaped through my vaporized breath at ice-coated trees and granite, moonlight infused clouds draping El Capitan, and the glassy Merced River spreading before me like a luminous carpet. The scene’s centerpiece, the element that really took the experience over the top for me, was a full moon embedded in the night sky like a blazing gem, illuminating every exposed surface.
Gathering my wits along with my gear, I started to think about photographing the scene. Because the moon was too bright to photograph (and I have the pictures to prove it), I started with a composition my favorite aspects of the rest of the scene: the clouds, the reflection, and the frozen moonlight magic—the moon would remain out of the frame, to the right.
In most moonlight images, my foreground is distant enough that everything in my frame is at infinity, regardless of my f-stop. But the nearby glazed trees and rocks meant this scene needed to be sharp from just a few feet away all the way to the stars, requiring a small aperture and very precise focus point selection. A quick check of my hyperfocal app told me that focusing 5 feet away at f/11 would give me the depth of field I needed. Once my eyes adjusted, the moonlit branches were just bright enough to manually focus on by magnifying the scene in my Sony a7R II’s viewfinder (I love mirrorless).
But at f/11, even with the brilliant moonlight, getting enough light to reveal the scene required other compromises. Pushing my shutter speed to 30 seconds—the after-dark threshold that the risk of star motion prevents me from crossing—I had to bump my ISO to 3200 to capture enough light. Fortunately, the a7R II was up to the task—while I did get some noise in the shadows, it cleaned up nicely in processing.
Leaving Valley View that night, the chill and hunger I’d felt earlier had disappeared. Photography is funny that way—we put ourselves in the most miserable conditions, then completely forget how miserable we are when Nature delivers. The key is to remember this capacity when we’re debating whether to set the alarm for zero-dark-thirty, skip a meal, or brave extreme conditions.
This El Capitan moonlight moment turned out to be my final 2015 photo shoot, a fitting conclusion to a year filled with highlights. Breaking in a new camera while learning a completely new system and way of shooting (Sony mirrorless), I visited the dunes of Death Valley, the rain forests of Hawaii, Yosemite’s glacier-carved granite (many times), Grand Canyon top and bottom—among many. I photographed lightning, rainbows, snow and ice, an active volcano, spring wildflowers and fall color, the moon in many phases, and the Milky Way above some of the world’s most spectacular scenery. How fortunate I am to have a job that I don’t need a vacation from!
At the end of 2014, while reflecting on the beauty I’d witnessed that year, the new friends I’d made, not to mention countless new memories with old friends, I wondered what 2015 would bring. And now I know. In one year I’ll do a similar retrospective on 2016, and while I have no idea what’s in store, I’m confident my good fortune will continue.
So let’s go….
Workshop Schedule || Purchase Prints || Instagram
Here’s what my 2015 looked like
Click any image to scroll through the gallery LARGE


Seeing in the dark
Posted on November 21, 2014

Autumn Moonlight, El Capitan, Yosemite
Canon EOS-5D Mark III
16 mm
20 seconds
F/4
ISO 800
One of the great joys of the digital photography is the ease with which our cameras reveal the world after dark. Scenes that are merely shadow and shape to the human eye are recorded with unseen color and detail by a digital sensor, and stars too faint to compete with moonlight shine brightly.
After a lifetime of refusing to sap my enjoyment of the night sky by attempting to photograph it with film, about ten years ago (a year or two into my personal digital photography renaissance) I decided to take my camera out after dark in the Alabama Hills to photograph Mt. Whitney and the sawtooth Sierra crest. It took just a few frames to realize that this was a new paradigm, but I wasn’t quite hooked until I viewed my images later that night and found, among a host of similarly forgettable Mt. Whitney among snow-capped peak images, one image of the Big Dipper framed by stacked, moonlit boulders that stood out. Ever since I’ve chased opportunities to photograph my favorite scenes after dark—first solely by the light of the full moon, and more recently (as digital sensors improve) by starlight.

Big Dipper, Alabama Hills, California
As I incorporate night photography into most of my workshops, I have no qualms about guaranteeing success for all my moonlight shoots (barring equipment failure). This month’s Yosemite Autumn Moon workshop was no exception—after photographing a beautiful full moon rising above Half Dome at sunset, we broke for dinner, then returned to the wide open spaces of El Capitan Meadow beneath El Capitan for a moonlight shoot. One of my favorite things about these moonlight shoots is the way everyone is equal parts surprised and delighted by how simple it is, not to mention how beautiful their images are.
I’d spent time that afternoon getting the group up to speed on moonlight photography (it doesn’t take long), so after a brief refresher on the exposure settings and focus technique, everyone seemed to be managing just fine without me. Feeling just slightly unessential, I decided to try a few frames of my own. Struck immediately with how beautifully the autumn gold stood out, I shifted my position to align the most prominent tree with El Capitan. As with most of my night images, I went vertical to maximize the amount of sky in my frame. I also took care to compose wide enough to include Cassiopeia on the right side of the scene.
If you have a digital SLR and a relatively sturdy tripod, you have everything you need for night photography. I have a couple of articles in my Photo Tips section to guide you: It’s best to start with moonlight photography before attempting the much more challenging starlight photography.
A moonlight gallery
Click an image for a closer look, and to enjoy the slide show


Moonbow: Nature’s little secret
Posted on May 20, 2014

Moonbow and Big Dipper, Lower Yosemite Fall, Yosemite
Canon EOS-1Ds Mark III
22 mm
30 seconds
F/4
ISO 800
Rainbows demystified
A rainbow forms when sunlight strikes airborne water droplets and is separated into its component spectral colors by characteristics of the water. The separated light is reflected back to our eyes when it strikes the backside of the droplets: Voila!—a rainbow.
Despite their seemingly random advent and location in the sky, rainbows follow very specific rules of nature—there’s nothing random about a rainbow. Draw an imaginary line from the sun, through the back of your head, and exiting between your eyes; the rainbow will form a full circle at 42 degrees surrounding that line (this won’t be on the test). Normally, because the horizon almost always gets in the way, we usually see no more than half of the rainbow’s circle (otherwise it would be called a “raincircle”). The lower the sun is, the higher the rainbow and the more of it we see; once the sun is higher than 42 degrees (assuming a flat horizon), we don’t see the rainbow at all unless we’re at a vantage point that allows us to look down (for example, at the rim of the Grand Canyon).
Read more about rainbows on my Photo Tips Rainbows Demystified page.
Moonbows
Moonlight is nothing more than reflected sunlight—like all reflections, moonlight retains a dimmer version of most of the qualities of its source (the sun). So it stands to reason that moonlight would cause a less bright rainbow under the same conditions that sunlight causes a rainbow. And guess what—it does! So why have so few people heard of moonbows? I thought you’d never ask.
Color vision isn’t nearly as important to survival in the wild as the ability to see shapes, so human vision evolved to bias shape over color in low-light conditions. In other words, colorful moonbows have been there all along, we just haven’t be able to see them. But cameras, with their ability to dial up sensitivity to light (high ISO) and accumulate light (long exposures), “see” much better in low light than you and I do.
While it’s entirely possible for a moonbow to form when moonlight strikes rain, the vast majority of moonbow photographs are waterfall-based. I suspect that’s because waterfall moonbows are so predictable—unlike a sunlight rainbow, which doesn’t require any special photo gear (a smartphone snap will do it), capturing a lunar rainbow requires at the very least enough foresight to carry a tripod, and enough knowledge to know where to look.
Nevertheless, even though we can’t see a moonbow’s color with the unaided eye, it’s not completely invisible. In fact, even without color, there’s nothing at all subtle about a bright moonbow—it may not jump out at you the way a sunlight rainbow does, but if you know where to look, you can’t miss a moonbow’s shimmering silver band arcing across the water source.
Yosemite Falls moonbow
Despite frequent claims to the contrary, moonbows can be seen on many, many waterfalls. Among the more heralded moonbow waterfalls are Victoria Falls in Africa, Cumberland Fall in Kentucky, and (of course) Yosemite Falls in Yosemite National Park.
Yosemite Falls is separated into three connected components: Upper Yosemite Fall plummets about 1400 feet from the north rim of Yosemite Valley; the middle section is a series of cascades dropping more than 600 feet to connect the upper and lower falls; Lower Yosemite Fall drops over 300 feet to the valley floor. While there are many locations from which to photograph the moonbow on Upper Yosemite Fall, the most popular spot to photograph it is from the bridge at the base of Lower Yosemite Fall.
The Lower Yosemite Fall moonbow is not a secret. Arrive at the bridge shortly after sunset on a full moon night in April, May, and (usually) June, and you’ll find yourself in an atmosphere of tailgate-party-like reverie. By all means come with your camera and tripod, but leave your photography expectations at home or risk appreciating the majesty of this natural wonder. In springs following a typical winter the mist and wind (the fall generates its own wind) on and near the bridge will drench revelers and cameras alike. After a particularly wet winter, the airborne water and long exposures can completely obscure your lens’s view during the necessarily long exposures. And if the wet conditions aren’t enough, if you can find a suitable vantage point, expect to find yourself constantly jostled by a densely packed contingent of photographers and gawkers stumbling about in limited light. Oh yeah, and then there are the frequent flashes and flashlights that will inevitably intrude upon your long exposures.
But, if you still have visions of a moonbow image, it’s best to come prepared:
- A tripod and digital SLR camera are must (a film camera will work too, but it adds complications I won’t get into here)
- Wear head-to-toe rain gear so you can concentrate on keeping your camera dry
- Bring a chamois or bath towel—you’ll be using it frequently
- An umbrella can help keep water off your lens during a long exposure
- Practice moonlight photography (you’ll find my how-to of moonlight photography, including exposure settings and focus techniques, in the link) before you get there—trust me when I say that you don’t want to be learning how to photograph by moonlight while you’re trying to capture a moonbow.
- Don’t have time to practice before your visit? Stop at the top of the Lower Yosemite Falls trail, where you can see the entire fall from top-to-bottom, and practice there—the conditions are much easier, and moonbow or not, these could turn out to be your favorite images of the night.
About this image
I’d taken my May workshop group to Glacier Point on this night, so we didn’t arrive at Yosemite Falls until nearly an hour after the moonbow started. This late arrival was intentional on my part because California’s severe drought has severely curtailed the mist at the base of the lower fall. In a normal year the mist rises so high that the moonbow starts when the moon is quite low (remember, the lower the sun or moon, the higher the bow); this year, I knew that the best moonbow wouldn’t appear until the moon rose and the bow dropped into the heaviest mist.
I’d given the group a talk on moonlight photography that afternoon, but we stopped at the top of the trail to practice for about 20 minutes, using the exquisite, tree-framed view of the entire fall. When everyone had had a success, we took the short walk up to the bridge and got to work.
We found conditions that night were remarkably manageable—by the time we arrived at the bridge, at around 9:45, some of the crowd had thinned, and our dry winter meant virtually no mist on the bridge to contend with. I started with couple of frames to get more precise exposure values to share with the group (moonlight exposures can vary by a stop or so, based on the fullness of the moon, its size that month, and atmospheric conditions), then spent most of my time was spent assisting everyone and negotiating locations for them to shoot (basically, wedging my tripod into an opening then inviting someone in the group to take my spot).
This image is one of my early test exposures—I went just wide enough to include the Big Dipper (just because it’s a test doesn’t mean I’ll ignore my composition). In wetter years I’ve captured move vivid double moonbows and complete arcs that stretch all the way across the frame, but I kind of like the simplicity of this year’s image. I’ve been including the Big Dipper in my moonbow images for many years because I just can’t resist it. I’ve found that May is the best month to capture it in a position that makes it appear to be pouring in the fall.
Join me as we do it all over again in next year’s Yosemite Moonbow and Wildflowers photo workshop or Yosemite Moonbow and Dogwood photo workshop
Two out of three ain’t bad
Posted on December 20, 2013

Moonlight Cathedral, El Capitan, Yosemite
Canon EOS 5D Mark III
30 seconds
23 mm
ISO 1600
F8
I scheduled my Yosemite Comet ISON photo workshop way back when astronomers were crossing their fingers and whispering “Comet of the Century.” Sadly, the media took those whispers and amplified them a thousand times—when ISON did its Icarus act on Thanksgiving day, its story became the next in a long line of comet failures (raise your hand if you remember Kohoutek).
But anyone who understands the fickle nature of comets would be foolish to get too excited about (or plan an event solely around) a comet’s promised appearance. So I scheduled this workshop knowing that even if the comet fizzled, storms and snowfall can make winter in Yosemite Valley spectacular. But, because snowfall in Yosemite is also far from a sure thing, to further enhance our chances for something special, in addition to Comet ISON and winter conditions, I scheduled this workshop to coincide with the December full moon. And while we didn’t get the comet, well, to quote Meat Loaf, “two out of three ain’t bad.”
Yosemite Valley received nearly a foot of snow a few days before the workshop started. Given Yosemite frequent sunshine and relatively warm temps, normally that snow would have all but disappeared from the trees and rocks within a few hours, and within a couple of days would have been marred by large brown patches—exactly what happened in the unshaded parts of Yosemite Valley. But because this storm was followed immediately by a cold snap, those parts of the valley that remained all day in the shade of Yosemite’s towering, sheer granite walls (mostly the south and/or west side of the valley) didn’t shed their snow and actually accumulated ice as the week went on.
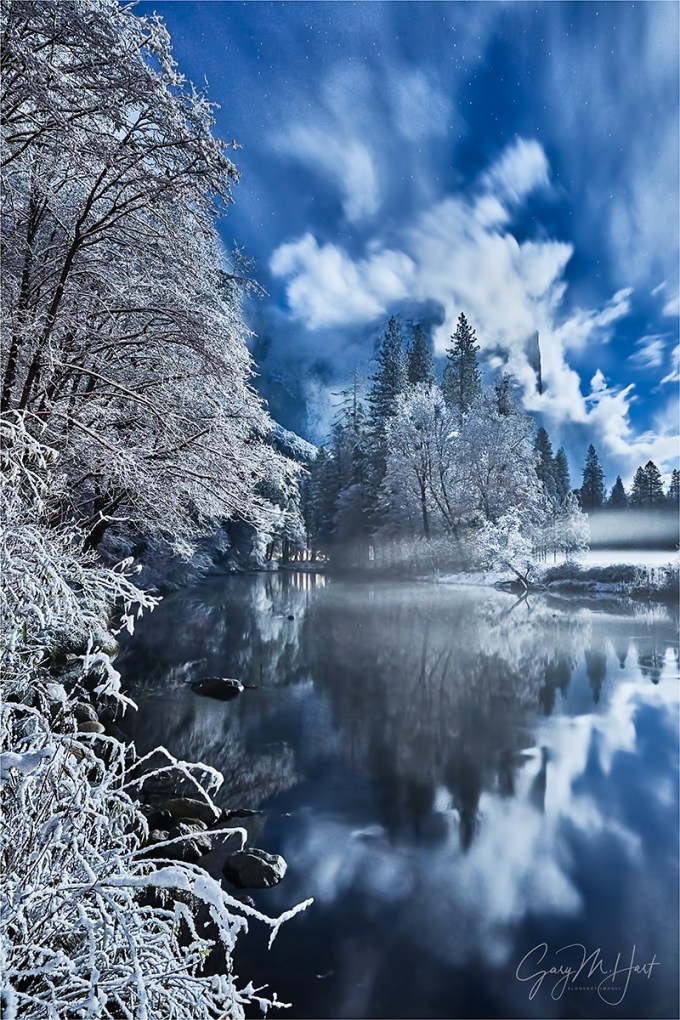
Valley View was the prime beneficiary of this all day shade—by the time my workshop started, snow-capped rocks, hoarfrost blooms, and a sheet of windowed ice had elevated this always beautiful location to more beautiful than I’ve ever seen it. Full moon notwithstanding, it was the highlight of the workshop. Taking advantage of our unique opportunity, my group photographed Valley View early morning, late afternoon, at sunset, and (as you can see) by moonlight.
There are lots of things human vision can do that the camera can’t—fortunately, one of those things is not see in low light. While moonlight adds beauty to any scene, when a scene starts out off-the-charts-beautiful, moonlight makes it a downright spiritual experience. Though moonlight is beautiful to the eye, even at its brightest, a full moon isn’t bright enough to reveal all the beauty present. Enter the camera.
Giving this scene lots of light allowed me to reveal how it would appear if your eyes could take in as much light as, say, an owl. Or your cat. The blueness of the sky, the sparkling ice crystals, the reflection in the river—that beauty is no less real just because it’s invisible to our eyes.
To reveal all this “invisible” beauty, I started at ISO 800, f4, 15 seconds. But the unusually extreme (for moonlight photography) depth of field this composition required caused me to increase to ISO 1600 and 30 seconds to allow the extra DOF f8 provides. And I was thrilled to discover that there was enough light to enable live-view manual focus (my now preferred focus method for all situations). According to my DOF app, focusing about eight feet into the frame would give me sharpness from front-to-back, but just to be sure, after capture I magnified image in my LCD and checked the ice in the foreground and trees atop El Capitan.
The other problem I needed to deal with was lens flare, an easy thing to forget about when photographing in the dark. But the moon is a bright light source and all the lens flare rules that apply to sunlight photography also apply to moonlight—if moonlight strikes your front lens element, you’ll get lens flare. Since I hate lens hoods, I manually shield my lenses in flare situations. A hat works nicely, but there was no way I was taking my snuggly warm hat off, so I shaded my lens with my hand for the entire 30 seconds of my exposure.
BTW, see that bright light shining through the tree at the base of El Capitan? That’s Jupiter.
Workshop Schedule || Purchase Prints
A Gallery of Snow and Ice
Click an image for a closer look and slide show. Refresh the window to reorder the display.


The calm above the storm
Posted on September 12, 2013

The Calm Above the Storm, Grand Canyon and Lightning by Moonlight, Mather Point
Canon EOS 5D Mark III
30 seconds
F/4
ISO 200
73 mm
If you’ve ever taken off in a violent storm, watched the exploding sky just beyond your window, felt the plane buck until you verged on panic, then suddenly broken through the clouds into utter peace, you might appreciate the dichotomy depicted in this scene.
* * * *
Overwhelmed by the euphoria the Grand Canyon workshop’s final sunrise was this moonlight experience on the South Rim a couple of nights earlier, the highlight of the workshop until that unforgettable morning. Don Smith and I had planned all along for this to be the group’s moonlight night, always a workshop highlight, but we got much more than we bargained for when we found the North Rim under a full scale assault from multiple electrical cells. The moonlit tranquility of our South Rim vantage point was a striking contrast to what was happening across the canyon. Several times per minute the clouds would strobe with lightning hidden by the clouds, and once or twice each minute a bolt would land near the rim for all to see. Above all this activity, the stars twinkled peacefully, clearly indifferent to the violence below.
Unlike the moonless experience at Kilauea a couple of weeks later, photographing with a full moon is pretty straightforward. Not only does the moon make a great focus point (just don’t forget to turn off autofocus before clicking your shutter), you can actually see your camera, its controls, the scene itself, and all potential obstacles (photographers, tripods, camera bags). And because exposures are generally short, do-overs are easy. So my job was easy, pretty much reduced to wandering around reminding everyone to vary their compositions, and making sure they’d all had a success.
Everybody got something that excited them that night, and the variety of images was amazing. I saw vertical and horizontal frames, wide and tight, most aimed north like this one, but there were also some great lightning captures to the east, up the canyon. My own favorite was this one that captured a bolt’s origin through a window high in the clouds, and its forked impact with the rim. While a wide composition would have increased the likelihood of capturing a strike somewhere in my frame, it would have also further shrunk the already distant lightning. My 73mm focal length in this case reflects my desire to make the lightning more prominent, and my confidence in the frequency of strikes in this direction (the more disperse the strikes, the wider I compose). Usually my night exposure decisions are designed to minimize star motion, but in this case I opted for 30 seconds to maximize the chance for capturing a strike (or more) during the exposure—a close look at the stars here clearly shows the onset of motion blur despite the fact that I was aimed north, where star motion is minimal.
This image reminds me why video is no substitute for still photography. Video’s benefits are undeniable, but the ability spend forever in a single instant like this is priceless.
Favorite: The Big Dipper
Posted on August 6, 2013
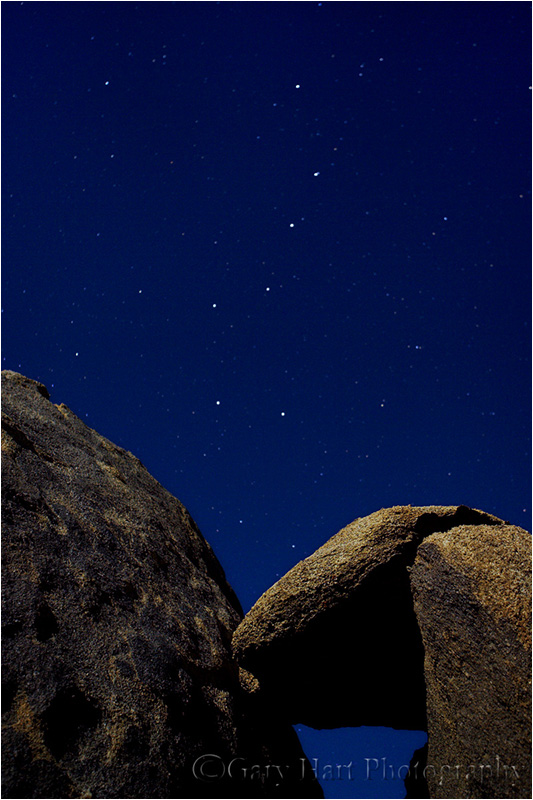
Big Dipper, Alabama Hills, California
Canon EOS-1D Mark II
20 seconds
F/2.8
ISO 200
25 mm
I’ve decided to turn my new Favorites gallery into an irregular series on each of the images there.
* * * *
This image of the Big Dipper above moonlit granite boulders in the Alabama Hills will always have a special place in my heart because it was my first moonlight “success.” I was still coming to terms with the low light capabilities of digital photography, and figured that a full moon over the Alabama Hills might be a good opportunity to play. I was in Lone Pine with my brother to explore the endless daylight possibilities among the weather granite boulders just west of town.
Jay and I started that night by simply photographing the Sierra crest, anchored by Lone Pine Peak and Mt. Whitney, from the side of the road. It wasn’t long before I was confident that I had the exposure settings right (arriving through trial and error at the moonlight exposure recipe I still use), and we soon set out for less prosaic surroundings, ending up in a box canyon at the end of an obscure spur off (unpaved) Movie Road. All of my attention was on Lone Pine Peak and Mt. Whitney in the west, but while waiting for an exposure to complete, I noticed the Big Dipper suspended above the northern horizon.
I wish I could say this composition was divine inspiration fueled by my innate artistic instincts, but it was more of a casual click using a couple of anonymous boulders whose prime attraction was their convenience. Focus was tricky, and while I don’t specifically remember all my decisions, I know I must have realized that sharp foreground rocks trumped sharp stars (that would be moving slightly anyway). I’ve done enough moonlight photography since to know that while manual focus in the dark is difficult, it’s not impossible. Finding focus involves rapidly twisting the focus ring in decreasing concentric arcs around the point where the target “feels” sharp—subsequent experience has taught me that (for me at least) the results are usually better than I fear they are. And of course it doesn’t hurt that even at f2.8, 25mm gives me quite a bit of depth of field.
I remember thinking when the image popped up on the postage-stamp LCD of my 1D Mark II, “That’s pretty cool.” But I couldn’t have been too impressed because I only took two frames before returning to the (ultimately forgettable) Sierra compositions. The next memory I have is looking at my images on my laptop later that night—it was quite clear that this image was my favorite, by a long-shot, and I wished I’d have tried more. I’ve tried unsuccessfully to find these boulders on subsequent visits, but I haven’t given up. I can’t even say that I’d photograph them again, but I’d at least love to see them once more.

We photograph the Alabama Hills in my Eastern Sierra photo workshop—click for details
All I want for Christmas….
Posted on April 27, 2013

Lunar Rainbow, Lower Yosemite Fall, Yosemite
Canon EOS 5D Mark III
15 seconds
F/4.0
ISO 800
26 mm
I returned late last night (well, early this morning) from my 2013 Yosemite Moonbow and Wildflowers photo workshop will lots of great new images and two fewer teeth. True story. The images I can verify; the teeth you’ll need to take my word for. Read on.
Chapter One: In the big inning
Twenty years ago I lost my two front teeth in a freak umpiring accident. Snapped off at the gum line, if you must know. (Nobody ever fouls a pitch straight back in slow pitch softball. Or so I believed.)
The visiting team was rallying in the last inning, with the tying run on second and their portly first baseman waving his bat in the box. The pitcher arced the ball homeward and with an awkward swing that somehow defied reality as defined by Newton, the batter sent the ball spinning toward my face like a yo-yo returning on a string—the picture of that stitched globe obscuring my view the instant before impacting my mouth is permanently etched in my memory. And with impact, Newton returned, imposing his second law with painful suddenness: Force equals mass times acceleration. I never did find out how the game ended.
Two emergency root canals the next morning were followed by a summer filled with trips to the dentist (I should have demanded my own parking space). By September I sported two gleaming crowns, affixed to the surviving tooth stubs (a process that involved embedded metal posts and “permanent” glue), a near perfect match that returned my smile to its original splendor.
Chapter Two: Be true to your teeth (or they’ll be false to you)
Apparently “permanent” means something different in the world of dental adhesives, because over the years (and despite my obsessive commitment to not testing them) my crowns have spontaneously detached several times: Once in the middle of a ten mile run, another time on Christmas day while snowed-in at my brother-in-law’s house in Colorado and fifteen hundred miles from my dentist. Each time I managed to avoid swallowing them, then had to endure much abuse (at the hands of the people who are supposed to love me most) until I could get back to the dentist for an application of the latest space-age cement guaranteed not to fail. Sigh.
Given the history, my biggest fear has always been that my crowns would lose purchase during a workshop (try saying ISO and shutter speed without your two front teeth), but since it only seems to happen once every three-to-five years, I felt fairly safe. I mean, what are the odds?
Chapter Three: Murphy is alive and well and living in Yosemite
After three-and-a-half days photographing waterfall rainbows, a rising full moon, a moonbow (lunar rainbow), and lots of dogwood with a group really nice (and fun!) photographers, my Yosemite spring workshop wrapped up Thursday night with a sunset shoot at one of my favorite Merced River spots. Half Dome, glowing with the warmth of the setting sun, reflected in the river as photographers contentedly crafted their own Yosemite masterpieces. What could go wrong?
I was helping one of the photographers add motion blur to his Half Dome reflection when my two front teeth (they’re connected) dropped without warning from the ceiling of my mouth. To avoid all the complications from the teeth slipping out the backdoor and down my throat, I reflexively dipped my head forward and opened my mouth, snatching them from the air before they could fall into the river. My workshop student was more than a little confused by my sudden theatrics until I flashed my toothless smile and explained that I’d just “Lotht my crownth.” I tried to deflect the inevitable (good natured) derision by telling the rest of the group that their workshop-mate slugged me for not answering his questions quickly enough, but they knew better.
Fortunately the teeth’s failure coincided with the end of the workshop, and I comforted myself with the knowledge that in the bottom of my suitcase was a tube of Polident I’d been carrying for years to mitigate (the very unlikely event of) just this calamity. After saying toothless goodbyes to the group I decided that, with nothing more than a four hour drive, requiring no more human interaction than one or two drive-thru passes, I’d wait until I was home with a mirror and clean, fully lit bathroom to temporarily reinsert my teeth. Then first thing in the morning I’d call the dentist to schedule the few minutes it would take him to “permanently” reattach my crowns. With that plan, I tenderly folded the teeth into a clean napkin from my glovebox, where they’d stay until I made it to the dentist the next morning. And that’s exactly how it would have happened….
Chapter Four: It gets worse
I pulled into the garage a little after midnight, grateful that the teeth hadn’t failed until the end of the workshop and pleased with myself for somehow not frightening the friendly barista who delivered my mocha through her sliding window. I grabbed my phone and wallet from the center console and reached for the napkin containing my teeth, which should have been right there in the cup holder. Hmmm.
A frantic search ensued, starting with all the logical places (beneath the seat) and becoming progressively more desperate (glove box, ash tray, back seat). Before dismantling the spare tire compartment I mentally reconstructed my trip home and flashed to the gas stop in Livingston (one of many generic, brightly lit exits with an assortment of gas stations and fast food selections dotting Highway 99 in the Central Valley). Slowly memories of a quick housecleaning while waiting for my gas to pump materialized—into the convenient garbage can went my Starbucks cup, fast food wrappers, a few stray napki…. Oh. Oops.
So what should have been a fifteen minute ride in the dentist’s chair turned into a two hour marathon involving Novocain, drills, goopy molds, and six hundred of my dollars while the dentist fashioned temporary crowns that will keep me from looking like I ended up on the wrong end of a pool cue until he can craft the “final solution.” In the meantime I’m instructed not to use my front teeth for anything but smiling—”Not even to tear bread,” he warned as I walked out the door. (Which I’m pretty sure means that while they’re in there, I can charge all ice cream purchases to my HSA card.)
Oh, and my dentist a$$ure$ me that ver$ion-two of my crown$ really will be permanent.
* * * *
About this image
About the only thing this image has to do with my teeth is I still had them when I took it. That and the fact that it was captured during the workshop that terminated in their demise. It’s a “moonbow,” a lunar rainbow caused by the light of a full moon. Witnesses see a shimmering silver band, but moonlight isn’t strong enough to reveal color to the naked eye. A camera, on the other hand, can accumulate light, making the scene in the image much brighter than being there.
While beautiful to photograph, the Yosemite Falls moonbow is no secret. The exposure is a piece of cake compared to the rest of the experience, which includes hundreds of photographers and point-and-shoot gawkers jostling in the dark, blowing mist. But despite the difficulties, the tailgate atmosphere at the bridge beneath lower Yosemite Fall is generally festive. Some photographers get a bit testy when a gawker (ignorantly) fires a flash, but generally a good time is had by all and those who want a picture (and are properly equipped and have some idea of what they’re doing) succeed.
The night before this I took my group out for a moonlight shoot without the moonbow (and the crowds) to get everyone comfortable with moonlight photography before braving the mayhem at the lower fall. Unfortunately, on our moonbow night unexpected clouds obscured the moon for most of window when the moon would be low enough for the moonbow. Nevertheless, the moonbow made several brief appearances (each time eliciting cheers) and most of the group got something, many that included a few moonlit clouds to enhance the sky. I spent most of my time working with the group (not the easiest thing to distinguish a dozen specific individuals from a couple of hundred strangers bundled in the dark against the elements) so this was the only moonbow I got that night.
Join me as I try to reprise this shot in my upcoming Yosemite Moonbow and Wildflowers photo workshop.
Yosemite After Dark
Click an image for a closer look, and a slide show. Refresh the screen to reorder the display.


Photographic reality: Accumulate light
Posted on May 27, 2012

Moonbow and Big Dipper, Yosemite Falls, Yosemite
“Photography’s gift isn’t the ability to reproduce your reality, it’s the ability to expand it.”
(The fourth installment of my series on photographic reality.)
Before getting too frustrated with your camera’s limited dynamic range, remember that it can also do things with light that your eyes can’t. While we humans experience the world by serially processing an infinite number of discrete instants in real time, a camera accumulates each instant, storing and assembling them into a single additive frame. The result, among other things, is a view into human darkness that reveals “invisible,” albeit very real, detail and color.
Nothing illustrates this benefit better than a moonlight image, particularly one that reveals a “moonbow.” Several years ago I photographed Yosemite Falls by the light of a full moon a couple of hours after sunset. While there was enough light to see the fall and my immediate surroundings, the world was dark and colorless. Knowing the possibility of a moonbow existed, but unable to see it, I positioned myself with my shadow (cast by the moonlight) pointing more or less in the direction of the fall and dialed in an exposure long enough to make the scene nearly daylight bright. An extremely wide, vertical composition included the Big Dipper high overhead, as if it was the Yosemite Falls’ source.
The result (above) is nothing like what my eyes saw, but it really is what my camera saw. The processing to complete this image involved cooling the color temperature in the raw processor to a more night-like blue; noise reduction to clean up the relatively long, relatively high ISO capture; a little (mostly futile) attempt to moderate the vertical distortion caused by the wide focal length; a slight wiggle in Curves to darken the sky and pop the stars; mild dodging and burning to even tones; some desaturation of the sky (I swear); and selective detail sharpening, avoiding the clouds and darkest shadows.
The definition of breathtaking
Posted on February 11, 2012

Moonlight and Big Dipper, Badwater, Death Valley
Death Valley is notorious for blue skies–great for tourists, but a scourge for photographers. Clouds add interest to a scene, and filtering harsh sunlight through clouds reduces contrast to a range a camera can capture. To mitigate harsh sky problems, I schedule my annual Death Valley workshop for winter to maximize the chance for clouds. And hedging my bets further, I time each workshop to coincide with a full moon–that way, if we don’t get clouds, careful location planning allows me to include a full moon in many of our sunrise and sunset shoots, and allows us to photograph Death Valley’s stark beauty by moonlight.
I returned last night from my 2012 workshop. Not only did we have a creative, enthusiastic group, we also were blessed with a wonderful blend of conditions. On our first two days we were treated to lots of clouds (and even a few snow flurries during a sunset shoot at Aguereberry Point) and beautiful sunrise color on the dunes. But by day three the Death Valley sky was back to business as usual and it was time to plug in a moonlight shoot.
I usually opt for moonlight on the Mesquite Flat Dunes near Stovepipe Wells, but during a pre-workshop visit to Badwater it occurred to me that the salt flat’s white surface was tailor made for the light of a full moon. Since the sky didn’t clear until our third day (the moon rises later every day), I was concerned that the moonlight wouldn’t reach Badwater, 282 feet below sea level and in the shadow of 5,700 foot Dante’s Peak, early enough. I briefly considered returning to the more exposed dunes, but finally decided that I could make Badwater work by simply leading the group out onto the salt flat until we reached the moonlight.
Sure enough, we arrived at Badwater a little after 8:00 p.m. to find ourselves in deep moonshadow. But across the valley, Telescope Peak and Badwater’s west fringe already basked in the light of the rising moon. So off we went to meet the advancing moonlight, following our headlamps through the darkness for about a half mile before reaching the advancing moonlight. With headlamps doused we paused in silence to take in our surroundings: Venus was just disappearing behind Telescope Peak and Jupiter sparkled high overhead; Orion and Sirius decorated the southern sky, while Cassiopeia and the Big Dipper straddled Polaris to the north. And rising above the mountains to the east, the moon painted the playa’s jigsaw surface with its silvery glow. Overuse has reduced “breathtaking” to cliché status, but I can’t help think it’s these moments the adjective was intended for.
After sharing exposure settings, a quick refresher on focus in moonlight, and some composition suggestions, I let the group get to work. We found compositions in all directions except due east, where the moon was simply too bright to include in the frame. With everyone working within a 100 foot radius, it was easy (and gratifying) to hear exclamations of delight as images popped onto LCD screens.
So amazing was the experience that we stayed far later than I’d planned. If I’d have been there by myself I’d have probably stayed out much longer, but I wanted to make sure no one was too tired for the sunrise moonset I had planned (also at Badwater) the following morning. The above image of the Big Dipper was captured toward the end of our shoot, when the entire playa was illuminated, but the moonlight hadn’t quite reached the Black Mountains. I used ISO 800, f5.6, and 30 seconds.
My 2013 Death Valley Winter Moon photo workshop is January 25-29–it’s already nearly full.

