Eloquent Images by Gary Hart
Insight, information, and inspiration for the inquisitive nature photographer
If it’s Tuesday, this must be Bishop
Posted on September 30, 2014

Bristlecone Moonrise, Patriarch Grove, White Mountains, California
Canon EOS-1Ds Mark III
60 mm
.3 seconds
F/11
ISO 100
I have no one to blame but myself (a significant downside of being self-employed), and know I’m not going to get a lot of sympathy, but I just need to share how crazy my last few weeks have been. I’m in the final third of a stretch of three photo workshops in three time zones in three weeks, separated by a grand total of 20 hours at home.
Today I’m in Bishop, California, for day-two of my Eastern Sierra workshop that started yesterday in Lone Pine (California) and wraps up Friday morning in Lee Vining (California). This marathon travel schedule kicked-off on Thursday, September 12, when I left Sacramento for my Hawaii Big Island workshop. I finished that workshop with a Kilauea night shoot on Friday the 19th; Saturday morning I was back to the Hilo airport for my flight home (plane change and layover in Honolulu), finally dragging in the front door about 11 p.m. Saturday night.
At 8:00 a.m. Sunday morning my daughter deposited me back at the Sacramento airport for a flight to Salt Lake City, where I met Don Smith for the five-hour drive to Jackson Hole to help Don with his Grand Tetons workshop. Because the Hawaii/Wyoming weather conditions are so different, and my turnaround was so quick, I actually packed for the Teton before leaving for Hawaii (I’m so glad I did).
After a week in the Tetons, we wrapped up that workshop with a wet sunrise shoot on Saturday morning—then it was straight to the Jackson airport for a series of flights and airport shuttle that got me home Saturday night. I had just enough time to upload my images, refresh my suitcase, catch five hours sleep, and pack the car before heading back out the door early Sunday morning for the six-hour drive to Lone Pine for my Eastern Sierra workshop.
Am I tired? Probably, but I won’t feel it until my drive home on Friday. Am I complaining? Absolutely not. Not only did I do this to myself, how could anyone complain about three weeks filled with Hawaii, the Grand Tetons, and the Eastern Sierra?
And honestly, you can’t really be happy doing what I do without at least being able to tolerate travel. This year, before my current marathon travel stretch, I’ve been to Death Valley, Yosemite (many times), Maui, Kauai, the Grand Canyon three times (including a raft trip), plus Page and Sedona. And truth be told, I enjoy driving, and don’t mind flying. Driving relaxes me, and flying is an opportunity to catch up on my reading and writing. Nevertheless, it will be nice to have consecutive days home, in my own bed,with the alarm off—before next month’s trip to the Columbia River Gorge….
A little more about the Eastern Sierra and this image
Everyone knows about Hawaii, and most know about the Grand Tetons, but mention of the Eastern Sierra still elicits a blank stare from many people. That’s probably because most tourists haven’t discovered it yet (the photographers certainly have). With Mt. Whitney and the Alabama Hills (if you’ve ever seen a John Wayne, Gary Cooper, or John Ford western, you know the Alabama Hills), the bristlecone pines (in the White Mountains, across the Owens Valley from the Eastern Sierra), Mono Lake, Yosemite’s Tuolumne Meadows, and lots of fall color, it’s my most diverse photo workshop.
We started yesterday evening with a nice shoot of the Whitney Portal waterfall, in the shadow of Mt. Whitney. This morning we photographed alpenglow on Mt. Whitney and the Sierra crest from Whitney Arch (aka, Mobius Arch) in the Alabama Hills. After breakfast we made the easy, scenic one hour drive to Bishop, which is where I am now (thank you, Starbucks). Tonight it’ll be the bristlecone pines, at more than 4,000 years, among the oldest living things on Earth (older even than Larry King!).
For tonight’s bristlecone shoot I’ll take the workshop to the relatively accessible Schulman Grove. But when I’m on my own, I often continue thirteen unpaved miles to the Patriarch Grove. And that’s the trip I made a few years ago, because I thought the bristlecones would make a nice foreground for the rising full moon, and because the Patriarch Grove has a clearer view of the eastern horizon than the Schulman Grove.
At the Patriarch Grove, finding the clear view I wanted required me to take off cross-country. Unfortunately, when I scaled the final ridge, I found the horizon obscured by clouds. Not to worry, the light was perfect for photographing these weather-worn, gnarled trees. I’m usually pretty good about catching the moon’s appearance, but because I’d written it off for this evening (shame on me), I failed to register that the clouds were breaking up. Which is why I was both surprised and pleased to find the moon’s glowing disk hovering just above the clouds a few minutes after sunset.
I’d been wandering so much, and so focused on the nearby scene, that I hadn’t identified a particular tree for any potential moon shot (also shame on me). With very little time before the foreground/moon contrast became un-photographable, I felt quite fortunate to find this tree so quickly. A wide composition would have shrunk the moon to nearly invisible, so I stepped back as far as the terrain allowed so I could zoom closer and compress the separation (and enlarge the moon a little). With a vertical composition, I had to decide on rocks or sky, but it wasn’t hard to decide that foreground rocks were far more interesting than empty sky.
Let’s see, what’s tomorrow? Wednesday. Lee Vining, here I come….
An Eastern Sierra gallery
Click an image for a larger view, and to enjoy the slide show


Let’s all take a breath and step away from the ledge
Posted on September 26, 2014

Tree at Sunset, McGee Creek Canyon, Eastern Sierra
Canon EOS-1Ds Mark II
1/40 second
F/7.1
ISO 400
126 mm
National Forest Service commercial photography policy (it’s not as bad as you think)
I’ve received a number of inquiries (some quite panicked) in the last few days asking my opinion about the “new” National Forest Service policy regarding commercial photography. I’ve actually read some media accounts that imply that simply whipping out your iPhone and snapping a mountain lake risks a $1,000 fine. After doing a little research, I’ve confirmed that this is yet one more example of the media whipping the public into a frenzy by selecting a few facts and presenting them in the most sensational way. Here’s an example: http://www.esquire.com/blogs/news/1000-dollar-fine-for-pictures-in-the-forest.
Not being an expert on the subject, I can’t really say whether there are any factual errors in that article. But I can say that it’s a pretty self-serving (he’s certainly received a lot of attention) distortion of the actual policy I found posted on the National Forest Service website (http://www.fs.usda.gov/Internet/FSE_DOCUMENTS/stelprdb5355613.pdf). Here’s the excerpt from the NFS document that applies to me and my photography:
“Still Photography: A special use permit is required for activities on National Forest System lands when the purpose is to: (1) Promote or advertise a product or service using actors, models, sets, or props that are not part of the site’s natural or cultural resources or administrative facilities; or (2) Create an image for commercial sale by using sets or props. In addition, a permit may be required if no activities involving actors, models, sets, or props are proposed when: (1) The activity takes place in an area where the general public is not allowed; or (2) In situations in which the Forest Service would incur additional administrative costs to either permit or monitor the activity.“
As far as I’m concerned, this policy doesn’t sound unreasonable, nor does it sound like my livelihood is in imminent peril, and I’m pretty sure no one’s photographic life is jeopardized.
As someone who conducts 10-12 photo workshops each year, I’m a strong advocate for reasonable rules and restrictions that protect the natural resources that are the foundation of my business (and my mental health). I have no problem jumping through all the necessary hoops—liability insurance, first aid certification, group size, and so on—and paying the annual fees (usually in the $200-$250 range) that each workshop location’s permit process requires. I also find the people I deal with at these locations to generally be quite helpful, reasonable to deal with, not to mention downright flexible when a unique situation arise (like the time I overlooked an application deadline and didn’t discover my error until the last minute).
It’s interesting that this issue should arise right now, as I’m in Grand Tetons National Park helping Don Smith with his photo workshop here. The talk around town is about a moose that had to be put down a couple of days ago when she broke her leg after being spooked by a horde of overzealous wildlife photographers. It’s a rare trip that I don’t witness photographers do illegal or foolish things that imperil themselves (not to mention the lives of those who would need to rescue them), frighten or threaten wildlife, and damage the fragile ecosystem. It’s this very small minority of selfish and/or ignorant photographers who put all photographers in a bad light, leaving National Park and Forest authorities no choice but to implement tighter regulation. I’ve spoken up and intervened at times, but I often regret the times that I just shook my head and walked away after witnessing something I knew to be wrong.
So. Would I support the kind of heavy-handed National Forest Service regulations that the media implies is coming our way? Absolutely not. And while I don’t think something like that is imminent, I do wish photographers would do a better job of policing themselves, both by managing their own behavior, and by respectfully speaking up when another photographer behaves irresponsibly before we’re all affected by more restrictive policy and stricter enforcement.
About this image
What better way to demonstrate my lack of concern by posting this image from Inyo National forest. This tree on the dirt road to McGee Creek had been on my radar for several years, but I’d never found the conditions suitable to photograph it. But following an afternoon fall color shoot at the creek, the vestiges of sunset lit these tilde-shaped clouds. I knew exactly where I wanted to be but wasn’t sure I had time to get there. I raced down the road, pulled my truck to the side, and had time for just a couple of frames before the color faded.
A National Forest Gallery


Addition by subtraction
Posted on September 22, 2014
Sunset on the Rocks, Puna Coast, Hawaii
Canon EOS-5D Mark III
29 mm
8 seconds
F/16
ISO 200
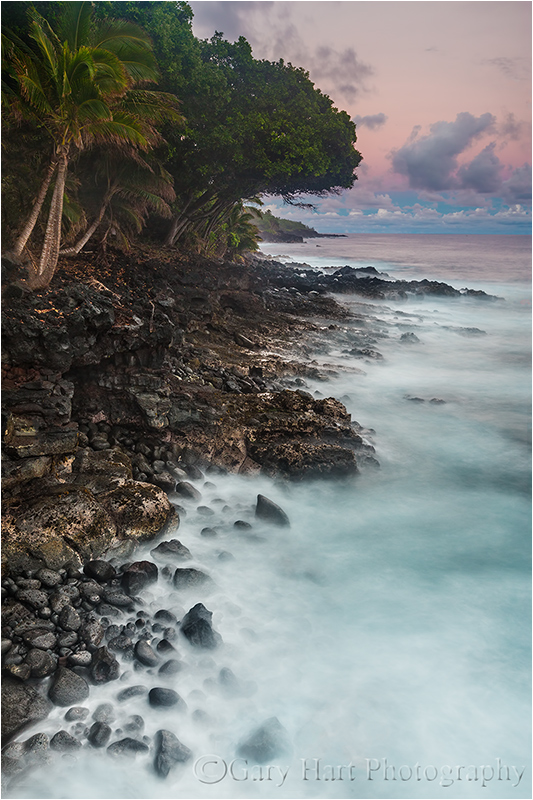
In my previous blog post I mentioned that I lost a couple of my Hawaii locations to Hurricane Iselle. Not only was the loss no big deal, it proved a catalyst that jarred me from my rut and into more exploring.
This location was at first glance an exposed, twenty foot cliff above the Pacific with a great view up the Puna Coast, past palm trees and surf-battered, recently cooled lava. But, as with most spots, there’s a lot more if you take the time to look. Exploring the dense growth lining the coast here soon brought me to views of tiered, reflective pools. While getting these views required a little bushwhacking followed by some creative rock-hopping, I know if I were by myself, that’s where I’d have ended up. But when leading a group I need to be more careful—it’s one thing when I injure myself doing something stupid, and something entirely different to guide others into risky spots.
Each group is different when it comes to risk taking—in this case when I offered to guide the group toward the pools I’d found the previous day, only two followed, so I returned to the rock platform where everyone seemed quite content with the spectacular view—the rocks and pools will wait for another visit. And while everyone may have missed a few photo opportunities on the safety of our cliff, not only did we still get some great stuff, we were in close enough proximity that laughter abounded (all without missing a click, of course).
About twenty feet below us, large waves sent explosions of spray skyward; occasionally a perfect coincidence of wave and wind dusted the group with a fine mist that was more refreshing than soaking. Our view here was northeast, which meant the setting sun was more or less behind us. By this, our final sunset, everyone had started to understand why I say my favorite sunrise/sunset view is usually away from the sun. Not only is the light easier to manage in that direction, the Earth-shadow paints the post-sunset (or pre-sunrise) horizon with rich pink and blue hues that the camera can reveal long after they’ve faded to the eye.
The best views were straight up the coast, so I quickly decided a vertical composition was the way to go here. I experimented with different shutter speeds to vary the blur in the waves, but as the scene darkened, each blur became some variation of extreme motion blur. The other major variable in the scene was how wide to compose. With a large tree overhanging the rocks toward the back of the scene, including lots of foliage proved better than truncating everything but the protruding crown of that one tree.
I captured this frame about five minutes after sunset. Giving the scene enough light to bring out detail in the shaded, dark-green foliage without washing out the color in the sky, I employed a two-stop hard-transition Singh-Ray graduated neutral density filter. Instead of the standard GND horizontal orientation, I turned it vertically, aligning the transition with the coastline. To mask the transition, I vibrated the filter slightly left/right throughout the entire eight-second exposure. Smoothing the tones in Lightroom/Photoshop became quite simple, thanks to the GND at capture.
My periodic rounds during our shoot seemed to indicate that everyone was happy—this in spite of a couple of extreme drenchings at the hands of two large waves that far exceeded all that had preceded it to land squarely atop those on the southeast corner of our perch—but it wasn’t until someone exclaimed at the end of the shoot, “This is the best spot yet!” that I knew I’d found a keeper. My former (“lost”) locations were nice, but it was good to be nudged into remembering that unknown opportunities are usually just a little exploration away.
Upcoming Hawaii workshops
Maui Tropical Paradise (two nights in West Maui, two nights in Hana), March 2-6, 2015
Hawaii Big Island Volcanos and Waterfalls, September 14-18, 2015
A Hidden Hawaii Coast Gallery
Click an image for a larger view, and to enjoy the slide show


The right stuff with the left brain
Posted on August 17, 2014
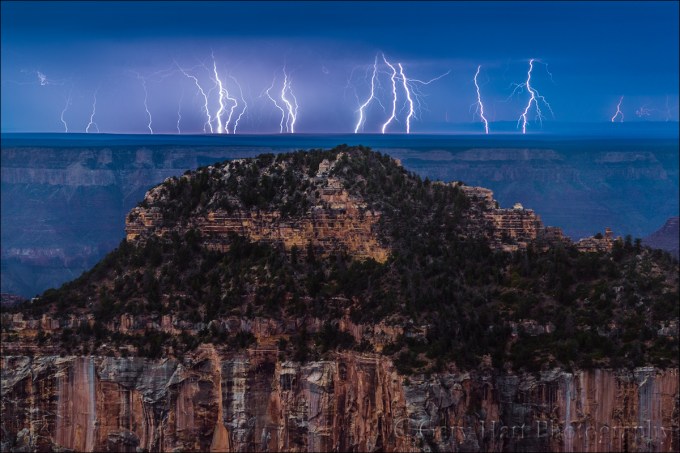
Electric Night, Grand Canyon Lodge, North Rim, Grand Canyon
Canon EOS-5D Mark III
Canon 24-105L
15 1/2 minutes
F/4
ISO 200
Left versus right
Writing about “The yin and yang of nature photography” a couple of weeks ago, I suggested that most photographers are limited by a tendency to strongly favor the intuitive or logical side of their brain (the so-called right-brain/left-brain bias). Today I want to address those intuitive (right brain) thinkers who feel it’s sufficient to simply trust their compositional instincts and let their camera do the thinking.
It was a dark and stormy night
There is absolutely nothing creative about this lightning image from last Monday night at the Grand Canyon. This single click image (one frame—no blending) was captured from the viewing deck of the Grand Canyon Lodge on the North Rim during a nighttime thunderstorm across the canyon. Compounding the darkness of night and the Grand Canyon’s dark pit were dense clouds that obscured a waning gibbous moon—the canyon so dark that I couldn’t see well enough to create anything. To compose, I simply aimed my camera in the general direction the lightning was most active, clicked, and hoped. The original raw file needed cropping for balance, to remove a few lights from the South Rim Village, and to correct a severely tilted horizon.
Don Smith and I had just brought our workshop group back from a sunset shoot at Point Imperial. Some headed back to their cabins to recover from a day that had started at 4:30 a.m., while a few veered to the “saloon” (it’s not quite as raucous as it sounds) for a beer or glass of wine. Lugging my gear back to my cabin, flashes in the clouds above the lodge indicated lightning was firing somewhere in the distant south and I detoured down to the lodge’s viewing deck to check it out. Through the two-story windows of the inside viewing room and before I even stopped walking I saw bolts landing due south across the canyon, and along the rim down the canyon to the west—violent, multi-stroke bolts that illuminated the clouds and canyon walls with their jagged brilliance.
I set up on the west viewing deck with just enough twilight remaining to compose, starting with a composition I liked—it wasn’t in the direction of the most activity, but I’d already seen a couple of strikes in that direction and was hoping I’d catch a bolt or two. But as the sky darkened and my exposures failed to capture anything, it became clear the activity was shifting west and I’d need to adjust my composition. By then the darkness was nearly complete and I simply centered my frame on the black outline of Oza Butte in front of me, going wide enough to ensure maximum lightning bolt captures.
While finding focus for my earlier compositions had been a little tricky, there had been enough light to make focus manageable. But now the absence of any canyon detail made getting a sharp frame extremely problematic using the conventional focus methods. (Contrary to a misconception that lingers from the old film days, when everyone used prime lenses, you can’t simply dial a zoom lens to infinity and assume you’ll be sharp.)
Once I decided on my composition (and focal length), I pointed my camera (still on the tripod) in the direction of the Grand Canyon Village lights on the South Rim centered the brightest light in my viewfinder. I engaged live-view, magnified the scene 5X, re-centered the target light, magnified 10X (5X and 10X are the two magnification options on my 5DIII), and slowly turned my focus ring until the cross-canyon light shrunk from a soft blur to a distinct point. I then swung my camera back toward my the butte and recreated my composition (without changing my focal length).
Because my earlier exposures had been 30 seconds at ISO 1600 ISO, designed to capture just one or two strikes in a composition I liked, but short enough to adjust things relatively frequently. But since my new strategy was to fire directly into the mouth of the beast, and lacking a composition in which I had any confidence, I decided on a long exposure that would capture enough lightning to overcome the unknown but likely relatively bland composition. Instead of 30 seconds, I wanted at least 12-15 minutes of exposure in Bulb mode (instead of a shutter speed that’s fixed at the moment of the click, in Bulb mode the shutter remains open until I decide it’s time to close it).
“You didn’t tell me there’d be math…”
Doing the math: Because each doubling of the shutter speed adds one stop, a 15 minute exposure would add about (close enough to) 5 stops of light to my original 30 seconds:
- 30 seconds x 2 = 1 minute—1 stop
- 1 minute x 2 = 2 minutes—2 stops
- 2 minutes x 2 = 4 minutes—3 stops
- 4 minutes x 2 = 8 minutes—4 stops
- 8 minutes x 2 = 16 minutes—5 stops
Adding five stops of exposure time meant that keeping the amount of light in my next image unchanged, I’d need to subtract a corresponding 5 stops of light in ISO and/or aperture. But since I thought that my previous exposure was at least a stop too dark, and I guessed that the sky would be darkening even more, I decided to drop only 3 stops, from ISO 1600 to ISO 200 (halving the ISO reduces the light by 1 stop). I made my ISO adjustment, clicked my shutter and locked it open on my remote, checked my watch, then sat back and enjoyed the show.
The 12-15 minute plan was just a guideline—since the difference between 10 minutes and 20 minutes would only be 1 stop, my decision for when to close my shutter had quite a bit of wiggle room. In this case after about 15 minutes I noticed the lightning was slowing down and shifting further west, so I wrapped my exposure and recomposed for my next shot. As it turns out, the next frame only captured a third of the number of strikes this one got because the most intense part of the show was winding down.
The worst is over
If you’re one of those “I have a good eye for composition, but…” folks, congratulations for sticking with me this long. I hope this illustrates for you how important understanding metering and exposure basics, and managing them with your camera, is to maximizing your capture opportunities. This technical aspect of photography isn’t something that should intimidate you—if you can multiply and divide by 2, you have all the math skills you need to figure things out on the fly.
I suspect, and in fact have observed, that most “intuitive” photographers are limited more by their belief that they can’t do the technical stuff than they are by an actual inability to it. What seems to have happened is that they’ve been buried by an avalanche of well-intended but less significant technical minutia covering everything from exposure (e.g., “RGB histograms” and “exposing to the right”), to focus (e.g., “circles of confusion” and “hyperfocal distance”), to printing (e.g., “colorspace” and “monitor calibration”). Many of these things are indeed quite important, but nobody should be expected to tackle them until they have a firm grasp on the basics of metering and exposure, and managing the complementary relationships connecting shutter speed, aperture (measured by f-stops), and ISO. I recommend that you ignore all the other technical buzz until this basic stuff makes sense—not only will you be a better photographer for it, you’ll find that the more “complex” stuff isn’t nearly as complex as it sounds.
Want to learn more?
Try these links:
Then go out in your backyard and practice!
But let’s not forget why we go out with our cameras in the first place
You can’t imagine how thrilling it was to watch these bolts firing several times per minute. Not only were they landing in the direction of my composition, they were also going all along the rim to the west. Witnessing this display was an experience I’ll never forget, and photographing it was a highlight of my photography life.
An Electric Gallery


The yin and yang of nature photography
Posted on August 7, 2014
Clearing Storm, El Capitan and the Merced River, Yosemite
Canon 1Ds Mark III
17 mm
1/8 second
F/11
ISO 100
Conducting photo workshops gives me unique insight into what inhibits aspiring nature photographers, and what propels them. The vast majority of photographers I instruct, from beginners to professionals, approach their craft with either a strong analytical or strong intuitive bias—one side or the other is strong, but rarely both. And rather than simply getting out of the way, the underdeveloped (notice I didn’t say “weaker”) side of that mental continuum seems to be in active battle with its dominant counterpart.
On the other hand, the photographers who consistently amaze with their beautiful, creative images are those who have negotiated a balance between their conflicting mental camps. They’re able to analyze and execute the plan-and-setup stage of a shoot, control their camera, then seamlessly relinquish command to their aesthetic instincts as the time to click approaches. The product of this mental détente is a creative synergy that you see in the work of the most successful photograpers.
At the beginning of a workshop I try to identify where my photographers fall on the analytical/intuitive spectrum and nurture their undeveloped side. When I hear, “I have a good eye for composition, but…,” I know instantly that I’ll need to convince him he’s smarter than his camera (he is). Our time in the field will be spent demystifying and simplifying metering, exposure, and depth management until it’s an ally rather than a distracting source of frustration. Fortunately, while much of the available photography education is technical enough to intimidate Einstein, the foundation for mastering photography’s technical side is ridiculously simple.
Conversely, before the sentence that begins, “I know my camera inside and out, but…,” is out of her mouth, I know I’ll need to foster this photographer’s curiosity, encourage experimentation, and help her purge the rules that constrain her creativity. We’ll think in terms of whether the scene feels right, and work on what-if camera games (“What happens if I do this”) that break rules. Success won’t require a brain transplant, she’ll just need to learn to value and trust her instincts.
Technical proficiency provides the ability to control photography variables beyond mere composition: light, motion, and depth. Intuition is the key to breaking the rules that inhibit creativity. In conflict these qualities are mutual anchors; in concert they’re the yin and yang of photography.
About this image
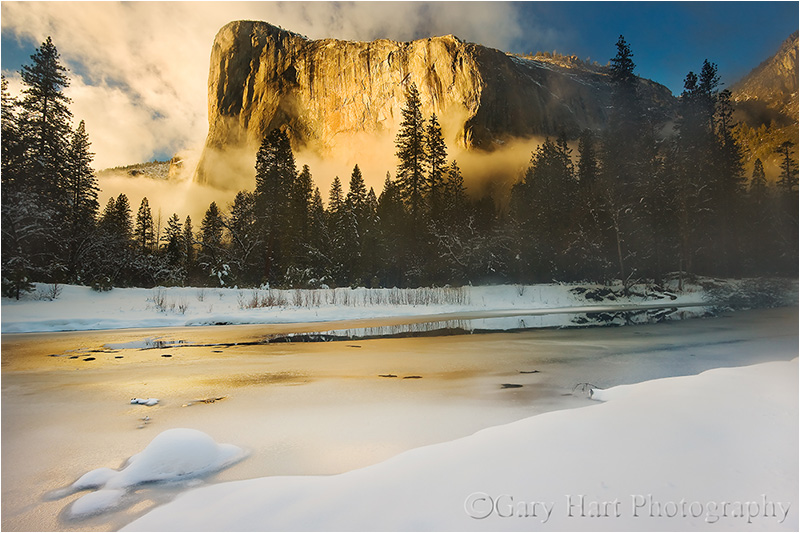
With snow in the forecast for a December morning a few years ago, I drove to Yosemite and waited out the storm. When the snow finally stopped, I made the best of the three or so hours of daylight remaining.
Rather than return to some of the more popular photo locations, like Tunnel View or Valley View, I ended up at this spot along the Merced River. Not only his is a great place for a full view of El Capitan, it’s also just about the only place in Yosemite Valley with a clear view of the Three Brothers (just upriver and out the frame in this image). Downriver here are Cathedral Rocks and Cathedral Spires.
As I’d hoped, the snow was untouched and I had the place to myself. My decision to wrap up my day here was validated when the setting sun snuck through and painted the clouds gold.
Yosemite Winter
Click an image for a closer look and slide show. Refresh the window to reorder the display.


Isolation
Posted on November 11, 2011

Forest Autumn, Yosemite
Canon EOS-1Ds Mark III
200 mm
1/25 second
F/4
ISO 200
I love sweeping panoramas, but when I’m alone I often gravitate to the intimate locations that make nature so personal. In Yosemite’s dark corners, places like Bridalveil Creek beneath Bridalveil Fall, and the dense mix of evergreen and deciduous trees lining Merced River near Fern Spring and the Pohono Bridge, I scour the trees and forest floor for subjects to isolate from their surroundings.
Helping your subjects stand out is often the key to a successful image. Sometimes subject isolation is a simple matter of finding something that stands out from its surroundings, an object that’s physically separated far from other distractions. But more often than not, effective isolation requires a little help from your camera settings, using contrast, focus, and/or motion to distinguish it from nearby distractions.
A disorganized tangle of weeds or branches can become a soft blur of color when you narrow your depth of field with a large aperture, close focus point, and/or long focal length. Likewise with motion, where a long shutter speed can smooth a rushing creek into a silky white ribbon. And a camera’s inherently limited dynamic range can render shadows black, and highlights white, creating a perfect background for your subject.
After finding these dangling leaves, just across the road and a little downriver from Fern Spring in Yosemite Valley, I juxtaposed them against the vertical trunks of background maples and evergreens. Zooming to 200mm reduced my depth of field, separating the sharp leaves from the soft background of trunks and branches. A large aperture further blurred the background to a simple, complementary canvas of color and shape. Slight underexposure and a polarizer (to remove glare) helped the color pop.
On my website you can read more about my favorite Yosemite photo locations.
A gallery of isolation


Sunrise on the rocks
Posted on September 21, 2011

Dawn, Puna Coast, Hawaii
Canon EOS 5D Mark III
10 seconds
17-40L
ISO 100
F11
I “discovered” this unnamed beach while scouting locations for my Hawaii workshops. It wasn’t on any maps or in any guidebooks, it was just there, tucked into a narrow strip separating the churning Pacific from lush Kapono-Kalapana Road. Through the trees the beach looked promising, so I pulled into a wide spot and explored more closely. A pair of children’s shorts draping a branch near the road, and a warning sign nailed to a tree, were indications that this not a secret location. I feared the sign would threaten severe consequences to anyone who dared trespass, but it simply said, “Private property: No camping or fires. Please enjoy.” So I did.
I’ve probably photographed this beach a dozen times since then. The hanging children’s clothing is always different: shoes, shirts, a swimsuit, but the sign stays the same. For the last few days, on each visit to locations I scouted before the workshop, I’ve scoured the rocks for a lens cap that disappeared somewhere early in my visit to the island. While I have no real hope of finding my lens cap, it’s a great reminder to look more closely at the beauty right at my feet. In Hawaii it’s easy to get distracted by the turquoise surf and billowing clouds, but it’s the jewel-like pools, pillow-shaped rocks, and emerald green moss within arm’s reach that make me feel like beautiful images are possible here any time, regardless of conditions.
This morning’s workshop sunrise was maybe my sixth time here in the last two weeks. The sky was nice but not spectacular, so I decided to emphasize the basalt pillows and quiet pools. I put on my widest lens (17-40) and dialed it out to 19mm to exaggerate the exquisite foreground. The pre-sunrise sky reflected nicely in the pools, but wasn’t yet sufficient to illuminate the black lava. To bring out the character in the nearby rocks, I used a two-stop graduated neutral density filter that held back the much brighter sky enough to expose the foreground detail. Because it was still too dark for a shutter speed that would freeze the violent waves, I opted to blur them into a gauzy mist that (I hoped) would create an ethereal mood. The result was a ten second exposure at f11 and ISO 100.
As we pulled away, an older gentleman hurried across the road to flag me down. I feared we’d inadvertently disturbed his peace, but he was simply wanted to express his admiration for our enjoying the beach so early. He gestured to a home mostly hidden behind dense foliage and said this was indeed “his” beach (technically no beach in Hawaii can be private) and that he was glad we enjoyed it. Then he reached into his pocket and handed me a small black disk, “I found this a few days ago.” I took my lens cap and thanked him for his generosity.
A Big Island Gallery


")


A landscape photographer’s time
Posted on June 25, 2011

Double Rainbow, Yosemite Valley
Canon EOS-1Ds Mark II
38 mm
1/5 seconds
F/16
ISO 100
On my run this morning I listened to an NPR “Talk of the Nation” podcast about time, and the arbitrary ways we Earthlings measure it. The guest’s thesis was that the hours, days, and years we measure and monitor so closely are an invention established (with increasing precision) by science and technology to serve society’s specific needs; the question posed to listeners was, “What is the most significant measure of time in your life?” Most listeners responded with anecdotes about bus schedules, school years, and work hours that revealed how our conventional time measurement tools, clocks and calendars, rule our existence. Listening on my iPhone, I wanted to stop and call to share my own relationship with time, but quickly remembered I wasn’t listening in realtime to the podcast. So I decided to blog my thoughts here instead.
Landscape photographers are governed by far more primitive constructs than the bustling majority, the fundamental laws of nature that inspire, but ultimately transcend, clocks and calendars: the Earth’s rotation on its axis, the Earth’s revolution about the Sun, and the Moon’s motion relative to the Earth and Sun. In other words, clocks and calendars have little to do with the picture taking aspect of my life; they’re useful only when I need to interact with the rest of the world on its terms (that is, run the business).
While my years are ruled by the changing angle of the Sun’s rays, and my days are inexorably tied to the Sun’s and Moon’s arrival, I can’t help fantasize about the ability to schedule my spring Yosemite moonbow workshops (that require a full moon) for the first weekend of each May, or mark my calendar for the blizzard that blankets Yosemite in white at 3:05 p.m. every February 22. But Nature, despite human attempts to manipulate and measure it, is its own boss. The best I can do is adjust my moonbow workshops to coincide with the May (or April) full moon each year; or monitor the weather forecast and bolt for Yosemite when a snowstorm is promised (then wait with my fingers crossed).
The insignificance of clocks and calendars is never more clear than the first morning following a time change. On the last Sunday of March, when “normal” people moan about rising an hour earlier, and the first Sunday of November, as others luxuriate in their extra hour of sleep, it’s business as usual for me. Each spring, thumbing its nose at Daylight Saving Time, the Sun rises a mere minute (or so) earlier than it did the day before; so do I. And each fall, on the first sunrise of Standard Time, I get to sleep an an entire minute longer. Yippee.
Honestly, I love nature’s mixture of precision and (apparent) randomness. I do my best to maximize my odds for something photographically special, but the understanding that “it” might not (probably won’t) happen only enhances the thrill when it, or maybe something unexpected and even better, does happen. The rainbow in today’s image was certainly not on anybody’s calendar; it was a fortuitous convergence of rain and sunlight (and ecstatic photographer). My human “schedule” that evening was a 6 p.m. get-to-know/plan-tomorrow dinner meeting with a private workshop customer. But seeing the potential for a rainbow, I suggested that we defer to Mother Nature, ignore our stomachs, and go sit in the rain. Fortunately he agreed, and we were amply rewarded for our inconvenience and discomfort.
Workshop Schedule || Purchase Prints
A Gallery of Rainbows
Click an image for a closer look, and a slide show. Refresh the screen to reorder the display.


