Eloquent Images by Gary Hart
Insight, information, and inspiration for the inquisitive nature photographer
Photographic reality: Expand time
Posted on May 30, 2012

Cascading Ferns, Russian Gulch Fall, Mendocino
Canon EOS-5D Mark III
81 mm
.6 seconds
F/11
ISO 400
“Photography’s gift isn’t the ability to reproduce your reality, it’s the ability to expand it.”
(The fifth installment of my series on photographic reality.)
There’s probably no better example of the difference between a camera’s reality and yours than the way we handle motion. In my previous post I compared the camera’s ability to accumulate light to the serial, real-time processing of seamless instants we humans do. In a static world, given the right exposure a photographic image can be rendered fairly literally (missing dimension notwithstanding). But photograph a world in motion and wonderful things start to happen.
A slow shutter speed allows a sensor to record the position of everything it “sees” during the exposure, expanding one frame into a recreation of every instant of its capture. When the capture includes objects in motion, the result a scene very different from the human experience: Rushing water smoothes to white, wind-whipped flowers blur to color, and Earth’s rotation renders stars as parallel streaks of light.
Blurred water
Labeled as cliché and unnatural by people who don’t understand photography, blurred water gets a bum rap. The cliché part ignores the fact that most rapidly moving water photographed in the best light (shade or overcast) is virtually impossible to not to blur. The “unnatural” label just cracks me up—when asked, detractors reply that freezing the motion (the only other option) would be more natural, to which I reply (usually to myself only, tongue firmly clamped between teeth), how many times have you seen water drops frozen in midair? The truth is, the camera and human eye handle motion differently, and photographers need to accept and appreciate it. Once you can accept that blurring water is often the best way to imply motion in a static medium, the fun begins.
First you need to understand that you can’t just blur every moving river, stream, or wave. Motion blur requires a slow shutter speed, impossible with water in full sunlight without a neutral density filter to cut the light. So you need to start by finding moving water darkened by overcast or shade (any sunlight in the frame at all will overexpose and likely ruin the image). Whitewater is best; if you find yourself photographing whitewater in shade or overcast, the question isn’t how to blur, it’s how much?
Unfortunately there’s no magic shutter speed for motion blur. The amount of blur you get depends on the speed of the water, how close you are to the water, how much you’re zoomed, and the angle of your capture relative to the direction of motion (and maybe some other things I’ve overlooked). And while there isn’t a ideal amount of blur, I find that there’s sweet spot (that changes with all the variables above) between very slight blur that’s not quite enough and just appears scratchy, and extreme blur that’s pure white. In some tight compositions of extremely fast water you get beautiful slight blur at 1/1o second; with wider compositions and/or slower water, the same amount of blur requires 3/4 second or longer. And achieving noticeable blur in a wide capture of a distant waterfall may require several seconds of exposure. My advice is to bracket your shutter speeds, varying your ISO and/or f-stop (take care that you don’t choose an f-stop that compromises your depth of field)—you’ll find the more you do it, the more you’ll get a sense for what works.
In the image of Russian Gulch Fall near Mendocino (at the top of the post), I arrived early enough to allow a full two hours to work the scene before sunlight blighted the forest floor. And work it I did, starting wide and trending tighter as I became more familiar with the scene. The dense forest dark didn’t allow a fast enough shutter speed for effective slight blur without severely compromising ISO and aperture (depth of field), so I just went with the extreme blur. Even though the air seemed perfectly still, I was a little concerned about slight wind motion in the ferns, so I bumped to ISO 400 and f11 (at 80 mm, f11 gave me about a 15 foot range of front-to-back sharpness–just enough). This resulted in a one second exposure that caused extreme blur (I call it extreme because I didn’t notice much difference between one second and five seconds) that, as it turned out, made the delicate strands of water quite lovely.
One other often overlook component of a forest water scene is a polarizer: I wouldn’t even attempt a scene like this without the glare reducing benefit of a polarizer. (And a polarizer has the added bonus of reducing the light by a couple of stops.)

Bristlecone Star Trails, White Mountains, California
Star trails
Star trails—parallel streaks of light caused by Earth’s rotation during a long exposure–are an extreme example of the same motion effect that blurs water. I find that moonless nights work best for star trails—a moonlit sky is usually too washed out for effective star trail photography, while the limited light of a moonless night maximizes the motion by allowing even the dimmest stars to shine through.
On a moonless night, a large aperture and high ISO can record enough light to allow a relatively fast 30-second shutter speed that records stars as near pinpoints of light, but doesn’t allow enough light to fully eliminate the foreground. On the other hand, a slower shutter speed that accumulates enough light to reveal the foreground also results in streaking stars—star trails. An added advantage of star trail photography is that the exposures are long enough to enable a smaller aperture (more DOF and better image quality) and lower ISO (less noise).
Some people have great success combining a series short-exposure frames to create a single star trail image, but all of my images are single-click capture (that’s just me, I have no problem with those who choose to blend multiple captures) using a trial and error approach I’ve worked out over the years. I start by taking a test (throw-away) exposure at my camera’s highest ISO and lens’s widest aperture, then tweaking the exposure and repeating until I get it right. I’ve also found that in the near total darkness of a moonless night, these test exposures are the best way to ensure my composition and focus are okay. Once I have my exposure, composition, and focus right (it usually takes two or three images), I figure out how many stops of light my desired shutter speed (usually around thirty minutes) adds to my successful test exposure, then subtract an equal amount of light through a combination of aperture and ISO reductions. (I’ll try to post a more thorough tutorial on my approach to star trails soon.)
I photographed the above bristlecone pine against backdrop of streaking stars with three friends who were light painting the tree—sweeping the beam of a bright flashlight across the trunk and branches for the first few seconds of exposure to illuminate the tree’s weathered wood enough for their cameras to capture the exquisite detail. But all my images use only natural light, so I opted for a silhouette, positioning myself as low as I could get to juxtapose as much of the tree against the sky as possible. I started my exposure as soon as the others’ light painting ended (no more than ten seconds), and for the next twenty-two minutes the four of us reclined there at nearly 11,000 feet, watching the sky and waiting for the exposure to complete. We talked and laughed some, but mostly we just appreciated a sky dense with stars and silence so complete (and foreign) that it almost hurt my ears. We were well down the road toward our hotel in Bishop before my camera finished its processing, and it wasn’t until I was able to view the image on my laptop that I knew I’d had a success.
Photographic reality: Accumulate light
Posted on May 27, 2012

Moonbow and Big Dipper, Yosemite Falls, Yosemite
“Photography’s gift isn’t the ability to reproduce your reality, it’s the ability to expand it.”
(The fourth installment of my series on photographic reality.)
Before getting too frustrated with your camera’s limited dynamic range, remember that it can also do things with light that your eyes can’t. While we humans experience the world by serially processing an infinite number of discrete instants in real time, a camera accumulates each instant, storing and assembling them into a single additive frame. The result, among other things, is a view into human darkness that reveals “invisible,” albeit very real, detail and color.
Nothing illustrates this benefit better than a moonlight image, particularly one that reveals a “moonbow.” Several years ago I photographed Yosemite Falls by the light of a full moon a couple of hours after sunset. While there was enough light to see the fall and my immediate surroundings, the world was dark and colorless. Knowing the possibility of a moonbow existed, but unable to see it, I positioned myself with my shadow (cast by the moonlight) pointing more or less in the direction of the fall and dialed in an exposure long enough to make the scene nearly daylight bright. An extremely wide, vertical composition included the Big Dipper high overhead, as if it was the Yosemite Falls’ source.
The result (above) is nothing like what my eyes saw, but it really is what my camera saw. The processing to complete this image involved cooling the color temperature in the raw processor to a more night-like blue; noise reduction to clean up the relatively long, relatively high ISO capture; a little (mostly futile) attempt to moderate the vertical distortion caused by the wide focal length; a slight wiggle in Curves to darken the sky and pop the stars; mild dodging and burning to even tones; some desaturation of the sky (I swear); and selective detail sharpening, avoiding the clouds and darkest shadows.
Photographic Reality: See the light
Posted on May 21, 2012

Crescent and Oaks at Dusk, Sierra Foothills, California
“Photography’s gift isn’t the ability to reproduce your reality, it’s the ability to expand it.”
(The third installment of my series on photographic reality.)
Dynamic range
One of photographers’ most frequent complaints is their camera’s limited “dynamic range,” it’s inability to capture the full range of light visible to the human eye. To understand photographic dynamic range, imagine light as water you’re trying to capture from a tap–if the human eye can handle a bucket-full of light, a camera will only capture a coffee cup. Any additional light reaching your sensor simply overflows, registering as pure white.
Limited dynamic range isn’t a problem when a scene is lit by omnidirectional, shadowless light. But while I can’t speak for other planets, here on Earth we’re illuminated by only one sun. Since most Earthlings prefer blue skies and brilliant, (unidirectional) sunshine that buries everything that’s not directly lit in dark shadows. Fortunately, human vision has evolved to the point where we can see detail in shadows and sunlight simultaneously.
Cameras haven’t evolved quite so far–on sunny days, photographers must choose between photographing what’s in the shade or what’s in direct sunlight. Exposing to capture detail in the shadows brings in so much light that everything in sunlight is overexposed; exposing to avoid overexposure of sunlit subjects doesn’t permit enough light to see what’s in the shadows.
Managing the light
Experienced photographers understand their camera’s limited dynamic range and take steps to mitigate it. For example, artificial light (such as a flash) can be used to fill shadows, or multiple exposures (covering a scene’s range of light) can be digitally blended into one image. But as a natural-light landscape photographer, I don’t even own a flash (really), and given that I only photograph scenes I can capture with a single exposure, I also never blend exposures.
The simplest solution for me is to avoid harsh, midday light. Full shade (absolutely no direct light) works, and a layer of clouds that spreads sunlight over the entire sky illuminates the landscape with even (low contrast), shadowless light that’s a joy to photograph. And the low, very early or very late light that occurs just after sunrise or before sunset has been subdued enough by its long journey through the thick atmosphere that the contrast falls into a camera’s manageable range. I’m also a huge advocate of graduated good old fashioned neutral density filters to reduce the difference between a bright sky and darker foreground.
Less is more
The best photography often results from subtraction. Photographers who merely take steps to make their camera’s world more like their own miss a great opportunity to show aspects of the world easily missed by the human experience. In the right hands, a camera’s limited light capturing ability can be used to emphasize special aspects of nature and eliminate distractions.
Exposing to hold the color in bright sky or water can eliminate unlit distractions and render shaded subjects in shape-emphasizing silhouette. And compositions that feature brightly backlit, translucent flowers and leaves explode with natural color that stands out against a shaded, black background.
Whether the image is a silhouetted mountain or translucent dogwood, the camera’s rendering is nothing like your experience of the scene. But it is a true rendering from the camera’s perspective, achieved without digital manipulation.
For example

Daybreak, El Capitan and Half Dome, Yosemite
Last week I rose at 4:00 a.m. to photograph a thin crescent moon rising above Half Dome almost an hour before sunrise. It was one of those, “I’m witnessing the most beautiful thing on Earth” moments, and I couldn’t believe no one else was there to enjoy it. I arrived about fifteen minutes before I expected the moon to rise, more than enough time to set up one tripod with my 1DS III 100-400 lens bulls-eyed on Half Dome at 400 mm. Another tripod had my 5D III and 24-105 composed to include El Capitan and Half Dome (above).
When the moon arrived I gave the scene just enough light to reveal the rich blue in the twilight sky. At that exposure the thin sliver of moon was completely overexposed (no lunar detail), a crescent of pure white that stands out boldly against the dark blue sky. A few stars pop through the darkness as well.
My eyes had adjusted to the predawn light enough for me to barely discern the trees and granite in Yosemite Valley below, and the rising sun had already started to wash out some of the sky’s color. But at the exposure I chose, my camera saw only Yosemite’s iconic skyline, El Capitan on the left and Half Dome on the right, as distinct black shapes against the cool blue sky. Rendering the image this way reduces erases the rocks and trees that add nothing to the scene, reducing this special Yosemite moment to its most compelling elements, color and shape.

Autumn Light, Yosemite: Here I metered on the brightest part of the backlit leaves, slightly underexposing to capture the leaves’ exquisite gold and turn the shaded background to complementary shades that range from dark green to nearly black. A small aperture softened dots of sky to small jewels of light.
Up next: Accumulate light
Photographic reality: Framing infinity
Posted on May 16, 2012

Snow and Autumn Leaves, Yosemite
“Photography’s gift isn’t the ability to reproduce reality, it’s the ability to expand it.”
(The second installment of my series on photographic reality.)
If you’ve ever tried to point out to someone a small detail in nature that pleases you, perhaps you’ve experienced a conversation like this:
You: “Look at that!”
Friend: “What?”
You: “Those leaves—look at the frost on those leaves.”
Friend: “What leaves?”
You: “There on the log—with the snow.”
Friend: “Those dead ones? Yeah, cool. Man, I can’t believe I ate all those fries at lunch.”
You: “Whatever.” Sigh.
It’s really great to enjoy nature, to take in all of its infinite, three dimensional, multi-sensory splendor: its smells, sounds, depth, and motion. But all this input is a lot to process, and because everybody interacts with the world a little differently, each person is drawn to different things—what moves you might be overlooked by others. If only there were some way to show others what you see. Hmmm….
Unlike us humans, a still camera experiences the world in single-sensory, discrete frames. Rather than being a disadvantage, a camera’s “limitations” provide an opportunity to isolate whatever aspects of a scene that moves you, and to remove extraneous elements that distract. In other words, the camera’s field of vision, determined by you, has finite boundaries that make a frame in which you can organize relationships and eliminate distractions through careful selection of your lens’s distance (or focal length) and direction.
The golden leaves in the above image were three among thousands dotting the forest floor on this November morning near Cathedral Beach in Yosemite. I wanted to juxtapose fall and winter, and reveal the leaves’ frosty fringe. A wide frame would have more closely represented the entirety of the scene as I experienced it, but without something to anchor the frame, I knew viewers’ eyes would wander and they’d be unsure of my intent.
So I put on my 100mm macro lens and moved closer, finding this trio of leaves on a log, surrounded by patches of snow. I started by positioning myself so none of the leaves merged—that each stood by itself, balanced in the frame. Framing the leaves tightly eliminated the rest of the world, giving you no choice but to only look at what I wanted you to see. F14 and careful focusing gave me enough depth of field to make the leaves and log sharp with the background distractions blurred to insignificance.
Up next: See the light
Photographic reality: Your camera’s vision
Posted on May 12, 2012

Floating Dogwood, Yosemite
1/160 second
F/4
ISO 400
176 mm
“Photography’s gift isn’t the ability to reproduce your reality, it’s the ability to expand it.”
(The first installment of my series on photographic reality.)
When I hear a photographer say “That’s exactly what I saw when I was there,” I cringe. Not only is capturing human reality in a photograph impossible (really), attempting to do so is so limiting. I’m a strong advocate of “honest” photography, photography that depicts a natural truth without digital deception, but photographic truth isn’t the same as human truth, a fact photographers should celebrate, not deny. Embracing your camera’s reality opens the door to revealing nature in ways humans can’t.
Leveraging your camera’s reality starts with understanding that “reality” is in fact a moving target defined by the medium experiencing it. The human eye’s version of reality is experienced within its narrow confines on the electromagnetic spectrum, limited to only those wavelengths between (about) 400 and 750 nanometers (a nanometer is one billionth of a meter—i.e., really, really small). An x-ray machine’s reality is .01 to 10 nanometers. But if you’ve ever seen an infrared image, you saw another version of reality, this time in the 3,000-14,000 nanometer range. Even your smartphone and microwave oven stake out their own reality turf on the very same electromagnetic spectrum.
My point isn’t to overwhelm you with scientific minutia (this won’t be on the test), it’s to jar you from your human-centric view of the universe. While a camera records light (more or less) within the same range of the electromagnetic spectrum registered by your eyes, a camera’s sensor responds to those wavelength’s a little differently, and it doesn’t benefit from the stereoscopic vision and cerebral processor that conveys depth and motion and adjusts in real time as light and focus needs dictate. And a camera’s sensor can’t handle the same range of light our eyes can, In other words, it’s impossible for a camera to record the world exactly like being there. Thank goodness.
Understanding and controlling the way your camera “sees” allows you to tap its unique vision and emphasize overlooked, unappreciated aspects of the natural world. On the other hand, photographers who see the world only with their own eyes, who use Photoshop or other digital tools to bludgeon their images into something closer to their own reality (or worse, into a manufactured digital reality), rarely add to their viewers’ perception of nature.
Get focused
The camera’s vision differs from yours in many ways. In upcoming posts I’ll cover confining borders, dynamic range, motion, time, and depth. But because I need to start somewhere, I thought I’d begin with an often unappreciated difference: focus. Not only do your eyes have a very wide focus range, they adjust focus (virtually) instantly, responding to a command from your brain in ways your not even conscious of to give you the impression that your entire scene is in crisp focus throughout. The camera, on the other hand, captures the current focus in a static instant. And the reciprocity of shutter speed and aperture make for sometimes impossible choices when trying maximize depth of field in limited light.
Photographers jump through lots of hoops to overcome limited depth of field and more closely approximate their own experience of world. Tiny apertures, tilt-shift lenses, and blended images will do it, albeit with trade-offs. And when all else fails, we’ll bump our ISO into the noisy stratosphere. All that is well and good, but let’s not forget that there’s no rule that says your capture must mimic your experience. Sometimes we can use our camera’s ability to severely limit depth of field to our advantage by eliminating distractions and turning uninteresting backgrounds into a complementary canvas of color and shape.
For example
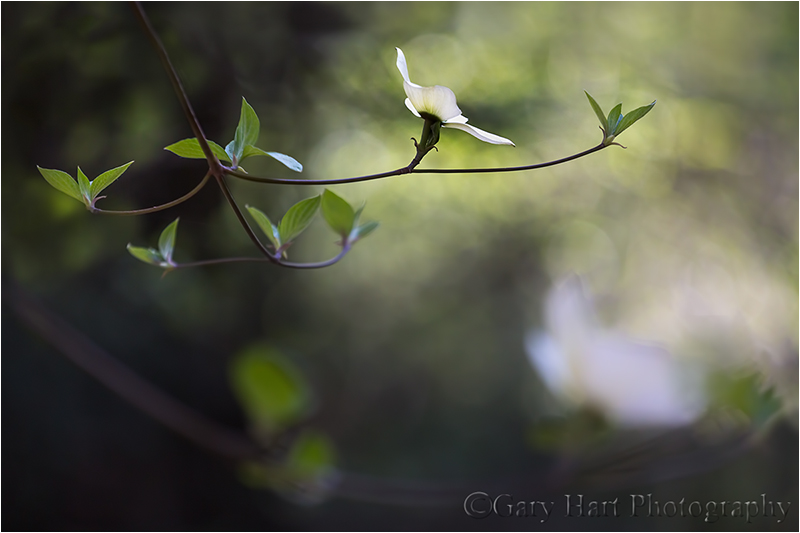
Floating Dogwood, Yosemite
Photographing near the Pohono Bridge in Yosemite, my eyes were treated to an overwhelming variety of input: countless dogwood blooms floating in dappled light; the swollen Merced River, deep and green or fast and frothing; oblivious cars and focused photographers; all this beneath a boring, pale blue sky. (Not to mention the sounds and smells of outdoors.) All of this input demanded attention, but I just wanted to convey the dogwood’s elegant grace in the context of its simple, verdant setting—everything else was superfluous.
While my human senses took in everything with razor sharpness, focusing close with a telephoto lens and large aperture allowed me isolate a single flower, reducing the rest of the visual world to a soft canvas of variegated green. Careful positioning and framing juxtaposed other blurred, complementary elements to provide location context. And using my camera’s inability to capture the range of light my eyes saw, I exposed for the brightly lit dogwood, turning everything in shade into a background ranging from dark green to nearly black.
This is image nothing like what my eyes saw, but it is what my camera saw (minimal Lightroom/Photoshop processing). Using my camera’s vision, I was able to eliminate distractions and isolate only the aspects of the scene I wanted to share. In my next few blog posts I’ll write more about leveraging your camera’s vision to reveal nature’s beauty in ways that are different, but no less real, than being there.
Up next, Framing infinity.
The Road to Hana
Posted on April 1, 2012

Serenity, Waterfall and Pool, Hana Highway, Maui
Canon EOS-5D Mark III
45 mm
.6 seconds
F/16
ISO 200
In my parents’ day, Maui’s “Road to Hana” was something to be achieved. Negotiating the narrow, undulating, muddy, potholed, serpentine, lonely jungle track was a badge of honor, something akin to scaling Everest or walking on the moon.
Today’s Hana road has been graded, paved, and widened just enough to accommodate a double yellow line that creates the illusion of space for one car in each direction. This sanitized road, now dubbed the “Hana Highway,” hosts a daily bi-directional swarm of tourists whose priorities range from not missing a single leaf, all the way to being the first to cross the finish line in Hana or back in Kapalua. Unfortunately, priorities (among other things) collide at each of the 56 bridges that, due to budget constraints, remain at their original one-lane width. Add to this mix laboring bicyclists, a sky that pinballs between blinding sunshine and windshield-obliterating downpour, an assortment of impatient and sometimes hostile locals (they’re the ones whose music you hear before their pickup rounds the turn), an occasional ten-wheel dump truck large enough to scrape roadside foliage with both mirrors, and random mongooses that pop from the jungle with Wac-A-Mole predictability, and navigating the Road to Hana feels more like a Hope/Crosby movie than a tropical vacation.
But one thing hasn’t changed: The Road to Hana experience remains a living embodiment of the tired axiom, “It’s not the destination, it’s the journey.” Hana itself is a pleasant, Hawaiian town with nice beaches and a small but eclectic assortment of restaurants and lodging. But with every hairpin turn or precipitous drop on the way there, you can’t help feeling that you’ve plopped into Heaven on Earth. The Hana road’s 50-plus miles alternate between dark, jungle tunnels and cliff-hugging ocean panoramas, punctuated by waterfalls (some of which start above you and complete beneath you, on the other side of the car), colorful foliage, and the constant potential for a rainbow. And oh yeah—banana bread. The best banana bread you’ve ever tasted. Still warm.
Sonya and I set out for Hana early Thursday morning—not quite as early as we’d planned, but we hoped early enough. Finding the first few miles beautiful and relatively easy going, we naively congratulated ourselves for our early start. But somewhere around mile-ten, as the curves tightened, the road shrank, and the photography improved, our pace slowed considerably and we found ourselves swept up in the tourist wave. Parking at every scenic turnout was a battle that often resulted in extremely, uh, “creative” solutions. Nevertheless, after a day packed with a year’s worth of scenery, we rolled into Hana at about 5 pm, equal parts exhausted and hungry.
Approaching Hana we’d glanced a sign for a restaurant called “Café Romantica,” offering “Gourmet, organic vegetarian food.” Since Sonya’s a vegetarian, and I don’t eat red meat, meals on the road are sometimes problematic and we were excited about the possibility of rewarding ourselves with a good meal. But the sign offered no specifics and despite our vigilance we found no hint of its existence anywhere.
Once we were comfortably ensconced in our (amazing) room, I pulled out my iPhone and looked up Café Romantica. I found it on Yelp, but no address, website, or phone number anywhere. The Yelp reviews were both amazing (nearly unanimous 5 stars) and intriguing (references to a truck beside the road and bizarre hours) enough that I knew we had to find it. Clicking the “Directions” link on Yelp returned a Google map with a dot on the road about ten miles south of town (in the opposite direction from which we’d arrived)–still no address, but at least solid clue.
In a perfect world we’d have taken an hour or so to clean up, enjoy the setting, and recharge after the drive, but one of the Yelp reviews warned the restaurant closes at 7:00, so we sucked it up and headed right back out. (This might be a good time to mention that the day prior Sonya and I had driven to the top of Haleakala. This is a harrowing drive in its own right, spiraling from sea level to over 10,000 feet in less than thirty miles. On the way down the mountain the brake warning light in our rental blinked on and off intermittently. And on the drive to Hana that morning, our tire pressure warning light had come on a couple of times.)
Twilight was fast approaching, but we felt confident in the Google map on my iPhone, with its bold red dot representing Café Romantica and a blue dot that perfectly pinpointed our location. I mean, even without an address, how hard could it be? Since there’s only one road in and out of town, I figured we’d just drive into the jungle until we found the restaurant where the dots meet.
I watched the road and the dashboard warning lights (so far so good), while Sonya monitored the dots, watching the blue dot inch closer to the red one far slower than we’d expected. It became immediately clear that the road out of Hana is even more challenging than the road into Hana. It’s narrower, shrinking to one lane for long stretches, and much rougher. And while the road into Hana seemed to be about 80-percent fellow gawking (but harmless) tourists, the only vehicles we encountered south of town were clearly locals who seemed to be enforcing their own secret roadway protocol, the prime principle being that, no matter what the hazard or consequence, we are to get out of their way.
About five miles (twenty minutes) into the jungle we rounded a particularly narrow corner to find ourselves headlights-to-headlights with a careening pickup who instantly opted for his horn instead of his brakes. After deftly braking and swerving, I glanced in the mirror and saw that pickup driver had finally discovered his brakes, and in fact had also stumbled upon his reverse gear and gas pedal and as accelerating back in our direction. I boldly applied the gas and disappeared around the next bend, then spent the next two miles with an eye on the mirror. (I’ll probably never understand that little encounter, but fortunately we never saw the guy again.) The road grew more remote with each turn, and we started imagining engine and tire noises–at one point I rolled down the window to see if I could figure out where that tire noise was coming from, but the road noise was drowned out by jungle sounds. My attention alternated between the road in front of us, the rearview mirror, and the dash, while Sonya kept a vigilant eye on the dots and we traded to “Deliverance” jokes to ease the tension.
By the time our dots merged, darkness was almost complete and we were pretty much resigned to the reality that our dinner plan had descended to wild goose chase status. According to Yelp, Café Romantica clings to a remote, vine-covered cliff about two hundred vertical feet above the Pacific—there’s not enough room there for a toaster, let alone an entire restaurant. But at that point we were just happy to find a place wide enough to turn around.
The drive back in the dark was less eventful (and no doubt due to my vigilant scrutiny, the previous day’s warning lights never did return), though at one point we were tailgated by a group of partying teenagers who pushed us along until I found a place wide enough to pull over safely. Needless to say, we were quite hungry by the time we rolled into town at around 7:30. Given Hana’s limited selection of restaurants, its reputation for shutting down early, and our specific culinary needs, we inventoried the food we had in the car and decided rice cakes, graham crackers, and fruit could get us to breakfast without starving.
About two blocks from our hotel a string of lights on the left caught my attention and I slammed on my brakes while my brain struggled to comprehend what I saw. Suspended above a small motorhome on an otherwise vacant lot was an awning with the words, “Café Romantica.” It was so close to our room that the walk there would have been shorter than the walk to our car had been. Besides a man putting away chairs and tables at the back of the property and a woman puttering inside the motorhome, we couldn’t see much activity. Nevertheless, I executed a quick u-turn and parked out front.
The motorhome had an attached awning covering a short counter with three or four stools. Behind a sliding window above the counter puttered the woman. I approached the window, crossed my fingers, and asked if they were still open. She shook her and apologized politely, explaining that she was almost out food. But as I started to summarize our futile hunt of the last hour she must have heard the desperation in my voice, because immediately her face warmed and she reassured us in a most maternal tone that she’d take care of us. She introduced herself as Lori Lee and asked where we were from.
About then another couple walked up, and rather than turn them away, Lori Lee rattled off to the four of us a handful of the most mouth watering, eclectic vegetarian entrées imaginable: rellenos, quiche, curry, …. She qualified each offering with the proviso that she only had one or two servings of each, but since they all sounded so good, the four of us had no problem negotiating who’d get what.
Lori Lee entertained us with friendly conversation as we sipped a wonderful soup (that also gave us great hope for what was to follow) she’d offered to hold us over until dinner was ready. Rather than make you watch me chew, I’ll just say that dinner was so good that we ordered dessert (something we never do), and even added one of her remaining entrees to-go for lunch the next day.
One of my tenets is that things always work out. I have to confess that our drive that evening severely tested my conviction, but without our little misdirection adventure, Sonya and I would have been deprived of probably the most memorable experience of our trip, and a restaurant experience I’ll never forget.
A few words about this picture
This little waterfall is just one of dozens visible along the entire length of the Hana Highway. Many are quite dramatic and stimulating; others, like this one, are more subdued and soothing. I must admit that by the time we pulled up to this fall I was verging waterfall overload. I’d found that my 70-200 lens worked best for most falls because it allowed me to isolate aspects of the scene and also to surgically remove tourists at some of the more popular falls, and I’d started exiting the car without the rest of my gear.
But cresting the small hill that provided a vantage point, I realized I’d left the car with only my 24-105 lens. Rather than walking back to the car (a hike all of maybe 150 feet), I decided to pick my way down to the pool’s edge. And had I not done that, I would have completely missed the beautiful rocks just beneath the water’s surface.
To ensure sharpness throughout the frame, I stopped down to f16, dropped to my knees, and focused on the large rock visible just beneath the surface (behind the protruding rocks). I carefully oriented my polarizer to remove glare on the nearby water and rocks, but not so much that I lost all of the fall’s reflection in the quiet water. I clicked several frames, all vertical. Some included the entire fall, but I like the mystery of this composition, the way it lets you imagine the rest of the fall and the scene surrounding it.
About thirty seconds after I snapped this a teenage girl jumped into the water right in front of me and the shot was gone. Fortunately I had all that I needed and I returned to the car a happy photographer.
Join me in my
Horsetail Fall: Yosemite’s natural firefall
Posted on February 19, 2012

Horsetail Fall, El Capitan, Yosemite (2008)
* * * *
This is the story of my 2012 Yosemite Winter workshop Horsetail Fall shoot. For more about when, where, and how to photograph Horsetail, read my Horsetail Fall Photo Tips article.
I returned home late last night from my annual Yosemite winter workshop. I’m happy to report that weeks of snow-dances, incantation, prayer, and just plain crossed fingers seem to have done the trick, as Yosemite Valley’s winter-long dry spell ended with two doses of snow last week. Since the most beautiful place on Earth is never more beautiful than when it’s blanketed in fresh snow, that was definitely the highlight of the week, but it was also fun to share the Horsetail Fall phenomenon with my group.
For those who don’t know what I’m talking about, for eleven+ months Horsetail Fall is probably Yosemite’s most anonymous waterfall. Even at its best, this ephemeral cataract is barely visible as a thin white thread descending El Capitan’s east flank–we can be standing directly beneath it and I still have to guide my students’ eyes to it (“See that tall tree there? Follow it all the way to the top of El Capitan; now run your eye to the left until you get to the first tree….”). But for about two and a half weeks in February, the possibility that a fortuitous confluence of snowmelt, shadow, and sunset light might, for a few minutes, turn this unassuming trickle into a molten red stripe, draws photographers like cats to a can-opener.
The curtain rises more than an hour before sunset, when a vertical shadow begins its eastward march across El Capitan’s south-facing flank. As the shadow advances the sunlight warms; as the unseen sun reaches the horizon, the only part of El Capitan not in shadow is Horsetail Fall; for a few minutes when the stars align–water in the fall, no clouds blocking the sun’s path to El Capitan, and enough haze to scatter all but the sun’s red rays–the fall is bathed in a red glow that resembles flowing lava. (Some people mistakenly call the Horsetail spectacle the “Firefall,” but that altogether different but no less breathtaking, manmade Yosemite phenomenon was suspended by the National Park Service in 1968.)
Some years Horsetail delivers sunset after sunset; other years bring daily of frustration. Unfortunately, it’s impossible to predict when all the tumblers will click into place: For every tale of a seemingly perfect evening when the sunset light was doused by an unseen cloud on the western horizon mere seconds before showtime, there’s another story about a cloudy evening when the setting sun somehow found a gap just as tripods were being collapsed. I know photographers who nailed Horsetail on their first attempt, and others who have been chasing it for years.
It’s fun to circle Yosemite Valley on pretty much any mid- to late-February afternoon, just to watch the hordes of single-minded photographers setting up camp like baby-boomers queueing for Stones tickets, securing a vantage point to capture (fingers crossed) their version of Horsetail Fall’s sunset pyrotechnics. When I lead a group it’s a always a tough call whether to sacrifice a nice Yosemite sunset at a more reliable location, or go all-in for the fickle grand prize. Generally, when February skies are cloudless, I might take my groups to the Horsetail circus multiple evenings (until we get it), because that’s what most are there for.
This year (2012) we had fresh snow and great clouds on Tuesday and Wednesday, so I targeted Thursday evening for Horsetail. Because we detoured to photograph the daily rainbow on Bridalveil Fall, I was resigned to dropping my group off, parking down the road, and walking back to the El Capitan picnic area beneath the fall (the spot best suited to large groups). But I was pleasantly surprised to find the necessary three parking spaces still available not much more than an hour before sunset. After a brief orientation (that started with helping everyone locate the fall), we all set up in fairly close proximity, practiced compositions and exposure, and shadow-watched. I’ve reached the point where I spend as much time watching the photographers as I do watching El Capitan–Horsetail Fall in February really has become an Event, not unlike waiting for the next act on the lawn at a concert.
Flow in the fall this year was low (it was bone-dry when I arrived Sunday), even by Horsetail standards, but still enough to make a photograph. We all held our breath, pleaded, and cheered as the shadow approached the fall. Shortly before sunset the amber light acquired a distinct pink hue and the chat, laughter, and cajoling died quickly in favor of clicking shutters. Instead of intensifying to the hoped-for red, the pink held for a few minutes before fading. So while we didn’t hit a home run, I think this year’s group still managed a stand-up triple.
I haven’t had a chance to get to this year’s images, so I’m posting a (better) 2008 Horsetail capture from a different spot. Despite appearances to the contrary, I didn’t have to scale shear granite to achieve this vantage point–I was in fact securely planted on the valley floor, shivering atop a snowbank beside the Merced River. Also of note is that this image was captured on February 9, earlier than many people claim the angle is right. I actually got it like this on consecutive nights that year, leading two different groups.
Digital photography the old fashioned way
Posted on January 29, 2012

Moonlight, Garrapata Beach, Big Sur
Canon EOS-1Ds Mark III
4 seconds
F/8
ISO 400
35 mm
Photoshop processing sometimes gets a bad rap. There’s nothing inherently pure about a jpeg file, and because a jpeg is processed by the camera, it’s actually less pure than a raw file. As a general rule, the less processing an image needs, the better, but sometimes raw capture followed by Lightroom/Photoshop processing is the only way to a successful image.
I’ve always considered myself a film shooter with a digital camera. But that doesn’t mean that I’m opposed to processing an image—in fact, processing is an essential part of every image. But just as Ansel Adams visualized the finished print long before he clicked the shutter, success today requires understanding before capture a scene’s potential, and the steps necessary to extract it later Lightroom/Photoshop.
For example
A couple of weeks ago, while co-leading Don Smith’s Big Sur photo workshop, our group had an early morning shoot that was equal parts difficult and glorious. The plan was a Garrapata Beach sunrise featuring the moon, one day past full, dropping into the Pacific at sunrise. But high tide and violent surf banished us to about 500 square feet of sheltered sand, and the cliffs above the beach (it’s bad for business when workshop participants get swept out to sea). Compounding the difficulty, the most striking aspect of the scene, a nearly full moon, was too bright for the rest of the scene. But despite the morning’s difficulties, I set to work trying to make an image because, well, that’s what photographers do.
As much as I wanted to be on the sand, aligning the moon with the the best foreground from down there would have made me a sitting duck for the waves. So I made my way along the cliff to an off-trail spot above a group of surf-swept rocks. It turns out the higher perspective was perfect for emphasizing the reflected moonlight that stretched all the way to the horizon.
With long exposures on a tripod, photographing the moonlight and beach wasn’t a problem. But adding the daylight-bright moon burning through the pre-dawn darkness made capturing the entire range of light in a single frame (a personal requirement) difficult, and perhaps impossible. Nevertheless, I spot-metered on the moon to determine the maximum exposure that would retain the ability to recover overexposed lunar detail later in the Lightroom raw processor. But even after maximizing the moon’s exposure, I didn’t have nearly enough light for the rest of the scene without first darkening the sky further using five stops of graduated neutral density (stacking my Singh-Ray three-stop reverse and two-stop hard GND filters). So far so good.
Satisfied that I could make the exposure work, but with very little margin for error, my next concern was finding a shutter speed that allowed enough light without risking motion blur in the moon. Because I needed sharpness throughout the frame, from the beach right below me all the way out to the moon, I couldn’t open all my aperture all the way. Whipping out my DOF app, I computed that focusing twenty feet away at f8 would give me sharpness from ten feet to infinity. Bumping to ISO 400 at f8 brought my shutter speed to four seconds, a value I was confident would freeze the moon enough. I clicked several frames to get a variety of wave effects, ultimately choosing this one for the implicit motion in foreground wave’s gentle arc.
In Lightroom, I cooled the light temperature slightly to restore the night-like feel. Using five GND stops at capture required significant Photoshop brightening of the sky to return it to a reasonable range. A few years ago this would have introduced far too much noise, but the latest noise reduction software (I use Topaz) is amazing. As expected, even after all my exposure and processing machinations, I still needed to process the raw file a second time to recover the highlights in the moon. Because the two versions were the same capture, combining them in Photoshop was a piece of cake.
A Gallery of Favorite Seascapes
Click an image for a closer look, and a slide show. Refresh your screen to reorder the display.


")
Alpenglow: Nature’s paintbrush
Posted on January 24, 2012
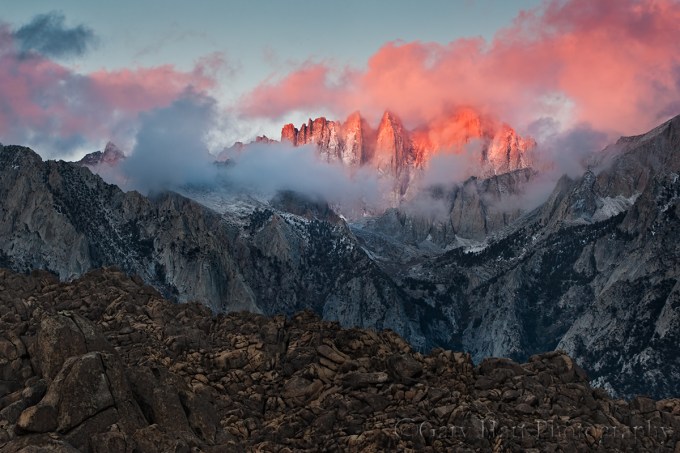
Red Dawn, Mt. Whitney and the Alabama Hills, Eastern Sierra
Canon EOS-1Ds Mark III
168 mm
.8 seconds
F/11
ISO 100
The foreground for Mt. Whitney is the rugged Alabama Hills, a disorganized jumble of rounded granite boulders, familiar to many as the setting for hundreds of movies, TV shows, and commercials. These weathered rocks make wonderful subjects without the looming east face of the southern Sierra. What makes this scene particularly special is the fortuitous convergence of topography and light that rewards early risers with a skyline dipped in pink–add a few clouds and it’s a photography trifecta.
We’ve all seen the pink band above the horizon opposite the sun shortly before sunrise or after sunset. Sometimes called “the belt of Venus,” this glow happens because sunlight that skims the Earth’s surface just before sunrise (or shortly after sunset) has to battle its way through the thickest part of the atmosphere, which scatters the shorter wavelengths (those toward the blue end of the visible spectrum), leaving just the longer, red wavelengths capping the horizon. When mountains jut high enough to reach into this region of pink light, we get “alpenglow.” Towering above the terrain to the east, the precipitous Sierra crest, anchored by 14,500 foot Mt. Whitney (the highest point in the contiguous 48 states) and 13,000 foot Lone Pine Peak, is ideally located to receive this sunrise treatment.
The image above was captured on a frigid January morning. While the best light on the Sierra crest usually starts a couple of minutes before the “official” (flat horizon) sunrise, this morning Mt. Whitney hid behind the clouds until the alpenglow was well underway. Like a piece of art waiting for its spotlight, the cloudy shroud was pulled back just as the sunlight struck Mt. Whitney, and for a couple of minutes it appeared as if a giant paintbrush had dabbed the swirling canvas with pink.
Workshop Schedule || Purchase Prints || Instagram
A Mt. Whitney Gallery
Click an image for a closer look, and to view a slide show.


Reflections on the polarizer
Posted on December 1, 2011

Autumn Reflection, North Lake, Eastern Sierra
Canon EOS-1Ds Mark III
1/5 second
F/16.0
ISO 200
22 mm
Polarizer 101
Photographers who think a polarizer is only for darkening the sky miss opportunities to saturate color and and emphasize texture in shade or overcast. Even worse, some photographers screw on a polarizer without understanding how it works, mistakenly believing that merely having it attached is sufficient.
The amount of polarization any composition calls for is a creative decision that can make or break an image. And unfortunately, a mis-oriented polarizer is worse than no polarizer. With no Photoshop substitute to help you recover, your only option is to get the polarization right at capture.
This won’t be on the test
So what does a polarizer do?
It helps some people to understand that a wave of light oscillates perpendicular to its direction of motion–picture the way a wave in the middle of the ocean rises and falls as it advances: the wave moves forward, but the water moves up and down. In very simple terms, by removing light that oscillates in a specific direction, a polarizing filter removes reflection. Polarization (reflection reduction) is most pronounced when your lens points 90 degrees (perpendicular) to the direction of the sun (or other light source); its least effective when the lens points directly toward or away from the sun.
A circular polarizer (what you want for today’s digital SLR cameras) screws to the front of your lens. Rotating the polarizer’s outer element relative to its fixed, inner element, varies the orientation and amount of polarization. You can see its effect (sometimes large, sometimes small) through your viewfinder or on your live-view LCD.
What a polarizer does for you
With reflections minimized by a polarizer, pale blue sky is transformed to a deep blue, the natural color and texture of rocks and foliage pops, and clouds that were barely visible suddenly snap into prominence. Or, imagine mountains reflected in a still alpine lake: As you rotate your polarize, the reflection is replaced by rocks and leaves dotting the lakebed; keep turning and the reflection returns.
So what’s the catch?
Lost light
A polarizer costs you one to two stops of exposure, depending on the polarizer and the amount of polarization you dial in. Since aperture manages depth, landscape photographers usually compensate for the lost light with a longer shutter speed–one more reason to use a tripod.
Differential polarization
Because a polarizer’s effect varies with the direction of the light, and wide lenses cover such a broad field of view, light strikes different parts of a wide scene from different angles. The result is “differential polarization”: parts of the scene that are more polarized than others.
Differential polarization is particularly troublesome in the sky, appearing as an unnatural transition from light to dark blue across a single frame. This effect can often be reduced, but rarely eliminated, with careful dodging and burning in Photoshop. Better yet, avoid images with lots of (boring) blue sky.
Vignetting
A standard polarizer is comprised of a circle of polarized glass mounted in a frame that screws into, and rotates relative to, the fixed lens beneath. Many also include an outer ring with threads for attaching other filters. The field of view of ultra-wide lenses can be so great that, at their wider focal lengths, they include the polarizer’s frame: vignetting. Polarizer vignetting manifests as dark edges on your images, particularly at the corners.
Most of the best polarizer manufacturers offer a low-profile version that mitigates vignetting. Low profile polarizers are more money (oh well), usually require a special lens cap (usually just a minor annoyance), and don’t have external threads (not an issue for me).
Where’s the rainbow?
A polarizer oriented to minimize reflections will completely erase a rainbow. So if you’re shooting a photographing a rainbow, turn your polarizer until you see the rainbow at its brightest. And if you’re photographing scene that could get a rainbow, pull away from your viewfinder from time-to-time just to be sure that you’re not missing something special.
Me and my polarizer(s)
Always on
Since I’m all about simplicity in the field, and determining whether or not I need a polarizer and then installing or removing it as needed is more trouble than it’s worth, each lens has its own polarizer that never comes off during daylight hours. I remove my polarizer only when I need more light; but remember, I’m always on a tripod, so unless it’s night, or I’m dealing with wind or water motion, the light lost to the polarizer isn’t a concern for me.
But. Shooting with no polarizer is better than using an incorrectly oriented polarizer. If you’re going to follow my “always on” polarizer approach, you must be diligent about rotating the polarizer and checking its effect on each composition, or risk doing more harm than good to your image.
Protection
Like many photographers, I always use a filter as protection for my front lens element; unlike many photographers, I don’t use UV or skylight filters. While it’s possible to stack a polarizer with a UV or skylight filter, I don’t. Instead, (because it never comes off) my polarizer doubles as protection for the front lens element.
Given that my polarizers are in the $200 range, this gets a little expensive when a filter “takes one for the team,” but it’s cheaper than replacing an entire lens, and more desirable than stacking superfluous glass between my subject and my sensor, not to mention the vignetting stacking causes. On the other hand, I will use a graduated neutral density filter with a polarizer, because GNDs perform a specific (not superfluous) function.
The polarizer and lens hoods
To those photographers who complain that it’s a real pain to rotate a polarizer with a lens hood in the way, I have a simple solution: remove the lens hood. I never use a lens hood. Ever. This is blasphemy to many photographers, but I hate lens hoods, which always seem to be in the way (see my “simplicity in the field” comment above). But (there’s that word again), jettisoning the lens hood must come with the understanding that lens flare is real and sometimes impossible to correct after the fact.
When there’s a chance direct sunlight will strike my front lens element, I check to see if shielding the lens helps. With my composition ready (on my tripod!), I peer through my viewfinder and shield my lens with my hand or hat (or whatever’s handy). If the scene becomes darker and more contrasty, and/or random fragments of light disappear, when my lens is shaded, I know I have lens flare and need to manually shield my lens while exposing. Of course if the sun is part of the composition, no shading in the world will eliminate lens flare.
Polarizer techniques
Polarizer on a budget
All scenes don’t benefit equally from a polarizer, and photographers on a budget can’t always afford one for every lens. If you’re only going to go with one polarizer, buy one for your largest lens–as long as you’re on a tripod, it’s not hard to hold (and rotate) a larger polarizer in front of a smaller lens.
Does this scene call for a polarizer?
To determine the polarizer’s effect, rotate the outer element 360 degrees as you peer through your viewfinder (or while viewing the LCD in live-view). Often just holding the polarizer to your eye and rotating it slowly is enough to determine its benefit. Either way, if you can’t see a change, you probably don’t need to worry about a polarizer.
Because a polarizer can also enhance reflections (and glare), whenever the polarizer is on, you must, must, must test its effect with every composition (and especially after switching from horizontal to vertical orientation). Unless I’m trying to maximize a reflection, I rotate the polarizer until the scene appears darkest. If there’s no apparent change, I watch specific objects that might have a slight sheen (water, a leaf, or a rock) as I rotate the polarizer–I almost always can find some change.
It’s not just for the sky
As nice as the the effect on the sky is, it’s the polarizer’s more subtle ability to reduce glare in overcast or shade that I find irreplaceable. Peering through your viewfinder (or watching your LCD if you’re using live-view), lock your eyes on a reflective surface and rotate the polarizer. The effect is most obvious on water, or wet rocks and leaves, but even when completely dry, most rocks and leaves have a discernible sheen. As you rotate the polarizer, harsh glare is replaced by natural color and texture; continue rotating and the glare reappears. The glare is minimized when the scene is darkest.
Regardless of the effect, there’s no rule that requires you to turn the polarizer to one extreme or anther (maximum or minimum reflection). Rotate the outer element slowly and watch the scene change, stopping when you achieve the desired effect.
In the North Lake autumn reflection scene at the top of the page, I was able to find a midpoint in the polarization that kept the best part of the reflection (the mountains and trees), while still revealing the submerged granite rocks at my feet.

Floating Leaves, Merced River, Yosemite
In the above image of autumn leaves floating in the Merced River, I used my polarizer to completely dial down the reflection, creating the illusion of leaves suspended in empty space. Polarizing away the reflection also helped the leaves’ color stand out by eliminating distracting glare.

Redbud, Merced River
An emergency neutral density filter
A polarizer can also be used as a two-stop neutral density filter by dialing it to maximum polarization (minimum light). In this image of a redbud above the surging Merced River, even at ISO 100 and f32, I couldn’t reach the 3/4 second shutter speed that would give me the motion blur I wanted. But the two stops of light I lost to my polarizer was just enough to get me where I wanted to be.
If you’re serious about your photography
Use only quality polarizers; you don’t need to spend a fortune, but neither should you skimp. Not only does the quality of the optics affect the quality of your results, I’ve also seen many poorly made polarizers simply fall apart for no apparent reason.
I advise buying polarizers that are commensurate with your glass–in other words, if you have top-of-the-line lenses, it makes no sense to use anything but top-of-the-line polarizers. I use Heliopan, Rodenstock, and Singh-Ray (I refuse to purchase anything from B+W until they fix their low profile lens cap, a problem they’ve know about for years).
My personal recipe for using a polarizer
- Always on during the day (but if you do this, you must check the orientation with each composition)
- No other filters except a graduated neutral density filter, when needed
- Compose my shot and lock it in place on my tripod
- Turn the polarizer to get the effect I want
- Expose the scene
- Check for lens flare and shield if necessary
- Click
Just do it
Like anything else in photography, using a polarizer is an acquired skill that improves with use. You don’t need to immediately jump in with both feet, but I suspect once you tune in to the polarizer’s benefits, you’ll have a hard time photographing nature without one.

