Eloquent Images by Gary Hart
Insight, information, and inspiration for the inquisitive nature photographer
Isolation
Posted on November 11, 2011

Forest Autumn, Yosemite
Canon EOS-1Ds Mark III
200 mm
1/25 second
F/4
ISO 200
I love sweeping panoramas, but when I’m alone I often gravitate to the intimate locations that make nature so personal. In Yosemite’s dark corners, places like Bridalveil Creek beneath Bridalveil Fall, and the dense mix of evergreen and deciduous trees lining Merced River near Fern Spring and the Pohono Bridge, I scour the trees and forest floor for subjects to isolate from their surroundings.
Helping your subjects stand out is often the key to a successful image. Sometimes subject isolation is a simple matter of finding something that stands out from its surroundings, an object that’s physically separated far from other distractions. But more often than not, effective isolation requires a little help from your camera settings, using contrast, focus, and/or motion to distinguish it from nearby distractions.
A disorganized tangle of weeds or branches can become a soft blur of color when you narrow your depth of field with a large aperture, close focus point, and/or long focal length. Likewise with motion, where a long shutter speed can smooth a rushing creek into a silky white ribbon. And a camera’s inherently limited dynamic range can render shadows black, and highlights white, creating a perfect background for your subject.
After finding these dangling leaves, just across the road and a little downriver from Fern Spring in Yosemite Valley, I juxtaposed them against the vertical trunks of background maples and evergreens. Zooming to 200mm reduced my depth of field, separating the sharp leaves from the soft background of trunks and branches. A large aperture further blurred the background to a simple, complementary canvas of color and shape. Slight underexposure and a polarizer (to remove glare) helped the color pop.
On my website you can read more about my favorite Yosemite photo locations.
A gallery of isolation


Aloha!
Posted on July 10, 2011

Sunset, Any Beach, Hawaii
The last few years I’ve spent quite a bit in Hawaii, but I really can’t say which island I prefer. All have gorgeous around-the-clock weather, more waterfalls than you can count, dense and colorful rain forests, and spectacular volcanic beaches. More recently my photographic attention has been focused on the Big Island and Maui, but I feel like I’ve just scratched the surface. Both have lots of rain forests and waterfalls. The Big Island has Kilauea and is much less crowded (especially the more photogenic Hilo side); Maui has Haleakala and the breathtaking Road to Hana. But rather than leave you hanging, I’ll continue my extensive research on this question and will gladly keep you apprised of my findings.
I return to Hawaii’s Big Island for one or two workshops each September, and starting March 2013 I’ll offer a four-day Maui workshop that includes two nights in Hana. There are more places to photograph on Hawaii than there’s time to photograph, so my Hawaii workshop schedule is a bit problematic. We certainly squeeze in lots of photo time, both day and night, but the Islands’ slow pace is infectious–it’s simply impossible not to spend time hanging by the pool and strolling by the beach, so I need to factor in quality downtime for my participants. And then there are those Mai Tais….
Check out my website for more info on my Hawaii photography workshops.

Akaka Fall is the centerpiece of Akaka Falls State Park, a lush, tropical rainforest splashed with reds and yellows so vivid they almost hurt your eyes.

Hawaii isn’t just endless sand beaches. The Big Island and Maui in particular have miles and miles of volcanic beaches like this–short on sand, but long on drama.

This is just one of what seems like hundreds of waterfalls on the Road to Hana, Maui—you’ll quickly realize that some waterfalls exhilarate, while others soothe.

This is the Kilauea Caldera on the Big Island. I can’t imagine anything more breathtaking than peering into an active volcano, unless maybe it’s peering into an active volcano at night.
A landscape photographer’s time
Posted on June 25, 2011

Double Rainbow, Yosemite Valley
Canon EOS-1Ds Mark II
38 mm
1/5 seconds
F/16
ISO 100
On my run this morning I listened to an NPR “Talk of the Nation” podcast about time, and the arbitrary ways we Earthlings measure it. The guest’s thesis was that the hours, days, and years we measure and monitor so closely are an invention established (with increasing precision) by science and technology to serve society’s specific needs; the question posed to listeners was, “What is the most significant measure of time in your life?” Most listeners responded with anecdotes about bus schedules, school years, and work hours that revealed how our conventional time measurement tools, clocks and calendars, rule our existence. Listening on my iPhone, I wanted to stop and call to share my own relationship with time, but quickly remembered I wasn’t listening in realtime to the podcast. So I decided to blog my thoughts here instead.
Landscape photographers are governed by far more primitive constructs than the bustling majority, the fundamental laws of nature that inspire, but ultimately transcend, clocks and calendars: the Earth’s rotation on its axis, the Earth’s revolution about the Sun, and the Moon’s motion relative to the Earth and Sun. In other words, clocks and calendars have little to do with the picture taking aspect of my life; they’re useful only when I need to interact with the rest of the world on its terms (that is, run the business).
While my years are ruled by the changing angle of the Sun’s rays, and my days are inexorably tied to the Sun’s and Moon’s arrival, I can’t help fantasize about the ability to schedule my spring Yosemite moonbow workshops (that require a full moon) for the first weekend of each May, or mark my calendar for the blizzard that blankets Yosemite in white at 3:05 p.m. every February 22. But Nature, despite human attempts to manipulate and measure it, is its own boss. The best I can do is adjust my moonbow workshops to coincide with the May (or April) full moon each year; or monitor the weather forecast and bolt for Yosemite when a snowstorm is promised (then wait with my fingers crossed).
The insignificance of clocks and calendars is never more clear than the first morning following a time change. On the last Sunday of March, when “normal” people moan about rising an hour earlier, and the first Sunday of November, as others luxuriate in their extra hour of sleep, it’s business as usual for me. Each spring, thumbing its nose at Daylight Saving Time, the Sun rises a mere minute (or so) earlier than it did the day before; so do I. And each fall, on the first sunrise of Standard Time, I get to sleep an an entire minute longer. Yippee.
Honestly, I love nature’s mixture of precision and (apparent) randomness. I do my best to maximize my odds for something photographically special, but the understanding that “it” might not (probably won’t) happen only enhances the thrill when it, or maybe something unexpected and even better, does happen. The rainbow in today’s image was certainly not on anybody’s calendar; it was a fortuitous convergence of rain and sunlight (and ecstatic photographer). My human “schedule” that evening was a 6 p.m. get-to-know/plan-tomorrow dinner meeting with a private workshop customer. But seeing the potential for a rainbow, I suggested that we defer to Mother Nature, ignore our stomachs, and go sit in the rain. Fortunately he agreed, and we were amply rewarded for our inconvenience and discomfort.
Workshop Schedule || Purchase Prints
A Gallery of Rainbows
Click an image for a closer look, and a slide show. Refresh the screen to reorder the display.


The Other Ninety-Nine Percent
Posted on May 2, 2011

Cradled Crescent, El Capitan and Half Dome, Yosemite
Canon EOS 1DS Mark III
4 seconds
400 mm
ISO 400
F8
Thomas Edison said, “Genius is one percent inspiration and ninety-nine percent perspiration.” (Without claiming genius) I think this applies to photography as well: Many successful images are more the product of being in the right place at the right time than divine inspiration. Of course anyone can stumble upon a lucky convergence of location and conditions and come home with a great photo, but the “genius” behind creating great photos consistently is preparation and sacrifice–a.k.a., perspiration.
The moonrise on the final sunrise shoot of last week’s Yosemite workshop spurred these thoughts about inspiration and effort. We were all in more or less the same place, photographing the same thing. And while everyone probably captured very similar images (in this case of a crescent moon squeezing between El Capitan and Half Dome), the true magic was simply being there.
But why were we the only ones there to witness this special moment that probably won’t repeat for decades? Determining the moon’s altitude and azimuth from any location on Earth is as easy as visiting one of many websites, or using one of many astronomical software applications such as The Photographer’s Ephemeris or (my preference) the Focalware iPhone app. Armed with this data, aligning the moon’s rise with any landmark isn’t rocket science.
Based on my calculations and plotting, I scheduled my “Yosemite Dogwood and Rising Crescent” workshop to coincide with a sunrise crescent moon. The dogwood bloom isn’t as reliable, but I know interesting weather is still possible in Yosemite in late April and early May. What we ended up with was mostly clear skies (great for tourists, but definitely not for photographers) and a very late dogwood bloom in Yosemite (probably two weeks behind “schedule”), forcing me to shift the daytime emphasis of my spring workshop to rainbows. I’m happy to report Bridalveil and Yosemite Falls delivered more photogenic rainbows than I can count, from a number of different locations.
As spectacular as they were, overshadowing the rainbows was the moonrise on our penultimate morning. I promised the group that departing at 4:50a.m. would get us to Tunnel View in time to photograph a 7% crescent moon rise above Yosemite Valley, between Sentinel Dome and Cathedral Rocks, in the pre-dawn twilight. (I knew this because I’ve been calculating moonrise and moonsets in Yosemite and elsewhere for many years, and have photographed more of these from Tunnel View than any other location.) That moonrise came off exactly as advertised–so far so good.
But the Tunnel View success, as beautiful as our images were, was merely a warm-up that gave everyone an opportunity to hone their silhouette exposure and composition skills in advance of the rare moonrise opportunity I’d planned for the next morning. When scheduling this workshop I’d determined that about 45 minutes before sunrise on May 1 of this year (2011), a delicate 3% crescent moon would slip into the narrow gap between El Capitan and Half Dome for anyone watching from Half Dome View on Big Oak Flat Road.
Lunar tables assume a flat horizon, so unless I’m at the ocean, the primary uncertainty is when the moon will appear above (or disappear below) the not-flat horizon. Once I’ve photographed a moonrise (or set) from a location, I simply check the precise time of its appearance (or disappearance) against the altitude/azimuth data for that day to get the exact angle of the horizon from there. Until I have this horizon information, I only have the moon’s direction and elevation above the unobstructed horizon and can only make an educated guess as to the time and location of its appearance.
The other big wildcard in moon and moonlight photography is the weather, but a last minute check with the National Weather Service confirmed that all systems were go there. Nevertheless, despite all my obsessive plotting, checking, and double-checking, having never photographed a moonrise from this location, and the fact that an error would affect not just me but my entire group, I couldn’t help feel more than a little anxious.
The afternoon before our second and final pre-dawn moonrise, I brought the group to Half Dome View so they could familiarize themselves with the location and plan their compositions. Due to the horizon uncertainties I just described, the first time I photograph a moonrise/set from a location, I generally give my group only an approximate time and position for the moon’s rise/set. But during this preview someone asked exactly where the moon would rise, and I confidently blurted that it will appear in the small notch separating El Capitan and Half Dome between 5:15 and 5:20 a.m. (about 25 minutes after the official, flat-horizon moonrise). Standing there that afternoon, however, I realized how small the notch really is, meaning that even the slightest error in my plotting could find the moon rising much later, from behind El Capitan or Half Dome. So I quickly qualified my prediction, explaining that I’ve never photographed a moonrise here and the uncertainty of knowing the horizon. But given all of my perfectly timed waterfall rainbow hits so far, not to mention our Tunnel View moonrise success earlier that morning, I had the sense that my group had unconditional (blind) confidence in me. (Yikes.)
Sunday morning we departed dark and early (4:45 a.m.), full of anticipation. We arrived at Half Dome View a little after 5:00, early enough to enable everyone to set up their tripods, frame their compositions, and set their exposures. Then we waited, all eyes locked on the gap separating El Capitan and Half Dome. Well, almost all eyes–mine made frequent detours to my watch and the Focalware iPhone app responsible for my bold (rash?) prediction. (What was I thinking, promising a moonrise into a paper-thin space in a five minute span from a spot where I’d never photographed a moonrise?) My watch crawled toward the 5:15-5:20 window: 5:15 (Is the notch shrinking?); 5:16 (It’s shrinking–I swear I just saw Half Dome inch closer to El Capitan); 5:17 (I entered the coordinates wrong, I know I did–what if it comes up behind us?). Surely this wasn’t the kind of perspiration Edison was thinking about.
As I frantically re-checked my iPhone for the umpteenth time, somebody exclaimed, “There it is!” I looked up and sure enough, there was the leading sliver of nearly new moon perfectly threading that small space between El Capitan and Half Dome. Phew. The rest of the morning was a blur of shutter clicks and exclamations of delight (plus one barely audible sigh of relief). (How could I have even dreamed of doubting the tried and true methods that had never failed me before?)
Before the shared euphoria abated, I suggested to everyone that they take a short break from photography and simply appreciate that they’re probably witnessing the most beautiful thing happening on Earth at this moment (a feeling every nature photographer should experience from time to time). It’s always exciting to witness a moment like this, a breathtaking convergence of Earth and sky that may not occur again exactly like this in my lifetime. It’s even more rewarding when the event isn’t an accident, that I’m experiencing it because of my own effort, and that I get to share the fruit of my perspiration with others who appreciate the magic just as much as I do.
Workshop Schedule || Purchase Prints || Instagram
A Crescent Moon Gallery
Click any image to scroll through the gallery LARGE

")


My camera can beat up your camera (and other photography myths)
Posted on April 28, 2011
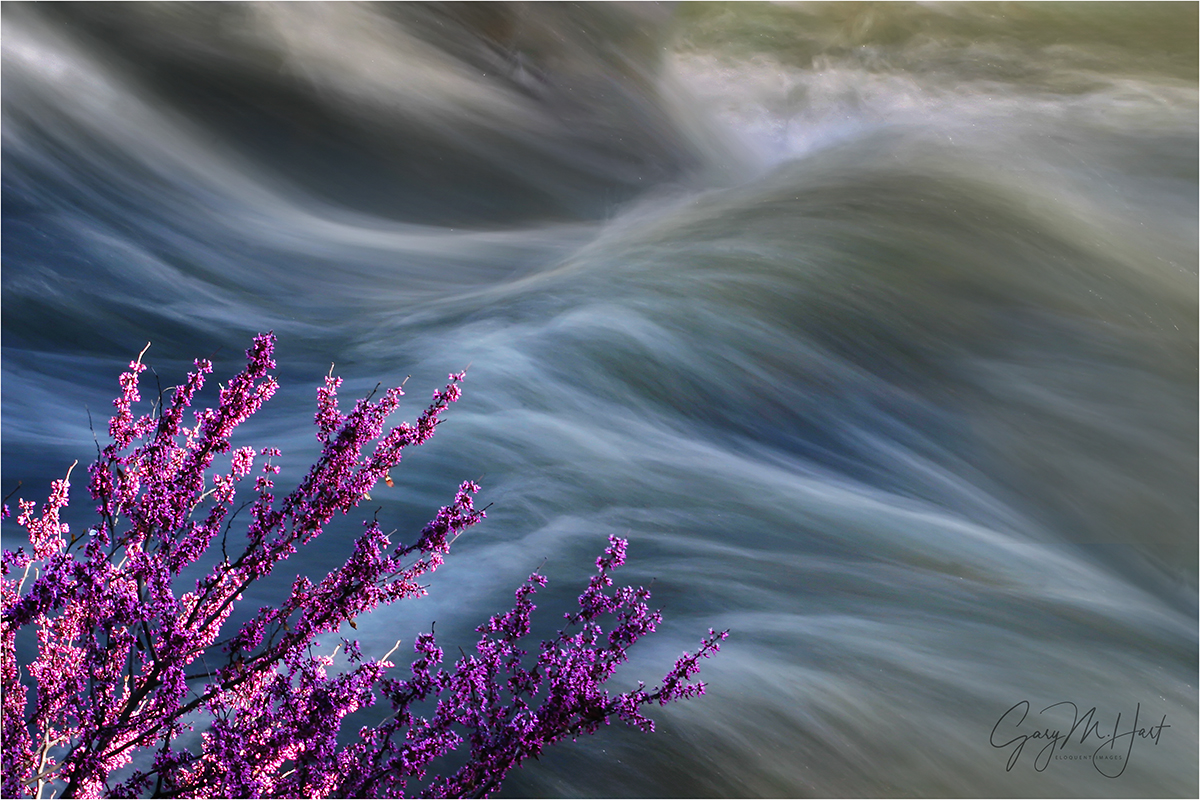
Redbud, Merced River Canyon
Canon EOS 10D
2/3 second
F/32 (the only way I could get the shutter speed I wanted)
ISO 100
80 mm
Want to know how to tell a pro landscape photographer from an amateur? Here are a few telltale indicators:
- The pro photographer has no emotional attachment to her camera and refuses to invest any energy in the “My camera can beat up your camera” debate
- The pro photographer is the one with duct tape on his tripod and camera bag
- The pro photographer is the one pointing her camera in the opposite direction from all the other photographers
- The pro photographer is the one using the garbage bag to protect her camera from the rain
- When you ask the pro photographer for his business card, he takes longer than .5 nanoseconds to produce it, and when (if) he finds it, it resembles a used napkin
- The pro photographer never asks, “How many megapixels is that camera?”
For me the last point, this megapixel thing, is a particular irritation, because until we all get wise to the reality that megapixels are not a measure of image quality (they’re merely a measure of image size), the camera manufacturers will continue shoving megapixels down our throats rather than giving us something of real value, like wider dynamic range or clean high ISO performance. And consider this: All things equal (identical technology), the more megapixels on a sensor, the lower the image quality. That’s because increasing the megapixel count requires smaller and/or more densely packed photosites, both of which reduce image quality.
How much resolution do you need? While there’s no absolute answer, consider that many of my most successful images are jpegs captured many years ago with my six megapixel Canon 10D. The riverside redbud image at the top of this post is one of my top sellers, an image that I still sell at 24×36 without apology.
Here are few more of my 6mp 10D jpeg favorites (all of which I have no problem enlarging to 24×36 or larger):


What does all this mean?
It’s hard to deny that digital cameras have improved. A lot. But the new technology is greatly underutilized by most photographers, the majority of whom display primarily online and rarely print larger than 12×18. Granted, more megapixels increase the margin for error (ability to crop a usable image from the original image) of any frame. And improved technology give newer cameras better dynamic range and high ISO performance than their predecessors. But most of these improvements are of limited value to the vast majority of photographers.
Of course photography needs to be a source of pleasure. So if it makes you happy to have the newest, fanciest, and most expensive equipment, by all means go for it. But understand that the latest camera is not a shortcut to professional success. If better photography is your goal, and you have a less than unlimited budget for camera gear, increased resolution should be toward the bottom of the dollar priority list, far below essential equipment that will make a tangible difference in your images and serve you for many years, additions like the highest quality lenses possible and a sturdy tripod that’s easy to carry and use.
Added 3/2/12: I’ve been shooting with the same camera since 2008. In that time I’ve purchased lenses, tripods, four new computers (two desktops, two laptops), a new printer, and lots of processing software upgrades. Each of these purchases has made a tangible difference in my results. And while I’ll probably be replacing my four-plus year-old camera this year, it won’t be to add resolution. It will be because the new technology finally gives me significantly better dynamic range and high ISO performance.
Added 3/8/14: I’ve now been using my 5DIII for two years. Is it better than my 10D? Absolutely, not even close. But I’d say that for at least 80 percent of my images, the differences between my 10D and 5DIII images make virtually no practical difference. So three years after this post, I still say that unless you have an unlimited photography budget, if you already have a DSLR of any vintage, you’re much better off spending your money on the best lenses and tripods (and maybe even a workshop or two).
Bracketing in the digital age
Posted on April 23, 2011

Poppy With a View, Point Reyes National Seashore, California
Canon EOS 10D
1/90 second
F8
ISO 100
24 mm
Remember the uneasy days of film, when we never knew whether we had exposed a scene properly until the film was processed? As insurance we’d bracket our exposures, starting with the exposure we believed to be right, then hedge our bets by capturing the same composition at lighter and darker exposure values. Today digital capture gives us instant exposure confirmation, yet the practice of exposure bracketing persists among inexperienced photographers.
Film shooters carefully budget their shutter clicks because they pay for film and processing by the exposure; digital photographers paid for their exposures when they purchased their camera. In other words, while every film click costs you money, every digital click increases the return on your investment. This means that using a digital camera, you can shoot to your heart’s content with little to no added cost, a great opportunity get the most out of your significant hardware investment and grow as a photographer. These “free” captures may also explain the persistence of exposure bracketing by so many digital photographers who think nothing of tripling the number of shutter clicks. But unless you plan to blend images later, exposure bracketing is a waste of time, shutter-cycles (the shutter is often the first thing to wear out on digital SLRs), and storage. Instead, trust your histogram and spend your extra shutter clicks on a more productive approach: composition bracketing.
Composition bracketing is “working” a scene by capturing composition and camera-setting variations to be decided upon later, when you review your images on a large screen. If you shoot your scenes both horizontally and vertically, you already composition bracket. But don’t stop there: Before looking for something else to shoot, shoot the current scene wider and tighter, move around to change the foreground or background, experiment with depth of field and motion blur, and so on.
For example, a few years ago I spent a couple of days photographing wildflowers in Point Reyes. Visualizing a solitary poppy with the coastline soft in the background, I was pleased to find this fearless subject clinging to Chimney Rock’s precipitous west slope. From my vantage point above the poppy, the background was a mix of dirt and weeds, but dropping down to poppy-level instantly juxtaposed it against the ocean. A blue ocean was better than dirt and weeds, but I wanted coastline so I rotated (with one eye on the cliff) until the poppy was framed by the curving shore. To fill the frame with the poppy and achieve the narrow depth of field I sought, I added an extension tube to my wide (24-70) lens.

Here I am refining my composition for this poppy. I ended up dropping lower and closer before bringing in my tripod. (The slope was as steep as it looks here.)
Dropping low enough to place the entire poppy against the surf put me too low for the tripod I was carrying. But since nailing the focus point is particularly essential these shallow depth of field images, I don’t even consider hand-holding close focus shots. In this case I placed my tripod on its side and carefully rested the lens on one of the legs, using my bunched jacket to cushion against vibration and my remote release to click without disturbing the precarious equilibrium. As you might imagine, because this was in the days before live-view, composing was an exercise in contortion and patience.
Exposure was easy, a fact confirmed by my histogram. But after going to all this trouble to set up my shot, I wasn’t about to fire off a single frame and move on. So I bracketed my compositions, timing several exposures for different background wave action, a surprisingly significant frame-to-frame change. And even though I believed minimal DOF was best, I knew that my postage stamp sized LCD wouldn’t tell me if I’d achieved the best DOF. So I followed my initial wide-open shot with several frames at a variety of smaller f-stops (and a correspondingly slower shutter speeds). Good thing, because the background in the original f4 exposure was far too soft–the frame I ended up choosing was at f8. While the exposure was identical for each frame, I attribute my satisfaction with this image to the choices due to my calculated composition bracketing.
Photographing the Grand Canyon: It’s not as easy as it looks
Posted on March 29, 2011

Sunset, Hopi Point, Grand Canyon
Canon EOS-1Ds Mark III
1 second
F/18.0
ISO 100
28 mm
As a photographer weaned on the no less breathtaking but far more finite confines of Yosemite, transitioning to photographing the Grand Canyon shattered a long-established template for success. In Yosemite Valley I’m surrounded by looming walls as familiar as they are spectacular. Attempts to capture Yosemite’s grandeur generally involve isolating or combining specific subjects: El Capitan, Half Dome, Yosemite Falls, and so on.
But when photographing from the rim of the Grand Canyon, no single subject stands out. Rather, I’m instantly overwhelmed by both the vast expanse of the vista and the enormity of its scale. The problem is, as far as the camera is concerned, breadth and size are mutually exclusive: The wider I compose to include the vista, the more everything in the frame shrinks; the tighter I compose to convey the size of the canyon’s features, the more the vista shrinks. But perhaps the greatest hurdle is the Grand Canyon’s great distance, with dramatic red ridge after red dramatic ridge seeming to continue into infinity. This visual depth is completely lost in the camera’s two-dimensional vision.
While I’m not sure I’ve completely mastered the Grand Canyon, I feel like I’m finally getting the hang of it. The above sunset photographed from Hopi Point demonstrates the approach that seems to work best for me, which is to find something for the foreground that complements the background I’m trying to highlight. The Grand Canyon’s rim is rife with interesting trees and shrubs, but in this case I wanted to photograph the sun on the horizon, using the river to lead the eye through the frame. But I couldn’t find an appealing foreground subject. Since experience has shown me that something in the foreground anchors the viewer and is essential to the depth I want to convey, rather than forego any foreground subject at all, I settled for two pretty ordinary shrubs on the canyon’s rim. Because they’re not particularly compelling, I positioned the shrubs at the edge of the frame, allowing ample room for the eye to move easily along the more interesting rim and through the rest of the frame.
Another difficulty photographing the Grand Canyon is the extreme contrast between the bright sky and deeply shaded canyon at sunrise and sunset, a contrast the eye handles far more easily than a camera. The best light in Yosemite Valley comes at sunset, when the sun is at your back for most compositions that include El Capitan or Half Dome. But the Grand Canyon offers an unobstructed view of the horizon in all directions–as difficult as it is to photograph, it’s pretty hard to ignore the rising and setting sun. And the canyon’s precipitous sides put much of it in deep shadow when the sun is on the horizon.
For this sunset I’d arrived at Hopi Point about an hour early, allowing time to plan and set up my composition. When the sun reached the horizon I combined two- and three-stop graduated neutral density filters, which enabled a long enough exposure to bring out the canyon’s shadow detail while holding back color-robbing brightness in the sky. (The Grand Canyon is a great place for hard-transition or reverse GNDs because the linear horizon is a great place to hide the dark-to-light transition.) The sunburst was achieved by using a small aperture (f18) and timing my exposure just as a thin sliver of sun peaked beneath a cloud.
While I’m still not as productive at the Grand Canyon as I am in Yosemite (and other more familiar locations), I really do enjoy the challenge and am encouraged by the growing satisfaction I feel following each trip. My fingers are crossed that I was able continue this trend with the images from my latest visit. Stay tuned….
Just another day at the office
Posted on March 11, 2011

Sunset, McWay Fall, Big Sur, California
Canon EOS-1Ds Mark III
Canon 17-40mm f/4L USM
3 2/3 seconds
F/11.0
ISO 400
As some readers know, fellow pro photographer Don Smith and I partner on many workshops, donating our time as co-leaders for each other’s trips. On a recent trip Don and I stood on a bluff at sunrise gazing at the Big Sur Coast (or was it sunset overlooking Yosemite Valley?) and reminded ourselves of all the people idling in traffic or confined in a cubicle, and how fortunate we are to do what we do for a living.
Not only do photo workshops allow me to see and photograph great stuff, they give me the opportunity to learn from the diverse perspectives of dedicated photographers from every hemisphere on Earth and virtually every state in America. My workshop participants have been, in no particular order, musicians, computer professionals, artists, physicians, writers, lawyers, corporate executives, electricians, accountants, bond traders, active and retired military, other professional photographers, real estate agents, clergy, a classical composer, a Hollywood graphic artist, and a Hooters girl (a very sweet young lady who would completely dash any preconceived impression of what that might mean). One workshop included a rocket scientist and a brain surgeon.
Sometimes the education I gain from this eclectic mix of professions, preferences, and personalities is simply an insight or point-of-view that helps me better understand or inform future workshop participants. And sometimes my education is a bit more, uh, “esoteric.” On the day I captured this image of McWay Fall in Big Sur, I got a little of both.
This was a couple of years ago, on the first day of Don’s spring Big Sur workshop. Driving to the workshop’s first shoot we hadn’t been on the road five minutes when it was discovered my backseat featured a sex therapist and a gynecologist. Uh-oh. While they seemed quite excited by their mutual interest, I was uncertain that the other passengers shared the doctors’ outspoken zeal for the subject and did my best to deflect the conversation into more benign territory. But the doctors were not to be deterred. We spent the duration of the drive listening to these experts compare notes in graphic and excruciatingly uncensored detail. Topics ranged from, uh, well let’s just say we covered everything from oysters to “When Harry Met Sally.” Much to my relief, and after fifty minutes without exhaling, I pulled into the parking area at Julia Pfeiffer Burns State Park with a car-full of laughing (and, it turns out, just a little better informed) passengers. Phew.
Amazingly, it turned out that the drive wasn’t even the most memorable part of the afternoon. That honor goes to the sunset, which I was fortunate enough to capture in today’s image. When we arrived at the view of McWay Fall, the sun was behind a cloud bank that painted land, sea, and sky matching gray. But successful photography is often not as much about what’s happening now as it is about what’s going to happen later. And few opportunities excite me more than watching the sun slip from the clouds just before it completes its dash for the horizon–exactly what was in store this evening.
Don and I rallied the troops and told them not to be deceived by the flat scene, to prepare for a sudden and dramatic change in the color and light when the sun popped from behind the clouds. We told everyone that the display wouldn’t last long and encouraged them to forego the current moment and search for a composition that would work when “the moment” happened. With about ten minutes to pick a spot, refine our compositions, and ready our cameras, I ended up working with about half the group at this location. Don stationed himself with the rest of the group a couple hundred feet up the trail.
After getting everyone situated, I opted for this wide shot that used the fall and sun to balance the frame. To reduce the contrast between the sky and foreground I stacked two graduated neutral density filters (totaling five stops); to get the starburst effect I stopped down to f18. Because everyone in my group was ready and comfortable enough with their camera, we were all able to capture our own version of this special moment.
I’m afraid Don wasn’t so fortunate. Most of his group was successful, but with little warning one of his people decided that this very moment was the absolute best time to learn the manual metering techniques Don and I had covered in our orientation. Despite suggestions from Don (and stronger “urgings” from her husband) to shoot the way she’s most comfortable now and defer the learning to later, she insisted that now is the time to crack the manual metering puzzle.
To Don’s credit, he passed his opportunity at this magic moment to work with her. So while Don didn’t get his shot (kind of the photographer’s equivalent of taking one for the team), we did come away with a great cautionary tale we now spin to all of our workshop participants: Practice, practice, practice, when everything’s static, but when the magic happens, always, always, always revert to what’s most comfortable.
All in all, a very educational (and productive!) day. I don’t remember the drive back up the coast that night, but given the sunset we’d witnessed I’m pretty sure the primary topic was photography. Over the course of the workshop our woman did in fact learn manual metering (as she has demonstrated in subsequent workshops), and Don will forever be able to tell people about “the one that got away.” I, on the other hand, learned how long I can hold my breath.
Workshop Schedule || Purchase Prints
A Seaside Gallery


Simple
Posted on February 8, 2011

Champagne Glass Poppies, Merced River Canyon
Canon EOS 10D
1/1000 second
F/2.8
ISO 100
100 mm
Yesterday NPR and Jazz24.org released their Jazz 100, “the 100 quintessential jazz songs of all time.” Topping the list was one of my jazz favorites, the Dave Brubeck Quartet’s “Take Five.” Listening to “Take Five” this morning I was particularly struck by the simplicity of its sound, and it occurred to me that simplicity is an essential and often overlooked element in photography.
Spend a little time on photography websites and it’s easy to come away feeling visually assaulted. Saturated sunsets, crashing waterfalls, and swirling clouds can make wonderful photographs, but some of nature’s most divine beauty is best revealed by subtracting elements we’ve been brainwashed into thinking are necessary. Just as many of the pieces on the Jazz 100 are quite complex, simplicity is certainly not necessary for a successful image. But it seems many photographers have forgotten how effective a simple image can be. As my parents used to advise (shout), louder is not necessarily better. And neither is a lot of activity in a frame. To be effective, a scene’s elements (shape, color, lines, texture) need to work together; if they can’t, it’s better to isolate the most compelling aspect and remove distractions, no matter how beautiful they are.
Case in point: A poppy-covered hillside is a beautiful thing, but so are the graceful curves and translucent gold of a single poppy. The poppy in the foreground of this image was just one of thousands blanketing a hidden hillside in the Merced River Canyon just west of Yosemite Valley. After photographing the entire scene I gradually moved closer until I found myself sprawled on my stomach beneath this one poppy. Conveying its simple elegance was all about removing distractions: rocks, weeds, and yes, even the thousands of other beautiful poppies in the background. In this case I used selective focus, attaching an extension tube and dialing up a wide aperture to limit the depth of field. Focusing on the poppy’s leading edge turned everything else in the frame to a smear of color.
Did I achieve Brubeck’s mastery of my world? I think not—but it’s nice to have something to aspire to.
Make the world your own
Posted on January 19, 2011

El Capitan Reflection, Valley View, Yosemite
Canon EOS 10D
1/4 second
F22
ISO 100
27 mm
Pretend you’re a musician who wants to make music your career. Let’s say Eric Clapton is your favorite artist, and “Layla” is your favorite song. Do you think your quickest path to fame and fortune would be to record a song that perfectly replicates “Layla”? (Especially given the difficulty you’d have resurrecting Duane Allman.)
So why is it that so many nature photographers with grand aspirations spend so much time trying to duplicate the shots of others, rather than trying to find and refine their own artistic vision? Using Eric Clapton as a model for your music is great—the more you listen to Clapton, the more your guitar playing will be influenced by his craftmanship. But at some point you need to choose between carving your own musical path or languishing in anonymity.
This applies equally in photography. In my photo workshops I encounter many people who have travelled a great distance to duplicate a photo they’ve seen online, in a book, or in a print. I certainly understand the impulse, and I can’t say that my portfolio doesn’t contain its share of these clichés. But, as I frequently urge my workshop students, if you must photograph something exactly as it’s been photographed before, make that version your starting point and not your ultimate goal.
Once you get your “iconic” (that word is a cliché itself) shot, slow down and work the scene. Look for foreground and background possibilities, find unique perspectives. Play with depth and motion. If your original frame was horizontal, try something vertical, and vice versa. Take your camera off the tripod and pan slowly, zooming in and out as you go until something stops you (don’t forget to bring the tripod back before clicking). Still feel uninspired? Try a longer lens—often the truly unique images are tighter shots that isolate elements of the conventional composition.
It’s true that the longer spend time with a scene, the more you’ll find to photograph. Make a mental checklist of the above steps (feel free to add your own) and go through them without rushing: Often the mere mechanical (uninspired) process of seeking something unique gives you deeper insight that leads to a creative capture if you stick with it long enough.
This image of El Capitan reflected in the Merced River resulted from just such an approach. I’d rolled into Yosemite at around 10:00 a.m. on a mid-November morning. The air was crisp and still, scoured clean by an overnight shower. At Valley View I found this perfect reflection, only possible in the quiet-water days of autumn. Working on a tripod, I started my compositions wide and captured many of the beautiful but conventional shots that have been done a million times here. But wanting something different, I removed my camera from my tripod continued probing the scene through my viewfinder. I eventually isolated the reflection, realizing it was so sharp the morning that it was the thing that really set this moment apart. Despite the advancing sunlight that would soon reach the river and wash out the reflection, I didn’t rush.
On my computer at home, it was fun to view my process through the series of captures that morning. I finally zeroed in on this frame that has become one of my most successful images. Did I create the photographic equivalent of “Layla” that morning? Doubtful. But I did come up with an image that pleases me, and something that’s a pretty unique take on this heavily photographed location.

