Eloquent Images by Gary Hart
Insight, information, and inspiration for the inquisitive nature photographer
Is a tripod really necessary?
Posted on December 6, 2015

Sunset Fire, Olmsted Point, Yosemite
Sony a7R II
Sony/Zeiss 16-35 f4
1.3 seconds
F/11
ISO 100
If you’re content with derivative snaps of pretty scenes, a tripod may not be for you. But for those who agree that, rather than regurgitating a rough representation of the world as we know it, landscape photography should reveal deeper, less obvious natural truths—things like relationships between diverse elements, an intimate exploration of larger scenes, detail and pattern lost in the blur of motion—there is no substitute for a tripod.
The case against the tripod
Once upon a time, the tripod’s sole purpose was stability—preventing blur caused by camera shake during the exposure. And while stability remains important, clean high ISO and stabilized bodies and lenses make possible shooting hand-held in light we’d never dreamed of just a few years ago.
The anti-tripod argument says that tripods are expensive, add weight and bulk, are awkward to set up, get in people’s way, and slow the composition process. Given that the exposure compromises (higher ISO, larger than ideal aperture, longer shutter speed) forced by hand-holding are usually minor and more easily corrected today than what we faced with our film cameras, why bother with a tripod at all?
I’d argue that you never know when even a minor, hand-held compromise—such as shooting at ISO 400 instead of ISO 100, opening to f5.6 when f11 would have been better, or stretching your exposure duration out to 1/4 second and holding your breath—will be a deal-breaker for that law firm downtown who ordered a 10-foot print for their lobby. Why spend all this money on state-of-the art equipment only to compromise your image quality even just a little?
Nevertheless, I’ll (grudgingly) acknowledge that for many current landscape photographers, the convenience of tripod-free shooting outweighs these compromises—clean, printable images are possible without a tripod most of the time.
But….
Inconveniences notwithstanding, serious landscape photography is improved by a tripod. In fact, despite the advantages digital capture has brought to tripod-free shooting, digital photography has enhanced the tripod’s value to landscape photographers.
There’s a draft in here
The odds of the perfect landscape image happening on the first click are about the same as crafting a perfect poem, novel, or essay on the first pass. When we write something important, we don’t sit down and spin it out without stop or correction, we start with an idea, write a draft, review, rewrite, review, rewrite, until we’re satisfied.
A photograph should be no different—no matter how much you like the first click, it’s pretty unlikely that frame is so perfect that further scrutiny and adjustment won’t improve it further. Much like the drafts I create when I write, my workflow in the field is a click/review/adjust, click/review/adjust cycle that continues until I’m either satisfied with my image, or convinced there’s no image to be had. I can’t imagine doing this without a tripod.
To review a hand-held image, you must completely remove the camera from its shooting position (your eye) and extend it down and in front of you, essentially erasing your camera’s view of composition the way vigorous shaking erases and Etch A Sketch—fine if you’re done, but to fix problems and add improvements, you must return the camera to your eye and completely recreate the composition you just reviewed. Standing at a vista snapping a scene that’s been snapped a million times before? No big deal. But what about an image with layers of detail at varying distances, trying to include all of that rock on the left while without including any of that tree-branch on the right, all while trying to maintain front-to-back sharpness?
When I shot film (always on a tripod thank-you-very-much), my personal image reviews involved alternating between studying the scene and peering through the viewfinder. The most I could hope for was a good guess that I had everything right. Enter digital, with its instantaneous display, including a graph and flashing pixels that tell me if I messed up the exposure. Suddenly, I can critique the image itself, right on the spot.
With digital, composing on a tripod gives me the freedom to stand back and take time to scrutinize my creation. I can study the frame for balance, scan the borders for distractions, check the histogram to ensure proper exposure, magnify the LCD for sharpness and depth of field—doing all this comfortable in the knowledge that when I’m ready, the exact image I just critiqued is waiting right there atop my tripod, ready for my improvements. In other words, my adjustments are applied to an existing creation, rather than an approximate (fingers crossed) recreation.
Revisiting the writing analogy, hand-holding reminds me of the typewriter days, when a major revision required retyping everything I just wrote; using a tripod is more like a word-processor that allows me to edit the existing document.
For example
A trip to Olmsted Point in Yosemite has become a tradition for the final sunset of my Eastern Sierra Fall Color photo workshop. Olmsted Point offers a distant, less common view of Half Dome and an assortment of photogenic trees and boulders for the foreground.
On this year’s visit we parked and made the short hike to the “point” (more of a granite dome than an actual point) for the best view down Tenaya Canyon to Half Dome and beyond. I pointed out that the sky was setting up for something special; following my encouragement to anticipate the colorful sunset and find a foreground to complement the obvious background, the group quickly scattered.
I tried to stay fairly centrally located, eventually choosing a nearby triangle of glacial erratics (granite boulders carried by glaciers and deposited in place when the retreating glaciers melted) anchored by a weathered pine. With time to spare, I set about finding a composition. I decided vertical orientation would be the best way to exclude peripheral distractions, emphasize my primary subjects (rocks, tree, Half Dome), while including enough of the sky feature what had the potential to be dramatic color.
Working methodically, I started wide and gradually tightened, refining the focal length, focus point, and borders. I’m kind of obsessive about no distractions on the edge of my frame, and try as I might, it always seems that widening or tightening to eliminate one distraction introduces a new distraction over there.
In this case I was dealing with a couple of large boulders carrying too much visual weight to be on the edge of my frame, plus the leg of a nearby tripod, and an overhanging tree branch. I was able to tighten enough to eliminate these distractions without going so tight that I cut off the boulder on the right, or crowded Half Dome on the left. Of course, since I was on a tripod, each click was an improvement of the one that preceded it—in this case it took only about a half dozen images until I was satisfied.
The foreground was static, but the sky seemed to change with each second. While I had the general framework of my composition ready, as the color overhead intensified I decided I wanted a little more sky. Fortunately, by now I was so familiar with my composition that adjustments were easy. This image came as the color reached a crescendo, intensifying until the entire landscape throbbed with color.
My primary tripod is a Really Right Stuff TVC-24L with a RRS BH-55
My travel/hiking tripod is a Really Right Stuff TQC-14 with a RRS BH-30
Each of my cameras has a RRS L-plate
A gallery of tripod-crafted images
(All of my images were captured using a tripod, but my favorites tend to be the images that require the click/review/refine/repeat process that’s greatly enhanced by a tripod)
Click an image for a closer look, and a slide show. Refresh the screen to reorder the display.
")


Getting ahead of the shot
Posted on November 28, 2015
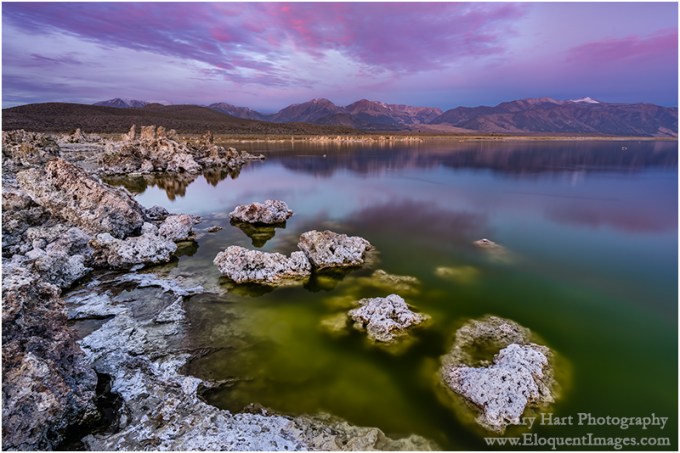
Dawn, Mono Lake and the Sierra Crest
Sony a7R II
Sony/Zeiss 16-35 f4
8 seconds
F/10
ISO 100
I hate arriving at a photo destination for the first time and having to immediately hit the ground running. Over the years I’ve come to appreciate the value of advance knowledge of landscape and light, and always try to factor in ample scouting time before getting down to serious shooting.
On the other hand, a prime reason people sign up for a photo workshop is to shortcut the scouting process, and for the most part this works pretty well. I (like any other experienced workshop leader) can share my knowledge of a location’s terrain and light to put my groups in the right place at the right time, and to provide insights into what’s in store and how they might want to approach it.
But sometimes there’s no substitute for firsthand exposure to a location before the good stuff happens. This is particularly true for sunrise spots, because the good shooting usually starts before it’s light enough to see the landscape. Unfortunately, a photo workshop’s tight schedule doesn’t always provide the luxury of exposing my groups to a location before it’s time to photograph it, but I do my best.
Mono Lake is a perfect example. The serpentine shoreline of South Tufa, the lake’s most photographed location, is a series of points and coves that offer lake views to the east, north, and west, depending on where you stand. Often nice at sunset, sunrise at South Tufa can be downright world class in any one of these compass directions. The best sunrise photography frequently cycles through (and sometimes overlaps) all three directions as the sunrise progresses. Overlaying South Tufa’s directional light are the vivid sunrise hues that can paint the sky in any direction at any time, and glassy reflections that double the visual overload.
After many years photographing South Tufa, I’ve established a fairly reliable sunrise workflow that helps me deal with these shifting factors. I usually start with tufa tower silhouettes facing east, into the early twilight glow in the east, then do a 180 to capture the magenta alpenglow on the Sierra crest in the west, and finally pivot northward as sidelight warms the tufa towers once the sun’s first rays skim the lake.
But just knowing the direction to point the camera is only part of the Mono Lake equation. In fact, with so many composition possibilities, South Tufa can overwhelm the first time visitor. Not only is there a lot going on here, on most mornings you need to contend with photographers that swarm the shore like the lake’s ubiquitous black flies.
Because of these difficulties, I make a point of getting my Eastern Sierra workshop group out to South Tufa for the sunset preceding the sunrise shoot. In my pre-shoot orientation, I strongly encourage my students to walk around before setting up their cameras, to identify compositions in each direction, and to envision the sunrise light.
It turns out, this year’s South Tufa sunset shoot was beneficial to me as well. With the lake level lower than I’ve ever seen it, the shoreline was virtually unrecognizable—many familiar lake features were now high and dry, and a number of new features had materialized. As alarming as it was to see the lake this low, the photographer in me couldn’t help but feel excited about the fresh compositions the new shoreline offered.
While showing the group around South Tufa’s various nooks and crannies, I spotted a stepping stone set of newly exposed tufa mounds on a north- and west-facing section. I pointed out to those still with me the way tufa could lead the eye through the bottom of the frame to the distant Sierra peaks, and made a mental bookmark of the spot. Sunset that night, with nice color a glassy reflection that’s more typical of sunrise than sunset, that everyone was a little dubious when I told them sunrise could be even better.
The next morning, all the conditions were in place for something special: a mix of clouds and sky, an opening on the eastern horizon to let the light through, calm winds to quiet the lake. Armed with knowledge from the night before, the group quickly dispersed to their pre-planned spots and I found myself mostly alone.
I’ve photographed Mono Lake so many times that I had no plans to shoot that morning, so I wandered around checking on everyone. As often happens when the photography is good (especially late in the workshop, when people have become pretty comfortable handling difficult light and extreme depth of field), I felt like my presence was more distraction than benefit, so I headed over to the spot I’d spied the previous evening (it had the added benefit of being pretty centrally located and well within earshot of my distributed students).
By the time I got there the show was well underway in the east and quickly moving west. It would have been easy to slip into panic-shooting mode and try to find something where things were good right now, but I’ve learned (for me at least) that it’s best to anticipate than react. Instead, because I’d already mentally worked this scene, I knew the composition I wanted and was ready for the color when it arrived.
The extra sixty seconds this bought me was enough to refine my composition, find the f-stop and focus point that would maximize sharpness throughout the scene, meter the scene and set my exposure, and orient my polarizer for the best balance between reflection and lakebed. It turns out that this anticipation was a difference-maker, as the vivid color peaked and faded in about 30 seconds.
Join my next Eastern Sierra Fall Color photo workshop
A Mono Lake Gallery
Click an image for a closer look, and a slide show. Refresh the screen to reorder the display.


I love you, goodbye…
Posted on November 18, 2015

Fire and Mist, Halemaumau Crater, Kilauea, Hawaii
Sony a7S
Sony/Zeiss 16-35 f4
10 seconds
F/4
ISO 3200
Last week I said goodbye to my Sony a7S. More than any camera I’ve owned, this is the camera that overcame photography’s physical boundaries that most frustrated me.
I’ve been interested in astronomy since I was ten, ten years longer than I’ve a been photographer. But until recently I’ve been thwarted in my attempts to fully convey the majesty of the night sky above a grand landscape.
What was missing was light. Or more accurately, the camera’s ability to capture light. Light is what enables cameras to “see,” and while there’s still a little light after the sun goes down, cameras struggle mightily to find a usable amount.
When faced with limited light, photographers’ solutions are limited, and each solution is a compromise. In no particular order, we can increase:
- Shutter speed: We can increase the time the light strikes the sensor. While we can usually keep our shutter open for as long as the battery lasts, the longer it’s open, the more motion we capture.
- Aperture (a ratio measure in f-stops): Larger apertures (the f-stop number shrinks as the aperture opens) allow more light, with a loss of depth of field. While the DOF loss is usually insignificant in most night photography scenes (because all subjects are usually at infinity), the laws of optics limit the size of of a lens’s aperture.
- ISO: We can increase the sensor’s sensitivity to light by increasing the ISO, but not without significant image quality degradation (noise).
Most night photography attempts bump into the limits of each solution before complete success is achieved. For me, the first barrier is usually the f-stop, which is soon maxed. With my f-stop maxed, I’m left with a dance between ISO and shutter speed as I attempt to balance acceptable amounts of motion and noise.
So why not just add more light? Duh. But, while adding light solves some problems, it introduces others. Anything bright enough to illuminate a large landscape (sunlight or moonlight) washes out the stars, and artificial local light (such as light painting or a flash) violates my own natural-light-only objective. Another option some resort to is image blending (one frame for the foreground, one for the sky), but that too violates my personal single-frame-only goal.
My first shot at the night photography conundrum came about ten years ago, when I started doing moonlight photography. I immediately found that the reflected sunlight cast by a full moon beautifully illuminated my landscapes, while preserving enough celestial darkness that the brighter, most recognizable constellations still shined through. But walking outside on a clear, moonless night far from city lights was all the reminder I needed that my favorite qualities of the night sky—the Milky Way and the the seemingly infinite quantity of stars—remained beyond my photographic reach.
To photograph a moonless sky brimming with stars, my next step was star trail photography—long exposures that accumulated enough light to reveal my terrestrial subjects at manageable ISO (not too much noise). Star trails have the added benefit of stretching stellar pinpoints into concentric arcs of light that beautifully depict Earth’s rotation.
While both enjoyable and beautiful, moonlight and star trail photography were not completely satisfying. But the laws of physics dictated that lenses weren’t going to get any faster, and Earth wasn’t going to rotate any slower, so the solution would need to be in sensor efficiency.
Unfortunately, camera manufactures remained resolute in their belief that megapixels sold cameras. So as sensor technology evolved, and photographers saw slow but steady high ISO improvement, we were force-fed a mind-boggling increase in megapixel count.
But cramming more megapixels onto a 35mm sensor requires: 1) smaller photosites that are less efficient at capturing light, and 2) more tightly packed photosites that increase (noise inducing) heat.
The megapixel race changed overnight when Sony, in a risky, game-changing move, decided to offer a high-end, full-frame camera with “only” a 12 megapixel sensor. What were they thinking!?
Acknowledging what serious photographers have known for years, that 12 megapixels is enough for most uses (just 12 years ago, pros paid $8,000 for a Canon 1Ds with only 11 megapixels), Sony bucked the megapixel trend to embrace the benefits of fewer, larger, less densely packed photosites. The result was a light-sucking monster that can see in the dark: the Sony a7S.
Since purchasing my a7S less than a year ago, I’m able to photograph the dark night sky above the landscapes I love. Additionally, I found that its fast shutter lag (since matched by the a7R II) made the a7S ideal for lightning photography. It was love at first click.
And now it’s gone. Last month Sony released the a7S II, and given my satisfaction with the upgrade from the a7R to the a7R II, it was only a matter of time before I upgraded to the a7S II. I’m happy to say that I found a good home for my a7S and in fact may even get to visit it in future workshops.
I haven’t had a chance to use the a7S II, but I assure you it won’t be long, and you’ll be the first to know.
About this image
The image at the top of this post was captured in September (2015) during my Hawaii Big Island Volcanos and Waterfalls photo workshop. Each time I visit here I hold my breath until I see what the sky is doing. I’ve encountered everything from completely cloudless to pea soup fog. I’ve come to hope for a mix of clouds and sky—enough sky for the Milky Way to shine through clearly, but enough clouds to reflect the orange light of the churning volcano.
On this evening we got a combination I hadn’t seen before—clear sky overhead, a few low clouds, and a heavy mist hanging in the caldera. Not only did the mist frame the scene with a translucent orange glow, it subdued the volcano’s fire enough for me to use a long exposure to bring out the Milky Way without blowing my highlights.
We’ll do it again in my next Hawaii Volcanos and Waterfalls workshop
An a7S homage
Click an image for a closer look, and a slide show. Refresh the screen to reorder the display.


On the rocks
Posted on November 14, 2015

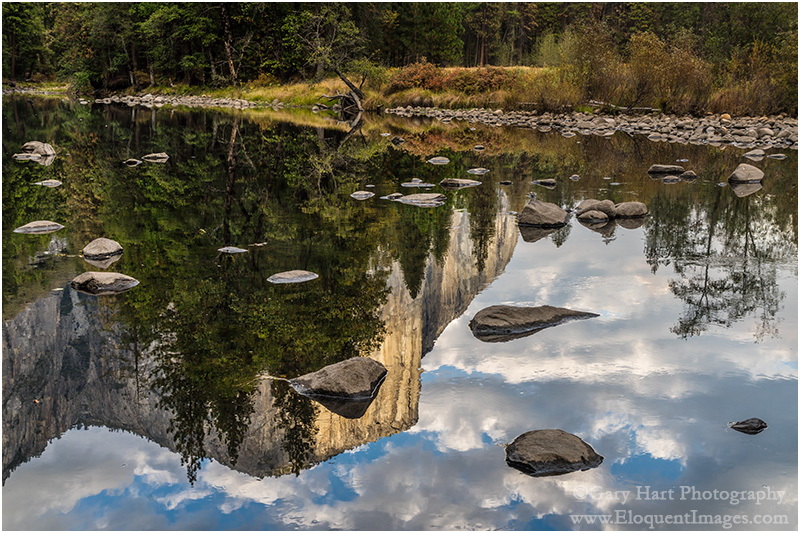
Reflection On the Rocks, El Capitan and the Merced River, Yosemite
Sony a7R II
Sony/Zeiss 24-70 f4
25 seconds
F/11
ISO 100
Yosemite is known for its waterfalls, but I gotta say, I think I’m happiest photographing Yosemite when the falls are dry. Not that I don’t love Yosemite’s waterfalls (I do!), but when the falls are dry, the Merced River has slowed to a reflective crawl that paints reflections everywhere. And as an added bonus, when the falls dry up, so do the crowds.
Last month I spent a day guiding a couple from Sweden through Yosemite when the Merced River was at its drought-starved nadir. I’d been looking forward to this day for a while, but two days earlier I’d cracked ribs and my collarbone in a cycling accident—I could walk, I could talk, but I couldn’t do both, and simply getting in and out of the car was an achievement. The seatbelt? Torture. So my camera and tripod stayed in the car all day.
But when we pulled up to Valley View for sunset, I just couldn’t resist the mix of light, clouds, sky, and reflection. By the time I extracted my camera and tripod and made my way down to the river (no more than 20 feet from the car), the sun was about done with El Capitan. There were a few hot spots in the clouds, but my Singh-Ray two-stop hard GND held back the highlights enough to enable enough exposure to bring out the shadows. The resulting 25 second exposure added a gauzy texture to the reflection.
The trickiest thing about photographing a reflection with embedded features is achieving depth of field throughout. Though it seems counter-intuitive, the focus point for a reflection is the focus point of the reflective subject, not the reflective surface. In this case I wasn’t too worried about the reflection because I knew the long exposure would soften it anyway. But I did want to be sharp from embedded rocks all the way back to El Capitan. A quick check of my hyperfocal app told me that at f11 and 28mm, focusing on the closest rock (about ten feet away), would ensure sharpness all the way to infinity.
A public service announcement
I don’t always wear a helmet when I bike. I’m fortunate to live adjacent to a bike trail that can keep me off city streets for virtually all of my bike trips, so (my rationalization went), why mess with a helmet?
My accident last month happened on the bike trail, with no cars in sight, when I clipped a portable barricade with my handlebar and my bike went right while I continued forward. In addition to cracked ribs and collarbone, some nasty road-rash, and a torn-up shirt, my helmet was totaled. I shudder to think what would have happened had I decided not to wear a helmet that day (about a 50/50 chance), and will never, ever ride a bike again without one. I encourage you to make the same promise to yourself.
I return you now to your regular programming.
A gallery of Yosemite reflections
Click an image for a closer look, and a slide show. Refresh the screen to reorder the display.


Reflection season
Posted on October 26, 2015
Reflection on the Rocks, El Capitan, Yosemite
Sony a7R II
Sony/Zeiss 24-70 f4
1/40 second
F/11
ISO 400
It’s reflection season in Yosemite, that time of year when the falls are dry and the Merced River slows to a glassy crawl. Plugging in the golds and reds of autumn makes this my favorite time for creative photography in Yosemite, and explains the volume of Yosemite autumn images in my portfolio.
It also explains why I’ve been to Yosemite three times this month. The month’s first visit, with my Eastern Sierra workshop group, we photographed high Sierra reflections and a Half Dome sunset from Olmsted Point—we’d had lots yellow and orange aspen in the canyons above Bishop and Lee Vining, but it was a little early for Yosemite color. The next two trips were primarily focused on Yosemite Valley, ground-zero for autumn reflections. On both Yosemite Valley trips, the Merced River, always low and slow in autumn, was down far enough that I saw places I could have rock-hopped from one side to the other without getting wet.
Today’s image, from about a week and a half ago, almost didn’t happen. I’d been looking forward to this visit (to guide a couple from Sweden) for several months, but a bike accident two days earlier had cracked a rib, torn a muscle in my shoulder, removed copious amounts of skin from my arm, and pretty much prevented me from doing anything requiring movement (or breathing, for that matter).
When I left home that morning I knew I was going to be sore, but I was actually a little surprised by just how uncomfortable I was. Somehow, bolstered by liberal quantities of ibuprofen, I managed to survive the day, quite content to limit my activity to driving, narrating, and and answering questions. Even getting in and out of the car was an ordeal, and photography seemed out of the question. But when we pulled into the parking lot at Valley View for the day’s final stop, the reflection drew me to the rocks like the Sirens of Greek mythology.
Rather than grab my camera bag and sling it over my shoulder as I normally would (the mere thought makes me flinch), I gingerly extracted my tripod, camera, and 16-35 lens, and assembled them them at my car’s tailgate. Given my level of pain and the precarious footing on the rocks by the river, I knew wouldn’t be able to move around as much as I’m accustomed to (or at all), so scanned the route and I very carefully selected my destination before departing on the 20 foot journey. In a perfect world I’d have been able to shuffle slowly, but the route to the river was over a disorganized jumble of granite rocks that made each step feel like a knife had been thrust into my ribcage.
At the river I found a flat granite platform just large enough for both my feet, and a solid rock for each tripod leg. Using the tripod for support, I found that if I moved slowly enough, I could keep the pain to a manageable minimum. Nevertheless, I was even more deliberate than I usually am, strategizing and executing each movement. Soon I developed a workflow that allowed me to do pretty much all I needed to do by only moving my arms from the elbow down.
There were a lot of moving parts to consider as I crafted this image. Since the focus point of a reflection is the focus point of the reflective subject, not the reflective surface, I needed DOF that went from the nearby rocks, just a few feet away, all the way out to El Capitan at infinity. But I couldn’t make DOF decisions until I composed and decided on a focal length. And as I tried to compose, I found that even the slight adjustment in focal length and framing introduced new problems—rocks cut off or jutting in from the side, or even worse, introducing bright sky at the top of the frame.
At one point I thought I finally had it, only to realize that the top rock of the foreground triangle intersected El Capitan. Moving my tripod a few inches to the left solved that problem, but also made it impossible to use my viewfinder without repositioning myself. Rather than destabilize my precarious perch, I decided to forego the viewfinder in favor of the LCD (thank you Sony for the articulating viewfinder).
With a little work I finally found a composition that achieved my framing objectives: balanced foreground, clean borders, and no sky. Now for my exposure variables. I estimated that foreground rocks were about 10 feet away—according to my hyperfocal app, at 40mm and f11, the hyperfocal distance was a little less than 16 feet. I picked a rock about that distance and carefully focused there, thus ensuring acceptable sharpness from about 8 feet to infinity. I decided to go with ISO 400 to mitigate the light breeze that moved the leaves just a little.
The shadows were quite dark, while the cloud reflections contained some hot spots, but I was confident that my Sony a7R II could handle the dynamic range if I was careful. Watching my histogram, I increased my shutter speed until the highlights were right up to the point of clipping.
Finally ready, I realized that my remote cable was in the car. Since there was no way I was going to put myself through an extra roundtrip, I engaged my camera’s 2-second timer and clicked. After reviewing the image on my viewfinder I made a couple of small adjustments and clicked again. I repeated this click/review/click cycle a couple more times, until I was satisfied that I’d achieved my vision.
Photograph reflections like this in my next Yosemite Autumn Moon photo workshop
A gallery of reflections
Click an image for a closer look, and a slide show. Refresh the screen to reorder the display.


The best time of day
Posted on October 20, 2015

New Day, Sunrise Sunstar, Mono Lake
Sony a7R II
Sony/Zeiss 16-35 f4
1/4 second
F/20
ISO 125
Imagine a world that’s so quiet you can hear nature’s every stirring, a place where each breath holds a pristine bouquet of subtle fragrances, and the sky is a continuously shifting kaleidoscope of indigo, blue, yellow, orange, and red. In case you haven’t figured it out, I’m describing the very world we live in, before the sun’s light and warmth draw out the dirty, noisy, oblivious masses.
As a nature photographer, I’m quite familiar with this world. And while I can’t say that I relish a 4:30 a.m. alarm, I’ve come to terms with its darkness, frigid temps, and sleep depravity. I also understand why most people despise early wake-ups, because that used to describe me. We’ve been conditioned by a lifetime of rising for school and work and completely bypassing early morning’s benefits as we rush to obligations, appointments, and responsibilities that are almost invariably less pleasant than staying in bed.
But if you haven’t learned to appreciate the joy of the pre-sunrise world, let me help you reset your bias with a few tips for making early mornings happen:
- For the full experience, plan to be at your spot at least 45 minutes before the “official” (flat horizon at that latitude and longitude) sunrise for that location. The eastern horizon will already be brightening noticeably by then, but the stars will be visible. (This is for mid-latitude locations—twilight starts earlier in the high latitudes, later in the low latitudes.)
- Get organized before you go to bed. Lay your clothes out, assemble your gear, make sure everything’s charged, and prime the coffee maker. You do all this so you can…
- Set your alarm for the absolute minimum time necessary to get ready. Your resolve will be much stronger at bedtime than when it goes off—the less time you have to delay, less the chance that you’ll lose your resolve to the cozy warmth of your bed. This also gives you the maximum amount of sleep possible. And don’t forget, one of the best things about being up when no one else is up and it’s dark is that it really doesn’t matter how you look (so you don’t really need to spend a lot of time on personal hygiene).
- Under no circumstances use the snooze button on your alarm. Rising early is like ripping off a Band-Aid—the sooner you get it over with, the happier you’ll be; the longer you drag it out, the harder it is. Trust me.

The weather report called for clear skies and no chance of rain this morning. But the lightning was already firing when we walked out to Grand Canyon’s Bright Angel Point in the dark, and it was still going when we finally ran out of compositions over two hours later.
- Don’t be discouraged by the conditions at bedtime or wake-up. Some of my most memorable sunrises have happened on mornings I’d have skipped if I’d relied solely on weather reports, or on the way things look when I peek out the window after the alarm. Photography is just one of the benefits of being out before the sun. Even when the photography conditions don’t materialize as hoped, I rarely regret those mornings when I dragged myself out of bed to sit in the cold and dark. And for some reason, the most special stuff seems happen when I go out with the lowest expectations, driven solely by the attitude that I’m just going to enjoy this special time of day.

For example (the above image)
Getting to this remote location on Mono Lake’s north shore is always an adventure; getting there early enough before the sun can feel downright crazy. We depart an hour-and-a-half before sunrise, navigate a bone-jarring maze of unpaved roads that worsen with each mile, and drive until we can drive no further. From there the lake is still a half mile walk. Most of the hike is in volcanic sand, but the last couple hundred yards are through shoe-sucking mud; with no trail or light, it’s no wonder I never end up at the same spot from one year to the next.
Earlier this month my Eastern Sierra workshop group made the annual pilgrimage out here for our final sunrise. We’d been incredibly blessed with great conditions throughout the workshop—great sunrise and sunset color, nice clouds, and glassy reflections at Mono Lake’s South Tufa the day before (always a highlight when it happens). Our luck held as we got all three—color, clouds, and reflection—for this final sunrise.

I started shooting in near darkness, with wide, east-facing compositions that included a thin slice of moon flanked by Venus, Jupiter, and Mars. My focus turned more south and west as the sun started to rise and paint the clouds with color. Soon the mountains in the west were bathed with warm light and I turned my attention there. The wind stayed calm, so every direction I shot, I was able to double the beauty with a reflection.
Watching the shadow slide down the mountains, I was able to anticipate the sun’s arrival at my position and turn back to the east just in time to make my sunstar composition. I used a trio of nearby rocks to anchor my foreground, removed my polarizer (I wanted a maximum reflection and didn’t want to worry about differential polarization at my wide focal length), extracted my 3-stop reverse graduated neutral density filter (Singh-Ray), and stopped down to f-20 to enhance the sunstar effect.
When the sun appeared I clicked a half-dozen or so images, each with a little bit brighter sunstar. I chose this one because it was a good balance between brilliant sunstar without washing out too much of the sky around it. Thanks to my GND and the ridiculous dynamic range of my a7R II, I got this scene with a single click. In Photoshop I dodged the top 2/3 of the sky and burned the water to disguise the GND effect, but did very little else.
Workshop Schedule || Purchase Prints|| Instagram
The joys of sunrise


Out of my depth
Posted on September 27, 2015

Hidden Waterfall, Akaka Falls State Park, Hawaii
Sony a7R II
Sony 70-200 f4
1/10 second
F/16
ISO 1600
A couple of weeks ago I wrote about appreciating the small stuff. Writing that article opened my eyes to how much I’d gotten away from aspects of photography that give me great pleasure, and that were a big part of my photographic style. Not completely away, but far enough to notice a difference when reviewing my images from the last year or so, a year that coincides with my switch from Canon DSLR to Sony mirrorless. While I can’t attribute this shift to a shortcoming in my Sony gear (far from it), I do believe the timing is more than coincidence.
First, with its radically different interface and shooting workflow, mirrorless is a new trick and I’m an old dog, and I think I underestimated the ramifications of the mirrorless switch. Nevertheless, within a few weeks I felt reasonably comfortable seeing through an electronic viewfinder, had embraced a new focus and metering paradigm, and became sufficiently familiar with my Sony a7R’s features, buttons, dials, and menus. So far, so good.
But simply knowing a camera doesn’t mean I don’t have to think about using it. And it’s the unconscious control of photography’s technical side—the focusing, metering, setting exposure variables, and so on—that frees my brain to create. (I suspect it’s this way for most other photographers too.) So until I can make my camera an unconscious extension that functions more like an extra limb, the interface is a distraction. After ten years, I’d taken for granted my ability to control every aspect of my Canon DSLRs by feel, in the dark if necessary, without conscious thought—simply put, it’s taken nearly a year to achieve that familiarity with my Sonys.
In that gap between familiar and intimate with my Sony bodies, bad (lazy) habits formed. Because while I was getting used to a new way of shooting, I became so enamored of my a7R’s extreme dynamic range that my photography began to skew in that direction. Suddenly sunrises and sunsets that had been especially difficult (or impossible) with my Canons, were easy, a luxury I was all too happy to indulge. Then came the a7S, with its mystical ability to see in the dark, and suddenly night photography was occupying much more of my photography time.
Compounding the problem, these high dynamic range scenes tend to be more dramatic, and drama impresses the masses more than subtle. I’d post a new image to rave reviews (“Stunning!”), and soon found myself lured by the instant validation. I loved what I was shooting, others loved what I was shooting, so what could possibly be wrong?
Or maybe a better way to put it, what’s missing? I’d scroll through my recent images and couldn’t avoid the vague sense that there were fewer images that excited me personally. There were some, but not as many as I’d been accustomed to. And then it hit me—my images lacked depth.
Depth is the final frontier for aspiring photographers. Photography attempts to render a three-dimensional world in a two-dimensional medium, and intuitive disconnect. But while true depth in a photograph is impossible, what is possible is the illusion of depth. I’ve always felt that most people can compose a nice two-dimensional landscape, but what separates the great photographers from the good is their ability to convey depth.
Conveying the illusion of depth starts with not settling for a dramatic background or striking foreground subject, but using that as the starting point for a scene that contains visual points throughout the (missing) front-to-back plane. If the primary scene is in the distance, find nearer objects that balance and complement it. Likewise, if your subject is in the foreground, make every effort to include complementary background elements.
But finding a complementary foreground and background is just the beginning. Once you’ve identified your foreground and background (and mid-ground if possible) elements, you have to manage their relationships while mentally subtracting the camera’s missing third dimension (depth). Things like creating imaginary lines that connect objects at different distances; avoiding merging of discrete objects; perspective management with focal length and subject distance choices; focus (depth of field) control to emphasize/deemphasize foreground/background elements (to name a few). All of these things take a scene from more literal, two-dimentional snaps to interpretive, artistic creations that exist only in your brain until the shutter is clicked.
And that’s what I think has suffered in the year since my Sony switch—I’m still getting captures that excite me (and others), but in settling for the scenes the Sony sensor makes so easy, I lost my way a bit. Now that I recognize what’s been lacking, it’s time to up my game and apply that amazing Sony sensor to our three dimensional world.
About this image
I traveled to Hawaii earlier this month vowing to reinvigorate my quest for depth in my images. With lush rainforests, rugged volcanic beaches, vivid sunsets, and an active volcano, it’s a great spot for filling the frame from front to back.
One place in particular I looked forward to visiting was Akaka Falls State Park. The little scene in this image is extremely familiar to me—it’s near the end of Akaka Falls loop, after the view of the fall, making it easy to think the show is over as you beeline back to the parking lot to escape the humidity. Each time I pass this spot I stop and try to make it work, which starts with finding a way to pull detail from the dense shade without blowing out the fully exposed foreground foliage. And even if I can make the dynamic range work, I still have to figure out how to balance the conflicting need for a small aperture that ensures adequate depth of field, against the need for a shutter speed long enough to pull the waterfall from the extremely dense shade, but fast enough to avoid blurring the leaves in the almost unavoidable breeze.
But several things worked in my favor on this visit. A heavy cloud cover reduced the foreground brightness to a more manageable level, and my new Sony a7R II has at least two stops more dynamic range than the Canon 5D III I’d used on prior visits—suddenly, dynamic range wasn’t a deal-breaker. Also, someone had flipped the switch on Hawaii’s usually reliable trade winds—the still, humid air was extremely uncomfortable, but far better for this kind of close photography. Last but not least, the high ISO capability of my a7R II made me quite comfortable shooting at ISO 1600, high enough to permit f16 while maintaining a fast enough shutter speed.
My focal length was 154mm, so even at f16 I needed to be careful about focus. In scenes where I’m not sure whether I’ll have enough depth of field to ensure front-to-back sharpness, I almost always find a point that keeps my closer elements sharp. To maximize depth of field, I’ll focus as far behind the closest visual anchor (in this case the closest flowers) as I can without sacrificing any foreground sharpness. In this case I was pretty sure I could focus on the back flower and still keep the closer flowers sharp. In a perfect world I’d have liked just a little more motion blur in the water, but even with the air relatively still, I wasn’t comfortable going beyond 1/10 second.
Read more about controlling depth of field
The illusion of depth
Click an image for a closer look, and a slide show. Refresh the screen to reorder the display.


Fallen color
Posted on September 5, 2015
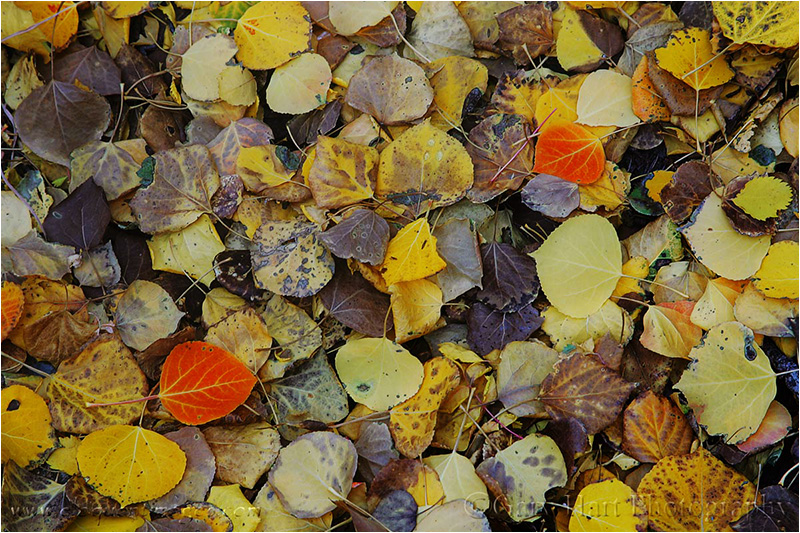
Fallen Color, Rock Creek Canyon, Eastern Sierra
Canon EOS-1D Mark II
3/10 second
F/9.0
ISO 100
85 mm
When you’re surrounded by beautiful scenery, it’s easy to overlook the small details that make a scene special. But there’s no substitute for the pleasure that comes from spending a little time in a scene, identifying its intricacies, and creating an image that conveys this connection to others. Capturing these intricacies can be the most rewarding aspect of photography, because they’re almost always uniquely reflective your own vision.
About this image
People frequently look at this image and ask if I arranged the red leaves. The answer is an emphatic, No! I usually go on to remind them that you can draw a straight line between any two objects on the face of the earth (or any other planet, as far as I know). In fact, the only arranging I do to an image is myself—circling, rising, dropping—and in that regard I’m quite aggressive.
In the field I look for individual elements to isolate in my frame; or better yet, groups of elements. Of course finding a subject is not the end of the job—without properly positioning the subjects in the frame, the scene is likely to fail. But rather than moving your subjects (the lazy solution), move yourself.
In this scene I circled the leaves slowly, camera to my eye, until the frame felt balanced. And while the leaves ended up at the “rule of thirds” points, that wasn’t a conscious decision on my part, but rather confirmation that the rule of thirds is indeed valid (sometimes).
Putting the Rule of Thirds in its place
What is the rule of thirds? Very simply, imagine a tic-tac-toe grid on your frame—the Rule of Thirds says that important linear elements (like the horizon) should be on the lines, and important compositional elements (like these leaves) should be at (or near) the intersections.
I hesitate to even bring the Rule of Thirds up because it’s one of the easiest photography “rules” to be broken effectively. It’s also probably the rule most frequently abused by well meaning judges at your local camera club. (If you get too much abuse about your Rule of Thirds choices in images you really like, don’t change your compositions, change your camera club.)
I think the Rule of Thirds true value is to help remind beginners not to bullseye subjects, or not to crowd elements against the edges. In fact, I could probably show about as many successful images that break the Rule of Thirds as follow it. When I’m composing a shot, any Rule of Thirds voices in my head are overruled by my intuition, my sense for what what balances a frame, and even more simply, what feels right.
Read more about photographing fall color
A fall color gallery
Click an image for a closer look, and a slide show. Refresh the screen to reorder the display.


The dark night
Posted on August 20, 2015

Angel’s View, Milky Way from Angel’s Window, Grand Canyon
Sony a7S
Rokinon 24 f1.4
20 seconds
F/1.4
ISO 6400
How to offend a photographer
Gallery browser: “Did you take that picture?”
Photographer: “Yes.”
Gallery browser: “Wow, you must have a good camera.”
Few things irritate a photographer more than the implication that it’s the equipment that makes the image, not the photographer. We work very hard honing our craft, have spent years refining our vision, and endure extreme discomfort to get the shot. So while the observer usually means no offense, comments discounting a photographer’s skill and effort are seldom appreciated.
But…
As much as we’d like to believe that our great images are 100 percent photographic skill, artistic vision, and hard work, a good camera sure does allow us to squeeze the most out of our skill, vision, and effort.
As a one-click shooter (no HDR or image blending of any kind), I’m constantly longing for more dynamic range and high ISO capability. So, after hearing raves about Sony sensors for several years, late last year (October 2014) I switched to Sony. My plan was a gradual transition, shooting Sony for some uses and Canon for others, but given the dynamic range and overall image quality I saw from my Sony a7R starting day one, I haven’t touched my Canon bodies since picking up the Sony.
While I don’t think my Sony cameras have made me a better photographer, I do think ten months is long enough to appreciate that I’ve captured images that would have been impossible in my Canon days. I instantly fell in love with the resolution and 2- to 3-stop dynamic range improvement of my Sony a7R (and now the a7R II) over the Canon 5D III, the compactness and extra reach of my 1.5-crop a6000 (with little loss of image quality), and my a7S’s ability to pretty much see in the dark.
But what will Sony do for my night photography?
I need more light
I visit Grand Canyon two or three times each year, and it’s a rare trip that I don’t attempt to photograph its inky dark skies. But when the sun goes down and the stars come out, Grand Canyon’s breathtaking beauty disappears into a deep, black hole. Simply put, I needed more light.
Moonlight was my first Grand Canyon night solution—I’ve enjoyed many nice moonlight shoots here, and will surely enjoy many more. But photographing Grand Canyon by the light of a full moon is a compromise that sacrifices all but the brightest stars to achieve a night scene with enough light to reveal the canyon’s towering spires, receding ridges, and layered red walls.
What about the truly dark skies? For years (with my Canon bodies) the only way to satisfactorily reveal Grand Canyon’s dark depths with one click was to leave my shutter open for 30 minutes or longer. But the cost of a long exposure is the way Earth’s rotation stretches those sparkling pinpoints into parallel arcs.
As with moonlight, I’m sure I’ll continue to enjoy star trail photography. But my ultimate goal was to cut through the opaque stillness of a clear, moonless Grand Canyon night to reveal the contents of the black abyss at my feet, the multitude of stars overhead, and the glowing heart the Milky Way.
So, ever the optimist, on each moonless visit to Grand Canyon, I’d shiver in the dark on the canyon’s rim trying to extract detail from the obscure depths without excessive digital noise or streaking stars. And each time I’d come away disappointed, thinking, I need more light.
The dynamic duo
Early this year, with night photography in mind, I added a 12 megapixel Sony a7S to my bag. Twelve megapixels is downright pedestrian in this day of 50+ megapixel sensors, but despite popular belief to the contrary, image quality has very little to do with megapixel count (in fact, for any given technology, the lower the megapixel count, the better the image quality). By subtracting photosites, Sony was able to enlarge the remaining a7S photosites into light-capturing monsters, and to give each photosite enough space that it’s not warmed by the (noise-generating) heat of its neighbors.
With the a7S, I was suddenly able to shoot at ridiculously high ISOs, extracting light from the darkest shadows with very manageable noise. Stars popped, the Milky Way throbbed, and the landscape glowed with exquisite detail. I couldn’t wait to try it at Grand Canyon.
My first attempt was from river level during this year’s Grand Canyon raft trip in May. Using my a7S and Canon-mount Zeiss 28mm f2 (after switching to Sony, I was able to continue using my Zeiss lens with the help of a Metabones IV adapter), I was immediately blown away by what I saw on my LCD, and just as excited when I viewed my captures on my monitor at home.
But I wasn’t done. Though I’d been quite pleased with my go-to dark night Zeiss lens, I wanted more. So, in my never-ending quest for more light, just before departing for the August Grand Canyon monsoon workshop, I purchased a Rokinon 24mm f1.4 to suck one more stop’s worth of photons from the opaque sky. The new lens debuted last Friday night, and I share the results here.
About this image
Don Smith and I were at Grand Canyon for our annual back-to-back monsoon workshops. On the night between workshops, Don and I photographed sunset at Cape Royal, then walked over to Angel’s Window where we ate sandwiches and waited for the Milky Way to emerge. The sky was about 80 percent clouds when the sun went down and we debated packing it in, but knowing these monsoon clouds often wane when the sun drops, we decided to stick it out.
Trying to familiarize myself with the capabilities of my new dark night lens, I photographed a handful of compositions at varying settings. To maximize the amount of Milky Way in my frame, everything oriented vertically. As with all my images, the image I share here is a single click.
Despite the moonless darkness, exposing the a7S at ISO 6400 for 20 seconds at f1.4 enabled me to fill my entire histogram from left to right (shadows through highlights) without clipping. Bringing the shadows up a little more in Lightroom revealed lots of detail with just a moderate amount of very manageable noise.
This is an exciting time indeed for photographers, as technology advances continue to push the boundaries of possibilities. Just a few years ago an image like this would have been unthinkable in a single click—I can’t wait to see what Sony comes up with yet.
Some comments on processing night images
Processing these dark sky images underscores the quandary of photography beyond the threshold of human vision—no one is really sure how it’s supposed to look. We’re starting to see lots of night sky images from other photographers, including many featuring the Milky Way, and the color is all over the map. Our eyes simply can’t see color with such little light, but a long exposure and/or fast lens and high ISO shows that it’s still there—it’s up to the photographer to infer a hue.
So what color should a night scene be? It’s important to understand that an object’s color is more than just a fixed function of an inherent characteristic of that object, it varies with the light illuminating it. I can’t speak for other photographers, but I try to imagine how the scene would look if my eyes could capture as much light as my camera does.
To me a scene with blue cast is more night-like than the warmer tones I see in many night images (they look like daylight with stars), so I start by cooling the color temperature below 4,000 degrees in Lightroom. The purplish canyon and blue sky in this image is simply the result of the amount of light I captured, Grand Canyon’s naturally red walls, and me cooling the image’s overall color temperature in Lightroom. For credibility, I actually decided to desaturate the result slightly. (The yellow glow on the horizon is the lights of Flagstaff and Williams, burned and desaturated in Photoshop.)
Learn more about starlight photography
A dark night gallery
Click an image for a closer look, and a slide show. Refresh the screen to reorder the display.


Hurry up and wait
Posted on August 14, 2015

Diagonal Lightning Strike, Lipan Point, Grand Canyon
Sony a7R II
Sony/Zeiss 24-70
1/13 second
F/11
ISO 50
Photographing lightning is about 5 percent pandemonium, and 95 percent arms folded, toe-tapping, just plain standing around. A typical lightning shoot starts with a lot of waiting for the storm to develop and trying to anticipate the best (and safest) vantage point. But with the first bolt often comes the insight that you anticipated wrong and: 1) The lightning is way over there; or 2) The lightning is right here (!). What generally ensues is a Keystone Cops frenzy of camera bag flinging, tire screeching, gear tossing, tripod expanding, camera cursing, Lightning Trigger fumbling bedlam. Then it’s more waiting. And waiting. And waiting….
In many ways the waiting part is a lot like fishing—except these fish have the ability to strike you dead without warning. And a strike is no guarantee that you’ve landed something—that assurance won’t come until you review your images. Unfortunately, when a Lightning Trigger is attached, LCD reviews are disabled. But to avoid missing the next one, I’ve learned to resist the temptation to turn off my Lightning Trigger and check after every bolt (like pulling the line from the water every few minutes to see if the worm’s still there).
About this image
With clear skies in the forecast, Don Smith and I started last Sunday with plans to recover from the preceding day’s 12 hour drive to the Grand Canyon, and to recharge for our Grand Canyon Monsoon workshop that started Monday. But walking outside after lunch, dark clouds building overhead sent us racing up to the rim (a 15 minute drive) to see what was going on (see Keystone Cops frenzy reference above).
Starting at Grand View, we quickly set up our tripods, cameras, and Lightning Triggers and aimed toward promising clouds up the canyon. But within 10 minutes the clouds overhead darkened; when they started pelting us with hail, we retreated to the car. Since the storm appeared to be moving east-to-west, we drove east to get on the back side of it, eventually ending up at Lipan Point (one of our favorite spots).
We set up west of the Lipan vista, enjoying relative peace and quiet away from the summer swarm. The cell that had chased us from Grand View was diminishing, so much so that we needed sunscreen when we started, but we could see an even more impressive cell was moving up from the south. Meanwhile, the clouds in the canyon were spectacular, but all the lightning was firing above the flat, scrub pine plain to the south. Our hope was that it would reach the canyon in our viewfinders before reaching us.
Of course I wanted lightning firing into the canyon, but at first I hedged my bets and composed wide enough to include the less aesthetically pleasing evergreen forest. As the rain moved across the canyon to our west, our blue sky had started to give way to darkening clouds, and distant thunder rolled through the afternoon stillness.
This was my first lighting shoot (and just my second overall) with my brand new Sony a7R II, so I was quite anxious to test its lightning capture capability. Speed is of the essence with lightning, and the faster the shutter responds to a click command, the better the chances of capturing it. My Canon 5D III had done the job in the past, but I knew I missed a number of strikes due to its only mediocre shutter lag.
The a7R II, like the a7S and a6000 (but not the a7R), has an electronic front curtain shutter that drastically shrinks shutter lag, so in theory its performance would rival the a7S and a6000, both of which I’d already succeeded with. That morning I’d tested the a7R II against the a7S and found its response identical, but you never know for sure until you try. (The other part of this equation is a good lightning sensor, and the only one I’ve seen work to my satisfaction is the Lightning Trigger from Stepping Stone Products.)
That afternoon we enjoyed about a half hour of quality shooting before the storm moved too close for comfort. In that span I saw at least a half dozen canyon strikes; the new camera captured most (all?) of them. The one you see here was from early in the show—subsequent strikes were further north (right) before petering out.
Read more about lightning photography, and see a gallery of lightning captures, on my Lightning Photography photo tips page.

