Eloquent Images by Gary Hart
Insight, information, and inspiration for the inquisitive nature photographer
Big Moon Rising
Posted on May 1, 2022

Big Moon Rising, Tunnel View, Yosemite
Sony a7RIV
Sony 200-600 G
Sony 2x teleconverter
ISO 100
f/13
1/10 second
It doesn’t take much time with my images to figure out that I love photographing the moon. Large or small, full or crescent, it doesn’t really matter. Almost every one of my moon images is the product of plotting the time of its arrival (or departure), then making sure I’m there to photograph it. Using astronomical tables and topo map software, I’ve been doing this for more than 15 years—long before the availability of the astronomy apps that tremendously simplify the process with pretty decent accuracy. And while I recommend these (new fangled) apps to everyone who wants to photograph anything celestial above a particular terrestrial scene, I still do it the old fashioned way for no other reason than it’s more fun. But, as much as I’d love to tell you that I plotted this moonrise from last Wednesday morning in Yosemite, I have to admit that this one was largely a matter of just happening to be in the right place at the right time (aided by just a dash of advance knowledge).
Yosemite Valley is not a great sunrise location because nearly all of its vistas face east, which means photographing towering monoliths in full shade (the sun’s behind them), against the brightest part of the sky. We always hope for clouds to add color to the sky and subdue some of the sun’s brightness, but too frequently end up with blank skies.
Nevertheless, in most of my Yosemite photo workshops I take my group to Tunnel View for our first sunrise. I choose Tunnel View for that first sunrise because when clouds aren’t present, we can still turn the distinctive outlines of El Capitan, Half Dome, and Cathedral Rocks into silhouettes. Not only does this give my students the opportunity to create something a little different than the standard Yosemite image, it’s also a good way to get them thinking about photographing the way their camera sees rather than the way their eyes see (a real point of emphasis in my workshops).
My Yosemite Waterfalls and Dogwood workshop was scheduled to (fingers crossed) coincide with the park’s peak spring runoff and dogwood bloom, which usually happens around May 1 (+/- a week or two). This year I chose the last week of April because I’d rather be a little early for the dogwood than a little late, and to avoid the weekend crowds. Though I hadn’t considered the crescent moon when I scheduled it, as the workshop approached I checked and saw that on our first morning an 11% crescent would rise nearly 90 minutes before sunrise. Unfortunately, this moon aligned poorly with all of Yosemite’s icons, and to be visible at all would need to climb above the much higher walls southeast of Tunnel View. On the other hand, I saw that the crescent would be trailing a nice planetary alignment that included Mars, Venus, and Jupiter—maybe not great to photograph, but pretty nice to see.
When we arrived the sky was dark enough to enjoy the planets, but there was no sign of the moon. As feared, there were no clouds, so after getting my group going with their silhouettes, I started thinking about the moon again. Knowing that it was almost directly beneath Jupiter, about 1 1/2 times the distance separating Venus and Jupiter, I was able to pretty closely approximate where the moon would rise. And I realized that when it did rise, the sky would still be plenty dark enough.
I let my group know what would be happening and quickly ran to my car to grab my tripod, Sony a7RIV, Sony 200-600 G lens, and Sony 2X Teleconverter. Zooming my lens all the way out to 1200mm (go big or go home), I trained it on the small tree on the far left of this image and waited. The moon actually appeared just slightly left of the target tree, close enough that I didn’t need to recompose. The ridge here was so steep that it took more than 10 minutes for the moon to completely separate, creating the illusion that it was sliding uphill. merge
The most exciting part of this otherwise serene morning came when a commercial jet zipped into the scene, contrail trailing, and someone realized it was on a collision course with the moon. What ensued was a brief scramble to photograph the collision. Thwarted by my 2-second timer (a further reminder why I don’t photograph anything that moves), I got nothing but contrail, but at least two in the group got the moon/jet convergence.
Here’s a link to my Crescent Moon article in the Photo Tips section of my blog
Workshop Schedule || Purchase Prints || Instagram
A Crescent Moon Gallery


")


")


I Can Relate (You Can Too)
Posted on April 24, 2022

Peek-a-Boo Moon, Merced River Canyon and Bridalveil Fall, Yosemite
Sony a7RIV
Sony 24-105 G
1/4 second
F/10
ISO 100
Our lives revolve around relationships: romance, family, friends, work, pets…. Even that clown who cut you off on the freeway, for a few brief (I hope) seconds, might just be the most powerful influence in your life.
Like most words in the English language, “relationship” can mean more than one thing. On the macro scale are the specific personal connections that matter to us—not just people, but also places, things (I actually love my new dishwasher), music, sports teams, and so on. On a micro scale, we have spacial juxtapositions that can be either planned or random, and the realization that it’s possible to draw a straight line relating any two objects on Earth (or in the Universe, for that matter).
I know this isn’t first time I’ve written about relationships (it won’t be the last), but they’re very important to photography because they play a significant role in literally every image we capture. My image choices are very much determined my relationship with my subjects, while my images’ ability to connect with others is a function of the relationships, both conscious and unconscious, they tap in the minds of my viewers.
In addition to finding those personal connections, as I wrote in last week’s post, spacial relationships that connect visual elements and guide the eye have the power to move viewers’ through the frame (good), pull them out of the frame (bad), and to signal viewers what it is they’re supposed to see and do in the image (good).
Laying the foundation
In this image from the final shoot of last week’s Yosemite workshop, it’s easy to see how all those relationship factors combine to create an image. It all starts with a life-long relationship with Yosemite that predates my oldest memories. Campfires, hiking, the Firefall, bear watching, transient friendships with kids in nearby campsites, fishing with my dad, are all among the many vivid contributors to my Yosemite memory mosaic.
My love of the night sky is related (there’s that word again) to this Yosemite connection, and started just a few years later. Its seeds, sown on summer nights falling asleep beneath a sky full of stars on family camping trips, germinated with my first telescope when I was 9 or 10, and flourished under the dark skies of the High Sierra backcountry.
Putting it all together
When I started getting serious about photography, my love for (and proximity to) Yosemite made it the ideal place to start. It’s hard to take a bad picture in Yosemite, so at first I was content with my own version of the more conventional scenes seen in postcards, calendars, and travel brochures.
Soon I grew to appreciate the importance of light, and started timing my Yosemite visits around the best opportunities for sunrise/sunset color, warm light, and waterfall rainbows—my first conscious attempts to create relationships between fixed terrestrial subjects and ephemeral natural conditions. This epiphany led to the realization that instead of being satisfied with great light on Half Dome, a tumbling cascade, or mirror reflection, why not accent the scene with fall color or elegant dogwood? Whether not I was conscious of it at the time, I’d gone all-in on creating my own visual relationships: disparate elements connected in a shared moment.
Incorporating the night sky came later, but at some point I realized that, while a Yosemite sunset is nice, a Yosemite sunset that includes the moon might be especially nice. Suddenly I found myself obsessively calculating and logging the horizontal and vertical angles at every conceivable Yosemite vista, and plotting the moon’s altitude and azimuth to determine when and where it would appear above Yosemite Valley. (This was long before the days of the Photographer’s Ephemeris, Photo Pills, and other tools of that ilk.)
Back to the present
Somehow, that long and continuous thread lead me and my workshop group to the Bridalveil Fall vista on Big Oak Flat Road in Yosemite last Friday evening. More than a year earlier, I’d plotted this moonrise and scheduled a workshop to photograph it—among other things, like the moonbow beneath Lower Yosemite Fall and the poppy bloom in the Merced River Canyon.
But simply planning for a relationship doesn’t make it so. This year’s poppy bloom was a complete swing-and-miss, and clouds dogged our entire workshop, wiping out our moonbow.
But all was not lost. The clouds made for spectacular skies, while the sun came out enough for the group to capture a variety of waterfall rainbows on Bridalveil and Yosemite Falls. And there was enough water in Tenaya Creek to justify the 1 1/2 mile hike up to Mirror Lake for the Half Dome Reflection. We even got to photograph the earliest dogwood that had just started to pop out near Valley View, an unexpected treat.
And I still had one relationship ace up my sleeve: the moonrise on our final night. As often happens in Yosemite, the Friday forecast was frustratingly noncommittal: partly sunny. So it’s no wonder my moonrise optimism waxed and waned all day as the sky wavered between blue (yay!) and gray (boo!).
I’d figured that the moon would appear above Leaning Tower (above and just right of Bridalveil Fall) at around 7:15 p.m., so I got the group in place about 7:00. Even though we had more clouds than sky, a small gap on the western horizon let just enough sun through to spotlight Bridalveil Fall. There was even enough of an opening above the fall to give me hope that we’d see the moonrise right on schedule, and I set up my (brand new!) Sony a1 with the Sony 200-600 lens and 2X Teleconverter in anticipation. But by the time 7:15 arrived, that window had slammed shut.
The next opportunity was another opening in the clouds about 2 degrees higher, and I kept my eyes on it knowing the moon would probably rise into it around 7:25—about 10 minutes before sunset. With the moon higher, I set aside the a1 and 200-600 in favor of (one of) my Sony a7RIVs and my Sony 24-105. As I watched the small patch of blue sky, I realized it was shrinking, further delaying (and threatening to completely wipe out) the moon’s appearance.
We experienced brief euphoria when the moon finally peeked above the clouds at around 7:30, just long enough to capture 2 frames that had it more than 1/2 visible. Then it was gone.
I still faced a 4-hour drive home, but since the clouds were changing so fast and we were already there, I decided not to call the workshop quite yet. About 20 minutes later, right at the tail end of the window when there’s still enough light to capture detail in the moon and foreground (with one click), I was starting to consider pulling the plug for good when a small bright patch got my attention. Suddenly the clouds parted just long enough for me to grab 2 more frames that included most of the moon, before snapping shut for good.
Yosemite Relationships
Click an image for a closer look, and to view a slide show.


Still Motion
Posted on April 18, 2022

Half Dome and Tenaya Creek, Yosemite
Sony a7RIV
Sony 12-24 GM
1/10 second
F/16
ISO 50
Put me firmly in the camp of those who prefer reading the book to watching the movie. Watching a movie, my gaze is fixed as the scene unfurls before my eyes at a predetermined pace—if something requires scrutiny or triggers my imagination, I have to pause or rewind (often not an option—or at the very least, a source of irritation to others in the room). Reading a book, I’m free to pause, ponder, revisit, and imagine to my heart’s content.
This ability to control the pace of my relationship with the world may explain why I prefer still photography to video capture. Acknowledging that video provides expressive opportunities that still photography can’t, I can’t help but think the power of still photography is under-appreciated.
One important distinction is that the motion in a video is applied by the medium; in a still image, the source of the motion is my own eyes. And while a video dictates the pace of my relationship with the scene, entering the world of a photograph gives my eyes the freedom to linger and explore the scene’s nooks and crannies, to savor its nuances at my own pace.
This still photography bias could be explained by the fact that in virtually all aspects of my life, “think fast” is rarely my default response. Rather, given a choice, I prefer analysis and comprehension to instant reaction. This evaluate-first mindset might also explain why my favorite sport is baseball (which many consider “too slow”), and why I prefer chess and Scrabble to video games (the last video game I played was Pong).
So I guess it should be no surprise that, as a landscape photographer, my subjects don’t move. I love having the time to craft a scene—to position myself, frame my subjects, and manage the exposure variables (that control motion, light, and depth)—confident that when I’m finally ready, my subject will still be there.
But, as we all know (and as Spider-Man reminded us), with great power comes great responsibility. To succeed, we photographers must be sensitive to our viewer’s experience. Is it clear what the picture is a about? Is there a place for the eye to land, and/or a path for the eye to follow?
Just plopping the viewer of an image into the scene without any clues about what to do there is an invitation to a quick exit. Which is why I try in every image to include visual signals to guide my viewer’s eye and make it as clear as possible what they’re supposed to be doing in the world I’m offering. And once they’re there and have examined whatever it is I’m trying to show them, they’re much more inclined to explore further and discover more of the scene’s subtleties.
Visual signals can take many forms. One popular device that I very consciously try not to think about is “leading lines.” Not because I think they’re inherently bad or wrong, but because we’ve heard about them to the point of eye-glazing cliché, and I fear that many photographers (and photography contest judges) have given them too much power—at the expense of other similarly, or even more, important factors. I’m not saying that my images don’t use leading lines, I’m just saying that I only use them when they work organically, without conscious thought.
That said, I am drawn to diagonals—a rock, shoreline, leaning tree trunk, fallen log, and so on. While these diagonals can indeed connect objects and lead viewers’ eyes, I’m more interested in the diagonal’s power to simultaneously move the viewers’ eyes across two planes of my scene: up/down and left/right.
And any line, whether horizontal, vertical, or diagonal doesn’t need to be an actual visible line—virtual lines work too. To understand the concept of a virtual line, I think in terms of visual “visual weight”: any object in my frame that, by virtue of its mass, brightness, position, or some other quality that creates enough visual gravity to pull a viewer’s eye in its direction. I try to avoid visually heavy objects that pull the eye away from the important parts of my frame, and to pair visually heavy objects that the viewer can subconsciously connect into a virtual line.
Another visual aid that I sometimes employ is a virtual frame—some object within the boundaries of my actual frame that holds my viewer’s eye in the scene, or nudges it it back into the scene the way the cushion on a pool table bumps the ball back into the action.
About this image
In last week’s Yosemite Moonbow and Wildflowers workshop (in which we got neither moonbows or wildflowers, but nevertheless enjoyed absolutely spectacular photography conditions), we made the 1 1/2 mile walk up to Mirror Lake. This is one of those hikes that’s as much about the journey as it is about the destination. Along the way I kept my eyes peeled for opportunities to pair Half Dome with churning Tenaya Creek. With Half Dome virtually straight up, of the way I was thwarted by the dense forest canopy, but as the trail steepened for its final ascent to the lake, I found a small gap I thought might work.
After climbing down among the jumbled boulders separating the trail from the creek, I pulled out my Sony a7RIV and attached my Sony 12-24 f/2.8 GM lens. While my Sony 16-35 GM would probably have worked here, I loved the extra room the 12-24 gave me to compose this scene that was beautiful from top to bottom.
With a little scrambling I was able to frame Half Dome with a pair of leaning tree trunks, dropping low to avoid blocking any of its face with a rogue branch. Not only did the leaning trunks provide a nice diagonal to move the eye, they also created a virtual frame to hold the eye in the scene. From my position I was also able to use the rushing creak to create a second diagonal. At 12mm, I was able to include many of the nearby rocks, the closest of which were no more than 2 feet away. These rocks made a great virtual frame across the bottom of the scene.
At 12mm and f/16, I knew I had plenty of focus wiggle room to achieve full front-to-back sharpness, and focused on a rock just a couple of feet into my scene. I wanted to put a slight blur in the water, but the 12-24 isn’t really filter-friendly (it can be done, but requires an expensive and awkward filter system that I haven’t found enough need for), so I couldn’t use a neutral density filter. Fortunately, the water here is so fast that the amount of blur I wanted wouldn’t be a problem. Turns ISO 50 and f/16 gave me enough blur to smooth the motion without losing its definition, exactly what I wanted.
It’s always interesting when I discover that I’d photographed a seemingly random scene before and used a similar composition. On the one hand, it’s a reminder to be careful not to get in a compositional rut, but on the other hand, it’s a confirmation that my compositional process is not random and likely reflective of my personal style.


One more thing
It’s interesting to compare these two images, capture almost exactly 5 years apart. The first one used 13mm, while last week’s was 12mm. The angle of view was similar but not identical, and I was closer to the creek in the first shot. The biggest difference between the two is the amount of sky and the amount of motion blur. Though I have no specific memory of my thoughts when I approach the earlier image, I know my process well enough to know exactly why they’re different. In the early image the sky was lousy (blank blue), and I composed to minimize it; in last week’s image I had clouds that were nice enough to justify including them. And the early image came after sunset (as I was walking back from Mirror Lake), so it was dark enough that it would have been very difficult to get anything but completely blurred water in the extremely fast (and much higher) creek.
Workshop Schedule || Purchase Prints || Instagram
Moving the Eye
Click an image for a closer look, and to view a slide show.


This is My Office
Posted on April 5, 2022
Fresh Snow, Valley View, Yosemite
Sony a7RIV
Sony 16-35 f/2.8 GM
1/15 second
F/9
ISO 100
More than 15 years ago I left a good job at an excellent (and very well known) tech company to pursue a career in nature photography. After all, I had a good camera and years of amateur photography experience—what could possibly go wrong? Turns out I had no interest in any of the kinds of photography that actually make money, so (in hindsight) my decision was somewhat riskier than I had imagined. But, while photography hasn’t brought me great financial fortune, I do indeed feel rich beyond all measure.
Since first picking up a serious camera in my early 20s (an Olympus OM-2, if you must know), I’d been a very content amateur photographer, able to choose my photo destinations and the images I clicked for the sheer joy they brought. Period. But, being stuck in a job that stifles your creativity tends to make you rethink life choices.
At the time I’d found myself swept up in the earliest waves of the photography renaissance spurred by digital capture. I loved the instant feedback and control it brought, and started fantasizing about a transitioning my livelihood to photography. But as I started plotting my transition, I sensed that a significant risk of turning one’s passion into a profession is making choices based on the income they generate rather than the pleasure they bring. Hoping to keep the joy in my photography, I made a personal vow to only photograph what I want to photograph, and to never take a picture just because I thought it would earn money.
To honor this commitment while still paying the bills, I blended my 20+ year career in technical communications (tech writing, training, and support) with my years of photography experience and subject knowledge, to create a photography business based on photo workshops rather than image sales. (Of course I do sell images too, but because I’ve always viewed image sales as a bonus rather than something to something I rely on, I’ve been able to honor my commitment to only take pictures that make me happy.) And here I am.
I’m thinking about this right now because sometimes I’ll come across an image that reminds me how lucky I was to have been at these places when I would have otherwise been fighting traffic or imprisoned in a cubicle. I found today’s image while engaged in one of my favorite idle time exercises: Start with a favorite image, return to the folder for that trip, and look for unprocessed images captured in the conditions of that day. This time, overdue for a blog post, I didn’t go too far back, ending up revisiting my images from the snowy opening day of last year’s December Yosemite Winter Moon workshop.


Given how happy the previously shared images from this day make me, this choice was low hanging fruit, but I’m actually a little surprised to have found something I like as much as, or more than, what I already had.
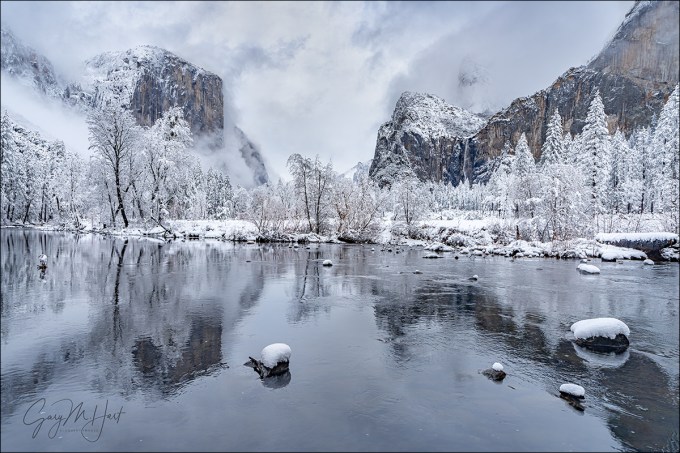
When I’m in the park by myself I tend to avoid from the popular spots. But these spots are popular for a reason, and since this was the workshop’s first day, I wanted to give my group a chance to photograph the iconic scenes in the best conditions. Granted (speaking of low hanging fruit), Valley View is one of those spots that really doesn’t need help to be beautiful, so adding fresh snow almost seems unfair. But after a lifetime of visiting Yosemite, I can honestly say that it doesn’t get much better than this, and it was a treat to be able to share that beauty with an appreciative group. The fact that this was the first view of Yosemite for some (but I didn’t have the heart to tell them it’s not always like this) made it even more memorable for me.
For this composition I used the snow-capped rocks to add a little foreground interest. They’d have been pretty hard to avoid anyway, but I was very conscious of where I set up my tripod to control where the rocks landed in my scene—not too close to the borders, and not merged with the important parts of the reflection.
In addition to the snow, the clouds this afternoon were truly special—not only the swirling fragments between El Capitan and Cathedral Rocks, but also the column that appears to be tumbling down El Capitan like a waterfall. Just another day at the office….
The View From My Office
Click an image for a closer look, and to view a slide show.


, California")


")

Yosemite Moonrise
Posted on February 27, 2022

Twilight Moon, Tunnel View, Yosemite
Sony a7RIV
Sony 24-105 f/4 G
1/3 second
F/11
ISO 100
Though last week’s harrowing story of a sneaker wave that drenched members of the Iceland photo workshop group had a (relatively) happy ending (R.I.P., 3 cameras and lenses), it generated more responses than any blog post in recent memory. Exactly one week later, that sobering reminder of Nature’s power and ability to surprise was still on my mind when I was gifted a reminder of Nature’s ability to also soothe and inspire.
This epiphany struck me as I reclined on a granite slab above Tunnel View, waiting for the full moon to grace the most beautiful view on Earth. Just as in Iceland, I was with a workshop group. Unseen in Yosemite Valley below us, I knew thousands of photographers were assembled with eyes glued to a section of granite stained by Horsetail Fall’s trickle, praying to avoid a reminder of Nature’s ability to disappoint. If all went as hoped, the moon would appear at about the same time light from the setting sun colored the waterfall some shade of orange or (fingers crossed) red.
While clouds were a factor for both events, I wasn’t concerned about the moonrise because I could see there was only one cloud that might delay the moon’s appearance, but certainly wouldn’t wipe it out. On the other hand, I knew from experience that the people on the ground beneath Horsetail Fall would have no idea of the clouds poised to block the sun, and ultimate fate that evening’s light, until it actually happened (or didn’t). For me and my group, the light on Horsetail Fall would be tomorrow night’s anxiety; tonight was our opportunity to bask and marvel.
My general moonrise approach is to start with max telephoto until the moon gets some separation from the landscape, then go wider as the moon climbs. This evening my tripod was mounted with my Sony a7RIV and Sony 200-600 composed at full magnification on Cloud’s Rest, the peak between El Capitan and Half Dome, behind which the moon should appear about 25 minutes before sunset. Within arm’s reach was my other a7RIV with my Sony 24-105.
Once everyone was set up with lenses trained, we had time to sit and appreciate the view. From our perch not only could we see the spot behind which the moon would appear, we also could see the part of El Capitan where Horsetail flowed (though there wasn’t enough water to actually see the fall from this distance). As we waited for the moon, we watched the shadow cast by the setting sun move across the face of El Capitan, gradually warming the granite as it advanced.
My eyes were trained more on the cloud taking a breather atop Cloud’s Rest—more specifically, trying to figure out if the cloud was dense enough to completely block the moon. I got my answer when the time for moonrise came and passed, and adjusted my composition by widening my composition somewhat.
The moon came out from behind the cloud about 10 minutes before sunset, still close enough to Horsetail Fall to include both at 400mm. Meanwhile, the light on Horsetail Fall faded as the sun dropped into thin clouds near the horizon—faded just enough to subdue the color and disappoint the massed throngs below.
From our vantage point the light on El Capitan was good, but I could tell that the color wasn’t what people came for. As pretty as our scene was was, my favorite time to photograph a full moon isn’t until after the sun has set and the blue and pink pastels of Earth’s shadow starts to paint the sky. By this time the daylight-bright moon stands out strikingly against the darkening sky. Waiting for this to happen, I switched to my 24-105 and started playing with a variety of compositions that included some combination of El Capitan, Half Dome, and Bridalveil Fall.
Since I need to capture detail in both the moon and the foreground, and I never blend images (combine exposures to make a single image), the exposure margin for error shrinks significantly as the sky darkens around the moon. I captured this image more than 15 minutes after sunset, when the scene looked much better to my eyes than it did on my LCD. This is where I especially appreciate the dynamic range of my Sony sensors—I just monitor the moon, making it as bright possible without blowing it out, then rely on Lightroom and Photoshop to reveal the unbelievable amount of usable detail hidden in the shadows and highlights.
Large or small, crescent or full, I love photographing the moon rising above Yosemite as much as ever. I’m fully aware that I have far more than my share of these images, but it just makes me so happy, I have no plans to stop.
Workshop Schedule || Purchase Prints || Instagram
Yosemite Moonrise


Back in the Saddle
Posted on February 13, 2022

Sun Kissed, Horsetail Fall, Yosemite (2021)
Sony a7RIV
Sony 24-105 f/4 G
1/15 second
F/9
ISO 100
Horsetail Fall’s February sunset show is an indescribable delight that thrills all who view it. After photographing Horsetail Fall in relative solitude for many years, when all the people started showing up, I actually started dreading the experience a little—especially the prospect of negotiating tripod space for a dozen workshop participants. But last year, despite record crowds, after adjusting my attitude and actually leaning in to the mayhem, I had more fun at Horsetail Fall than I’ve had in years. And following last year’s experience, I’m actually looking forward to tomorrow’s return for this year’s festivities.
Because arriving early to ensure a good vantage point is important, photographing Horsetail Fall requires a lot of standing around. Of course my priority is always my group, but once everyone was settled in and all the questions were answered, I had time to chat with neighbors, and even wander up and down the road to take in the infectious tailgate party atmosphere, dodging flying frisbees and inhaling mouth-watering barbecue smoke as I went.
But for Horsetail Fall, as sunset approaches, group anxiety starts to take over. That’s because part of the thrill is the possibility that on any given evening, it won’t happen. Not only does there need to be water in the fall (never a sure thing), the setting sun needs an unobstructed path to El Capitan. But those in position to view Horsetail are standing on the valley floor with no view of the sun in the minutes leading up to the main event.
In some years, due I suspect to some nefarious conspiracy between water and light, the sunset fire never happens, not even once. Other years, it seems like every day our social media pages burst with pictures of the previous night’s display.
Horsetail failure comes in many forms, ranging from the fall simply being dry (2020, I’m looking at you), or the sunlight being blocked, for days or weeks at a time, by a string of winter storms. The worst kind of failure happens when the fall is flowing and the light strong as the clock ticks toward sunset—until some unseen cloud on the horizon snuffs the sun and breaks hearts.
I’ve also seen the reverse happen, when there’s no sign of sunlight on El Capitan and people have begun packing their gear when, without warning, the sun sneaks out to spotlight El Capitan for just a minute or two as it is swallowed by the horizon.
Maybe that’s why it seems that everyone who has tried it has their own Horsetail Fall story. And for every Horsetail aspirant who has been trying and failing for years, there’s another one who got it on the first attempt. For the fortunate, success is a badge of honor; for the unlucky, the quest can rise to obsession status.
Last year was a great year for Horsetail Fall, with good flow and light throughout the February viewing window. Trying to recover from 2020 COVID losses, in 2021 I had the good fortune to have scheduled two Yosemite workshops in February. The first one emphasized Horsetail Fall, while the second focused on photographing the full moon rising at sunset.
My Horsetail group enjoyed the first attempt so much that, despite our success, we went back for another shot the next night. And after the first workshop’s success, I gave my moon group the option to try Horsetail on a non-moonrise evening—they jumped at the chance, and weren’t disappointed. In between the two workshops, I hiked by myself up the Four Mile Trail (that goes to Glacier Point) far enough to photograph it from a perspective I’ve never tried. (If you’re keeping score, that’s 4 for 4.)
Today’s image is from my first group’s first attempt. In the minutes leading up to sunset, we’d been teased by light that seemed to come and go, before ultimately staying just long enough to thrill everyone. When the show was over, applause broke out, strangers hugged, and no one seemed to mind the 1 1/2 mile walk back to the car, and the ensuing gridlock.
Look below the gallery for my updated guide to photographing Horsetail Fall
Horsetail Fall 2021
Click an image for a closer look, and to view a slide show.


Horsetail Fall Do-It-Yourself Guide
(from my Photo Tips section)

Horsetail Fall, El Capitan, Yosemite
2022 Horsetail Fall Update 1 (01Feb2022)
- No reservations are required to view Horsetail Fall in 2022
- From noon until 7 p.m., all parking on Southside Drive between the El Capitan crossover and Swinging Bridge is prohibited.
- Also between El Capitan crossover and Swinging Bridge, the entire area between the Merced River and Southside Drive side is closed to parking and pedestrians. In other words, you can’t photograph Horsetail Fall from the south bank of the Merced River. This will be strictly enforced.
- All parking on Northside Drive between Yosemite Valley Lodge and the El Capitan crossover is closed. You also won’t be permitted to unload or stop on this stretch of road. To view Horsetail Fall, the NPS wants you to park in the Yosemite Falls parking area just west of Yosemite Valley Lodge, and walk to the viewing area at or near the El Capitan Picnic Area. This is about 1.5 miles each way, but it’s flat, and one lane of Northside Drive will be blocked for pedestrians. If this lot is full, you can park at the Yosemite Village parking lot and walk, or take the free shuttle to the Yosemite Falls parking area (and walk from there).
- It’s impossible know what Horsetail Fall will deliver in 2022—that will depend on the weather (it needs sunlight at sunset), and the runoff. One small bit of hopeful news is the early and heavy snow Yosemite received this season. Though California is in a drought, several significant storms in October and December gave the snowpack a significant boost, increasing the chances that there will at least be a little water flowing (you don’t need a lot). But no promises, so keep your fingers crossed.
- Here’s the NPS Yosemite Horsetail Fall page: https://www.nps.gov/yose/planyourvisit/horsetailfall.htm
- And finally, if you think you’ll be able to skirt the rules and slip under the radar, think again. I saw a very active ranger presence monitoring the activity on both sides of the river. The rangers were very friendly and helpful, but they were also clearly serious about making sure everyone abided by the rules. So be patient, stay mellow, and enjoy the show…
Please respect these restrictions. The minority of photographers who ignore rules, or try to cut corners, reflect poorly on all photographers, which only leads to even tighter restrictions and risks complete loss of access to Horsetail Fall.

2021 Horsetail Fall Crowd, Northside Drive, Yosemite :: For nearly a mile, scenes like this one from a small section of Northside Drive, repeated themselves every couple hundred yards.
Photographing Horsetail Fall
For eleven-plus months each year, Horsetail Fall may just be Yosemite’s most anonymous waterfall. Usually dry or (at best) a wet stain, even when flowing strong this ephemeral cataract is barely visible as a thin white thread descending El Capitan’s east flank. When it’s flowing, my workshop groups can be standing directly beneath Horsetail and I still have to guide their eyes to it: “See that tall tree there? Follow it all the way to the top of El Capitan; now run your eye to the left until you get to the first tree…”. But for a couple of weeks in February, the possibility that a fortuitous confluence of snowmelt, shadow, and sunset light might, for a few minutes, turn this unassuming trickle into a molten stripe draws photographers like cats to a can-opener.
The curtain rises in the second week of February, a couple of hours before sunset, when a vertical shadow begins its eastward march across El Capitan’s south face. As the shadow advances, the sunlight warms; when the unseen sun (direct sunlight is gone from the valley floor long before it leaves towering El Capitan) reaches the horizon, the only part of El Capitan not in shadow is a narrow strip of granite that includes Horsetail Fall, and for a few minutes, when all the photography stars align, the fall is bathed in a red glow resembling flowing lava framed by dark shadow.
Some years Horsetail delivers sunset after sunset in February, while other years administer daily doses of February frustration. Unfortunately, it’s impossible to predict when all the tumblers will click into place: I know photographers who nailed Horsetail on their first attempt, and others who have been chasing it for years.
Don’t call it “Firefall”
One important thing before I continue. To avoid outing yourself as a Yosemite rookie, don’t make the mistake of calling Horsetail Fall the “Firefall.” Yosemite’s Firefall was a very real nightly display of burning embers pushed from Glacier Point every summer night. It was as spectacular as it sounds. The phenomenon started in 1872 and continued until the National Park Service, concerned (among other things) about the crowds it drew, terminated the Firefall in 1968.
Anyone who has witnessed or seen pictures of Horsetail Fall would agree that “Firefall” would be a great name for it, but those of us fortunate (and old) enough to have witnessed the actual Firefall know the difference between Horsetail Fall and the Firefall, and will never confuse one for the other.
(Oh yeah, and it’s Horsetail Fall, not Horsetail Falls.)
Where does the red come from?
Horsetail Fall turns red for the same reason clouds turn red at sunset. When the sun drops below the horizon, the last rays to make it through the atmosphere are long, red wavelengths. El Capitan, towering more than 3,000 feet above Yosemite Valley, is high enough above the surrounding terrain to receive extended exposure to these red rays.
Horsetail Fall’s sunset color varies between orange and red. The color’s hue and intensity is a function of atmospheric clarity—the cleaner the air, the more vivid the red will be. You can read more about sunrise/sunset color in my Sunset Color article.
When to photograph Horsetail Fall
The “when” of Horsetail Fall depends on the convergence of three independent conditions:
- The sun’s angle is refreshingly predictable, lining up perfectly only in February (and October, when the fall is almost always dry). Common wisdom says the shadow on El Capitan most precisely targets Horsetail Fall at sunset during the third week of February, from around the 15th through the 22nd (or a little later). While I won’t dispute this, I’ve had some of my best success a week earlier, and my favorite Horsetail shot (at the top of the page) was captured February 9. I’ve also had success photographing it right up until the end of February. But the stripe of sunset light on El Capitan is thinnest (and therefore most tightly focused and photogenic) in the third week of February—the benefit of doing it a week earlier is fewer people.
- Water in the fall varies greatly from year to year, depending on how much show has fallen on the fall’s extremely small watershed, and how much of that snow is currently melting. A large snowpack and warm daytime temperatures are ideal. Sometimes Horsetail can be frozen solid in the morning, but afternoon warmth can be enough to get it flowing in time for the show. And a heavy rain can get it going strong for a few hours or even a day or so.
- Direct sunlight at sunset is the most fickle aspect of the Horsetail experience—for every tale of a seemingly perfect evening when the sunset light was doused by an unseen cloud on the western horizon mere seconds before showtime, there’s another story about a cloudy evening when the setting sun somehow threaded a gap in the clouds just as tripods were being collapsed.
The problem with targeting February’s third week is that it isn’t a secret: I generally prefer sacrificing Horsetail perfection in favor of Horsetail near perfection and far fewer photographers. But I’ll leave that decision up to you.
Where to photograph Horsetail Fall
It’s fun to circle Yosemite Valley on pretty much any mid- to late-February afternoon just to watch the hordes of single-minded photographers setting up camp like iPhone users on “Release Day.” In fact, one non-scientific way to find a spot to photograph Horsetail is to simply park where everyone else parks and follow the crowd. Unfortunately, as Horsetail’s popularity grows, so does the distance you’ll need to walk.
If Horsetail Fall is on the top of your bucket list, it’s best to pick your spot and show up early. Really early. Really, really early. The downside of this approach is that, because the best locations for Horsetail aren’t especially good for anything else, you’ll sacrifice a lot of quality Yosemite photography time waiting for something that might not happen.
And no one has commanded that you worship with the rest of the Horsetail congregation: Experienced Yosemite photographers know that any west-facing location with a view of the fall will do. If you find yourself in Yosemite with time to kill, try walking the Merced River between Cathedral and Sentinel Beaches—any place with a view to Horsetail will work. But because of their open space and relative ease of access, two spots have become the go-to Horsetail spots for most photographers.
El Capitan Picnic Area / Northside Drive
El Capitan Picnic Area, GPS: 37.72782N 119.61844W
The El Capitan Picnic Area (highlighted by Galen Rowell) on Northside Drive for years was the epicenter of the Horsetail Fall experience. The picnic area’s advantages are that it is the closest view of Horsetail Fall, has the most parking, has the most room for photographers (by far), and has a bathroom (plug your nose). The downside is there really isn’t a lot of composition variety here, and thousands of others will have already captured something as good as or better than what you’ll get.

Horsetail Fall from the picnic area
If you like people, the El Capitan Picnic Area is the place to be—more than any other Horsetail vantage point, this one has a festive, tailgate atmosphere that can be a lot of fun. I suspect that’s because people arrive so early and there’s little else to do before the show starts. And since everyone is pointing up with a telephoto, it’s pretty much impossible for anyone to be in anyone else’s way, which eases much of the tension that often exists when shooting among large crowds.
You’ll find the parking lot, with room for twenty or so cars, on Northside Drive, about two miles west of Yosemite Lodge (now only open to people with handicap parking permits). You can shoot right from the parking lot, or wander a bit east to find several clearings with views of the fall.
There are variations of the picnic area view all along Northside Drive that in recent years have surpassed the picnic area in popularity (crowds). My suggestion is to scout El Capitan views in any month that’s not February; if your only Yosemite visit is the day you’re there to photograph Horsetail Fall, scout early in the morning. Or, as you set out to photograph Horsetail Fall, simply walk Northside Drive (one lane is blocked for pedestrians walking from Yosemite Valley Lodge) until you find a view that you like (but don’t expect to have it to yourself).
The farther east you set up, the better your view of the top of El Capitan. But some of the east-most views are too aligned with El Capitan’s face, giving you a more side view of Horsetail that makes it very hard to see. You can also try venturing off into the woods to get a better angle, but doing that also means trying to avoid trees that obstruct your view.
Merced River south bank bend
Merced River south bank bend, GPS: 37.72885N 119.60743W
Due to extreme crowds and the damage they’ve caused, in 2021 the National Park Service closed Southside Drive to any Horsetail Fall viewing. While there’s no indication that this closure is permanent, it won’t surprise me if it is (in fact, it would surprise me if it doesn’t become permanent). So, until further notice, the information below is strictly historical (as I write this in February 2022).
Photographed from a bend on the Merced River’s south bank, El Capitan’s extreme sloping summit creates the illusion that you’re somewhere above Yosemite Valley, eye-to-eye with the top of Horsetail Fall—it’s a great perspective.
I like this location because the river greatly increases the variety of possible compositions, and also because you can pivot your view upstream to photograph Upper Yosemite Fall, and behind you toward Sentinel Rock (which also gets fantastic late light), almost directly above while you wait for Horsetail to light up. The downside to photographing here is that there’s precious little room, both to park and to photograph. This requires getting there a couple of hours early, and also can lead to a bit more tension as people jockey for position.

Horsetail Fall reflection from the Southside Drive Merced River view
Driving east on one-way Southside Drive, you’ll parallel the Merced River for most of 1.2 miles beyond the turn for Cathedral Beach. The Horsetail Fall spot is right where the road and river diverge. Parallel park right there in one of two narrow but paved parking areas on opposite sides of the road, where you’ll find room for about a dozen cars.
Since there’s so little parking here, and Southside Drive is one-way eastbound, if you find no parking (don’t try to squeeze in where there’s no room—I’ve seen rangers doing traffic control and ticketing cars that don’t fit), it also helps to know that the spot is about a ½ mile from the 4-Mile Trail parking area and ¾ miles west of the Swinging Bridge parking area—an easy, flat walk.
Because of the potential for crowds, the best strategy here is to arrive early and forego what may be a great view from the elevated riverbank (that is sure to be blocked by late-arrivers trying to cram their way in), in favor of getting as close to the river as possible. Standing at river level gives you many more compositional choices, and nobody else can block your wide shots. (But if there are other photographers already set up on the elevated riverbank when you arrive, please don’t be the one who sets up in front of them.)
How to photograph Horsetail Fall
Regardless of where you set up to photograph Horsetail Fall, it’s pretty difficult to find something that nobody else has done. But that doesn’t mean you shouldn’t try. There are definitely other places in Yosemite Valley with view of Horsetail Fall, they just take a little hunting—I suggest walking the south bank of the Merced River, and ascending the 4 Mile Trail. And since you’ll likely be doing lots of waiting, take advantage of the downtime to experiment with compositions.
Strategy
When the light begins to warm, it’s time to shoot. Because you never know when the light will shut off, don’t wait until the light is perfect—it’s best to start early and photograph often. Until the light goes away completely, my rule of thumb is that the light now is better than the light a minute ago—just keep shooting . I’m not suggesting you hold your shutter down in burst mode until your card fills; I usually tell my workshop groups to fire a frame every minute or two until the fall turns amber, then pick up the pace as it goes (fingers crossed) pink and (if you’re lucky) red. The best light is in the final five minutes before sunset.
Composition
Viewed from the picnic area, there’s not a lot of visual interest surrounding Horsetail; your most obvious compositions will be moderate telephotos, up to 300mm or full frame. I use my Sony 24-105 and 70-200 (or more recently, my 100-400) lenses almost exclusively here. Use the trees to frame your shots and let them go black; with a telephoto you can isolate aspects of the fall and eliminate the sky and some or all of the trees.
The Merced River bend near Southside Drive is farther away from the fall, with more foreground possibilities, including the river and reflections, so you’ll be able to use a greater range of focal lengths here. Don’t get so caught up in photographing the fall that you overlook wider possibilities that include the river.
From either location I think vertical compositions work best (there’s a reason you don’t see lots of horizontal Horsetail Fall images), but that doesn’t mean there aren’t horizontal opportunities too. I like to identify a go-to composition based on the conditions, then vary between wide/tight and horizontal/vertical. If the sky is boring (cloudless), minimize or eliminate it from your composition. If there are clouds that make the sky interesting, by all means include them.
A frequent rookie mistake is cutting the waterfall off at the bottom. I’m not saying there’s never a reason to do that, but unless you consciously decide to truncate the fall because you think it’s the way to compose your frame, make sure you include the diagonal ridge that Horsetail disappears behind.
Filters
Years ago I used to use a graduated neutral density filter to keep from washing out the color in the bright sky, but today’s cameras all have enough dynamic range to handle the exposure if you monitor your histogram. A polarizer cuts reflections will alter your results, so if you have one on, make sure you orient it properly. I often have a difficult time deciding between maximizing and minimizing the reflections with my polarizer, so I hedge my bets and shoot both ways. I’ve found that when Horsetail is flowing strongly, minimizing the reflection is best; when Horsetail is more of a wet or icy stain, maximizing the reflection works better. Either way, it’s best to just shoot it both ways and decide later.
Exposure
Automatic metering can be problematic in extreme dynamic range scenes when color is paramount, so I always recommend manual exposure, spot metering on Horsetail Fall or the adjacent sunlit granite. To maximize the color on the fall and El Capitan, I usually underexpose slightly. Because the trees rarely add value beyond framing, they usually work better when very dark green to black, a fact that’s completely lost on your meter (which thinks everything should be a middle tone). And monitor your RGB histogram to ensure that you haven’t washed out the red (Horsetail and El Capitan) or blue (sky) channels.
Highlight Alert (blinking highlights) is your friend. While you should never make your final exposure decision based on the highlight alert, when you see the highlights flashing, check your histogram and adjust if necessary.
And finally
And perhaps most important of all, don’t get so caught up in the photography that you forget to appreciate what you’re viewing. Just take a couple of seconds to stand back and allow yourself to appreciate the amazing spectacle unfolding before your eyes.
A Horsetail Fall Gallery
Click an image for a closer look and to view a slide show.


Doing the Scene Justice
Posted on January 19, 2022

Falling Snow, El Capitan, Yosemite
Sony a7RIV
Sony 12-24 f/2.8 GM
1/250 second
F/9
ISO 800
Woe is me
I just returned from nearly a week in Death Valley, where I had virtually no connectivity (wifi at my hotel made the Grand Canyon North Rim feel like a Silicon Valley Starbucks). Workshop or not, I try to post something on social media every day, and a new blog article each Sunday, but with no wifi and spotty 3G cellular that struggled just to send or load a text-only e-mail, I felt virtually cut off from civilization (there was a tsunami?!). I know in the grand scheme of things these are small problems, and that I probably missed the world more than it missed me, but still….
So anyway…
Last week I wrote about creating unique perspectives of familiar scenes, and offered some ideas for achieving this. As admirable as it is to make unique images, sometimes Mother Nature delivers something so magnificent that best thing to do is just get out of the way and let the scene stand on its own.
For example
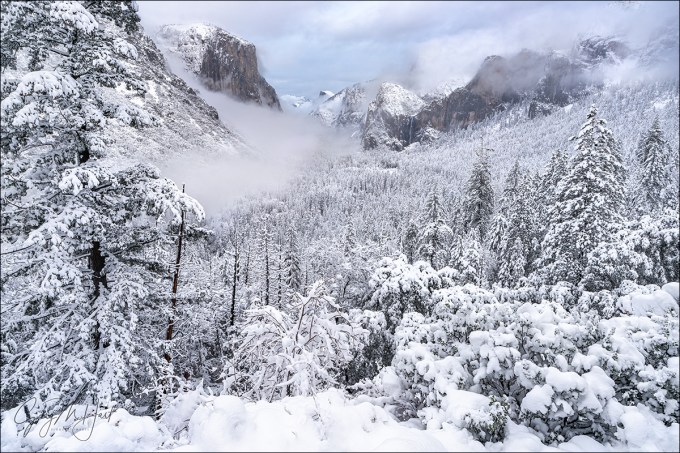
Though last month’s Yosemite Winter Moon workshop wasn’t scheduled to start until the afternoon I took this picture, I drove to Yosemite the evening before the workshop to get a few hours of morning one-on-one time with the multiple inches of snow forecast to fall overnight. And as hoped, I arrived that morning to find every square inch of exposed surface glazed white—and the snow was still falling.
The paradox of photographing Yosemite during a storm is that all of the features you came to photograph are most likely obliterated by clouds. Sometimes visibility is so poor, it’s difficult to imagine the obscured features ever existed—and quite easy to imagine the comfort and warmth of your hotel room. The key Yosemite storm success is to be there when the storm clears—but job-one for catching the clearing part of a Yosemite clearing storm, is first enduring the storm part.
So, rather than succumb to the temptation of comfort and warmth, I armored up and went to work in near zero visibility. After an hour or so of driving around, interrupted by a stop or two (or three) to photograph some of the more intimate nearby beauty, I pulled up to El Capitan Bridge and noticed the clouds starting to lift (fingers crossed). In the still-falling snow, I quickly set up my tripod, grabbed my Sony a7RIV, attached my Sony 12-24 f/2.8 GM lens, and hoped.
I digress
Without getting too preachy, let me just say that if you ever want to piss off a photographer, look at one of their images and say, “Ooooh, you must have a great camera.” While that may very well be true, the photographer’s unavoidable inference will be that the questioner means the beautiful image is a product of the photographer’s equipment, not his or her photographic vision and skill.
But…. As much as I’d like to say my equipment is irrelevant and I could achieve the same results with a pinhole camera, I’ll admit that I have images I couldn’t have created without the right camera or lens. And this is one of them.
Back on point
I’ve written before about Sony’s 12-24 lenses, and how they feel specifically designed for Yosemite’s ultra-close views of massive monoliths. El Capitan Bridge is one of those views, so close that I’ve always felt that even a 16-35 wasn’t wide enough to do the scene justice. So when Sony released its 12-24 f/4 G lens, this was one of my very first stops. My excitement was validated when I discovered that at 12mm I could indeed get all of El Capitan, plus its entire reflection, in a single vertical frame. I became so enamored of my new top-to-bottom-reflection power that pretty much every subsequent 12-24 El Capitan composition here (both with the original Sony 12-24 f/4 G, and the newer Sony 12-24 f/2.8 GM) had been vertical. My goal this morning was to change that.
-

- Winter Storm, El Capitan in the Snow, Yosemite
-

- Autumn and Winter, El Capitan Reflection, Yosemite
-

- Storm Clouds, El Capitan, Yosemite
While the clouds didn’t completely part for several more hours, during this stop at El Capitan Bridge they did lift just enough to reveal all of El Capitan for about 15 minutes. During that time, their swirling vestiges careened across the granite face so rapidly that the scene seemed to change by the second.
Photographically, there wasn’t really a lot I could do for this scene besides not mess it up. Mounting my camera horizontally, I widened my lens all the way out to 12mm, put the top of the frame slightly above El Capitan (to maximize the amount of reflection below it—more sky would have meant less reflection), and used the snow-covered trees on both sides to frame the scene.
Depth of field wasn’t a factor, and very little contrast made metering easy. Wanting a fast enough shutter speed to freeze the falling snowflakes, I dialed to ISO 800 and f/9, which I quickly determined centered my (pre-capture) histogram at a more than adequate 1/250 second. Then I clicked a dozen or so images to ensure a wide variety of cloud formations and falling snowflake patterns, pausing occasionally to appreciate the moment.
This scene felt like a gift that I really didn’t want to overthink. I’m just grateful for the opportunity to photograph it (and the equipment that allowed me to do it justice).
An El Capitan Gallery
Click an image for a closer look, and to view a slide show.


Dare To Be Different
Posted on January 9, 2022
Snowfall, Tunnel View, Yosemite
Sony a7RIV
Sony 16-35 f/2.8 GM
1/15 second
F/9
ISO 100
What does it take to make a great landscape image? The answer to that question could fill volumes (so I hope you don’t expect the final word in one blog post), but for starters, it seems pretty obvious that a great landscape image should involve some combination of beautiful scene and compelling composition. Of course it’s possible for one side of that scale to tilt so strongly that it renders the other side all but irrelevant: I’m thinking about the masterful composition that manages to extract beauty from the most ordinary scene, or the scene that’s so spectacular that it would be virtually impossible to not return with a beautiful image.
But as much as photographers should strive for the former, I’m afraid ubiquitous cameras and information have given us too much of the latter—because it’s easier. Not only can today’s photographers learn where to be and when to be there with the tap of an app (or the click of a mouse), even when unexpected beauty suddenly materializes before our eyes, we’re almost certainly armed with a tool to capture it. Add to this the power of today’s computers and software to actually manufacture beauty (don’t get me started…), and I’m concerned that the world is becoming numbed to the appreciation of photography as a craft—the ability to see the less obvious beauty and convey it by deftly controlling the scene’s framing, motion, depth, and light.
This is especially relevant to me because I make my living serving people who dream of getting “the” shot at my workshop locations. Usually they’ve seen some other photographer’s version of their “dream” shot and simply want one of their own to display and share. Whether it’s sunset light on Horsetail Fall, a lightning strike at the Grand Canyon, or fresh snow at Tunnel View, I completely understand their motivation and I do everything in my power to make it happen (I love photographing these things too). But still…
In addition to helping my workshop student get their dream image, I also encourage them to make these shots their starting point, not their goal. Photograph the icons without shame, but don’t stop there, also find your own perspective on the scene’s beauty. That could be identifying a foreground element that complements a glorious background, going vertical when the obvious composition is horizontal, introducing motion or focus blur to part of the scene, or any number of large or small compositional twists.
My own approach when photographing a scene imbued with obvious inherent beauty—such as a spectacular sunset, vivid rainbow, or breathtaking vista—is to remind myself not to settle for something I’ve already done, no matter how beautiful it might be. While that’s a relatively small challenge at new or less familiar scenes, this approach makes familiar places like Tunnel View in Yosemite (arguably the most beautiful vista on Earth, and one that I’ve photographed more times than I can count) a much higher photographic bar to clear. So high, in fact, that I rarely take out my camera at Tunnel View anymore. (Well, at least that’s the mindset when I get there—I’m a sucker for this scene and sometimes can’t resist photographing a beautiful moment here because some scenes are too beautiful to ignore—but you get the point.) Even still, these days I pretty much only photograph Tunnel View when I can include some a scecial, transient element, like the moon or a rainbow. Or fresh snow.
Last month my Yosemite Winter Moon workshop group had the immense good fortune to start just as a cold winter storm finished dropping 8 inches of snow on Yosemite Valley. For a couple of reasons, we started at Tunnel View—first, because it’s the best place to introduce first-timers to Yosemite’s majesty; second, it’s probably the best place in Yosemite to view a clearing storm. The scene that greeted us was as spectacular as you might imagine—and as also you might imagine, it wasn’t something I hadn’t seen before.
My original plan was to keep my camera in the car, but once I got everyone settled into their spots and was confident they were content (and wanted to be left alone), I couldn’t resist the beauty, no matter how familiar. Oh—and before I go any farther, let me make clear that I am not trying to say, nor do I in any way believe, that this image is more special than thousands of other Tunnel View images that preceded it (or even that were captured that day). I just want to use it to illustrate my approach, and the decisions that got me to something that turned out to be a little different for me. But anyway…
The first thing I usually I preach about photographing Tunnel View is to not go too wide. As beautiful as the entire view is, the real (permanent) visual action is between El Capitan on the left, and Leaning Tower (the diagonal, flat granite face angling up from Bridalveil Fall) on the right. Another problem at Tunnel View is that the sky in Yosemite is usually boring (cloudless), and the foreground trees are nothing special. So not only does the real estate left of El Capitan and right of Leaning Tower pale in comparison to the primary scene it bookends, composing wide enough to include that extra granite also means shrinking the best stuff (from left to right: El Capitan, Cloud’s Rest, Half Dome, Cathedral Rocks, Bridalveil Fall, Leaning Tower) while including more bland sky and trees. Therefore, my go-to lens for Tunnel View is my Sony 24-105 f/4 G lens. And when I want to isolate one or two of the primary features, I’ll switch to my Sony 100-400 GM lens.
But this afternoon, with the entire landscape glazed white, those scruffy foreground trees were suddenly a feature worthy of inclusion. So, rather than starting with the 24-105 on my Sony a7RIV, I reached for my Sony 16-35 f/2.8 GM lens. Going wider created another problem: that large tree on the left is a usually an obstacle, a potential distraction always that must be dealt with. My standard approach is to move to the right to completely eliminate the tree from my composition, but this afternoon the vista was so packed with gawkers and photographers that moving around without encroaching on someone else’s space was difficult-to-impossible. Because I got my group setup before grabbing a spot for myself, I’d found myself stuck farther to the left than I like, making my plan to shoot the scene extra-wide while eliminating the tree even more problematic. So, grateful once again for the snowy glaze, I decided to use my arboreal nemesis to frame the left side of my composition (if you can’t beat ’em…). For the right side of my frame, I chose to go wide enough to include a couple of more prominent trees in the middle distance, as well as the interesting clouds swirling near the rim behind them.
In any composition, the decision between sky and foreground always comes down to which is more interesting—in this case, despite some fairly interesting clouds overhead, those clouds couldn’t compete with the snowy foreground. To maximize the snowy foreground, I put the bottom of my frame in the homogeneous white snowbank at the base of the shrub line just a few feet below me—just low enough to allow me to include only the most interesting clouds.
And finally, because I know someone will ask, even with so much detail from near-to-far, at 20mm and f/9, my focus point was pretty much irrelevant (hyperfocal distance was 5 feet). As something of a control freak in my photography life (understatement), I’ve always been a manual focus evangelist, but I’m getting lazy in my old age and in this case I just hit my back-button focus button to autofocus somewhere in the scene (wherever the focus point happened to be), then clicked with the knowledge I’d be sharp throughout.
More Tunnel View Magic: One Spot, Many Takes
Click an image for a closer look, and to view a slide show.


2021 Highlights: Looking Back, Looking Forward
Posted on January 2, 2022


Last week I shared a brief summary of the year just passed; this week I offer the fruits of all that labor.
Leading photo workshops for a living, I spend a lot of time in places I’ve visited many times, but it seems each spot feels more a part of me with each visit. This year in particular, I sought opportunities to add the Milky Way, a moonrise, fresh snowfall, an electrical storm, or some other transient natural phenomenon to my scene to further elevate these familiar landscapes.
But thrilling images notwithstanding, for me, and I suspect (hope?) for many, the true joy of nature photography isn’t the image itself, it’s the chase—all the planning and physical sacrifice that made it possible—as well as the humbling awe of being there. Last year, despite its difficulties, was chock-full of those experiences.
As you may have guessed, many of the scenes in the gallery above were shared with workshop participants. It took losing more than a dozen workshops to the pandemic to fully appreciate how much it lifts me to experience Nature’s best displays with people who are as awestruck as I am, and I felt blessed to get that back in 2021.
On the other hand, I feel similarly blessed for those rare opportunities to commune with Nature in meditative solitude. With 16 workshops last year (and all the planning and organization they required), I had precious few truly private photo moments in 2021. But the opportunities I did have still resonate clearly.
Looking forward
Another thing that happens when I review images from the year just ended is a reminder of the visual treats in store for the coming year. I have no idea what I’ll see in 2022, but I’ve been doing this long enough to know that I’ll create more images that thrill me, and more memories to sustain me.
Thanks to each of you for your support, in whatever form that takes. Whether you’re a workshop student, an avid follower, or just a casual browser, I’m so happy you’ve joined me on this amazing ride.
See more in my…
2021 Highlights Gallery
2021 In Review: Pedal to the Metal, While Tapping the Brakes…
Posted on December 26, 2021

Massive Moonrise, El Capitan, Yosemite
Sony a7RIV
Sony 200-600 G
Sony 2x teleconverter
ISO 400
f/16
1/80 second
As COVID started ravaging my workshop schedule way back in March 2020, my private mantra was, “Just hang on until August.” As we approach our third pandemic year with the Omicron variant raging, how misguided that dream feels today. While 2020 was pretty much lost to COVID, 2021 was the year things seemed poised to return to normal. And while not the Disney happy ending I’d envisioned, in many ways that proved true.
Even though I had to postpone my 2021 January workshops—one in Death Valley, as well as the Iceland workshop I do with Don Smith—it seemed things were improving. And improve they did: In quick succession I did two Yosemite workshops in February, followed by three more Yosemite workshops, one each in March, April, and May. Another 2021 spring highlight came in May, when I returned to the Grand Canyon for my beloved raft trip. Amidst all this, Don Smith and I managed to get in our April Oregon Coast and Columbia River Gorge workshops. So far, so good.
Despite missing most of 2020 and a few COVID-related inconveniences, these resurrected workshops felt surprisingly normal—not only was I thrilled to get back to my locations, spending time with the groups reminded me how much I missed having people to share the beauty with. And it seemed the people in my groups were just as happy to return to nature, and to interact with others in the relative safety of the great outdoors, as I was.
Approaching mid-year, Don and I did lose our spectacular New Zealand workshop for the second year in a row, but we’d been resigned to that for many months and had a solid plan in place. I was actually philosophical about the New Zealand loss, rationalizing that I was ready for a breather following my brutal spring schedule, and the similarly ambitious schedule coming in the second half of the year (trying to make up for my 2020 losses).
The second half of the summer was back to pedal-to-the-metal mode, with three Grand Canyon workshops (back-to-back-to-back) in July and August, followed by a return to the Big Island of Hawaii in September. Autumn didn’t get any easier, with back-to-back Eastern Sierra workshops in September and October, and another Yosemite workshop in November.
If all this seems like a lot, let me assure you, it was. But, in the midst of this breakneck pace, October brought a real tap-the-brakes moment: Despite COVID precautions and all 11 participants/leaders fully vaccinated, following my second Eastern Sierra workshop, 7 people (including me) tested positive for COVID. Fortunately, no one became seriously ill (I felt like I had a moderate cold for less than a week—no fever, headache, or fatigue, but 4 days with absolutely no sense of smell). I know it would have been far worse had we not been vaccinated—a blessing for which I’ll be eternally grateful—but it was a reminder to stay vigilant.
The grand finale
Fully recovered, I wrapped up my busy year in December with a spectacular Yosemite workshop. This “Winter Moon” workshop delivered ample portions of both winter and moon—lots of snowfall that gave way to clear sky just in time for the full moon on our final shoot.
Fellow Yosemite (among other places) photographer Michael Frye was doing a workshop at the same time, but we communicated regularly and adjusted our plans to prevent our groups from ending up at the same spots at the same time. After learning that we both planned to be at Tunnel View for Friday’s sunset moonrise (we agreed there’d be enough room to make it work), an event that was no secret to the photography community in general, I knew it would be crowded.
While there’s quite a bit of room at Tunnel View, it’s not infinite, and parking can sometimes be a problem, so I got my group up there about 90 minutes before sunset (and about 75 minutes before the moon would appear). While we waited, I made sure everyone knew when and where the moon would appear, and encouraged them to work on compositions before the moon appeared.
Though I had two tripods with me, I didn’t think it would be fair for one person to take two spots and instead just set up one tripod and readied two bodies and lenses: a Sony a7RIV with my Sony 200-600 G and Sony 2X Teleconverter (1200mm), and a Sony a7RIV with my Sony 24-105 G. My plan was to start with the telephoto body as the moon appeared, then switch to the wider body as the moon climbed and moved away from El Capitan.
As you can see, the workshop grand finale was a spectacular success. The moon appeared near the (barely visible) frozen trickle that will become Horsetail Fall just a few minutes before sunset, just as the day’s last light kissed El Capitan. I shared one of the wider images in last week’s post; this week I’m sharing a 1200mm image from shortly after the moon’s arrival.
Note the size of the moon in these two images that were taken on the same night, from the same location. While it would be spectacular to have the large moon in the scene with both El Capitan and Half Dome, that would be impossible from any earthbound vantage point. From Tunnel View, magnifying the moon with a 1200mm focal length only gives me a small fraction of El Capitan, while widening the scene enough to include both of Yosemite’s granite icons shrinks the moon to small disk. The results are so different, I won’t even try to suggest that one is “better” than the other.
Epilogue
So, in case you weren’t keeping score, in 2021 I had 3 workshops rescheduled, while adding 16 workshops notches to my belt—a personal record. Yet despite this very productive year, 2021 didn’t usher in the Disney happy ending I’d hoped for. It seems very possible that Don and I will lose New Zealand again in 2022, and Omicron has forces to reschedule one of the two Iceland workshops scheduled for January.
My other 2022 workshops are still on schedule, but I’m monitoring Omicron closely and hoping it fades as quickly as it started (monitoring positive signs from South Africa and other countries ahead of us—with fingers crossed).
Workshop Schedule || Purchase Prints || Instagram
2021 Highlights


