Eloquent Images by Gary Hart
Insight, information, and inspiration for the inquisitive nature photographer
Chasing the Northern Lights
Posted on September 29, 2019

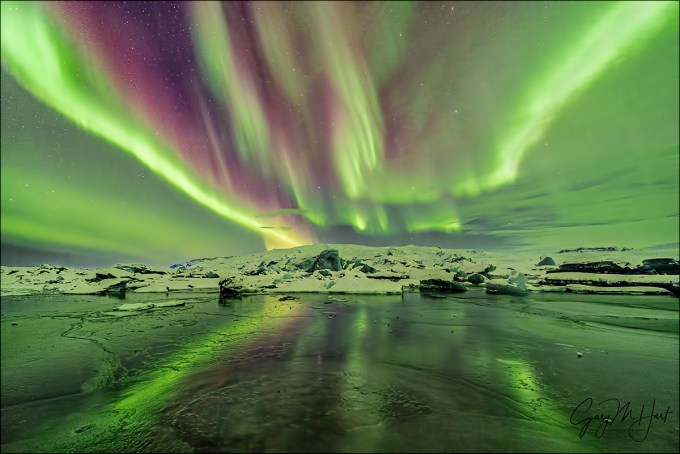
Aurora on Ice, Glacier Lagoon, Iceland
Sony a7SII
Sony 12-24 f/4 G
15 seconds
F/4
ISO 16,000
Aurora Streaks, Glacier Lagoon, Iceland
Sony a7SII
Sony 16 – 35 f/2.8 GM
6 seconds
F/2.8
ISO 6400

Northern Lights Reflection, Aurora and Glacier Lagoon, Iceland
Sony a7SII
Sony 16 – 35 f/2.8 GM
8 seconds
F/2.8
ISO 3200
After finally witnessing a total solar eclipse and declaring it the most beautiful thing I’ve ever seen, I started hearing people say things like, “Wait until you see the northern lights.” So when fellow pro photographer Don Smith and I planned an Iceland photo trip to prepare for our upcoming photo workshop, we chose January because it’s right the heart of northern lights season. Could the northern lights’ beauty really rival a total solar eclipse? (Spoiler alert: Yes.)
An Aurora Primer
Our planet is continuously bombarded by solar energy. When this perpetual solar wind encounters Earth’s atmosphere, a narrow range of wavelengths (infrared and visible) passes through to warm us and light our way. But other energy wavelengths in the solar wind interact differently with the molecules they encounter, creating an charge imbalance by stripping electrons.
Instead of penetrating our atmosphere to create havoc on Earth’s surface, most of these charged particles (ions) are intercepted by the magnetosphere, our protective magnetic shield. The magnetosphere is teardrop shaped, with the battered side that faces the sun compressed, and the shielded side behind Earth stretching much farther into space.
As Earth rotates, at any given moment the side facing the sun (the daylight side) looks out through the thinner, compressed side of our magnetosphere, while the night side of Earth faces the extended region of the magnetosphere. Just as the upwind face of a wall or building breaks a wind, the sunward side of the magnetosphere sheds the charged particles and channels them to upper regions of Earth’s leeward (night) side. It’s these ionized molecules dancing high in the night sky that cause an aurora.
The result of these atmospheric machinations is an atmospheric oval of geomagnetic activity corresponding to the intensity of the solar wind—the greater the activity, the greater the oval’s area and the intensity of its aurora activity. The aurora’s color depends on the molecules involved. The most plentiful and frequently activated molecules vibrate in the green wavelengths, but reds and blues are possible as well, depending on the intensity and altitude of the activity.
As with terrestrial weather, there’s no such thing as an aurora “sure thing”—the best we can do is put ourselves in position to be as close to the auroral oval, on nights with the greatest chance for auroral activity. Planning a winter trip to the high latitudes (the higher the better), like Iceland, is a good start.
Another key to aurora chasing is understanding and monitoring the Kp- (or K-) index. The Kp-index is a 0-9 scale of atmospheric electromagnetic activity, with 0 being little or no activity (get some sleep), and 9 being the most extreme activity (don’t forget the sunglasses). Many governments and scientific organizations issue regular Kp forecasts that seem about as reliable as a weather forecast—pretty good, but far from perfect. There are many websites and smartphone apps that will provide you with up-to-date Kp forecasts for your current location—some will even issue alerts.
Let the chase begin
Armed with more knowledge than experience, in the last week of January we set out for Iceland’s frozen hinterlands with visions of auroras dancing in our heads. Fortunate for us, our guide was an Iceland native and an excellent photographer with years of northern lights experience.
By day we photographed all the winter-accessible locations on Iceland’s Snæfellsnes Peninsula and South Coast, benefiting greatly from winter’s 2-hour sunrises and sunsets and a sun that never rose higher than 8 degrees above the horizon. And by night we bundled up and ventured into the frigid dark seeking an electric light show.
For our nightly aurora hunt we’d drive to a pretty scene that had both dark skies (not hard to find in Iceland) and a clear view of the northern sky. There we’d sit for an hour or two, fogging the windows in the guide’s spacious Suburban, regularly stepping into the cold darkness to scan the sky.
We quickly learned the uncertain, frustrating nature of aurora hunting. Nights with potential were stifled by clouds; nights with clear skies were Kp washouts. So with just two nights in Iceland remaining, I was getting a little anxious.
The final two nights would be spent near Glacier Lagoon, a magnificent ocean inlet dotted with floating icebergs and a patchwork of thin ice and reflective water that created an ideal foreground for the northern lights.
The forecasts for Wednesday, our penultimate night, were clear skies, and a 1 or 2 Kp index. Not great, but the best weather/Kp combination of the trip. And our guide assured us that even Kp 1 can deliver an aurora, and Kp 2 can be a very nice display. Pulling into the Glacier Lagoon parking lot beneath a beautiful star-studded sky, we saw no aurora. So we waited.
Soon what I swore was fog appeared above the lagoon, but the guide insisted this was the beginnings of northern lights. Dubious, we followed him down to the lagoon and I was thrilled (understatement) when a long exposure revealed not fog, but my first view of the northern lights! We spent a couple of hours photographing a low-hanging, fuzzy green haze, occasionally infused with hints of red. Except for just a few minutes at its peak, the aurora we photographed that night had no real definition, but I really didn’t care because I could check northern lights off my bucket list. Little did I know that the show that night was just a warm-up for the next night’s experience.
The Kp forecast for Thursday night was 4 or 5, which our guide told us was perfect because anything more than Kp 5 can be too bright. The weather was a different story and all we could do was watch the sky all day and hope. Despite a nearly 100 percent cloud cover at sunset, we optimistically headed back to the lagoon.
Waiting in the lagoon parking lot, the clouds parted to reveal a faint aurora ebb and flow, but stayed in the car because, “This is no better than last night.” (One success and we’re already aurora snobs.) What looked promising out my north-facing side window one minute, all but disappeared the next. Then we noticed new activity in the western sky that went from 0-to-60 so fast that we bolted down to the lagoon like Keystone Cops. By the time I was set up the sky had transformed into a green and red psychedelic extravaganza.
The next two hours were a blur as I witnessed what was quite possibly the most beautiful sight I’ve ever seen in my life. Starting across the lagoon, in the western sky, the show gradually moved south (defying all my expectations), forcing me to constantly shift further up the lagoon to keep the ice and water in my foreground.
With my head on a swivel, I saw glowing tendrils stretch skyward, some touching both the east and west horizons, others pulsing, spiraling, and doubling back until felt like I was inside a giant lava lamp. At one point I tore my eyes from the show above the lagoon and saw the entire eastern sky ablaze with tangled green ribbons so intense that I turned my back on the lagoon and frantically scaled the snowy hill behind me for a better view in that direction. Over the course of maybe 20 minutes, that display rocketed heavenward, filled the entire eastern sky from horizon to zenith, shifted north, and finally back to the west and over the lagoon, forcing me race (and tumble) back down the hill.
The display was still going when we left, but at some point it just felt greedy to keep shooting (and we couldn’t wait to return to the hotel to count our riches).
Lessons learned
Getting a shot like this requires a significant amount of good fortune for sure, but all the good fortune in the world will do you no good if you don’t:
- Bundle up: Winter nights in the high latitudes might just be the coldest temperatures you’ve ever experienced—dress accordingly because few things will shorten or distract a great shoot faster than cold. In addition to a robust, hooded down jacket, I was comfortably toasty in a wool base layer, fleece, wool hat, balaclava, thin liner and heavy gloves, wool socks, and insulated boots
- Learn how to expose, compose, and focus in extremely low light.
- Spend some time before dark to find a foreground to go with your aurora, and look for spots with views in multiple directions. The northern lights are so spectacular, it’s easy to just show up and forget to compose the scene. And while the northern lights tend to concentrate in the northern sky, an intense display can appear in any direction.
- Monitor your exposure constantly: Unlike Milky Way and other night photography, aurora exposures can change by multiple stops in minutes and sometimes seconds. An exposure that worked to capture the aurora’s color and bring out foreground detail one minute, may completely blow out the aurora the next.
- Bring extra batteries (more than you think you’ll need) and keep them warm. (In extreme cold, li-ion batteries can go from 50% charged to exhausted in minutes.) It’s best to store batteries next to your body, and/or and or close to a heat source, like a hand-warmer pouch. And when a battery runs down, it may be reusable once it’s warmed.
- Don’t forget to set the camera aside and take a few minutes to truly appreciate what you’re witnessing.
Celestial Rewards
Click an image for a closer look and to view a slide show.


Monsoon Madness
Posted on September 22, 2019

Serpentine Lightning, Mather Point, Grand Canyon South Rim
Sony a7RIII
Sony 24-105 f/4 G
1/6 second
F/10
ISO 100
Every August for the last seven years, good friend and fellow pro photographer Don Smith and I have done a Grand Canyon Monsoon photo workshop where we attempt to, among many other things, photograph lightning. I say “many other things” because Grand Canyon doesn’t need lightning to be spectacular. And even without lightning, the monsoon storms that build above the canyon most afternoons add beautiful clouds, rainbows, and sunsets to the magnificent vistas. (We also try to include a Milky Way shoot.) But as nice as all that other stuff is, most people come for the lightning. Don and I do our best to establish realistic expectations, because as reliable as the summer monsoon is in the American Southwest, nothing weather related is a sure thing.
This year I got a reminder of that fact by watching the weather forecasts leading up to our workshops. Each year in the weeks before first workshop’s start date, I regularly (obsessively) monitor the Grand Canyon weather forecast. This is a futile exercise that does nothing but add stress because no matter what the forecast is, I get anxious. No lightning? Oh no! This year’s monsoon is a dud (a “nonsoon”). Lots of lightning? Oh no! All the good stuff will be over before we get there. Sigh.
Coming into this year’s workshops, Don and I had done 12 (two per year for six years). For the first few years, I’d estimate that in about half, everyone in the group captured multiple lightning strikes (in some groups the number of successes approached or exceeded 100). In many of the less successful workshop, a few people got lighting and a few didn’t. And a few were a complete shutout. But the last two years had been great, with everyone in both groups getting multiple strikes.
Part of this recent success I attribute to just plain good luck, and part I attribute to experience—Don and I have gotten better at preparing the groups, teaching lightning photography, troubleshooting Lightning Trigger and camera problems, reading and responding to the conditions, and simply knowing where to be and when to be there.
This year’s first workshop would start on July 31, but as July wound down, each day’s forecast called for blue sky. Blank. Blue. Sky. Maybe our run of good luck was about to end. Fire up the anxiety engines. Compounding my stress was the realization that this would be our 13th monsoon workshop. And we had 13 participants—I’m not a particularly superstitious person, but still…. (We normally cap our groups at 12, but a small administrative hiccup resulted in an extra enrollee.)
But, to make a long story just a little shorter, we needn’t have worried. On the day our first workshop started, Mother Nature flipped the lightning switch and by the end of the third day (of five), everyone in Group 1 had their lightning. Phew. As it turned out, that group ended up with multiple lightning opportunities. Halfway there….

Lightning Explosion, Oza Butte, Grand Canyon North Rim
The second group had to wait until the fourth day, and only got one good shot at it, but theirs was one of the most spectacular lightning storms I’ve ever witnessed (Lightning Explosion, Oza Butte)—both for its intensity and its proximity.
Don and I usually use the day between workshops to “recharge” (pun unavoidable), but at dinner that evening we’d been monitoring our (fantastic) lightning app, My Lightning Tracker Pro, we saw that lightning was firing nearby and just couldn’t resist going out on our own.
Picking the lowest hanging fruit, we ended up at easily accessible Mather Point. The show was well underway when we arrived, but didn’t need to wait long before our Lightning Triggers started firing. I captured a dozen or so frames with lightning that evening, some with multiple bolts, but the unique, circuitous path followed by one I share above was my favorite.
I recently rewrote the lightning explanation portion of my Lightning Photo Tips article. As you’ll read below, lightning always follows the easiest path to resolve its polarity discrepancy, so I wonder what atmospheric machinations caused this serpentine bolt.
Lightning Explained
A lightning bolt is the atmospheric manifestation of the truism that opposites attract. In nature, we get a spark when two oppositely charged objects come in close proximity. For example, when you get shocked touching a doorknob, on a very small scale, you’ve been struck by lightning.
The primary process at work in an electrical storm is convection, the circular, up/down flow that happens when heat is applied to a fluid. As air warms, it becomes less dense and rises. The rising air cools with altitude and becomes more dense, causing it to sink. But the sinking air warms as it loses altitude, eventually rising again, and the cycle continues…. (Convection is also the process behind the bubbling of boiling water.)
Convection’s up/down flow creates turbulence knocks together airborne molecules, striping their (negatively charged) electrons. Lighter, positively charged molecules are carried upward in the convection’s updrafts, while the heavier negatively charged molecules remain near the bottom of the cloud. Soon the cloud is electrically polarized, more positively charged at the top than it is at the base.
Extreme polarity can also happen when a negatively charged cloud base hovers above the positively charged ground. Either way, nature resist this charge disparity and tries to resolve it as fast as possible: a lightning bolt.
Nature always finds the easiest path. If the easiest path to electrical equilibrium is between the cloud top and bottom, we get intracloud lightning; if it’s between two different clouds, we get intercloud lightning. A cloud-to-ground strike occurs when the easiest path to equilibrium is between the cloud and ground.
With lightning comes thunder, the sound of air expanding explosively when heated by a 50,000 degree jolt of electricity. The visual component of the lightning bolt that caused the thunder travels at the speed of light, over 186,000 miles per second (from the human perspective, that’s virtually instantaneous, regardless of your distance on Earth). But lightning’s aural component, thunder, only travels at the speed of sound, a little more than 750 miles per hour—a million times slower than light.
Knowing that the thunder occurred at the same time as the lightning flash, and the speed both travel, we can estimate distance of the lightning strike. At 750 miles per hour, thunder will travel about a mile in about five seconds: Dividing the number of seconds between the lightning’s flash and the thunder’s crash by five gives you the lightning’s distance in miles; divide the interval by three for the distance in kilometers. If five seconds pass between the lightning and the thunder, the lightning struck about one mile away; fifteen seconds elapsed means it’s about three miles away.
One of the things I love most about photographing lightning at Grand Canyon is the ability to do it in relative safety. With a few notable exceptions (see Lightning Explosion above), most of the lightning we photograph is at least 10 miles away, distant enough that we rarely hear thunder. I won’t pretend that any lightning photography is completely safe because the safest place to be in an electrical storm is always inside. But standing on one Grand Canyon rim while waiting for lightning to fire on the other rim, as we did this evening, feels more like magic than madness.
Join me at Grand Canyon
Workshop Schedule || Purchase Prints
Monsoon Madness
Click an image for a closer look and to view a slide show.


Grand Canyon After Dark
Posted on September 15, 2019
Monsoon Milky Way, Cape Royal, Grand Canyon
Sony a7SII (single frame—no composite or blending)
Sony 24 f/1.4 GM
15 seconds
F/1.4
ISO 6400
On an impossibly balmy summer evening, this year’s first Grand Canyon Monsoon workshop group waited at Cape Royal (with more hope than optimism) for the Milky Way. We’d just photographed a beautiful sunset, courtesy of light from the setting sun that breached the nearly total cloud cover just enough for color to slip through. An essential part of our sunset success, those clouds were now an obstacle for our Milky Way plans. But this was our last night on the North Rim (where Milky Way photography is best), and we had nowhere better to be, so we decided to give the Milky Way an hour or so.
Cape Royal is nearly 8000 feet above sea level, so I’d come armed with a jacket, hat, and gloves to keep me comfortable during the long wait for complete darkness. They never left my bag. The first “star” to appear was Jupiter (yes, I know it’s a planet), followed by Saturn—especially good news because the Milky Way this summer is flanked by bright Saturn (on the left) and even brighter Jupiter.
Of all the things we do in these workshops, the night shoot might just be my favorite. Even the wait for darkness is fun—once everyone is composed, focused, and properly exposed, we all just kick back, relax, and enjoy the view as the stars start to pop out. On this evening we started shooting in earnest about 45 minutes after sunset, but it was immediately apparent that while the clouds were thinning, the fainter stars, and especially the Milky Way, were still somewhat obscured by a gauzy layer of clouds. But even even with the Milky Way not at its best, the night was so pleasant, and we were having so much fun, so we just kept going. And with each click it became more clear that the clouds were drifting south and the stars were popping out behind them.
We shot for an hour or so, with this image one of the night’s last. As with all my photography, it’s a one-click capture. I know it’s become popular to blend multiple images to get the best possible foreground and sky exposure, but I like doing it the old fashioned way.
One more thing
One of my favorite things to do on nights like this is to forget my camera and take time to appreciate what my eyes see. Not just the beauty, but what it all represents. Feasting my eyes on the Milky Way, I remind myself that the photons striking my eyes started their journey 25,000 years ago. The Grand Canyon? Unlike my Milky Way shoots at (now resting) Kilauea, where most of the landscape isn’t much older than I am (and some is in fact much younger), the Grand Canyon’s layered sediments represent more than a billion years of our planet’s history. Pretty cool.
Extra Credit
- Starlight Photography
- Milky Way Photography
- The Milky Way My Way (my night photography processing paradigm)
Or you can just join me at Grand Canyon next year
Workshop Schedule || Purchase Prints
Grand Canyon After Dark


Endless Possibilities
Posted on September 8, 2019

Winter Moonrise, Horsetail Fall and Half Dome, Yosemite
Sony a7RII
Sony 100-400 GM
ISO 200
f/10
1/160 seconds
This picture from last February features two beautiful photographic phenomena, one with (literally) thousands of cameras trained on it, the other virtually ignored. You might be surprised to learn that for most, the “main event” about to take place in this scene wasn’t the moonrise, it was the light on the thin stripe of waterfall trickling down the diagonal shoulder of El Capitan (the top is in shadow). But while (it seemed) virtually the entire photographic world was elbow-to-elbow in Yosemite Valley hoping for their shot at the day’s last light on Horsetail Fall, I was one of a half dozen or so photographers chilling at Tunnel View, waiting for the moon to rise.
When I’d arrived at Tunnel View and saw a herd of several dozen photographers already set up, I was initially heartened to think that so many photographers had foregone the Horsetail mayhem in favor of the moonrise. But why had they set up so far down the wall, behind trees that obstructed their view of Half Dome? It wasn’t hard to conclude that they weren’t there for the moon at all, they were there for Horsetail Fall. And as I waited for the moon, still more photographers showed up, and though there was plenty of room at spots with a far better view of the entire scene (including Horsetail Fall), every single new arrival crammed in to the scrum pointed at Horsetail Fall.
Photographing Horsetail Fall is kind of like dropping a quarter in a slot machine and hoping all the cherries line up: 1. Sun angle—the light’s right only at sunset for a couple of weeks in February (and October, when the fall is dry); 2. Snowmelt—no snowmelt, no waterfall; 3: Sunlight—all it takes is one cloud to block the sun and send everyone home disappointed. The jackpot? Some version of a picture that’s not much different from thousands (millions?) of other pictures.
Don’t get me wrong—the Horsetail Fall phenomenon is breathtaking, unique, and absolutely photo-worthy. But I do think that photographers, myself included, can be somewhat myopic when it comes to subject choice, deciding far too soon what “the” shot is and missing something even better as a consequence. And when they’re not sure what the shot is, instead of trusting their own vision, they just do what everyone else is doing.
We all could be a little better about considering photo opportunities beyond the obvious. Never is this more clear than in the image reviews in my photo workshops. In my image reviews everyone shares an image taken during the workshop (I project the image for all to see), and I offer constructive feedback. When I started doing workshops, I assumed that the prime benefit from the image reviews would be my “expert” critique, and while I like to think my suggestions do help, I didn’t anticipate how effective this image sharing is at conveying to everyone the unlimited possibilities each scene offers. We’re all photographing the same locations, but the variety of images always catches me off guard. In fact, I can’t tell you how many times I’ve looked at a workshop student’s image and thought, wow, how did I miss that?
It turns out the photographers who locked in on Horsetail this evening were disappointed. A rogue cloud, low in the west and unseen from Yosemite Valley, blocked the sun at just the wrong time. But that’s not the point—even if Horsetail Fall had lit up like red magma, there were other things to photograph in Yosemite that evening. And I wonder how many photographers would have opted to photograph the moonrise had they known about it.
I don’t share this image to pat myself on the back—I came to Yosemite specifically for this shot and didn’t really look for anything else. Therefore, it’s entirely possible that something even more special was happening behind me. (One reason I write these blogs is to remind myself of stuff like this.)
In life, we stop learning the instant we believe we have the answer. It’s equally true that photographers stop being creative the instant they “know” what the shot is. Our ability to grow as photographers is determined by our ability to open our eyes (and mind!) to the endless possibilities not yet visible.
An Evening’s Rewards
Alternate Perspectives
(Views Away from the Conventional Scene)
Click an image for a closer look and to view a slide show.


, California")


Starry Night
Posted on September 1, 2019

Starry Night, Lake Wanaka, New Zealand
Sony a7SII
Sony 16-35 f/2.8 GM
35mm
30 seconds
F/2.8
ISO 6400
It’s midnight and I’m right back where my day had started 21 hours earlier. Standing in the frigid dark beside Lake Wanaka, I feel equal parts energized and exhausted by the longest photography day of my life. And for the first time all day, I’m alone.
With the moon’s arrival still a couple of hours away, most of my attention is on aligning the Milky Way with the much photographed Wanaka willow tree. But photographing the Milky Way with the tree also put the glow of the Wanaka’s lights directly in my field of view. As someone who always strives to photograph the natural world untouched by humans, this would have been a deal-breaker for the old me. But what the heck—the reflection is crisp, the light’s amber glow illuminating the fog is kind of pretty, and since I’m already out here….
Once I embrace the moment, I’m free to click and enjoy. For most of this night the fog ebbed and flowed in the distance, adding character to the scene without subtracting too many stars. I’m having a blast, city lights or not. But eventually the fog starts to take over, slowly expanding upward until it completely swallows most of the Milky Way. Bedtime….
But just as I decide to pack it in, the fog pulls back and the stars briefly rally. Much of the Milky Way is still obscured, but the sky in the west has opened and I quickly reposition, pointing my camera away from the fog, city, and Milky Way, and toward the dark, pristine sky. As my exposure begins, long, undulating ripples stir the lake surface that had been still all night, and I’m concerned that I’ll loose my reflection. Instead, the long exposure smooths the ripples and stretches the brightest stars into oblong balls of light.
Read the story of this unforgettable day.
Join Don Smith and Me in New Zealand
Below is a rewrite of the Starlight Photography article in my Photo Tips section
Starlight Photography
With pretty much any mirrorless or DSLR camera, a sturdy tripod, fast lens, and just little knowledge, you can now capture landscapes beneath more stars than you ever imagined possible. A camera’s ability to accumulate light allows it to reveal stars far fainter than the naked eye sees; rapidly advancing digital SLR technology now enables usable (low noise) images at the extreme ISOs necessary for star-freezing shutter speeds in very low light.
Before you start
I’m starting with the assumption that you have a relatively new mirrorless camera or digital SLR, one that allows you to capture fairly clean (low noise) images at 3200 ISO or higher. You’ll need to be fairly comfortable with managing the controls in the dark, and know how to get it into manual and bulb modes. For star trails a locking remote release is essential (one that allows you to lock down the shutter rather than forcing you to hold it down for the duration of the exposure).
And of course don’t even think about trying any of this without a rock-solid tripod (you don’t need to spend tons of money, but neither can you assume any tripod will work). A wide (28mm or wider on full frame is best), fast (at least f/2.8, but the faster the better) lens is best. Oh yeah, and take off your polarizer.
Test frame
Moonlight photography is great for photographing landscapes beneath a few bright stars, but a sky filled with stars (and maybe even the Milky Way) can only happen when there’s no moon and city light washing out the faint stars.

Milky Way Reflection, Colorado River, Grand Canyon
When I go out on a moonless night, whether my goal is pinpoint stars, star trails, or both, I start with a test frame to determine the amount of light my planned image requires. The test frame also allows me to check my exposure, focus, level, and composition in light that’s nearly opaque to my eyes.
My initial test frame is usually no more than a 30-second, high ISO (the goal isn’t a usable image, it’s solely to determine exposure, focus, and composition) and my lens’s widest aperture. After each click I check my composition and focus, adjust, and reshoot. The first frame is mostly to gauge the light; subsequent frames refine both the exposure and composition. I’m usually ready to go after two or three test frames.
Once I have an exposure that works (the desired combination of stars and foreground light), I just need to decide which shutter speed will give me the star effect I want—short for pinpoint stars, long for star trails. With that, finding the ISO and/or f-stop that adds or subtracts the light subtracted or added by my chosen shutter speed is just simple math.
For example, let’s say my test exposure was perfect at ISO 12,800, f/2.8, and 30 seconds. A 30-minute star trail image will gather a lot more light (than my 30-second test exposure), so I start by figuring out how many stops 30 minutes adds to 15 seconds. Since I have to double ¼ minute (15 seconds) seven times to get to 32 minutes, I know going from 15 seconds to 32 minutes adds 7 stops of light. (2×1/4=1/2 minute -> 2×1/2=1 -> 2×1=2 -> 2×2=4 -> 2×4=8 -> 2×8=16 -> 2×16=32.)
Finding focus
A moonless night doesn’t have enough light to see the controls on your camera, the contents of your bag, and the tripod leg you’re about to kick. Needless to say, there’s not enough light to focus either, at least in the traditional ways.
Because we’re usually wide, and very rarely concerned about close detail, all of our night subjects are probably at least 25 feet away with an infinity focus point. Unfortunately, that old prime lens habit of twisting the focus ring to the end for infinity focus doesn’t work on a zoom lens—every focal length has a different focus point (I’ve found this to be true even for lenses labeled parfocal). While I’ve simplified my night photography by usually going with my Sony 24mm f/ 1.4 GM lens, when I do use a zoom (usually my Sony 16-35 f/2.8 GM), I almost always use it at its widest focal length. Not only does a wide lens maximize the amount of sky in my frame, the extra depth of field increases my range of focus tolerance. And sticking with a single focal length reduces the times I need to mess with focus—once I get it sharp, I’m done with the focus hassle.
Despite the hardships, there are a number of methods for focusing at infinity in the dark. Here they are in my order of preference:
1. Autofocus on a bright planet or star. Some camera/lens combinations have excellent autofocus (the faster the lens, the better). I always start by picking out the brightest planet/star. Venus is great, but it won’t be up during the darkest hours of the night. Jupiter, Saturn, and Mars can work, as can Sirius and maybe a few other bright stars. Regardless, you don’t need to know what you’re pointing at—find something bright in the sky, center it in your viewfinder, and try to autofocus. (Any bright, distant object will do—headlights, a plane overhead, whatever.) Don’t forget to take your lens out of autofocus as soon as it’s focused.
2. Live-view focus on a bright planet or star. With my camera on my tripod I center the brightest object in the sky in my viewfinder and lock it in place. I go into live-view mode, center the star/planet in the LV magnification square, then magnify the view to the maximum (it’s 10x on my Canon), and manually focus. Since switching to Sony mirrorless, this is my preferred focus technique and I rarely try 1 or 3.
3. Autofocus on a nearby flashlight. When all else fails, I have somebody stand 50 feet or so away with a flashlight and autofocus on that. If I’m by myself, I rest the flashlight on a rock (or whatever) and walk (stumble?, grope?) 50 feet away. Believe it or not, if I focus my 24mm f/1.4 lens (for example), on a point 50 feet away, I’ll be sharp from about 25 feet to infinity, so you should be fine too unless your lens is significantly longer (which I don’t recommend for night photography) or faster (lucky you). Don’t forget to take your lens out of autofocus as soon as it’s focused.
Don’t forget!: Because there’s no fixed infinity on a zoom lens, if you change your focal length, you must refocus. And no matter what method you choose to focus, you must check the sharpness on the LCD before assuming it’s sharp (once you’ve verified sharpness, you don’t need to refocus or check sharpness again until you change your focal length).
Composition

Moonlight and Milky Way, Lake Wakatipu, New Zealand
Because I love stars, and it’s the stars that really set a night image apart, most of my night images are at least 2/3 sky. The foreground is usually more of a placeholder, an excuse to dazzle you with the celestial ceiling. But that does not mean the foreground doesn’t matter. Quite the contrary, because the sky is a relative constant, the foreground is the difference between another pretty picture and something that pulls people to a print from across the room.
It’s not necessary, but when possible I always try to include something recognizable, such as the Milky Way (my favorite), or a recognizable constellation like the Big Dipper, Orion, or Cassiopeia. This is especially nice in pinpoint star images. If you don’t know the night sky, spend a little time familiarizing yourself with the major constellations—there are many, many smartphone apps to help with this.
Most people’s vision subconsciously runs along the long edge of an image. Since the primary feature or a night image is the sky, most of my night images are oriented vertically. Regardless of my orientation preference for a particular night shoot, I always make sure I have at least one vertical and horizontally oriented image.
I’m constantly on the lookout for a striking foreground to feature beneath a starry sky. Bold objects without a lot of intricate detail work well, such as a prominent or mountain. Reflective subjects, like water, granite, and sand, work well too.
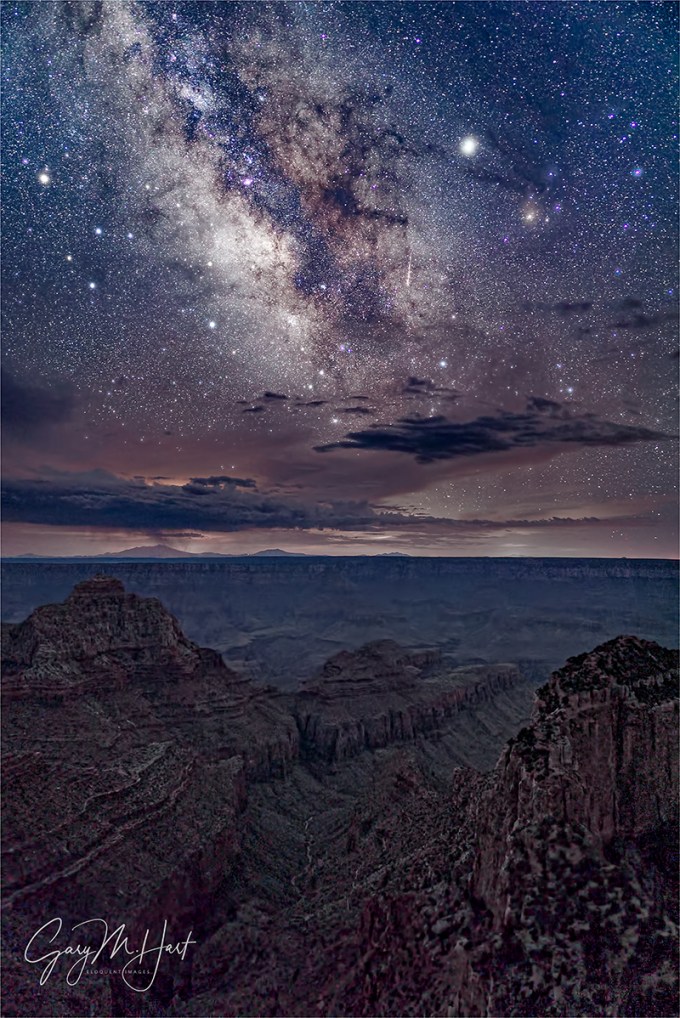
In Yosemite I like Half Dome for the way it stands out against the sky. For years I struggled getting enough light into the dark hole of the Grand Canyon at night, but today’s digital sensors and fast lenses have changed that. had better luck with Grand Canyon my star trail images because the long shutter time allows enough light at a very clean ISO. My current favorite location for night photography is New Zealand, which I always visit in June (winter). The skies are dark and clear, the nights are long (the Milky Way is up all night in June), and the foregrounds are off the charts
Star motion
Successful star photography is all about managing star motion—either minimizing their motion or maximizing it. Unfortunately there’s an inverse relationship between the number of stars you capture and your ability to freeze their motion—for any given ISO and f-stop, the longer your shutter is open, the more stars you’ll expose, but the more they’ll move during your exposure.
Pinpoint stars
Pinpoint star images require (relatively) fast shutter speeds to (more or less) freeze the stars’ motion; star trail images us long shutter speeds (either in one frame, or a series of blended frames), the longer the better, to maximize star motion. (Of course it’s not the stars’ motion we’re capturing, it’s Earth’s rotation against a fixed backdrop of stars, but you already knew that.)

Dark Sky Dreams, Lake Matheson, New Zealand
Some nights I shoot both pinpoint stars and star trails; other nights I only photograph pinpoint stars. Because a pinpoint star exposure is usually only 15 to 30 seconds, even after I’ve completed my test exposures, they’re the best way to make sure I have everything right before moving on to the quite lengthy star trail exposures.
I’ve seen a formula floating around that’s supposed to ensure pinpoint stars. It’s called the “Rule of 600” (or 500) and says: “Divide 600 by your focal length to ensure a shutter speed that will freeze the stars.” My concern with solutions like this is that they sound far more precise than they are, and they create a false sense of security, often leading to longer or shorter exposures than the scene calls for.
The problem is, the amount of motion is a function of (among other things) a star’s distance from the axis of rotation. For example the North Star, which is less than a degree from Earth’s north axis, will show very little motion in exposures of many minutes or even hours; Betelgeuse, on the other hand, because it’s near the celestial equator will show a significant amount of motion in just a few minutes. For pinpoint stars I think it’s more important to find an exposure that delivers enough light with the least amount of noise.
My biggest problem with exposure speed rules like this is that they can create a worse problem than they correct. Night photography is all about compromise—less than ideal aperture, ISO, and shutter speeds. To me the most unrecoverable compromise, the thing that will render an image unusable more than anything, is too much noise. I generally will forgive the slight amount of star motion of a 30-second exposure (that’s not usually even visible at standard viewing distance) if it saves me from a too dark foreground or unsatisfactory ISO. I find that I’m satisfied with my results if I keep my shutter speeds to 30-seconds and below—the faster the lens, the more likely I am to drop my shutter speed into the 10-20 second range.
I currently (as of September 2019) shoot with a Sony a7SII and Sony 24mm f/1.4 GM lens. I know I can get usable images that clean up nicely with noise reduction software (DxO Prime and/or Topaz DeNoise is my choice) at 12800 ISO, which allows me to stop down to f/2.0 and/or use a 10-second shutter speed. ISO 12800 is higher than I’d use with most cameras, but it seems today’s full frame (and even some APS-C) sensors do fine at ISO 3200, which might require a 30-second shutter speed to get enough light for the foreground.
The Milky Way

Spiral Galaxy (Milky Way look-alike): This is what our galaxy would look like from above. The individual stars are nearby neighbors who just got in the way—they’re not part of the galaxy pictured. (Photo courtesy of European Southern Observatory)
The Milky Way may just be the single most beautiful everyday feature of Earth’s night sky. Sadly, increased light pollution has made it all but unknown to the vast majority of us. Once upon a time observing the Milky Way’s glowing band stretching across the sky was for most people a matter of walking out and looking up on a dark, clear night; seeing it now usually requires planning and travel.
As most know, the Milky Way is the galaxy of which our Solar System is a very insignificant piece (the Sun is one star in nearly a half trillion). When you see the Milky Way, you’re looking toward our galaxy’s center and seeing the accumulated light of billions of stars. The dark areas you see aren’t areas without stars, they’re regions of interstellar dust so dense that it obscures all starlight (the occasional pinpoint of starlight in these dark regions are nearby stars between us and the galactic center).
Earth’s position in one of the Milky Way’s spiral arms is kind of like being in the distant suburbs of a large city. While all the discrete stars we view and imagine into constellations are the porch lights of our neighbors (technically they’re part of the Milky Way too, just as some cities have city limits that extend all the way out to the suburbs), when we view the Milky Way we’re looking beyond our neighborhood toward our galaxy’s distant, much more densely populated, urban skyline. Due to our Solar System’s skewed orientation (we don’t orbit the Sun on the same plane on which the Milky Way is laid out), parts of the Milky Way are visible regardless of the side of the Sun Earth is on.
The constellations the Milky Way “passes through” (from our perspective—in reality we’re looking through these constellations to the Milky Way center beyond) include Perseus, Cassiopeia, Lacerta, Cygnus, Aquila, Sagittarius, Ophiuchus and Scorpius, Norma, Circinus, Crux, and Carina. If you want to see it, simply pick one of these constellations, figure out when and where it will be visible (an star chart or app will do), pick a clear, moonless night, and position yourself a location

Milky Way and Jupiter, Tasman Lake, New Zealand
far from city lights. For example, in the Northern Hemisphere Cassiopeia is visible year-round more or less opposite the Big Dipper with Polaris (the North Star) in the center—you might be able to go out tonight to see it (assuming there’s no moon and you can get away from city lights).
But the Milky Way isn’t particularly bright in Cassiopeia—for most photographers (or anyone else who appreciates beauty) it’s the Milky Way center we’re looking for. For that Northern Hemisphere viewers need to look to the southern sky, toward Sagittarius, the constellation that aligns most closely with the Milky Way’s dense (most brilliant) center. And since the Sun is in or near Sagittarius (when we look in the direction of Sagittarius, we’re also looking toward the sun) in winter, we need to wait until Earth has circled around to the other side of the sun—summer.
In other words, viewing (and photographing) the Milky Way’s bright center is a summer (-ish—late spring and early fall will work too) activity. Get out your star chart/app and find a summer night when the moon is below the horizon while Sagittarius is above it (the closer to a new moon, the better your odds). Then get yourself as far from city lights as you can (mountains or desert are great), look to the south, and prepare to be awestruck. Stand there and appreciate the view for a while—when you’re ready to photograph, follow the instructions for pinpoint stars above.
Read more about photographing the Milky Way
Star trails
Many people enjoy great success photographing star trails by combining many consecutive, relatively short exposures. In general this approach reduces noise and results in a cleaner image. But since all my images are captured in a single frame (I’m a film shooter with a digital camera), you’ll need to look elsewhere for guidance on that method.

Bristlecone Star Trails, White Mountains, California
My star trail images are usually 20-30 minute exposures, which I find to be more than adequate to achieve the motion effect I’m looking for. Start with pinpoint star frames and stick with those shots until you’re happy with your composition, exposure, and focus. When you’re ready for star trails, without changing your composition, focal length, or focus:
- Turn on your camera’s long exposure noise reduction (most cameras have it, though it’s usually buried deep in the menu system). LENR isn’t necessary for pinpoint stars (though it may help slightly—results vary with the camera manufacturer), but it makes a noticeable difference in star trail images. The downside of LENR is that it doubles your exposure time because the camera takes a second exposure of the same duration with the shutter closed, compares the results, and subtracts whatever it finds in both images. That means if you take a 30 minute exposure, you’ll need to wait another 30 minutes before viewing your results (which is another reason you want star trails to be at the end of your shoot).
- Put your camera in Bulb mode. On some cameras Bulb mode is one of the choices on the Aperture Priority, Shutter Priority, Manual (and so on) dial; on others Bulb is the step after 30 seconds as you increase the shutter speed.
- Now it’s time to do your exposure math. Assuming you want the same exposure (amount of light) you have in the pinpoint star images, determine how many stops of light your star trail shutter speed will add, then subtract that amount of light with some combination of lower ISO and smaller aperture (larger f-stop number). For example, if your star trail exposure is 30 seconds at ISO 3200 and f/2.8, a 30 minute exposure would add 6 stops (technically a full 6 stops would be all the way to 32 minutes, but those extra two minutes are inconsequential). I usually get my ISO down as far as possible before subtracting light with my f-stop, so in this example I’d probably go with 30-32 minutes, ISO 100, f/4.
- Now you’re ready to shoot. If your camera allows you to block the light entering through the viewfinder, now’s the time to engage that (if you don’t know what I’m talking about, you probably can’t do it, so don’t worry about it). Click the shutter button on your remote, lock it down, and check your watch or set a timer.
- Enjoy the view.
Processing
Before I start, let me just say that there are just about as many processing approaches as there are photographers. And there are far fewer absolute right/wrong ways to do things than you might read/hear/see. So what I’ll tell you here is the way I process a night image, rather than the way to process night image. If you already have a workflow you like, or if somebody else tells you a way you like better mine, go for it.
I wouldn’t even consider photographing night scenes in anything but raw. Not only do jpeg captures reduce your margin for error, a jpeg capture makes processing decisions that are difficult to impossible to reverse.

Sky Light,The Milky Way and City Lights, Lake Wanaka, New Zealand
Lightroom
- Cool the color temperature: Since I photograph everything with auto white balance, in my raw processor (Lightroom) the first thing I do with a night image is cool the color temperature to introduce a little blue that gives the scene a more night-like feel. The temperature varies from image to image, but it’s usually in the 3,000-4,000 degrees range.
- Noise reduction: Lightroom/Camera Raw noise reduction is much improved, but I don’t use it as my final noise solution. Rather, I do a subtle de-noise with the Lightroom color and luminosity sliders (you’ll notice much more difference with the luminosity slider than you will with the color slider),
- Clarity: The Clarity slider brings out stars like magic, but you need to be careful about the noise it subtly (insidiously) increases right along with the stars. I’ve found that it’s easy to get so excited by what Clarity does to your stars that you overlook the more subtle damage it does to the noise in the image. I generally magnify my view to 1:1 and slowly pull my Clarity slider to the right, concentrating on the noise and ignoring the stars (as much as I can). I’ll be able to fix a little noise later with my Photoshop de-noise plugin, but I just try to be careful not to create additional problems for myself.
- Dehaze: Like Clarity, the Dehaze slider can make a night image look spectacular, but it’s extremely easy to overdo so be gentle.
- Standard Lightroom processing: While the above bullets are points of particular emphasis, that doesn’t mean that I don’t also apply the rest of my Lightroom workflow to a night image. Exposure, Highlights, Vibrance, Crop, and so on may or may not have their place in any given image.
Photoshop
- Noise reduction (since NR is an art in itself, I won’t go into it in great deal here): I use Topaz DeNoise; it’s the first thing I do when I bring an image into Photoshop. Depending on the rest of frame, I often select the areas most prone to noise (shadows, sky, clouds, etc.) and process them separately from the areas with lots of detail (which may not get an NR treatment at all, or a much gentler treatment that preserves detail).
- Dodge/burn: I find that many night images benefit from subtle dodge/burn brush strokes to smooth tone differences in the sky. For example, I often have to clean up slight vignetting, likely the result of shooting wide open (at an aperture far from the lens’s best). And sometimes I like to moderate the tone difference between the horizon line and the top of the frame. Another problem I occasionally encounter is a subtle brightness on one side of the frame or the other, caused by extraneous light (such as moonlight, nearby artificial light) leaking in from outside the frame.
- Content Aware Fill: The longer the exposure, the greater the chance of something unwelcome finding its way into your frame. Headlights and airplanes are by far the biggest offender. But since the advent of Content Aware Fill, I no longer stress about these things.
- Sharpen: Always my final step, I never sharpen an image until it’s sized for output. Especially with night photography, I selectively sharpen only those areas with important detail—dark shadows are never sharpened. And be careful when sharpening the sky—as with the Clarity slider, sharpening can make the stars pop but at the cost of extra noise. One trick I sometimes do after sharpening is brush with the history slider at around 85 percent (100 percent can sometimes create visible transitions) those areas of the sky without significant stars. And honestly, the more I do this, the less night image sharpening I do and in fact, I often do sharpen them at all.
- Standard Photoshop processing: While the above bullets are points of particular emphasis, that doesn’t mean that I don’t also apply the rest of my Photoshop workflow to a night image.
New Zealand Photo Workshop
Workshop Schedule || Purchase Prints
A Starlight Gallery


