Dogwood days
Posted on April 21, 2017

Forest Dogwood, Yosemite Valley
Canon EOS 5D Mark III
1/80 second
159 mm
ISO 800
F4
People ask all the time for my favorite season in Yosemite, and I really can’t give them an answer that doesn’t sound like a press conference by a waffling politician—there are things I love about each season in Yosemite, so asking me to choose is like asking me to pick a favorite child. But I can tell you what I like about each season, and I’ve always felt that spring in Yosemite is the most consistently photographable—it doesn’t really matter what the conditions are, I can always find something to photograph.
Spring is when Yosemite’s waterfalls peak, and Yosemite Valley starts to green up. Many of the meadows are home to ephemeral pools that reflect Yosemite’s iconic monoliths, soaring cliffs, and plunging waterfalls. And with all the water in the falls, spring sunshine means rainbow opportunities from many spots if you know when to be there.
Maybe my favorite Yosemite spring treat is dogwood, which usually peaks around May 1, give or take a week or two. I enjoy photographing dogwood in any kind of light, from sunshine, to overcast, to full shade. In sunshine, I put backlit blooms against a dark background, expose for the flower, and go to town. The translucence of these backlit flowers gives them a luminosity that appears to originate from within. In overcast and shade, I opt for soft focus that emphasizes my primary subject and reduces the background to colors, lines, and shapes.
Regardless of the light, I start with a bloom, group of blooms, or entire branch, that I can isolate from surrounding distractions. Once I identify a likely candidate, I maneuver myself until I can get the subject against a complementary background, such as shade, shape, and color.
I worked this scene for about a half hour before I was satisfied. I started with the flower-laden branch and moved around a bit until the background was right. Then I tried a variety of focal lengths to simplify, balance, and soften the composition. Once I was satisfied with my composition, I used live-view to focus toward the front of the center cluster. Finally, I ran the entire range of f-stops from f4 to f16, in one-stop increments, to ensure a variety of bokeh effects to choose from.
A Dogwood Gallery


Seeing the whole frame
Posted on April 14, 2017

Moonrise Reflection, Leidig Meadow, Yosemite
Sony a7R II
Sony/Zeiss 24-70 f4
1 second
F/10
ISO 100
Photographers are responsible for every square inch of their frame—not just the primary subject, but every other point of visual interest, and the relationships of those points to each other. Nevertheless, there’s a natural tendency give too much attention to the primary subject at the expense of the rest of the scene. The result is moments in nature that felt special in person fall flat in an image.
I’m a tripod evangelist because there’s just too much going on in most scenes to nail an image on the first click: Reviewing a hand-held image requires us to pull the camera down from the scene we just shot, while composing on a tripod, we can evaluate and refine without changing the prior shot, ensuring that each subsequent click is an improvement of the prior click.
For example
We wrapped up last week’s Yosemite Moonbow and Wildflowers workshop in Leidig Meadow, photographing Half Dome reflecting in small vernal pools. I’d spent most of the evening photographing about 30 feet west of this spot, mostly tighter (but still fairly wide) compositions that used the stump in the center of this frame as a foreground balance-point for Half Dome, and the tall trees splitting the middle to frame the right side. The sunset color had left Half Dome, and I saw that most of the group was starting to pack up.
The April full moon doesn’t align well with Half Dome, so it wasn’t a consideration in that night’s sunset plans. But because the moon (two days from full) rose about two hours before sunset, as the light faded I guessed that it might just about be high enough to top the valley wall. With low expectations I glanced toward the high ridge just east of Sentinel Rock (partially visible on the right in this image), where, what to my wondering eye should appear (oh, wait a minute, wrong story)…, and saw the glow of the moon’s leading edge pushing up through the trees.
I called out to the group and soon everyone was back in action. The window to could capture foreground and lunar detail in a single frame was closing fast, but I knew I’d need to relocate to include the moon effectively.
One important concept I try to convey to my workshop students is “visual weight,” the idea that elements in the frame draw the eye the way gravity tugs an object earthward. Visual weight isn’t quantifiable like gravity; it can vary with many factors that change with the conditions, perspective, and even the viewer (that is, visual weight isn’t entirely a function of the object the object itself). Qualities of an object than can pull the eye in an image include: size, brightness, color, contrast, position in the frame, and emotional connection (for example, the moon).
In this scene I felt that the moon and Half Dome carried equal visual weight: Half Dome for its bulk and iconic status, the moon for its brilliance and emotional pull. Given this, if nothing else I needed to balance the two of them in my frame, so I moved eastward along the pool’s bank until Half Dome and the moon were equidistant from their respective sides, connected by the diagonal of the ridge. The diagonal was a bonus, because another important concept is the power of diagonal lines, both literal lines or lines implied by a virtual connection between two objects, and their ability to generate visual tension by moving they eye along two planes at once.
My next concern was how to handle the rest of the scene. I try to avoid cutting strong elements in my frame, so I opted for a vertical that included all of the tall nearby evergreens and their reflection. This required nearly all the width my 24-70 lens offered (if I’d have had more time, I’d have switched to my 16-35), and shrunk the moon quite a bit. Since I’ve always believed that even a small moon (in a wide composition) carries lots of weight, I don’t usually worry too much about that if the rest of the composition calls for it, and I’m happy with my choice here.
With the primary subjects handled, I still needed to address the rest of the frame. My prime concern was the grass in the reflection—though it doesn’t carry nearly the visual weight of Half Dome and the moon, it does have some visual pull, especially the way it stands out against the pristine reflection. I try to avoid anything that my draws the eye to the edge of my frame, so after evaluating my first click on my LCD, I tweaked the composition slightly to keep the borders as free of grass clumps and blades as possible.
In a perfect world the large clump on the bottom left would have had a little more room around it, but the world rarely cooperates perfectly and I soon realized that going wider to give that clump more space would have introduced even greater distractions elsewhere. I was also aware that the stump that had been a focus point of my earlier compositions (lots of visual weight), in my new position was mostly swallowed by the reflection, but there was nothing I could do about that.
The hyperfocal distance at my current focal length and f-stop was 9 feet (focusing nine feet in would have given me “acceptable” sharpness from 4 1/2 feet to infinity), but since the closest grass was at least 10 feet away, I focused farther into the scene to ensure an even sharper background.
Exposing a scene like this on my Sony a7RII is so easy it feels like cheating: I just kept dialing my shutter speed longer until the “zebra” highlight alert appeared in the moon, then pushed the exposure another 2/3 stop knowing I could easily recover the moon’s highlights in Lightroom.
Though this was billed as a “Moonbow and Wildflowers” workshop, we got neither: clouds prevented us from photographing the moonbow in Yosemite Fall, and the wildflowers in Merced River Canyon weren’t quite ready for primetime. But I don’t think anyone in the group would trade what we got for what we’d planned. This workshop included (daylight) waterfall rainbows, multiple clearing storms, more reflections than we could count, and even a little snowfall. Our shoot this evening was a fitting finale.
Using the whole frame


A few of my favorite things
Posted on March 30, 2017
Yosemite Falls Reflection, Swinging Bridge, Yosemite
Sony a7R II
Sony/Zeiss 16-35 f/4
1/20 seconds
F/9
ISO 100
I love being a photographer, but it’s an unfortunate reality that turning your passion into your profession risks sapping the pleasure when earning money takes priority over taking pictures. When I decided to make photography my livelihood, it was only after observing other very good amateur photographers who, lulled by the ease of digital photography, failed to anticipate that running a photography business requires far more than taking good pictures. Rather than an opportunity for further immersion in their passion, their new profession forced them to photograph not for love, but to put food on the table. And with the constant need for marketing, networking, bookkeeping, collections, taxes, and just plain keeping customers happy, these newly minted photographers soon found that little time remained for the very thing that led them to become photographers in the first place.
I changed from photographer to Photographer about twelve years ago. After seeing what the change had done to others, my transition started with a vow to photograph only what I want to photograph, and to never photograph something simply because I thought I could sell it. In my case that meant sticking with landscapes: no people or wildlife (in other words, pretty much nothing that moves).
But how to make money? For that answer I had to look no farther than my career in technical communications: For five years I’d been a technical writer for a (very) large high tech company; before that I’d spent fifteen years tech training, supporting, documenting, and testing a programming language for a small software company. This experience, combined with a lifetime of camping, hiking, backpacking, and (of course) photographing throughout the western US, made photo workshops a logical choice. Today my workshops, supplemented by writing and print sales, allow me to pay the bills, visit favorite destinations, and explore new locations.
And most importantly, my new life has allowed me to concentrate on photographing the subjects and locations I love most. In no particular order (and far from all-inclusive), my favorite subjects include: poppies, the Milky Way, the moon (both crescent and full), rainbows, moonlight, fresh snow, dogwood, bristlecone pines, lightning, fall color, reflections. Among my favorite locations are Yosemite Valley, Grand Canyon’s North Rim, the Colorado River through the Grand Canyon, California’s foothills, Maui’s bamboo forest, and Kilauea Caldera.
Of course nothing beats photographing a favorite subject at a favorite location. To maximize my opportunity to combine favorite subjects and locations, I monitor weather forecasts, check local condition reports (to learn where the trees have turned or the wildflowers are blooming), study natural phenomena to learn how to anticipate an event (such as rainbows and lightning), and plot celestial alignments and add them to my calendar.
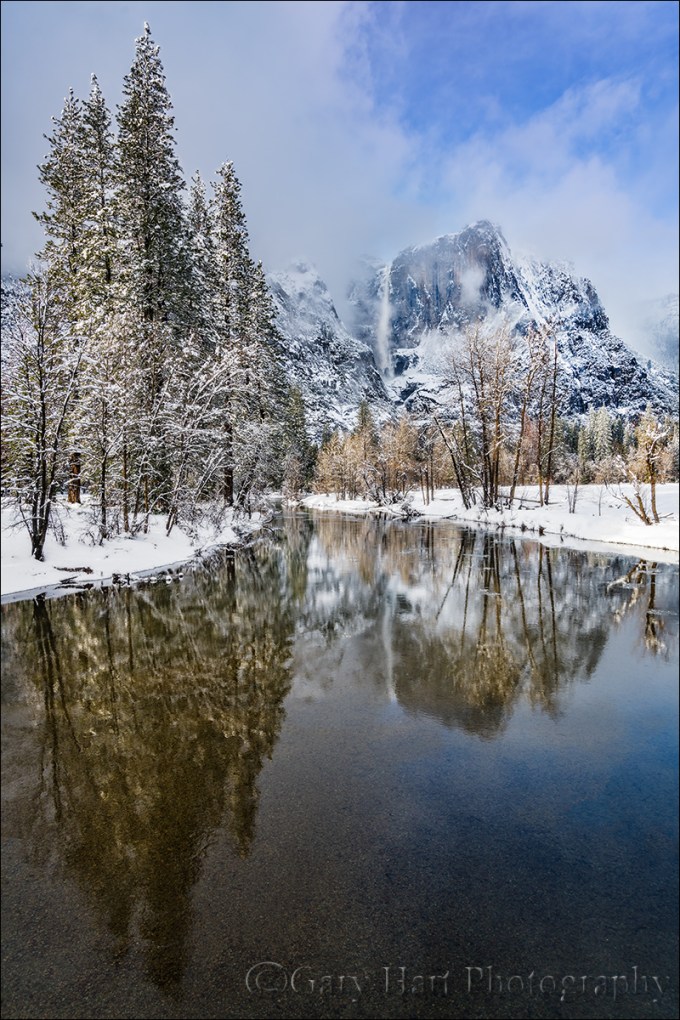
Despite (and more likely because of) a lifetime of visits, Yosemite Valley remains at the top of my favorite locations. I can’t give you a favorite season, but I can tell you that my favorite time to be in Yosemite is just after a snowstorm, when every exposed surface is glazed white and overhead swirls an ever-changing mix of clouds and blue sky.
Today’s image of snowy Yosemite with Upper Yosemite Fall reflected in the Merced River is the product of a week’s worth of monitoring weather reports and schedule shifting. That day started with a lock-down blizzard that obscured all views beyond 100 yards, but by late morning the clouds started to lighten and lift and soon the clearing was underway in earnest. Sometimes when a storm clears in Yosemite I’ll pick a spot and work it through the entire clearing process; on this day I took the other approach, moving around capture the clearing in a variety of locations.
I ended up at Swinging Bridge in mid-afternoon. The Merced River widens and slows here, making reflections possible even in high water months. Though Swinging Bridge no longer swings (but I remember when it did), it does bounce enough to jiggle a tripod at the slightest step. To minimize the vibration, I try to set up my tripod atop one of the bridge’s support pillars, but that didn’t give me the exact angle I wanted on this afternoon so I just needed to take extra care to stay still and time my clicks when the bridge was empty.
In the fifteen or so minutes I photographed here that afternoon I tried a variety of compositions, horizontal and vertical. I also played with my polarizer, sometimes maximizing the reflection, other times dialing it down to reveal the rocky riverbed below. Most of my compositions were a little tighter than this, but here I went with a vertical orientation wide enough to include lots of blue sky, and the trees and their reflection from top to bottom. My polarizer was turned to the partial range, enough to capture Upper Yosemite Fall’s reflection, while still revealing some of the submerged smooth stones nearer the bridge. The trees were partially lit by cloud-filtered sunlight just starting to break through.
A Gallery of my Favorite Things
Click an image for a closer look and slide show. Refresh the window to reorder the display.


Silent Night
Posted on March 21, 2017

Silent Night, Yosemite Valley from Tunnel View
Sony a7R II
Sony/Zeiss 16-35 f/4
20 seconds
F/5.6
ISO 1250
One perk of being a photographer is the opportunity to experience normally crowded locations in relative peace. That’s because the best nature photography usually happens at most people’s least favorite time to be outside: crazy weather and after dark. A couple of weeks ago in Yosemite I got the opportunity to enjoy both.
After spending a snowy Sunday guiding a couple around Yosemite Valley in a snowstorm, I dropped them back at (the hotel formerly known as) The Ahwahnee with nothing but the drive home on my mind. But winding through the valley in the fading twilight I saw signs of clearing skies and made a snap decision to check out the scene at Tunnel View.
I found the vista at Tunnel View gloriously empty. By the time I’d set up my camera and tripod the darkness was nearly complete, but as my eyes adjusted I could make out large, black holes in the once solid clouds overhead. Soon stars dotted the blackness above El Capitan and the white stripe of Bridalveil Fall. Each time light from the waxing gibbous moon slipped through the shifting clouds, the entire landscape lit up as if someone had flipped a switch.
Because the best parts of the view were in a narrow strip starting with the snow-glazed trees beneath me and continuing through the scene and up into the star-studded sky, I opted for a vertical composition. To include as much foreground and sky as possible, I went nearly as wide as my 16-35 lens would allow, more or less centering El Capitan and Bridalveil Fall to give the snow and stars equal billing.
Being completely comfortable with my a7RII’s high ISO performance, I didn’t stress the 1250 ISO that allowed me to stop down to a slightly sharper f/5.6 (virtually every lens is a little sharper stopped down from its largest aperture). Night focus with the Sony a7RII is extremely easy, easier than any camera I’ve ever used that isn’t an a7S/a7SII. Often I manually focus on the stars and use focus peaking* to tell me I’m sharp; in this case I back-button auto-focused on the contrast between the moonlit snow and dark granite near Bridalveil Fall. I chose a long enough shutter speed to capture motion blur in the rapidly moving clouds, knowing the potential for visible star streaking was minimized by my extremely wide focal length.
My favorite thing about that evening? The 20 seconds my shutter was open, when I didn’t have anything to do but stand there and enjoy the view in glorious silence.
* Focus peaking is a mirrorless feature that highlights in the viewfinder the in-focus areas of your scene.
Workshop Schedule || Purchase Prints
Yosemite After Dark
Click an image for a closer look and slide show.


Variations on a scene
Posted on March 14, 2017
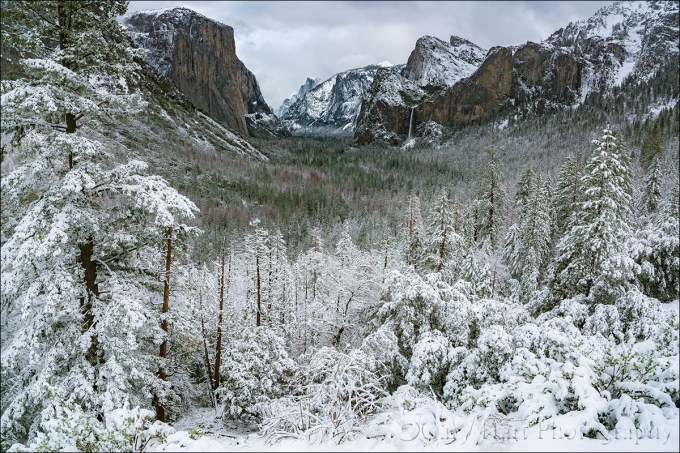
Snowfall, Tunnel View, Yosemite
Sony a7R II
Sony/Zeiss 16-35 f/4
1/250 second
F/9
ISO 100
A week or so ago I had the good fortune to be in Yosemite for the most recent snowfall there. All week the National Weather Service had been waffling a bit on the snow—based on the forecast, I probably wouldn’t have made the trip. But I was there anyway, guiding a fun couple from England for the weekend. Following a nice but unspectacular Saturday, we woke Sunday morning to find the world dipped in white.
The snow fell all day, at times so hard that that it was difficult to see more than a couple hundred yards, other times dwindling to a few flakes per minute. During one of the lulls we made our way to Tunnel View for the obligatory shot there. Despite hundreds (thousands?) of pictures of this view, after surveying the scene for a few minutes I couldn’t resist pulling out my camera and tripod.
My general feeling is that people tend to go too wide with their Tunnel View images, shrinking the main features (El Capitan, Half Dome, Bridalveil Fall) to include less exciting granite left of El Capitan and right right of Cathedral Rocks/Bridalveil Fall. That’s why I opt to tighten my horizontal Tunnel View compositions on the left and right, or isolate one or two of the three primary subjects with a telephoto. And when something exciting is happening in the sky (moon, clouds, or color) or foreground (fog, snow, rainbow), I’ll often compose vertically and bias my composition to favor the most compelling part of the scene.
With so many Tunnel View images in my portfolio, that afternoon I consciously set aside my long-held composition biases in favor of something I don’t already have. Of course the feature that most set the scene apart was the snow, so I set out to find the best way to emphasize it. Because the snow level that day was right around 4000 feet, also the elevation of Yosemite Valley, even the three hundred or so feet of elevation gain at Tunnel View resulted in much more snow virtually at my feet than on the distant valley floor. My Sony/Zeiss 16-35 f/4 lens, a great lens that I usually find too wide for Tunnel View, was perfect for highlighting the foreground snow.
Dialing my focal length to about 20mm allowed me to maximize the foreground snow while including minimal less-than-interesting gray sky. Of course going this wide meant shrinking the scene’s “big three” and adding lots of extraneous middle-ground on the left and right. To mitigate that problem I used the snowy pine on the left, often an obtrusive distraction to be dealt with, as a frame for that side of the scene. Not only did the tree block less interesting features, it actually enhanced the snowy effect I sought. On the right the diagonal ridge added a touch of visual motion (diagonal lines are so much stronger visually than horizontal and vertical lines), and it didn’t hurt that much of the bland granite there was covered with snow.
Workshop Schedule || Purchase Prints
A Tunnel View Gallery
Click an image for a closer look and slide show. Refresh the window to reorder the display.


Photograph the Milky Way: Part Two
Posted on March 9, 2017
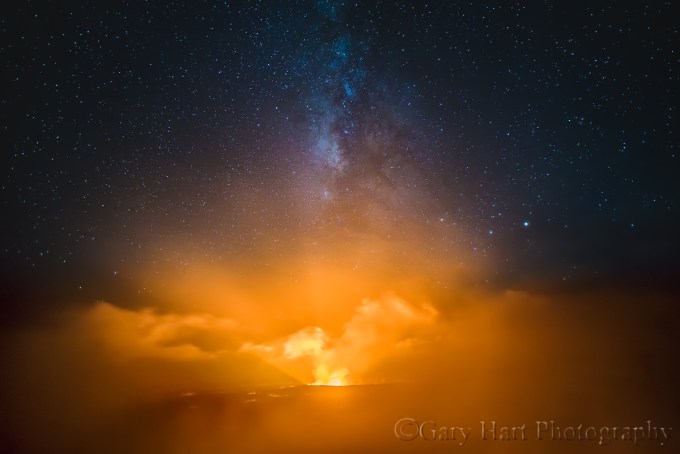
Fire and Mist, Halemaumau Crater, Kilauea, Hawaii
Sony a7S
Sony/Zeiss 16-35 f4
10 seconds
F/4
ISO 3200
Previously on the Eloquent Nature blog: Photograph the Milky Way: Part One
Viewing the Milky Way requires nothing more than a clear, dark sky. The Milky Way’s luminosity is fixed, so our ability to see it is largely a function of the darkness of the surrounding sky—the darker the sky, the better the Milky Way stands out. But because our eyes can only take in a fixed amount of light, there’s a ceiling on our ability to view the Milky Way with the unaided eye.
A camera, on the other hand, can accumulate light for a virtually unlimited duration. This, combined with technological advances that continue increasing the light sensitivity of digital sensors, means that when it comes to photographing the Milky Way, well…, the sky’s the limit. As glorious as it is to view the Milky Way with the unaided eye, a camera will show you things your eyes can’t see. In fact, not only does the right camera in the right hands resolve far more Milky Way detail than we can see, it also reveals color too faint for the human eye.
Knowing when and where to view the Milky Way is a great start, but photographing the Milky Way requires a combination of equipment, skill, and experience that doesn’t just happen overnight (so to speak). But Milky Way photography doesn’t need to break the bank, and it’s not rocket science.
Equipment
Bottom line, photographing the Milky Way is all about maximizing your ability to collect light: long exposures, fast lenses, high ISO.
Camera
In general, the larger your camera’s sensor and photosites (the “pixels” that capture the light), the more efficiently it collects light. Because other technology is involved, there’s not an absolute correlation between sensor and pixel size and light gathering capability, but a small, densely packed sensor almost certainly rules out your smartphone and point-and-shoot cameras anything more than a fuzzy snap of the Milky Way. At the very least you’ll want a mirrorless or DSLR camera with an APS-C (1.5/1.6 crop) size sensor. Better still is a full frame mirrorless or DSLR camera. (A 4/3 Olympus or Panasonic sensor might work, but I’ve not been overly impressed with the high ISO images I’ve seen from these smaller sensors.)
Another general rule is that the newer the technology, the better it will perform in low light. Even with their smaller, more densely packed sensors, many of today’s top APS-C bodies outperform in low light full frame bodies that have been out for a few years, so full frame or APS-C, if your camera is relatively new, it will probably do the job.
If you’re shopping for a new camera and think night photography might be in your future, compare your potential cameras’ high ISO capabilities—not their maximum ISO, but read some reviews to see how your camera candidates fare in objective tests by credible sources like DP Review or Imaging Resource (there are many others).
An often overlooked consideration is the camera’s ability to focus in extreme low light. Autofocusing on the stars or landscape will be difficult to impossible, and you’ll not be able to see well enough through a DSLR’s viewfinder to manually focus. Some bodies with a fast lens will autofocus on a bright star or planet, but it’s not something I’d count on (though I expect within a few years before this capability becomes more common).
Having photographed for years with Sony and Canon, and working extensively with most other mirrorless and DSLR bodies in my workshops, I have lots of experience with cameras from many manufacturers. In my book, focus peaking makes mirrorless the clear winner for night focusing. Sony’s current mirrorless bodies (a7R II, a7S, and a7S II) are by far the easiest I’ve ever used for focusing in the dark—what took a minute or more with my Canon, I can do in seconds using focus peaking with my Sony bodies. That said, of the major DSLR brands, I’ve found Canon’s superior LCD screen makes it much easier to focus in extreme low light than Nikon. (More on focus later.)
Lens
Put simply, to photograph the Milky Way you want fast, wide glass—the faster the better. Fast to capture as much light as possible; wide to take in lots of sky. A faster lens also makes focus and composition easier because its larger aperture gathers more light. How fast? F/2.8 or faster—preferably faster. How wide? At least 28mm, and 24mm or wider is better still. I do enough night photography that I have a dedicated, night-only lens—my original night lens was a Canon-mount Zeiss 28mm f/2; my current night lens is a Rokinon 24mm f/1.4.
Tripod
It goes without saying that at exposure times up to 30 seconds, you’ll need a sturdy tripod and head for Milky Way photography. You don’t need to spend a fortune, but the more you spend, the happier you’ll be in the long run (trust me). Carbon fiber provides the best combination of strength, vibration reduction, and light weight, but a sturdy (heavy) aluminum tripod will do the job.
An extended centerpost is not terribly stable, and a non-extended centerpost limits your ability to spread the tripod’s legs and get low, so I avoid tripods with a centerpost. But if you have a sturdy tripod with a centerpost, don’t run out and purchase a new one—just don’t extend the centerpost when photographing at night.
Read my tips for purchasing a tripod here.
Other stuff
To eliminate the possibility of camera vibration I recommend a remote release; without a remote you’ll risk annoying all within earshot with your camera’s 2-second timer beep. Don’t forget a flashlight or headlamp for the walk to and from the car. And it’s never a bad idea to toss an extra battery in your pocket.
Getting the shot
Keep it simple
There are just so many things that can go wrong on a moonless night when there’s not enough light to see camera controls, the contents of your bag, and the tripod leg you’re about to trip over. After doing this for many years, both on my own and helping others in workshops, I’ve decided that simplicity is essential.
Simplicity starts with paring down to the absolute minimum gear: a sturdy tripod, one body, one lens, and a remote release (plus an extra battery in my pocket). Everything else stays at home, in the car, or if I’m staying out after a sunset shoot, in my bag.
Upon arrival at my night photography destination, I extract my tripod, camera, lens (don’t forget to remove the polarizer), and remote release. I connect the remote and mount my lens—if it’s a zoom I set the focal length at the lens’s widest—then set my exposure and focus (more on exposure and focus below). If I’m walking to my photo site, I carry the pre-exposed and focused camera on the tripod (I know this makes some people uncomfortable, but if you don’t trust your head enough to hold onto your camera while you’re walking, it’s time for a new head), trying to keep the tripod as upright and stable as possible as I walk.
Flashlights/headlamps are essential for the walk/hike out to to and from my shooting location, but while I’m there and in shoot mode, it’s no flashlights, no exceptions. This is particularly important when I’m with a group. Not only does a flashlight inhibit your night vision, its light leaks into the frame of everyone who’s there. And while red lights may be better for your night vision, they’re particularly insidious about leaking into everyone’s frame (so before you ask, no red light!). If you follow my no flashlight rule, you’ll be amazed at how well your eyes adjust. I can operate my camera’s controls in the dark—it’s not hard with a little practice, and well worth the effort to learn. If I ever do need to see my camera to adjust something, or if I need to see to move around, my cell phone screen (not the phone’s flashlight, just its screen) gives me all the light I need.
Composition
A good Milky Way image is distinguished from an ordinary Milky Way image by its foreground. Simply finding a location that’s dark enough to see the Milky Way is difficult enough; finding a dark location that also has a foreground worthy of pairing with the Milky Way usually takes a little planning.
Since the Milky Way’s center is in the southern sky (for Northern Hemisphere observers), I look for remote (away from light pollution) subjects that I can photograph while facing south. Keep in mind that unless you have a ridiculous light gathering camera (like the Sony a7S or a7S II) and an extremely fast lens (f/2 or faster), your foreground will probably be more dark shape than detail. Water’s inherent reflectivity makes it a good foreground subject as well, especially if the water includes rocks or other features to add a little visual weight.
When I encounter a scene I deem photo worthy, not only do I try to determine its best light and moon rise/set possibilities, I also consider its potential as a Milky Way subject. Can I align it with the southern sky? Are there strong subjects that stand out against the sky? Is there any water I can include in my frame?
I’ve found views of the Grand Canyon from the North Rim, the Kilauea Caldera, and the bristlecone pines in California’s White Mountains that work spectacularly. On the other hand, while Yosemite Valley has lots to love, you don’t see a lot of Milky Way images from Yosemite Valley because there just aren’t that many south views there, and Yosemite’s towering, east/west trending granite walls give its south views an extremely high horizon that blocks much of the galactic core from the valley floor.
To maximize the amount of Milky Way in my frame, I generally (but not always) start with a vertical orientation that’s at least 2/3 sky. On the other hand, I do make sure to give myself more options with a few horizontal compositions as well. Given the near total darkness required of a Milky Way shoot, it’s often too dark to see well enough to compose that scene. If I can’t see well enough to compose I guess at a composition, take a short test exposure at an extreme (unusable) ISO to enable a relatively fast shutter speed (a few seconds), adjust the composition based on the image in the LCD, and repeat until I’m satisfied.
Focus
Needless to say, when it’s dark enough to view the Milky Way, there’s not enough light to autofocus (unless you have a rare camera/lens combo that can autofocus on a bright star and planet), or even to manually focus with confidence. And of all the things that can ruin a Milky Way image (not to mention an entire night), poor focus is number one. Not only is achieving focus difficult, it’s very easy to think you’re focused only to discover later that you just missed.
Because the Milky Way’s focus point is infinity, and you almost certainly won’t have enough light to stop down for more depth of field, your closest foreground subjects should be far enough away to be sharp when you’re wide open and focused at infinity. Before going out to shoot, find a hyperfocal app and plug in the values for your camera and lens at its widest aperture. Even though it’s technically possible to be sharp from half the hyperfocal distance to infinity, the kind of precise focus this requires is difficult to impossible in the dark, so my rule of thumb is to make sure my closest subject is no closer than the hyperfocal distance.
For example, I know with my Rokinon 24mm f/1.4 wide open on my full frame Sony a7S II, the hyperfocal distance is about 50 feet. If I have a subject that’s closer (such as a bristlecone pine), I’ll pre-focus (before dark) on the hyperfocal distance, or shine a bright light on an object at the hyperfocal distance and focus there, but generally I make sure everything is at least 50 feet away. Read more about hyperfocal focus in my Depth of Field article.
By far the number one cause of night focus misses is the idea that you can just dial any lens to infinity; followed closely by the idea that focused at one focal length means focused at all focal lengths. Because when it comes to sharpness, almost isn’t good enough, if you have a zoom lens, don’t even think of trying to dial the focus ring to the end for infinity. And even for most prime lenses, the infinity point is a little short of all the way to the end, and can vary slightly with the temperature and f-stop. If you know your lens well enough to be certain of its infinity point by feel (and are a risk taker), go for it. And that zoom lens that claims to be parfocal? While it’s possible that your zoom will hold focus throughout its entire focal range, regardless of what the manufacturer claims, I wouldn’t bet an entire shoot on it without testing first.
All this means that the only way to ensure night photography sharpness is to focus carefully on something before shooting, refocus every time your focal length changes, and check focus frequently by displaying and magnifying an image on your LCD. To simplify (there’s that word again), when using a zoom lens, I usually set the lens at its widest focal length, focus, verify, then never change the focal length again once I know I’m focused. And remember, the best way to ensure focus is to set your focal length and focus before it gets dark.
But sometimes pre-focusing isn’t possible, or for some reason you need to refocus after darkness falls. If I arrive at my destination in the dark, I autofocus on my headlights, a bright flashlight, or a laser 50 feet or more away. And again, never assume you’re sharp—always magnify your image and check it after you focus.
For more on focusing in the dark, including how to use stars to focus, read my Starlight Photo Tips article.
Exposure
Exposing a Milky Way image is wonderfully simple once you realize that you don’t have to meter because you can’t (not enough light)—your goal is simply to capture as many photons as you can without damaging the image with noise, star motion, and lens flaws.
Basically, you can’t give a Milky Way image too much light. What I mean by that is, capturing the amount of light required to overexpose a Milky Way image is only possible if you’ve chosen an ISO and/or shutter speed that significantly compromises the quality of the image with excessive noise and/or star motion.
In a perfect world, I’d take every image at ISO 100 and f/8—the best ISO and f-stop for my camera and lens. But that’s not possible when photographing in near total darkness—a usable Milky Way image requires exposure compromises. What kind of compromises? Each exposure variable causes a different problem when pushed too far:
- ISO: Raising ISO to increase light sensitivity comes with a corresponding increase in noise that muddies detail. The noise at any particular ISO varies greatly with the camera, so it’s essential to know your camera’s low-light capability(!). Some of the noise can be cleaned up with noise reduction software (I use Topaz DeNoise 6)—the amount that cleans up will depend on the noise reduction software you use, your skill using that software, and where the noise is (is it marring empty voids or spoiling essential detail?).
- Shutter speed: The longer the shutter stays open, the more motion blur spreads the stars’ distinct pinpoints into streaks. I’m not a big fan of formulas that dictate star photography shutter speeds because I find them arbitrary and inflexible, and they fail to account for the fact that the amount of apparent stellar motion varies with the direction you’re composing (you’ll get less motion the closer to the north or south poles you’re aimed). My general shutter-speed rule of thumb is 30-seconds or less, preferably less—I won’t exceed 30 seconds, and do everything I can to get enough light with a faster shutter speed.
- F-stop: At their widest apertures, lenses tend to lose sharpness (especially on the edges) and display optical flaws like comatic aberration (also called coma) that distorts points of light (like stars) into comet shaped blurs. For many lenses, stopping down even one stop from wide open significantly improves image quality.
Again: My approach to metering for the Milky Way is to give my scene as much light as I can without pushing the exposure compromises to a point I can’t live with. Where exactly is that point? Not only is that a subjective question that varies with each camera body, lens, and scene, as technology improves, I’m less forgiving of exposure compromises than I once was. For example, when I started photographing the Milky Way with my Canon 1DS Mark III, the Milky Way scenes I could shoot were limited because my fastest wide lens was f/4 and I got too much noise when I pushed my ISO beyond 1600. This forced me compromise by shooting wide open with a 30-second shutter speed to achieve even marginal results. In fact, given these limitations, despite trying to photograph the Milky Way from many locations, the only foreground that worked well enough was Kilauea Caldera, because it was its own light source.
Today (early 2017) I photograph the Milky Way with a Sony a7S II and a Rokinon 24mm f/1.4 lens. I get cleaner images from my Sony at ISO 6400 than got a ISO 1600 on my Canon 1DSIII, and the light gathering capability of an f/1.4 lens revelatory. Now I can stop down slightly to reduce lens aberrations, drop my shutter speed to 20 or 15 seconds to cut star motion 33-50 percent, and still get usable foreground detail by starlight.
I can’t emphasize enough how important it is to know your camera’s and lens’s capabilities in low light, and how for you’re comfortable pushing them. For each of the night photography equipment combos I’ve used, I’ve established a general exposure upper threshold, rule-of-thumb compromise points for each exposure setting that I won’t exceed until I’ve reached the compromise threshold of the other exposure settings. For example, with my a7SII/Rokinon combo, I usually start at ISO 3200, f/2, 20 seconds. Those settings will usually get me enough light for Milky Way color and a little foreground detail. But if I want more light (for example, if I’m shooting into the black pit of the Grand Canyon from the North Rim), my first exposure compromise is to increase to ISO 6400; if I decide I need even more light, my next compromise is to open up to f/1.4; if that still isn’t enough light, my next compromise is to bump my shutter speed to 30 seconds. Finally, if I want more light that ISO 6400, f/1.4, 30 seconds delivers, I’ll try ISO 12,800 (and cross my fingers)*. If that’s not enough, I go home (or just sit and enjoy the view).
These thresholds are guidelines rather than hard-and-fast rules, and they apply to my setup only—your results may vary. And even though I’m pretty secure with this workflow, for every Milky Way composition I try a variety of exposure combinations before moving to another composition. Not only does this give me a range of options to choose between when I’m at home and reviewing my images on a big monitor, it also gives me more insight into my camera/lens capabilities, allowing me to refine my exposure compromise threshold points.
* In normal situations the Sony a7SII can handle ISO 12,800 without even breathing hard, but the long exposure time required of night photography generates a lot of heat on the sensor with a corresponding increase in noise.
It’s time to click that shutter
You’re in position with the right gear, composed, focused, and exposure values set. Before you actually click the shutter, let me remind you of a couple of things you can do to ensure the best results: First, lower that center post. A tripod center post’s inherent instability is magnified during long exposures, not just by wind, but even by nearby footsteps, the press of the shutter button, and slap of the mirror (and sometimes it seems, by ghosts). And speaking of shutter clicks, you should be using a remote cable or two-second timer to eliminate the vibration imparted when your finger presses the shutter button.
When that first Milky Way image pops up on the LCD, it’s pretty exciting. So exciting in fact that sometimes you risk being lulled into a “Wow, this isn’t as hard as I expected” complacency. Even though you think everything’s perfect, don’t forget to review your image sharpness every few frames by displaying and magnifying and image on your LCD. In theory nothing should change unless you changed it, but in practice I’ve noticed a distinct inclination for focus to shift mysteriously between shots. Whether it’s slight temperature changes or an inadvertent nudge of the focus ring as you fumble with controls in the dark, you can file periodically checking your sharpness falls under “an ounce of prevention….” Believe me, this will save a lot of angst later.
And finally, don’t forget to play with different exposure settings for each composition. Not only does this give you more options, it also gives you more insight into your camera/lens combo’s low light capabilities.
The bottom line
Though having top-of-the-line low-light equipment helps a lot, it’s not essential. If you have a full frame DSLR that’s less than five years old, and a lens that’s f/2.8 or faster, you probably have all the equipment you need to get great the Milky Way images. Even with a cropped sensor, or an f/4 lens, you have a good chance of getting usable Milky Way images. If you’ve never done it before, don’t expect perfection the first time out. What you can expect is improvement each time you go out as you learn the limitations of your equipment and identify your own exposure compromise thresholds. And success or failure, at the very least you’ll have spent a magnificent night under the stars.
Workshop Schedule || Purchase Prints
A Milky Way Gallery
Click an image for a closer look and slide show. Refresh the window to reorder the display.


Photograph the Milky Way: Part One
Posted on March 6, 2017
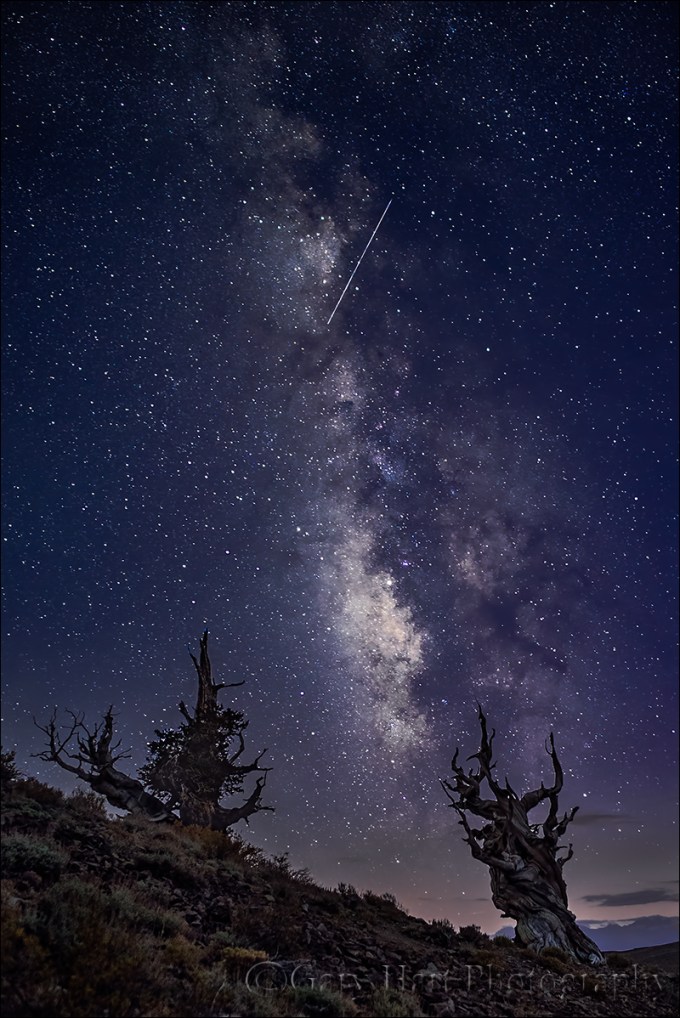
Milky Way and Meteor, Bristlecone Pine Forest, White Mountains, California
Sony a7S II
Rokinon 24mm f1.4
20 seconds
F/1.4
ISO 6400
See the Milky Way
Look heavenward on a moonless summer night far from city light. The first thing to strike you is the shear volume of stars, but as your eyes adjust, your gaze is drawn to a luminous band spanning the sky. Ranging from magnificently brilliant to barely visible, this is the Milky Way, home to our Sun and nearly a half trillion other stars of varying size, age, and temperature.
Size and shape
Though every star you’ve ever seen is part of our Milky Way galaxy, stargazers use the Milky Way label more specifically to identify this river of starlight, gas, and dust spanning the night sky. As you feast your eyes, appreciate that some of the Milky Way’s starlight has traveled 25,000 years to reach your eyes, and light from a star on one edge of the Milky Way would take 100,000 years to reach the other side.

Milky Way look-alike spiral galaxy: This is what our galaxy would look like from the outside, looking in. (The individual stars visible here are “local” and not part of the spiral galaxy depicted here.) Earth would be between two of the spiral arms, about halfway out from the center.
The rest of the sky appears to be filled with far more discrete stars than the region containing the Milky Way, but don’t let this deceive you. Imagine that you’re out in the countryside where the lights of a distant city blend into a homogeneous glow—similarly, the stars in the Milky Way’s luminous band are simply too numerous and distant to resolve individually. On the other hand, the individual pinpoints of starlight that we name and mentally assemble into constellations are just closer, much like the lights of nearby farmhouses. And the dark patches in the Milky Way aren’t empty space—like the trees and mountains that block our view of the city, they’re starlight-blocking interstellar dust and gas, remnants of exploded stars and the stuff of future stars.
Just as it’s impossible to know what your house looks like by peering out a window, it’s impossible to know what the Milky Way looks like by simply looking up on a dark night. Fortunate for us, really smart people have been able to infer from painstaking observation, reconstruction, and comparison with other galaxies that our Milky Way is flat (much wider than it is tall) and spiral shaped, like a glowing pinwheel, with two major arms and several minor arms spiraling out from the center. Our solar system is in one of the minor arms, a little past midway between the Milky Way’s center and outer edge.
Blinded by the light
Sadly, artificial light and atmospheric pollution have erased the view of the Milky Way for nearly a third of the world’s population, and eighty percent of Americans. Worse still, even though some part of the Milky Way is overhead on every clear night, many people have never seen it.
Advances in digital technology have spurred a night photography renaissance that has enabled the Milky Way challenged to enjoy images of its splendor from the comfort of their recliner, but there’s nothing quite like viewing it in person. With just a little knowledge and effort, you can enjoy the Milky Way firsthand; add the right equipment and a little more knowledge, and you’ll be able to photograph it as well.
Spanning the sky
Understanding that our Solar System is inside the Milky Way’s disk makes it easier to understand why we can see some portion of the Milky Way on any night (assuming the sky is dark enough). In fact, from our perspective, the plane of the Milky Way forms a complete ring around Earth (but of course we can only see half the sky at any given time), with its brightness varying depending on whether we’re looking toward our galaxy’s dense center or sparse outer region.
Where the action is

The Milky Way’s brilliant center, its “galactic core,” radiates above Kilauea on Hawaii’s Big Island
Though the plane of the Milky Way stretches all the way across our sky, when photographers talk about photographing the Milky Way, they usually mean the galactic core—the Milky Way’s center, its most densely packed, brightest region. Unfortunately, our night sky doesn’t always face the galactic core, and there are many months when this bright region is not visible at all.
To understand the Milky Way’s visibility in our night sky, it helps to remember that Earth both rotates on its axis (a day), and revolves around the sun (a year). When the side of the planet we’re on rotates away from the sun each day, the night sky we see is determined by our position on our annual trip around the sun—when Earth is between the sun and the galactic core, we’re in position to see the most brilliant part of the Milky Way.
Put in terrestrial terms, imagine you’re at the neighborhood playground, and that the merry-go-round is our solar system—the Sun is the stationary post at the center, and Earth on the outer edge (we’re ignoring our solar system’s other planets because they’re not a factor here). Our celestial merry-go-round takes a year to complete a single revolution. The Milky Way would be like a tree growing beside the merry-go-round; the tree’s trunk is the galactic core, and and a branch arcing above the merry-go-round is a less dense (fewer stars) outer extension of a spiral arm. No matter where the merry-go-round is in its revolution, the branch remains visible overhead, but the tree’s trunk is only visible when the merry-go-round rotates to face it.
Finding the Milky Way
Just like every other celestial object outside our solar system, the Milky Way’s position in our sky changes with the season and time of night you view it, but it remains constant relative to the other stars and constellations. This means you can find the Milky Way by simply locating any of the constellations in the galactic plane. Here’s an alphabetical list of the constellations* through which the Milky Way passes (with brief notes by a few of the more notable constellations):
- Aquila
- Ara
- Auriga—faintest
- Canis Major—faint
- Carina
- Cassiopeia—faint; its easily recognized “w” (or “m”) shape makes Cassiopeia a good landmark for locating the Milky Way in the northern sky
- Cepheus
- Circinus
- Crux
- Cygnus—bright
- Gemini
- Lacerta
- Lupus
- Monoceros
- Musca
- Norma
- Ophiuchus
- Orion—faint; another easy to recognize constellation that’s good for finding the galactic plane
- Perseus—faint
- Puppis
- Pyxis
- Sagitta
- Sagittarius—brightest, galactic core
- Scorpius—bright
- Scutum
- Serpens
- Taurus—faint
- Triangulum
- Vela
- Vulpecula
* Constellations are comprised of stars that only appear connected by virtue of their position in our night sky—a constellation is a direction in the sky, not a location in space.
If you can find any of these constellations, you’re looking in the direction of some part of the Milky Way (if you can’t see it, your sky isn’t dark enough). But most of us want to see the center of the Milky Way, where it’s brightest, most expansive, and most photogenic. The two most important things to understand about finding the Milky Way’s brilliant center are:
- From our perspective here on Earth, the galactic core is in Sagittarius (and a couple of other constellations near Sagittarius)—when Sagittarius is visible, so is the brightest part of the Milky Way (assuming you can find a dark enough sky)
- Earth’s night side most directly faces Sagittarius in the Northern Hemisphere’s summer months (plus part of spring and autumn)
Armed with this knowledge, locating the Milky Way’s core is as simple as opening one of my (too many) star apps to find out where Sagittarius is. Problem solved. Of course it helps to know that the months when the galactic core rises highest and is visible longest are June, July, and August, and to not even consider looking before mid-March, or after mid-October. If you can’t wait until summer and don’t mind missing a little sleep, starting in April, with a dark enough sky you can catch Sagittarius and the galactic core rising in the southeast shortly before sunrise. After its appearance in April, the Milky Way’s core rises slightly earlier each night and is eventually well above the horizon by nightfall.
People who enjoy sleep prefer doing their Milky Way hunting in late summer and early autumn, when the galactic core has been above the horizon for most of the daylight hours, and is high in the southwest sky as soon as the post-sunset sky darkens enough for the stars to appear. The farther into summer and autumn you get, the closer to setting beneath the western horizon the Milky Way will be at sunset, and the less time you’ll have before it disappears.
Into the darkness
The Milky Way is dim enough to be easily washed out by light pollution and moonlight, so the darker your sky, the more visible the Milky Way will be. To ensure sufficient darkness, I target moonless hours from an hour or so after sunset to an hour before sunrise. New moon nights are easiest because the new moon rises and sets with the sun and there’s no moon all night. But on any night, if you pick a time before the moon rises, or after it sets, you should be fine. Be aware that the closer the moon is to full, the greater the potential for its glow to leak into the scene from below the horizon.
Getting away from city lights can be surprisingly difficult (and frustrating). Taking a drive out into the countryside near home is better than nothing, and while it may seem dark enough to your eyes, a night exposure in an area that you expect to be dark enough reveals just how insidious light pollution is when you realize all of your images are washed out by an unnatural glow on the horizon. Since the galactic core is in the southern sky in the Northern Hemisphere, you can mitigate urban glow in your Milky Way images by heading south of any nearby population area, putting the glow behind you as you face the Milky Way.
Better than a night drive out to the country, plan a trip to a location with a truly dark sky. Here those in the western US have an advantage. The best resource for finding world class dark skies anywhere on Earth is the International Dark-Sky Association. More than just a resource, the IDA actively advocates for dark skies. If the quality of our night skies matters to you, spend some time on their site, get involved, and share their website with others.
Once you’ve feasted your eyes on the Milky Way, the next step is to photograph it. In my next blog post I pick up from here, sharing my tips for capturing the Milky Way with your camera.
Photograph the Milky Way: Part Two
Workshop Schedule || Purchase Prints
A Milky Way Gallery
Click an image for a closer look and slide show. Refresh the window to reorder the display.


Aspen abstract
Posted on February 25, 2017
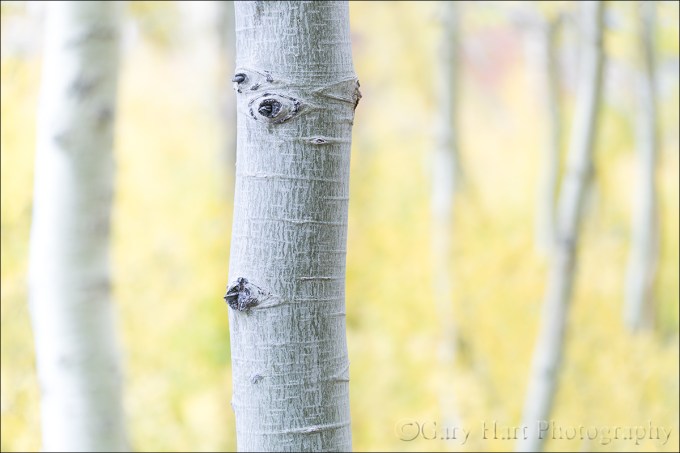
Aspen Abstract, Lundy Canyon, Eastern Sierra
Sony a7R II
Sony 70-200 f/4
1/25 second
F/4
ISO 400
I recently started rereading Ansel Adams’ “Examples: The Making of 40 Photographs,” a book I’d recommend to anyone interested in the thinking side of photography. Though much of the book covers equipment and techniques that are irrelevant to today’s digital photographer, Adams’ words reveal a vision and mastery of craft that transcends technology. Like him or not (I do!), you can’t deny that Ansel Adams possessed an artist’s vision and an ability to convey that vision in ways the world had never seen.

©Ansel Adams
Aspen, New Mexico, 1958
“The majority of the viewers (of this image) think it was a sunlit scene. When I explain that it was diffused lighting from the sky and also reflected light from distant clouds, some rejoin, ‘Then why does it look the way it does?’ Such questions remind me that many viewers expect a photograph to be a literal simulation of reality.”
Ansel Adams in “Examples: The Making of 40 Photographs”
Another takeaway from the book is Adams’ clear disdain for pictorialism, a more abstract approach to photography that (among other things) uses the camera’s unique vision to interpret the world in ways that are vastly and intentionally different from the human experience. Preferring instead the more literal front-to-back sharpness of the f/64 group that became his hallmark, Adams had little room for pictorialists’ soft focus and abstract images.
I, on the other hand, love using limited depth of field to emphasize my primary subject and disguise potential distractions. When we explore the world in person, our ability to pivot our head, move closer or farther, and change perspective allows us to enables us to lock in on a compelling subject and experience the scene in the way we find most meaningful. But an image is a constrained, two-dimensional approximation of the real world as seen by someone else. The photographer shares his or her experience of the scene by guiding our eyes with visual clues about what’s important and how to find it.
This reality wasn’t lost on Ansel Adams. Despite his distaste for soft focus techniques, Adams guided viewers of his images with in other ways, particularly his use of light. He knew that the camera and human eye handle light differently, and used every trick at his disposal, both at capture and in the darkroom, to leverage that difference.
At the risk of initiating a debate about the relative merits of the two techniques, I’ll just say that I’m a fan of both and am not afraid to apply whichever approach best suits my objective. And I suspect that if Ansel Adams were photographing today, he would be taking full advantage of the creative possibilities created by today’s technology.
Last October I was exploring the aspen grove at the end of the Lundy Canyon road near Mono Lake. With fall color peaking I put extension tubes on my Sony 70-200 f/4 looking for subjects that I could get close to, but with a distant enough background to maximize focus contrast (sharp/soft). I’ve always felt that soft focus aspen make a great background, but they need to be soft enough that individual leaves and trunk detail don’t distract.
I started looking for dangling leaves, either individual or bunches, but soon turned my attention to stark white aspen trunks that stood out in striking contrast against the distant wall of yellow leaves. I soon zeroed in on this trunk for its well-spaced knots, gentle curve, and clean, textured bark, plus the nice assortment of parallel trunks at varying distances in the background.
This frame I shot wide open at the closest possible focus distance to get the softest background focus. To emphasize the white trunks, I exposed the scene as bright as I could without clipping the highlights in the primary trunk. On my camera’s LCD at capture this image looked pretty much as you see it here, and required minimal processing.
Workshop Schedule || Purchase Prints
A Selective Focus Gallery
Click an image for a closer look and slide show. Refresh the window to reorder the display.


The Range of Light
Posted on February 19, 2017

Twilight Crescent, Mt. Whitney
Sony a7R II
Sony 70-200 f/4
1/3 second
F/11
ISO 160
“… the mighty Sierra, miles in height, and so gloriously colored and so radiant, it seemed not clothed with light but wholly composed of it, like the wall of some celestial city…. Then it seemed to me that the Sierra should be called, not the Nevada or Snowy Range, but the Range of Light.” — John Muir
Anyone who has spent time in or around the Sierra Nevada has to agree that there’s something special about its interaction with light. Towering one to two miles above the surrounding terrain for nearly all of its 400-mile length, the Sierra Nevada are California’s most prominent natural feature. But it’s not just prominence that sets the Sierra apart. The Sierra are almost entirely granite, an intrusive igneous rock comprised primarily of light-toned feldspar and liberally infused with lustrous quartz and mica. Because igneous intrusive rocks form deep beneath the Earth’s surface, constituent minerals cool and harden slowly enough for large, reflective crystals to form.
In addition to its inherently reflective qualities, granite is quite hard and resistant to erosion. Unlike the overlying sedimentary and metamorphic rock that washed downhill as the Sierra pushed (and continues to push) upward, granite remains intact when subjected to wind and rain. Eventually small cracks form; water percolating into these cracks expands as it freezes, widening the cracks further until the granite fractures and a large block separates. The result is large vertical and domed surfaces whose extreme slope and hardness are particularly inhospitable to plant life, even well below the timberline. Granite’s hardness also means that rather than crumbling beneath the weight of the numerous glaciers to scour the Sierra, much of the Sierra granite has been polished to a glassy sheen.
Granite’s light complexion, reflective inclusions, and abundance of exposed, polished surfaces make the Sierra particularly inclined to reflect the color of whatever light illuminates it. This relationship with light is quite evident in Yosemite Valley, nestled in the range’s more moderately sloped west side. When the sun strikes Yosemite’s Half Dome and El Capitan at day’s end, warm sunset light paints these monoliths in brilliant orange and red hues just before the sun is snuffed by the horizon. While this color can be seen at sunset year round, it takes center stage each February when sunset shadow and light conspire to highlight normally insignificant Horsetail Fall’s tumble down El Capitan’s east face.
As exquisite as the light on Yosemite’s granite is, I’m even more drawn to the Sierra’s east side, which gets its best sun at sunrise. Unlike the Sierra’s gradually sloped, relatively moist, and largely foliated west slopes, the Sierra’s east side is much steeper, drier, and therefore sparsely foliated and more exposed. Enhancing the drama, the Eastern Sierra’s towering granite face also catches the earliest possible sunlight, sunlight that has traveled farther and through purer air (because there fewer airborne pollutants in the morning in general, and the sunlight east of the Sierra traverses much less densely populated terrain).
My favorite place to watch the light play on the Eastern Sierra granite is in and near the Alabama Hills, two vertical miles beneath Mt. Whitney and the Sierra’s most precipitous section. Looming above the Owens Valley, 14,505 foot Mt. Whitney is the highest point in the 48 contiguous United States. Unlike many towering peaks that stand by themselves, Mt. Whitney is bounded by 13,000 foot Lone Pine Peak and 14,000 foot Mt. Williamson, all connected by a serrated ridge of 13,000+ foot sharks tooth prominences.
Before sunrise I like to arrive early enough to see the Sierra crest reflect the pale blue of the pre-dawn sky, then watch it warm gradually as the sky brightened before the approaching sun. The color reaches a crescendo when the sun’s longest wavelengths first kiss the highest peaks with pink alpenglow. As the rest of the sun’s visible wavelengths join the party, the crest warms to amber before finally cooling beneath the daylight-blue sky.
At the end of the day the best color arrives after the sun has long disappeared behind the crest and the entire scene is illuminated by a sky well on its way to night. Though the mountains’ color is more subtle than the sunrise show, the Eastern Sierra’s granite when imbued with the pale mauve of evening twilight is no less beautiful. Eventually night takes over and once again the Sierra granite throbs a soft blue.
Early last October I guided my Eastern Sierra workshop group up to Whitney Portal at the base of Mt. Whitney to photograph cascading Whitney Portal Fall in late afternoon shade. On the drive back down we squeezed into a small turnout not too far down the road for the closest view of Whitney that doesn’t require a serious hike. This year’s group got a bonus when a thin slice of brand new moon appeared shortly after sunset.
Mounting my Sony 70-200 f4 on my a7RII, I framed the scene as tightly as I could while still including both Mt. Whitney and the crescent moon. Though the sky was clear, a steady stream of small clouds materialized as if issued by a cloud making machine just out of sight behind the crest to the right of Whitney. Each new cloud scooted to the left and dissipated quickly in drier air near the summit. After composing, metering, and focusing, I waited for the next cloud to appear and clicked this frame in the purple twilight.
PURCHASE PRINTS || PHOTO WORKSHOPS
The Many Colors of Mt. Whitney


Up a creek
Posted on February 12, 2017
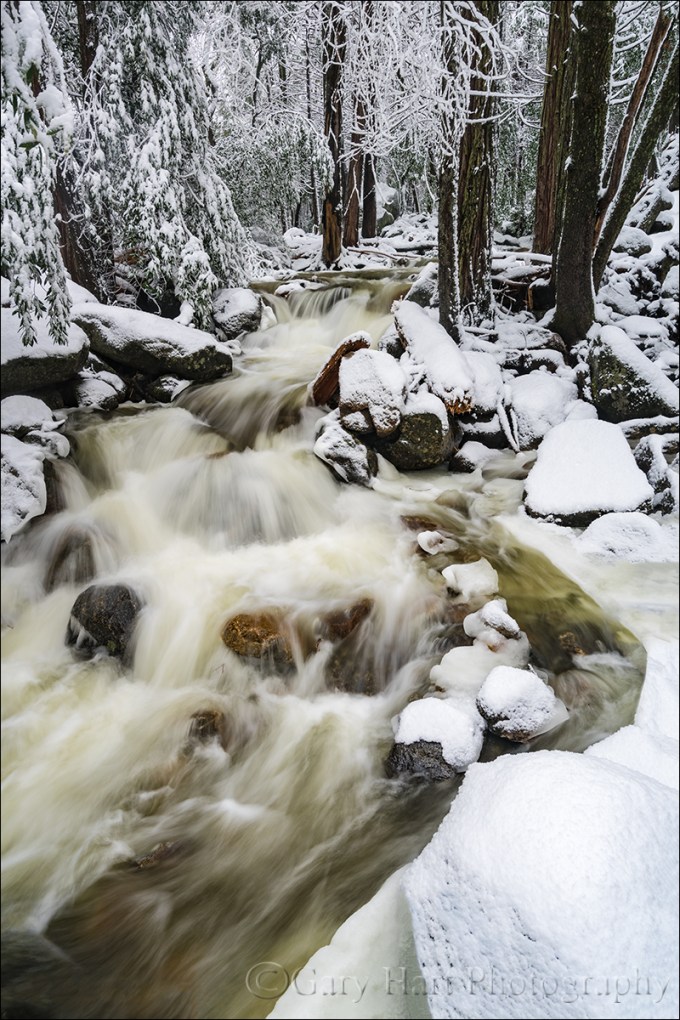
Wonderland, Bridalveil Creek, Yosemite
Sony a7R II
Sony/Zeiss 16-35 f/4
1/4 second
F/10
ISO 100
Many photographers vary their portfolios by visiting as many locations as possible. While I love visiting new locations, I’ve always preferred the kind of intimate familiarity that’s only possible with frequent, quality visits. And as enjoyable as it is photograph the icons, for my personal pleasure I’m most drawn to quiet pastorals and intimate portraits of nature that could be anywhere—wildflowers, fall color, solitary oaks, sparkling reflections, and tumbling creeks can keep me happy for hours.
One of my favorite intimate settings is Bridalveil Creek beneath Bridalveil Fall in Yosemite. Not only is there lots to photograph here, it’s different every time I visit. In spring the water in all three of the creek’s branches roars down the slope beneath Bridalveil Fall like it can’t get to the Merced River soon enough. And I’m especially fond of Bridalveil Creek in autumn, when the flow is often down to a single leisurely trickle, its whispering cascades and spinning pools adorned with vivid yellow leaves. Winter can find Bridalveil Creek in a variety of states that range from a gentle rivulet to a raging torrent. During one particularly cold winter the creek was solid ice, as if some frostbitten wizard had waved his wand and frozen the flowing water in place.
For some reason I haven’t had as much success here in winter as autumn or spring, so this winter I redoubled my efforts. On last month’s snow trip, while waiting for Yosemite’s monoliths to emerge from the clouds, I headed to Bridalveil Creek and found every square inch covered with snow—not a fine etching, but a dense glazing that covered virtually every exposed surface with several inches of white powder.
I hadn’t even crossed the first bridge when I was stopped by the scene here. I extended my tripod and evaluated the possibilities, starting on the bridge before moving down to a rock right on the creek. My first compositions were horizontal, but I eventually adjusted to vertical to emphasize the creek. Following my standard click, review, refine, click process, I finally landed on this composition—just wide enough to include both sides of the creek, and tall enough to include the parallel tree trunks and the creek’s exit from the bottom of the frame. I had to drop down quite low to get beneath an overhanging branch and keep it from occluding part of the creek.
The non-compositional variables I had to consider were motion and depth of field—there was no wind to sway the branches, but I knew the water’s blur would vary greatly with my shutter speed choice. And because I wanted everything in my frame sharp, I needed to be careful with my f-stop choice. The closest point of interest, the snowy foreground rock, was about five feet away. My hyperfocal app told me that at my 22mm focal length and f/8, my hyperfocal distance was about six feet (sharp from three feet to infinity). Because hyperfocal data draws the acceptable sharpness line a little less critically than I do, I stopped down to f/10 and focused on a small rock about eight feet away. Playing with a few ISOs to vary my shutter speed for different water motion effects, I decided I liked 1/4 second because it blurred the creek enough to clearly convey the water’s speed, but not so much that it lost its definition.
Intimate and Anonymous
Click an image for a closer look and slide show. Refresh the window to reorder the display.


