Photographic matchmaking
Posted on December 7, 2016

Autumn Pool and Cascade, Bridalveil Creek, Yosemite
Sony a7R II
Sony/Zeiss 16-35 f4
6 seconds
F/16
ISO 200
While everyone loves a pretty scene, I’m afraid our aesthetic sense has been numbed by the continuous assault of “stunning” images online. A picture grabs our eyes on Instagram or Facebook and we reflexively click Like and move on to the next (similarly) stunning image. The photography equivalent of pop music, formula fiction, or (most) network television, these images exit our conscious about as fast as they entered because they fail to make a personal connection.
But every once in awhile an image surprises us and we pause, float our eyes around the scene, examine detail, bask in its mood. Who knows the trigger for such a response? Maybe is as simple as aspect of the scene that spurs a memory or taps a longing. Or maybe the connection reaches deeper than that.
Pictures succeed not just by virtue of their visual elements, but also by how those elements are connected. I used to believe that the sole purpose of including visual elements throughout my frame was to create the illusion of depth in photography’s two-dimensional medium. While I still strongly agree, I think the value of multiple points of visual interest goes deeper than that. Just as humans seek interpersonal connections in our daily lives, I think we’re programmed to favor images with relationships between heterogeneous elements in the nature. Not just Grand Canyon, but Grand Canyon speared by lightning; not just Half Dome, but Half Dome beneath a rising full moon; not just glowing Kilauea Caldera, but glowing Kilauea Caldera beneath the Milky Way.
Creating relationships between elements work on a smaller scale as well (albeit, usually without the opportunity for planning that celestial or meteorological phenomena provide)—small forest scenes and intimate macros benefit from inclusion of multiple elements as well. Of course an image with a disorganized arrangement of elements, no matter how beautiful each is individually, probably won’t get a second look. But find a way to organize a scene’s elements in a way that allows the eye to flow effortlessly through the frame and you have the potential for visual synergy—an image that’s greater than the sum of its visual parts.
The opportunity to connect disparate elements is everywhere if you look, from the broadest panorama to the most intimate macro. Whatever the scale, the key is not locking onto your subject until you find something to pair it with. In other words, finding a photo-worthy subject should never be your goal, it should be your starting point.
Without diving too deeply into the concept of visual weight (a subject in and of itself), I try to create a frame with balance between visual elements (not loaded too much in on of the scene’s quadrants: upper left, upper right, lower left, lower right). I also try to keep objects with a strong visual tug away from the edges of my frame. And finally, I look to position my elements so they’re connected by virtual diagonal lines.
About this image
On the final morning of last month’s Yosemite Autumn Moon photo workshop, I set the group loose in the forest beneath Bridalveil Fall to scour the possibilities in and around Bridalveil Creek. Always a workshop favorite, I usually save the Bridalveil Creek until the workshop’s final day, when my students have found their creative zone after three days of shooting and training. This approach seems to pay off, because no matter how much time I give them in there, it never seems to be enough.
When I found this accumulation of just-fallen autumn leaves floating in a glassy pool, I knew I had the start of a nice scene. Scanning my surroundings, I didn’t have to look hard to find a small cascade to connect with my colorful leaves. But with the pool tucked beneath a fallen log, accessing the best angle was tricky. Sprawling nearly flat on my back beneath the overhanging log, with one tripod leg in the water, turned out to be the best way to maximize the virtual diagonal connecting the leaves and cascade.
The other consideration here was depth of field—the leaves started no more than three feet from my lens, while the cascade was about 12 feet away. To ensure maximum sharpness throughout with getting too far into the diffraction zone, I stopped down to f/16 and focused on the back of the leaves. I wasn’t too concerned about shutter speed and the cascade’s blur because the difference between one and six seconds was insignificant, and freezing the water would have required a ridiculously high ISO, while the pool was so still that I could discern no motion at all.
Purchase Prints
Workshop schedule
A Gallery of Relationships


Fall color explained
Posted on November 27, 2016

Autumn Morning, El Capitan Reflected in the Merced River, Yosemite
Sony a7R II
Sony/Zeiss 16-35 f4
2 seconds
F/16
ISO 50
Like most photographers in the Northern Hemisphere, my fall color season is about finished. But things are just ramping up along the streets near my home in California’s Central Valley (where winter doesn’t really begin until December, and spring’s first blooms start to pop up at the end of January—sorry). While there’s not a lot for me to photograph in my neighborhood, the opportunity to partake of the visual feast without a camera in my hands is refreshing.
I’m also harvesting the fruits the most intense autumn workshop/travel schedule of my photography life, and appreciating all over again how much I enjoy fall photography. Browsing my autumn images, I’m reminded of the need to understand my subjects. That goes double for the why and when of fall color, a blend of science and myth so intertwined that casual observers often resort to memory, anecdote, and lore to fill knowledge voids with partial truth and downright falsehood.
Innkeeper logic
Show up at at the fall color spot that guy in your camera club said was peaking at this time last year, you might find the same trees displaying lime green mixed with just hints of yellow and orange. Ask the old guy behind the desk at the inn, and you’ll get a head shake and confident explanation that, “The color’s late this year—it hasn’t gotten cold enough yet.” Check into the same inn on the same weekend next year, you might find just a handful of leaves clinging to exposed branches—this time, as the old guy hands you the key, he proclaims, “That hot summer got everything started early—you should have been here last week.”
While “expert” testimony like this sounds like objective truth, it only perpetuates the myths surrounding fall color. Fortunately, science has provided a pretty good understanding of the fall color process to all who want to understand.
It’s all about the sunlight
The leaves of deciduous trees contain a mix of green, yellow, and orange pigments. During the spring and summer growing season, the green chlorophyl pigment overpowers the orange and yellow pigments, keeping the trees green. While this chlorophyl is quickly broken down by sunlight, the photosynthesis that turns sunlight into nutrients that nourish the tree, warmth and long days provide the energy to sustain chlorophyl creation through the summer.
As the days shrink toward autumn, things begin to break down. Cells at the “abscission layer” at the base of the leaves’ stem (the knot where the leaf connects to the branch) begin a thickening process that blocks the transfer of carbohydrates from the leaves to the rest of the tree. Meanwhile, movement of nutrients to the leaves is inhibited as well—without these minerals, the leaves’ chlorophyl production dwindles and finally stops. No longer masked by the chlorophyl’s green, it’s time for the tree’s yellow and orange pigments to shine: Color!
Sunlight and weather
Contrary to popular belief, the timing of the onset of this fall color chain reaction is much more daylight-dependent than temperature- and weather-dependent—triggered by a genetically programmed day/night-duration threshold; contrary to innkeeper-logic, the trees in any given region will commence their transition from green to color at about the same time each year (when the day length drops to a certain point).
Nevertheless, though it doesn’t trigger the process, weather does play a significant part in the intensity, duration, and demise of the color season. Because sunlight breaks down the green chlorophyl, cloudy days after the suspension of chlorophyl creation will slow the coloring process. And while the yellow and orange pigments are present and pretty much just hanging out, waiting all summer for the chlorophyl to relinquish control of the tree’s color, the red and purple pigments are manufactured from sugar stored in the leaves—the more sugar, the more vivid their color. Ample moisture, warm days, and cool (but not freezing) nights after chlorophyl replacement has stopped are most conducive to the creation and retention of the sugars that form the vivid red and purple pigments.
On the other hand, freezing temperatures destroy the color pigments, bringing a premature end to the color display. Drought can stress trees so much that they drop their leaves before the color has a chance to manifest. And wind and rain can wreak havoc with the fall display—go to bed one night beneath a canopy of red and gold, wake the next morning to find the trees bare and the ground blanketed with color.
Of course all these weather factors come in an infinite number of variations that make this year’s color timing and intensity a little different from last year’s and next’s. Despite my need to understand nature’s mysteries, it’s this (perceived) randomness, the impossibility of ever knowing for sure what I’ll encounter, that draws me back.
About this image
Yosemite isn’t an inherently great sunrise location. With most of its views facing east, toward shaded subjects beneath the brightest part of the sunrise sky, sunrise light is difficult here. And without clouds, more the the rule than the exception in California, Yosemite sunrises can be rather bland. But Yosemite’s bland sunrises are more than compensated by the first direct sunlight light visible Yosemite Valley, which starts on the highest points a few minutes after the “official” (flat horizon) sunrise, and progresses over the next hour or so until the valley floor is bathed in sunlight. El Capitan is among the first of Yosemite’s prominent features to benefit from this early light.
I have a mental list of go-to El Capitan views for photographing its first light. Among them is a quiet bend in the river, known affectionately (and unofficially) to photographers as “Tahiti Beach,” with views of Cathedral Rocks, El Capitan, and the Three Brothers. Additionally, the river widens and slows here, providing some of Yosemite Valley’s best reflection opportunities as well.
One morning in the first of this year’s two Yosemite fall color workshops, I guided my group to Tahiti Beach for El Capitan’s first light. Clouds ruled the sky as the first light window opened, but fleeting patches of blue gave me hope. And with the deciduous trees across the river displaying their finest golds and oranges, we weren’t lacking for opportunities in the meantime.
The sun broke through suddenly, spotlighting a thin slice of granite near El Capitan’s summit. Unsure how long the opportunity would last, I moved quickly to compose this wide, vertical frame that emphasized the reflection juxtaposed with a thin veneer of colorful leaves floating at my feet. I reminded myself to heed the frequent admonition I issue my workshop groups: the focal point for a reflection is the focus point for the reflective subject, not the reflective surface. In other words, while the leaves floated in water that was just a few feet from my lens, their focus point was much closer than the infinity focus point of the reflection in the same water. I focused on the leaves, confident that the depth of field provided by f/16 at my 18mm would render El Capitan, the trees, and the reflection acceptably sharp.
Another noteworthy exposure setting in this image is my 50 ISO decision. Though the leaves were completely still, there were slight ripples disturbing the river where most of my reflection lay. Stopping down to f/16, dialing my sensor’s sensitivity to ISO 50, combined with a polarizer carefully tuned to cut the reflective glare on the leaves without diminishing the rest of the reflection too much, allowed a 2-second exposure that smoothed the ripples enough to enhance the reflection.
Purchase Prints
Photo Workshop Schedule
A fall color gallery


How do you do that?: Properly expose a full moon
Posted on November 20, 2016
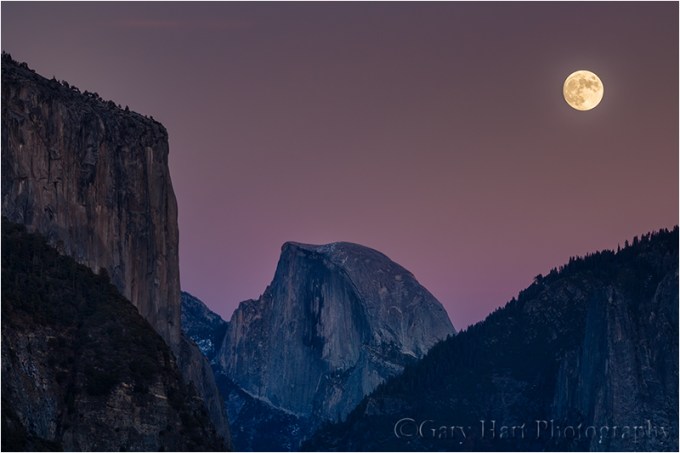
Twilight Moonrise, El Capitan and Half Dome, Yosemite (2014)
Canon Rebel EOS SL1
.4 seconds
Canon is 70-200 f/4L
ISO 100
F11
The problem
Cameras struggle to capture simultaneous detail in bright highlights (the moon) and and dark shadows (the landscape)—capturing one or the other is easy, but both? Not so much. A full moon is daylight bright, but because a full moon rises at sunset and sets at sunrise (more or less, depending on exactly how full the moon is when it rises/sets, and the elevation of the horizon the moon and sun rise/set above), when a full moon is visible, the sky and landscape will be some degree of dark.
The dynamic range problem is compounded by the fact that the darker the sky, the better the moon looks—often by the time a photographer is inspired to pull out a camera to capture the moment, it’s too dark. Additionally, many photographers attempt to photograph a rising full moon on the night it’s at its maximum fullness, which at best provides very little margin for error, and often is just plain too late.
While the advent of digital photography has provided exposure aids like LCD review and a histogram to help us cope with extreme dynamic range, these advances have also caused poor exposure habits. By far the most frequent mistake made by aspiring moon photographers is insisting that the landscape part of their scene as it appears on the LCD look close to what their eyes see, all but ensuring a white blob of moon. Even the trusty histogram lets down moon photographers because the moon is usually too small to register on a histogram—they pat themselves on the back for what appears to be a perfect histogram, completely oblivious to the fact that the moon is hopelessly overexposed.
The solution
One solution to extreme dynamic range is a composite: one image exposed for the moon combined with a second image exposed for the landscape. As tempting as a composite solution seems, my goal is always to capture everything with one click. (But just because we’re doing it with one click doesn’t mean there’s no post-processing required bring out the full range of light my camera captured.) While my technique can work with a jpeg image, you’ll have a much greater chance for success shooting raw. Of course there is a point when the sky and landscape are so dark that a single-click moon/landscape capture becomes impossible and you’ll need to pack up, resort to a composite, or simply stand there and appreciate what you’re witnessing.
Timing
When I plot my moonrises, I look for opportunities in my “lunar sweet spot,” when the sky is dark enough for the moon to stand out in brilliant contrast, but not so dark that I can’t photograph landscape and lunar detail with a single click. That starts around 15 minutes before official (flat-horizon sunrise) and last until about 15 minutes after sunset. That doesn’t mean that I can’t get nice images a little earlier, and squeeze out usable exposures a few minutes longer, but it’s a good rule of thumb.
Getting the full (or nearly full) moon in my “sweet spot” starts with picking the right night—just because your smartphone app tells you the full moon is Sunday night, don’t assume that Sunday night is the best night to photograph it. “Official” sun and moon rise/set always assumes a flat horizon—if you have mountains or hills in the east, you’ll need to wait for the moon to ascend above them, all the while the sky and landscape are growing darker. It helps to know that the moon rises a little less than an hour later each day (this is an average that varies quite a bit with a number of factors)—of the full moon won’t rise above your local horizon until long after the sun is below the horizon, pick an evening one or two days earlier. While the moon is only completely round when it’s full, a day or two earlier will still net you a mostly full moon in much easier light. And if your scene is in the west, your best chance will be a sunrise moonset after the moon is full.
For example, I do a lot of Yosemite moonrise photography, where most of the views are against the eastern sky—depending on where I want to photograph the moon, I may need to be there one, two, or even three evenings before it’s completely full to time its appearance for sunset. In my just completed Yosemite workshop, my group got to photograph moonrise at sunset from four different locations on four different evenings—each evening I found a spot a little higher and farther away from the valley rim so the moon would have to rise quite as high as it did the previous night. On the other hand, in my Death Valley workshop most of our views face west, so we do three or four sunrise moonsets, each one at a spot with a higher horizon than the previous day.
Exposure
The key photographing both the full moon and landscape with detail starts with ignoring the way the picture looks on your LCD because, in a high dynamic range scene, an ideal exposure rarely looks good on the LCD. I repeat: In a high dynamic range scene, an ideal exposure rarely looks good on the LCD. The key is to make the image as bright as possible without blowing the highlights, then adjust the highlights and shadows in post-processing. In most extreme dynamic range situations the key is to completely trust the image’s histogram, but the moon is such a small part of most images, it rarely registers on the histogram—it’s possible to capture a histogram that looks great and moon that’s hopelessly blown (detail-less white).
So if you can’t trust the image or the histogram, what can you trust? I thought you’d never ask. While the histogram is helpful for the landscape part of the scene, when I photograph a full moon, I monitor the moon’s exposure with my camera’s highlight alert feature (“blinking highlights”). Highlight alert manifests in the post-capture LCD image review (though a mirrorless camera displays a highlight alert before I click, too). When engaged, everything in your frame that’s blown out flashes when you review your image, a helpful reminder that the exposure is broken and needs to be fixed. Every digital camera I’ve ever seen offers highlight alert, though some make you burrow deep into the menu system to turn it on and/or hide it on an obscure image playback screen (I’m looking at you, Nikon). If you don’t know how to find the blinking highlights, pull out your camera and manual, click a frame with blown highlights, and read/experiment until you figure it out (it really isn’t that difficult).
Once you’re confident that your camera’s highlight alert is engaged and you know how to check it, you’re ready for the next full moon. Here’s my process for a sunset moonrise:
- Metering in manual mode (because I want complete control of my exposure), I meter the landscape just as I would an ordinary scene. If I can get a good exposure (unclipped histogram) without the moon blinking, I know I’m good for the time being and get to work. Of course for a sunrise moonset, the process is reverse: I subtract light until the moon stops blinking
- The moon’s brightness won’t change, but if it’s a moonrise I’m shooting (always at sunset), I know the landscape will continue to darken, so that exposure that was perfect a few minutes ago isn’t quite so perfect now. As the scene darkens, I continue to add light by increasing my shutter speed in 1/3 stop increments (that is, one click at a time). Each time increase the exposure, I check the moon to make sure it’s not blinking.
- As soon as the moon starts blinking, I’m done adding light—no matter how much darker the scene becomes, giving it more light will blow out the moon.
The more familiar you are with your camera, the more success you’ll have. Different cameras’ highlight alerts engage at different points, and it’s entirely possible (likely even) that you can add a little more light after the first “blinkies” appear in the moon—on my Sony a7RII, I can usually push my highlights another 2/3 to 1 full stop once I first detect blinking and still recover detail later.
A graduated neutral density filter will subdue the bright moon, allowing you to add more light to the landscape without blowing out the moon. Depending on the location, a GND will add 5 to 15 minutes of productive shooting.
Processing
This is not a processing tutorial; I assume you’re shooting in raw mode and have at least rudimentary Lightroom or Adobe Camera Raw skills (though I’m sure if you’re comfortable with any raw processor you’ll be able to figure it out). I’ll just describe a couple of really quick raw processing moves to get you started.
As with all of my images, I try to do most of my full moon image highlight/shadow recovery in Lightroom. But before doing that, I want to get the white balance right. When I open the image in Lightroom, I drag the Vibrance slider all the way to the right (to exaggerate the color cast), adjust away any unwelcome color cast with the White Balance slider, then return the Vibrance slider to 0 (though I reserve the right to nudge it up or down later, when I’m further along in my raw processing).
With the color temperature right, I pull the Highlights slider all the way to the left, and the Shadows slider all the way to the right. This isn’t likely where they’ll end up, but it gives me a good idea of whether I captured recoverable details. If the moon is still blown, or the shadows are still black, I pull the Exposure slider left or right until the missing detail appears. (Tip: Holding down the Option/Alt key while adjusting any exposure slider reveals exactly what is and isn’t clipped.) If I can’t find the detail with the exposure slider, it’s not there.
This is by no means a complete processing workflow—that will vary with too many factors to cover here (including the conditions and exposure decisions at the time of capture, and your own processing style and preferences). But if you exposed the scene correctly, my suggestions will get your overall exposure to the point where you can start working on the rest of what the image needs.
About this image
My favorite spot to photograph a moonrise in Yosemite Tunnel View, which, in addition to being a fantastic view, is far enough from Half Dome to allow a fairly long telephoto. But for this moonrise in 2014 I realized that the moon would appear just a little too late—I needed to be higher and farther back to get the moon before the sky and landscape were too dark. So instead of Tunnel View, I took my workshop group to a vista on the west side of the Wawona Tunnel. While the view here is missing Bridalveil Fall and the bottom half of El Capitan, for our purposes it was perfect. (For this shoot I used my 1.6 crop body to increase the reach of my 70-200 lens.)
Workshop Schedule
A Full(ish) Moon Gallery
Click an image for a closer look and slide show. Refresh the window to reorder the display.


Supermoon
Posted on November 14, 2016

Supermoon, Half Dome and El Capitan, Yosemite
Sony a7RII
Tamron 150-600 (Canon-mount with Metabones IV adapter)
1/3 second
F/9
ISO 100
The media tends to distort facts and blow events out of proportion. Perhaps you’ve noticed. The latest example is this week’s “supermoon,” an event heralded on TV, in print, and online like the Second Coming. Okay, now for a little perspective. Despite hype to the contrary, a supermoon occurs at least twice, and up to five times, in a year. In fact, our last supermoon was all the way back in October, and the next one isn’t until December.
But, as I’m sure you’ve heard, this month’s supermoon was special, an event the likes of which we haven’t seen since 1946, and won’t see again until 2034. True enough. But exactly how special was it? Not nearly as special as you might have heard: the diameter of the “epic” November supermoon was only one-half of one percent (.57) larger than the October full moon, and four-fifths of one percent (.84) larger than the December full moon—differences that are impossible to discern with the naked eye. Next year we’ll get two moons that are more than 99 percent the size of this month’s supermoon, and last year we had four.
So why was I out taking pictures of the full moon Sunday night? Because I think every full moon is beautiful, regardless of its size, and I take any opportunity to photograph it over my favorite landscapes. Which is also why each fall I schedule a workshop in Yosemite to coincide with the full moon.
Thursday night my Yosemite Autumn Moon workshop group photographed an 82% (of full) waxing gibbous (on its way to full) moon above Valley View at sunset. For Friday night’s sunset, from a quiet beach beside the Merced River we glimpsed through clouds an 87% moon rising just right of Half Dome. Saturday’s sunset found us beneath a magenta sky at Tunnel View to witness the 96% moon ascend between Sentinel Dome and Cathedral Rocks.
The workshop’s grand finale came Sunday night, when we gathered at the Half Dome vista on Big Oak Flat Road. Though I rarely encounter other photographers for any of my moon rise/set shoots, limited parking and tripod space here prompted me to arrive an hour before sunset. That turned out to be a fortunate decision, as within 30 minutes of our arrival the parking lot was brimming beyond full and photographers swarmed the nearby rocks like ants at a picnic.
With an hour to kill, I made sure everyone in my group was ready (but by now, this being our fourth moonrise, they were experienced veterans) and chatted with other photographers nearby. Comparing notes, it seemed that most (all?) of the other photographers had relied on apps like The Photographer’s Ephemeris and Photo Pills to plot the moon’s arrival location and time, while I was the only one clinging to my old fashioned topo map, scientific calculator, trigonometry plotting approach. (I do it this way because I’ve been plotting the moon since long before the apps were available, I feel like I can be more precise, and I enjoy it—not necessarily in that order.)
In the viewfinder of my Sony a7R Mark II, atop my tripod and armed with my Tamron 150-600 lens to enlarge the moon as much as possible, was the composition I wanted—assuming the accuracy of my calculations. The consensus among others seemed to be that the moon would appear from behind Half Dome’s right flank, anytime between 5:00 and 5:10 p.m. I stuck to my guns that the moon would show up at about 5:05, and that it would be straight over the top of Half Dome. While I saw this more as an opportunity to check my plotting method’s accuracy than a competition between methods, it was pretty thrilling when the moon popped into view right on schedule and on target. Take that, technology!
Since the moon didn’t appear until a full fifteen minutes after sunset, the extreme dynamic range (very dark landscape beneath a daylight-bright moon) made this an extremely tricky exposure for anyone (like me) not interested in compositing two images (one with the moon properly exposed, another with the scene properly exposed). To capture this scene with a single click, I closely monitored the pre-capture “zebra stripes” highlight alert in my a7RII and pushed my exposure 2/3 stop after the first hint of the alert appeared. To hedge my bets and give myself processing options, I varied my exposure 1/3 to 2/3 of a stop in either direction (an exception to my standard workflow because the moon is too small to register on the histogram).
The result was a scene that looked quite dark on my LCD, and a moon with no detail. No problem, I reassured myself, for my a7RII’s ridiculous dynamic range. This morning in Lightroom I adjusted the white balance, pulled up the shadows, and pulled down the highlights. In Photoshop I applied a moderate dose of Topaz DeNoise and did a few minor dodge/burn moves to get the image you see here.
One more thing
The size of the moon in this image has virtually nothing to do with the fact that this was a “supermoon,” and virtually everything to do with the fact that I was far enough away to be able to use a 600mm lens. Click below to read about how to capture your own big moon:

Photo Workshop Schedule
The Moon in all Shapes and Sizes
Click an image for a closer look and slide show. Refresh the window to reorder the display.


Yosemite Autumn Reflection
Posted on November 9, 2016
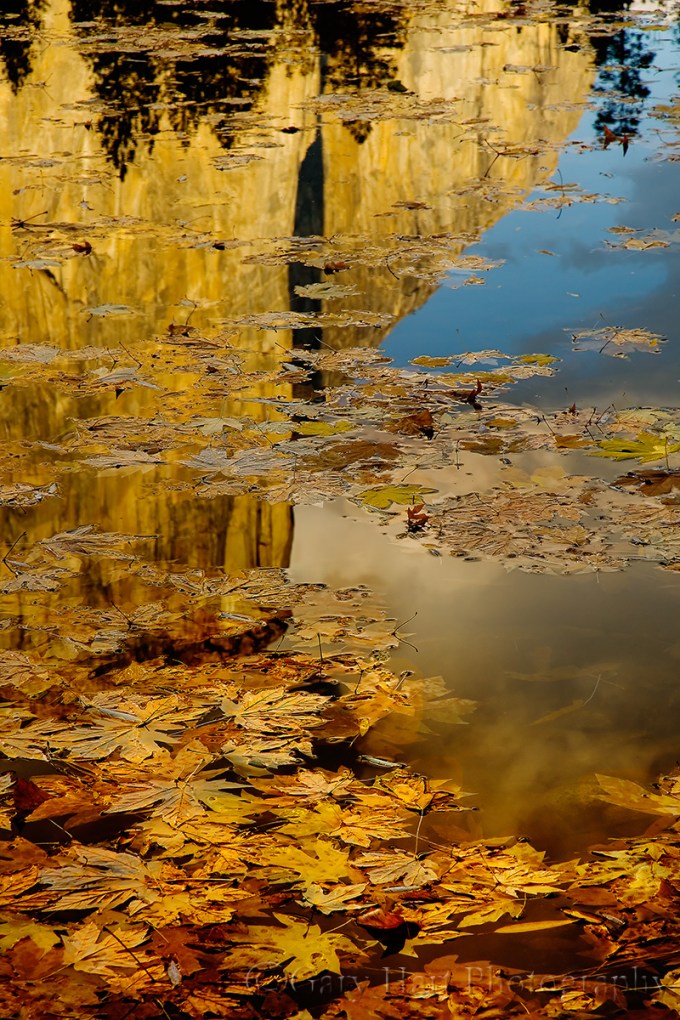
Autumn Reflection, El Capitan, Yosemite
Tomorrow I start the final workshop in the busiest workshop season I’ve ever had—since mid-August I’ve led 8 of my own workshops, and assisted Don Smith with 2 of his, in four states from Hawaii to Utah. I’ve photographed lots of great stuff, and met many fantastic people, but I’m looking forward to a few consecutive days in my own bed, and an opportunity to share more new images and blog about them.
In the meantime, here’s a Yosemite autumn reflection image from a few years ago. This scene perfectly illustrates a point I try to make to my workshop students: The focus point for a reflection is the focus point of the reflective subject and not the reflective surface. In other words, if you want objects in the foreground (like these leaves) to be sharp, unless you maximize your depth of field, your reflection will be soft.
This is counterintuitive for many, but it’s an easy thing to verify. The next time you find yourself photographing a scene like this, try focusing on the reflection and watch your foreground go soft; focus on the foreground and watch your reflection go soft. The solution is to stop down to a small aperture to maximize your depth of field, and focus toward the back of your foreground subject or subjects. If you find it impossible to get both in focus, it’s usually best to opt for a sharp foreground over a sharp reflection.
For this reflection of El Capitan basking in warm pre-sunset light, I stopped down to f18 and focused on the most distant leaves I could see through my viewfinder (seat-of-the-pants hyperfocal focusing). My small aperture ensured that all the leaves would be sharp (the smaller the aperture, the wider the sharp zone in front of and behind your focus point), while still giving me the most distant focus point possible.
Join a Future Yosemite Photo Workshop
A Yosemite Autumn Gallery
Click an image for a closer look and slide show. Refresh the window to reorder the display.


Nature’s transcendent moments
Posted on October 28, 2016

Kilauea Fountain, Hawaii
Sony a7RII
Tamron 150-600 (Canon-mount with Metabones IV adapter)
1/100 second
F/8
ISO 400
It’s a rare photo trip that doesn’t include a moment to savor, a special confluence of location and light that seems to virtually assure great images. But every year or two I get to witness something that transcends photography, a moment that will be forever etched in my brain, camera or not. These moments are special not simply for their visual gifts, but also for the emotional connection to nature they foster.
I’ve written about some of these experiences here:
- An unexpected Grand Canyon electrical storm that dazzled us for over two hours, and was accented by a delicate rainbow fragment just as the sun crested the canyon rim
- A perfect night with friends beneath the stars in the bristlecone pines
- Clouds in perfect formation, aglow with sunrise light, mirrored perfectly atop Mono Lake
- Sitting in the rain, rewarded by a double rainbow above Yosemite Valley
- A double rainbow arcing rim-to-rim above the Colorado River in the Grand Canyon
Last month I added a new transcendent moment to my list, this time on the summit of Kilauea on Hawaii’s Big Island. While spending the prior week dodging raindrops on Maui, I started hearing rumblings of extreme activity in Kilauea’s Halemaumau Crater. Though this eruption has been going since 1983, it’s usually not directly visible from the caldera’s rim (which is as close the public is allowed)—from here the only sign of crater’s churning lava lake is the rising plume of gas and steam, and the red glow that colors the sky after the sun goes down. But according to reports, the lake had risen high enough to be viewed directly from the rim, and there were even rumors of lava fountains.
On the evening before the workshop I visited Kilauea’s Jaggar Museum vista to see what all the excitement was about (though it’s about a mile from the crater, this is the closest and best view). The lake was indeed high enough to see from the rim (a personal first!), but all I could see was a mostly static black crust of cooling basalt lava. Several times a submerged wave opened a crack in the crust, creating a thin, barely visible window to the orange liquid below. It was cool to witness, but not anything particularly dramatic.
Two days later I guided my workshop group to Kilauea. Everyone was most excited about the chance to photograph the caldera beneath the Milky Way, but before the Milky Way the plan was to kill time with a trip the Visitor Center, a walk through the Thurston Lava Tube, sunset at the Jaggar vista, and a nice dinner. Everything went as planned until we reached Jaggar.
We pulled into the parking lot without high expectations, and as the group gathered their equipment, I jogged over to the caldera. To my complete shock (and awe), since my last visit, subterranean forces had whipped the previously placid lava lake into a roiling frenzy. Even from a mile away the volcano’s power was on plain display. Undulating jigsaw cracks zigzagged across the entire lake surface, but the main activity was focused on one region that every few seconds sent a new fountain of lava exploding skyward, splattering the lake surface and nearby wall with molten droplets. I turned and raced back to hurry the group.
Everyone quickly spread out along the wall and started shooting. After making checking on everyone I could find, I went to work with my Sony a6300 and Tamron 150-600. It was still daylight when we started, but dark by the time we had to leave for dinner. At some point during the festivities I remember uttering (and probably multiple times) to all within earshot that this was one of the highlights of my life. That night’s Milky Way shoot was lost to clouds, but no one felt cheated (and we finally got it a couple of nights later).
We returned to the caldera the next night, ostensibly to try again for the Milky Way, not daring to hope for a volcanic reprise. Again the clouds obscured the stars, but to our amazement, we found the lake as at least as agitated as the first night and everyone got a chance to correct whatever mistakes they’d made the previous night. For example, I decided I didn’t need the extra reach of the a6300’s 1.5 crop sensor and switch to my Sony a7RII. I also made a point of taking time to savor the experience a little more. The image I share here is from that second shoot.
The third night the caldera’s activity had calmed, but we finally got the Milky Way. I’ve loved the night sky since I was a kid, and will never tire of photographing the Milky Way above Kilauea. But I’m equally fascinated by the tectonic forces that mold our planet (enough to major in geology for several semesters), and will be forever grateful for (and humbled by) this experience on Kilauea and the opportunity to witness the process firsthand.
Join me in Hawaii
A Gallery of my Transcendent Moments


Winter is coming
Posted on October 20, 2016

Elm in Blizzard, Cook’s Meadow, Yosemite (2007)
Canon EOS-1Ds Mark II
Canon 70-200 f/4L
1/4 second
F/11.0
ISO 100
Photographing snow-covered Yosemite requires planning and patience: planning to ensure your arrival before the snow stops; patience to wait out the storm when visibility is so poor that you can barely see the nearest tree.
Planning
When the snow stops, Yosemite’s relatively mild temperatures (usually in the 30s when it snows) conspire with sunshine, wind, and gravity to clear the trees in a matter of hours. Meanwhile, park visitors driven inside by the storm, swarm outdoors to gape, quickly adding footprints and spreading mud with their boots, bikes, and cars. In other words, if you delay your departure for Yosemite until you hear that it snowed there, you’re too late. The key is being in the park during the storm.
All winter I monitor the National Weather Service Yosemite forecast and discussion (in-depth forecast analysis) pages for hints of a cold storm. I know there are lots of weather forecast options out there, but most either lack the resources of the NWS, or simply use the NWS data. The NWS may not always nail the forecast, but they’re more consistent and reliable than all the other options.
Sometimes the weather can change at the last minute, but I’m always ready. (It doesn’t hurt that I live less than four hours by car from Yosemite Valley.) In the back of my AWD Subaru Outback all winter are chains (required to be carried in Yosemite in winter, even with AWD/4WD), a portable charger that can recharge a car battery (among other things) in a pinch, and a duffle bag with all my cold weather gear (waterproof pants and upper shell, hat, gloves, umbrella, and ice grips for my shoes).
Patience
Once I decide I’m in, I’m all in. That usually means getting a room in or near Yosemite Valley, driving to the park a day early, and waiting for the snow to start. Once the snow arrives, I don’t hole up in my room, I’m out shooting. Even though Yosemite’s storms often erase all signs of its most recognizable features, stormy weather is a great time to photograph swirling clouds and accumulating snow in glorious (and rare!) solitude.
As much as I love photographing Yosemite in near white-out conditions, I sometimes get too cold, wet, or worn out to continue. But even when I reach that point, I don’t go in. Instead, I park at Tunnel View and wait for the weather to clear. Tunnel View is the perfect place to wait out a Yosemite storm because it’s on the west side of Yosemite Valley (where the clearing usually starts), provides an elevated vantage point with a view all the way down to Half Dome on the valley’s east side, and is spectacular to photograph when the storm clears. It even has decent cell service. And if I’m looking for an excuse to turn on the engine and warm things up, I drive through the tunnel for a view to the west, a preview of coming weather.
My final advice for anyone waiting out a storm at Tunnel View is when the storm clears, don’t spend so much time there that you miss opportunities elsewhere. This is easy to do because the photography will remain spectacular long after you should have moved on to other scenes.
Today’s image
Among my many snowy-Yosemite go-to spots is Cook’s Meadow. On this trip several years ago, until the snow arrived, the meadow was a field of lumpy brown grass, its sentinel elm a bare skeleton in the shadow of Half Dome. But a few inches of overnight snow transformed the bland meadow into an undulating sea of frozen white waves and etched the tree in white.
The snow was still falling when I arrived, wet and fast, slanted by a stiff breeze. Half Dome was gone. I positioned my tripod so the elm stood by itself, balanced in the frame by a stand of evergreens. The falling snow added an interesting dynamic to the otherwise static scene and I chose a 1/4 shutter speed that would blur its motion to streaks of white.
Yosemite Photo Workshops

Snowy Yosemite
Click an image for a closer look and slide show. Refresh the window to reorder the display.


Practicing what I preach
Posted on October 10, 2016
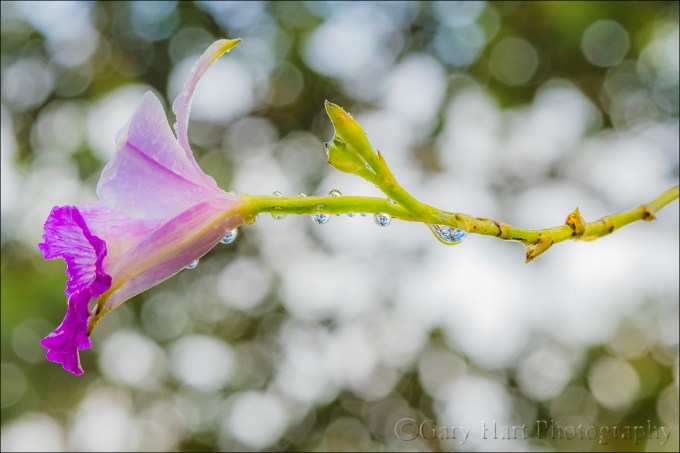
Raindrops on Orchid, Lava Tree State Park, Hawaii
Sony a7R II
Sony FE 90mm f2.8 Macro
1/30 second
F/11
ISO 800
The morning (last week) I started this post I was photographing South Tufa at Mono Lake in 26 degree temperatures. It’s hard to believe that less than three weeks earlier I was wearing a tank top, shorts, and flip-flops while photographing orchids in Hawaii. And later today I’m off to Moab, Utah.
I’d taken my Hawaii workshop group to Lava Tree State Park, long a personal favorite spot for its quiet beauty and intimate scenes. A recent heavy downpour had soaked the ground and left virtually every square inch of foliage glistening with raindrops. Recognizing an opportunity for some extreme close-focus photography, I immediately loaded my macro and extension tubes into my bag and herded my group onto the loop trail that circumnavigates the park.
In the shade just off the trail at the back of the park, a solitary, raindrop-laden orchid caught my eye—exactly what I look for when close-focus photography is my goal. Unfortunately, even with my tripod extended to its maximum height (6 inches above my head), the flower was a few inches too high to photograph at what I considered a good angle. No matter how I tried, I couldn’t find a position that allowed me to emphasize the orchid and its raindrops without blowing out the brilliant sky in the background. Tugging at the back of my brain as I stalked my subject was that frequently uttered photographic mantra, “Never blow the highlights.” But rather than give up, I stood back and considered my options.
Photographic rules are usually based on sound, proven reasoning that guides the neophyte to competent, appealing images. And while I’ll acknowledge that a broken photographic rule can indeed ruin an image, I’ve also spent my entire photographic career espousing the creative merits of breaking rules. If true artistic achievement means doing something new, and there’s already a rule for something, doesn’t that mean it’s been done? In other words, genuine creativity requires breaking the very rules that are supposed to lead to good images.
So what was my problem? Among the most ubiquitous and absolute pieces of photograph dogma is, “Never blow your highlights!” And for the most part I agree that blown highlights ruin an image—in fact I’ve spent a lot of time writing about how to deal with difficult light, and it’s all been based on the premise that we need to save the highlights at all costs. Over the years I’ve written and spoken about exposure techniques, graduated neutral density filters, HDR blending, and silhouettes to save the highlights.
In this case, after exhausting my conventional solutions, it would have been far easier to move on to a different orchid. But I liked this orchid, with its rich color and shimmering raindrops, and the more time I spent with it, the more I liked it. So what if I make it okay to blow the highlights? What if instead of trying to subdue them, I made the highlights a feature of my scene?
Suddenly unshackled, an entirely new world of possibilities opened for me. I eyed the background and realized that turning the bright sky white, I’d have a striking contrast for the properly exposed orchid. Furthermore, the sky breaking through the canopy overhead would be softened by a paper-thin depth of field—if I could find the right aperture, the effect could be quite appealing.
To focus as close as possible, I added a 15mm extension tube to my macro and worked on identifying the angle of view and front/back relationships, eventually refining my the composition in small increments until all felt right. To mitigate a very slight breeze, I set my ISO to 800 and metered on the flower, ignoring the violently flashing highlights. The final piece of the puzzle was determining the f/stop that would give me the best effect. Rather than trust the result on my LCD, I ran the range of f/stops from f/2.8 to f/16, increasing my shutter speed to keep the exposure uniform. Regardless of the f/stop, with my lens more or less parallel to the orchid’s stem, I had a fairly large area of sharpness that included all of the raindrops, most the flower, and much of the stem.
I know this scene won’t garner as much attention as a vivid sunrise or dramatic lightning strike, but really like this image. So I guess the moral here is if you find yourself bound by rules, aggressively seek the unconventional. If a “rule” applies, go ahead and follow the rule for a shot or two, then challenge yourself to break it. You may end up with more failures than successes (but of course nobody needs to know that), but I’ll bet your successes will turn out to be among your favorite images.
Workshop Schedule || Purchase Prints || Instagram
Playing with light
(Creative use of the camera’s “limited” dynamic range)


The nature of time
Posted on October 2, 2016
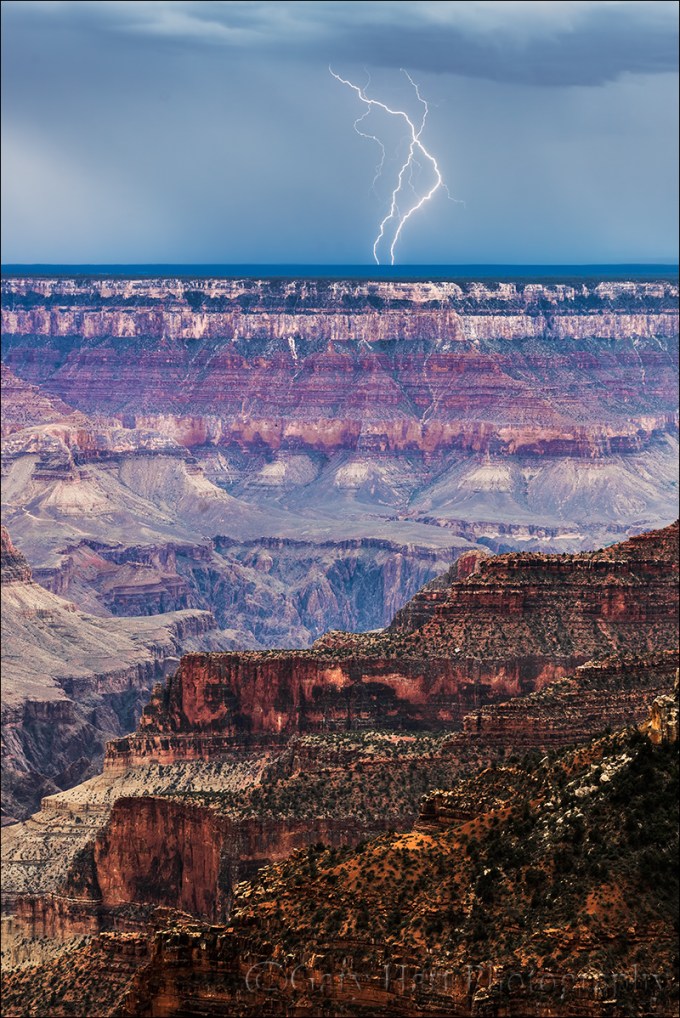
Electric Dance, Grand Canyon
Sony a7R II
Sony/Zeiss 24-70 f4
1/8 second
F/13
ISO 50
Lightning Trigger LT-IV
A few years ago I listened to an NPR show about Time and the arbitrary ways we earthlings measure it. The guest’s thesis was that the hours, days, and years we measure and monitor so closely are an invention established (with increasing precision) by science and technology to serve society’s specific needs. The question posed to listeners was, “What is the most significant measure of time in your life?”
Most callers responded with anecdotes about bus schedules, school years, and work hours that revealed how conventional time measurement tools, the arbitrary units of clocks and calendars, rule our existence. Listening while on my morning run, I was unable to call in to share my own (significantly different) relationship with time, so you’re stuck with reading about it here instead.
Landscape photographers are governed by far more primitive time constructs than the bustling majority. We follow the fundamental laws of nature that inspire but ultimately transcend clocks and calendars: the earth’s rotation on its axis, the earth’s revolution about the sun, and the moon’s motion relative to the earth and sun. The clocks and calendars that have little to do with the picture taking aspect of my life are useful only when I need to interact with the rest of the world on its terms (that is, run the business).
While my days are inexorably tied to the sun’s and moon’s arrival, and my years are ruled by the changing angle of the sun’s rays, I can’t help long for the ability to mark my calendar for the rainbow that arcs above Yosemite Valley at 4:29 p.m. every May 26, or the lightning bolt that strikes the Grand Canyon’s South Rim at 2:45 p.m. each August 18. But Nature, despite human attempts to measure and manipulate it, is its own boss. The best I can do is schedule my personal photo trips and photo workshops to maximize my odds for the good stuff, then show up and hope for the best.
The insignificance of clocks and calendars is never more clear than the first morning following a time change. On the second Sunday of March, when “normal” people moan about rising an hour earlier, the sun thumbs its nose at Daylight Saving Time and rises a mere minute (or so) earlier than it did the day before. So do I. And on the first Sunday of November, as others luxuriate in their extra hour of sleep, I get to sleep an entire minute longer. Yippee.
There’s irony in the immutability of the natural laws responsible for the (perceived) randomness of the very events we landscape photographers covet: Earth’s revolution and rotation, our orbiting Moon, each predictable down to microseconds, set in motion the atmospheric and tidal dynamics that are the catalysts for the unpredictable seasons, weather, and waves we photograph. Ironic or not, I love nature’s mixture of precision and randomness. Though I try to maximize my odds for photographically special natural phenomena, understanding that “it” might not (probably won’t) happen only enhances the thrill when something special does happen.
The lightning in today’s image was certainly not on anyone’s calendar, but knowledge of the Grand Canyon’s August monsoon enabled Don Smith and me to schedule our annual Grand Canyon Monsoon workshops for the best time to be there. And despite the uncertainty, it was no fluke that we had our group on the North Rim and within sprinting distance of the Grand Canyon Lodge viewing deck (with Lightning Triggers primed and ready) when the clouds started building and darkening across the canyon.
This turned out to be a special day. After several fruitless afternoons of ticking seconds that stretched to minutes and hours, our group was treated to a two-hour electric show that left us all giddy and breathless. This strike came and went in milliseconds, so fast that I had no idea that it was actually a pair of intertwined bolts, a secret revealed only by my camera’s ability to freeze time.
Workshop Schedule || Purchase Prints || Instagram
Right place, right time
Click any image to scroll through the gallery LARGE


, Yosemite")


")


You’re smarter than your camera, because…
Posted on September 24, 2016

Cradled Crescent, Sierra Foothills
Sony a7RII
Tamron 150-600 (Canon-mount with Metabones IV adapter)
.4 seconds
F/8
ISO 400
Your camera is stupid (and you’re not)
In a previous life, I spent a dozen or so years doing technical support. In this role, job-one was convincing people that, despite all failures and error messages to the contrary, they are in fact smarter than their computers. Most errors occur because the computer just didn’t understand: If I misspel a wurd, you still know what I meen (rite?); not so with a computer. A computer can’t anticipate, reason, or create; given a task, it will blithely continue repeating a mistake, no matter how egregious, until it is instructed otherwise, fails, or destroys itself.
All this applies equally to today’s “smart” cameras—no matter how advanced its technology, a camera just can’t compete with your brain. Really. If I’d have allowed my camera to decide the exposure for this crescent moon scene, I’d have ended up with a useless mess: The camera would have decided that the foreground hillside was important and allowed in enough light to expose distracting detail and completely wash out the color in the sky. But I knew better. Wanting to simplify the scene, I manually metered and banished the insignificant details to the black shadows, capturing only the moon’s delicate shape and a solitary oak silhouetted against the indigo twilight.
It’s scenes like this that cause me to never trust my camera’s decision making, and why, in my (many) decades of serious photography, I’ve never used anything but manual metering. And since I try to have elements at different depths throughout my frame, focus is almost always my decision, not my camera’s, as well.
Today’s cameras are more technologically advanced than ever—their auto exposure and focus capabilities are quite good, good enough that nobody should feel they must switch to manual if they fear it will diminish the pleasure they get from photography. But if you define photographic pleasure as getting the best possible images, try spending a little time mastering manual metering and hyperfocal focus, then use that knowledge to override your camera’s inclinations. In my workshops, where I teach (but never require) manual metering and hyperfocal focus to all who are interested, people frequently marvel at how easy and satisfying it is to take control of their camera.
Photo Workshop Schedule
Overriding my camera’s “brain”
(Images I couldn’t have done in Auto mode)


