Eloquent Images by Gary Hart
Insight, information, and inspiration for the inquisitive nature photographer
Things Always Work Out…
Posted on October 10, 2025

Setting Crescent Moon, Grand Teton, Grand Teton NP
Sony a7R V
Sony 24-105 G
.8 seconds
F/16
ISO 100
I’m a naturally positive person who doesn’t have to work too hard to stay optimistic about pretty much everything. And while this “things always work out” philosophy generally serves me quite well, it can sometimes cause problems. Case in point…
A couple of weeks ago I was in Jackson Hole to help out Don Smith with his Grand Teton workshop. Back in the pre-Covid days, when Don and I would trade off assisting several of each other’s workshops every year, my annual Jackson Hole trip was one I especially looked forward to. Since I hadn’t been there since 2018, returning this year was a particular treat.
In addition to the incomparable beauty of the Tetons, Jackson itself is has a great little downtown that I make a point of walking daily when I’m there. With so many shops, galleries, and restaurants, it’s hard to spend quality time at each, but the one place I always make sure I get to is Tom Mangelsen’s gallery on Cache Street.
This year I had so much other stuff on my plate, by the time our final day arrived, I still hadn’t made it there. So I got a late checkout and carved out a couple of morning hours to walk down there, browse, and return before heading to the airport.
While enjoying the beautiful gallery, I couldn’t help patting myself on the back for allowing enough time to feast on every print displayed without feeling rushed. Even though I’d estimate that at least 80% of Mangelsen’s images are of wildlife, and I don’t photograph wildlife, I couldn’t help but feel the inexplicable kindred connection that draws me to a very small cadre of nature photographers whose motivation seems, rather than to dazzle or impress, simply to share their own very personal relationship with natural beauty as it touches them. And while I won’t pretend to have tapped those instincts to the extent Mangelsen and those few others have, their images have a profound influence on me.
As much as I’d have loved to leave with a Mangelsen print, I knew that would be far beyond my ability to transport home (not to mention my budget). But during my meanderings I couldn’t help notice the variety of beautiful Tom Mangelsen coffee table books displayed throughout the gallery. Last year I wrote a post about, among other things, my relationship with coffee table books, and how it saddens me that the coffee table photo book appears to be a declining medium., so it always thrills me to encounter signs of CTB life. On a whim I asked if any of the books were signed (I’d looked but found none) to my delight she not only did she point me to some, she said there was no price premium for the signed books.
For context, I’m of the pre-selfie generation, coming of age way back in the time autographs, not selfies, were the ultimate commemoration of a transient connection to greatness. (Another nice thing about autographs is that they can be acquired without bothering a person who is most likely quite tired of accommodating intrusive strangers.) Though I’m not a collector, over the years I’ve assembled an eclectic inventory of signed memorabilia from people I admire.
How eclectic? Well, I have a baseball signed by Ted Williams; a bottle of wine signed by Mick Fleetwood; “August and Everything After,” in vinyl, signed by all of Counting Crows; CDs signed by Michael Franks and Pat Metheny; two signed Galen Rowell prints; and a personal postcard from Wallace Stegner. (And the person who scores me a cartoon personally signed by Gary Larson would be a friend for life.) So anyway, getting a signed Tom Mangelsen book just seemed like the thing to do.
I’d be lying if I said I’d forgotten that, on my flight out, my suitcase weighed in at 51 pounds, one pound above the checked bag limit, forcing me to transfer a pound worth of miscellany to my already 30-pound camera bag. (My computer bag, which must fit under the seat to qualify as a personal item, weighs about 10 pounds and was already stuffed to the brim.) Nevertheless, I of course chose the largest, heaviest Mangelsen book: “The Last Great Wild Places”— a whopping 12×18 inches and (including the lovely protective carryall) about ten pounds. My plan for how I was going to travel with an additional 10 pounds? It’ll work out.
Unfortunately, somehow the woman at the Jackson Hole United Airlines counter didn’t get that memo. While packing, after adding my new book, I’d made a token effort to transfer a few more things to my camera bag (oh yeah, I’d also purchased some T-shirts for me, a sweatshirt for my wife, plus a pound of coffee, so my suitcase was starting out even heavier than before), and strategically positioned a few other heavy-ish items near the top of the suitcase for easy access in case more transferring was required. At the airport, I held my breath as I hefted my suitcase onto the scale, flashing my best, “Hey, I’m nice guy—work with me here” smile. The counter person looked at the scale, then back at me, and issued her best, “You’ve got to be kidding me” stare. When I feigned ignorance, she simply said, “You’re ten pounds over.” Sigh.
After shifting my pre-staged heavier items and discovering that I was still seven pounds overweight, a small amount of panic started to leak in. Fortunately, we’d arrived at the airport more than 3 hours early. After 45 minutes of shifting, repacking, and reweighing (at least four times) I passed the weigh-in and queued up for TSA. (My new United airlines “friend” wouldn’t even reward me for getting down to just 1/2 pound over.)
I won’t bore you with the details, but suffice to say, if the plane had gone down and they sent my recovered belongings to my wife, she’d no doubt be scratching her head trying to figure out why my camera bag included a one pound bag of ground coffee, my toiletry kit, a Bluetooth speaker, and a pair of hiking boots—and why my computer bag also included a coffee mug, umbrella, and several pairs of socks.
But the bottom line is, after countless failed weigh-ins, then lugging (not to mention babysitting) over 50 pounds of bulky carryon through the Jackson Hole, (incomprehensibly large) Denver, and Sacramento airports, I did indeed make it home with the signed Tom Mangelsen book that’s now on display in my office. So I guess things really do work out.
Speaking of things working out
The workshop shoot that resulted in today’s image was not part of Don’s Grand Teton workshop master plan. It was an opportunistic response to a fortuitous confluence of blank skies and a crescent moon that just happened to come at the right time this year.
When scheduling a photo workshop, we have no idea of the conditions we’ll encounter. While I schedule many workshops using the moon as a hedge against blank skies, other factors can and do take priority—like fall color in a fall color workshop. Since this was Don’s workshop, I had nothing to do with the schedule, but I knew this one had to be scheduled for the best chance of peak fall color, moon be damned. (And to say Don nailed the fall color timing this year would be an understatement.)
Having just returned from my Hawaii Big Island workshop, and knowing I was departing for my Eastern Sierra workshop the day after returning from Jackson Hole, the moon had been the last thing on my mind until just a day or two before the workshop started. That we’d have a crescent moon in the west shortly after sunset had been on Don’s radar long before that, but we both agreed that it would probably be too far south to align with any of our prime sunset locations. But when mostly clear skies were forecast for the workshop, Don and I revisited the moon as a potential blank sky antidote to follow one of the workshop’s sunsets, and decide that we could indeed make it work.
After pulling up some topo maps and solar/lunar data, I plotted the waxing crescent’s altitude and azimuth for each evening of the workshop and determined that Thursday night would be the time to go for it. Then Don and I scouted the potential locations, both on maps and in person, and found a spot on the road between Jackson Lake and Oxbow Bend that would align the moon perfectly with Teton Peak on Thursday evening.
When the day arrived, we followed a nice sunset at Jackson Lake with a short drive to our predetermined spot, arriving in the warm glow of early twilight. To my eye the view here was the spectacular peaks to our south and west, but I couldn’t help notice that just across the the road and facing north (backs to the mountains), a dozen or so photographers were pointing very long glass at something far across the meadow. I looked more closely and barely made out a pair of elk doing whatever elk do (no, not that). Whatever. (Okay, seriously, I understand the appeal of wildlife photography, it’s just not for me.)
We landscape shooters pointed in the complete opposite direction, toward the brightening crescent hanging above Grand Teton, arguably America’s most striking mountain. To align the moon and peak with the foreground I wanted, I jogged about 5o yards down the road, staying only long enough to get a few frames. But being down there also gave me a great perspective of the conflicting priorities on display: wildlife shooters on one side of the road pointing north, landscape shooters on the other pointing south (it was actually a pretty amusing sight I wish I’d thought to take a picture of). I imagine they were just as baffled by our choices as I was about theirs.
Even though this moonset wasn’t a “featured” shoot of the workshop (people were there for fall color and the many views of the Tetons), it’s a great example of how things really do work out. Don and I used to stress about the conditions in a workshop and whether people might be disappointed, but we learned a long time ago that if you stay prepared and flexible, there will always be great stuff to photograph—and things really do work out.
Workshop Schedule || Purchase Prints || Instagram
A Peek at Peaks
Click any image to scroll through the gallery LARGE


")


What Would Tom Cruise Do?
Posted on May 31, 2025

Rising Crescent, Grand Canyon
Sony a7R V
Sony 24-105 f/4 G
ISO 400
f/11
.6 second
As you might imagine, at the bottom of Grand Canyon the sleep schedule syncs with the sun. In May, that means flopping into our cots to await the stars around 8:00 p.m., then rising around 5:00 a.m. On a typical day, the morning pace is fairly leisurely, providing time for packing up our campsites, coffee, relaxed chat, breakfast, and even a little photography. While all this happens, the guides clean up breakfast and pack up the kitchen and toilets, then let us know when it’s time to queue up for the 5-minute fire-line that loads the boat. By 8:00 a.m. we’re on the water.
But this was not a typical day. The plan this morning, my annual Grand Canyon raft trip’s final full day, was to compress all that morning activity into one hour so we could beat the crowds to Havasu Creek, and catch the best light there. Photographers love clouds, but when clouds aren’t in the forecast, we go for the next best thing: shade. We formulated the Havasu shade strategy the prior afternoon, then sold it to the group at dinner that night. Though some were dubious of our seemingly impossible mission, the guides assured us it was doable if everyone bought in and worked together. And it didn’t hurt that, unlike the trip’s prior nights, this campsite wasn’t positioned with the view toward the southern horizon necessary for a sleep-interrupting Milky Way shoot.
Turns out I actually had a pretty good sleep that night, waking about 4:45 and instantly springing fully rested from bed, very much geared up for the morning’s tight schedule. The first thing I did was pack my cot and walk it down to the staging area in front of the rafts, greeting a few still groggy fellow rafters on the way. But after depositing my cot, I glanced up upstream and did an actual double-take….
Before continuing, I should probably let you know, or at least remind you, that I’m something of a moon fanatic—which I guess would make me quite literally, a “lunatic,” given that the word derives from the Latin word for moonstruck. I’ve always believed that the moon’s presence enhances pretty much any scene, and work hard to include it whenever possible.
Which is why, more than 20 years ago, I started plotting the moon’s potential arrival upon, or departure from, every scene I hoped to photograph, going to great lengths to capture this arrival or departure whenever possible. In fact, many photo trips and workshops are scheduled specifically for a landscape/lunar confluence. And even when the moon isn’t a prime objective, it’s a rare photo trip that I don’t at least know the moon’s status before departing, its phase and daily rise/set positions and times, just in case.
But since the primary celestial goal of my Grand Canyon raft trip is the Milky Way, and it requires moonless nights for the absolute darkest skies possible, I always schedule this trip for the moonless nights around a new moon. Not only that, given that we spend the entire trip in the shadow of vertical walls soaring up to a mile above us, including the moon in my Grand Canyon raft trip images is never a consideration—I simply don’t think about it.
So imagine my surprise when that casual upstream glance revealed a thin slice of moon suspended in the pre-sunrise gloaming, perfectly framed by the canyon’s towering limestone layers. Overcoming my disbelief, I reflexively shouted, “Look at the moon!,” then ran like Tom Cruise to grab my camera gear and race back to the best view. (I also do all my own stunts.)
For about 10 minutes I photographed in rapturous frenzy, completely forgetting our compressed morning. I composed horizontal and vertical, recording many versions of the ever-changing moon, clouds, color, and light. Given the weight restrictions on this trip, my longest lens was a 24-105, but I didn’t stress and (correctly) reasoned that I have more than enough resolution to crop my images down to the tighter compositions the scene called for.
By the time the crescent ascended behind the south wall and I put my camera away (and remembered the departure deadline I’d lobbied the group so hard for), my adrenaline was ramped so high that I had no problem packing the rest of my stuff and catching the last raft out of camp. (Okay, there are only two rafts and we depart together—I’m reasonably confident they wouldn’t have left without me, though I imagine I’d have had to endure a fair amount of good natured abuse.)
I’m fully willing to acknowledge that my passion for moon photography is extreme, a fact confirmed by the fact that most of the group didn’t join me photographing the moon this morning. But that’s okay—we each have our own relationship with the natural world, and my own deep interest in all things celestial predates my interest in photography by more than a decade. The fact that today’s technology (finally) enables me to combine these loves is a true blessing I will never take for granted.
One more truth was with me as I photographed that morning. All week I’d been fully aware that this was my final Grand Canyon raft trip. Drifting downstream, bouncing over rapids, and hiking to so many familiar spots, I’d spent the week silently saying goodbye to all the scenes that had moved me so profoundly on my ten visits. As I composed and clicked, I couldn’t help feel overwhelmed by the realization that this magic place had bestowed a divine parting gift.
I Still Do My Grand Canyon Monsoon Workshop
Workshop Schedule || Purchase Prints || Instagram
Grand Canyon Raft Trip Collection
Click any image to scroll through the gallery LARGE


Big Moon Rising
Posted on May 1, 2022

Big Moon Rising, Tunnel View, Yosemite
Sony a7RIV
Sony 200-600 G
Sony 2x teleconverter
ISO 100
f/13
1/10 second
It doesn’t take much time with my images to figure out that I love photographing the moon. Large or small, full or crescent, it doesn’t really matter. Almost every one of my moon images is the product of plotting the time of its arrival (or departure), then making sure I’m there to photograph it. Using astronomical tables and topo map software, I’ve been doing this for more than 15 years—long before the availability of the astronomy apps that tremendously simplify the process with pretty decent accuracy. And while I recommend these (new fangled) apps to everyone who wants to photograph anything celestial above a particular terrestrial scene, I still do it the old fashioned way for no other reason than it’s more fun. But, as much as I’d love to tell you that I plotted this moonrise from last Wednesday morning in Yosemite, I have to admit that this one was largely a matter of just happening to be in the right place at the right time (aided by just a dash of advance knowledge).
Yosemite Valley is not a great sunrise location because nearly all of its vistas face east, which means photographing towering monoliths in full shade (the sun’s behind them), against the brightest part of the sky. We always hope for clouds to add color to the sky and subdue some of the sun’s brightness, but too frequently end up with blank skies.
Nevertheless, in most of my Yosemite photo workshops I take my group to Tunnel View for our first sunrise. I choose Tunnel View for that first sunrise because when clouds aren’t present, we can still turn the distinctive outlines of El Capitan, Half Dome, and Cathedral Rocks into silhouettes. Not only does this give my students the opportunity to create something a little different than the standard Yosemite image, it’s also a good way to get them thinking about photographing the way their camera sees rather than the way their eyes see (a real point of emphasis in my workshops).
My Yosemite Waterfalls and Dogwood workshop was scheduled to (fingers crossed) coincide with the park’s peak spring runoff and dogwood bloom, which usually happens around May 1 (+/- a week or two). This year I chose the last week of April because I’d rather be a little early for the dogwood than a little late, and to avoid the weekend crowds. Though I hadn’t considered the crescent moon when I scheduled it, as the workshop approached I checked and saw that on our first morning an 11% crescent would rise nearly 90 minutes before sunrise. Unfortunately, this moon aligned poorly with all of Yosemite’s icons, and to be visible at all would need to climb above the much higher walls southeast of Tunnel View. On the other hand, I saw that the crescent would be trailing a nice planetary alignment that included Mars, Venus, and Jupiter—maybe not great to photograph, but pretty nice to see.
When we arrived the sky was dark enough to enjoy the planets, but there was no sign of the moon. As feared, there were no clouds, so after getting my group going with their silhouettes, I started thinking about the moon again. Knowing that it was almost directly beneath Jupiter, about 1 1/2 times the distance separating Venus and Jupiter, I was able to pretty closely approximate where the moon would rise. And I realized that when it did rise, the sky would still be plenty dark enough.
I let my group know what would be happening and quickly ran to my car to grab my tripod, Sony a7RIV, Sony 200-600 G lens, and Sony 2X Teleconverter. Zooming my lens all the way out to 1200mm (go big or go home), I trained it on the small tree on the far left of this image and waited. The moon actually appeared just slightly left of the target tree, close enough that I didn’t need to recompose. The ridge here was so steep that it took more than 10 minutes for the moon to completely separate, creating the illusion that it was sliding uphill. merge
The most exciting part of this otherwise serene morning came when a commercial jet zipped into the scene, contrail trailing, and someone realized it was on a collision course with the moon. What ensued was a brief scramble to photograph the collision. Thwarted by my 2-second timer (a further reminder why I don’t photograph anything that moves), I got nothing but contrail, but at least two in the group got the moon/jet convergence.
Here’s a link to my Crescent Moon article in the Photo Tips section of my blog
Workshop Schedule || Purchase Prints || Instagram
A Crescent Moon Gallery


")


")


Expect the Unexpected
Posted on June 20, 2021

High Sierra Nightfall, Crescent Moon and Venus, Yosemite
Sony a7RIV
Sony 100-400 GM
1/2 second
F/16
ISO 400
With so many natural variables beyond our control, and no matter how creatively we visualize, thoroughly we plan, and precisely we execute, landscape photographers go into every shoot uncertain of success. But making consistently successful images depends not only on our ability to visualize, plan, and execute, but also on our ability to recognize and respond to unexpected opportunities.
The truth is, your creativity’s greatest limitation is probably your own biases. Put in more practical terms, don’t allow yourself to be swayed by preconceived notions of what “the shot” is, what equipment you’ll need, and whether the opportunities are exhausted.
We cover this kind of stuff in my workshops, where one of my most frequently asked questions is, what lens should I bring? I’ve been doing this long enough to know that the underlying essence of this question is, what lens can I leave behind? And since it’s a photography truism that the lens you need is the one you left at home, I’m usually reluctant to give an absolute answer. In fact, I usually encourage people to bring all they can carry.
A couple of weeks ago my brother Jay and I made a quick trip to Olmsted Point in Yosemite to photograph the Milky Way. I’d chosen Olmsted because I think it’s the best easily accessible (with a car) place to photograph Half Dome with the Milky Way; I chose this night because clear skies were forecast, and a brand new moon meant the darkest possible sky. Though I knew a small sliver of one-percent moon would be visible for an hour or so after sunset, as soon as I realized the moon would be nowhere near Half Dome, I didn’t give it another thought—this trip was all about the Milky Way and Half Dome. Period. Nevertheless, I packed all my gear because…. Well, why not?
I’m afraid that for me, “all I can carry” requires at least two camera bags, which of course isn’t usually practical when flying, given the space and weight constraints. But when I drive to a location from home, I forgo the Sophie’s Choice equipment decisions and just pack everything. Everything. Which is why, for a trip on which I’d only planned to use my Sony a7SIII and (brand new!) Sony 14mm f/1.8 GM lens, the back of my Outback contained (among many other things) my Sony a7RIV and Sony 100-400 GM.
The other part of being prepared is to no be so locked onto your objective that you fail to recognize other opportunities. This is a problem I’m frequently reminded of in my workshop image review sessions, when everyone shares one of their images from the workshop for my feedback. We’re all going to the same locations at the same time, but it’s a rare session that at least one person doesn’t share something that causes others, myself included, to exclaim, “Wow, I didn’t see that!” The lesson here is, the instant you think you know “the” shot is the instant your creative door slams shut.
This lesson also applies to the belief that the show is over, or that the show isn’t going to happen. Some of my most unforgettable photography experiences have happened because I stayed just a little longer after it seemed pretty obvious that Mother Nature was done, or decided to go out when there was every indication that nothing was going to happen.
We pulled into Olmsted Point a little after sunset. Job-one was changing out of my Sacramento-summer T-shirt and shorts, and into my High-Sierra-night long-johns, flannel-lined jeans, wool shirt, and down jacket. But while changing, I couldn’t keep my eyes off the wisp of crescent moon setting behind a granite ridge far north of the scene I’d come to photograph. And joining the moon on its journey to the horizon was Venus, a visual bonus I hadn’t anticipated.
Sufficiently fortified against the elements and unable to take my mind off the moon and Venus, I discarded my plan to make the 1/4 mile hike up to Olmsted Point before the darkness was complete (rationalizing that I could probably do this hike blindfolded anyway). Standing at the car I mentally framed a shot, then extracted my tripod, a7RIV, and 100-400. While setting up in the parking lot would have worked, I decided to scramble up the adjacent granite slope for an elevated vantage point that reduced some of the foreground clutter.
It was pretty dark by the time I was in position and had everything assembled, but since I was only interested in creating silhouetted shapes to go with the moon, the darkness wasn’t a big problem. I shot until the moon dropped out of sight. Because I had to move around a bit to adjust the relationships between the trees and the descending moon and Venus, I only managed nine frames before the moon was gone
The Milky Way delivered as expected, but I found extra pleasure thinking about this moon shoot that kicked off the night and delivered something as satisfying as it was unexpected.
Workshop Schedule || Purchase Prints || Instagram
A Gallery of the Unexpected


Your camera is stupid (but you’re not)
Posted on August 16, 2020

New Moon and Oak, Sierra Foothills, California
Sony a6300
Tamron 150-600 (Canon-mount with Metabones IV adapter)
.4 seconds
F/8
ISO 400
In a previous life I spent a dozen or so years doing technical support. In this job a key role was convincing people that, despite all failures and error messages to the contrary, they are in fact smarter than their computers. Most errors occur because the computer just didn’t understand: If I misspel a wurd, you still know what I meen (rite?). Not so with a computer. A computer can’t anticipate, reason, or create; assigned a task, it will blithely continue repeating a mistake, no matter how egregious, until it is instructed otherwise, fails, or destroys itself.
All this applies equally to today’s “smart” cameras, which are essentially computers at their core. But no matter how advanced its technology, a camera just can’t compete with your brain. Really.
For example, if I’d allowed my camera to decide the exposure for this crescent moon scene from 2016, I’d have ended up with a useless mess: While this image is all about color and shape, automatic exposure, deciding that the foreground hillside is important, would have brightened the scene enough to expose distracting detail and completely wash out the color in the sky. But I knew better. Wanting to simplify the scene, I manually metered and banished the extraneous foreground detail to the black shadows, capturing only the moon’s delicate shape and a solitary oak silhouetted against the indigo twilight.
Digital cameras become more technologically advanced each year, and their auto-exposure and -focus capabilities are quite good, good enough that nobody should feel they must switch to manual if they fear it will diminish the pleasure they get from photography. But if your photographic pleasure comes from getting the best possible images, it would benefit you to spend a little time mastering manual metering (and hyperfocal focus), then using that knowledge to override your camera’s programmed inclinations. It might help to know that in my photo workshops I teach (but never require) manual metering to all who are interested, and most who try it are surprised by how easy and rewarding it is to take control of their camera.
Trust your histogram
Exposure control starts by learning to use a histogram, a graph of the tones in an image (read more about histograms). Not only does every digital camera show us a histogram of the scene we just photographed, modern cameras (all mirrorless for sure, and all of the latest DSLRs that I know of) display the histogram for the scene we’re currently metering, before the shutter is clicked.
With a histogram, instead of clicking and hoping as we did in the film days, or clicking, checking, and adjusting as we did in the pre-live-view histogram days, the addition of a histogram before we shoot provides advance knowledge of the image’s exposure. For those who know how to read a histogram, manual exposure has never been easier—just monitor the histogram as you prepare your shot and dial the exposure until the histogram looks right. Click.
Setting up your live-view histogram
To ensure a valid pre-capture histogram (on your DSLR’s live-view screen, or your mirrorless camera’s live-view or viewfinder screen), make sure you are in whatever your camera manufacturer calls exposure simulation. When the camera simulates exposure, rather than always showing the ideal exposure on the live-view screen, it attempts to emulate the exposure settings you’re using. Here is a far from comprehensive guide to the exposure simulation designation used by the major camera manufacturers (though I can’t guarantee that all cameras from the same manufacturer do it the same way):
- Canon: Exposure Simulation (enabled)
- Fuji: Preview Exp. in Manual Mode (off)
- Olympus: Live-view Boost (off)
- Nikon: Exposure Preview (selected in the Info menu)
- Sony: Setting Effect (on)
On most camera’s the metering mode (the way the camera’s meter views the scene—not to be confused with exposure mode, which is the way the camera sets the exposure) doesn’t affect the pre-capture histogram, but to be safe, instead of spot or partial metering, I choose a metering mode that uses the entire frame. (With my Sony mirrorless bodies, I set my metering mode to Entire Screen Average.)
Once you’ve turned on exposure simulation, you need to figure out how to display the histogram. Most cameras, mirrorless or DSLR, offer multiple live-view screen options that display a variety of information about the scene you’re photographing. On most cameras, only one or two of these screens displays the histogram—finding it is usually a simple matter of cycling through the various displays until the histogram appears. To minimize the number of screens I need to scroll through to get to the information I need (such as the histogram or level), I always go into my camera’s menu system and disable the live-view screens I don’t use.
Using your live-view histogram
Using my pre-capture histogram, I start the metering process as I always have. In manual exposure mode, I start in my camera’s best ISO (100 for my Sony a7RIV), and the best f-stop for my composition (unless motion, such as wind or star motion, forces me to compromise my ISO and/or f-stop). With ISO and f-stop set, I slowly adjust my shutter speed with my eye on the histogram in my viewfinder (or LCD).
Most mirrorless bodies offer highlight warnings in their pre-capture view (often called “zebras”). While these alerts aren’t nearly as reliable as the histogram and should never be relied on for final exposure decisions, I use their appearance as a reminder to check my histogram. The first time I meter a scene, my current exposure settings (based on my prior scene) can be far from what the current scene requires—in this case, I push my shutter speed fast until the zebras appear (if my prior exposure was too dark) or disappear (if my prior exposure was too bright), then refine the exposure more slowly while watching the histogram.
In a low or moderate contrast scene, I’ll have room on both the shadows and highlights sides of the histogram—a pretty easy scene to expose. But in a high dynamic range scene (dark shadows and bright highlights), the difference between the darkest shadows and brightest highlights might stretch the histogram beyond its boundaries. When the high dynamic range is so great that I have to choose between saving the highlights or the shadows, I almost always bias my exposure choice toward sparing the highlights, carefully dialing the exposure until the histogram bumps against the right side—at that point I stop adding exposure, even if my shadows are cut off (black).
Because the post-capture histogram is more reliable than the pre-capture histogram, when high dynamic range gives me little margin for error, I verify my exposure by checking the post-capture histogram. Here’s where the RGB (red, green, blue) histogram becomes important. While the luminosity (white) histogram gives you the detail you captured, it doesn’t tell you if you lost color. Washed out color is always a risk when you push the histogram all the way to the right, so it’s best to check the post-capture RGB histogram to ensure that none of the image’s color channels are clipped.
An often overlooked aspect of mastering in-camera metering is simply learning how your camera reports exposure. Not only does every camera interpret and display its exposure information differently, the histogram returned is based on the jpeg, so raw shooters always have more information than their camera reports—it’s important to know how much more. With my Sony a7Rx bodies, I know I’m usually safe pushing my histogram’s exposure graph up to a full stop beyond the left or right (highlights and shadows) boundary—I have no problem using every available photon.
A few more words about this image
In addition to taking control of the exposure for this image, roaming a hilly cow pasture in the foothills east of Sacramento gave me full freedom of movement to control the new moon’s position relative to the tree. As the sky darkened and the moon dropped, I literally ran up and down the hill to capture as many moon/tree/frame relationships as possible before the moon disappeared.
This is the week (August 16-21, 2020) to photograph a crescent moon. My recommendation is Monday morning on the eastern horizon before sunrise, and Wednesday or Thursday low in the west after sunset.
A Crescent Moon Gallery
")


Random Thoughts on a Sunday Afternoon
Posted on June 14, 2020
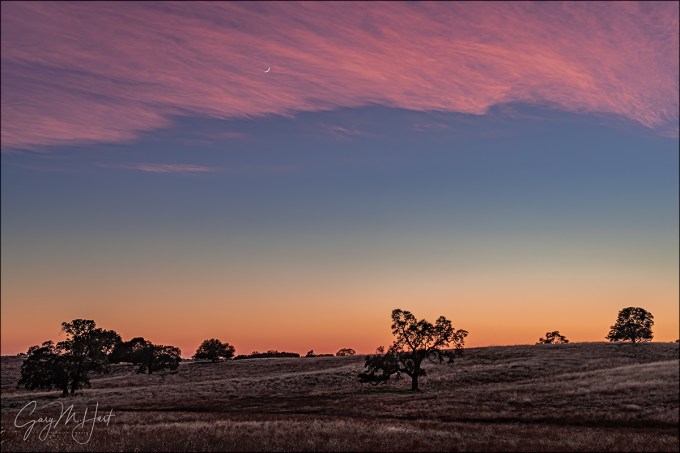
Sunset Accent, Crescent Moon and Oaks, Sierra Foothills
Sony a7R
Sony/Zeiss 24-70
1/3 second
F/9
ISO 100
Here’s a brand new image that’s nearly six years old. Brand new because I processed it for the first time just yesterday; six years old because I found it after loading my pre-Lightroom raw files from 2014 into Lightroom, something I’ve been wanting to do for a long time and I finally ran out of reasons not to do it. Before 2015 I did all my raw processing in Adobe Camera Raw, which worked fine as far as individual image processing was concerned, but also made it pretty easy for things to get out of control on my hard-disk because there was no underlying organization to my import process. Want proof? I’m actually missing about a month’s worth of images from 2013—I know because I have several processed jpegs from that span for which I have no originals. Sigh.
This is also just my 282nd image after switching to Sony mirrorless in the fall of 2014. While I have no specific memories of this evening (there have been many, many like this, as you’ll see in the gallery), I imagine that I was still struggling with the Sony interface—partly because mirrorless was a new trick for this old dog, and partly because the original a7R’s interface pretty much sucked (a problem that has been incrementally, and now completely, addressed in succeeding models). But it was fun processing this “old” image and recalling why I was able to forgive the lousy interface and abysmal battery life (also addressed) of the a7R: man, even right out of the gate that Sony dynamic range just doesn’t quit.
Skeptics might might look at this image and think I added the moon because it appears to be in front of the clouds. Anyone who has been in one of my workshops, or who knows me even just a little, knows I don’t do that. But for the skeptics in the audience, let me assure you that it is indeed possible for clouds to catch sunset color while still being translucent enough for the moon to shine through (you can actually see other examples below).
It saddens me that photography has reached a point where every beautiful, or interesting, or revealing image is (often justifiably, I’m afraid) scrutinized with a cynical eye. Photographers have brought this on themselves with their never-ending quest for more social media Likes, or to make a case for something for which they have no evidence (as we’ve seen in some of the recent news reporting).
After spending a good chunk of my photography life as a color transparency (slides) shooter who was pretty much stuck with whatever came back from the lab, I appreciate the ability to process my images as much as the next photographer. But there’s a continuum with basic processing on one end (there’s no such thing as an unprocessed image, whether you do it yourself or leave the processing to your camera) and Frankenstein hybrids on the other. To me the decision about where to draw the line on the processing continuum is similar to the decision between wearing nice clothes and putting on makeup and resorting to cosmetic surgery (yes, I understand that there are in fact many valid reasons for cosmetic surgery, and that this is not a flawless analogy).
So it really comes down to honesty—a commitment not to deceive. I love nature and want to share my love by portraying my subjects at their absolute best, but I want people’s first thought when they see one of my images to be, “Wow, I need to get out in nature more,” and not, “Wow, what a great photographer, or, “Wow, that’s impossible.” The scene you see in this image really happened, and there’s a photo of it because I put myself in position for the (very predictable) confluence of a new moon hanging above rolling hills dotted with statuesque oaks, plus the fortuitous addition of thin clouds that lingered just long enough to catch sunset color. It helped that I had a camera that could easily handle the difference between the brilliant sky and darkening hills, and enough photographic skill to properly frame and expose the scene. The image itself was remarkably easy to process and required very little digital help. This image is a success if it first helps you realize how beautiful even the simplest foothill scenes are, without being distracted by my skill as a photographer (good or bad), or the processing decisions I made.
A Foothills Gallery
Click an image for a closer look, and to view a slide show.
")


Eyes on the Sky
Posted on December 11, 2019

Goodnight Moon, Olmsted Point, Yosemite
Sony a7RIV
Sony 200-600 G
ISO 800
f/13
1/25 second
We tend to photograph the things we love most, but I don’t think that necessarily happens consciously. For example, I never appreciated the role the sky plays in my photography until someone pointed it out a few years ago. Browsing my galleries to verify, I was amazed at the percentage of my images that include at least one of the following: the sun, the moon, stars, a rainbow, lightning, or dramatic clouds. (And, as of last January, the northern lights.)
While I never set out to be a “skyscape” photographer, given my background, I guess it makes sense. (Or more succinctly, “Duh.”) As an astronomy enthusiast since I was a child, and an armchair meteorologist since my late teens, I spent most of my formative years with my eyes and mind on the sky. I continued these childhood interests into adulthood, studying both astronomy and meteorology in college (I even majored in astronomy for a few semesters), and to this day can’t pass up a book or article on either topic. Even without a camera, I can spend hours watching clouds form and dissipate, or gazing at the stars.
Despite a parallel interest in photography, as a film shooter I was frustrated by limitations that prevented me from photographing many of my favorite sky phenomena. While daylight sights like clouds and rainbows were doable, but daylight lightning was out of reach. Narrow dynamic range, a lack of exposure feedback, and inability to process a color image made photographing simultaneous detail in the landscape and the moon frustrating. But switching to digital photography finally provided the control over my color captures, control that had previously only been available to monochrome film shooters with access to a darkroom.
With my first DSLR, purchased more than 15 years ago (!), I suddenly had the exposure feedback and processing control I lacked. That camera struggled with ISOs above 400, but that was enough to handle moonlight and I was hooked on night photography. Nevertheless, for many years photographing the Milky Way and landscape detail with a single click (my own personal rule) seemed like a pipe dream. But unlike the film days, advancement in digital sensors seemed happen with each passing year, and for the last few years I’ve been able to add Milky Way photography to my night repertoire.
The same goes for daylight lightning—with my Lightning Trigger, I’m able to freeze bolts that come and go so fast they’re memories before my brain registers them. Not only that, we now have computers in our pockets that can tell us where lightning is firing almost in realtime.
My evolution to skyscape photography was gradual, paced mostly by the evolution of technology, but in hindsight, I feel a little foolish for taking so long to recognize the personal synergy created by combining these three lifelong interests. Now if I could only figure out a way to add baseball to the mix…
A few tips for good sky photography
- The amount of sky and landscape a frame gets is pretty much a function of the visual appeal of each: the better the sky relative to the landscape, the more frame real-estate it gets. Both nice? I have no problem splitting the frame in the middle.
- Clear sky? Use the absolute minimum sky possible—sometimes that’s a thin strip at the top of the frame, other times it’s no sky at all.
- Rules for compositional elements in the sky are no different than they are for elements in the landscape. And I’m afraid clouds are frequently overlooked, leading to things like a towering thunderhead with its top cropped, or a cloudy ceiling with a small patch of blue that juts up and out of the top of the frame (and pulling the eye with it). Sometimes these things can’t be avoided, but you should always make the edges of your frame a conscious choice, even in the sky.
- Clouds are great, and for photography almost always better than a blank blue sky, but I especially enjoy including special elements that can be subjects in themselves (like a rainbow, lightning, the Milky Way, the moon, and so on). Rather than showing up and benignly accepting whatever the scene delivers, I aggressively pursue sky subjects by planning my visits to coincide with the best chance for something interesting in the sky. I start with a landscape scene I like, then figure out what sky feature or features I might be able to put with it. How can I get this scene with the Milky Way? What about a full or crescent moon? A rainbow? Lightning? ( (And before you ask, I refuse to add a sky in post—like everything else I photograph, all of my images that include the sky need to happen with one click.)
- Weather phenomena require a little knowledge and planning, and a lot of luck. For example, whenever I shoot in rain, or with the potential for rain, I figure out where a rainbow would appear if the sun were to break through. And don’t think you can just go out and photograph lightning because you’re in an electrical storm and have a camera. Not only is capturing lightning very difficult without knowledge, experience, and the right equipment, it’s just plain dangerous. Read my tips for photographing lightning.
- Night photography is about the stars, so make sure you give enough of your frame to the sky to highlight the stars. My rule of thumb is 2/3 sky, but sometimes I’ll do even more, and if the foreground is spectacular (like the Grand Canyon), I might split the frame evenly between the sky and landscape.
- The moon is predictable, requiring only clear skies, a sturdy tripod, and maybe some warm clothes. Before any photo trip, I make a point of knowing the moon’s phase and rise/set times and position. Read my tips for photographing the moon.
- While photographing the Milky Way’s isn’t as dangerous as photographing lightning (unless you walk off a cliff in the dark), like lightning photography, including the Milky Way (the right way) also requires a lot of knowledge and experience, as well as the right equipment. Read my tips on photographing the Milky Way.
About this image
I found this scene in October’s Yosemite Fall Color and Reflections workshop, on our last-minute (not part of the original plan) trip to Olmsted Point to photograph sunset and the Milky Way. The crescent moon wasn’t the prime prime goal of this shoot, but I knew it would be here when we arrived and had every intention of photographing it as big as possible. (Had I not known there’d be a chance to photograph the moon, I’d likely have left my Sony 200-600 lens behind.)
The challenges I dealt with composing this scene were extreme dynamic range and a (freezing) wind. Since a waxing crescent moon always sets shortly after the sun, which puts it in the brightest part of the sky above a fairly dark landscape, capturing the moon, sky color, and landscape detail is difficult to impossible. I solved this problem by positioning myself so the moon set behind a ridge lined with distinctive trees against the sky. With my Sony 200-600 G lens on my Sony a7RIV, I zoomed tight to enlarge the moon and exposed to make the trees a silhouette.
To mitigate vibration imposed by the breeze and magnified by my 600mm focal length, I bumped my ISO to 800, which allowed me to use a 1/25 second shutter speed. And just to be sure, I magnified the image in my viewfinder and checked its sharpness.
Skyscapes
Click an image for a closer look and to view a slide show.


")


")


Go Big or Go Home
Posted on October 13, 2019

Setting Crescent, Sierra Crest, Alabama Hills (California)
Sony a7RIV
Sony 200-600 G
Sony 2x teleconverter
ISO 400
f/13
1/3 second
Like a teenager with his first car, I was itching to take my brand new Sony 200-600 for a spin. But since I don’t photograph wildlife, my ultra-telephoto lenses are used mostly for the moon, and occasionally close-focus stuff like fall color and wildflowers. And as much as I wanted to try it on the moon, I thought the fall color in my Eastern Sierra workshop would be my first opportunity.
Because I schedule the Eastern Sierra workshop to thread the needle between the best chance for peak fall color at North Lake, while avoiding the Lone Pine Film Festival and the Bishop Classic Car Rally, it’s one of the few workshops I do that isn’t timed for something happening in the sky (like the moon, the Milky Way, the northern lights, or lightning). So imagine my excitement when, before this year’s Eastern Sierra workshop, I checked the moon and realized a 6% crescent would be setting behind the Sierra Crest between Lone Pine Peak and Mt. Whitney on the workshop’s first night. Oh boy!
I got the group in position that evening and we all had a blast photographing the new moon slipping toward the serrated Sierra peaks. It started near Lone Pine Peak, and moved closer to Mt. Whitney as it dropped through the darkening sky. My first frames, while the moon was still pretty high, were fairly wide, but as it dropped closer to the mountains, my composition tightened.
When the crescent was just a few degrees above the crest, I grabbed my 200-600 and went to work. But, also like a teenager with his first car, I soon got the urge to soup it up and reached for my Sony 2X teleconverter. This gave me 1200mm at 61 megapixels. Wow.
I always joke that I don’t photograph anything that moves because I want to know my subject will still be there when I’m ready, so for someone as deliberate as I am, it really is startling to see how fast the moon moves through a 1200mm frame. Okay, maybe not as fast as a lion chasing dinner, or a leaping salmon becoming dinner, but instead of trying to track it, I still found it easier to anticipate the spot where the moon would disappear and let it slip into my frame.
It was 35 minutes after sunset when the moon finally reached the crest, making the trickiest part about this scene the exposure. This is the kind of exposure that begs to be handled in Manual mode because a meter would have no clue that I wanted to capture enough contrast between the sky and peaks to create a silhouette, as well as definition in the moonshadow, without completely blowing out the crescent. I also knew that the properly exposed image would look like crap on my LCD (it would require processing to moderate the extreme dynamic range between the dark mountains and bright moon).
To get the exposure right, I slowly pushed the scene brighter until the small blob of highlights in my histogram (the moon) hit the right side, then gave it one more stop of light (so the moon looked completely blown in the preview), knowing (fingers crossed) I could recover them later. I was slightly apprehensive because I still hadn’t processed any images from my new Sony a7RIV, but I was confident that it would have at least as much dynamic range as as my a7RIII, and just approached the exposure the same. All’s well that ends well—phew.
In a workshop my own photography isn’t a priority, so I didn’t get a lot of opportunity to play with my new toys on that trip. But my sense is that I’m going to love this new lens. Though its size means the 200-600 probably won’t replace my Sony 100-400 GM lens (which I love, BTW) as a full-time passenger in my camera bag, it will almost certainly be my default “big moon” lens. And my preliminary feelings are that the dynamic range of the a7RIV is indeed at least as good as the a7RIII (which is pretty incredible too).
Helping my workshop group with this crescent moon shoot got me thinking about metering, and how important it is to have it down cold. I’ve written a document on metering that I provide to all my groups to help them get up to speed before each workshop, but I’ve actually changed the way I meter in the few years since I wrote it. The old approach isn’t invalid (in fact, I think any serious photographer should be able to meter the old fashioned way), but I do think live-view histograms have made it a lot easier. So this week I rewrote my document and am sharing it below. (Please forgive any typos—it’s a work in progress.)
My Next Moon Shoot Opportunity
Exposure Basics
Cameras seem to be getting “smarter” every year. So smart, in fact, that for most scenes, duplicating a two-dimensional version of what your eyes see is a simple matter of pointing your camera and clicking the shutter button. That’s fine if all you care about is recording a memory, but not only is there more to photography than approximating “reality,” there are many creative reasons to override the camera’s choices.
For the creative control that elevates your images above the billions of clicks being cranked out every day, giving your camera the control of photography’s most important decisions ignores an undeniable truth…
Your camera is stupid
Sorry—mine is too. And while I can easily cite many examples, right now it’s just important to understand that your camera thinks the entire world is a middle tone. Regardless of what its meter “sees,” without intervention your camera will do everything in its power to make your picture a middle tone. Sunlit snowman? Lump of coal at the bottom of your Christmas stocking? It doesn’t matter—if you let your camera decide the exposure, your subject will turn out gray.
Modern technology offers faux-intelligence to help overcome this limitation. Usually called something like “matrix” or “evaluative” metering, this solution compares your scene to a large but finite internal database of choices, returning a metering decision based on the closest match. This works pretty well for conventional “tourist” snaps, but often struggles in the warm or dramatic light artistic photographers prefer—and it knows nothing of creativity. If you want to capture more than documentary “I was here” pictures, you really do need to take full control of your camera’s metering and exposure. Fortunately, this isn’t nearly as difficult as most people fear (or as it once was).
Laying the exposure foundation
The amount of light captured for any given scene varies with the camera’s shutter speed, f-stop, and ISO settings. Photographers measure captured light in “stops,” much as a cook uses a cup (of sugar or flour or chocolate chips or whatever) to measure ingredients in a recipe. Adding or subtracting “stops” of light by increasing or decreasing the shutter speed, f-stop, or ISO makes an image brighter or darker.
The simple beauty of metering is that a stop of light is a stop of light is a stop of light—it’s always the same amount of light, whether you change it with the:
- Aperture: The opening light passes through when the shutter opens, measured in f-stops (though aperture and f-stop are almost always used interchangeably, aperture is the actual opening, while f-stop is the ratio of the focal length to the aperture size we use to measure the amount of light that reaches the sensor). Since f-stop is a ratio, the higher the number, the smaller the aperture. Doubling the f-stop number decreases the light by two stops; halving the f-stop number increases the light by two stops. To memorize f-stops in one-stop increments, I keep track of two overlapping f-stop series, one starting at f/1, the other at f/1.4. Doubling then interleaving the results returns one-stop f-stop increments: f/1, f/1.4, f/2, f/2.8, f/4, f/5.6, f/8, f/11, f/16/, f/22, and so on.
- Shutter speed: The time the shutter is open, allowing light to pass through the aperture to reach the sensor. Doubling the shutter speed (open less time) reduces the light by one stop; halving the shutter speed adds one stop.
- ISO: The sensitivity of the sensor (or film) to light. Doubling the ISO adds one stop of light; halving the ISO subtracts one stop.
But while an aperture stop adds/subtracts the same amount of light as a shutter speed or ISO stop, the resulting picture can still vary significantly.
Your aperture choice determines the picture’s depth of field (DOF), while your shutter speed choice determines whether motion in the frame is stopped or blurred. And while an ISO stop also adds/subtracts the same amount of light as shutter speed and aperture without affecting motion and depth, image quality decreases as the ISO increases. So getting the light right is only part of the exposure objective—you also need to consider how you want to handle any motion in the scene, how much DOF to capture, and the ISO that generates the least noise.
Let’s say you’re photographing autumn leaves in a light breeze. You get the exposure right, but the leaves are slightly blurred at 1/15 second. To freeze that blur, you change your shutter speed to 1/30 second, which also reduces the light reaching the sensor by one stop. To replace that lost light (keep the exposure the same), you could open your aperture by a stop (change the f-stop), double the ISO, or make a combination of fractional f-stop and ISO adjustments that total one stop. Each choice will render a different result, but that’s a creative decision your camera isn’t capable of.
Metering modes
Today’s cameras have the ability to measure, or “meter” the light in a scene before the shutter clicks. In fact, most cameras have many different ways of evaluating a scene’s light. Your camera’s metering mode determines the amount of the frame the meter “sees.” The larger the area your meter measures, the greater the potential for a wide range of tones. Since most scenes have a range of tones from dark shadows to bright highlights, the meter will take an average of the tones it finds in its metering zone.
Metering mode options range from “spot” metering a very small part of the scene, to “matrix” (also known as “evaluative”), which looks at the entire scene and actually tries to guess at what it sees. Each camera manufacturer offers a variety of modes and there’s little consensus on name and function (different function for the same name, same function for different names) among manufacturers, so it’s best to read your camera’s manual to familiarize yourself with its metering modes.
Since I want as much control as possible, I prefer spot metering because it’s the most precise. The spot meter covers the smallest area of the frame possible, an imaginary circle in the center 3% (or so, depending on the camera) of the viewfinder. (Some cameras optionally allow you to spot meter on the current focus point instead of the center of the frame.) When spot metering, I can target the part of the frame I deem most important and base my exposure decision on the light reading there.
Spot metering isn’t available in all cameras (this was more true with older models). In some cameras, the most precise (smallest metering area) metering mode available is “partial,” which covers a little more of the scene, somewhere around 10%.
Regardless of the size of the metering zone, the camera will take an average of what it finds. In some modes that average is evenly extracted from the entire zone, in other modes, the average is biased toward the middle: “center-weighted.”
Exposure modes
Don’t confuse the metering mode with the exposure mode. While the metering mode determines what the meter sees, the exposure mode determines the way the camera handles that information. Most mirrorless and DSLR (digital single lens reflex) cameras offer manual, aperture priority, shutter priority, plus a variety of program or automatic exposure modes. Serious landscape photographers usually forego the full automatic/program modes in favor of the manual (my preference) or aperture/shutter priority modes that offer more control.
If you select aperture or shutter priority mode, you specify the aperture (f-stop) or shutter speed, and the camera sets the shutter speed or f-stop that delivers a middle tone based on what the meter sees. But you’re not done. Unless you really do want the middle-tone result the camera desires (possible but far from certain), you then need to adjust the exposure compensation (usually identified by a +/- symbol) to specify the amount you want your subject to be above or below a middle tone.
For example, if you point your camera’s spot-meter at a bright, sunlit cloud, the camera will only give your picture enough light make the cloud a middle tone—but if you’ve only given your scene enough light to make a white cloud gray, it stands to reason that the rest of your picture will be too dark. To avoid this, you would adjust exposure compensation (the +/- symbol) to instruct your camera to make the cloud brighter than a middle tone by adding two stops of light (or however much light you want to give the cloud to make it whatever tone you think it should be).
Rather than aperture priority, I prefer manual mode because I want control: my camera should not be making decisions for me. And once it’s mastered (it really isn’t hard), I think manual metering is easier. But if you can successfully handle each exposure situation with aperture or shutter priority, you’ll be fine—just stay away from the full automatic modes.
Exposure without (and with) compromise
I always try to use my camera’s best ISO, and the aperture that gives me the sharpest frame. Not just the desired DOF, but also the least diffraction (diffraction is a loss of detail caused when light passes through a small opening and spreads slightly—the smaller the opening, the greater the diffraction softening). But sometimes exposure-setting compromise is the only way to achieve the desired results.
For example, when DOF isn’t a consideration, I keep my f-stop in the f/8-f/11 range because it provides a reasonable amount of DOF, and that’s where lenses tend to be sharpest (least distortion), and diffraction is less of a concern (than it is at smaller apertures). But when I need a specific DOF, or want to capture a sunstar (small aperture), I have no problem compromising my f-stop setting to get there.
And I only compromise my ISO when there’s no other way to achieve a certain motion effect. So while ISO 100 is ideal (for my Sony a7RIV and the majority of other cameras), when the wind blows or I want to freeze moving water, I’ll increase my ISO to achieve the motion and DOF combination I need. And if I want a little more motion blur, I have no problem dropping down to ISO 50 to a allow a longer shutter speed.
The simplest way to minimize the need to compromise image quality is to use a tripod. A tripod removes camera shake from the exposure equation, meaning the only time shutter speed matters is when there’s motion in the scene. And when shutter speed doesn’t matter, you can always use the perfect ISO and aperture by going with whatever shutter speed you need, regardless of its length.
Some scenes are all about compromise, even with a tripod. For example, I’d love to photograph the Milky Way at ISO 100, f/8, 1/100 second, but that would give me a black frame. Since star motion increases with shutter speed, I push the ISO as far as I can without getting unfixable noise, open the aperture as wide as I can without obvious distortion—and I still have to live with a shutter speed that gives me a little star motion. All of these exposure choices are compromises that render less than perfect results, but without them, I’d have no Milky Way image at all.
The old fashioned way to meter
Armed with all this exposure understanding, it’s time to think about the best way to read and capture the light in a scene. For most of my photography life, in manual mode I’d set my camera to its native ISO (or to the ISO/ASA of the film I had loaded), determine my aperture (based on the DOF I want and/or the sharpest f-stop for my lens), point my camera’s spot-meter zone at the area on brightest part of the scene, and dial my shutter speed until it indicated the spot-meter zone is the tone I want. (I chose the brightest part of the scene because I know if I don’t blow it out, nothing in my frame will be lost.)
During my film days, and in my early digital life, that approach served me well. In fact, I think every serious photographer should understand metering well enough to do it this way. But….
With digital photography comes the histogram, which used to feel like cheating, but now has completely changed the way I meter.
Digital Metering
In the film days, we didn’t know if the exposure was right until the pictures were processed. To insure against missing the exposure, we’d bracket exposures by (usually) one stop on either side of what we believed to be the correct exposure. Today, thanks to the histogram, bracketing is no longer necessary.
Histogram explained
The histogram is a graph of the tones in an image, from absolute black to absolute white. Instead of clicking and hoping as we did in the film days, the addition of a histogram on every digital camera (that’s not a smartphone) provides photographers instant feedback on each image’s exposure. Better still, live-view histograms in mirrorless viewfinders, or on DLSR and mirrorless LCD screens, provide that essential exposure feedback before we click the shutter.
While any graph has the potential to evoke flashbacks of high school science trauma, a histogram is really quite simple—simple enough to be read and interpreted in the blink of an eye. And not only is your histogram easy to read, it really is your most reliable source of exposure feedback.
Simple Histogram: The shadows are on the left and the highlights are on the right; the far left (0) is absolute black, and the far right (255) absolute white.
When an image is captured on a digital sensor, your camera’s “brain” samples each photosite (the sensor’s individual pixels comprising the megapixel number used to measure sensor resolution), determining a brightness value that ranges from 0 (black) to 255 (white). Every brightness value from 1 to 254 is a shade of gray—the higher a photosite’s number, the brighter its tone.
Armed with the brightness values for each photosite in the image, the camera starts building the image’s histogram. The horizontal axis of the histogram has 256 discrete columns (0-255), one for each possible brightness value, with the 0/black column on the far left, and the 255/white column on the far right (they don’t display as individual columns because they’re crammed so close together).
Despite millions of photosites to sample, your camera builds a new histogram for each image virtually instantaneously, adding each photosite’s brightness value to its corresponding column on the histogram, like stacking poker chips—the more photosites of a particular brightness value, the higher its corresponding column will spike.
RGB histogram
The black-and-white histogram most of us are familiar with is the luminosity histogram. But each photosite on a conventional sensor actually measures the tone of one of three colors: red, green, and blue (RGB). The RGB histogram uses the same pixel sampling process to separate the luminosity histogram into three separate, more granular, graphs, one for each color.
The luminosity histogram shows the detail you captured, but it doesn’t tell you whether you lost color. In fact, the luminosity histogram could look fine even when two of the three RGB channels are clipped (cut off, indicating color is lost). So in high dynamic range scene (extreme highlights and shadows), or scenes with an extreme amount of one color (such a brilliant sunset or a backlit poppy), checking the RGB histogram to ensure that none of the image’s color channels is clipped is especially important. The solution for a clipped RGB channel (or two) is to reduce the exposure.
Reading your histogram
There’s no such thing as a “perfect” histogram shape. Rather, the histogram’s shape is determined by the distribution of light in the scene, while its left/right distribution (whether the graph is skewed to the left or right) is a function of the amount of exposure you’ve chosen to give your image. The histogram graph’s height is irrelevant—information that appears cut off at the top of the histogram just means the graph isn’t tall enough to display all the photosites possessing that tone (or range of tones).
When checking an image’s histogram for exposure, your primary concern should be to ensure that the none of the tone data is cut off on the left (lost shadows) or right (lost highlights). If your histogram appears cut-off on the left side, shadow detail is so dark that it registers as black. Conversely, if your histogram appears cut off on the right side, highlight detail is so bright that it registers as white.
Trusting your histogram
Basing the image’s exposure on the way the picture looks on the LCD is the single biggest exposure mistake I see photographers make. The post-capture review image that displays on your camera’s LCD is great for checking composition, but the range of tones you can see in your review image varies with many factors, such as the review screen’s brightness setting and the amount of ambient light striking the LCD. Even more important, because there’s more information captured than the LCD preview can show, even in the best conditions, you’ll never know how much recoverable data exists in the extreme shadows and highlights by relying on the LCD preview.
It’s human nature to try to expose a scene so the picture on the LCD looks good, but an extreme dynamic range image that looks good on the LCD will likely have unusable highlights or shadows. As counterintuitive as it feels, exposing a high dynamic range scene enough to reveal detail in the darkest shadows brightens the entire scene (not just the shadows), likely pushing the image’s highlights to unrecoverable levels. And making an image dark enough on the LCD to salvage bright highlights darkens the entire scene, all but ensuring that the darkest shadows will be too black.
In fact, a properly exposed, a scene with both bright highlights and dark shadows, such as a sunrise or sunset, will look awful on the LCD (dark shadows and bright highlights) because there’s information there you can’t see (yet). The histogram provides the only reliable representation of the tones you captured (or, in your live-view LCD display or mirrorless electronic viewfinder, of the tones you’re about to capture).
Live-View Metering
Starting with the live-view screen, and now in mirrorless viewfinders, we can view our histogram before clicking the shutter. So instead of guessing the exposure settings that return the tones we want, we have an actual pre-capture picture of the tones to monitor and adjust.
It really is this simple
Using the pre-capture histogram—almost always in my Sony mirrorless viewfinder, but the histogram on a mirrorless or DSLR LCD screen will work too—I start the exposure process as I always have. In manual exposure mode, I default to my camera’s best ISO (100 for most cameras, but definitely not all, so check your camera’s native ISO), and the best f-stop for my composition. I don’t touch these settings unless motion in my scene, such as wind or star movement, forces an ISO and/or f-stop compromise. With ISO and f-stop set, I slowly adjust my shutter speed with my eye on the histogram until it looks right. Click.
Spare the highlights
In a low or moderate contrast scene, I’ll have a little room on both sides of the histogram (the graph doesn’t bump up against either side)—a very easy scene to expose. But in a high dynamic range scene, the difference between the darkest shadows and brightest highlights might stretch beyond one or both sides of the histogram. When a high dynamic range scene forces me to choose between saving the highlights or the shadows, I almost always bias my exposure choice toward sparing the highlights, carefully dialing the shutter speed until the histogram bumps against the right side.
When forced to decide between the highlights or shadows, I almost always try to spare the highlights, for a couple of reasons: First, shadows are usually easy to recover than highlights; second, highlights are almost always more important than shadows. In fact, because the human eye is reflexively drawn to the brightest areas of the frame, I rarely have anything important in the shadows of a high dynamic range scene.
The post-capture histogram is usually more reliable than the pre-capture histogram. Sometimes this doesn’t matter, but in a high dynamic range scene, or any time I push my histogram close to the right side, I verify my exposure by checking the post-capture histogram. Another situation that can sometimes fool the pre-capture histogram is blurred (long exposure) whitewater.
The zebras
Most mirrorless cameras, and many newer DSLRs, offer “zebra” highlight warnings in their pre-capture view. The first time I meter a scene, my camera’s current exposure settings (based on my previous scene) might be far from what the new scene requires. When that’s the case, I push my shutter speed fast until the zebras appear (if my prior exposure was too dark) or disappear (if my prior exposure was too bright), then refine the exposure more slowly while watching the histogram. While these alerts aren’t nearly as reliable as the histogram and should never be relied on for final exposure decisions, I use their appearance as a signal that it’s time to monitor my histogram.
Know your camera
Photographers who shoot raw make exposure decisions with the understanding that the capture exposure is simply the start, and the final exposure is determined by the processing. But the more photons you capture, the greater your latitude for adjustment later.
Trusting the histogram is a great start, but every camera model interprets and displays its exposure information differently. Added to that, the histogram is based on the jpeg the camera displays, so raw shooters always have more image information than their histogram shows—it’s important to know how much more.
With my Sony a7R bodies, I know I’m pretty safe pushing my histogram at least a full stop beyond the left or right (shadows and highlights) histogram boundary. This knowledge enables me to get the most out of even the most challenging high dynamic range scenes.
Practice makes perfect
Like most things in photography, the more you do it, the easier it becomes. For many people reading this, my approach is nothing revolutionary. But if it’s all new to you, or if you feel a little rusty, I suggest that you go out and try it in a low stress situation. Keep working on it whenever you find yourself in a situation where getting the shot doesn’t feel life or death.
When you do get into one of those “Oh my God, look at that!” moments, go back to whatever feels most comfortable to you. I think you’ll find that it won’t take too much practice before the right way is also the most comfortable way.
Workshop Schedule || Purchase Prints
Big (and Big-ish) Moons
Click an image for a closer look and to view a slide show.


Tapping your inner Dorothy
Posted on June 12, 2018
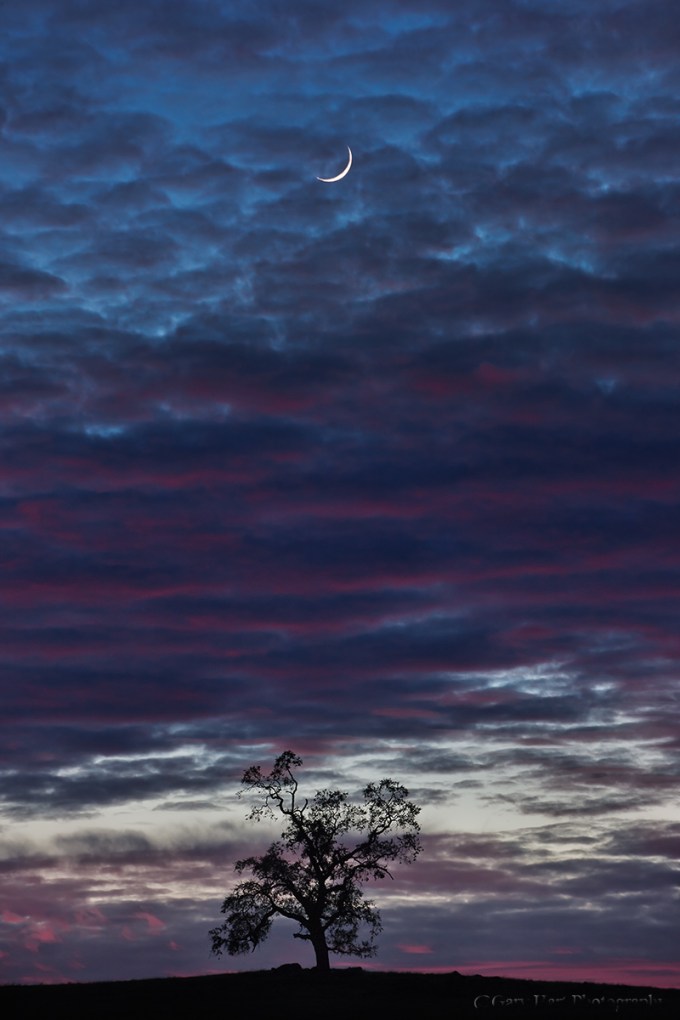
Alone Together, Oak and Crescent Moon, Sierra Foothills, California
Canon 1Ds Mark III
8/5 seconds
F/8.0
ISO 400
Canon 70-200 f/4 L
Spend enough time on Facebook and Instagram and you get a pretty good idea of what it takes to make a picture that generates attention. The unfortunate consequence is a photographic feedback loop, where one ostentatious image inspires more similarly ostentatious images, which inspire more…, well, you get the point. This uninspired feedback loop reminds me of top-40 music, where one groundbreaking success generates a flood of uninspired clones. Catchy tunes are fine for a few listens, but few possess staying power. Contrast that to the Beatles, who aggressively resisted repetition and pursued new sounds that the world has been listing to pretty much nonstop for more than 50 years.
Admittedly, few artists are blessed with the Beatles’ creative genius, but that’s no excuse to shortcut creativity. The same holds for photography: images that elicit a reflexive Like and Share from digital passersby, and maybe (if you’re lucky) a “Stunning!” in the comments section, are forgotten with the next click. But images that resonate on a personal level by revealing something unseen, or by touching a hidden place inside the viewer, not only stop people in their tracks, they grab them and don’t let go.
Of course this sounds great in theory, but how is it accomplished? If the answer were easy, we’d all be doing it. But like Dorothy and the Ruby Slippers, perhaps we’ve had the power all along.
Because most people long for a connection with the world around them—not simply a connection with nature, but more importantly a connection with kindred souls—a good place to start would be to give viewers of your images something of yourself to latch on to by concentrating on subjects that resonate with you.
My own photography took a huge leap forward when I started photographing simply to please myself. The more I pursue moments in nature that touch me personally, (as if by magic) the more unique, gratifying, and successful my images became. While my most personal images don’t please everyone, the people they do reach seem to feel a deeper connection than they do to my images intended to impress.
Familiarity is the first step toward intimacy. With many picturesque trees and hills to work with, on this evening (as with many shoots) my compositions started wider, but didn’t seem to be about anything. But as the moon fell and the light faded, the scene’s essence began to materialize.
So what moved me to this composition? At the time it was enough that the scene finally felt right. But given the benefit of time and introspection, even though the moon and tree share the same frame, each is isolated: the tree is grounded in its terrestrial world, while the moon soars in its celestial world.
I’m writing this at Starbucks, very much by myself, but in the company of a dozen or so other people similarly isolated at the center of their world. It occurs to me that the shared isolation of the tree and moon makes a great metaphor for the human experience.
On the other hand, maybe it’s just a pretty picture….
Workshop Schedule || Purchase Prints
A Gallery of Personal Connection


The Range of Light
Posted on February 19, 2017

Twilight Crescent, Mt. Whitney
Sony a7R II
Sony 70-200 f/4
1/3 second
F/11
ISO 160
“… the mighty Sierra, miles in height, and so gloriously colored and so radiant, it seemed not clothed with light but wholly composed of it, like the wall of some celestial city…. Then it seemed to me that the Sierra should be called, not the Nevada or Snowy Range, but the Range of Light.” — John Muir
Anyone who has spent time in or around the Sierra Nevada has to agree that there’s something special about its interaction with light. Towering one to two miles above the surrounding terrain for nearly all of its 400-mile length, the Sierra Nevada are California’s most prominent natural feature. But it’s not just prominence that sets the Sierra apart. The Sierra are almost entirely granite, an intrusive igneous rock comprised primarily of light-toned feldspar and liberally infused with lustrous quartz and mica. Because igneous intrusive rocks form deep beneath the Earth’s surface, constituent minerals cool and harden slowly enough for large, reflective crystals to form.
In addition to its inherently reflective qualities, granite is quite hard and resistant to erosion. Unlike the overlying sedimentary and metamorphic rock that washed downhill as the Sierra pushed (and continues to push) upward, granite remains intact when subjected to wind and rain. Eventually small cracks form; water percolating into these cracks expands as it freezes, widening the cracks further until the granite fractures and a large block separates. The result is large vertical and domed surfaces whose extreme slope and hardness are particularly inhospitable to plant life, even well below the timberline. Granite’s hardness also means that rather than crumbling beneath the weight of the numerous glaciers to scour the Sierra, much of the Sierra granite has been polished to a glassy sheen.
Granite’s light complexion, reflective inclusions, and abundance of exposed, polished surfaces make the Sierra particularly inclined to reflect the color of whatever light illuminates it. This relationship with light is quite evident in Yosemite Valley, nestled in the range’s more moderately sloped west side. When the sun strikes Yosemite’s Half Dome and El Capitan at day’s end, warm sunset light paints these monoliths in brilliant orange and red hues just before the sun is snuffed by the horizon. While this color can be seen at sunset year round, it takes center stage each February when sunset shadow and light conspire to highlight normally insignificant Horsetail Fall’s tumble down El Capitan’s east face.
As exquisite as the light on Yosemite’s granite is, I’m even more drawn to the Sierra’s east side, which gets its best sun at sunrise. Unlike the Sierra’s gradually sloped, relatively moist, and largely foliated west slopes, the Sierra’s east side is much steeper, drier, and therefore sparsely foliated and more exposed. Enhancing the drama, the Eastern Sierra’s towering granite face also catches the earliest possible sunlight, sunlight that has traveled farther and through purer air (because there fewer airborne pollutants in the morning in general, and the sunlight east of the Sierra traverses much less densely populated terrain).
My favorite place to watch the light play on the Eastern Sierra granite is in and near the Alabama Hills, two vertical miles beneath Mt. Whitney and the Sierra’s most precipitous section. Looming above the Owens Valley, 14,505 foot Mt. Whitney is the highest point in the 48 contiguous United States. Unlike many towering peaks that stand by themselves, Mt. Whitney is bounded by 13,000 foot Lone Pine Peak and 14,000 foot Mt. Williamson, all connected by a serrated ridge of 13,000+ foot sharks tooth prominences.
Before sunrise I like to arrive early enough to see the Sierra crest reflect the pale blue of the pre-dawn sky, then watch it warm gradually as the sky brightened before the approaching sun. The color reaches a crescendo when the sun’s longest wavelengths first kiss the highest peaks with pink alpenglow. As the rest of the sun’s visible wavelengths join the party, the crest warms to amber before finally cooling beneath the daylight-blue sky.
At the end of the day the best color arrives after the sun has long disappeared behind the crest and the entire scene is illuminated by a sky well on its way to night. Though the mountains’ color is more subtle than the sunrise show, the Eastern Sierra’s granite when imbued with the pale mauve of evening twilight is no less beautiful. Eventually night takes over and once again the Sierra granite throbs a soft blue.
Early last October I guided my Eastern Sierra workshop group up to Whitney Portal at the base of Mt. Whitney to photograph cascading Whitney Portal Fall in late afternoon shade. On the drive back down we squeezed into a small turnout not too far down the road for the closest view of Whitney that doesn’t require a serious hike. This year’s group got a bonus when a thin slice of brand new moon appeared shortly after sunset.
Mounting my Sony 70-200 f4 on my a7RII, I framed the scene as tightly as I could while still including both Mt. Whitney and the crescent moon. Though the sky was clear, a steady stream of small clouds materialized as if issued by a cloud making machine just out of sight behind the crest to the right of Whitney. Each new cloud scooted to the left and dissipated quickly in drier air near the summit. After composing, metering, and focusing, I waited for the next cloud to appear and clicked this frame in the purple twilight.
PURCHASE PRINTS || PHOTO WORKSHOPS
The Many Colors of Mt. Whitney


