Eloquent Images by Gary Hart
Insight, information, and inspiration for the inquisitive nature photographer
Three Moons
Posted on December 19, 2017
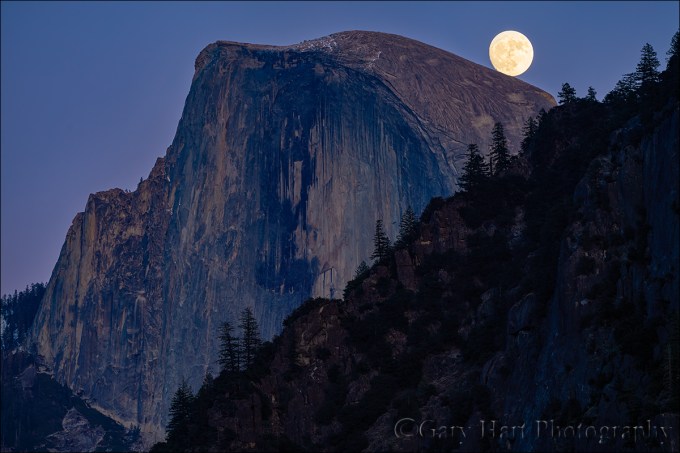
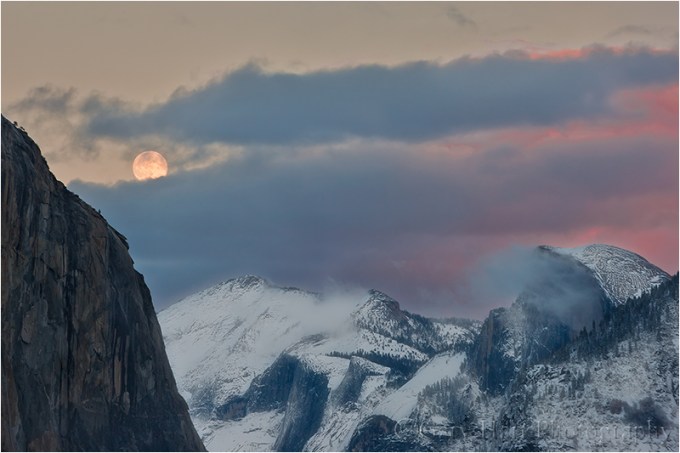
Balanced Moon, Half Dome, Yosemite
Sony a7RIII
Sony 100-400 GM
ISO 100
f/8
1/10 second
This month’s Yosemite Winter Moon photo workshop group got the rare opportunity to photograph a full (or nearly full) moon rising above Half Dome at sunset on three consecutive nights. One reason it’s rare is that, as viewed from Yosemite Valley, the full moon and Half Dome only align in winter. But the real tricky part is making it happen three times when sunset happens at pretty much the same time each evening, but the moon rises about 45 minutes later.
-

- Sunset Moonrise, Half Dome, Yosemite (11/30/17)
-

- Balanced Moon, Half Dome, Yosemite (12/1/17)
-

- Winter Supermoon, Half Dome, Yosemite
My goal for photographing a rising full moon is to get the moon on the horizon in the window from 15 minutes before to 15 minutes after the “official” (flat horizon) sunset. Earlier and there’s not enough contrast and the moon looks bland; later and there’s too much dynamic range to capture detail in the dark landscape and daylight-bright moon.
The key to making this work starts with understanding that when you see a sunset or moonrise time published for a location, that time is always based on a flat horizon. So unless you’re atop a mountain or on a ship at sea, you’ll probably see the sun disappear behind the terrain in the west before sunset, and you’ll probably need to wait for the moon to rise above the terrain in the east.
Since the sun is at my back when a full moon rises, I’m not too concerned about the precise timing of the sun’s disappearance. But I need to be pretty dead-on for the moon’s arrival. Knowing the moon will rise an 40-60 minutes (or so) later each day, it’s easy to infer that the more days until the full moon, the higher the moon will be at sunset. Sadly, I have no control over the timing of the absolute sunset/moonrise, but I can control the elevation of the horizon, and therefore the moon’s appearance on a given day, by choosing my position relative to the horizon above which the moon will rise.
To make this workshop’s consecutive moonrises work, each evening I picked a view that was farther from Half Dome than the previous evening. On our first evening I chose a spot on the east side of Yosemite Valley; the next evening we were closer to the middle of the valley; on our the third evening our vantage point was near Tunnel View, at the opposite side of Yosemite Valley from Half Dome. The moon rose later above the flat horizon each evening, but by moving farther away, we reduced the distance the moon had to travel before it appeared.
Big moon, small moon
The other thing this little exercise illustrates is how to make the moon big in your frame. Notice that in each image, Half Dome is more or less the same size, but the moon gets progressively bigger. That’s because on any given day, no matter where I am on Earth, the moon is so far away that its apparent size doesn’t change. But the size of earthbound features, like Half Dome, changes a lot with proximity. When I was on Yosemite Valley’s east side for the first moonrise, filling my frame with Half Dome required just a little more than 100mm; the next night I was far enough back to require about 250mm to fill the frame; and on the final night, from eight miles away I needed more than 500mm. And as my focal length increased, so did the moon’s size in my frame.
Join me as I do this all over again next December
A Full Moon Gallery


Sanity check
Posted on January 7, 2017

Nightfall, Half Dome and Sentinel Fall, Yosemite
Sony a7R II
Sony/Zeiss 24-70 f4
1/2 second
F/9
ISO 100
Are you insane?
Albert Einstein defined insanity as doing the same thing over and over again and expecting different results. Hmmm. For some reason this makes me think of the thousands of aspiring landscape photographers with portfolios brimming with beautiful images that they can’t sell.
Despite a great eye for composition, all the latest gear, insider knowledge of the best locations, and virtual guru status with Photoshop, somehow they haven’t managed to separate themselves from the large pack of other really good photographers. Their solution to anonymity is more: more locations, more equipment, more software. (Perhaps you even know such a photographer.) Compounding the problem, many photographers have become so mesmerized by technology that they turn over control of the most important aspects of their craft to their camera, completely discounting the most powerful tool at their disposal, the one on top of their shoulders.
Knowledge vs. understanding
Just as a new camera won’t make you a better photographer, neither will simply upgrading your knowledge of the latest gear, or accumulating . Knowledge is nothing more than information ingested and regurgitated. On the other hand, understanding is fundamental insight into the workings of a process. While knowledge might enable you to impress table-mates at a dinner party, understanding gives you the ability to use information to create new knowledge—solve problems.
Many photographers invest far too much energy accumulating knowledge, and far too little energy understanding what they just learned. For example, I see many photographers relying on a formula for determining the shutter speed that freezes star motion at a given focal length, oblivious to the fact that this formula doesn’t consider other equally important variables such as display size and the direction the camera is pointing (yes, that’s important). Similarly, simply knowing that a longer shutter speed, bigger aperture, or higher ISO means more light is of limited value if that knowledge doesn’t translate into an understanding of how to manage light, motion, and depth with your camera.
Take control
Pretty much anyone can pick up a camera, put it in auto exposure mode, and compose a nice image. While the automatic modes in most cameras “properly” (conventionally) expose most scenes, they struggle in the limited light, extreme dynamic range, and harsh conditions that artistic nature photographers seek. Worse than that, relying on the automatic exposure modes eliminates a photographer’s best opportunity for creativity—the ability to control a an image’s depth, motion, and light.
Too many aspiring photographers are stuck creatively because their unwavering faith in technology leaves them with a critical deficiency in two fundamental, related photographic principles:
- How a light meter determines the exposure information it gives you. This seems so basic, but auto-exposure and histograms have fooled many into thinking they understand metering and exposure. (Don’t get me wrong—the histogram is a wonderful tool for the photographer who truly understands it.)
- How to use the reciprocal relationship between aperture, shutter speed, and ISO to manage photography’s three variables: light, depth, and motion. This is the universal tool that enables photographers to handle the limiting factors of every scene.
Books and internet resources are a great place to start acquiring these principles, but the knowledge you gain there won’t turn to understanding until you get out with your camera and apply them. When these principles become second nature, you’ll be amazed at what you’ll be able to accomplish with your photography.
Insanity is in the mind of the beholder
If landscape photography already gives you everything you want, by all means continue doing what you’re doing. But if you’re having a hard time achieving a creative goal, I suggest that the solution is likely not doing more of what you’re already doing. Instead, start by reevaluating your comprehension of fundamental photographic principles that you might not have thought about for years. You’ll know you’re there when you have complete control of the light, motion, and depth for every scene you encounter, know how to get the result you want, or understand why it’s simply not possible.
Do I really think you’re insane for doing otherwise? Of course not. But I do think you’ll feel a little more sane if you learn to take more control of your camera.
About this image
The image at the top of the post is from a visit to Yosemite this past December. I’d guided my workshop group here for the rise of a nearly full moon, crossing my fingers that clouds wouldn’t obscure our view. The clouds exited just in the nick of time for us to enjoy a beautiful moonrise into the indigo twilight. I started with fairly tight compositions when the moon was close to Half Dome, but in the still, chilled air shortly after sunset, a thin radiation fog formed above Leidig Meadow and I started looking for a wider composition that would add the meadow to the moon and Half Dome.
Before thinking about the scene’s light, depth, and motion variables, I spent a lot of time just assembling the elements of my composition. I decided to frame the scene with Half Dome on the left and Sentinel Fall on the right, positioning myself so a group of tall foreground evergreens, mirrored by towering Sentinel Rock in the background, anchored the center of my frame. I knew that would require a wide composition that would render the moon very small, but I moved back as far as I could to allow the longest possible focal length to avoid shrinking the moon to pinhole size.
By far my biggest exposure concern was dynamic range—the moon is daylight bright, while the rest of my scene was deeply shaded. Normally I trust my histogram in these high dynamic range situations, but in this case the moon was so small that I knew it wouldn’t register. Instead I used my Sony a7RII’s pre-capture “zebra” highlight alert that indicates the parts of my scene that are overexposed.
At just a little wider than 24mm, with no significant detail in my immediate foreground, I stopped down to a fairly diffraction safe f/9. I’m always at ISO 100 unless I can’t achieve the amount of light I want at my ideal aperture and shutter speed, and in this case ISO 100 worked just fine. With my f-stop and ISO set, I increased my shutter speed slowly, checking the moon after each 1/3-stop click for the zebras (if you don’t shoot mirrorless, you can set blinking highlights and check the moon for “blinkies” when you review the image on your LCD). Since I know my camera well enough to know that I could push my exposure at least a full stop beyond the point where the zebras appeared, then recover the highlights in the Lightroom raw processor.
This image looked quite dark on my LCD, and the histogram was way to the left, but after loading it onto my computer and pulling the Lightroom Shadows slider to the right, I recovered an unbelievable amount of clean (low noise) detail, even in the darkest shadows. I just continue to be blown away by the dynamic range of this a7R Mark 2 sensor that enables me to capture scenes I’d never imagined possible in my previous (Canon) life. In this case I probably could have brightened the image further in processing, but I wanted a more moody, twilight feel.
Workshop Schedule || Purchase Prints
Yosemite Less Traveled


Supermoon
Posted on November 14, 2016

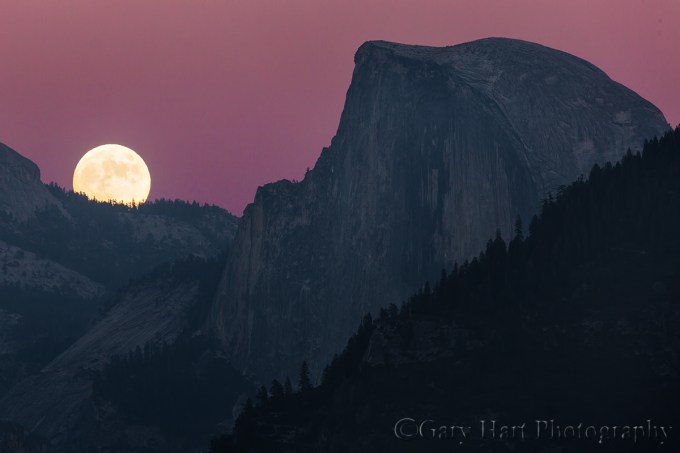
Supermoon, Half Dome and El Capitan, Yosemite
Sony a7RII
Tamron 150-600 (Canon-mount with Metabones IV adapter)
1/3 second
F/9
ISO 100
The media tends to distort facts and blow events out of proportion. Perhaps you’ve noticed. The latest example is this week’s “supermoon,” an event heralded on TV, in print, and online like the Second Coming. Okay, now for a little perspective. Despite hype to the contrary, a supermoon occurs at least twice, and up to five times, in a year. In fact, our last supermoon was all the way back in October, and the next one isn’t until December.
But, as I’m sure you’ve heard, this month’s supermoon was special, an event the likes of which we haven’t seen since 1946, and won’t see again until 2034. True enough. But exactly how special was it? Not nearly as special as you might have heard: the diameter of the “epic” November supermoon was only one-half of one percent (.57) larger than the October full moon, and four-fifths of one percent (.84) larger than the December full moon—differences that are impossible to discern with the naked eye. Next year we’ll get two moons that are more than 99 percent the size of this month’s supermoon, and last year we had four.
So why was I out taking pictures of the full moon Sunday night? Because I think every full moon is beautiful, regardless of its size, and I take any opportunity to photograph it over my favorite landscapes. Which is also why each fall I schedule a workshop in Yosemite to coincide with the full moon.
Thursday night my Yosemite Autumn Moon workshop group photographed an 82% (of full) waxing gibbous (on its way to full) moon above Valley View at sunset. For Friday night’s sunset, from a quiet beach beside the Merced River we glimpsed through clouds an 87% moon rising just right of Half Dome. Saturday’s sunset found us beneath a magenta sky at Tunnel View to witness the 96% moon ascend between Sentinel Dome and Cathedral Rocks.
The workshop’s grand finale came Sunday night, when we gathered at the Half Dome vista on Big Oak Flat Road. Though I rarely encounter other photographers for any of my moon rise/set shoots, limited parking and tripod space here prompted me to arrive an hour before sunset. That turned out to be a fortunate decision, as within 30 minutes of our arrival the parking lot was brimming beyond full and photographers swarmed the nearby rocks like ants at a picnic.
With an hour to kill, I made sure everyone in my group was ready (but by now, this being our fourth moonrise, they were experienced veterans) and chatted with other photographers nearby. Comparing notes, it seemed that most (all?) of the other photographers had relied on apps like The Photographer’s Ephemeris and Photo Pills to plot the moon’s arrival location and time, while I was the only one clinging to my old fashioned topo map, scientific calculator, trigonometry plotting approach. (I do it this way because I’ve been plotting the moon since long before the apps were available, I feel like I can be more precise, and I enjoy it—not necessarily in that order.)
In the viewfinder of my Sony a7R Mark II, atop my tripod and armed with my Tamron 150-600 lens to enlarge the moon as much as possible, was the composition I wanted—assuming the accuracy of my calculations. The consensus among others seemed to be that the moon would appear from behind Half Dome’s right flank, anytime between 5:00 and 5:10 p.m. I stuck to my guns that the moon would show up at about 5:05, and that it would be straight over the top of Half Dome. While I saw this more as an opportunity to check my plotting method’s accuracy than a competition between methods, it was pretty thrilling when the moon popped into view right on schedule and on target. Take that, technology!
Since the moon didn’t appear until a full fifteen minutes after sunset, the extreme dynamic range (very dark landscape beneath a daylight-bright moon) made this an extremely tricky exposure for anyone (like me) not interested in compositing two images (one with the moon properly exposed, another with the scene properly exposed). To capture this scene with a single click, I closely monitored the pre-capture “zebra stripes” highlight alert in my a7RII and pushed my exposure 2/3 stop after the first hint of the alert appeared. To hedge my bets and give myself processing options, I varied my exposure 1/3 to 2/3 of a stop in either direction (an exception to my standard workflow because the moon is too small to register on the histogram).
The result was a scene that looked quite dark on my LCD, and a moon with no detail. No problem, I reassured myself, for my a7RII’s ridiculous dynamic range. This morning in Lightroom I adjusted the white balance, pulled up the shadows, and pulled down the highlights. In Photoshop I applied a moderate dose of Topaz DeNoise and did a few minor dodge/burn moves to get the image you see here.
One more thing
The size of the moon in this image has virtually nothing to do with the fact that this was a “supermoon,” and virtually everything to do with the fact that I was far enough away to be able to use a 600mm lens. Click below to read about how to capture your own big moon:

Photo Workshop Schedule
The Moon in all Shapes and Sizes
Click an image for a closer look and slide show. Refresh the window to reorder the display.


Yosemite Moon
Posted on July 21, 2016
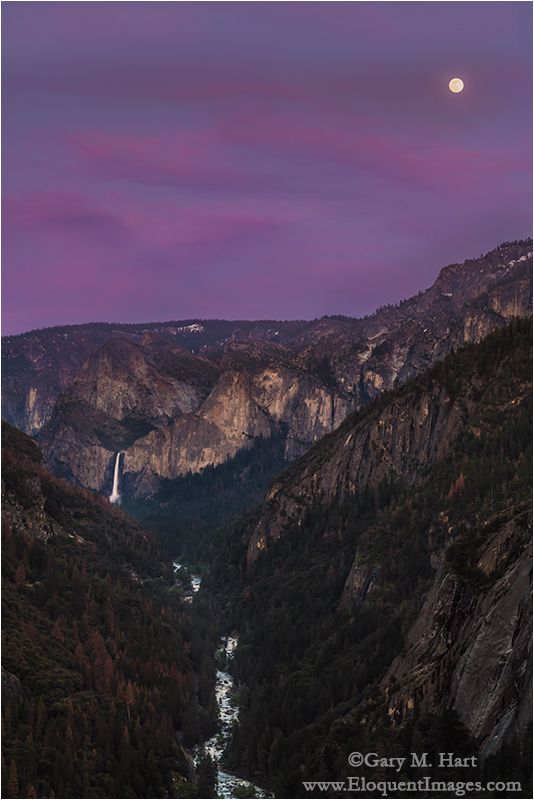
Spring Moonrise, Bridalveil Fall and the Merced River Canyon, Yosemite
Sony a7R II
Sony 70-200 f4
1/2 second
F/8
ISO 100
I’m a relationship photographer. By that I mean I’ve never been one of those photographers who expands his portfolio by adding new locations. Rather, I like to get a feel for a place, not just the where and when of its photo opportunities, but its history, geology, flora, and fauna. I much prefer digging deeply into one scenic area to visiting a large variety of scenic areas. This is a personal style thing, and I know my more deliberate approach would drive many photographers crazy, but I’ve learned that I’m rarely very productive on my first visit anywhere, and often not until I’m several visits in.
I’m probably several hundred (thousand?) visits into my Yosemite relationship, with no end in sight. But despite this extensive history, any moonrise above Yosemite Valley, regardless of the phase, still takes my breath away. Orbital geometry aligns Yosemite’s moon with different features as the seasons change, and I try to be there for as many moonrises as possible. Whether it’s the late fall and winter full moon hovering above Yosemite Valley, the summer crescent moon appearing from behind Half Dome, or the spring full moon rising above Bridalveil Fall, I just can’t get enough of it.
As with most of my Yosemite workshops, a planned highlight for this year’s April Yosemite Moonbow and Wildflowers workshop was a moonrise, this time the Bridalveil Fall full moon. Throughout the workshop we’d enjoyed a Yosemite Valley bursting with more water than I’d seen in several years, a dogwood bloom that was just about at peak, and a sky enhanced by an assortment of beautiful clouds.
When the moonrise day came and the clouds stayed, there were a few concerns for our moonrise. But knowing Yosemite well enough to understand that you can’t predict the conditions five minutes from now based on the conditions right now, I made sure we were in position with cameras ready (and fingers crossed).
Moon or not, the view up the Merced River Canyon that evening was beautiful, but when the moonrise time arrived and the moon didn’t, I scanned the clouds for hints of the moon’s glow. Though there was no sign of it, a little higher, and directly in the moon’s path, the clouds appeared thinner; higher still, actual stripes of blue sky gave me hope.
By the time the moon emerged, nearly ten minutes after sunset, the entire sky had taken on a rich magenta hue. The Merced River Canyon below had become quite dark, but my Singh-Ray two-stop hard-transition graduated neutral density filter held back the (daylight-bright) moon enough for me to give the canyon the light it needed. The final step for this image came in Lightroom and Photoshop, which enabled me to add a little more light to both the canyon and the clouds (which had been darkened along with the moon by the GND), and pull back the highlights in the moon.
One more thing
People ask me if I ever tire of Yosemite, and I can honestly answer, no. Part of keeping it fresh is the infectious excitement when the people I’m with witness something like this moonrise. (I don’t think this makes me unusual—most people get vicarious pleasure from the joy of others’ first experience of something that’s special to us.) This night the moonless pink sky was enough to thrill everyone, but when the moon poozed out, it became one of those once-in-a-lifetime moments for everyone in the group. That just never gets old.
Join me in a Yosemite photo workshop
Yosemite Moons
Click an image for a closer look and slide show. Refresh the screen to reorder the display.


Eye on the sky
Posted on April 27, 2016

High Sierra Moonrise, Glacier Point, Yosemite
Sony a7R II
Sony/Zeiss 24-70 f4
2.5 seconds
F/10
ISO 200
I spend much of my photography time chasing the moon. Most of my trips factor in the moon’s phase and location—usually to catch a full or crescent moon rising or setting above a particular landmark, and often to photograph a landscape by moonlight (full moon) or starlight (no moon). But sometimes the moon catches me less than fully prepared, and I need to improvise.
For example
I enjoyed the January full moon with my workshop group in Death Valley and the Alabama Hills; in February my Horsetail Fall workshop group photographed a full moon rising above Yosemite Valley; in March I was in Sedona with Don Smith to photograph the full moon as it rose above Cathedral Rock and Oak Creek; and last week my Yosemite Moonbow and Wildflowers workshop group photographed the April full moon above Bridalveil Fall and the Merced River Canyon, then headed off to catch a moonbow in the mist at the base of Lower Yosemite Fall. And chasing the moon isn’t all about the full moon—already this year I’ve photographed several thin crescents in the Sierra foothills, and next week I raft Grand Canyon, where my group will (fingers crossed) witness a waning crescent moon just after sunset, and later that night photograph the canyon illuminated by nothing but the Milky Way and thousands of stars only visible in a moonless sky.
All this planning around the moon does indeed get me to many beautiful locations at just the right time, but sometimes the moon catches me in situations where, without the necessary knowledge at hand, I’m forced to think on my feet (and smartphone). Most recently was the unplanned moonrise added to last week’s Yosemite workshop. When the National Park Service opened Glacier Point about a month earlier than expected, I quickly inserted a Glacier Point sunset into the workshop but didn’t have time for anything more than a cursory moonrise check.
Beautiful clouds and light made our Glacier Point sunset a success, but as we were about ready to return to the warmth of the cars, the moon’s imminent arrival crept into the back of my mind. What I knew was that this night, from Glacier point the moon would be rising far to the right of Half Dome (out of the primary view), and probably just slightly too late to photograph effectively (not enough light to capture both landscape and lunar detail). Nevertheless, before packing up my gear I pulled out my iPhone to be certain we weren’t making the classic photographer’s mistake of leaving too early.
This won’t be on the test
Without a strong cell signal, I had to resort to apps that function offline. I started with Focalware, my go-to app for the sun’s and moon’s altitude and azimuth from any location on Earth. Next, now armed with the moon’s azimuth, I opened MotionX-GPS (with the map pre-downloaded) to plot its location relative to the current landscape, determining that it would emerge from behind Mt. Clark.
The final (and most difficult) piece of the puzzle was determining when the moon would appear. This is tricky because published moonrise times always assume a flat horizon—great if you’re on a ship at sea, but not so much anywhere else, and especially not in the mountains.
Using the topo info in the MotionX app, I determined that Mt. Clark’s elevation was around 11,500 feet. Knowing the Glacier Point is at 7,200 feet, I subtracted 7,200 from 11,500 and got 4,300 feet, the vertical distance between my location and the point where the moon would appear. Because the MotionX app also gave me the horizontal (as the crow flies) distance between me and Mt. Clark (about 8.2 miles, or around 43,300 feet), I had everything I needed to plug into my HP-11C (scientific calculator) app and compute the altitude, in degrees, that the moon would need to achieve before cresting the peak (thank God I stayed awake in trigonometry). With that information, it was a simple matter of returning to Focalware to see what time the moon would ascend to that altitude (appear above Mt. Clark).
There are apps that will do all this for me (PhotoPills and The Photographer’s Ephemeris are the ones I recommend), but they require connectivity, and the foresight to do the work when my signal is strong enough to download the maps. (Plus, I just like doing it my way.)
I never tire of this stuff
So, after less than five minutes of figuring, I was confident enough to tell everyone the moon would appear from behind Mt. Clark at 7:57 p.m., plus or minus two minutes. That gave us a couple of minutes to prepare a composition, and sure enough, right around 7:55, the clouds behind Mt. Clark started to glow; at 7:58, there it was and we were in business. In this case the thin clouds on the horizon subdued the moon’s brilliance just enough that I could give the foreground enough light without turning the moon to a white disk.
As often as I do this (sometimes I plot the moon just for fun, even though I know I can’t be there to enjoy it), few things thrill me more than my eyes on the exact point on the horizon at the moment the moon first nudges into view.
Understanding vs. knowledge
I know my process sounds complicated, but it really isn’t—in fact, plotting the moon this way doesn’t require any special insight beyond what most of us learned in high school. But it does illustrate something I constantly stress: the advantage of understanding over knowledge. When we know something, we can respond to a finite set of circumstances; when we understand something, we can reason our way to knowledge beyond our training.
One more quick example: A couple of days ago, I was scouting a potential sunrise location in the Columbia River Gorge. Because I’m reluctant to trust compass apps that point an arrow (or whatever) in a general direction, I pulled out Focalware and saw that tomorrow’s sunrise azimuth would be 70 degrees. Focalware also told me that the sun’s current azimuth was 253 degrees. Since I know that a (solar) shadow always points exactly 180 degrees from the sun’s current azimuth, I knew that my shadow was pointing directly at the 73 degree azimuth (253 minus 180), more than close enough to figure out where the sun would appear (in this case, farther north than ideal).
Whether it’s lunar geometry, exposure settings, depth of field, or whatever, understanding (and visualizing) a system’s underlying principles is always superior to memorizing its facts. And amazingly, it’s almost always simpler than we imagine. Since the position of the sun, moon, and stars are important to me, I try to visualize the celestial choreography.
Likewise, the more you can understand what’s happening when you adjust your shutter speed, f-stop, and ISO, the better prepared you’ll be to reason your way through difficult exposure puzzles, such as, I really need a lot of depth of field to get this tree and that mountain sharp, but the breeze is really blowing the leaves?, or, The exposure is perfect for this 20-second pinpoint stars image, but how can I do a 30-minute star trail shot of the same scene without changing the exposure?.
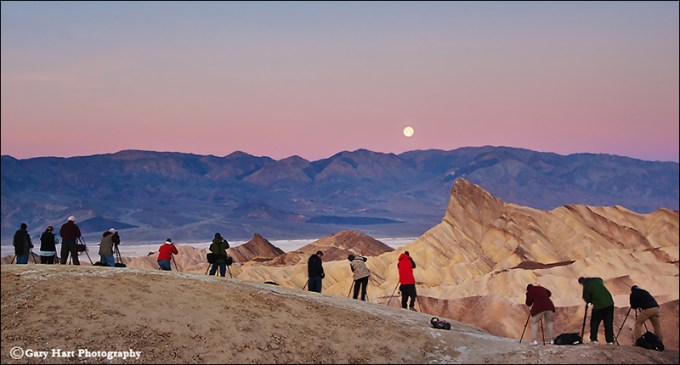
Photo Workshop Schedule
A gallery of celestial wonders


Oops
Posted on December 17, 2013

Winter Moonrise, Merced River, Yosemite
Canon EOS 5D Mark III
1/10 second
40mm
ISO 800
F16
Last Friday evening, this professional photographer I know spent several hours photographing an assortment of beautiful Yosemite winter scenes at ISO 800. Apparently, he had increased his ISO earlier in the day while photographing a macro scene with three extension tubes—needing a faster shutter speed to freeze his subject in a light breeze, he’d bumped his ISO to 800. Wise decision. But, rushing to escape to the warmth of his car, rather than reset the camera to his default ISO 100 the instant he finished shooting, he packed up his camera with a personal promise to adjust it later, when his fingers were warmer—surely, he rationalized, removing the extension tubes and macro lens would remind him to reset the ISO too. (You’d think.) But, despite shutter speeds nowhere near what they should have been given the light and f-stop, he just kept shooting beautiful scene after beautiful scene, as happy as if he had a brain.
I happen to know for a fact that this very same photographer has done other stupid things. Let’s see…. There was that time, while chasing a sunset at Mono Lake, that he drove his truck into a creek and had to be towed out. And the two (two!) times he left his $8,000 camera beside the road as he motored off to the next spot. And you should see his collection of out-of-focus finger and thumb close-ups (a side effect of hand-holding his graduated neutral density filters). Of course this photographer’s identity isn’t important—what is important is dispelling the myth that professional photographers aren’t immune to amateur mistakes.
And on a completely unrelated note…
Let’s take a look at this image from, coincidentally, last Friday evening. Also completely coincidentally, it too was photographed at ISO 800 (go figure)—not because I made a mistake (after all, I am a trained professional), but, uhhh, but because I think there are just too many low noise Yosemite images. So anyway….
This was night-two of what was originally my Yosemite ISON workshop—but, after the unfortunate demise of Comet ISON and a week of frigid temperatures in Yosemite, became my Yosemite ice-on workshop. That’s because, to the delight of the workshop students (and the immense relief of their leader), much of the one foot of snow that had fallen the Saturday before the workshop’s Thursday start had been frozen into a state of suspended animation by a week of temperatures in the teens and low-twenties.
Each day we rose to find nearly every shaded surface in Yosemite sheathed in a white veneer of snow and ice. (Valley locations that received any sunlight were largely brown and bare.) And the Merced River, particularly low and slow following two years of drought, was covered in ice in an assortment of textures and shapes from frosted glass to blooming flowers. Adding to all this terrestrial beauty was a waxing moon, nearly full, ascending our otherwise boring blue skies and illuminating our nightscapes.
On Friday night I guided my group to this spot just downstream from Leidig Meadow. There we found the moon, still several days from full, glowing high above the valley floor, and Half Dome reflected by a watery window in the ice. I captured many versions of this scene, from tight isolations of the reflections to wide renderings of the entire display. It’s too soon to say which I like best, but I’m starting with this one because it most clearly conveys what we saw that evening.
I chose a vertical composition because including the moon in a horizontal frame would have shrunk Half Dome and the moon, and introduced elements on the right and left that weren’t as strong as Half Dome, its reflection, and the snowy Merced River. (Sentinel Rock is just out of the frame on the right—as striking as it is, I wanted to make this image all about Half Dome.)
My f16 choice was to ensure sharpness throughout the frame, from the ice flowers blooming in the foreground, to Half Dome and its reflection. As you may or may not know, the focus point for a reflection is the focus point of the reflective subject, not the reflective surface. That means when photographing a reflection surrounded by leaves, ice, rocks, or whatever, you need to ensure adequate DOF or risk having either the reflection or its surrounding elements out of focus. Here I probably could have gotten away with f11, but my iPhone and its DOF app were buried beneath several layers of clothes, and using it would have require removing two pair of gloves.
I’d love to say that I chose ISO 800 to freeze the rapids, but I’m not sure you’d buy it. So I’m sticking with my too many low noise Yosemite images story and moving on. (A few cameras ago, ISO 800 would have meant death to this image, but today, thankfully, it’s mostly just a lesson in humility.)
A Yosemite Winter Gallery
Click an image for a closer look, and a slide show. Refresh the screen to reorder the display.


Moon chasing: The rest of the story
Posted on November 19, 2013
Moon!, Half Dome, Yosemite
Canon EOS 5D Mark III
1/13 second
F/11
ISO 200
400 mm (slightly cropped)
Wow, it seems like only yesterday that the moon was just tiny dot hovering above Half Dome.

Moonrise Reflection, Half Dome and the Merced River, Yosemite
What happened?
No, the moon didn’t magically expand, nor did I enlarge it digitally and plop it into this image. What happened is that I waited two days and moved back; what happened is the difference between 40mm and 400mm; what happened is a perfect illustration of the photographer’s power to influence viewers’ reaction to a scene through understanding and execution of the camera’s unique view of the world.
The rest of the story
My workshop group captured the “small” moon at sunset on Thursday, when it was 93% full and the “official” (assumes a flat, unobstructed horizon) moonrise was 3:09 p.m (an hour and 40 minutes before sunset). That night the moon didn’t rise to 16 degrees above the horizon, the angle to Half Dome’s summit as viewed from our location beside the Merced River, until almost exactly sunset. Because it’s so much higher than anything to the west, Half Dome gets light pretty much right up until sunset—look closely and you can see the day’s last rays kissing Half Dome’s summit.
Flat horizon moonrise on Saturday, when the moon was 100% full, was at 4:24 p.m., only about twenty minutes before sunset. But Tunnel View is nearly 500 feet above Yosemite Valley; it’s also 5 1/2 miles farther than Half Dome than Thursday’s location—this increased elevation and distance reduces the angle to the top of Half Dome to just 6 degrees. So, despite rising over an hour later, when viewed from Tunnel View, the moon peeked above the ridge behind Half Dome just a couple of minutes after sunset (if we’d stayed at Thursday night’s location, in addition to being hungry and cold, by Saturday we’ have had to wait until after 6:00 for the moon to appear).
Exposure
My objective for full moon photography is always to get the detail in the moon and the foreground. As I mentioned in yesterday’s post, these were workshop shoots, and experience has shown me that the most frequent failure when photographing a rising moon in fading twilight is getting the exposure right—the tendency is to perfectly expose the foreground, which overexposes the daylight-bright moon (leaving a pure white disk). This problem is magnified when the moon catches everyone unprepared.
So, both evenings I had my group on location about 30 minutes before the moon. While we waited I made sure everyone had their blinking highlights (highlight alert) turned on, and understood that their top priority would be capturing detail in the moon. I warned them that an exposure without a blinking (overexposed) moon would slightly underexpose the foreground. And I told them that once they had the moon properly exposed (as bright as possible without significant blinking highlights), they shouldn’t adjust their exposure because the moon’s brightness wouldn’t change and they’d already made it as bright as they could. This meant that as we shot, the foreground would get continually darker until it just became too dark to photograph.
(A graduated neutral density filter would have extended the time we could have photographed the scene, but the vertical component of Yosemite’s horizon made a GND pretty useless. A composite of two frames, one exposed for the moon and one exposed for the landscape would have been a better way to overcome the scene’s increasing dynamic range.)
Compare and contrast
Winter Moonrise, Half Dome, Yosemite
Thursday night’s scene, which would have been beautiful by itself, was simply accented by the (nearly) full moon. Contrast that with my visit a few years ago, when I photographed a full moon rising slightly to the left of its position last Saturday’s night. But more significant than the moon’s position that evening was the rest of the scene, which was so spectacular that it called for a somewhat wider composition that included the pink sky and fresh snow. And then there’s the above image, from last Saturday night—because the sky was cloudless (boring), and snow was nowhere to be seen, I opted for a maximum telephoto composition that was all about the moon and Half Dome.
The wide angle perspective I chose Thursday night emphasized the foreground by exaggerating the distance separating me, Half Dome, and the moon; the snowy moonrise image found a middle ground that went as tight as possible while still conveying the rest of the scene’s beauty. Saturday night’s telephoto perspective compressed that distance, bringing the moon front and center. Same moon, same primary subject: If Thursday night’s moon was a garnish, Saturday’s was the main course.
Learn more about photographing a full moon
Join me next fall as we do this all over again
A gallery of Yosemite moons
Click an image for a closer look and slide show. Refresh the window to reorder the display.


