Eloquent Images by Gary Hart
Insight, information, and inspiration for the inquisitive nature photographer
Lightning lessons
Posted on August 31, 2016
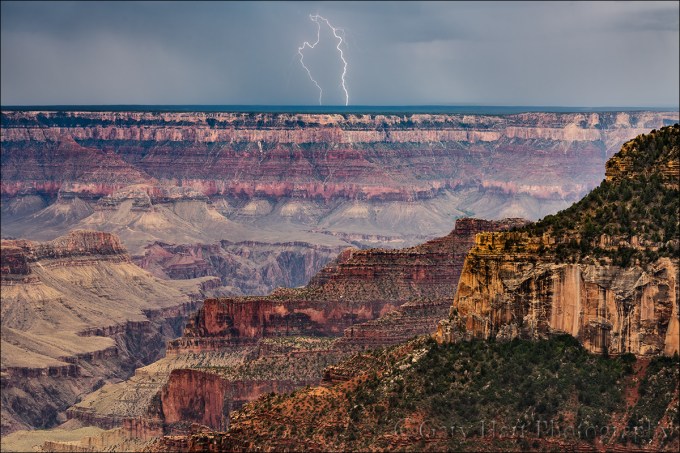
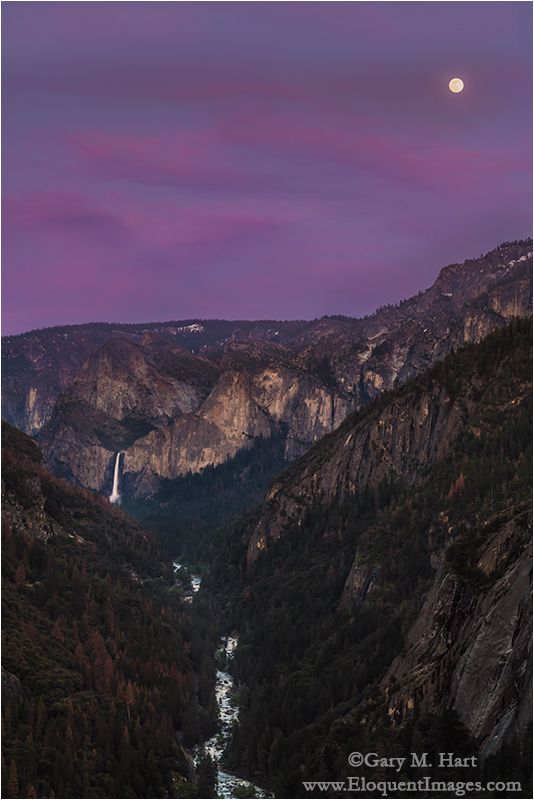
Hand of God, Grand Canyon
Sony a7R II
Sony/Zeiss 24-70 f4
1/13 second
F/13
ISO 50
Lightning Trigger LT-IV
Let’s start with the given that lightning is dangerous, but if “safety first” is a criterion for intelligence, photographers are stupid. It’s impossible to be 100 percent safe photographing lightning, but the more you understand lightning, how to avoid it and maximize your safety in its midst, the greater your odds of surviving to take more pictures. And not only does a healthy respect for lightning’s fickle power make you safer, understanding lightning will also help you anticipate and photograph lightning.
The shocking truth about lightning
Lightning is an electrostatic discharge that equalizes the negative/positive polarization between two objects (when you get shocked touching a doorknob, you’ve been struck by lightning). The convective air motion (convection is up/down circular flow caused when warm, less-dense air rises, cools and becomes more dense, and finally falls and repeats the process; convection is also what causes bubbling in boiling water) in a thunderstorm transports positively charged molecules upward and negatively charged molecules downward. Because opposite charges attract each other, the extreme polarization (positive charge at the top of the cloud, negative charge near the ground) is quickly (and violently) equalized: Lightning.
With lightning comes thunder, the sound of air expanding rapidly (exploding) when heated by a 50,000 degree lightning bolt. The visual component of the lightning—the flash or bolt that you see—travels to you at the speed of light, over 186,000 miles per second (virtually instantaneous regardless of distance). But lightning’s aural component, thunder, only travels at the speed of sound (a little more than 750 miles per hour—a million times slower than light).
Knowing that the thunder occurred simultaneous with the lightning flash, and that they travel at different speeds, we can infer that the farther we are from the lightning, the greater the time elapsed between the arrival of the lightning and thunder. And since we know how fast both travel, we can compute the approximate distance the lightning struck from our location
At 750 miles per hour, thunder will travel about a mile in about five seconds, so dividing by five the number of seconds between the lightning’s flash and the thunder’s crash give you the lightning’s distance in miles (divide the interval by three for the distance in kilometers). If five seconds pass between the lightning and the thunder, the lightning struck about one mile away; fifteen seconds elapsed means the lightning struck about three miles away.
Lightning safety
The 30 people killed by lightning in the United States each year had one thing in common: each didn’t believe he or she would be struck by lightning when they started whatever it was they were doing when they were struck. The surest way to be safe in an electrical storm is to be in a fully enclosed structure or metal vehicle, away from open windows, plumbing, wiring, and electronic devices (ideally, 100 miles away). But since that would preclude our ability to photograph lightning, we need to find a middle ground.
While there’s no completely safe way to photograph lightning, there steps to improve your odds of surviving to enjoy the fruits of your labor. This is where more knowledge comes to the rescue. Most lightning strikes within a six mile radius of the previous strike. So, if less than thirty seconds elapses between the flash and bang, you’re too close. And since “most” doesn’t mean “all,” it’s even better to allow a little margin for error. Thunder isn’t usually audible beyond ten miles, so if you can hear the thunder, it’s safe to assume that you’re within the range of the next strike.
But if you do find yourself caught outside in an electrical storm, with no available shelter, try to do as many of the following steps:
- Avoid water
- Avoid high ground
- Avoid exposed areas
- Avoid metal or electronic objects
- Avoid tall objects such as trees and open structures (and tripods)
- Stay at least fifteen feet from other people
- If you’re surrounded by trees, position yourself near shorter trees, as far from trunks as possible
- Do not lie down
- Crouch with your feet together and your hands covering your ears
- A lightning strike is often preceded by static electricity that makes your hair stand on end and an ozone smell (best described as the smell of electricity—I think of bumper cars at the amusement park or the smell of my electric slot cars when I was a kid)—if your hair starts to stand up and/or you notice a distinct odor that could be ozone, follow as many of the above steps as you can, as quickly as possible (often you’ll only have time to crouch).
Night lightning
Photographing lightning at night is fairly straightforward, following most of the rules and difficulties that apply to any other night photography shoot: metering, composition, and finding focus in low light. My exposure settings are usually a function of the lightning’s frequency—if it’s only firing every five or ten minutes, I need stretch out my exposure time with a lower ISO and/or smaller aperture.
Rather than try to meter a night scene conventionally, I find the easiest way to get a proper night exposure is to start with a 30-second, large aperture, extreme ISO (ISO 6400 or higher) test exposure. When I get an exposure that works, I determine the shutter speed that suits the lightning frequency, and the lightning density I want in my frame, figure out how many stops more than my 30-second test exposure that is, and subtract the same number of stops from my ISO and f-stop. This test exposure is a good way to check my composition and focus in extreme low light situations.
Daylight lightning
Until recently, most lightning photography was either at night, when a long exposure will capture as many strokes that occur while the shutter’s open, or the product of pure luck—the shutter just happened to be open when the lightning fired. Daylight lightning is difficult because if you’re relying on your reaction time, the strike will almost certainly come and go before you can react (people who claim success with this technique have usually captured a secondary or tertiary bolt). But now we have lightning sensors, which can detect and respond much faster than any human can react.
A lightning sensor attaches to your camera’s hot shoe and connects via a special cable to the camera’s remote-release port. When engaged, it fires the shutter immediately upon detecting lightning.
There are many lightning sensors from which to choose. I went with the one that was the consensus choice among photographers I know and trust: Lightning Trigger from Stepping Stone Products in Dolores, CO. At slightly less than $400, including a cable to match your DSLR, the LT-IV is far from the cheapest option, but from all I’ve read, heard, observed, and (especially) experienced first hand, lightning sensors are not generic products, and the internal technology matters a lot. The Lightning Trigger is the only one I’d use (I get no kickback for this).
A good lightning sensor should detect lightning at least 20 miles away. And you can count on a lot of extra clicks—for every click with lightning in my camera’s field of view, I get many clicks caused by lightning not visible to me, or outside my camera’s field of view (better too sensitive than not sensitive enough). But when lightning does fire somewhere in my composition, I estimate that my Lightning Trigger clicked the shutter at least 95 percent of the time.
But even firing in response to a visible bolt doesn’t ensure a successful image—sometimes the bolts are so short that the camera can’t click fast enough. This is a limitation of your camera, not your sensor—some cameras are significantly faster than others (more on this later). In general, the more violent the storm, the greater the likelihood of bolts with long duration and/or multiple strokes that significantly increase your odds.
Exposure settings
The daylight lightning shutter speed sweet spot is between 1/15 and 1/4 second—faster shutter speeds risk completing the exposure before some or all of the secondary strokes fire; slower shutter speeds will wash out the lightning (which is why you can’t just put on a neutral density filter and dial in a long exposure to capture daylight lightning).
Achieving daylight shutter speeds around 1/8 second isn’t always easy. I shoot in Manual mode, use a polarizer, often at ISO 50 and f16 or smaller. Of course exposure will vary with the amount of light, and you may not need to go to such extremes if you’re shooting into an extremely dark sky. You can also use a neutral density filter to slow the shutter speed, but take care not to slow the shutter speed beyond 1/4 second and risk washing out the lightning entirely. And if you’re in manual mode (as I am), be aware of the rapidly changing light in a thunderstorm—an exposure that worked five minutes ago might be all wrong now.
After doing this for many years, I’ve developed an exposure approach that seems to work fairly well for me. When the scene is fairly bright, I tend to go with faster shutter speeds like 1/10 to 1/15 second. I find that longer shutter speeds in these situations tends to was out the lightning I capture, making it less dramatic or even virtually invisible. But when dense, saturated clouds block the sunlight and darken the clouds significantly, I usually extend my shutter speeds into the 1/4 to 1/8 second range. The lightning still stands out quite nicely against the dark clouds, and the longer shutter speeds allow me to capture more multiple strokes.
Shutter lag
Because shutter lag (the time elapsed between the press of the shutter button and the shutter opening) is death to lightning photography, you’ll want a camera with as little as possible shutter lag. Too much delay, and the bolt will be gone before the camera clicks. (Using shutter speeds in the 1/15 to 1/4 second range, there’s no concern that your shutter will be too fast.)
Shutter lag is one area where the Sony mirrorless cameras shine—after years of shooting Canon, and working with Nikon and other camera brands in my workshops, I’m pretty confident that the Sony mirrorless bodies are the fastest, often by a large amount.
Ideally, you’ll want a camera with shutter lag faster than 60 milliseconds. Somewhat slower shutter lag won’t shut you out completely, but the slower your camera, the lower your success rate will be.
The best resource I’ve found for camera shutter lag times is http://www.imaging-resource.com. In the Camera Review section, look for the Pre-focused time on the Performance tab (though I can’t guarantee that any sensor but the Lightning Trigger is able to pre-focus).
Regardless of the camera you’re using, there are a couple of things you should do to do to minimize shutter lag:
- Turn off autofocus. Even with back-button focus (focus not tied to the shutter button), on some cameras autofocus will initiate a brief communication between the lens and camera that will slightly delay response. If you must autofocus, go ahead and do it each time you recompose, then turn autofocus off as soon as you’re focused.
- Though the Lightning Trigger documentation suggests Aperture Priority, I recommend manual exposure mode to eliminate any metering when the shutter trips (again, this could vary with the camera).
- Turn off any pre-click detection, such as face-recognition. (Noise reduction settings shouldn’t matter, since that’s a post-click function.)
It may very well be that your camera isn’t slowed with these features enabled, but since it’s virtually impossible to get camera manufacturers to commit to a camera’s performance at this level (and despite the wealth of self-proclaimed experts who claim to know), I think it’s wise to minimize your chance for problems by simplifying your camera’s capture process as much as possible.
Other equipment
Other essential or recommended equipment*:
- A sturdy tripod (and despite what you might have heard, you’re no safer with carbon fiber than you are with aluminum)
- Rain gear that will keep you dry from head-to-toe
- An umbrella for shielding your camera and lightning sensor (many sensors, including the Lightning Trigger, aren’t waterproof) while composing and shooting in the rain
- Lens hoods to reduce the raindrops that might mar the front element of your lenses
- Neutral density filter and/or polarizer to slow shutter speed
- A garbage bag (my choice) or rainproof camera jacket (haven’t found one I like) to protect your camera
- Extra lightning sensor batteries (better safe than sorry)
- An infrared remote to make sure the sensor is functioning (I sometimes borrow the remote from the hotel)
- A towel (also borrowed from the hotel)
* While I don’t recommend risking staying out when the thunderstorm is on top of you, there will be times when the rain sneaks up on you (I’ve had to leave my camera out in a downpour when a too-close bolt chased me to shelter).
Getting the shot
My goal is to photograph lightning that’s happening somewhere else. In other words, if I’m in the storm, I’m too close. For example, places like the rim of the Grand Canyon and Yosemite offer vantage points with expansive views that allow me to photograph thunderstorms from many miles away (which of course still doesn’t absolutely guarantee safety).
Do your homework
Before attempting a lightning shoot, research potential vantage points and familiarize yourself with the weather patterns in the area you’d like to photograph. It’s possible that most storms in your area will tend to form at around the same time of day, and move in the same direction—this knowledge will definitely improve your chances. It’s also a good idea scout escape routes and have a plan if you’re caught off-guard by an advancing or developing cell.
Because you can’t be everywhere at once, I strongly recommend using a smartphone app that reports current lightning activity. For example, when I’m at the Grand Canyon’s South Rim, I usually stay in Tusayan, about 15 minutes from the rim, and often don’t know exactly when the lightning has started, or whether it’s west or east. I can also get a pretty good idea of where the storms are building and the direction they’re moving to get myself out to the rim before the show starts.
The app I use on my iPhone is Lightning Finder, which reports (with a minimal annual subscription), virtually real-time, every lightning strike in North America. Another subscription-based (for real-time lightning) app that I’ve heard good things about but haven’t tried is RadarScope. This is by no means a comprehensive list, so you might want to do some research to see what’s out there.
Maximize your odds
Choosing a conventional landscape scene usually involves some planning to ensure the best light for my planned subject, and that the weather will cooperate. But lightning photography is far more opportunistic—we may know that a chance for lightning exists, but we rarely know exactly where it will appear. So while I may have an idea of a landscape to put with my lightning, but if the lightning’s not happening there, my lightning shoot won’t be terribly productive unless I adjust.
The greater the vertical distance raindrops rise and fall in the clouds, the greater the potential for the extreme polarization that’s conducive to electrical activity. So look for towering thunderheads, the higher the better. I also look for gray curtains of rain hanging beneath dark clouds, which is usually an indication of where the cell is most active. The darker the rain curtains, the heavier the rain and the more likely there will be lightning. But be aware that the lightning doesn’t necessarily fire in the darkest part of the clouds—sometimes you can see lightning in the thinner gray areas out front of the main rain band.
My general approach is to identify the most likely lightning source (rain curtain) and find the best composition that includes it. The wider your composition, the greater your odds of capturing lightning somewhere in your frame, but the smaller the lightning will appear. I tend to start wider to ensure success, then tighten my composition once I’m fairly confident I captured something.
Sometimes I encounter a situation where the best lightning is firing above a boring scene, but I see potential (but so far no lightning) above a much better scene. That’s a classic risk/reward dilemma without an absolute best solution. Because I have so many lightning images, I tend to go with the better composition rather than the best chance for lightning. On the other hand, I advise those who have few or no lightning captures to opt for the sure thing until they know they’ve had some success.
A frequent composition problem I see in the initial images of my workshop students is too much sky. Monitor the storm until you know the height of the lightning’s origin, then put the top of the frame a little above that—more sky if there’s something interesting above, less if it’s homogenous gray clouds. But it’s better to have a little too much sky than to have the lightning coming out of the top of your frame.
With a lightning sensor engaged and firing, it’s easy to feel like there’s not much to do. But lightning storms move, so in addition to the obvious safety implications (which should be your primary concern), it benefits you to monitor and anticipate the lightning activity’s path. Armed with this knowledge, I’ll frequently shift, tighten, or widen my composition as the situation dictates.
Since my Lightning Trigger is so sensitive, picking up lightning well out of my frame and (most frequently) in inter- and intra-cloud lightning that’s invisible to the naked eye in daylight, I get far more frames than I get lightning. This going through hundreds of frames on my computer to find the ones with lightning a very tedious task. That job becomes much easier if, when my Lightning Trigger is armed and ready, I lock my eye on the horizon. When I see lightning and hear my shutter click, I mark that frame by quickly clicking another with my hand in front of the lens. (If I don’t hear my shutter click, I check to make sure everything is working and set up properly.)
Be aware that electrical storms can move quite quickly, so monitor the storm you’re photographing, and the sky around you in all directions, closely and continuously. Not only will this enable you to adjust your composition to account for a cell’s movement, it can save your life when an active cell threatens your location.
Grand Canyon Monsoon Photo Workshops
A Lightning Gallery
Click an image for a closer look and slide show. Refresh the window to reorder the display.


Less sky, more canyon
Posted on August 26, 2016
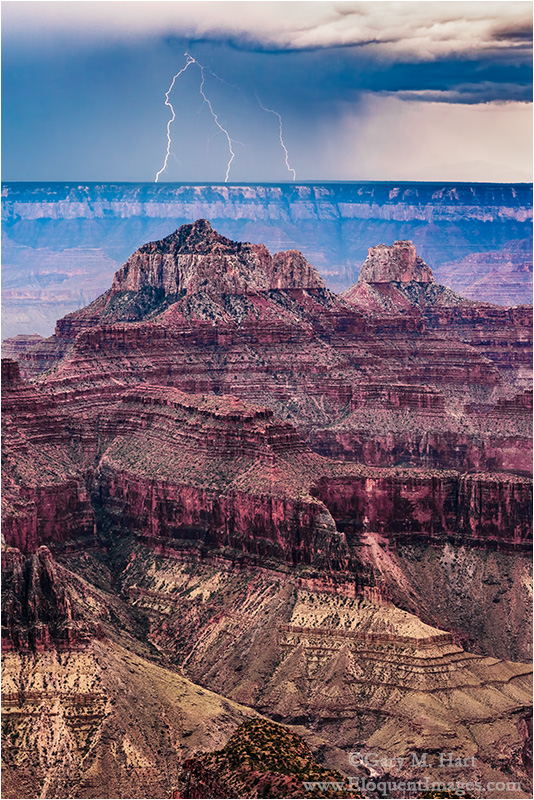
Forked Lightning, North Rim, Grand Canyon
Sony a7R II
Sony/Zeiss 24-70 f4
1/6 second
F/14
ISO 50
Lightning Trigger LT-IV
Don Smith and I just wrapped up 13 days and two workshops at Grand Canyon. Bookending the trip with 12+ hour drives, each day we had 4:30 a.m. wake-ups, lots of waiting for something to happen punctuated by bursts of extremely intense activity, and very late dinners. Both groups enjoyed the full complement of monsoon thrills, including thunder and lightning, rainbows, dramatic clouds, and vivid sunrises and sunsets that made the difficult schedule more than tolerable.
Most workshops have a theme that develops organically and takes on a life of its own throughout the workshop. At some point I realized that second workshop’s theme had somehow become me peering at an LCD, or projecting an image onto the screen during image review, and advising (with emphasis), “Less sky, more canyon.”
I won’t belabor a point I’ve made many times (most recently here) that the most frame space should go to the part of the scene with the most visual interest, except to say that few locations illustrate this better than Grand Canyon. It’s a rare sky that compete with the canyon’s majesty, but what I saw frequently in this workshop was photographers giving half or more of their frame to a sky that didn’t match the canyon below.
I suspect this was happening for a few reasons. Sometimes people just reflexively split their frame with the horizon, or automatically break their scene with the horizon 1/3 of the way down from the top, or up from the bottom, because a misguided judge at their camera club enforces the rule of thirds with Biblical conviction. Other times they simply were composing for lightning firing across the canyon and just weren’t sure how high the lightning originated. But for the distant lightning we usually shoot, that’s invariably fairly near the horizon, and it only takes one strike to get a pretty good idea of where that will be.
This doesn’t mean Grand Canyon images should never include lots of sky, it means that the sky you give your Grand Canyon image should be earned. A towering rainbow? Horizon-to-horizon sunrise or sunset color? By all means, widen your lens and tilt the camera up. But don’t forget that even when the sky is spectacular, it’s the canyon that makes your image special.
No sky, minimal sky, lots of sky—I came away from this workshop with lots of new images I’ll be sharing over the next few weeks. The image here was from the first of two spectacular lightning shows, one for each workshop, our groups enjoyed. We were about halfway into the image review at Grand Canyon Lodge on the North Rim when the lightning started up across the canyon. We instantly jumped into an unrehearsed Keystone Cops scene, scrambling for our gear, racing for the door, and setting up on the viewing deck outside.
Don and I had prepped the group on Lightning Trigger setup on the first evening, and made sure everyone’s Trigger was functioning, so we didn’t have too many problems that afternoon.
The show lasted over two hours, and by the time it was over, everyone in the group had multiple lightning images.
Join next year’s Grand Canyon Monsoon photo workshop
Less sky, more canyon


The cure for the summertime blues
Posted on August 15, 2016

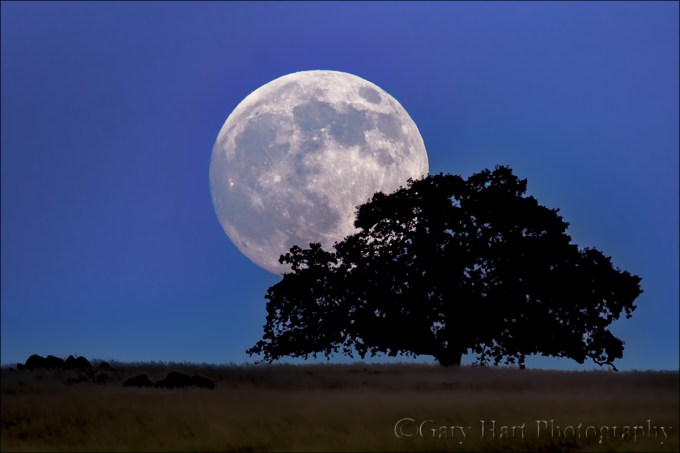
New Moon, Sierra Foothills, California
Sony a6300
Tamron 150-600 (Canon-mount with Metabones IV adapter)
1/8 second
F/8
ISO 100
There are many great reasons to be a landscape photographer in California. Summer isn’t one of them. Most people find California’s benign whether appealing—our mild winters and dry summers are one of the Golden State’s prime attractions. But to photographers, blue skies are boring, and California’s summer skies are nothing if not blue.
We say goodbye to our clouds in May, and I go stir crazy waiting for their return in October. One summertime solution is night photography, which requires clear skies. As an added bonus, summer’s warm temperatures make fumbling with camera gear and standing around in the dark much more tolerable, and the Milky Way’s bright center is very much a summer feature. California’s dense population means extreme light pollution through much of the state, but our proximity to mountains make escaping the light relatively easy in summer.
Because I can’t always make it to the mountains, I’ve found other photo opportunities in the foothills closer to home. The wildflowers of spring are gone, and the sun has burned the once green grass a golden brown, but the foothill’s oak trees are reliable silhouettes against the colorful twilight sky. Once upon a time I was satisfied with simple silhouettes, but in recent years I’ve made an effort to include a crescent moon in my foothill oak silhouette scenes.
A crescent moon only appears in close proximity to the sun, hanging in the brightest part of the post-sunset/pre-sunrise sky, above a (relatively) dark landscape. The more of the moon that’s illuminated, the farther in the sky from the sun it will hover (a full moon is exactly opposite the sun, rising at sunset and setting at sunrise). Since a crescent rises and sets just before or after the sun, there’s not a lot of time when it’s above the horizon and the sky is dark enough for its thin outline to stand out.
Getting a crescent moon to align with my foreground subjects is all about timing—for example, some months a new moon follows the sun too closely, dropping below the horizon before the sky has darkened enough to reveal it. The next night the moon lags so far behind the sun that that getting it in the frame with my subject before the sky darkens too much requires a moon-shrinking wide angle lens. As much as I enjoy accenting a scene with a small crescent, I truly love photographing the moon large.
My most recent attempt came last Thursday, a day I’d circled in my calendar several months ago after calculating that the moon would be in the perfect twilight window—not too low or too high—for my favorite trees. My brother and I started the evening at a location with a lower horizon so we could photograph the sun setting into the trees (I blogged about that shoot last week), then zipped up the road to a spot that I’ve been photographing for years.
Sometimes I can photograph this scene from the road, but in summer the new moon sets so far north that we had to angle a little south and climb one small hill and circle another to align it with the trees in the distance. Aligning the trees and moon enabled me to shoot the entire scene with my Tamron 150-600 and Sony a6300 for maximum magnification.
There are actually two trees side-by-side atop this distant hill, but I had so much magnification, I could only photograph one at a time. I gave both trees equal time—today’s image came early in the shoot, when the moon aligned better with the left-most tree. As the moon descended to the right, I eventually turned my attention to the other tree.
Regardless of the tree I was working on, I moved around a lot, left/right and up/back, dodging cow pies, to balance the moon and tree in the frame and find a relationship that worked. By ascending a small hill behind me, I was even able to extend the shoot a few minutes before the moon finally disappeared.
It would have been very easy to stay home and do something else that night. I know these simple images aren’t big money makers, and summer moon and oak silhouettes may not be as spectacular as Yosemite Valley covered with snow, or a rainbow above the Grand Canyon, but I find photographing them no less personally rewarding. (I already can’t wait until next month.)
One more thing: See the small dot of light on the right, at about the same level as the moon? That’s Mercury, another sun-hugging visitor only visible in the dawn or dusk twilight glow.
Read more about photographing a crescent moon
A crescent moon gallery


The night sky and me
Posted on August 12, 2016
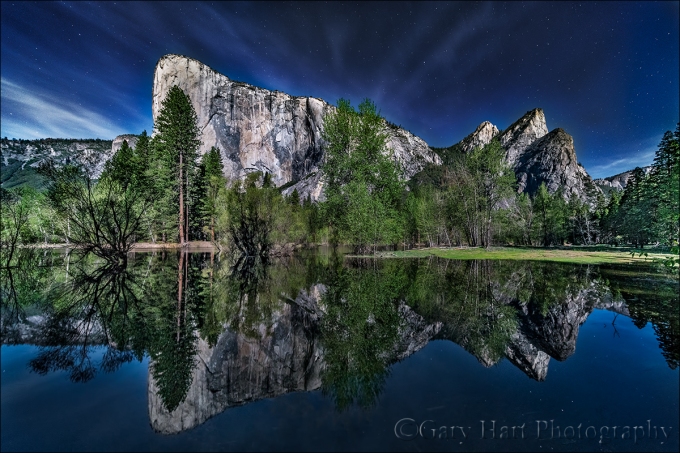
Moonlight Reflection, El Capitan and the Three Brothers, Yosemite
Sony a7R II
Canon 11-24 f/4L with Metabones IV adapter @11mm
20 seconds
F/4
ISO 3200
My relationship with the night sky started when I was ten. Astronauts were my generation’s cowboys, so when I was given a castoff, six-inch reflector telescope by an amateur astronomer friend of my dad, I jumped at the opportunity to explore the celestial frontier on my terms. On clear nights my best friend Rob and I dragged that old black tube onto the front lawn and pointed it, randomly and full of wonder, at the brilliant points of light overhead. With guidance from our dads and the books of Herbert S. Zim, we learned the difference between stars, which despite their great size and temperature, are at such great distance that even the strongest telescope only sees discrete points of light, and planets, nearby worlds reflecting sunlight, which my telescope revealed as glowing disks.
With that telescope Rob and I searched in vain for comets and galaxies, watched Venus and Mercury cycle through phases just like the moon’s, tracked the nightly dance of Jupiter’s Galilean moons, and monitored the changing tilt of Saturn’s rings. Suddenly and hopelessly infected with the astronomy bug, on camping trips I declined the luxury of the family tent in favor of a sleeping bag beneath more stars than I imagined possible. There, nestled to my neck in the bag’s warmth, I’d stretch beneath the boundless ceiling, counting “shooting stars” and scouring the sky for satellites, fighting sleep for as long as my eyelids could hold out. In my later teen years I discovered backpacking and with it skies that inspired ponderings of infinity. My first college major was astronomy, a most impractical aspiration that I managed to correct before quantification of the universe spoiled my appreciation of its elegance.
In my early twenties I discovered photography, but, frustrated by my film camera’s inability to capture the night sky’s beauty, quickly moved on to more terrestrial subjects. Fast forward to the twenty-first century, when the advent of digital photography offered light capturing and processing capabilities impossible with film. My first night subject was the Big Dipper; since then I’ve tried to include some form of night photography in most of my workshops and as many personal shoots as possible, seeking to use my camera’s unique perspective to convey the emotion the night experience brings me, rather than attempt the impossible task of recreating the sky literally.
Among other subjects, I’ve developed a particular fondness for photographing the gold/blue transition-zone separating day and night. Arriving on location well before sunrise gives me a front-row view of the indigo night’s slow retreat in favor of the golden promise of a new day; lingering long after the sun sets, I watch the day’s vestiges linger on the horizon, as if waiting with me for the stars to materialize.
About this image
This year’s Yosemite Moonbow and Wildflowers workshop group had the good fortune to photograph Yosemite brimming with more water than I’ve seen in years. A particular highlight was this location beside the Merced River, one of my favorite early morning spots. The morning we arrived we found my normal vantage points flooded beyond recognition, but rather than let the flooding turn us around, I explored the new shoreline and found view through the trees onto a crystal clear reflection. We stayed and photographed here until bad light and empty stomachs finally drove us to breakfast.
Excited by our good fortune that morning (read The Power of Reflections), I offered to return that night with anyone who wanted to photograph the scene by moonlight. Though I already had a moonbow shoot scheduled for later in the workshop, the moonlight potential here was so great that I wanted to at least give everyone the option of photographing it (on the other hand, with such early mornings, I knew from experience that I needed to give everyone the option to return to the hotel for an early bedtime).
Despite a long drive back from our sunset at Glacier Point, about half the group still joined me for what turned out to be a very memorable moonlight shoot. The already somewhat limited space was made even more difficult by the darkness (we were shaded from the moonlight by trees and the valley wall behind us), but we made it work with great cooperation and no shortage of laughter.
Among other things, this image highlights one of the great joys of photography with today’s advanced technology: the camera’s improving ability to reveal a world previously obscured by night’s dark curtain. (It will only get better.)
Photo Workshop Schedule
A moonlight gallery


Just messing around
Posted on August 7, 2016

Big Sun, Sierra Foothills, California
Sony a6300
Tamron 150-600 (Canon-mount with Metabones IV adapter)
1/4000 second
F/11
ISO 100
A few days ago my brother and I made a trip up into the foothills to photograph the new moon hanging on the horizon shortly after sunset. With several fires burning in Northern California, I realized that if the wind cooperated, we’d also have a chance to photograph an orange ball of setting sun before the moon appeared. Not only is this a beautiful sight, the dulled sun compresses the dynamic range to a much more manageable level—definitely worth giving it a shot.
Because the horizon for my planned moonset location was too high for the sunset shoot, I picked a starting spot that would allow me to shoot the sun against distant oaks when it was much lower in the sky. The plan was to shoot the sunset, then make the ten-minute drive to my moon location. Unfortunately, the conditions didn’t cooperate as the smoke was gone and the sun the shined bright all the way down to the horizon. But since we were there, we decided to make the best of the situation.
Since my goal was a big sun, I went all-in with my 1.5 crop Sony a6300 and Tamron 150-600 lens. Shooting directly into the brilliant sun, while not something I’d recommend, is decidedly easier with a mirrorless camera because I don’t need to worry about frying my corneas with my telephoto lens. I still had to be careful to only look at the sun through my camera, but found that I could see well enough to compose if I darkened enough.
I had no illusions about turning the sun yellow while still being able to see anything else in the scene, but I at least wanted to darken the sky enough for the bright sun to stand out. That would give me, I hoped, a round sun with trees silhouetted against the sky.
Zooming my lens all the way out to 600mm (900mm full-frame equivalent), I started playing with compositions as the sun approached the horizon. Focus was a piece of cake with the a6300’s focus peaking—I just dialed my focus ring to maximized the peaking highlights, and clicked.
In-camera my images were extremely dark except for the hopelessly blown sun, but I could see that I’d captured enough detail to give me hope for recovering it later. Opening the images in Lightroom later, I was thrilled at how much I could pull out of the darkness—not just the detail in the trees, but the color in the sky. Why all the orange? That’s simply a product of the significant underexposure I needed to keep the sun round. In fact, sticking with the white balance my camera’s auto white-balance chose, I actually ended up desaturating the scene a little. Noise reduction and a slight crop for framing was about all the processing I did for this image.
When the sun disappeared we packed up and hightailed it to our moonset destination. That shoot worked out wonderfully, but that’s a story for another day….
Purchase Prints
A Sierra Foothills Gallery


Someday My Prints Will Come
Posted on August 1, 2016

First Light, Yosemite Valley
Canon EOS-1Ds Mark III
Canon 24-105L
1/3 second
F/16
ISO 100
Someday is now…
The dilemma
I’ve been selling prints of my images for about fifteen years. I started at weekend art shows and in art galleries, and soon added a modest online store. The art shows in particular were very successful, but as much as I enjoyed them (I truly did), the shows required so much work that I stopped because they detracted from my primary bread and butter, the photo workshops.
Despite my workshop emphasis, I have maintained a small gallery presence, and continue to offer my prints for sale on my website (which I’ve upgraded significantly). While I still sell prints fairly regularly, I know there are many more people who don’t purchase them because they’re just too expensive.
I can explain
Though printing is a pretty labor intensive process, I’ve always insisted on doing it myself, largely because I’ve never trusted anyone else to create the print to my satisfaction. But the amount of work that goes into each print (even after it’s been processed and sized)—from constant maintenance (clearing clogged print heads, monitor calibration, paper and ink management, and so on) to careful packaging and shipping—results in pricing that’s prohibitive for many people.
Finally, a solution
For a long time I’ve sought a solution that would cut me out of the printing and shipping side of the transaction while still yielding quality prints, and think I’ve finally found one. I’ve spent the last few weeks creating a SmugMug website exclusively for showcasing my prints for sale: GaryHartPrints.com. On this new site, instead of coming to me, your print orders will go to the much acclaimed Bay Photo Labs, my longtime lab of choice for jobs my own printer can’t handle (such as prints too large, or paper I don’t offer).
Though these prints won’t have my personal signature, each print has been photographed, processed, copyrighted, and digitally signed by me. I can also vouch for the quality, which will be at least as good as what I can offer. By taking the printing process out of my hands and putting it in the hands of people who do this exclusively, you get more choices, including multiple papers (lustre, glossy, metallic, and gicleé watercolor) and many matting and framing options—all at a much lower price than I can offer by printing directly.
Check it out*
*This site is brand new, so the images you see here are by no means a complete representation of all that’s available. If you don’t see what you’re looking for, just send me message.
About this image
In a post announcing a new print sale website, I thought it appropriate to re-share my most requested image, captured on a chilly April morning in 2009. As with many of my images, it was captured during a workshop. And also like many of my images, it almost didn’t happen.
My workshop group was at Tunnel View overlooking Yosemite Valley, wrapping up our first sunrise shoot. A storm had moved through overnight, dusting the granite walls with snow down to about 5,000 feet (Yosemite Valley is at about 4,000 feet), and soaking the lower elevations with a light rain. With no wind to mix the chilly atmosphere, the coldest air dropped all the way to the saturated valley floor, where it found the dew point and condensed into a ground-hugging fog.
Overhead, the parting storm’s cloudy vestiges covered the scene with a dull, gray blanket of homogenous clouds, so our attention all morning had been on the wispy valley fog below. The dynamic range at Tunnel View is pretty unmanageable when the morning sun arrives, so I was about to move the group on to greener pastures when I noticed a golden glow expanding behind Sentinel Dome. As the color spread, it was apparent that the uniform clouds above were far more translucent than I’d imagined and I put a hold on our exit. Soon I was so mesmerized by the buttery veneer stretch from rim to rim , reflecting softly on the fog below, that I almost forgot about my camera.
I raced to the car to get my gear and sprinted back to set up far faster than I like. By the time I was ready, the sun was just about to crest the ridge behind Sentinel Dome. I worked quickly, using a 2-stop hard graduated neutral density filter to subdue the bright sky. I stopped down to f16 thinking a sunstar might be possible, but the sunlight was too diffused by the clouds.
Of all the pictures of Yosemite that I’ve taken, this is the one that makes it easiest for me to imagine how this heavenly location might have looked before human interference.
America the Beautiful
A gallery of favorites (coming to a wall near you)


How do you do that?: Big Moon
Posted on July 26, 2016
The Secret for Supersizing the Moon
Foothill Full Moon, Sierra Foothills, California
Sony a6000
Tamron 150-600 (Canon-mount with Metabones IV adapter)
1/100 second
F/8
ISO 400
(One click—not a composite)
A few days ago I saw a picture of an oversize moon above the Golden Gate Bridge; beneath the picture someone had commented that the image was obviously was faked because the moon isn’t that big. Though I didn’t scrutinize the picture, I suspect that the commenter’s accusation was right, but for the wrong reason.
While some photographers take the easy (and deceptive) approach and just plop a huge moon into their beautiful scene, the mere presence of a large moon doesn’t mean that the image is a fake. In fact with the right equipment and a little preparation, any photographer can photograph the moon large in their images (without cheating).
Size matters
Most people understand that the longer the focal length, the larger the moon will appear in an image. But focal length is only half the equation, a fact that becomes clear when you take the extreme telephoto approach to the limit and attach a camera to a telescope. True, with a telescope you’ll achieve the maximum enlargement possible, but you’ll also end up with the moon and nothing else—you could capture the very same image whether you’re standing on a tropical beach, atop a towering peak, or in the comfort of your own backyard.
Size isn’t everything
Rather than simply photographing a large moon, what we landscape photographers really want is a moon that appears large relative to the rest of the image. And while the size of the moon in your frame is determined by the focal length, its size relative to the landscape has nothing to do with the focal length.
The moon’s extreme distance means that it will appear the same size to our eye (or lens) regardless of our location on earth. We can enlarge the moon with optics (a lens or telescope), but not by moving closer (without a rocket). On the other hand, the perceived size of earthbound objects changes dramatically with distance—move closer and things get bigger, move back and they get smaller.
So, if the perceived size of the moon from earth is constant, but earthbound subjects shrink with distance, you can make the moon look larger compared to earthbound subjects foreground by moving back and shrinking the foreground—then, once you’re farther back, you can use a telephoto to enlarge everything.
Understanding this makes it easier to see why the moon looks so small in most images because the photographer was too close to the subject: The closer we are to the scene we’re photographing, the shorter (wider) the focal length required to include all of the scene in the frame, and the wider our field of view, the smaller the moon will appear in the scene.
The two images above were taken from the same location (at different times). The size of the moon relative to Half Dome is the same, but in one image I shrank the scene and enlarged the moon with a telephoto; in the other, I widened the scene and shrank the moon with a wide angle lens. To get the wide scene and the large moon, I’d need a vantage point with the same angle of view, only much farther back (sadly, that vantage point doesn’t exist).

Foothill Moonrise, Sierra Foothills, California
The story of this image
Armed with this knowledge, I’m on constant lookout for distant subjects that stand out against the east or west horizon. This oak tree in the foothills west of Sacramento has been on my radar for awhile—for years I’ve noted it from the road, but was always on my way somewhere else and never had time to hunt for a vantage point that would work for the moon.
One evening I found myself with a little extra time when conditions changed and a planned foothills shoot didn’t materialize as hoped. Instead of heading straight home, I spent the hour or so of remaining daylight searching west of this tree for a vantage point that would align it with the upcoming moonrise. (Not only do I need a distant enough view that puts the tree against the sky, that view needs to align with the rising moon.)
Back home I did a little more plotting with my topographic software and came up with a tentative plan, and on the evening of the full moon I made my way back up to the foothills. I knew about where the moon would rise, but because I don’t know the exact altitude (in degrees) of the hillside from my planned location, I couldn’t be sure exactly when the moon would appear. (That’s not a problem once I’ve photographed a moonrise from a location, like Yosemite.)
Unfortunately, I got hung up by traffic that sapped all the extra time I’d factored into my plan, and ended up arriving at my location right at the beginning of the window when I thought the moon might appear. I started extracting and assembling my camera, lens, and tripod with one eye on the east horizon and did a double-take when I realized that the moon was indeed coming up. It was just slightly downhill from (west of) the tree, so I grabbed my gear and sprinted east a couple of hundred yards until they were aligned.
I used my Sony a6000 with my Tamron 150-600 lens (Canon-mount with a Metabones adapter). I maxed the focal length to 600mm, but since the a6000 is a 1.5 crop sensor, my effective focal length was 900mm. I quickly focused on the moon, metered, and started clicking. I used ISO 400 to speed my shutter and mitigate micro-vibrations that can be easily magnified at such a long focal length.
The tree was about a mile-and-a-half away. If I hadn’t been so rushed I’d have probably stopped down to f/11 or f/16 to ensure more depth of field (the hyperfocal distance was over 7,000 feet), but fortunately, focusing on the moon at f8 did the job. In Lightroom I cropped the image slightly (less than 15 percent) for framing and to enlarge the tree and moon a little more.
Workshop Schedule
The Moon, Big and Small


Yosemite Moon
Posted on July 21, 2016
Spring Moonrise, Bridalveil Fall and the Merced River Canyon, Yosemite
Sony a7R II
Sony 70-200 f4
1/2 second
F/8
ISO 100
I’m a relationship photographer. By that I mean I’ve never been one of those photographers who expands his portfolio by adding new locations. Rather, I like to get a feel for a place, not just the where and when of its photo opportunities, but its history, geology, flora, and fauna. I much prefer digging deeply into one scenic area to visiting a large variety of scenic areas. This is a personal style thing, and I know my more deliberate approach would drive many photographers crazy, but I’ve learned that I’m rarely very productive on my first visit anywhere, and often not until I’m several visits in.
I’m probably several hundred (thousand?) visits into my Yosemite relationship, with no end in sight. But despite this extensive history, any moonrise above Yosemite Valley, regardless of the phase, still takes my breath away. Orbital geometry aligns Yosemite’s moon with different features as the seasons change, and I try to be there for as many moonrises as possible. Whether it’s the late fall and winter full moon hovering above Yosemite Valley, the summer crescent moon appearing from behind Half Dome, or the spring full moon rising above Bridalveil Fall, I just can’t get enough of it.
As with most of my Yosemite workshops, a planned highlight for this year’s April Yosemite Moonbow and Wildflowers workshop was a moonrise, this time the Bridalveil Fall full moon. Throughout the workshop we’d enjoyed a Yosemite Valley bursting with more water than I’d seen in several years, a dogwood bloom that was just about at peak, and a sky enhanced by an assortment of beautiful clouds.
When the moonrise day came and the clouds stayed, there were a few concerns for our moonrise. But knowing Yosemite well enough to understand that you can’t predict the conditions five minutes from now based on the conditions right now, I made sure we were in position with cameras ready (and fingers crossed).
Moon or not, the view up the Merced River Canyon that evening was beautiful, but when the moonrise time arrived and the moon didn’t, I scanned the clouds for hints of the moon’s glow. Though there was no sign of it, a little higher, and directly in the moon’s path, the clouds appeared thinner; higher still, actual stripes of blue sky gave me hope.
By the time the moon emerged, nearly ten minutes after sunset, the entire sky had taken on a rich magenta hue. The Merced River Canyon below had become quite dark, but my Singh-Ray two-stop hard-transition graduated neutral density filter held back the (daylight-bright) moon enough for me to give the canyon the light it needed. The final step for this image came in Lightroom and Photoshop, which enabled me to add a little more light to both the canyon and the clouds (which had been darkened along with the moon by the GND), and pull back the highlights in the moon.
One more thing
People ask me if I ever tire of Yosemite, and I can honestly answer, no. Part of keeping it fresh is the infectious excitement when the people I’m with witness something like this moonrise. (I don’t think this makes me unusual—most people get vicarious pleasure from the joy of others’ first experience of something that’s special to us.) This night the moonless pink sky was enough to thrill everyone, but when the moon poozed out, it became one of those once-in-a-lifetime moments for everyone in the group. That just never gets old.
Join me in a Yosemite photo workshop
Yosemite Moons
Click an image for a closer look and slide show. Refresh the screen to reorder the display.


Can you defend your exposure settings?
Posted on July 15, 2016
Dogwood Above the Merced River, Near Fern Spring, Yosemite
Sony a7R II
Tamron 150-600, Canon-mount with Metabones IV adapter
1/125 second
F/8
ISO 1600
While I’m a huge advocate of manual metering (it’s all I’ve ever used), I stop short of saying everyone shoot shoot in manual mode. But I do believe that anyone who is serious about their photography should at least be comfortable shooting in manual mode. That means understanding how a light meter “sees” a scene, the information the meter returns, and how each of the camera’s three exposure variables affect an image. (I won’t get into the rudiments of metering now, but you can brush up here: Exposure basics.)
We have three ways to control the amount of light our sensor records:
- Aperture, measured in f-stops, is the size of the opening that allows the light in. Controlling exposure by changing the aperture affects your depth of field—larger aperture (smaller f-stop), means less depth of field.
- Shutter speed is how long the light strikes the sensor. Controlling exposure by changing the shutter speed affects the way the camera captures motion—a faster shutter speed freezes motion, a longer shutter speed blurs motion.
- ISO is the sensor’s sensitivity to light. Controlling your exposure by adjusting the ISO affect the digital noise in the image—increasing the ISO to make the sensor more sensitive to light increase’s the resulting image’s noise.
Every image you capture uses a combination of these three variables to establish the exposure (amount of light) for every image. And because the variable you choose to adjust affects more than just the exposure of your image, if you can’t justify your choice for each of the three exposure settings for every shot (if it’s not a conscious decision), you have a wonderful opportunity to improve.
To illustrate, I’ll explain my exposure choices in the dogwood image above (a new image, captured during my 2016 Yosemite Moonbow and Wildflowers workshop in April). Though I used f/8, 1/125 second, and ISO 1600 to achieve my desired exposure, keep in mind that I could have achieved exactly the same exposure by choosing f16, 1/4 second, and ISO 100. Or f5.6, 1/500, and ISO 6400. Or a virtually unlimited variety of other combinations that all would have captured the same amount of light. But since whatever exposure combination I decide on will potentially yield a completely different image (different depth, different motion, different noise), I had to be very careful with my decisions.
So here goes:
- f/8: Because the f-stop determines the depth of field for my chosen focal length and focus point, and I try to compose with front-to-back relationships in every frame, f-stop is usually my primary, non-negotiable exposure variable. In this case I wanted my background soft to force my viewers’ eyes to the dogwood only, but not so soft that the background whitewater was unrecognizable. I decided that f/8 gave me the right balance of foreground sharpness and background softness.
- 1/125 second: When photographing a stationary landscape on a tripod, I can go with whatever shutter speed I need, but when there’s motion in the scene, my shutter speed becomes as important as my f-stop. On this afternoon, in addition to the water moving in the background, I was dealing with a slight breeze. If the breeze hadn’t been a consideration I could have chosen whatever shutter speed gave me the best motion effect, but I needed to freeze the swaying dogwood and was confident I could do that at 1/125 second.
- ISO 1600: Because it gives me the cleanest images, I always go with ISO 100 when possible, but that wasn’t an option here. Given that I needed f/8 for my desired depth of field, and I wasn’t comfortable keeping my shutter open longer than 1/125 second, ISO was the only remaining variable to control the light in my scene. I spot-metered on the brightest dogwood and increased the ISO until my meter indicated the flower was as bright as I could make it without overexposing. The dynamic range in this scene was great enough that even though the dogwood bloom was fully exposed, the shadows remained quite dark, but fortunately that helps the dogwood stand out.
This was my process and rationale for this image. Depending on the factors I’m dealing with, my process might follow a completely different path for another image.
In general I tell people just learning to master manual metering to approach every scene with a tripod (non-negotiable—with no tripod, my suggestions below aren’t valid) and this mindset:
- F-stop: f/11, because this provides the most depth of field possible at an f/stop that is in most lens’s sharpest range, and without significant diffraction.
- ISO: 100 (or whatever your camera’s native ISO is), because this is where you’ll get your cleanest (least noise) images.
- Shutter speed: Adjust until you’ve achieved the proper exposure.
These guidelines certainly don’t apply to all situations, but they’re a good starting point that will simplify the decision making process until you get more comfortable juggling your exposure variables. And keep in mind that you’ll need to deviate from f/11 and ISO 100 whenever your creative needs and the scene conditions (such as wind or moving water) dictate. Practice makes perfect.
I cover all this stuff in much greater detail in my photo workshops.
Walking the Exposure Tightrope
(Images that required a very specific combination of exposure variables)


From One Second to the Next
Posted on July 10, 2016
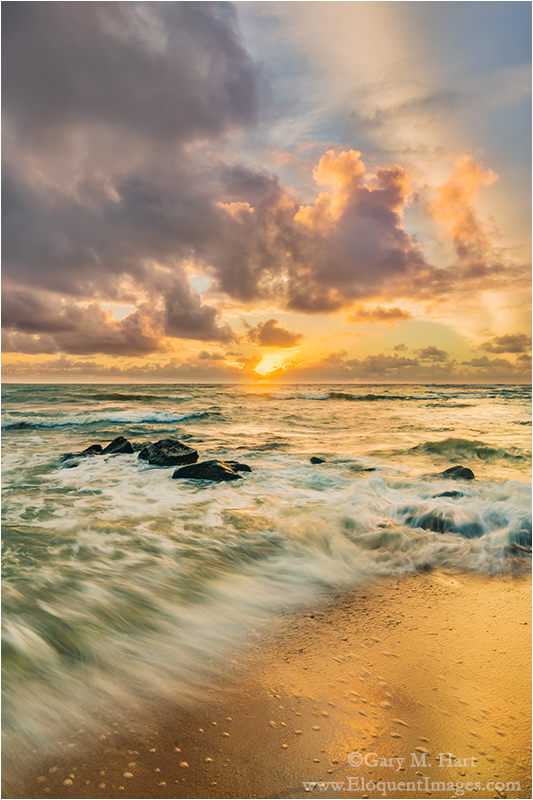
Here Comes the Sun, Lydgate Beach, Kauai, Hawaii
Sony a7R II
Sony/Zeiss 16-35 f4
1/5 second
F/16
ISO 50
I don’t know about you, but my earliest memories of photography are of Dad pulling the family wagon up to an iconic vista, beelining to the railed viewpoint, and snapping a few frames (that would be quickly forgotten, until the slides came back from the lab and Dad sequestered the family in our darkened living room until each Kodak Carousel had completed its cycle). Though Dad’s photo stops were never timed for light or conditions (you can’t plan a family vacation around the best time for photography), he loved recording nature’s beauty, and I think we all felt comfort in the knowledge that the next time we went to Yosemite, the beach, or wherever, everything would still look pretty much as it did in Dad’s pictures.
I suspect many photographers had a similar start, snapping pictures simply content to record the experience of being there. But those of us who grew frustrated with the similarity of our captures to all the other images of the same locations longed for more. Looking for ways to make our efforts unique, we took advantage of the predictability of nature’s permanent features, and tried to pair them with nature’s more dynamic elements, like a sunrise or sunset, the moon, fresh snow, a rainbow, the Milky Way, and so on.
Melding these static scenes with nature’s changing conditions is a great start, but sometimes we get so caught up in the thrill of seeing Half Dome with fresh snow, or the first rays of a Hawaiian sunrise, that we overlook our scene’s most dynamic features, its scooting clouds and flowing water that literally change by the second.
Nowhere do I need to be more vigilant about my scene’s transient features than Hawaii, where the ubiquitous clouds form, transform, and scoot through a scene with startling speed, and where even a fraction of a second can mean the difference between lapping surf and an exploding wave.
The image at the top of the screen was captured at Kauai’s Lydgate Beach, less than 20 minutes after the image in my July 4 post. As you can see, the compositions are quite similar, but the overall feel is very different. Not only has the color changed significantly, the surf is completely different, and the clouds have very little in common.
Though my position on the beach was more or less the same, I did make adjustments to accommodate the changing conditions. I started with the rapidly shifting clouds, with each frame recomposed slightly from the previous to account for the clouds’ movement as I sought the best place for the frame’s border, trying not to cut the clouds awkwardly (or at all).
The other consideration was the wave motion. In the earlier image, wave timing was less important because my 5-second exposure smoothed the activity. Though I didn’t freeze the motion in this image, my 1/5 second exposure stopped the water enough to make timing important.
I liked the sunlight’s gold reflection on the wet sand, but that required a receding wave to capture the most reflective water (an advancing wave was just non-reflective white foam; between waves, the sand wasn’t wet enough). I also wanted a wave that moved diagonally across the bottom of my frame. While most waves arrived more straight-on, I’d been living with these waves for at least a half hour and knew that every once in a while one would sweep the beach at an angle. And of course while waiting for the ideal wave to arrive, I had to continue monitoring the clouds to ensure that they didn’t shift enough to alter my composition. After about a half dozen or so clicks, I finally got all the elements to align.
From One Second to the Next
Images where timing was essential


