Eloquent Images by Gary Hart
Insight, information, and inspiration for the inquisitive nature photographer
A few of my favorite things
Posted on March 30, 2017
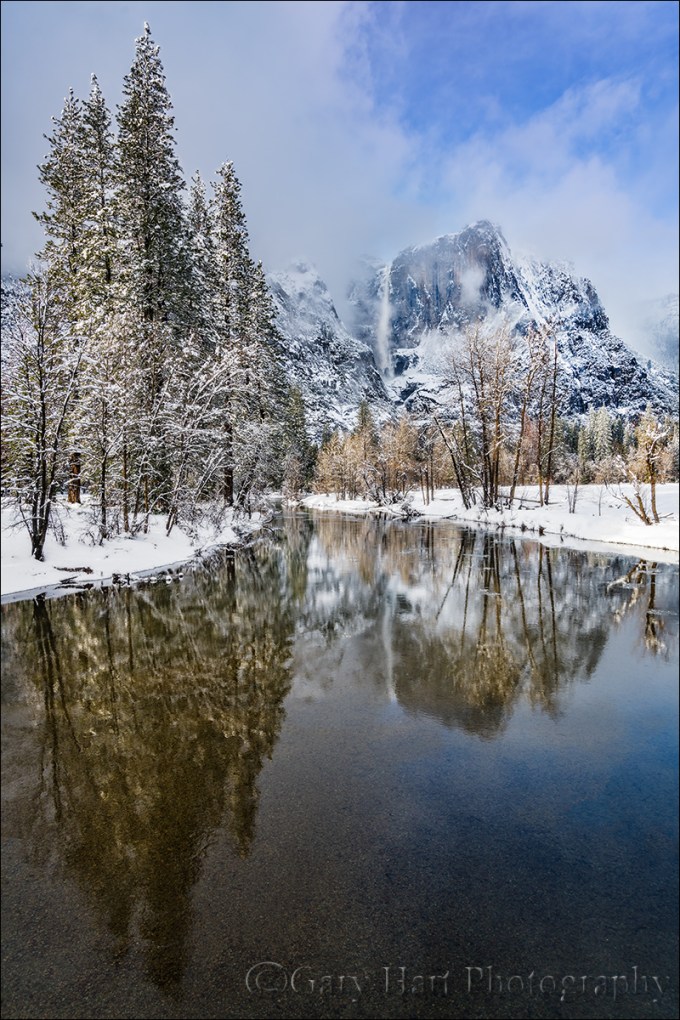
Yosemite Falls Reflection, Swinging Bridge, Yosemite
Sony a7R II
Sony/Zeiss 16-35 f/4
1/20 seconds
F/9
ISO 100
I love being a photographer, but it’s an unfortunate reality that turning your passion into your profession risks sapping the pleasure when earning money takes priority over taking pictures. When I decided to make photography my livelihood, it was only after observing other very good amateur photographers who, lulled by the ease of digital photography, failed to anticipate that running a photography business requires far more than taking good pictures. Rather than an opportunity for further immersion in their passion, their new profession forced them to photograph not for love, but to put food on the table. And with the constant need for marketing, networking, bookkeeping, collections, taxes, and just plain keeping customers happy, these newly minted photographers soon found that little time remained for the very thing that led them to become photographers in the first place.
I changed from photographer to Photographer about twelve years ago. After seeing what the change had done to others, my transition started with a vow to photograph only what I want to photograph, and to never photograph something simply because I thought I could sell it. In my case that meant sticking with landscapes: no people or wildlife (in other words, pretty much nothing that moves).
But how to make money? For that answer I had to look no farther than my career in technical communications: For five years I’d been a technical writer for a (very) large high tech company; before that I’d spent fifteen years tech training, supporting, documenting, and testing a programming language for a small software company. This experience, combined with a lifetime of camping, hiking, backpacking, and (of course) photographing throughout the western US, made photo workshops a logical choice. Today my workshops, supplemented by writing and print sales, allow me to pay the bills, visit favorite destinations, and explore new locations.
And most importantly, my new life has allowed me to concentrate on photographing the subjects and locations I love most. In no particular order (and far from all-inclusive), my favorite subjects include: poppies, the Milky Way, the moon (both crescent and full), rainbows, moonlight, fresh snow, dogwood, bristlecone pines, lightning, fall color, reflections. Among my favorite locations are Yosemite Valley, Grand Canyon’s North Rim, the Colorado River through the Grand Canyon, California’s foothills, Maui’s bamboo forest, and Kilauea Caldera.
Of course nothing beats photographing a favorite subject at a favorite location. To maximize my opportunity to combine favorite subjects and locations, I monitor weather forecasts, check local condition reports (to learn where the trees have turned or the wildflowers are blooming), study natural phenomena to learn how to anticipate an event (such as rainbows and lightning), and plot celestial alignments and add them to my calendar.
Despite (and more likely because of) a lifetime of visits, Yosemite Valley remains at the top of my favorite locations. I can’t give you a favorite season, but I can tell you that my favorite time to be in Yosemite is just after a snowstorm, when every exposed surface is glazed white and overhead swirls an ever-changing mix of clouds and blue sky.
Today’s image of snowy Yosemite with Upper Yosemite Fall reflected in the Merced River is the product of a week’s worth of monitoring weather reports and schedule shifting. That day started with a lock-down blizzard that obscured all views beyond 100 yards, but by late morning the clouds started to lighten and lift and soon the clearing was underway in earnest. Sometimes when a storm clears in Yosemite I’ll pick a spot and work it through the entire clearing process; on this day I took the other approach, moving around capture the clearing in a variety of locations.
I ended up at Swinging Bridge in mid-afternoon. The Merced River widens and slows here, making reflections possible even in high water months. Though Swinging Bridge no longer swings (but I remember when it did), it does bounce enough to jiggle a tripod at the slightest step. To minimize the vibration, I try to set up my tripod atop one of the bridge’s support pillars, but that didn’t give me the exact angle I wanted on this afternoon so I just needed to take extra care to stay still and time my clicks when the bridge was empty.
In the fifteen or so minutes I photographed here that afternoon I tried a variety of compositions, horizontal and vertical. I also played with my polarizer, sometimes maximizing the reflection, other times dialing it down to reveal the rocky riverbed below. Most of my compositions were a little tighter than this, but here I went with a vertical orientation wide enough to include lots of blue sky, and the trees and their reflection from top to bottom. My polarizer was turned to the partial range, enough to capture Upper Yosemite Fall’s reflection, while still revealing some of the submerged smooth stones nearer the bridge. The trees were partially lit by cloud-filtered sunlight just starting to break through.
A Gallery of my Favorite Things
Click an image for a closer look and slide show. Refresh the window to reorder the display.


The illusion of depth
Posted on February 4, 2017
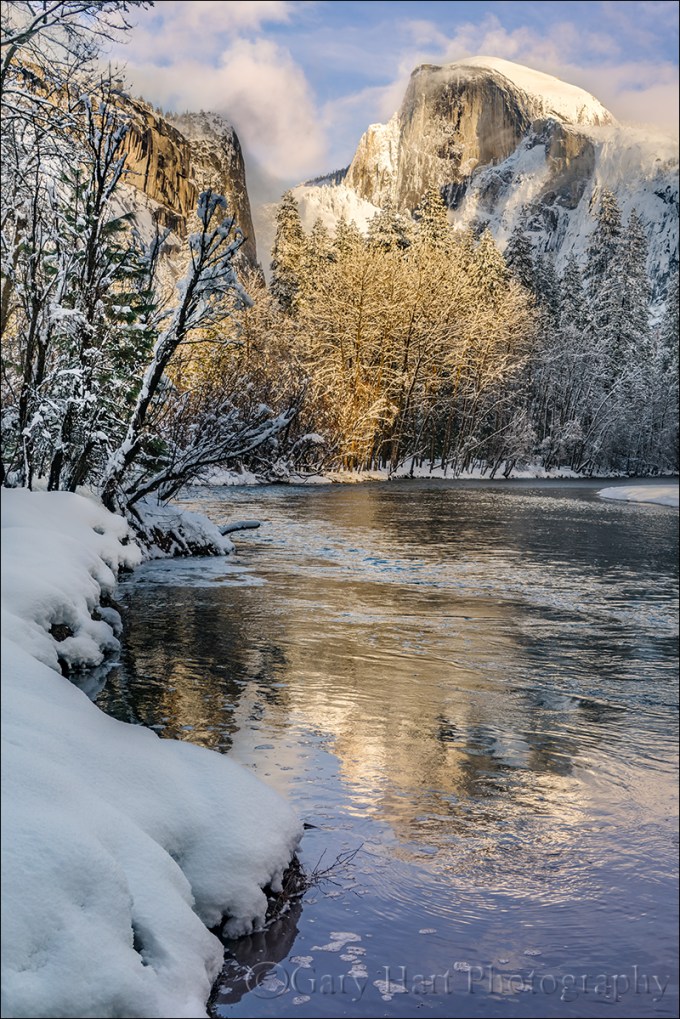
Frozen Reflection, Half Dome, Yosemite
Sony a7R II
Sony/Zeiss 24-70 f4
1/40 second
F/9
ISO 100
It seems too obvious to mention, but I’ll say it anyway: Photography is a futile attempt to render a three-dimensional world in a two-dimensional medium. Unfortunately, that reality doesn’t seem to keep people from putting their eye to their viewfinder and clicking without regard for their camera’s unique view of the world. But here’s a secret: Anyone with a camera can manage the lateral (left-to-right) aspect of a scene, but the photographers who distinguish themselves are those able to convey the illusion of depth by translating a scene’s actual depth to their camera’s virtual depth.
Creating the illusion of depth isn’t rocket science. It starts with seeking a foreground for your beautiful background, or a background for your beautiful foreground. Once you’ve figured out your foreground or background, do your best to ensure that the elements at varying depths don’t merge with each other—the more elements in your frame stand alone, the more you invite your viewers to move incrementally through the frame, hopping (subconsciously), front to back, from one visual point to the next. Getting elements to stand apart often requires some physical effort on your part (sorry): Moving left/right, up/down, foreword/backward changes the relationship between objects at varying depths, sometimes quite significantly.
With your foreground and background identified, decide whether you want the entire image in focus, or selective focus that guides your viewer to a particular point in the frame. With all your pieces in place, you’re ready to choose your f-stop and focus point. (Here’s some extra credit reading: hyperfocal focusing techniques.)
About this image
The primary subject here is Half Dome, but I had to work incorporate all the other wonderful things going on this afternoon: fresh snow, beautiful clouds, warm sunlight, and an abstract reflection.
With Half Dome as my centerpiece, my biggest concern was organizing the other visual elements into a coherent image. I started with the decision that a vertical orientation would make the most efficient use of the scene, allowing me to include the river at the bottom of my frame and Half Dome at the top without shrinking the scene and introducing less interesting elements on the left and right. I didn’t want too much sky, but I found a break in the clouds for the top of my frame.
I could have moved a little to the right and made the reflection my entire foreground, but I decided to use the snowy riverbank to convey an illusion of depth. Because there wasn’t too much visual interest in the snow, I included just enough snow to frame the left side of my scene. A focus point about 20 feet away gave me sharpness throughout my frame. Click.
Focus and depth of field simplified
Workshop Schedule || Purchase Prints
A Gallery of Depth
Click an image for a closer look and slide show. Refresh the window to reorder the display.


It ain’t over till it’s over
Posted on January 26, 2017

After Twilight, Valley View, Yosemite
Sony a7R II
Sony/Zeiss 24-70 f4
30 seconds
F/8
ISO 800
(How many photography blogs out there quote Yogi Berra? Just sayin’….) During the 1973 baseball season, Yogi Berra was asked about his last place Mets’ chances in the pennant race. His reply, “It ain’t over till it’s over,” was greeted with chuckles, but Yogi got the last laugh when the Mets rallied to make it all the way to the World Series. I couldn’t help thinking of Yogi’s quote on my drive home Monday night with this image, my final click of the day, still fresh in my mind.
When the weatherman promised snow down to 2500 feet on Monday, I drove to Yosemite late Sunday night so I could beat sunrise and have an entire day to play. And snow I found, lots and lots of it, and still falling. The snowfall continued throughout morning, so heavy that my first few hours were limited to photographing close scenes, interspersed with lots of waiting for conditions to improve. But a little before noon the clouds started to thin and the snow became more showery and I was in business.
When the clearing started in earnest I was at Valley View (but it didn’t look anything like this). The rest of the day I spent dashing around Yosemite Valley, chasing the clouds’ parting and the light that came with it. It’s so much fun watching a storm clear in Yosemite, poised beneath Yosemite Falls or Half Dome or El Capitan, and wait for the big reveal when the clouds to pull back.
For sunset I ended up trudging through about 18 inches of virgin snow to a favorite Half Dome reflection spot by the Merced River, recently rendered much less accessible by major roadwork underway in the valley. Throughout the day I’d crossed paths several times with good friend Don Smith who had driven up for the day with our mutual friends Scott and Mike, and they eventually joined me at sunset. As we shot we shared stories of the day—for example, how they had just missed getting crushed by a falling tree (true story). After a half hour of really nice photography, a large cloud set up shop atop Half Dome right around sunset, completely obscuring the scene’s main attraction. Satisfied with a tremendous day of photography, we declared the day, “Over.”
It wasn’t until I was back at my car that fully appreciated how wet everything was—my gear, my car, and even me (a day of plunging through snowdrifts had been enough for the snow to find its way over the top my waterproof boots and underneath my waterproof outer pants). I decided I’d swing into Valley View on my way out of the valley to use the bathroom and change into drier clothes. In the back of my mind was possibility of a parting shot of El Capitan in the late, blue twilight.
The west end of Yosemite Valley gets much less winter sunlight, so while trees had already started shedding the snow on the east side (where I’d photographed sunset), I pulled in at Valley View to find virtually every exposed surface still glistening white. Bridalveil Fall and Cathedral Rocks clearly visible in the fading light, but El Capitan was cloud-shrouded from top to bottom. Still quite cold, tired, and more than a little hungry, this would have been a perfect excuse to beeline home. But the scene was so beautiful, and the light so perfect, that after changing my clothes I just sat in my car, peeled an orange, and waited for El Capitan to show itself.
I didn’t have to wait long. At the first sign of clearing I hopped out and was completely set up by the river before El Capitan appeared. Bumping my ISO to 800, I composed the standard horizontal frame with El Capitan on the left, Leaning Tower on the right, and the Merced River in the foreground. Often the most difficult thing about shooting in low light like this is finding focus, but despite the fact that it was more 30 minutes after sunset, my Sony a7RII was able to autofocus on Cathedral Rocks. I spent a several clicks refining that original composition and was about to call the day “Over” one more time when something moved me to shift my view to the right. As soon as the image popped up on my LCD I knew I was onto something. I refined for about a half dozen more frames, culminating with the one you see here, until I was satisfied that a great day truly was over.
The lesson here, one I learned many years ago but I see many photographers struggle to grasp, is that the camera can still do fantastic things long after your eyes tell you the show is over. Another satisfying reminder from this day is that it’s still possible to enjoy Yosemite in glorious peace. As someone who has seen Yosemite at its congested worst, I relish the solitude possible when I choose times that the average person (tourists, fair weather photographers) won’t venture out: miserable weather, late at night, before sunrise. The entire time I was out there at Valley View that evening I was alone, and only two cars drove by. As Yogi would say, “Nobody goes there anymore—it’s too crowded.”
Workshop Schedule || Purchase Prints
A Twilight Gallery
Click an image for a closer look and slide show. Refresh the window to reorder the display.


Seeing double
Posted on January 22, 2017
Autumn Mirror, Half Dome, Yosemite
Sony a7R II
Sony/Zeiss 16-35 f4
30 seconds
F/8
ISO 50
People stay away from Yosemite in autumn because that’s when the waterfalls are at their lowest. But believe it or not, Yosemite isn’t all about waterfalls. El Capitan, Half Dome, Cathedral Rocks, the Three Brothers (I could go on) are great subjects in their own right. Subtract the waterfalls but add the yellows, oranges, and reds of Yosemite Valley’s many deciduous trees and you have what I think is a pretty a fair trade. And when the water is low, the usually turbulent Merced River smooths to a reflecting ribbon of glass; suddenly, pretty much any scene can be doubled at your feet.
These reflections add layers of creative possibilities impossible the rest of the year. I usually try to photograph each reflection scene several ways—splitting it in the middle for a 50/50 mirror effect, isolating the reflection only, emphasizing the reflection with just enough of the primary scene to establish context, and using a partial reflection to accent to the primary scene—then decide later which I like best.

In this image I split the frame 50/50, but dialed down the reflection with my polarizer. Even polarized, the bright sky’s glare washed out much of the river surface, painting the outline of El Capitan like a negative that uses the trees with a jigsaw of submerged river rocks.

This one is all about the reflection, with the snow-covered forest used to frame El Capitan’s image in the Merced River. Here I dialed my polarizer to a mid-point, holding the reflection of El Capitan but dialing down the homogenous gray sky.

Here I used a more conventional composition, emphasizing El Capitan’s bulk against clouds that were spitting small, wet snowflakes.
About this image

I took another favorite approach for the featured image at the top of this post, using a long exposure in low light to smooth moving water and enhance the reflection. My workshop group had already had a nice shoot that evening—it started with warm, late light on Half Dome, some nice color at sunset, and rapping up with textured clouds above Half Dome as darkness fell.
By the time I captured this frame the scene was much darker than what you see here. With the reflection disturbed by slight ripples and floating bubbles, the darkness of post-sunset twilight enabled me to extend my shutter speed to 30 seconds, which smoothed the reflection and turned the bubbles into soft white streaks.
Workshop Schedule || Purchase Prints
A Gallery of Yosemite Reflections
Click an image for a closer look and slide show. Refresh the window to reorder the display.


Enjoying Yosemite in a fog
Posted on December 14, 2016
Morning Sun, Half Dome, Yosemite
Sony a7R II
Sony/Zeiss 16-35 f4
1/100 seconds
F/16
ISO 100
One of Yosemite’s most underrated winter treats is the radiation fog that hugs the valley floor on cold, clear, still mornings. Unlike the advection fog that drapes the San Francisco Bay Area (among other places) when (relatively) warm, saturated air passes over the colder ocean and blows inland, radiation fog forms in place when plummeting overnight temperatures cause airborne water vapor to condense.
A sheltered valley with a cold river, soggy meadows, and a spongy forest floor, Yosemite Valley is ideal for the formation of radiation fog. Each winter, storms fill the Merced River and soak the meadows and forest. On nights when there’s no wind to mix the atmosphere, cold air sinks until it meets the water-laden air near the ground. Because cold air can’t hold as much water vapor as warmer air, and the air on the valley floor is completely saturated, the airborne water vapor condenses as soon as the air chills even slightly: Fog.
Often no more than a thin, gray veneer, in radiation fog that’s dense enough to obscure trees across a meadow, it’s sometimes possible to see stars or blue sky overhead. Viewed from a distance (for example, from Tunnel View), Yosemite’s radiation fog appears to be in constant motion, alternately engulfing and revealing treetops, sometimes rising hundreds of feet and completely disappearing in a matter of minutes. With no wind to move the fog, the reality is that what appears to be motion is primarily fog forming and dissipating in place. Yosemite’s radiation fog persists until the air heats enough to hold the available airborne moisture, or the wind picks up and mixes warmer air above with the colder, saturated air below.
About this image
Last Friday morning I went out to scout a new route to one of my favorite Yosemite spots, a bend in the Merced River upstream from Sentinel Bridge with view and reflection of Half Dome. My Yosemite Winter Moon workshop started that afternoon, but the original access here had been obliterated by major roadwork underway in Yosemite Valley, so I needed to make sure I could still get my group out here.
With very little time to spare, I originally left my camera bag in the car, but didn’t get too far before second thoughts sent me back for it. Good thing—after a few minutes of traipsing across crunchy snow, I made it out of the woods and to the river just in time to catch sunlight illuminating a diaphanous radiation fog. Shadows cast by sunlight passing through evergreen branches created a beam effect in the illuminated mist, while upstream a blanket of fog basked in golden sunlight.
The sun was about to disappear behind the granite ridge beneath Glacier Point and I new I only had a few more minutes of this spectacularly illuminated fog. At first I tried to position the sun behind the trees, but at this distance the treetops were so thin that very little blocking occurred and I ended up with a white blob of blown highlights. So I hustled over to the intersection of the ridge’s shadow with the sunlit ground and prepared for a sunstar. Every lens creates a different sunstar effect, some much better than others, and my Sony/Zeiss 16-35 f/4 is my favorite. Stopping down to f/16, I went to work. Moving with the sun so I was always straddling the shadow line, I was able to shoot for about five minutes before the entire beach was in shade and I was finished.
Purchase Prints || Photo Workshops
Yosemite Fog


Photographic matchmaking
Posted on December 7, 2016

Autumn Pool and Cascade, Bridalveil Creek, Yosemite
Sony a7R II
Sony/Zeiss 16-35 f4
6 seconds
F/16
ISO 200
While everyone loves a pretty scene, I’m afraid our aesthetic sense has been numbed by the continuous assault of “stunning” images online. A picture grabs our eyes on Instagram or Facebook and we reflexively click Like and move on to the next (similarly) stunning image. The photography equivalent of pop music, formula fiction, or (most) network television, these images exit our conscious about as fast as they entered because they fail to make a personal connection.
But every once in awhile an image surprises us and we pause, float our eyes around the scene, examine detail, bask in its mood. Who knows the trigger for such a response? Maybe is as simple as aspect of the scene that spurs a memory or taps a longing. Or maybe the connection reaches deeper than that.
Pictures succeed not just by virtue of their visual elements, but also by how those elements are connected. I used to believe that the sole purpose of including visual elements throughout my frame was to create the illusion of depth in photography’s two-dimensional medium. While I still strongly agree, I think the value of multiple points of visual interest goes deeper than that. Just as humans seek interpersonal connections in our daily lives, I think we’re programmed to favor images with relationships between heterogeneous elements in the nature. Not just Grand Canyon, but Grand Canyon speared by lightning; not just Half Dome, but Half Dome beneath a rising full moon; not just glowing Kilauea Caldera, but glowing Kilauea Caldera beneath the Milky Way.
Creating relationships between elements work on a smaller scale as well (albeit, usually without the opportunity for planning that celestial or meteorological phenomena provide)—small forest scenes and intimate macros benefit from inclusion of multiple elements as well. Of course an image with a disorganized arrangement of elements, no matter how beautiful each is individually, probably won’t get a second look. But find a way to organize a scene’s elements in a way that allows the eye to flow effortlessly through the frame and you have the potential for visual synergy—an image that’s greater than the sum of its visual parts.
The opportunity to connect disparate elements is everywhere if you look, from the broadest panorama to the most intimate macro. Whatever the scale, the key is not locking onto your subject until you find something to pair it with. In other words, finding a photo-worthy subject should never be your goal, it should be your starting point.
Without diving too deeply into the concept of visual weight (a subject in and of itself), I try to create a frame with balance between visual elements (not loaded too much in on of the scene’s quadrants: upper left, upper right, lower left, lower right). I also try to keep objects with a strong visual tug away from the edges of my frame. And finally, I look to position my elements so they’re connected by virtual diagonal lines.
About this image
On the final morning of last month’s Yosemite Autumn Moon photo workshop, I set the group loose in the forest beneath Bridalveil Fall to scour the possibilities in and around Bridalveil Creek. Always a workshop favorite, I usually save the Bridalveil Creek until the workshop’s final day, when my students have found their creative zone after three days of shooting and training. This approach seems to pay off, because no matter how much time I give them in there, it never seems to be enough.
When I found this accumulation of just-fallen autumn leaves floating in a glassy pool, I knew I had the start of a nice scene. Scanning my surroundings, I didn’t have to look hard to find a small cascade to connect with my colorful leaves. But with the pool tucked beneath a fallen log, accessing the best angle was tricky. Sprawling nearly flat on my back beneath the overhanging log, with one tripod leg in the water, turned out to be the best way to maximize the virtual diagonal connecting the leaves and cascade.
The other consideration here was depth of field—the leaves started no more than three feet from my lens, while the cascade was about 12 feet away. To ensure maximum sharpness throughout with getting too far into the diffraction zone, I stopped down to f/16 and focused on the back of the leaves. I wasn’t too concerned about shutter speed and the cascade’s blur because the difference between one and six seconds was insignificant, and freezing the water would have required a ridiculously high ISO, while the pool was so still that I could discern no motion at all.
Purchase Prints
Workshop schedule
A Gallery of Relationships


Fall color explained
Posted on November 27, 2016

Autumn Morning, El Capitan Reflected in the Merced River, Yosemite
Sony a7R II
Sony/Zeiss 16-35 f4
2 seconds
F/16
ISO 50
Like most photographers in the Northern Hemisphere, my fall color season is about finished. But things are just ramping up along the streets near my home in California’s Central Valley (where winter doesn’t really begin until December, and spring’s first blooms start to pop up at the end of January—sorry). While there’s not a lot for me to photograph in my neighborhood, the opportunity to partake of the visual feast without a camera in my hands is refreshing.
I’m also harvesting the fruits the most intense autumn workshop/travel schedule of my photography life, and appreciating all over again how much I enjoy fall photography. Browsing my autumn images, I’m reminded of the need to understand my subjects. That goes double for the why and when of fall color, a blend of science and myth so intertwined that casual observers often resort to memory, anecdote, and lore to fill knowledge voids with partial truth and downright falsehood.
Innkeeper logic
Show up at at the fall color spot that guy in your camera club said was peaking at this time last year, you might find the same trees displaying lime green mixed with just hints of yellow and orange. Ask the old guy behind the desk at the inn, and you’ll get a head shake and confident explanation that, “The color’s late this year—it hasn’t gotten cold enough yet.” Check into the same inn on the same weekend next year, you might find just a handful of leaves clinging to exposed branches—this time, as the old guy hands you the key, he proclaims, “That hot summer got everything started early—you should have been here last week.”
While “expert” testimony like this sounds like objective truth, it only perpetuates the myths surrounding fall color. Fortunately, science has provided a pretty good understanding of the fall color process to all who want to understand.
It’s all about the sunlight
The leaves of deciduous trees contain a mix of green, yellow, and orange pigments. During the spring and summer growing season, the green chlorophyl pigment overpowers the orange and yellow pigments, keeping the trees green. While this chlorophyl is quickly broken down by sunlight, the photosynthesis that turns sunlight into nutrients that nourish the tree, warmth and long days provide the energy to sustain chlorophyl creation through the summer.
As the days shrink toward autumn, things begin to break down. Cells at the “abscission layer” at the base of the leaves’ stem (the knot where the leaf connects to the branch) begin a thickening process that blocks the transfer of carbohydrates from the leaves to the rest of the tree. Meanwhile, movement of nutrients to the leaves is inhibited as well—without these minerals, the leaves’ chlorophyl production dwindles and finally stops. No longer masked by the chlorophyl’s green, it’s time for the tree’s yellow and orange pigments to shine: Color!
Sunlight and weather
Contrary to popular belief, the timing of the onset of this fall color chain reaction is much more daylight-dependent than temperature- and weather-dependent—triggered by a genetically programmed day/night-duration threshold; contrary to innkeeper-logic, the trees in any given region will commence their transition from green to color at about the same time each year (when the day length drops to a certain point).
Nevertheless, though it doesn’t trigger the process, weather does play a significant part in the intensity, duration, and demise of the color season. Because sunlight breaks down the green chlorophyl, cloudy days after the suspension of chlorophyl creation will slow the coloring process. And while the yellow and orange pigments are present and pretty much just hanging out, waiting all summer for the chlorophyl to relinquish control of the tree’s color, the red and purple pigments are manufactured from sugar stored in the leaves—the more sugar, the more vivid their color. Ample moisture, warm days, and cool (but not freezing) nights after chlorophyl replacement has stopped are most conducive to the creation and retention of the sugars that form the vivid red and purple pigments.
On the other hand, freezing temperatures destroy the color pigments, bringing a premature end to the color display. Drought can stress trees so much that they drop their leaves before the color has a chance to manifest. And wind and rain can wreak havoc with the fall display—go to bed one night beneath a canopy of red and gold, wake the next morning to find the trees bare and the ground blanketed with color.
Of course all these weather factors come in an infinite number of variations that make this year’s color timing and intensity a little different from last year’s and next’s. Despite my need to understand nature’s mysteries, it’s this (perceived) randomness, the impossibility of ever knowing for sure what I’ll encounter, that draws me back.
About this image
Yosemite isn’t an inherently great sunrise location. With most of its views facing east, toward shaded subjects beneath the brightest part of the sunrise sky, sunrise light is difficult here. And without clouds, more the the rule than the exception in California, Yosemite sunrises can be rather bland. But Yosemite’s bland sunrises are more than compensated by the first direct sunlight light visible Yosemite Valley, which starts on the highest points a few minutes after the “official” (flat horizon) sunrise, and progresses over the next hour or so until the valley floor is bathed in sunlight. El Capitan is among the first of Yosemite’s prominent features to benefit from this early light.
I have a mental list of go-to El Capitan views for photographing its first light. Among them is a quiet bend in the river, known affectionately (and unofficially) to photographers as “Tahiti Beach,” with views of Cathedral Rocks, El Capitan, and the Three Brothers. Additionally, the river widens and slows here, providing some of Yosemite Valley’s best reflection opportunities as well.
One morning in the first of this year’s two Yosemite fall color workshops, I guided my group to Tahiti Beach for El Capitan’s first light. Clouds ruled the sky as the first light window opened, but fleeting patches of blue gave me hope. And with the deciduous trees across the river displaying their finest golds and oranges, we weren’t lacking for opportunities in the meantime.
The sun broke through suddenly, spotlighting a thin slice of granite near El Capitan’s summit. Unsure how long the opportunity would last, I moved quickly to compose this wide, vertical frame that emphasized the reflection juxtaposed with a thin veneer of colorful leaves floating at my feet. I reminded myself to heed the frequent admonition I issue my workshop groups: the focal point for a reflection is the focus point for the reflective subject, not the reflective surface. In other words, while the leaves floated in water that was just a few feet from my lens, their focus point was much closer than the infinity focus point of the reflection in the same water. I focused on the leaves, confident that the depth of field provided by f/16 at my 18mm would render El Capitan, the trees, and the reflection acceptably sharp.
Another noteworthy exposure setting in this image is my 50 ISO decision. Though the leaves were completely still, there were slight ripples disturbing the river where most of my reflection lay. Stopping down to f/16, dialing my sensor’s sensitivity to ISO 50, combined with a polarizer carefully tuned to cut the reflective glare on the leaves without diminishing the rest of the reflection too much, allowed a 2-second exposure that smoothed the ripples enough to enhance the reflection.
Purchase Prints
Photo Workshop Schedule
A fall color gallery


The night sky and me
Posted on August 12, 2016
Moonlight Reflection, El Capitan and the Three Brothers, Yosemite
Sony a7R II
Canon 11-24 f/4L with Metabones IV adapter @11mm
20 seconds
F/4
ISO 3200
My relationship with the night sky started when I was ten. Astronauts were my generation’s cowboys, so when I was given a castoff, six-inch reflector telescope by an amateur astronomer friend of my dad, I jumped at the opportunity to explore the celestial frontier on my terms. On clear nights my best friend Rob and I dragged that old black tube onto the front lawn and pointed it, randomly and full of wonder, at the brilliant points of light overhead. With guidance from our dads and the books of Herbert S. Zim, we learned the difference between stars, which despite their great size and temperature, are at such great distance that even the strongest telescope only sees discrete points of light, and planets, nearby worlds reflecting sunlight, which my telescope revealed as glowing disks.
With that telescope Rob and I searched in vain for comets and galaxies, watched Venus and Mercury cycle through phases just like the moon’s, tracked the nightly dance of Jupiter’s Galilean moons, and monitored the changing tilt of Saturn’s rings. Suddenly and hopelessly infected with the astronomy bug, on camping trips I declined the luxury of the family tent in favor of a sleeping bag beneath more stars than I imagined possible. There, nestled to my neck in the bag’s warmth, I’d stretch beneath the boundless ceiling, counting “shooting stars” and scouring the sky for satellites, fighting sleep for as long as my eyelids could hold out. In my later teen years I discovered backpacking and with it skies that inspired ponderings of infinity. My first college major was astronomy, a most impractical aspiration that I managed to correct before quantification of the universe spoiled my appreciation of its elegance.
In my early twenties I discovered photography, but, frustrated by my film camera’s inability to capture the night sky’s beauty, quickly moved on to more terrestrial subjects. Fast forward to the twenty-first century, when the advent of digital photography offered light capturing and processing capabilities impossible with film. My first night subject was the Big Dipper; since then I’ve tried to include some form of night photography in most of my workshops and as many personal shoots as possible, seeking to use my camera’s unique perspective to convey the emotion the night experience brings me, rather than attempt the impossible task of recreating the sky literally.
Among other subjects, I’ve developed a particular fondness for photographing the gold/blue transition-zone separating day and night. Arriving on location well before sunrise gives me a front-row view of the indigo night’s slow retreat in favor of the golden promise of a new day; lingering long after the sun sets, I watch the day’s vestiges linger on the horizon, as if waiting with me for the stars to materialize.
About this image
This year’s Yosemite Moonbow and Wildflowers workshop group had the good fortune to photograph Yosemite brimming with more water than I’ve seen in years. A particular highlight was this location beside the Merced River, one of my favorite early morning spots. The morning we arrived we found my normal vantage points flooded beyond recognition, but rather than let the flooding turn us around, I explored the new shoreline and found view through the trees onto a crystal clear reflection. We stayed and photographed here until bad light and empty stomachs finally drove us to breakfast.
Excited by our good fortune that morning (read The Power of Reflections), I offered to return that night with anyone who wanted to photograph the scene by moonlight. Though I already had a moonbow shoot scheduled for later in the workshop, the moonlight potential here was so great that I wanted to at least give everyone the option of photographing it (on the other hand, with such early mornings, I knew from experience that I needed to give everyone the option to return to the hotel for an early bedtime).
Despite a long drive back from our sunset at Glacier Point, about half the group still joined me for what turned out to be a very memorable moonlight shoot. The already somewhat limited space was made even more difficult by the darkness (we were shaded from the moonlight by trees and the valley wall behind us), but we made it work with great cooperation and no shortage of laughter.
Among other things, this image highlights one of the great joys of photography with today’s advanced technology: the camera’s improving ability to reveal a world previously obscured by night’s dark curtain. (It will only get better.)
Photo Workshop Schedule
A moonlight gallery


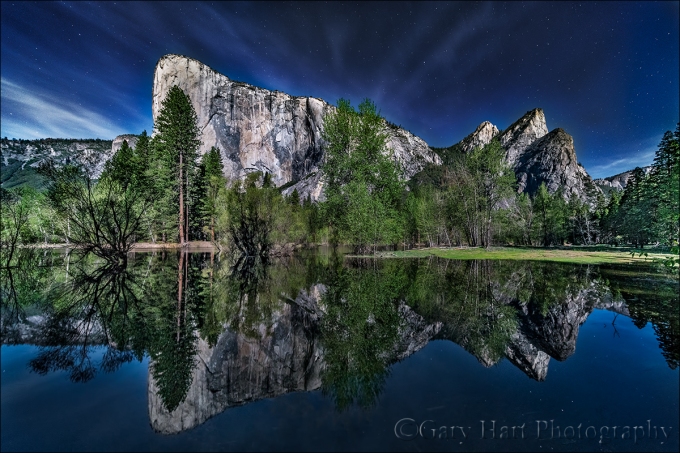
The Power of Reflections
Posted on July 1, 2016

Spring Reflection, El Capitan and Three Brothers, Yosemite
Sony a7R II
Canon 11-24 f/4L with Metabones IV adapter @11mm
1/60 second
F/8
ISO 100
Reflection
Dictionary.com: The return of light, heat, sound, etc., after striking a surface.
Okay, so that’s pretty basic. How about this one?
Wikipedia: The change in direction of a wavefront at an interface between two different media so that the wavefront returns into the medium from which it originated
Whoa, I hope that’s not on the test.
Who doesn’t love the soothing tranquility of a good reflection? And like a metaphor in writing, a reflection is an indirect representation that can be more powerful than its literal double by virtue of its ability to engage the brain in different ways than we’re accustomed. Rather than processing the scene directly, we first must mentally reassemble the reflection’s reverse world, and in the process perhaps see the scene a little differently.
Reflections are a powerful photographic tool as well. Water’s universal familiarity makes it an ideal subject for photographers frustrated by their camera’s static representation of our dynamic world. Just as we freeze in space or blur a waterfall to express turbulent motion, we can include a reflection to convey serene peace.
Water reflections come in many forms, from a mirror-sharp reverse of a mountain atop a still pool, to an abstract shuffle of color and texture on a choppy lake. Without getting too far into the physics of light, it’s important to understand that every object we see (and photograph) comes to us courtesy of reflected light. For example, when sunlight strikes El Capitan, some of the sun’s photons bounce straight back into our eyes, and there it is: El Capitan!
But other photons striking El Capitan head off in different directions—some are captured by other sets of eyes, and others land on the surface of the Merced River. Some of these photons pass beneath the river’s surface to reveal the submerged riverbed, while others bounce off. The ricocheting photons that travel from El Capitan and bounce off the river, reach our eyes as a reflection. In other words, what we call a reflection is in fact re-reflected light (reflected first from El Capitan, then by the river).
Mirror reflection recipe
The ingredients for a crisp, mirror reflection like the El Capitan image at the top of the page is pretty simple: still water, a reflection subject that’s much brighter than the water’s surface (the greater the contrast the better), and a view angle that matches the angle from the water’s surface to the reflection subject. (The best reflections are usually found on shaded water because there are fewer photons to compete with the photons bouncing from the reflected subject.)
The El Capitan reflection above was a perfect confluence of reflection conditions. Clean, still air, dense shade on the river, and El Capitan’s fully exposed, reflective granite, make early morning the best time for El Capitan reflections. On this April morning I made my way down to the Merced River hoping to photograph the first light on El Capitan reflected in the Merced River. Finding my route down to the river blocked by spring flooding, I was forced to improvise. The morning air was clean and calm, and the ephemeral lake was mirror-still.
Circling the flooded meadow, I found a gap in the trees that opened onto the most complete view and reflection of El Capitan and the Three Brothers I’ve ever seen. So complete in fact, that I couldn’t include it all with my 16-35mm lens at its widest focal length. Fortunately, I was able to borrow a Canon 11-24 lens and Metabones IV adapter from a friend (thanks, Curt!), just wide enough to fit the entire scene at the lens’s shortest focal length.

Sunset Palette, Half Dome from Sentinel Dome, Yosemite
Playing the angles
Understanding that reflected photons leave the water’s surface at the same angle at which they arrive—imagine the way a tennis ball bounces (if it weren’t affected by spin, wind resistance, or gravity)—helps us get in position for the reflection we want.
A few years ago I found myself atop Sentinel Dome right after an intense rain shower had turned indentations in the granite into small, glistening pools. Rather than simply settle for the vivid sunset coloring the clouds above, I decided to include the sunset reflected in the pools as well. At eye-level the pools reflected blue sky, so I dropped my tripod as low as it would go, almost to granite level, positioning my lens at the same angle to the pools that the red light leaving the clouds struck the water.
When the water’s in motion

On the Rocks, El Capitan and the Merced River, Yosemite
As spectacular as a crisp, mirror reflection in still water is, it’s easy to overlook the visual potential in a reflection that’s not crisp, or to forget your camera’s ability to render a soft or abstract reflection much better than your eyes view it. While a crisp reflection often dominates the primary subject in an image, a splash of reflected color or shape can provide a striking accent to a dominant primary subject. And a reflection disturbed by the continuously varying angles of rippled or choppy water magically appears when a long exposure smoothes the water’s surface.
In the image on the right, the El Capitan reflection undulating atop the Merced River was barely perceptible to my eyes. But the reflection came to in a 25 second exposure achieved with the help of 2-stop hard graduated neutral density filter that subdued the day’s last rays on the clouds and El Capitan, and a neutral polarizer (with the reflection dialed up) that cut the light on the entire scene by a couple of stops. And since a reflection is never as bright as the actual scene, using a GND meant I need to do a little dodging and burning in Photoshop.
Where to focus
Another often misunderstood aspect of reflection photography is where to focus. Though it seems counterintuitive, the focus point of a reflection is the reflection subject, not the reflection surface. This isn’t such a big deal in a scene like the El Capitan reflection at the top of the post, where the focus point of everything of visual significance is infinity, but it’s a very big deal when you want both your reflection and rocks or leaves on the nearby water surface sharp.

Autumn Reflection, El Capitan, Yosemite
The El Capitan reflection on the right is very different from the El Capitan reflection above, where the extreme depth of field ensured sharpness had I focused on anything in the scene or the reflection. But here the leaves that were my scene’s primary emphasis were just a couple of feet from my camera, while El Capitan was several thousand feet distant. Even though the leaves floated atop the El Capitan reflection, focusing on El Capitan would have softened the leaves. To increase my depth of field, I stopped down to f/18 and focused several feet into the foreground leaves, then magnified the image on my LCD to verify that all of the leaves were sharp. Though El Capitan is slightly soft, a soft reflection is far more forgivable than a soft foreground.
Think ahead
It seems that reflections often feel like a fortuitous gift that we just stumbled upon. But given that reflections are entirely beholden to the laws of physics, they’re far more predictable than many of the natural elements we photograph. Taking a little time to understand the nature of reflections, and how they’re revealed by a camera, enables photographers to anticipate their appearance.
For example, in Yosemite I know that low flow makes autumn the best time for reflections in the Merced River. On the other hand, when the Merced is rushing with spring runoff, Yosemite’s meadows often shimmer beneath tranquil vernal pools. I plan many trips (and workshops) to take advantage of these opportunities.
Photo Workshop Schedule
A Reflection Gallery
Click an image for a closer look and slide show. Refresh the screen to reorder the display.


Think before you shoot
Posted on January 5, 2016

Winter Arrives, El Capitan, Yosemite
Sony a7R II
Sony/Zeiss 16-35 f4
1/8 second
F/11
ISO 125
True story: I once had a woman in a workshop who put her camera in Continuous mode and every time she clicked her shutter, she held it down and waved her camera in the general direction of a scene until the buffer was full. When I asked what she was doing, she said, “There’s bound to be a good one in there somewhere.” We were in Yosemite, so I couldn’t really disagree with her. But I’m guessing she wasn’t seeing a lot of growth as a photographer.
I tend to fall on the other end of the photography spectrum. Rather than a high volume of low-effort images, much of my photography style carries over from my film days—back then, a photographer who wasn’t careful might return from Europe to find that the photographs cost more than the trip. With our wallets forcing us to be more calculated and discriminating with our captures, we took our time, checked and double-checked our compositions and settings, and relied much more on our tripods.
Times have changed. While every film click costs money, every digital click increases the return on our investment. So far, so good: Combined with a histogram and instant review, digital shooters can click liberally, secure in the knowledge that each shot can be better than the one preceding. But I fear that this great benefit digital has bestowed, combined with powerful processing capabilities, has engendered a “shoot now, think later” mentality among many photographers. Rather than taking advantage of digital’s instant feedback to ensure that everything’s perfect at capture, these photographer adopt a high volume approach that sometimes hits a bullseye, but does nothing to improve their aim.
While there’s nothing wrong with lots of clicks, to advance your photography, each click needs a purpose. That purpose doesn’t even need to be a great image, it can simply be an I-wonder-what-happens-if-I-do-this experiment. Or it can be an incremental approach that begins with a “draft” and works toward perfection.
For example
On my recent snow day in Yosemite, I tried to highlight locations a little off the beaten path (as much as that’s possible in Yosemite). One of my stops was along Southside Drive, a little west of the crossover (to Northside Drive). Traipsing through wet snow, I made my way through the trees down to the Merced River. Bounding El Capitan Meadow, here the river widens and slows, as if gathering strength for its headlong charge down the Merced River Canyon.
The relatively open views and leisurely pace of the Merced River at this spot makes this one of my favorite place for full reflections of El Capitan. Ever on the lookout for juxtaposed disparate elements, I didn’t have to venture too far upstream before the collision of autumn leaves and winter snow stopped me. Parallel yellow and white, El Capitan reflection, towering evergreens, snow-etched oaks, swirling clouds, all against a granite background: I knew there was a shot in here somewhere, and I was going to work these elements until I found it.
To identify the shot, I started with an initial, “rough draft” click, then stood back and critiqued my result. With that frame as a foundation, I made incremental refinements, adjusting individual aspects rather than trying to fix everything at once: My horizontal orientation became vertical to highlight the (more or less) parallel snow and leaves; I determined the lowest f-stop that would ensure front-to-back sharpness and carefully refined my focus point, selecting leaves about a quarter of the way into the frame; I shifted slightly left to avoid merging the snowy log with El Capitan’s reflection; and finally, I tweaked the borders slightly (micro-zooming and -widening) to ensure that no significant visual elements were cut off. With everything set, I watched the shifting clouds and clicked when they did something interesting.
I was satisfied after about a dozen frames—far more than I could have afforded in my film days, but a far cry from my workshop student’s machine gun approach. No doubt she’d have gotten something I didn’t get, but I like this one. I bet I had more fun, too.
Join my
Yosemite Winter Moon photo workshop

An El Capitan gallery
Click an image for a closer look, and a slide show. Refresh the screen to reorder the display.


