Eloquent Images by Gary Hart
Insight, information, and inspiration for the inquisitive nature photographer
The illusion of depth
Posted on February 4, 2017
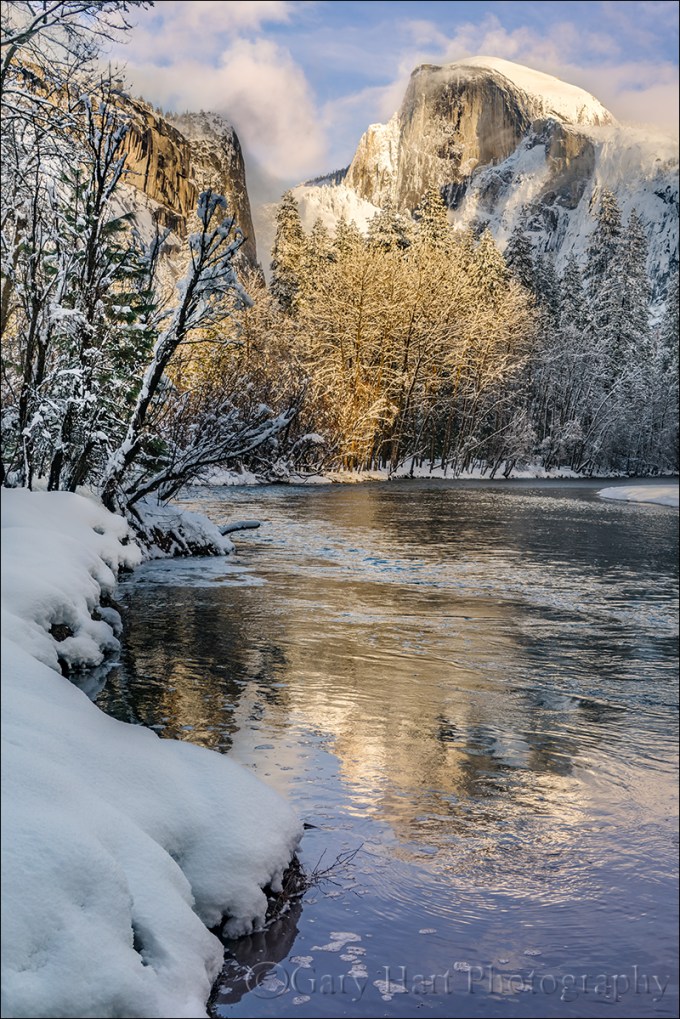
Frozen Reflection, Half Dome, Yosemite
Sony a7R II
Sony/Zeiss 24-70 f4
1/40 second
F/9
ISO 100
It seems too obvious to mention, but I’ll say it anyway: Photography is a futile attempt to render a three-dimensional world in a two-dimensional medium. Unfortunately, that reality doesn’t seem to keep people from putting their eye to their viewfinder and clicking without regard for their camera’s unique view of the world. But here’s a secret: Anyone with a camera can manage the lateral (left-to-right) aspect of a scene, but the photographers who distinguish themselves are those able to convey the illusion of depth by translating a scene’s actual depth to their camera’s virtual depth.
Creating the illusion of depth isn’t rocket science. It starts with seeking a foreground for your beautiful background, or a background for your beautiful foreground. Once you’ve figured out your foreground or background, do your best to ensure that the elements at varying depths don’t merge with each other—the more elements in your frame stand alone, the more you invite your viewers to move incrementally through the frame, hopping (subconsciously), front to back, from one visual point to the next. Getting elements to stand apart often requires some physical effort on your part (sorry): Moving left/right, up/down, foreword/backward changes the relationship between objects at varying depths, sometimes quite significantly.
With your foreground and background identified, decide whether you want the entire image in focus, or selective focus that guides your viewer to a particular point in the frame. With all your pieces in place, you’re ready to choose your f-stop and focus point. (Here’s some extra credit reading: hyperfocal focusing techniques.)
About this image
The primary subject here is Half Dome, but I had to work incorporate all the other wonderful things going on this afternoon: fresh snow, beautiful clouds, warm sunlight, and an abstract reflection.
With Half Dome as my centerpiece, my biggest concern was organizing the other visual elements into a coherent image. I started with the decision that a vertical orientation would make the most efficient use of the scene, allowing me to include the river at the bottom of my frame and Half Dome at the top without shrinking the scene and introducing less interesting elements on the left and right. I didn’t want too much sky, but I found a break in the clouds for the top of my frame.
I could have moved a little to the right and made the reflection my entire foreground, but I decided to use the snowy riverbank to convey an illusion of depth. Because there wasn’t too much visual interest in the snow, I included just enough snow to frame the left side of my scene. A focus point about 20 feet away gave me sharpness throughout my frame. Click.
Focus and depth of field simplified
Workshop Schedule || Purchase Prints
A Gallery of Depth
Click an image for a closer look and slide show. Refresh the window to reorder the display.


Managing light, depth, and motion in nature
Posted on January 29, 2017
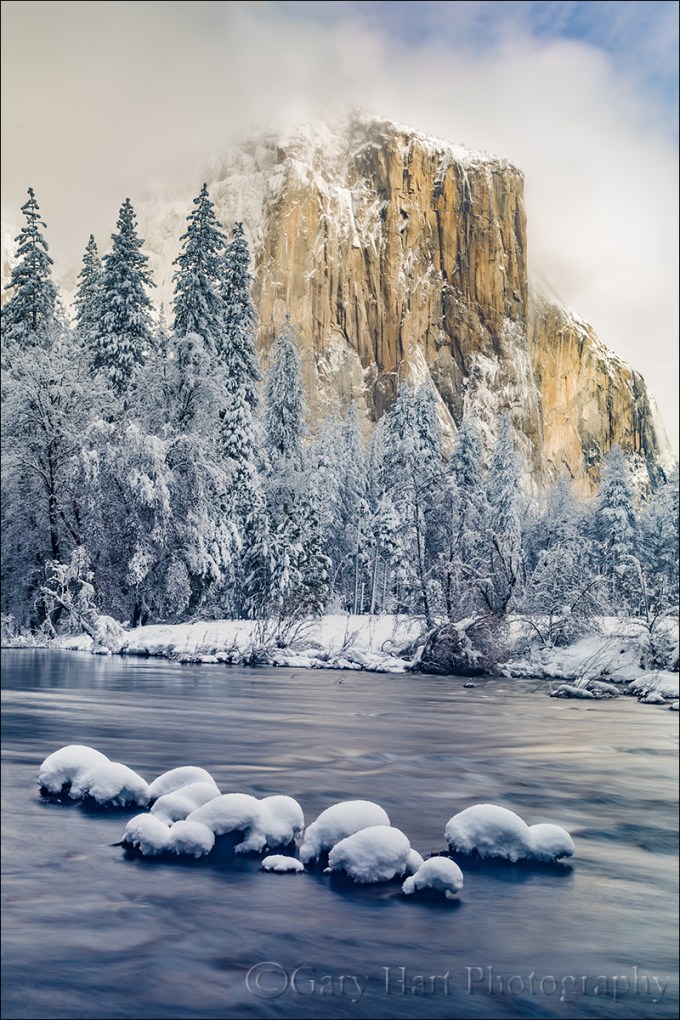
Snowcap, El Capitan, Yosemite
Sony a7R II
Sony/Zeiss 24-70 f4
3.2 seconds
F/10
ISO 50
Independent of composition, photographers have three scene variables to play with when setting up a shot: light, depth, and motion. And not so coincidentally, we have three exposure parameters with which to manage those variables: shutter speed, f-stop, and ISO. The exposure parameters have a reciprocal relationship—an increase/decrease in one can be compensated by a corresponding decrease/increase in another—but merely getting the “correct” exposure with a random combination of exposure values can yield wildly different results. This is why I never want my camera making decisions for me, and always photograph in manual mode. It’s also why I tell my workshop students that they should be able to defend (explain their reason for) every exposure value.
My approach to metering
As a landscape photographer who is always on a tripod, I’ve removed camera shake from the exposure equation, so the only motion that concerns me is motion in the scene. Unless I’m trying for a motion effect (for example, blurring moving water or freezing wind-blown leaves) I use the f-stop and ISO that yields the absolute sharpest, cleanest image—no quality compromise (such as a large f-stop or high ISO) to subdue camera shake. This allows me to approach every scene at ISO 100 (most camera’s best ISO) and f/8 – f/11 (the maximum depth of field possible with minimal diffraction, and also the range where most lenses tend to be sharpest), and only deviate when my scene variables dictate.
Once I determine my composition, I refine the f-stop to ensure to depth of field that achieves my desired effect, then dial my shutter speed to whatever value delivers the proper exposure. My ISO only moves from 100 when motion in the scene requires it. For example, photographing at night requires a shutter speed fast enough to minimize star motion and I’m force to increase my ISO to 800, 1600, or higher, depending on the amount of light and the focal length at which I’m shooting.
About this image
In this image from last Monday’s snow day in Yosemite, I wanted to smooth the rapidly flowing Merced River to smooth chop that I thought might distract from rest of this spectacular scene, but first I had to get everything else in place. I on a fairly tight vertical composition that eliminated everything on the left and right of El Capitan. I used the snow-capped boulders in the foreground to create a little depth, and included just a little sky for some extra color (if the clouds swirling about El Capitan had been more interesting, I might not have done this).
Aligning the foreground boulders was both tricky and awkward. First, I had to wade through a couple of shallow pools to reach a one-rock island (not much bigger than a basketball), then thrust my tripod into the water as far to the left as I could and still operate my camera. A focal length too narrow would have cut off important elements, and too would have introduced distractions just outside this frame. Where the camera was positioned, I couldn’t get my eye to the viewfinder without going for a swim, and there was too much light to see my LCD clearly. So I pulled my camera from the tripod and framed the composition to get the right focal length. With my composition established, I decided f/10 was the largest aperture that would ensure front-to-back sharpness, and focused on a ripple a little behind the boulders.
Finally ready to shoot, I returned the camera to the tripod and used what I could see of the LCD to guess the final composition. After each click I removed the camera and reviewed the image in my electronic viewfinder (another reason I love the EVF), adjusting two or three times until the composition was right.
With my composition framed exactly as I wanted, my exposure dialed in, and my focus point set, I was ready to play with the motion. I started by dropping my ISO to 50 (almost as good as ISO 100, but with slightly less dynamic range), but still couldn’t get the shutter speed long enough without shrinking my f-stop to a less than ideal, diffraction inducing number.
The solution was my Singh-Ray Vari-ND filter. Because my Vari-ND is 77mm, I had to stretch to hold it in front of my 67mm Sony/Zeiss 24-70 f4. Dialing the filter ever so slightly darker between exposures and adjusting my shutter speed to maintain the correct exposure, I ended up with a variety of motion effects. I found that this one, at around 3 seconds, smoothed the water enough while retaining just enough texture for visual interest without being distracting.
Yosemite Winter Photo Workshop
Workshop Schedule || Purchase Prints
A Gallery of Motion
Click an image for a closer look and slide show. Refresh the window to reorder the display.


It ain’t over till it’s over
Posted on January 26, 2017

After Twilight, Valley View, Yosemite
Sony a7R II
Sony/Zeiss 24-70 f4
30 seconds
F/8
ISO 800
(How many photography blogs out there quote Yogi Berra? Just sayin’….) During the 1973 baseball season, Yogi Berra was asked about his last place Mets’ chances in the pennant race. His reply, “It ain’t over till it’s over,” was greeted with chuckles, but Yogi got the last laugh when the Mets rallied to make it all the way to the World Series. I couldn’t help thinking of Yogi’s quote on my drive home Monday night with this image, my final click of the day, still fresh in my mind.
When the weatherman promised snow down to 2500 feet on Monday, I drove to Yosemite late Sunday night so I could beat sunrise and have an entire day to play. And snow I found, lots and lots of it, and still falling. The snowfall continued throughout morning, so heavy that my first few hours were limited to photographing close scenes, interspersed with lots of waiting for conditions to improve. But a little before noon the clouds started to thin and the snow became more showery and I was in business.
When the clearing started in earnest I was at Valley View (but it didn’t look anything like this). The rest of the day I spent dashing around Yosemite Valley, chasing the clouds’ parting and the light that came with it. It’s so much fun watching a storm clear in Yosemite, poised beneath Yosemite Falls or Half Dome or El Capitan, and wait for the big reveal when the clouds to pull back.
For sunset I ended up trudging through about 18 inches of virgin snow to a favorite Half Dome reflection spot by the Merced River, recently rendered much less accessible by major roadwork underway in the valley. Throughout the day I’d crossed paths several times with good friend Don Smith who had driven up for the day with our mutual friends Scott and Mike, and they eventually joined me at sunset. As we shot we shared stories of the day—for example, how they had just missed getting crushed by a falling tree (true story). After a half hour of really nice photography, a large cloud set up shop atop Half Dome right around sunset, completely obscuring the scene’s main attraction. Satisfied with a tremendous day of photography, we declared the day, “Over.”
It wasn’t until I was back at my car that fully appreciated how wet everything was—my gear, my car, and even me (a day of plunging through snowdrifts had been enough for the snow to find its way over the top my waterproof boots and underneath my waterproof outer pants). I decided I’d swing into Valley View on my way out of the valley to use the bathroom and change into drier clothes. In the back of my mind was possibility of a parting shot of El Capitan in the late, blue twilight.
The west end of Yosemite Valley gets much less winter sunlight, so while trees had already started shedding the snow on the east side (where I’d photographed sunset), I pulled in at Valley View to find virtually every exposed surface still glistening white. Bridalveil Fall and Cathedral Rocks clearly visible in the fading light, but El Capitan was cloud-shrouded from top to bottom. Still quite cold, tired, and more than a little hungry, this would have been a perfect excuse to beeline home. But the scene was so beautiful, and the light so perfect, that after changing my clothes I just sat in my car, peeled an orange, and waited for El Capitan to show itself.
I didn’t have to wait long. At the first sign of clearing I hopped out and was completely set up by the river before El Capitan appeared. Bumping my ISO to 800, I composed the standard horizontal frame with El Capitan on the left, Leaning Tower on the right, and the Merced River in the foreground. Often the most difficult thing about shooting in low light like this is finding focus, but despite the fact that it was more 30 minutes after sunset, my Sony a7RII was able to autofocus on Cathedral Rocks. I spent a several clicks refining that original composition and was about to call the day “Over” one more time when something moved me to shift my view to the right. As soon as the image popped up on my LCD I knew I was onto something. I refined for about a half dozen more frames, culminating with the one you see here, until I was satisfied that a great day truly was over.
The lesson here, one I learned many years ago but I see many photographers struggle to grasp, is that the camera can still do fantastic things long after your eyes tell you the show is over. Another satisfying reminder from this day is that it’s still possible to enjoy Yosemite in glorious peace. As someone who has seen Yosemite at its congested worst, I relish the solitude possible when I choose times that the average person (tourists, fair weather photographers) won’t venture out: miserable weather, late at night, before sunrise. The entire time I was out there at Valley View that evening I was alone, and only two cars drove by. As Yogi would say, “Nobody goes there anymore—it’s too crowded.”
Workshop Schedule || Purchase Prints
A Twilight Gallery
Click an image for a closer look and slide show. Refresh the window to reorder the display.


Winter is coming
Posted on October 20, 2016

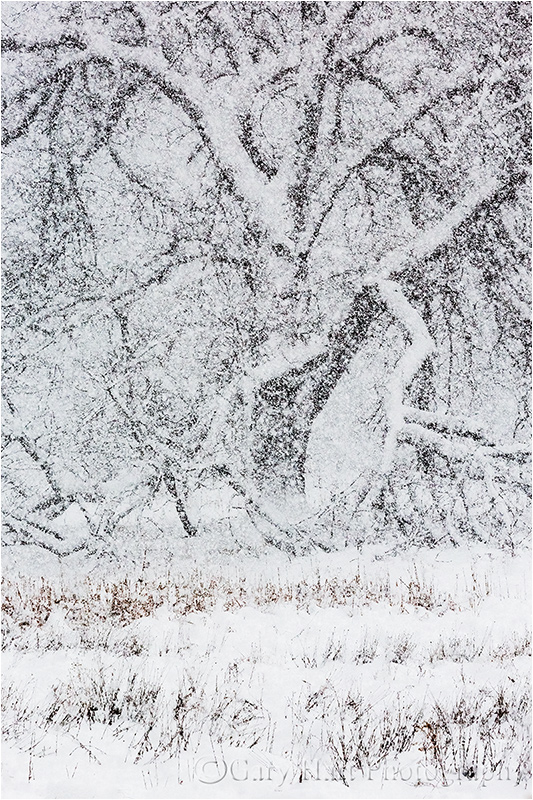
Elm in Blizzard, Cook’s Meadow, Yosemite (2007)
Canon EOS-1Ds Mark II
Canon 70-200 f/4L
1/4 second
F/11.0
ISO 100
Photographing snow-covered Yosemite requires planning and patience: planning to ensure your arrival before the snow stops; patience to wait out the storm when visibility is so poor that you can barely see the nearest tree.
Planning
When the snow stops, Yosemite’s relatively mild temperatures (usually in the 30s when it snows) conspire with sunshine, wind, and gravity to clear the trees in a matter of hours. Meanwhile, park visitors driven inside by the storm, swarm outdoors to gape, quickly adding footprints and spreading mud with their boots, bikes, and cars. In other words, if you delay your departure for Yosemite until you hear that it snowed there, you’re too late. The key is being in the park during the storm.
All winter I monitor the National Weather Service Yosemite forecast and discussion (in-depth forecast analysis) pages for hints of a cold storm. I know there are lots of weather forecast options out there, but most either lack the resources of the NWS, or simply use the NWS data. The NWS may not always nail the forecast, but they’re more consistent and reliable than all the other options.
Sometimes the weather can change at the last minute, but I’m always ready. (It doesn’t hurt that I live less than four hours by car from Yosemite Valley.) In the back of my AWD Subaru Outback all winter are chains (required to be carried in Yosemite in winter, even with AWD/4WD), a portable charger that can recharge a car battery (among other things) in a pinch, and a duffle bag with all my cold weather gear (waterproof pants and upper shell, hat, gloves, umbrella, and ice grips for my shoes).
Patience
Once I decide I’m in, I’m all in. That usually means getting a room in or near Yosemite Valley, driving to the park a day early, and waiting for the snow to start. Once the snow arrives, I don’t hole up in my room, I’m out shooting. Even though Yosemite’s storms often erase all signs of its most recognizable features, stormy weather is a great time to photograph swirling clouds and accumulating snow in glorious (and rare!) solitude.
As much as I love photographing Yosemite in near white-out conditions, I sometimes get too cold, wet, or worn out to continue. But even when I reach that point, I don’t go in. Instead, I park at Tunnel View and wait for the weather to clear. Tunnel View is the perfect place to wait out a Yosemite storm because it’s on the west side of Yosemite Valley (where the clearing usually starts), provides an elevated vantage point with a view all the way down to Half Dome on the valley’s east side, and is spectacular to photograph when the storm clears. It even has decent cell service. And if I’m looking for an excuse to turn on the engine and warm things up, I drive through the tunnel for a view to the west, a preview of coming weather.
My final advice for anyone waiting out a storm at Tunnel View is when the storm clears, don’t spend so much time there that you miss opportunities elsewhere. This is easy to do because the photography will remain spectacular long after you should have moved on to other scenes.
Today’s image
Among my many snowy-Yosemite go-to spots is Cook’s Meadow. On this trip several years ago, until the snow arrived, the meadow was a field of lumpy brown grass, its sentinel elm a bare skeleton in the shadow of Half Dome. But a few inches of overnight snow transformed the bland meadow into an undulating sea of frozen white waves and etched the tree in white.
The snow was still falling when I arrived, wet and fast, slanted by a stiff breeze. Half Dome was gone. I positioned my tripod so the elm stood by itself, balanced in the frame by a stand of evergreens. The falling snow added an interesting dynamic to the otherwise static scene and I chose a 1/4 shutter speed that would blur its motion to streaks of white.
Yosemite Photo Workshops

Snowy Yosemite
Click an image for a closer look and slide show. Refresh the window to reorder the display.


Securing the border
Posted on January 8, 2014

Frozen, Merced River, Valley View, Yosemite
Canon EOS 5D Mark III
1.3 seconds
45 mm
ISO 200
F16
If you’ve ever been in one of my workshops, or (endured) one of my image reviews, you know where I’m going with this (I can sense eyes rolling from here). But I hope the rest of you stick with me, because as much as we try be vigilant, sometimes the emotion of a scene overwhelms our compositional good sense—we see something that moves us, point our camera at it, and click without a lot of thought. While this approach may indeed capture the scene well enough to revive memories or even impress friends, you probably haven’t gotten the most out of it. So before every click, I do a little “border patrol,” a simple mnemonic that reminds me to deal with small distractions on the perimeter that can have a disproportionately large impact on the entire image. (I’d love to say that I coined the term in this context, but I think I got it from Brenda Tharp—not sure where Brenda picked it up.)
To understand the importance of securing your borders, it’s important to understand that our goal as photographers is to create an image that invites viewers to enter, and persuades them to stay. And the surest way to keep viewers in your image is to help them forget the world beyond the frame. Lots of factors go into crafting an inviting, persuasive image—things like balance, visual motion, and relationships are essential (topics for another day), but nothing reminds a viewer of the world beyond the frame faster than objects jutting in or cut off at the edge, or visually “heavy” (large or bright) objects that pull the eye away from the primary scene. To avoid these distractions, for years I’ve been practicing, and advocating, border patrol before clicking. Just run your eyes around the perimeter, note everything that’s on or near the border, and ask yourself if that really is the best place for the edge of the frame.
Sometimes border patrol is easy—a simple scene with just a small handful of objects to organize, all conveniently grouped toward the center, usually requires very little border management. But more often than not we’re dealing with complex scenes containing multiple objects scattered throughout and beyond the frame: leaves, rocks, clouds, whatever, with no obvious demarcation.

Incoming Storm, Mesquite Flat Dunes, Death Valley
Border patrol for this image was relatively simple—with nothing prominent near the edges, I was primarily concerned about visual balance, though I did conduct a bit of border patrol on the sky to ensure that I chose the best place to break the churning (rapidly moving) clouds.
The frigid Yosemite scene at the top of his post was as difficult as it was beautiful. With my camera in live-view mode atop my tripod, I relatively quickly came up with a composition that encompassed the beauty and felt fairly balanced, but all the snow-capped rocks, patches of ice, and randomly distributed hoarfrost made it pretty much impossible to find the perfect place for my border.
The circle of five snow-covered rocks in the left foreground was my foreground anchor—I needed to give these rocks space, and to balance them with the field of hoarfrost blooms in the right foreground. I was very aware of the rocks cut off in the left and right middle-ground, but going any wider introduced all kinds of new problems (just outside the current frame) at the bottom and on both sides. On the other hand, a tighter composition would have cut off the ice-etched trees that stood out so beautifully against the shaded evergreen background. Sigh. So, I did what every photographer must do in virtually every image: compromise. Compromise in this case meant opting for the lesser of multiple evils, hopeful that the unique drama of this frigid scene would be enough to overcome its flaws.
What flaws? I thought (hoped) you’d never ask. After several minutes of shifting up/down, left/right, forward/backward (while crossing my fingers that the ice on which I was stationed would hold out), and zooming in and out, I managed to get all of my icy trees at the top of the frame and find a relatively clean patch of water in front of me for the bottom of the frame. The large rock cut off on the middle right doesn’t bother me too much either—large objects cut in the middle can serve as frames that hold the eye in the scene. But if I could have had complete creative control over this scene (this is where painters have a distinct advantage), I’d have done something about those small rocks cut off on the middle left—I know nobody would be consciously aware of them, but there’s nothing like a clean border to hold a viewer in the scene, and those rocks just aren’t clean to my eye.
Because you can actually practice border patrol, and composition in general, in the comfort of your home, another frequent theme in my image reviews is the value of the crop tool as a learning device. Pick any image—yours or someone else’s—and see how many compositions you can find in it. The goal isn’t to create usable images (you’ll loose too many pixels for that), it’s to train your eye to see things you currently miss in the field. I promise that if you do this enough, you’ll find yourself naturally seeing compositions and fixing obvious problems before you click.
There’s a draft in here
Posted on December 13, 2013
Elm in Blizzard, Cook’s Meadow, Yosemite
Canon EOS 5D Mark III
1/200 second
220mm
ISO 800
F16
Drafting an image
Few writers create a polished piece of writing in a single pass—most start with a draft that gets refined and tightened until it’s ready for publication. It’s an incremental process that builds upon what’s already been done. As somebody who has been writing and taking pictures for a long time, I’ve found a real connection between the creation process of each craft. The most successful photographers aren’t afraid to create “draft” images that move them forward without necessarily delivering them all the way where they want to be.
When I write a blog, I start with an idea and just go with it. But before clicking Publish (or Delete), I read, revise, then re-read and re-revise more times than I can count. Likewise, when I find a scene that might be photo-worthy, I expose, compose, and click without a lot of hand wringing and analysis. But I’m not done after that first click, and I don’t particularly care if it’s not perfect. When my initial (draft) frame is ready, I pop the image up on my LCD, evaluate it, make adjustments, and click again, repeating this cycle until I’m satisfied, or until I decide there’s not an image there. (In the days before digital, the same evaluation process took place through the viewfinder with my camera on a tripod.)
Another tripod plug
It’s the tripod that makes this shoot/critique/refine process work. Much the way a computer allows writers to save, review, and improve what they’ve written (a vast improvement over the paper/pen or typewriter days), a tripod holds your scene while you decide how to make it better. Photographing sans tripod, I have to exactly recreate the previous composition before making my adjustments. But using a tripod, when I’m finished evaluating the image, the composition I just scrutinized is waiting for me right there atop my tripod, allowing each frame to improve on the previous frame.
About this image
Composition isn’t limited to the arrangement and framing of elements in a scene—it can also be the way the image handles depth and motion. For example, living in California, I just don’t get that much opportunity to photograph falling snow. So, on last week’s visit to Yosemite, when I saw the Cook’s Meadow elm tree partially obscured by heavy snowfall, I knew an image was in there, but wasn’t quite sure how to best render the millions of fluttering snowflakes between me and the tree. What shutter speed would freeze (pun unavoidable) the falling flakes, and what depth of field would best convey the falling snow? Would too much DOF be too cluttered? Would not enough DOF be too muddy?
But before solving those problems, I needed a composition. I started with my original vision, a tight, horizontal frame of the tree’s heavy interior—my “draft” image. With my camera on my tripod I tried several successively wider frames, each a slight improvement of the previous one, before jettisoning my tight horizontal plan in favor of a wider vertical composition. Though I knew right away I was on the right track, it still took a half dozen or so incrementally better frames before finally arriving at the composition you see here.
With my composition established, I set to work on the depth and shutter speed question. As good as the LCD on my camera is, I didn’t want to be making those decisions based on what I saw on a credit card size screen, but my tripod enabled me to capture a series of identically framed images, each with a different f-stop and shutter speed. Back home on my computer, I was able compare them all to one and other without being distracted by minor framing differences. I finally decided I like the version with lots of depth field.
Cliché for a reason
Posted on October 29, 2013

Autumn Snow, Valley View, Yosemite
Canon EOS 5D Mark III
1/15 second
F/16
ISO 100
24 mm
It’s actually even a cliché just to say it, but some things really are “cliché for a reason.” And as much as I try to avoid the cliché shots in Yosemite, sometimes they just can’t be helped.
My Yosemite Fall Color workshop began yesterday, and even though I’d spent all day Saturday in the park, yesterday morning a storm filled Saturday’s blue skies with rain and I felt like I should go check on the conditions before we started. The wet weather had slowed me enough that I didn’t really have time to take pictures, but when I found not only the red and yellow leaves I’d seen on Saturday, and the swirling clouds I’d hoped for, but also Yosemite Valley’s colorful trees and meadows etched with snow, I was tempted at every turn to reach for my camera. Nevertheless, with the exception of a brief breakdown at Cook’s Meadow, I managed to resist temptation.
Unfortunately, the Cook’s Meadow stop had put me even more behind schedule, so I told myself while approaching Valley View that any stop here would be just reconnaissance. And anyway, Valley View images are a dime a dozen, clichés that I’d done more than my share to perpetuate over the years. Then I got there….
I mean seriously, cliché or not (deadline or not), how does a photographer pass up a scene like this? With my group meeting me in just an hour, I really, really didn’t have time for pictures, which is exactly what I kept reminding myself as I leaped from my car, snatched my camera and tripod, and sprinted down to the river. I only snapped four frames, two vertical and two horizontal, before racing back to the car and toward my impending rendezvous.
It’s images like this that remind me that nature’s beauty transcends any human judgement of “cliché.” Pro photographers, myself included, can get a little snobbish about frequently photographed scenes. And while I think it’s important to take the time to find a unique perspective, sometimes it’s best to let Mother Nature speak for herself.
Happy ending
I made it to my workshop with minutes to spare, conducted a lightning-fast orientation, and hustled everyone back outside as quickly as possible. We ended up circling Yosemite Valley several times, photographing without a break until dark. I heard no complaints.
A gallery of clichés


Moon over wherever
Posted on July 26, 2013
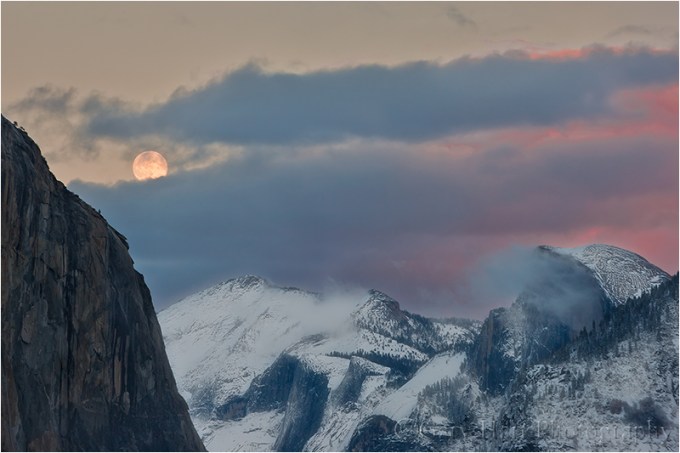
Winter Moonrise, Half Dome, Yosemite
Canon EOS-1Ds Mark III
1/6 second
F/11.0
ISO 100
188 mm
Often, including a rising or setting moon will turn an ordinary landscape into something special. Of course, like most things worth doing, moon photography adds a couple of layers of complication: First, there’s the matter of getting there at the right time, with the moon in the right place (it does little good to arrive as the moon rises if it’s skewed 90 degrees from the scene you came to photograph); and once you have everything lined up, you still have to contend with the almost always tricky exposure issues.
A little lunar geometry (you can skip this section of you’re more interested in “how” than “why”)
Many factors, some within our control, some completely beyond our control, determine the time, location, and phase of the moon at any time. The factors beyond our control are things like the earth’s rotation and the moon’s orbit, which determine the moon’s phase and its absolute position in the sky. On the other hand, we can control our location, and take the steps necessary to get us in the right place at the right time.
A full moon always rises and sets directly opposite the sun, rising in the east at sunset and setting in the west at sunrise. This actually makes perfect sense when you take a little time to understand the monthly choreography of the earth, moon, and sun. Just as the earth revolves around the sun, the moon revolves around the earth; at any point in this dance, half of the earth is lit (daytime) and half of the earth is dark (nighttime), half of the moon is lit and half of the moon is dark.
What we on earth see as a full moon is simply that one day each month that the moon’s entire lit side faces the earth’s dark side—that is, when the earth is directly between the sun and the moon (picture a beam of light that follows a straight line that starts at the sun, passes through earth, and ends on the moon). On that day only, as the point of your location on earth rotates from day to night, you’ll see the sun disappear in the west and the moon rise in the east. As the earth keeps rotating away from daylight and into night, the full moon rises higher and higher, reaching its highest point around midnight, then dropping as your location rotates back toward the sunlit side (and sunrise).
So then why do we rarely see a full moon rising exactly as the sun sets? That’s because: 1) the point of maximum fullness (when the sun, earth, and moon align perfectly) only happens at one instant each month—at every other instant of each month’s full moon day, the moon is only almost full (but still full enough to appear completely full); and 2) sun/moon rise/set times we see published always assume a flat horizon—if you have mountains between you and the horizon, your view of the actual sun/moon rise/set will be blocked.
Due to its monthly orbit about the earth, each day (or night) the moon rises a little later and gains or loses a little bit of its disk (the farther it has revolved from that sun->earth->moon line, the less of the moon’s lit side we see). So the night after the moon is full, it rises after sunset and is a little less full. The next night it rises a little later still, and is even less full, and so on. Eventually (in a little more than two weeks after it was full) the moon has revolved all the way around the earth until it lies between the earth and sun (now our imaginary line goes sun->moon->earth); all of its sunlit side faces away from the earth and we have a new (invisible) moon.
We call the moon “new” because the night before it disappears into the sun, all that was left of the shrinking moon (that was completely full about two weeks ago) was a small sliver that shined briefly on the eastern horizon just before sunrise, then disappeared as soon as the sky brightened (it’s still up there, but completely overpowered by the sun’s brightness). The next day the moon won’t appear at all because seeing it would require looking directly into the sun; but the following day, there it is, this time as a thin sliver on the western horizon immediately after sunset (again, it was up there most of the day, we just can’t see it until the sun sets and the sky darkens). This brand new crescent slips below the horizon shortly after it appears. And for the next two-plus weeks it will rise a little later, and grow a little larger, each night, until it’s full again and rising at sunset. Cycle complete.
If we do the math (this won’t be on the test), we can infer that if the moon takes 29.5 days to complete its cycle (from full to new and back to full), and there are 24 hours in a day, the moon must be rising about 50 minutes later each day (29.5/24=48.8). This rough approximation varies with many factors; for simplicity I usually round it to an hour when I do rough calculations in my head. And I always rely on much more precise software or astronomical charts for my critical calculations.
Locating the moon
Those who don’t do a lot of moon photography are amazed at how much the moon shifts above the landscape throughout the year—you can sight a full moon rising between Half Dome and El Capitan one month, and a few months later it’ll be rising above Leaning Tower (far to the south). Fortunately, like many things in nature that appear random to the uninformed, there is actually nothing random about the moon’s location once you take the time to figure it out.
If the idea of figuring anything saps the pleasure from your photography (or sends you into a panic), you’ll be happy to know that sometimes it’s enough to simply know that the moon will be rising in the east a little before sunset (this info is available in many places, in many forms, but the most complete source I’ve found is the US Naval Observatory website). Armed with that knowledge, you can go out to a location with a view of the western horizon, wait for the moon to appear, and start shooting.
On the other hand, juxtaposing the moon with a specific landmark requires more planning. And because its position is so not random, many others have done the heavy lifting for the rest of us. There are far too many moon phase/position resources to name even a small percentage of them, so rather than even try, I’ll just give you a couple of techniques, and the tools that enable them:
- My old fashioned way (old trick for an old dog): I figured out my technique for locating the moon long before computer software and smartphone apps took away most of the effort. Nevertheless, I continue to do it this way because I’ve already done all the hard work (figuring out how to do it), and I can do it in the field, with zero connectivity (no wifi or cell signal required). After relying for years on a the US Naval Observatory website for the info I need (moon phase and moon/sun rise, set, altitude, and azimuth), I now get all the pertinent data from my Focalware iPhone app (I never said I’m opposed to new technology), plugging it into my National Geographic Topo! (that’s NG’s exclamation point, not mine) mapping software (discontinued) to plot the direction of the moon’s rise/set. To determine when the moon will appear above (or disappear behind) the surrounding terrain, I plug distance and elevation information from Topo! into the trigonometric functions of my HP 11C scientific calculator (originally an actual calculator, but now also an iPhone 11C emulation app) to compute the elevation in of my horizon.
- Software (the better way for 99.999 percent of you): The Photographer’s Ephemeris (a free computer download or fairly inexpensive smartphone app) is the most complete solution that I know of (though I’m sure there are others I don’t know of)—I probably would have never taken the time to figure out my technique if TPE had been available. Not only does TPE give you the sun and moon’s location and elevation above the flat horizon, it also figures out the the actual (terrain included) horizon. The downside is that because it uses Google Maps, TPE requires connectivity and is better used in advance of your shoot (usually not a problem). Recent TPE versions also allow you to download the maps to your device for offline access—if I were a TPE user, I’d be doing this before every trip.
Exposure
My rule for photographing a rising/setting full moon is that I must capture detail in the landscape and the moon. If my landscape is black (or just too dark), or my moon is a white disk (or blob), my image has failed. But since the post-sunset landscape is in full shade, and the moon is as bright as a sunlit landscape (because it is a sunlit landscape), the dynamic range of a full moon scene is pretty extreme, often too extreme for a camera to handle with a single click (always my goal).
But here’s the great part—if you figure that the moon rises about an hour later each day, and the full moon rises at sunset, then it stands to reason that the day before it’s full the moon will rise about an hour before the sun sets. Factoring in the terrain on the horizon (and assuming you’re not at the base of a mountain), that means that the day before the moon is full is the best opportunity to photograph a nearly full (say 97%, give or take a percent or two) moon rising in the east above a landscape painted with the warm sunlight of the golden hour. Conversely, if your view is to the west, you can photograph a nearly full moon setting in warm sunrise light the day after it’s full. Either way, the day before or after the full moon gives you everything you need to capture your scene in nice, photographable light that’s still sufficient to hold the moon’s highlights at bay.
I’ve found that if I’m really careful with my exposure, I can usually capture enough foreground and lunar detail until five or ten minutes after sunset. Shooting after sunset usually requires raw capture, then massaging the dark foreground brighter, and bright moon darker, in the raw processor. A graduated neutral density filter can increase this threshold to maybe fifteen or twenty minutes after sunset—after that my foreground is unusably dark (or my moon is recoverably bright).
Another technique that works when the light gets too extreme is a composite—two images, one exposed for the landscape and the other exposed for the moon, combined in Photoshop. In the “Rules According to Gary,” this isn’t cheating if you don’t change the size or position of the moon. (Though it doesn’t break my rules, I no longer do composites because I have this weird compulsion to get everything with one click.)
The final piece of exposure advice I’ll add is to make sure your camera’s blinking highlights (also called highlight alert) are set (as far as I’m concerned, they should be set anyway because I see no downside to highlight alert). The moon is usually so small in your frame that it won’t register in the histogram, which means blinking highlights are usually the only way to know that you’re blowing out the moon. I monitor my highlights closely after each exposure and have found that, when shooting raw (jpeg shooters don’t have as much margin for error), I can usually recover enough detail with an exposure 2/3 to 1 stop brighter than the exposure that first showed blinking.
Just do it
Like most things photographic, don’t expect resounding success the first time you try adding a full moon to your landscape. But each time you go out, not only will you improve, you’ll probably come away with ideas for how to do it differently the next time.
Read more about moon photography


Everything’s up from here
Posted on July 25, 2012

Sunrise, Telescope Peak & Badwater, Death Valley
:: :: ::
At 282 feet below sea level, Badwater in Death Valley is the lowest point in North America. While that’s impressive by itself, consider that Telescope Peak, the sunlit mountain in center of this picture, is over 11,000 feet above sea level. But wait, there’s more…. Just 85 miles from where I stand here, Mt. Whitney towers 14,500 feet above sea level, the highest point in the lower 48 United States. And 5,400 feet vertical feet above me is Dante’s View; from there you can see both Badwater and Mt. Whitney. Pretty cool.
The Badwater playa is actually an ephemeral lake, filled only by unusually heavy rainfall and its runoff. With no outlet, and averaging less than two inches of replenishing rain each year, evaporation quickly empties Badwater Lake. Each evaporation cycle leaves behind a layer of salt. As the mud beneath the salt layer dries, polygonal cracks form openings that accumulate extra salt. Heat causes this salt to expand into corresponding polygonal shapes on the otherwise flat surface. Some winters I’ve found these shapes filled with water, like faceted jewels. And on my 2005 visit I watched a kayaker glide across the completely submerged basin.
Winter visitors have the best chance of catching the top salt layer before Death Valley’s ample airborne dust has had a chance to turn the playa from pure white to dirty brown. The north/south orientation of Death Valley means that the Panamint Range on the valley’s west side is bathed in the warm light of the rising sun. As with Mt. Whitney, the Panamint Range’s extreme elevation above the playa makes Badwater an ideal spot for early risers to photograph sunrise alpenglow. On this morning from early last February, the playa was pristine and a layer of thin cirrus clouds arrived at the same time as the sun, brushing the blue sky pink.
Photographic reality: Framing infinity
Posted on May 16, 2012

Snow and Autumn Leaves, Yosemite
“Photography’s gift isn’t the ability to reproduce reality, it’s the ability to expand it.”
(The second installment of my series on photographic reality.)
If you’ve ever tried to point out to someone a small detail in nature that pleases you, perhaps you’ve experienced a conversation like this:
You: “Look at that!”
Friend: “What?”
You: “Those leaves—look at the frost on those leaves.”
Friend: “What leaves?”
You: “There on the log—with the snow.”
Friend: “Those dead ones? Yeah, cool. Man, I can’t believe I ate all those fries at lunch.”
You: “Whatever.” Sigh.
It’s really great to enjoy nature, to take in all of its infinite, three dimensional, multi-sensory splendor: its smells, sounds, depth, and motion. But all this input is a lot to process, and because everybody interacts with the world a little differently, each person is drawn to different things—what moves you might be overlooked by others. If only there were some way to show others what you see. Hmmm….
Unlike us humans, a still camera experiences the world in single-sensory, discrete frames. Rather than being a disadvantage, a camera’s “limitations” provide an opportunity to isolate whatever aspects of a scene that moves you, and to remove extraneous elements that distract. In other words, the camera’s field of vision, determined by you, has finite boundaries that make a frame in which you can organize relationships and eliminate distractions through careful selection of your lens’s distance (or focal length) and direction.
The golden leaves in the above image were three among thousands dotting the forest floor on this November morning near Cathedral Beach in Yosemite. I wanted to juxtapose fall and winter, and reveal the leaves’ frosty fringe. A wide frame would have more closely represented the entirety of the scene as I experienced it, but without something to anchor the frame, I knew viewers’ eyes would wander and they’d be unsure of my intent.
So I put on my 100mm macro lens and moved closer, finding this trio of leaves on a log, surrounded by patches of snow. I started by positioning myself so none of the leaves merged—that each stood by itself, balanced in the frame. Framing the leaves tightly eliminated the rest of the world, giving you no choice but to only look at what I wanted you to see. F14 and careful focusing gave me enough depth of field to make the leaves and log sharp with the background distractions blurred to insignificance.
Up next: See the light

