Starry Night
Posted on September 1, 2019

Starry Night, Lake Wanaka, New Zealand
Sony a7SII
Sony 16-35 f/2.8 GM
35mm
30 seconds
F/2.8
ISO 6400
It’s midnight and I’m right back where my day had started 21 hours earlier. Standing in the frigid dark beside Lake Wanaka, I feel equal parts energized and exhausted by the longest photography day of my life. And for the first time all day, I’m alone.
With the moon’s arrival still a couple of hours away, most of my attention is on aligning the Milky Way with the much photographed Wanaka willow tree. But photographing the Milky Way with the tree also put the glow of the Wanaka’s lights directly in my field of view. As someone who always strives to photograph the natural world untouched by humans, this would have been a deal-breaker for the old me. But what the heck—the reflection is crisp, the light’s amber glow illuminating the fog is kind of pretty, and since I’m already out here….
Once I embrace the moment, I’m free to click and enjoy. For most of this night the fog ebbed and flowed in the distance, adding character to the scene without subtracting too many stars. I’m having a blast, city lights or not. But eventually the fog starts to take over, slowly expanding upward until it completely swallows most of the Milky Way. Bedtime….
But just as I decide to pack it in, the fog pulls back and the stars briefly rally. Much of the Milky Way is still obscured, but the sky in the west has opened and I quickly reposition, pointing my camera away from the fog, city, and Milky Way, and toward the dark, pristine sky. As my exposure begins, long, undulating ripples stir the lake surface that had been still all night, and I’m concerned that I’ll loose my reflection. Instead, the long exposure smooths the ripples and stretches the brightest stars into oblong balls of light.
Read the story of this unforgettable day.
Join Don Smith and Me in New Zealand
Below is a rewrite of the Starlight Photography article in my Photo Tips section
Starlight Photography
With pretty much any mirrorless or DSLR camera, a sturdy tripod, fast lens, and just little knowledge, you can now capture landscapes beneath more stars than you ever imagined possible. A camera’s ability to accumulate light allows it to reveal stars far fainter than the naked eye sees; rapidly advancing digital SLR technology now enables usable (low noise) images at the extreme ISOs necessary for star-freezing shutter speeds in very low light.
Before you start
I’m starting with the assumption that you have a relatively new mirrorless camera or digital SLR, one that allows you to capture fairly clean (low noise) images at 3200 ISO or higher. You’ll need to be fairly comfortable with managing the controls in the dark, and know how to get it into manual and bulb modes. For star trails a locking remote release is essential (one that allows you to lock down the shutter rather than forcing you to hold it down for the duration of the exposure).
And of course don’t even think about trying any of this without a rock-solid tripod (you don’t need to spend tons of money, but neither can you assume any tripod will work). A wide (28mm or wider on full frame is best), fast (at least f/2.8, but the faster the better) lens is best. Oh yeah, and take off your polarizer.
Test frame
Moonlight photography is great for photographing landscapes beneath a few bright stars, but a sky filled with stars (and maybe even the Milky Way) can only happen when there’s no moon and city light washing out the faint stars.

Milky Way Reflection, Colorado River, Grand Canyon
When I go out on a moonless night, whether my goal is pinpoint stars, star trails, or both, I start with a test frame to determine the amount of light my planned image requires. The test frame also allows me to check my exposure, focus, level, and composition in light that’s nearly opaque to my eyes.
My initial test frame is usually no more than a 30-second, high ISO (the goal isn’t a usable image, it’s solely to determine exposure, focus, and composition) and my lens’s widest aperture. After each click I check my composition and focus, adjust, and reshoot. The first frame is mostly to gauge the light; subsequent frames refine both the exposure and composition. I’m usually ready to go after two or three test frames.
Once I have an exposure that works (the desired combination of stars and foreground light), I just need to decide which shutter speed will give me the star effect I want—short for pinpoint stars, long for star trails. With that, finding the ISO and/or f-stop that adds or subtracts the light subtracted or added by my chosen shutter speed is just simple math.
For example, let’s say my test exposure was perfect at ISO 12,800, f/2.8, and 30 seconds. A 30-minute star trail image will gather a lot more light (than my 30-second test exposure), so I start by figuring out how many stops 30 minutes adds to 15 seconds. Since I have to double ¼ minute (15 seconds) seven times to get to 32 minutes, I know going from 15 seconds to 32 minutes adds 7 stops of light. (2×1/4=1/2 minute -> 2×1/2=1 -> 2×1=2 -> 2×2=4 -> 2×4=8 -> 2×8=16 -> 2×16=32.)
Finding focus
A moonless night doesn’t have enough light to see the controls on your camera, the contents of your bag, and the tripod leg you’re about to kick. Needless to say, there’s not enough light to focus either, at least in the traditional ways.
Because we’re usually wide, and very rarely concerned about close detail, all of our night subjects are probably at least 25 feet away with an infinity focus point. Unfortunately, that old prime lens habit of twisting the focus ring to the end for infinity focus doesn’t work on a zoom lens—every focal length has a different focus point (I’ve found this to be true even for lenses labeled parfocal). While I’ve simplified my night photography by usually going with my Sony 24mm f/ 1.4 GM lens, when I do use a zoom (usually my Sony 16-35 f/2.8 GM), I almost always use it at its widest focal length. Not only does a wide lens maximize the amount of sky in my frame, the extra depth of field increases my range of focus tolerance. And sticking with a single focal length reduces the times I need to mess with focus—once I get it sharp, I’m done with the focus hassle.
Despite the hardships, there are a number of methods for focusing at infinity in the dark. Here they are in my order of preference:
1. Autofocus on a bright planet or star. Some camera/lens combinations have excellent autofocus (the faster the lens, the better). I always start by picking out the brightest planet/star. Venus is great, but it won’t be up during the darkest hours of the night. Jupiter, Saturn, and Mars can work, as can Sirius and maybe a few other bright stars. Regardless, you don’t need to know what you’re pointing at—find something bright in the sky, center it in your viewfinder, and try to autofocus. (Any bright, distant object will do—headlights, a plane overhead, whatever.) Don’t forget to take your lens out of autofocus as soon as it’s focused.
2. Live-view focus on a bright planet or star. With my camera on my tripod I center the brightest object in the sky in my viewfinder and lock it in place. I go into live-view mode, center the star/planet in the LV magnification square, then magnify the view to the maximum (it’s 10x on my Canon), and manually focus. Since switching to Sony mirrorless, this is my preferred focus technique and I rarely try 1 or 3.
3. Autofocus on a nearby flashlight. When all else fails, I have somebody stand 50 feet or so away with a flashlight and autofocus on that. If I’m by myself, I rest the flashlight on a rock (or whatever) and walk (stumble?, grope?) 50 feet away. Believe it or not, if I focus my 24mm f/1.4 lens (for example), on a point 50 feet away, I’ll be sharp from about 25 feet to infinity, so you should be fine too unless your lens is significantly longer (which I don’t recommend for night photography) or faster (lucky you). Don’t forget to take your lens out of autofocus as soon as it’s focused.
Don’t forget!: Because there’s no fixed infinity on a zoom lens, if you change your focal length, you must refocus. And no matter what method you choose to focus, you must check the sharpness on the LCD before assuming it’s sharp (once you’ve verified sharpness, you don’t need to refocus or check sharpness again until you change your focal length).
Composition

Moonlight and Milky Way, Lake Wakatipu, New Zealand
Because I love stars, and it’s the stars that really set a night image apart, most of my night images are at least 2/3 sky. The foreground is usually more of a placeholder, an excuse to dazzle you with the celestial ceiling. But that does not mean the foreground doesn’t matter. Quite the contrary, because the sky is a relative constant, the foreground is the difference between another pretty picture and something that pulls people to a print from across the room.
It’s not necessary, but when possible I always try to include something recognizable, such as the Milky Way (my favorite), or a recognizable constellation like the Big Dipper, Orion, or Cassiopeia. This is especially nice in pinpoint star images. If you don’t know the night sky, spend a little time familiarizing yourself with the major constellations—there are many, many smartphone apps to help with this.
Most people’s vision subconsciously runs along the long edge of an image. Since the primary feature or a night image is the sky, most of my night images are oriented vertically. Regardless of my orientation preference for a particular night shoot, I always make sure I have at least one vertical and horizontally oriented image.
I’m constantly on the lookout for a striking foreground to feature beneath a starry sky. Bold objects without a lot of intricate detail work well, such as a prominent or mountain. Reflective subjects, like water, granite, and sand, work well too.
In Yosemite I like Half Dome for the way it stands out against the sky. For years I struggled getting enough light into the dark hole of the Grand Canyon at night, but today’s digital sensors and fast lenses have changed that. had better luck with Grand Canyon my star trail images because the long shutter time allows enough light at a very clean ISO. My current favorite location for night photography is New Zealand, which I always visit in June (winter). The skies are dark and clear, the nights are long (the Milky Way is up all night in June), and the foregrounds are off the charts
Star motion
Successful star photography is all about managing star motion—either minimizing their motion or maximizing it. Unfortunately there’s an inverse relationship between the number of stars you capture and your ability to freeze their motion—for any given ISO and f-stop, the longer your shutter is open, the more stars you’ll expose, but the more they’ll move during your exposure.
Pinpoint stars
Pinpoint star images require (relatively) fast shutter speeds to (more or less) freeze the stars’ motion; star trail images us long shutter speeds (either in one frame, or a series of blended frames), the longer the better, to maximize star motion. (Of course it’s not the stars’ motion we’re capturing, it’s Earth’s rotation against a fixed backdrop of stars, but you already knew that.)

Dark Sky Dreams, Lake Matheson, New Zealand
Some nights I shoot both pinpoint stars and star trails; other nights I only photograph pinpoint stars. Because a pinpoint star exposure is usually only 15 to 30 seconds, even after I’ve completed my test exposures, they’re the best way to make sure I have everything right before moving on to the quite lengthy star trail exposures.
I’ve seen a formula floating around that’s supposed to ensure pinpoint stars. It’s called the “Rule of 600” (or 500) and says: “Divide 600 by your focal length to ensure a shutter speed that will freeze the stars.” My concern with solutions like this is that they sound far more precise than they are, and they create a false sense of security, often leading to longer or shorter exposures than the scene calls for.
The problem is, the amount of motion is a function of (among other things) a star’s distance from the axis of rotation. For example the North Star, which is less than a degree from Earth’s north axis, will show very little motion in exposures of many minutes or even hours; Betelgeuse, on the other hand, because it’s near the celestial equator will show a significant amount of motion in just a few minutes. For pinpoint stars I think it’s more important to find an exposure that delivers enough light with the least amount of noise.
My biggest problem with exposure speed rules like this is that they can create a worse problem than they correct. Night photography is all about compromise—less than ideal aperture, ISO, and shutter speeds. To me the most unrecoverable compromise, the thing that will render an image unusable more than anything, is too much noise. I generally will forgive the slight amount of star motion of a 30-second exposure (that’s not usually even visible at standard viewing distance) if it saves me from a too dark foreground or unsatisfactory ISO. I find that I’m satisfied with my results if I keep my shutter speeds to 30-seconds and below—the faster the lens, the more likely I am to drop my shutter speed into the 10-20 second range.
I currently (as of September 2019) shoot with a Sony a7SII and Sony 24mm f/1.4 GM lens. I know I can get usable images that clean up nicely with noise reduction software (DxO Prime and/or Topaz DeNoise is my choice) at 12800 ISO, which allows me to stop down to f/2.0 and/or use a 10-second shutter speed. ISO 12800 is higher than I’d use with most cameras, but it seems today’s full frame (and even some APS-C) sensors do fine at ISO 3200, which might require a 30-second shutter speed to get enough light for the foreground.
The Milky Way

Spiral Galaxy (Milky Way look-alike): This is what our galaxy would look like from above. The individual stars are nearby neighbors who just got in the way—they’re not part of the galaxy pictured. (Photo courtesy of European Southern Observatory)
The Milky Way may just be the single most beautiful everyday feature of Earth’s night sky. Sadly, increased light pollution has made it all but unknown to the vast majority of us. Once upon a time observing the Milky Way’s glowing band stretching across the sky was for most people a matter of walking out and looking up on a dark, clear night; seeing it now usually requires planning and travel.
As most know, the Milky Way is the galaxy of which our Solar System is a very insignificant piece (the Sun is one star in nearly a half trillion). When you see the Milky Way, you’re looking toward our galaxy’s center and seeing the accumulated light of billions of stars. The dark areas you see aren’t areas without stars, they’re regions of interstellar dust so dense that it obscures all starlight (the occasional pinpoint of starlight in these dark regions are nearby stars between us and the galactic center).
Earth’s position in one of the Milky Way’s spiral arms is kind of like being in the distant suburbs of a large city. While all the discrete stars we view and imagine into constellations are the porch lights of our neighbors (technically they’re part of the Milky Way too, just as some cities have city limits that extend all the way out to the suburbs), when we view the Milky Way we’re looking beyond our neighborhood toward our galaxy’s distant, much more densely populated, urban skyline. Due to our Solar System’s skewed orientation (we don’t orbit the Sun on the same plane on which the Milky Way is laid out), parts of the Milky Way are visible regardless of the side of the Sun Earth is on.
The constellations the Milky Way “passes through” (from our perspective—in reality we’re looking through these constellations to the Milky Way center beyond) include Perseus, Cassiopeia, Lacerta, Cygnus, Aquila, Sagittarius, Ophiuchus and Scorpius, Norma, Circinus, Crux, and Carina. If you want to see it, simply pick one of these constellations, figure out when and where it will be visible (an star chart or app will do), pick a clear, moonless night, and position yourself a location

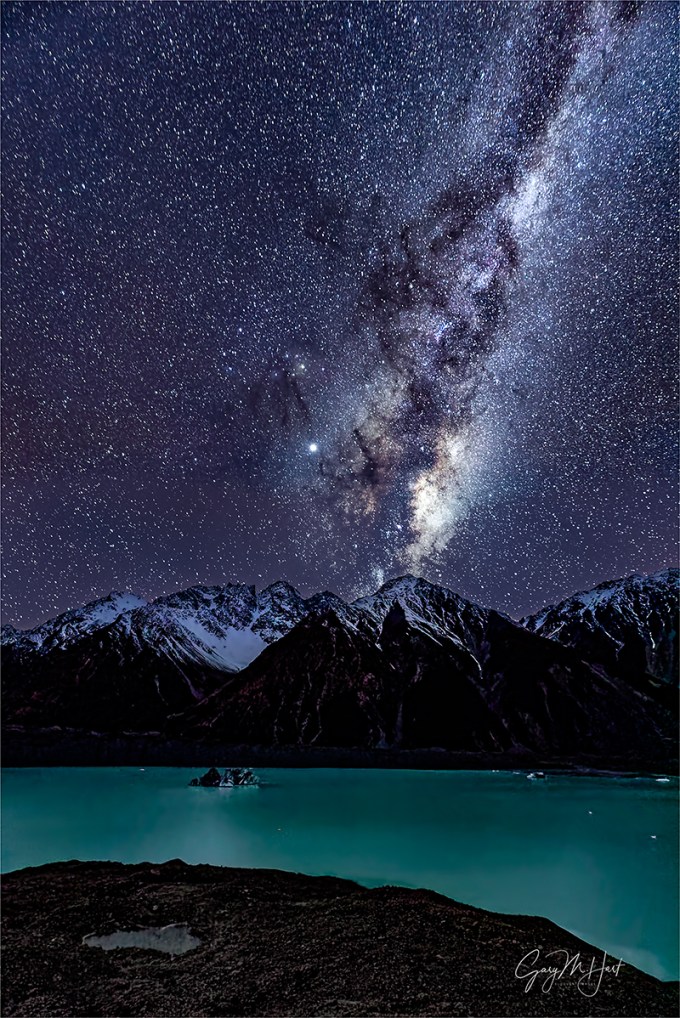
Milky Way and Jupiter, Tasman Lake, New Zealand
far from city lights. For example, in the Northern Hemisphere Cassiopeia is visible year-round more or less opposite the Big Dipper with Polaris (the North Star) in the center—you might be able to go out tonight to see it (assuming there’s no moon and you can get away from city lights).
But the Milky Way isn’t particularly bright in Cassiopeia—for most photographers (or anyone else who appreciates beauty) it’s the Milky Way center we’re looking for. For that Northern Hemisphere viewers need to look to the southern sky, toward Sagittarius, the constellation that aligns most closely with the Milky Way’s dense (most brilliant) center. And since the Sun is in or near Sagittarius (when we look in the direction of Sagittarius, we’re also looking toward the sun) in winter, we need to wait until Earth has circled around to the other side of the sun—summer.
In other words, viewing (and photographing) the Milky Way’s bright center is a summer (-ish—late spring and early fall will work too) activity. Get out your star chart/app and find a summer night when the moon is below the horizon while Sagittarius is above it (the closer to a new moon, the better your odds). Then get yourself as far from city lights as you can (mountains or desert are great), look to the south, and prepare to be awestruck. Stand there and appreciate the view for a while—when you’re ready to photograph, follow the instructions for pinpoint stars above.
Read more about photographing the Milky Way
Star trails
Many people enjoy great success photographing star trails by combining many consecutive, relatively short exposures. In general this approach reduces noise and results in a cleaner image. But since all my images are captured in a single frame (I’m a film shooter with a digital camera), you’ll need to look elsewhere for guidance on that method.

Bristlecone Star Trails, White Mountains, California
My star trail images are usually 20-30 minute exposures, which I find to be more than adequate to achieve the motion effect I’m looking for. Start with pinpoint star frames and stick with those shots until you’re happy with your composition, exposure, and focus. When you’re ready for star trails, without changing your composition, focal length, or focus:
- Turn on your camera’s long exposure noise reduction (most cameras have it, though it’s usually buried deep in the menu system). LENR isn’t necessary for pinpoint stars (though it may help slightly—results vary with the camera manufacturer), but it makes a noticeable difference in star trail images. The downside of LENR is that it doubles your exposure time because the camera takes a second exposure of the same duration with the shutter closed, compares the results, and subtracts whatever it finds in both images. That means if you take a 30 minute exposure, you’ll need to wait another 30 minutes before viewing your results (which is another reason you want star trails to be at the end of your shoot).
- Put your camera in Bulb mode. On some cameras Bulb mode is one of the choices on the Aperture Priority, Shutter Priority, Manual (and so on) dial; on others Bulb is the step after 30 seconds as you increase the shutter speed.
- Now it’s time to do your exposure math. Assuming you want the same exposure (amount of light) you have in the pinpoint star images, determine how many stops of light your star trail shutter speed will add, then subtract that amount of light with some combination of lower ISO and smaller aperture (larger f-stop number). For example, if your star trail exposure is 30 seconds at ISO 3200 and f/2.8, a 30 minute exposure would add 6 stops (technically a full 6 stops would be all the way to 32 minutes, but those extra two minutes are inconsequential). I usually get my ISO down as far as possible before subtracting light with my f-stop, so in this example I’d probably go with 30-32 minutes, ISO 100, f/4.
- Now you’re ready to shoot. If your camera allows you to block the light entering through the viewfinder, now’s the time to engage that (if you don’t know what I’m talking about, you probably can’t do it, so don’t worry about it). Click the shutter button on your remote, lock it down, and check your watch or set a timer.
- Enjoy the view.
Processing
Before I start, let me just say that there are just about as many processing approaches as there are photographers. And there are far fewer absolute right/wrong ways to do things than you might read/hear/see. So what I’ll tell you here is the way I process a night image, rather than the way to process night image. If you already have a workflow you like, or if somebody else tells you a way you like better mine, go for it.
I wouldn’t even consider photographing night scenes in anything but raw. Not only do jpeg captures reduce your margin for error, a jpeg capture makes processing decisions that are difficult to impossible to reverse.

Sky Light,The Milky Way and City Lights, Lake Wanaka, New Zealand
Lightroom
- Cool the color temperature: Since I photograph everything with auto white balance, in my raw processor (Lightroom) the first thing I do with a night image is cool the color temperature to introduce a little blue that gives the scene a more night-like feel. The temperature varies from image to image, but it’s usually in the 3,000-4,000 degrees range.
- Noise reduction: Lightroom/Camera Raw noise reduction is much improved, but I don’t use it as my final noise solution. Rather, I do a subtle de-noise with the Lightroom color and luminosity sliders (you’ll notice much more difference with the luminosity slider than you will with the color slider),
- Clarity: The Clarity slider brings out stars like magic, but you need to be careful about the noise it subtly (insidiously) increases right along with the stars. I’ve found that it’s easy to get so excited by what Clarity does to your stars that you overlook the more subtle damage it does to the noise in the image. I generally magnify my view to 1:1 and slowly pull my Clarity slider to the right, concentrating on the noise and ignoring the stars (as much as I can). I’ll be able to fix a little noise later with my Photoshop de-noise plugin, but I just try to be careful not to create additional problems for myself.
- Dehaze: Like Clarity, the Dehaze slider can make a night image look spectacular, but it’s extremely easy to overdo so be gentle.
- Standard Lightroom processing: While the above bullets are points of particular emphasis, that doesn’t mean that I don’t also apply the rest of my Lightroom workflow to a night image. Exposure, Highlights, Vibrance, Crop, and so on may or may not have their place in any given image.
Photoshop
- Noise reduction (since NR is an art in itself, I won’t go into it in great deal here): I use Topaz DeNoise; it’s the first thing I do when I bring an image into Photoshop. Depending on the rest of frame, I often select the areas most prone to noise (shadows, sky, clouds, etc.) and process them separately from the areas with lots of detail (which may not get an NR treatment at all, or a much gentler treatment that preserves detail).
- Dodge/burn: I find that many night images benefit from subtle dodge/burn brush strokes to smooth tone differences in the sky. For example, I often have to clean up slight vignetting, likely the result of shooting wide open (at an aperture far from the lens’s best). And sometimes I like to moderate the tone difference between the horizon line and the top of the frame. Another problem I occasionally encounter is a subtle brightness on one side of the frame or the other, caused by extraneous light (such as moonlight, nearby artificial light) leaking in from outside the frame.
- Content Aware Fill: The longer the exposure, the greater the chance of something unwelcome finding its way into your frame. Headlights and airplanes are by far the biggest offender. But since the advent of Content Aware Fill, I no longer stress about these things.
- Sharpen: Always my final step, I never sharpen an image until it’s sized for output. Especially with night photography, I selectively sharpen only those areas with important detail—dark shadows are never sharpened. And be careful when sharpening the sky—as with the Clarity slider, sharpening can make the stars pop but at the cost of extra noise. One trick I sometimes do after sharpening is brush with the history slider at around 85 percent (100 percent can sometimes create visible transitions) those areas of the sky without significant stars. And honestly, the more I do this, the less night image sharpening I do and in fact, I often do sharpen them at all.
- Standard Photoshop processing: While the above bullets are points of particular emphasis, that doesn’t mean that I don’t also apply the rest of my Photoshop workflow to a night image.
New Zealand Photo Workshop
Workshop Schedule || Purchase Prints
A Starlight Gallery


It’s All About Relationships
Posted on August 25, 2019
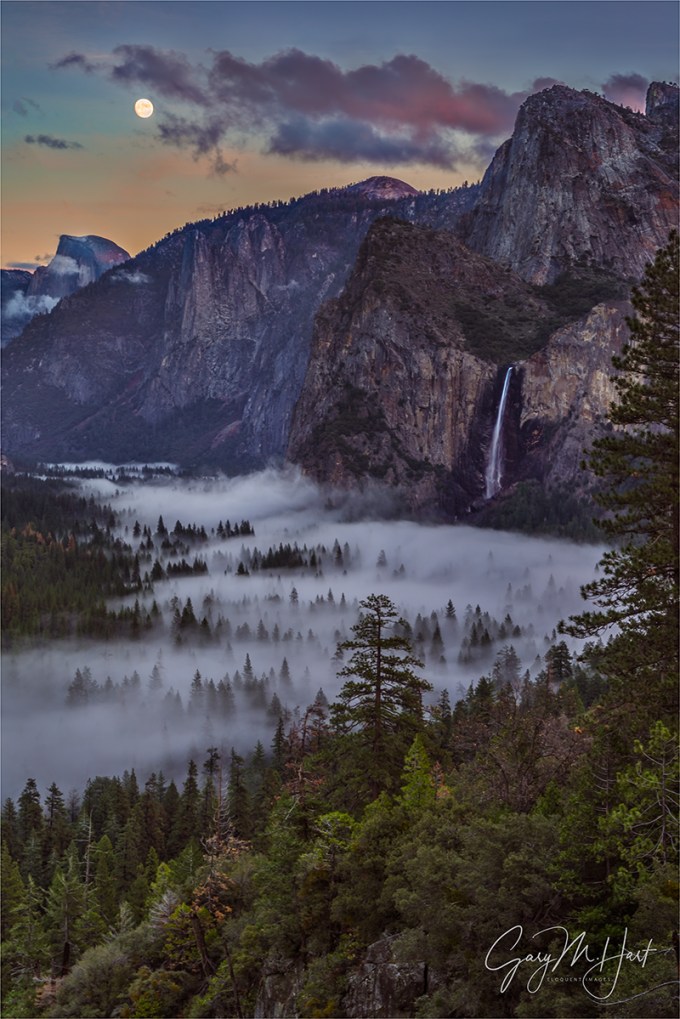
Moon and Mist,Tunnel View, Yosemite
Sony a7R
Sony/Zeiss 24-70 f4
1 second
F/11
ISO 100
Think about how much our lives revolve around relationships: romance, family, friends, work, pets, and so on. They’re such a big part of human existence that it’s no wonder most of the significant compositional choices photographers make involve relationships between elements in our scenes, either to one another or to their environment.
A pretty sunset is nice, but a pretty sunset over the Grand Canyon especially nice. Likewise, why be satisfied with an image of mountain cascade when we can accent the scene with an autumn leaf? And wouldn’t that tree up there on the hill look great beneath a setting crescent moon? Conscious choice or not, these are all relationships—distinct elements connected in a shared moment.
Some photographers are better than others at creating relationships; some do it instinctively, seemingly pulling relationship from thin air no matter where they are to find a nearby tree that perfectly complements a distant peak; others are more calculating, identifying the potential for a future relationship and taking the steps to be there when it happens—a moonrise, the Milky Way, or a rainbow. Most photographers fall somewhere on the continuum connecting these two extremes. And contrary to what you might read online or hear in your camera club, there is no single “best” approach to creating photographic relationships.
The more we can think in terms of finding relationships in nature, adding that extra element to our primary subject, or finding multiple elements and organizing them, through positioning and framing, in a way that guides the eye through the frame, the more our images will connect on a subconscious level that draws people closer and holds them longer.
Relationship heaven
Yosemite visitors burst from the darkness of the Wawona Tunnel like Dorothy stepping from her monochrome farmhouse into the color of Oz. This is Tunnel View, a veritable who’s-who of Yosemite icons chock full of ready-made relationships for photographers to feast on: El Capitan, Cloud’s Rest, Half Dome, Sentinel Rock, Sentinel Dome, Cathedral Rocks, Leaning Tower, and Bridalveil Fall. That’s a lot of stuff to take in without a camera, so it’s easy, especially for first-time or infrequent visitors, to just snap a picture of the whole thing and call it good.
If you keep the camera out a little longer, or visit Tunnel View a few times, relationships within the relationships start to pop out: El Capitan and Half Dome, Half Dome and Bridalveil Fall, Bridalveil Fall and Cathedral Rocks, and so on. But as nice as these combinations are, Yosemite’s truly special stuff doesn’t happen until the conditions cooperate by serving up a clearing storm, rainbow, fresh snow, or rising moon.
I’m fortunate to live close enough to Yosemite to time visits with the idea of adding these little extras to my images. Some of these trips come up at the last minute, spurred by a weather forecast that promises snow or lightning. Other trips I can plan months or years in advance, based on where the sun, moon, or stars will be, or maybe to catch a seasonal feature like fall color. These are the visits that I usually time my Yosemite workshops for: light on Horsetail Fall in February, a moonbow or the dogwood bloom in spring, fall color each autumn, or a rising full moon in winter.
About this image
My goal this December evening a few years ago was a nearly full (96%) moon rising through the twilight hues above Half Dome. It had been on my calendar for over a year, but thanks to a winter storm, the main event was in doubt when I arrived. Fortunately, the clouds soon relented, parting just as the sky started to pink up. As a bonus, the departing storm left the valley floor glazed with a treetop hugging mist. (Talk about an embarrassment of riches.)
When I photograph a scene with so much going on, I first decide the feature or features to highlight—which brings me back to the relationship thing. The entire scene this evening, from El Capitan on the left to Leaning Tower on the right, was beautiful, but I knew the more of it I included, the smaller the moon became—and to me the moon was the star of this show.
When assembling elements in any composition, I start by identifying the objects with visual weight—the objects that will draw viewers’s eyes. Contrast, mass, color, position all play a role in determining visual weight. In this case I identified the moon, Half Dome, and Bridalveil Fall (in that order). Sometimes I can adjust these obects’ relationships to each other by strategic positioning—moving left/right, forward/backward, up/down—but here I was perched on a cliff behind the conventional Tunnel View vista, which limited my mobility.
Evaluating the scene, pretty much everything I wanted in this image was between Half Dome and Cathedral Rocks. I quickly decided that a vertical composition would be best to feature the color in the sky and fog on the valley floor without going wider than necessary. And while I’d normally try to avoid having the two “heaviest” objects on the same side of my frame (the moon and Half Dome), in this scene the right side of the frame had enough extra stuff to balance things. In addition to Bridalveil Fall, I also had bulky Cathedral Rocks and a solitary evergreen standing boldly against the fog.
My final decision was how to handle the nearby evergreen lurking on the right. To gain some separation between the tree and Bridalveil, I moved as far left as my surroundings allowed, enabling me to use the tree as a natural frame on the right border. Click.
Yosemite Relationships
Click an image for a closer look and to view a slide show.


Thanking My Stars (and Moon, and Lightning, and Rainbows, and…)
Posted on August 18, 2019

Surprise Rainbow, Point Imperial, Grand Canyon
Sony a7RIII
Sony 24-105 f/4 G
1/4 second
F/8
ISO 100
So lately I’ve been thinking about the things I photograph and why I photograph them. Then the other day, after boarding a plane following my recent Grand Canyon monsoon trip, I squeezed into my seat and rummaged through my computer bag, loading the knee-jamming magazine holder on the seat-back in front of me with the two books I’m currently reading. One was “All About Lightning,” by Martin Uman (published in 1971 and revised in 1986); the other was “The Weather Machine: A Journey Inside the Forecast,” by Andrew Blum. On my AirPods was an astronomy podcast (“Orbital Path”). I have no illusions (anymore) of becoming an astronomer or a meteorologist, and the movie version these books is unlikely to be coming soon to a theater near you—no, I’m filling my mind with this stuff simply because it interests me. A lot.
I think everyone has those things that fascinate them so much that there’s no effort learning them. I have a history of finding something interesting and devouring every possible word on the subject. Some were passing obsessions (handwriting analysis, Lincoln head pennies, and—uhhhhh… The Monkees), and others have stuck with me (baseball, astronomy, geology, meteorology, and certain writers).
Which brings me back to the things I photograph, and the realization that we can probably tell a lot about most photographers’ relationship with the world by viewing their images. Anyone who checks the percentage of my images that have a weather or celestial component wouldn’t (or shouldn’t) be surprised by my in-flight entertainment, or to learn that for a few misspent college semesters I majored in astronomy, then geology (and have since kept them as hobbies, where they belong).
The longer I do this, the more I appreciate how lucky I am to actually make my living photographing only the things I love. Nearly 15 years ago I left a good career in the tech industry, naively planning to turn a photography passion into a profession. I can’t tell you how many people since then have told me that doesn’t work—fortunately, I didn’t hear them until it was too late.
For photographers, there’s a fine line between self-employed and unemployed, a line I didn’t fully appreciate when I made my decision to jump into it with both feet. Like millions of other photographers, all I wanted to make a living photographing the beautiful natural world I love so much—how hard could that be? But as many have learned (some sooner than others), not only is there very little market for landscape images, there seems to be pretty much infinite competition—competition that causes landscape photographers to sell digital images for pennies, and prints for little more than their cost. But somehow, for reasons I like to attribute to foresight but must acknowledge dash of shovel full of good luck as well, I’ve managed to make my living photographing only what I love.
Before leaving my tech job, I was doing art shows and making pretty decent money for a weekend’s work. But a weekend art show is so much more than just a weekend of effort, and after doing the math I realized that I’d need to be on the road at least 40 weeks per year to even have a chance to make ends meet through art shows. Gallery sales were a non-starter because the galleries just want too much of the small number of sales they generate, and the stock photography market was already on life support. Open my own gallery? That just sounded like an anchor that would prevent me from taking pictures.
So I started leading photo workshops, which were just starting to catch on and seemed ideally suited to my skillset. Not only was I intimately familiar with Yosemite and other California destinations that pretty much sell themselves, my background was in technical communications (tech writing, training, support), and I genuinely like people.
When I started offering workshop, I still did the art shows, but then came 2008 and the economic downturn. Despite a lot of hand wringing, my workshops continued filling, helped a lot by repeat customers who kept me afloat through the recession. And after one particularly unsuccessful weekend in San Francisco, I decided to drop the art shows altogether and focus on the workshops. I haven’t looked back.
Since making my mid-life career change, I’ve also managed to create a small niche as a writer, both through this blog (which pays nothing but has developed a pretty loyal following), and as a regular contributor to “Outdoor Photographer” and other photography publications (and which earns just slightly more than nothing). Not enough to live on, but at least enough to scratch my life-long writing itch.
So here I am, nearly 15 years into this ride and still going strong. I’m not getting rich, and least financially, but there are better measures of success than dollars. Whether alone or sharing with others, I still get as excited as anyone when the moon rises behind Half Dome, the Milky Way brightens above a New Zealand lake, or the setting sun paints a rainbow against a Grand Canyon sky.
About this image
After a day with a lot more rain than lightning, Don Smith and I took our Grand Canyon Monsoon photo workshop group up to Point Imperial for sunset. The vestiges of the storm still lingered as we set up, but there was no sign of the lightning that had been in the forecast, or even the rain that had drenched us for most of the day. Though lightning was on everyone’s mind, soft light in the canyon and the play of sunlight and clouds overhead kept everyone happy as we waited for sunset.
We’d been photographing for about a half hour when I noticed a tiny fragment of rainbow balanced atop the rim in the south. Not nearly prominent enough to be a prime subject, I nevertheless pointed it out to others and composed a few frames of my own before moving on to other opportunities in a view filled with them. Since there was no sign of rain, I only occasionally checked on the tiny rainbow, each time fully expecting it to have vanished, but each time noticed that it was hanging in there—not really any bigger, but still somewhere on the continuum from vivid to nearly-faded-to-oblivion.
Just a few minutes before sunset and with no rain visible, that little spot of color intensified and stretched skyward. Those of us with eyes on it alerted the rest of the group, sending everyone into a shooting frenzy that lasted until the light faded with the setting sun. I’ve photographed bigger rainbows, and (slightly) brighter rainbows, but only a few that have thrilled me as much as this one that seemed to come out of nowhere.
Grand Canyon Workshops
Personal Favorites: Moon, Stars, and Weather
Click an image for a closer look and to view a slide show.


One Fine Morning
Posted on August 11, 2019
One Fine Morning, Grandview Point, Grand Canyon South Rim
Sony a7RIII
Sony 16-35 f/2.8 GM
1 second
F/18
ISO 100
Confession: 4:30 wake-ups aren’t my favorite part of being a landscape photographer. But honestly, the worst part of an early wake-up starts the instant the alarm goes off and lasts until I get out of bed, so I’ve trained myself to set my alarm with zero time to spare, which forces me to rip off the wake-up bandaid.
Though sunrise doesn’t always work out photographically, it rarely lets me down emotionally. There’s no better time of the day to be outside, when all nature’s sensory inputs are coming alive and the din of humankind is still asleep. Even in a crowded national park like Grand Canyon, it’s the best time of the day to hear the birds conversing and savor the whisper of water and wind. And with the atmosphere unfiltered by human pollutants, the spectacular sights never feel closer.
I just wrapped up two workshops at Grand Canyon. These workshops were built to maximize our lightning capture opportunities, and in that regard each workshop was a major success. But we had other memorable moments that had nothing to do with lightning, with probably most memorable being the second group’s first sunrise. (Or the first group’s first sunset, but that’s a story for a different day.)
On that morning’s eastward drive to Grandview Point, we’d passed through a couple of rain showers, but through the trees I caught a glimpse of an opening on the eastern horizon. Clouds overhead with a gap low in the east is the recipe for a colorful sunrise, but not wanting to jinx us, I kept my mouth shut until the pre-shoot orientation (a quick summary of the site—where to go and what to look for). I also suggested the possibility of a rainbow and where it would be, and gave everyone a quick refresher on how to capture a sunstar before setting them free to explore and create.
Our morning started with a deep red glow on the eastern horizon that slowly brightened and spread across the sky. With the brightening horizon behind Desert View signaling the sun’s approach, the clouds took on a shimmering pink hue. Anticipating a sunstar opportunity, I composed my scene and stopped my Sony 16-35 f/2.8 lens (my favorite sunstar lens) down to f/18. I had several minutes to spare and spent them taking in my surroundings, then snapped to action with the first brilliant rays of direct sunlight. Unlike many mornings, the color hung in there for a couple of minutes after the sun’s arrival, all the time I needed to capture this frame.
Right in the midst of my sunstar shoot someone in the group shouted “Rainbow!” and I whipped around to confirm. I’d already decided this was a pretty special sunrise, but thought the rainbow, though not complete or ideally positioned, would be the cherry on top. But the show wasn’t over—when the sun rose into the clouds and the light flattened, people started to pack up. But I noticed a few holes that would almost certainly soon send crepuscular rays (god rays) into the canyon, so we hung around long enough to add that to the morning’s checklist. Color, sunstar, rainbow, god-rays—not a bad way to start the day. (I haven’t processed the rainbow and crepuscular rays images yet—stay tuned.)
Join me for a Grand Canyon photo workshop
Memorable Sunrises


I Just Have To Share This
Posted on August 8, 2019

Lightning Explosion, Oza Butte, Grand Canyon North Rim
Sony a7RIII
Sony 24-105 f/4 G
Breakthrough neutral polarizer
Lightning Trigger LT-IV
.4 seconds
F/11
ISO 100
I don’t usually write a brand new blog in the middle of a workshop, but I have to share last night’s experience
August 7, 2019
Scanning the southern horizon from the view deck of Grand Canyon Lodge on the North Rim, I saw no sign of lightning. Far to the south was a somewhat promising curtain of rain, maybe 30 miles beyond the South Rim. With nothing to do until I met the group for our sunset departure, I found a composition I liked and pointed my camera (with Lightning Trigger engaged) in that direction.
Soon others joined me—with my lightning app showing activity 50 miles distant in the general direction my camera pointed, I made the call to bag the sunset shoot and put all our eggs in the lightning basket. (A decision I might not have made had this second workshop group already had the lightning success the first had). Turns out that was a good call.
About an hour later, when lightning started firing to the west, I stubbornly stuck with my composition, but instructed the rest of the group to point their cameras toward the more sure thing. My reasoning was that since I had over 100 lightning strikes from the first workshop, I could afford to be selective and take a chance on the composition I preferred, but everyone who hadn’t had a success should play the odds.
My storm completely fizzled, but the storm cell to the west was very active and appeared to be moving closer. I finally admitted defeat and gave up on my cell, turning my attention to the active cell just about the time we started hearing thunder. Within minutes the storm was on top of us and suddenly we couldn’t tell which thunder went with which bolt.
Huddled in relative safety beneath the lodge’s lightning rods, the next 20 minutes provided the most jaw-dropping electrical this California boy has ever seen—maybe all lightning storms are this spectacular, but I’ve never been that close. We gave everyone the option of retreating to the lodge’s enclosed viewing deck, but everyone steadfastly stuck to their tripods. The lightning was firing two or three times per minute, each strike so close that we couldn’t couldn’t fit the entire bolt in our frame. Then the wind kicked up and soon thereafter the sky opened, so we grabbed our cameras and headed inside.
As the lightning flashed in the pictures windows, we reviewed our captures on our LCDs and shared our bounty with each other. Everyone had multiple lightning captures, and it seemed like virtually all in the group had some version of this bolt striking Oza Butte, about one mile away. It was interesting to compare the differences between each person’s capture—not only did they vary with the composition, they also varied with the exposure time (more or fewer strokes and filaments) and camera type (some cameras trigger their shutters faster than others).
This image is a perfect example of what I love about still photography: It freezes an instant in time that is already memory by the time my brain registers it, allowing me to spend as much time as I want scrutinizing detail I’d never see otherwise. I can’t tell you how long I’ve studied this image already, and I’m still find new things.
Join me in a Grand Canyon photo workshop
Workshop Schedule || Purchase Prints
2019 Grand Canyon Monsoon Highlights (processed so far)


Alone on the Rim
Posted on August 5, 2019
Bolt from the Pink, Grandview Point Lightning, Grand Canyon
Sony a7RII
Sony 24-105 f/4 G
Breakthrough neutral polarizer
.4 seconds
F/10
ISO 400
In a day of surprises, I think the most surprising thing was finding myself completely alone on the South Rim of the Grand Canyon—in the middle of a workshop. The sun had set, the tourists had gone to dinner, and the rest of my group, thanks to an unexpected turn of events (stay tuned), was with my workshop partner Don Smith at Desert View, about ten miles east. I love leading workshops, but the opportunity to enjoy a summer sunset alone at the Grand Canyon was too rare to not to appreciate. And as if that wasn’t enough, I was being treated to one of the most spectacular lightning displays I’d seen in all my years of photographing the Grand Canyon monsoon.
The weather gods had been messing with us since the workshop’s start two days earlier. The forecast for our first two days was so good, Don and I had virtually guaranteed everyone a lightning bolt (or ten, or 20, or…) on their memory cards by the time we headed to the South Rim on Day 3. But on Day 1 we got too much rain and not enough lightning (not unprecedented), a loss largely assuaged by a gorgeous rainbow at sunset (phew). No worries, the Day 2 lightning forecast was even more promising.
While we did see a bolt or two on the second day, we got nothing close to the classic lightning displays the North Rim frequently serves up during the Grand Canyon Monsoon. Even without any lightning photos, the day was salvaged by the night’s fantastic Milky Way shoot at Cape Royal—an evening so warm that most of us kept the jackets packed and did the whole thing in T-shirts.
But lighting is this workshop’s Holy Grail, and the pressure was building for Don and me. For a few reasons, the North Rim is usually generates about 80 percent of our lightning success. But after being shut out for our two North Rim days, now it was time to motor to the much more crowded South Rim, where the crowds are oppressive and weather forecast called for a measly 10 percent chance of thunderstorms. Suddenly my optimism was waning.
Mother Nature is fickle, and I’m pretty sure she was punishing me for being a little too cocky at the beginning of the workshop. Because on the road to the South Rim (about the time I started to admit serious doubts about our lightning chances), she started filling my windshield with billowing cumulus clouds—not friendly cotton-ball puffs, these clouds were dark, angry towers. By the time we checked into our hotel, our lightning app was showing signs of sneaking activity sneaking up from the south (behind us).
Though nothing was happening near the canyon yet, experience has taught us to be proactive when the storms are building. So rather than wait until the planned sunset departure time, Don and I herded the group to the cars and we bolted for the rim as soon as we could get everyone assembled. Turning east on Desert View Road toward our sunset destination, Desert View, we pulled over at the very first vista. We hopped out to take a look and as Don and I surveyed the view, someone spotted lightning directly across the canyon. Showtime.
This was indeed a great show, with at least one or two bolts per minute for nearly an hour. Within 15 minutes it was pretty clear that everyone had captured multiple strikes and Don and I could relax—everyone would go home with the lightning photos they came for. The storm was still active when increasing wind and threatening clouds led us to decide it would be prudent to move on.
The next stop on the way to our way to Desert View was Grandview Point, and that’s where things took an unexpected turn. First, when I went to change the precariously low battery on my Sony a7RIII, I realized my backup battery was at home on the charger (gone are my Sony a7RII days when I carried six batteries). But that crisis was soon set aside when one of the members of the group had an emergency that required her to return to the hotel. After a bit of discussion and a little math (Do we have enough seats for the rest of the group to continue to Desert View for sunset? Answer: Yes, with none to spare), I drove her back while everyone else continued on to photograph sunset.
Back at the hotel I did a bit more math and realized there was no way I could make it all the way out to Desert View in the 50 minutes remaining until sunset. But seized by FOMO*, I grabbed my a7RII, checked the battery (fully charged—yay!), and headed back to the rim with no particular plan—even if I couldn’t make it back to the group, I just wanted to be somewhere for sunset. At the junction with Desert View Road I headed east again, away from the Grand Canyon Village congestion and toward some of the less crowded vistas.
The entire sky was gray and at first I thought sunset might be a dud, but then I caught a thin layer of brightness in my rearview mirror and realized there was a hole on the horizon—when the sun drops into it, everything might just light up for a few minutes. I checked my watch and goosed the accelerator hoping to make it as far as Grandview Point. Unfortunately, in the national parks you can only go as fast as the next Winnebago, and sunset was less than 10 minutes away when I dove into my Grandview parking space. I grabbed my camera bag and dashed down the trail to my favorite view atop an exposed rock outcrop, not realizing until headed off-trail that I was still in my flip-flops. But with no time to go back for more sane footwear, I continued slip-sliding my way down to my destination and (barely) made it with all limbs intact.
The color was starting but as soon as my camera was set up, but I took a few seconds to get my adrenalin under control. The first thing that struck me was the quiet, most unusual for a Grand Canyon summer sunset. I attributed it to the storm, which had just moved on from here, and the fact that Grandview isn’t heralded as a sunset location (because most non-photographers like their sunset views to face west, and there are better spots at Grand Canyon for that).
As expected, there was indeed great color that evening, but even more exciting was all the lightning in the east: Cloud to ground, cloud to cloud, cloud flashes, multiple bolts, extreme zig-zags—pretty much a who’s who of lightning, several times per minute. Most of the lightning was firing somewhere in the empty desert beyond Desert View, but it looked far enough away that the group was safe. From my perspective there was no canyon or anything else interesting in the direction of extreme activity, so I pointed my camera at a somewhat promising curtain of rain that aligned better with my view of the canyon—and hoped.
Photographing lightning is more thrilling than I can describe, and I can think of no better place for it than Grand Canyon. The distance of the views here relieves (most of) the anxiety that comes with viewing lightning—so far on this trip I’ve captured 116 frames with lightning (yes, I count them) and still haven’t been close enough to any of them to have heard their thunder. And Grand Canyon puts the actual lightning experience on steroids because during the long peaceful periods between strikes you’re gazing upon one of the most breathtaking views on Earth. When a bolt explodes from the clouds, its metaphorical jolt to my psyche seems to match it’s actual 50,000 (ish) volt electrostatic jolt.
I only captured a half-dozen or so strikes over the canyon that evening, but all I need is one. This one touched down several minutes after sunset, about 30 miles away. It came right at the peak of the color and couldn’t have been more perfectly timed or placed. And as I waited for the next bolt to trigger my camera, I got to enjoy this view the same, infinitely more spectacular, light show the rest of the group was enjoying—in glorious, absolute quiet.
* FOMO: fear of missing out
My Approach to Photographing Lightning || Join My Next Grand Canyon Workshop
Workshop Schedule || Purchase Prints
Highlights of (nearly) a Decade Chasing Lightning


I’m Not Always In My Right Mind
Posted on July 28, 2019

Sky on Fire, Hopi Point, Grand Canyon (click image for purchase options)
Canon EOS-5D Mark III
1 second
F/16.0
ISO 400
20 mm
In a couple of days I’m off to the Grand Canyon for my annual trip with good friend and fellow pro photographer Don Smith. We’ll be leading two workshops where we’ll chase lightning, rainbows, and whatever else the monsoon throws at us. But wild weather or not, I’ll be at the Grand Canyon. But anyway…
Left, left, left, right, left
The Grand Canyon is a very difficult place to photograph. Or maybe I should say, the Grand Canyon is a very difficult place to photograph well. More than any place I photograph, the Grand Canyon incites right/left (creative/logical) battles that can kill an image. Despite (and likely because of) the Grand Canyon’s sweeping grandeur, you can’t expect to simply walk up to the rim and find a shot that does the scene justice. The view at the rim puts your emotional, creative brain on overload—the very things that make the Grand Canyon so breathtaking in person, its depth and breadth, are completely lost to the camera’s two-dimensional, confined perspective.
Overcoming this requires:
- Understanding your camera’s vision and how it differs from yours: 2-dimensional, limited dynamic range and depth of field, constrained by a rectangular box
- Recognizing each scene’s compositional elements: subject(s), color, depth, light, visual flow, relationships, distractions, and so on
- Control of your camera’s exposure variables: f-stop, shutter speed, ISO, focal length
- An ability (and willingness) to seamlessly transition between your left (logical) and right (creative) brain: The carefully crafted plan and essential exposure decisions can also distract from the creative process
With all that mastered (easier said than done: practice, practice, practice), you’re ready to formulate and execute an actual plan for approaching the scene you plan to photograph. For me, implementing all this means arriving early and spending every non-shooting moment familiarizing myself with my surroundings, the light, and whatever is going on in the sky. Not only does arriving early give me time to formulate my plan, it gives me a feel for the scene that becomes increasingly important as the time to shoot approaches.
Once I’ve analyzed my scene, identifying its compositional elements and how I want to handle them, I turn off my left (logical) brain and engage my right (creative) brain. This isn’t conscious, nor is it genius—it’s pretty much just the product of years of repetition. Putting my camera to my eye, I compose the scene by moving the view up/down, forward/backward, left/right, and zooming in and out until feels “right” (whatever that means).
Then I have to jump back to my left brain to determine how to apply my exposure variables: How much depth of field do I need? Is there motion to freeze or blur—and if so, how much? Do I have extreme dynamic range to contend with? And so on.
Despite all the analysis and planning that goes into setting up a shot, I ultimately have to switch back to my right brain and try to click the shutter with my heart.
Putting it all together
My “plan” for this evening at the Grand Canyon’s Hopi Point was to photograph a full moon rising in the east, above the canyon, an image I’ve long sought. But when clouds hugging the eastern horizon thickened, I started having second thoughts. I could have stubbornly stuck to my guns and hoped the moon would somehow find its way through the muck, but I knew if the moon didn’t show and something nice started in the west (where the sky looked more promising), I’d have to scramble to the other side and hope to quickly find a composition that did the moment justice. That’s not easy even in ideal circumstances, but Hopi Point at sunset is like a Tokyo subway at rush hour. Anxious to avoid reactive photography, I jettisoned the east-facing moonrise plan and headed over to re-familiarize myself with Hopi Point’s west side and stake out a spot before the crowd assembled.
The Grand Canyon is great for this kind of anticipatory photography because the unobstructed view of the horizon from the rim provides good insight into what’s in store. Once I switched views, I spent quality time walking Hopi Point’s western rim, identifying trees, shrubs, and rocks that could anchor my frame and balance the distant ridges, river, sun, and clouds. I also had to be aware of the sun’s path, because its brightness was certain to be a significant photographic element. And not wanting to settle for a nice sky above the canyon, I sought foreground subjects to create near/far relationships. I finally chose this spot where a small (albeit unassuming) shrub jutted from the textured rim rock.
Given the extreme depth of field my composition required, I opted for f16, focusing on the rock just behind the shrub. A gusty breeze forced me to bump my ISO to 400 and time my shutter click to coincide with the wind’s intermittent lulls. This was before I switched to Sony, so I had to use a 3-stop reverse graduated neutral density filter to reduce the significant dynamic range to a manageable level (then later smooth the GND transition in Photoshop).
The moon that evening was in fact a no-show, but the view to the west rewarded me with about forty-five minutes of productive, continuously improving photography as the sun slipped in and out of gaps in the clouds before finally dropping below the horizon. The highlight came couple of minutes after sunset, when a fan of thin clouds spewing from the sun’s exit point throbbed crimson, creating a flame-like effect. After spending most of my shooting time emphasizing the canyon’s vast lateral expanse with wide, horizontal compositions, when the color kicked in I wanted a vertical composition that would turn the emphasis to flaming sky and the canyon’s depth.
While I’d love to claim that I was conscious of the virtual diagonals connecting the flaming sky and flame-shaped shrub, and the shimmering sliver of the Colorado River and nearby vein of light colored rock, I really wasn’t. But neither do I believe relationships like this are accidental—I’ve done this long enough to know that compositional relationships happen organically when I free my mind from distractions that force me to think when I should be creating. This is what I mean when I say I want to click the shutter with my heart.
Workshop Schedule || Purchase Prints
A Grand Canyon Gallery


Small Steps and Giant Leaps
Posted on July 20, 2019
Big Moon, Valley View, Yosemite
Sony a6000
Tamron 150-600 (Canon-mount with Metabones IV adapter)
1/25 second
F/8
ISO 400
The memory of Neil Armstrong’s first steps on the moon has personal significance to me. To honor the 50th anniversary of that achievement, I’m sharing an updated version of my story, first posted five years ago.
July, 1969
I had just turned 14. I was into baseball, chess, AM radio, astronomy, and girls—not necessarily in that order. Of particular interest to me in 1969 was the impending moon landing, a milestone I’d been anticipating since tales of American aerospace engineering ingenuity and our heroic astronauts started headlining the “Weekly Reader,” and my elementary school teachers began gathering the class around a portable TV to watch the latest Mercury, Gemini, or Apollo launch.
If you remember the 60s, you understand that the buzz surrounding each of these missions provided a unifying distraction from the divisive tension spurred by headlines of Vietnam casualties, anti-war demonstrations, Civil Rights clashes, and Communist paranoia. When President Kennedy promised to land a man on the moon by the end of the decade, so far in the future was that goal that in my mind he may just as well have said infinity. But as the decade drew to a close and the promise approached reality, I couldn’t devour enough information on the impending mission.
Unfortunately, without checking NASA’s schedule or asking for my input, my parents and three other couples they knew from graduate school decided mid-July 1969 would be the ideal time for our four families to join forces on a camping trip in the remote, television-free redwoods of Northern California. (“What could we possibly need a television for?”)
Apollo 11 was halfway to the moon when the Locher and Hinshaw families pulled up to our home in Berkeley (the Hardings, coming down from Eastern Washington, would meet us at the campground a couple of days later). The warm greetings exchanged by the adults were balanced by the cool introductions forced on the unfamiliar children.
We departed the next morning, caravan style, our cars connected by woefully inadequate walkie-talkies that we’d almost certainly have been better off without (I’m sure it had seemed like such a good idea at the time). I remember my dad keeping a safe distance behind the Hinshaws, as he was convinced that their borrowed trailer that seemed to veer randomly and completely independently of their car, would surely break free and careen into the woods on the next curve.
Somehow our three-car parade pulled safely into Richardson’s Grove State Park late that afternoon. In true sixties style, the three dads went immediately to work setting up campsites, and the moms donned aprons and combined forces on a community spaghetti dinner. Meanwhile, while the younger kids scattered to explore, the four teens, having only recently met and being far too cool for exploration or anything remotely resembling play, disappeared into the woods, ostensibly on a firewood hunt. Instead, we ended up wandering pretty much aimlessly, kicking pinecones and occasionally stooping for a small branch or twig, lingering just far enough from camp to avoid being drafted into more productive (and closely supervised) labor by the adults.
But just about the time we teens ran out of things not to do, we were relieved to be distracted by my little brother Jim rushing back into camp, breathless, sheet-white, and alone. We couldn’t quite decipher his animated message to the adults, but when we saw our dads drop their tarps and tent poles and rush off in Jim’s tracks toward the nearby Eel River, we were (mildly) curious (to be interested in anything involving parents was also very not cool). So, with feigned indifference, the four of us started wandering in the general direction of the river. Our path was blocked by a 50 foot, nearly vertical cliff that provided a clear view into the vortex of all the excitement. It was the instant of that shared view when I think we all ceased being strangers.
The scene before us could have been from a bad slasher movie: Flat on the ground and unmoving was 11 year-old Paul Locher; sitting on a rock, stunned, with a stream of blood cascading from his forehead, was Paul’s 10 year-old brother John. As disturbing as this sight was, nothing could compare to seeing father Don Locher orbiting his injured sons, dazed and covered in blood. The rest of this memory is a blur of hysterics, sirens, rangers, and paramedics.
It wasn’t until the father and sons were whisked away by ambulance to the small hospital in Garberville, about 10 miles away, that we were able to piece together what had happened. Apparently Paul and John, trying to blaze a shortcut to the river, miscalculated risk and had tumbled down the cliff. My brother at first thought they were messing with him, but when John showed him a rock covered with blood, he sprinted back to fetch the parents.
Conferring at the point where the kids had gone over, the fathers made a quick plan: My dad and Larry Hinshaw would rush back to to summon help, and to see if they could find a safer path down to the accident scene. Don would stay put and keep an eye on his sons. But shortly after my dad and Larry left, John had looked down at his brother cried, “Daddy, I can see his brains!” Hearing those words, Don panicked and did what any father would do—attempt to reach his boys. Thinking that a small shrub a short distance down would make a viable handhold, Don took a small step in its direction, reached for and briefly grasped a branch, lost his grip, and tumbled head-over-heals down to the river.
After what seemed like days but was probably only an hour or two, we were relieved to learn that John needed no more than a few stitches; he was back in camp with us that night. Paul had faired slightly worse, with a concussion and a nasty cut behind his ear—the “brains” his brother had seen was ear cartilage. Paul spent the night in the hospital and was back with us by the time the Harding clan arrived the following afternoon. Don, however, wasn’t quite so fortunate. In addition to a severe concussion, he had opened up his head so completely that over 150 stitches were required to zip things back together. Though Don spent several days in the hospital, we were all consoled by the understanding that it could have been much worse.
By Sunday, Don was feeling much better but was still a day or two from release to the dirt and fish guts of our four family campsite. Most of us had visited the hospital at one time or another in small, brief waves that honored the hospital’s visiting rules. I can’t say who first recognized the opportunity, but I’m guessing that Larry Hinshaw had something to do with convincing the nursing staff to look the other way when Don was suddenly host to 20 simultaneous visitors that night. Whatever magic was worked, I’ll forever remember Sunday evening, July 20, 1969, when our entire group shoehorned into a tiny hospital room to witness history on a tiny, black-and-white television screen.
Besides my parents and two brothers, the rest of the crew that night I’d only met just a few days earlier, but I can still name every single one of them. The relationships formed that week continue to this day. And so do the stories, which, like this story, are filled with some of the greatest joy I’ve ever experienced, and also with some of the greatest tragedy. But it’s this story in particular, the catalyst for all the stories that follow, that explains why the words, “One small step for man, one giant leap for mankind,” have a very personal significance for me. Today it’s hard to look at the moon without remembering that hospital room and the emotional events that enabled me to witness Neil Armstrong’s historic first steps with those very special friends.

Big Moon, Valley View, Yosemite
Photograph the moon with me in a Yosemite photo workshop
Workshop Schedule || Purchase Prints
A lunar gallery
Click an image for a closer look, and a slide show


")


The Milky Way My Way
Posted on July 14, 2019
Winter Night, Milky Way Above Tasman Lake, New Zealand
Sony a7SII
Sony 16-35 f/2.8 GM
30 seconds
F/2.8
ISO 8000
What’s my problem?
I’ve been sharing lots of Milky Way images lately. But then, so has everyone else. And when I look at some of the other truly spectacular Milky Way images posted online, I realize I’m working at something of a disadvantage—not because of deficient equipment (not even close), a physical or mental handicap (though as I get older…), or even because I think the world is unfair (maybe so, but it’s been pretty good to me). No, my disadvantage is solely the result of self-imposed “rules” that prevent me from photographing anything that can’t be captured with a single click.
Single-click shooting means no focus stacking, no HDR, no blending separately captured foreground and sky. In other words, if I can’t get what I want with one click, I don’t get it. It’s not that I think there’s anything wrong with combining images—image blending is a tremendous tool that allows digital photographers to transcend the limitations of film photography. And it’s not because blending is “too technical” for me—having spent 20 years working in the high tech industry, I know my way around a computer and have actually played a fair amount with blending images (it’s not rocket science). No, I don’t blend images simply because, as beautiful as they might be, I get no personal satisfaction from the results. And if photography isn’t a source of happiness, why bother?
Every time I bring this up, someone gets defensive, feeling like I’m saying that there’s something wrong with blending images. There isn’t!* I love looking at the work of photographers who use blending to elevate their art. So if you blend and enjoy it, please go forth and shoot to your heart’s content (and keep those defensive comments to yourself). This is about me, and what makes me happy.
*As long as it’s not used to deceive.
Milky Way processing
I’m frequently asked about my processing for Milky Way images, and I’ve always been a little reluctant to share a lot because I don’t do blending, I’m not an expert, and my Milky Way workflow is still a work in process. Nevertheless, I get asked enough that I’ve decided it might still help for me to share my overall mindset and approach. (Plus, it might help others to understand why my images aren’t as dazzling as those that blend.)
I still consider myself a film shooter, albeit with a digital camera. Processing, though not my favorite part of photography, is an essential digital windfall that enables us to extract results from our images that were never possible with film (especially for those of us who shot only color). Like most digital photographers, I couldn’t succeed without processing. And processing is doubly important for Milky Way images.
Given that I don’t blend images (in the case of my Milky Way photography, take one exposure for the foreground and another for the sky), I start with a raw file that needs help. A lot of help. I like foreground detail in my night images, which requires me to compromise with a less than ideal f-stop, shutter speed, and (especially) ISO. And even with these compromises, the image straight from the camera is still darker than ideal.
The right gear
First, if you’re going to do it my way (one click), you need to have the camera and lens to do it. Keep in mind that the heat generated by a long exposure creates a lot of noise, so at any ISO, 30 seconds is inherently much noisier than say 1/30 second. For this reason, my Milky Way body is the Sony a7SII, and my go-to night lens is the Sony 24mm f/1.4. At this writing (July 2019), the a7SII is hands down the best high ISO camera available—I can can get very usable 30-second exposures at ISO 12800 (and sometimes higher). And using an f/1.4 lens means I don’t usually have to go all the way to 30 seconds.
Exposure compromise
My processing choices depend a lot on my exposure choices, which as I said earlier, are all compromises. For example, with my 24mm at f/1.4, I can usually keep my a7SII at ISO 6400 and lower—both compromises, but the results are well within the acceptable range for that lens and camera. But for this image I wanted a wider view than 24mm, so I switched to my Sony 16-35 f/2.8 GM lens. Losing 2 stops of light, I bumped to ISO 8000 and a 30 second exposure to recover some of that light—the compromise was a little more star movement (mitigated somewhat by the wider focal length), and increased noise. It might help to know that when I photograph the Milky Way, I usually give each composition a variety of exposure settings and choice the best one later, when I can see the images on my computer.
It starts with noise reduction
For all of my images, my standard noise processing is Topaz DeNoise plugin in Photoshop. But for my Milky Way photography, I open the image in Lightroom and immediately transfer it to DxO PhotoLab 2 for their (magic) Prime Noise Reduction (nothing else). As soon as DxO has worked its noise reduction voodoo on my, I send it straight back to Lightroom. What started as a raw file is now a tiff file, but I’m still able to do my basic Lightroom processing on it.
Even though DxO does a great job, when I’m done processing my image in Lightroom, the first thing I do after opening the processed image in Photoshop is a more gentle application of the Topaz DeNoise plugin. For this step, I magnify the view to 100% and apply as much noise reduction as I can without muddying the detail.
The method to my madness
This is where things start to get more vague because my approach is less an explicit series of processing steps than it is finding the best way to achieve the results I want, steps that can vary a lot from image to image. Sometimes I can do what I want mostly in Lightroom, other times I lean more heavily on Photoshop—usually it’s a fairly even balance of the two.
Given my hit-and-miss approach, it’s probably most important to explain what makes a successful Milky Way image. Here’s what I’m going for:
- Minimal noise: Asked and answered
- The right sky color: As far as I’m concerned, the color of the sky in a Milky Way image the photographer’s creative choice because no one knows what color it’s supposed to be. If you look at my recent Milky Way images, you’ll see that I tend to avoid a blue/cyan sky in favor of something more blue/purple. It just feels more night-like to me. But that’s just my opinion and I empower you to go with whatever color makes you happy (more on that below).
- Foreground detail: The amount varies with the foreground, and how much light I can give it without too much noise.
- Uniform sky tone and hue (as much as possible): I don’t like a huge difference between the sky near the horizon and up toward the top of the frame
- The stars should pop: I want the sky to be fairly dark, but the stars to stand out
- No part of the Milky Way should be blown out: While I want the stars bright, I don’t want them too bright
Before I continue, you need to know that I make extensive use of Lightroom and Photoshop’s History panels. There’s no single best way to do anything, so I make a lot of what-if?, trial-and-error adjustments that I only keep if I’m satisfied. So you’re not going to get specific steps from me as much as you’ll get things to try and accept/reject. The other thing I want to emphasize is to magnify the image to 100% (1:1) when you’re trying to decide whether or not to accept an adjustment.
I always play with the Highlights/Whites/Shadows/Blacks sliders—lots of up/down trial-and-error adjustments to find the right balance (love that History panel). The Lightroom Clarity and Texture sliders will make the stars pop (and sometimes the foreground), but be especially gentle with these to avoid exaggerating the noise). And Dehaze will add contrast to the sky that really enhances the Milky Way, but it also might darken parts of the scene too much.
I use lots of techniques to get the color I want—often just one or two adjustments are enough, and sometimes it requires a lot of adjustments. In Lightroom, I play with Color Temperature and Tint. That usually means cooling the temperature to somewhere in the 3000-4000 range, and nudging the Tint slider slightly to the right (less cyan, more purple). Sometimes I do this for the entire image, but often I use the Lightroom Graduated Filter tool. When those things don’t do the job, I’ll play with Lightroom’s HSL sliders.
To tweak the color in Photoshop, I usually select the area I want to adjust, Feather it fairly loosely (large Feather Radius), and create Color Balance or Saturation layer. I do lots of trial-and-error moves with Color Balance; with Saturation I almost always work on specific colors, and will adjust some combination of Hue, Saturation, and Lightness until I’m satisfied. Also, I find that some of the other adjustments I make in Lightroom and Photoshop pump up the color too much, so I usually desaturate the sky a fair amount in Photoshop.
To make the Milky Way more prominent, a few passes with the Dodge brush set to Highlights can do wonders, brightening the stars without affecting the sky. I usually prefer multiple passes at low Opacity (<20).
Probably the trickiest thing to contend with is a different hue near the horizon than I get in the rest of the sky. I can usually mitigate it somewhat with a feather selection and a Color Balance or Saturation layer, described above. And sometimes, if I’m really brave, I’ll select the offending area, Feather it, use the Eyedropper tool to pick the color I want, and the Paint Bucket tool to apply the color to the selected area. I usually get better results with Tolerance set fairly high (>50) and Opacity fairly low (<30). If you do this, don’t expect it to work every time, and always examine the results at 100% because it can introduce some pretty nasty blotchiness that doesn’t jump right out at you on first glance at lower magnification.
With most of my images, the last thing I do before saving is sharpen. But since night images are rarely about fine detail, and sharpening exacerbates noise, I no longer sharpen my Milky Way images.
These tips are not intended to be the final word on Milky Way processing—I just wanted to give you some insight into my approach, both my goals and the steps I take to achieve them. I’ve been using Photoshop for a long time, but don’t consider myself a Photoshop expert, not even close. There may be (and probably are) better ways to do many of these things. But I’ve always been a simple-first photographer: Do things the simplest possible way, until you find some way that’s better, or until you encounter something you just can’t do. And if you take nothing else away from this, I hope you at least feel empowered to experiment until you achieve results that make you happy.
About this image
I wrote about this day and a similar image from this shoot in my Longest Day post. Look for the “You’re gonna need a bigger lens” section near the bottom. The only difference, besides the fact that I went vertical here for more Milky Way, is that I used my Sony 16-35 f/2.8 GM lens.
New Zealand Photo Workshop
Workshop Schedule || Purchase Prints
Milky Way Favorites


The Longest Day
Posted on July 7, 2019

Sky Light, The Milky Way and City Lights, Lake Wanaka, New Zealand
Sony a7SII
Sony 16-35 f/2.8 GM
25 seconds
F/2.8
ISO 3200
After one of the most exhausting, exhilarating, and just plain productive photography days of my life, our van rolled into Wanaka a little before midnight and everyone’s thoughts, including my own, were on sleep. But the stars were out and the moon was not (yet), and I knew it would be at least a year before I’d get another chance like this. With a warm bed and blissful sleep beckoning, was I really going to go back out to the lake in the frigid dark for the second time that day? You betcha.
Just what could inspire such craziness? Driven by more than a nice photo opportunity, I’d been infused with the infectious energy of a dozen young, Sony-sponsored social media influencers: the Sony Alpha Imaging Collective (AIC). (It would be doing them a disservice to label them mere photographers.) After spending months arranging this trip on Sony’s behalf, my ostensible role for its execution was as a guide and mentor. But the aggressive creativity of these visual artists was an inspiration to this conventional photographer’s vintage muse, and I can’t imagine that I was able to offer them nearly as much as they gave me.
So, with the Health app on my iPhone reporting that I’d already logged 9 miles and climbed the equivalent of 58 flights of stairs, I found myself standing alone, in icy lake water, photographing something I’d vowed I’d never photograph. So how did I get here?
3:00 a.m.: Note to self

Milky Way and Reflection, Lake Wanaka, New Zealand
When my alarm went off at 3 a.m. that morning, I’d staggered from bed without high expectations. This wasn’t the first time I’d tried rising photograph the Milky Way above the lone willow in Lake Wanaka, but I’d always been thwarted by fog. This morning, instead of another foggy reprieve and a few more hours of welcome sleep, the stars were out.
Despite a 48% waning gibbous moon, the Milky Way was clearly visible and I photographed for about an hour with three or four others from the AIC group. Having never photographed the Milky Way here, I made mental notes for how it could be better the next time. First, the galactic center was a little left of the tree and quite high. And the moon, while adding light to the foreground, washed out the sky a little too much.
Note to self: Next time, come earlier and make sure the moon isn’t up.
11:00 a.m.: Stop the van!

Fogbow, Wairepo Arm, New Zealand
The three hour drive from Wanaka to Aoraki / Mt. Cook National Park had been slowed by a detour, a couple of unplanned stops, and now dense fog. With at least an hour’s drive and a full photography schedule ahead head of us, we couldn’t really afford to stop. But… Oh. My. God. Look at those trees, glazed with hoarfrost and shrouded with fog… The visibility was so limited, by the time the scene popped out of the fog we were past them, but when a simultaneous command issued from every seat, “Stop the van!”, stop we did. (It didn’t hurt that our driver was a photographer too.)
Doubling back, we poked along the shoulder until we found a narrow, unpaved road on which to park, then sprinted toward the trees—which turned out to line a small lake. Wow. The next hour was some of the most magical photography I’ve ever experienced. When the fog started to thin, the sun broke through, framing the trees with a shimmering fogbow that I just had time to capture.
5:30 p.m.: I can’t believe I’ve never been here

Alpenglow, Tasman Lake, New Zealand
After a beautiful hike to Kea Point (where I opened my bag and realized I’d left my camera in the van—oops, don’t tell anyone), we wrapped our daylight hours with a sunset shoot at Tasman Lake. Normally I scale the 335 steps to the vista overlooking the lake, but it didn’t take much urging to get me to join the group who took the longer but less steep hike to the foot of the lake, where I’d never been.
Getting to the lake from the end of the trail was a short boulder-hopping scramble down a steep hillside, but once I made it down I couldn’t believe I’d never been here. Icebergs, large and small, mingled with the reflection of snowcapped peaks in the clear, turquoise water. We didn’t have clouds to provide an electric sunset, but New Zealand’s impossibly pristine air delivered something I found even more beautiful, the deep magenta of the Belt of Venus.
7:00 p.m.: You’re gonna need a bigger lens

Milky Way and Jupiter, Tasman Lake, New Zealand
From the very first time my eyes feasted on it, I marveled at what a spectacular spot the vista above Tasman Lake would be for Milky Way photography. I was especially pleased to be guiding an entire group of photographers who were as excited about photographing the Milky Way as I was, so this shoot was the plan since before the workshop started. But as the sky darkened, I was still down at the foot of the lake (just off the screen on the far right) where I’d photographed sunset. Most of the group wanted to stay there for the Milky Way shoot, and while I had to admit that spot would be no less spectacular, I just had to check the higher view off my list. Plus, I knew the Milky Way would align better with the peaks up here. So I scrambled back up the boulders and made the roughly two kilometer walk up here in virtual darkness to make it happen.
I thought a couple others in the group would already be up here, but I arrived to find the view empty. While I was happy to eventually be joined by a couple of others, the solitude I enjoyed for the first 30 minutes I was up here was downright spiritual. Going with my dedicated night camera, the Sony a7SII, I started with my default night lens, the amazing Sony 24mm f/1.4. But the scene was so expansive that I soon switched to my Sony 16-35 f/2.8 GM for a wider view. That did the job for a while, but when I found myself wanting an even bigger view, I reached for my Sony 12-24 f/4 G lens. F/4 is a little slow for night photography, but the a7SII can handle 10,000 ISO without any problem, and at 12mm the star motion of a 30-second exposure isn’t too bad. It didn’t hurt that the best parts of the scene, the snow and water, were highly reflective, and the dark rock wasn’t really essential to the scene.
12:00 Midnight: Completing the Circle

Sky Light, The Milky Way and City Lights, Lake Wanaka, New Zealand

Starry Night, Lake Wanaka, New Zealand
I’d spent the week sharing my favorite New Zealand South Island sights with the Sony AIC crew. With lots of night photography and driving, each day had been long, but this one took the record. I’d started 21 hours earlier and had been a non-stop blur of driving to the beat of music I’d never heard (Bubble Butt?), hiking to and through breathtaking scenery both old and new, and taking pictures, lots and lots of pictures.
Despite all this, no one got tired. It would have been easy to attribute this group’s boundless energy to youth, but the more I watched them work this week, the more I realized their carpe diem passion for experiencing and expressing our world was the driving real force. While I lack some of the non-photography technical skills they employ so effortlessly (specifically video and the computer as an artistic tool), as soon as followed their lead and I allowed myself to stretch my own personal boundaries in other ways, I had no problem keeping up with the pace. (Though I did draw the line at the all-night processing parties.)
As I’d expected when I returned to the lake late that night, the sky was moonless and the Milky Way better aligned with the Wanaka Willow that anchors the scene. But photographing the Milky Way with the tree also put the glow of the Wanaka sky directly in my field of view. As someone who always strives to photograph the natural world untouched by humans, this would have been a deal-breaker for the old me. But what the heck—those lights are kind of pretty, and I’m already out here….
Once I embraced the moment, I was free to click and enjoy. And enjoy I did. For the entire time I was out here, I was completely alone (though a couple of others in the group did come out to shoot shortly after I left). The fog was barely visible in the distance when I arrived, but while I was there I got to watch it ebb and flow like the tide, dropping down to lake level, expanding upward until at times it nearly obscured the sky completely. Benefiting from the extra light my camera could capture (beyond what I saw), what appeared to my eyes as a faint amber hue in the clouds registered on my LCD as a vivid gold even more brilliant than what you see in this image (I toned it down slightly simply for credibility).
And when the bank of fog receded at one point to expose most of the southern hemisphere stars, I pointed my camera away from city lights, toward the darkest sky. Just as my new composition and exposure were ready, a rogue patch of fog wafted up, providing the ideal background for the tree. As if in collaboration with the fog, the lake chose that instant to smooth its ripples and dial up the reflection.
After this night I can’t say that cityscapes are going to become a regular part of my repertoire, but for one night it was liberating discard my shackles and roll with the scene—and I’ll be much less hesitant to do it the next time. But more than the images, it was simply a joy being out there to watch the fog dance with the stars.
My Next New Zealand Photo Workshop
New Zealand 2019


